We use cookies to offer you a more personalized and smoother experience. By visiting this website, you agree to our use of cookies. If you prefer not to accept cookies or require more information, please visit our Privacy Policy.
Necessary cookies These cookies are essential for the proper functioning of the website and cannot be turned off.
Analytics cookies These cookies help us understand how visitors use our website.
Marketing cookies These cookies are used to track visitors and display relevant advertisements.
Social media cookies These cookies allow you to share pages and content on social media.
Als u precies weet waarover w vraag gaat dan kunt u een van deze categorieën kiezen. Categorieën:
Resultaten:
Q (Q&A-190|551):
Microsoft will update the Secure Boot certificates. What do I need to do?(3/16/2026)
A:You only need to follow one of the update methods below and wait for the new Windows Boot Manager to take effect:
Method 1: Update through Windows Update
If Windows Update is turned on and Secure Boot is enabled (see "How to enable Secure Boot”), supported Windows devices will automatically download and install the new Secure Boot certificates and the new Boot Manager.
Since 2024, Microsoft has been rolling out the new Secure Boot database update in phases. All devices with Secure Boot enabled will receive the update automatically before the certificate expires in June 2026.
With default settings, users usually do not need to do anything manually. Just keep Windows Update enabled and wait for the update to install automatically.
Method 2: Manually update the UEFI / BIOS
Note:After updating the BIOS, the system may ask for your BitLocker recovery key to unlock Windows.
You may also choose to turn off Device Encryption and Standard BitLocker Encryption before updating the BIOS, then turn them back on afterward to keep your data safe.
If your device cannot get the update through Windows Update, you can download and install the latest UEFI BIOS from the official website to get the updated Secure Boot certificates.
1. Visit the ASRock official website, search for your motherboard model, and download the latest UEFI BIOS from the support page.
2. Clear the Secure Boot keys.
① After updating the BIOS and rebooting, enter BIOS Setup and go to:
Advanced \ Security > Secure Boot
② If Secure Boot Mode is set to Standard, change it to Custom.
③ Select Key Management.
④ Select Clear Secure Boot Keys, then choose [Yes].
⑤ Confirm that all UEFI Secure Boot keys (PK, KEK, DB, DBX) have been cleared.
3. Install the default Secure Boot keys.
① After clearing the keys, select Install Default Secure Boot Keys, then choose [Yes].
② Confirm that the Size/Number of Keys for PK / KEK / DB / DBX is not 0, and the Key Source shows [Factory]. This means the Secure Boot key update is complete.
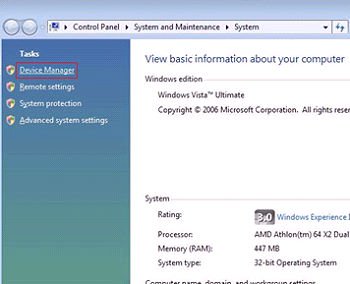
4. How to check the Secure Boot key status?
① In BIOS, go to: Security > Secure Boot > Key Management
② Select Key Exchange Keys (KEK) choose "Details”:
③ Make sure that KEK Management contains:
- Microsoft Corporation KEK 2K CA 2023
Q (Q&A-188|549):
I am looking for Pre-boot DMA Protection option, but I cannot find it in the BIOS interface. Where can I locate this option?(12/16/2025)
A:The option name varies across different platforms. Please refer to the following screenshots to identify the correct option and its location in the BIOS menu.
Intel platform
● Intel 600, 700 series
● Intel 800 series
Note:
Please first update BIOS to the latest version to obtain this option on Intel 600, 700 and 800 platforms.
AMD Platform
● AM4 series
● AM5 series
Users can enable this option if they encounter game‑related or security‑related problems.
#DMA #Pre-boot #IOMMU #DMA Protection
Q (Q&A-187|548):
Some new games like Battlefield 6 or Call of Duty: Black Ops 7 require Secure Boot and TPM 2.0 to provide kernel level anti cheat protection. How do I enable these options on ASRock AM4 motherboards?(10/3/2025)
A:On recent platforms such as AMD 800 and AMD 600 series, Secure Boot and TPM 2.0 are enabled by default. With these platforms, there is no need to change BIOS settings.
However, if you are still using an AM4 motherboard, Secure Boot and TPM 2.0 might not be enabled. Also, the TPM firmware might have to be updated.
Before enabling Secure Boot, you must check your disk partition style and BIOS settings to ensure they meet the requirements for Secure Boot.
Secure Boot System Requirements
1. Partition Style: GPT (GUID Partition Table). If the disk is MBR (Master Boot Record), please convert it to GPT.
2. BIOS Mode: UEFI only. Legacy or CSM mode doesn't support secure boot.
How to check if the current partition type supports Secure Boot
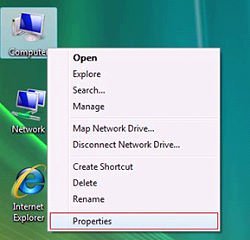
1. Right-click the Windows button on the desktop and select "Disk Management”.
2. Right-click the disk where Windows is installed and select the ""Properties"".
3. Click the "Volumes” tab and check if the partition style is "GPT”.
GPT partition style can support Secure Boot. You can skip below steps 4-7.
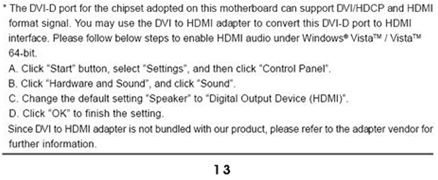
4. If the partition style is "MBR”, please make a backup of important data on the system and refer to steps 5-7 to convert the partition style to GPT.
If you have multiple OS installations or if some system partition is on a different drive than where the OS is, the conversion might not have the desired result. Please backup your DATA and reinstall the OS.
5. Type "CMD" in the Windows search bar, right-click on "Command Prompt” and choose to run as administrator.
6. Type the command "mbr2gpt /convert /allowFullOS” to convert the partition style and press [Enter].
7. Restart the system, and the BIOS Mode/Partition style will be converted to UEFI/GPT.
Switching to UEFI Mode and Enabling Secure Boot in BIOS
1. Please press the "F2” key during POST to enter BIOS setup.
Go to Boot\CSM (Compatibility Support Module) and set "CSM” to "Disabled”.
Press the "F10” key to save configuration changes.
2. Go to Security\Secure Boot and set "Secure Boot Mode” to "Custom”.
3. Please press "Install default Secure Boot keys” and select "Yes” to install Secure Boot keys. If at this point this option is greyed out, Secure Boot key have been loaded already.
4. Set "Secure Boot” to "Enabled”. Then press the "F10” key to save configuration changes.
5. After the system restarts, go to Security\Secure Boot, and make sure that Secure Boot is showing "Active”.
Update BIOS and AMD fTPM
To ensure compatibility between games and Secure Boot/TPM 2.0, ASRock has released new BIOS versions for AM4 motherboards, to update to AMD fTPM 3.x.2.x version.
Type "TPM.msc" in the Windows search bar to find the current fTPM version.
If your current fTPM version is 3.x.0.x, we recommend updating to the latest BIOS version to get the fTPM update. This BIOS version should help you to enable anti-cheat on for example Battlefield 6 or Call of Duty:Black Ops 7.
fTPM 3.*.2.* (TPMB) Information
AMD has informed us that only CPUs with below former codename support fTPM 3.*.2.* (TPMB).
If your CPU is not in the supported CPU lineup for TPMB compatibility, based on AMD's official specifications, your CPU does not meet the security requirements necessary for your game.
Q (Q&A-182|540):
If I encounter an issue with LED lighting not working on the Intel Z890 series and adjusting ASRock Polychrome RGB in the BIOS has no effect, what should I do?(11/29/2024)
A:If you notice that the LED lighting on your Intel Z890 series is not functioning, please visit ASRock's official website and download ASRock Polychrome RGB version 2.0.190 or a newer version for your operating system.
Q (Q&A-181|538):
After I tried to overclock the memory, my system with Z890 motherboard cannot power on. What should I do?(10/29/2024)
A:Overclocking results may vary between different CPUs and hardware configurations.
If the system fails to power on boot when the power button is pressed (no fans spinning) after loading XMP or overclocking memory, please follow below steps.
1. Switch off power completely. Wait at least 20 seconds. Switch power back on and start the system.
2. If that fails, please clear the CMOS. See the user manual for the clear CMOS procedure for your motherboard.
3. In case that does not help, use flashback to update to the latest BIOS. The BIOS is available via the ASRock website. Please make sure to select the correct model, as some model names are similar.
Visit ASRock's website: https://www.asrock.com/support/index.asp?Model=Z890
Q (Q&A-181|537):
How do I configure Realtek 5.1ch audio output on N100M under Windows 10?(10/29/2024)
A:Please follow the steps below.
1. Go to BIOS\Chipset Configuration and set Intel SST to "Enabled”.
2. Boot into Windows. Download and install Realtek high definition audio driver version:6.0.9503.1_RTK_SST and follow the instructions, restarting the system after the installation.
Realtek high definition audio driver ver:6.0.9503.1_RTK_SST:
Q (Q&A-180|536):
How can I allow the cTDP of my 9700X/9600X to boost to 105W?(9/20/2024)
A:To adjust the cTDP of the 9700X/9600X to 105W, please download a BIOS version with AGESA code 1.2.0.2 or later from ASRock's official website.
After updating the BIOS, go to OC Tweaker and enable the option to set the TDP to 105W. Please note that not all AM5 motherboards might support this option.
#9700X #9600X #AM5 #X670 #TDP #105
Q (Q&A-179|535):
How can I use Intel default settings on my Intel 600/700-series motherboard?(8/28/2024)
A:ASRock provides 3 profiles for users to select. Two of these profiles are provided by Intel.
We recommend trying the BIOS Default profile first.
If your system is not stable with the BIOS default profile, you can try Baseline Mode.
Q (Q&A-178|534):
인텔 Z790/Z690 플랫폼에서 'CPU Indicator' 의 CPU정보가 "N/A"와 "0"을 표시하는 경우 어떻게 해야 합니까?
(11/1/2023)
A:Minimum system requirement: K-Series CPU+ Latest BIOS
If the system encounters an unexpected restart during boot-up, the CPU Indicator utility will display the following warning message when entering the BIOS.
After that, please press "OK” and restart the system and the data will be retrieved again or you can shut down the system and refer to the user manual to clear CMOS and go to the BIOS again to check if the 'CPU Indicator' utility displaying the correct information.
#Intel #Z790 #Z690 #K-series #CPU #Indicator
Q (Q&A-178|533):
How to enable Intel Application Optimization with Intel Core 14th Generation processors?(11/1/2023)
A:Please make sure your system meets the minimum requirements and follow below steps to enable Intel Application Optimization.
Supported Processors:
Intel® Core™ 12th i5/i7/i9 processor
Intel® Core™ 13th i5/i7/i9 processor
Intel® Core™ 14th i5/i7/i9 processor
Supported OS:
Windows 11 22H2 or later
Motherboard:
ASRock Intel 700 or 600 series motherboard with the latest BIOS.
Instructions for enabling Intel Application Optimization.
1. Enable the BIOS option "Intel Dynamic Tuning Technology”. It can be found under OC Tweaker\CPU Configuration.
Q (Q&A-176|531):
My software requires Secure Boot to be enabled. How can I set it up?(8/16/2023)
A:Please follow the steps below to enable Secure Boot.
Step 1.
Please press the "F2” key during POST to enter BIOS setup.
Go to Boot\CSM (Compatibility Support Module) and set "CSM" to "Disabled".
Press the "F10” key to save configuration changes.
Step 2.
Go to Security\Secure Boot and set "Secure Boot Mode" to "Custom".
Step 3.
Please press "Install default Secure Boot keys" and select "Yes" to install Secure Boot keys.
Step 4.
Set "Secure Boot" to "Enabled". Then press the "F10" key to save configuration changes.
Step 5.
After the system restarts, go to Security\Secure Boot, and make sure that Secure Boot is showing "Active".
*AM5 platform
If a prompt "Discard Changes and Exit" appears after clicking "Install default Secure Boot keys" and selecting "Yes", please select "No" and continue to step 4.
Q (Q&A-175|530):
When I installed the APU+AMD GPU on the AMD AM4 platform, the "Record & Stream" icon disappears in AMD Radeon software after disabling the CSM. How can I fix it?(6/30/2023)
A:Please follow the steps below to disable the iGPU.
This problem happens when using an AM4 motherboard and APU (CPU with integrated graphics), if you also have an AMD discrete graphics card and the Compatibility Support Module (CSM) is disabled in BIOS.
1. Go to BIOS\Advanced\AMD CBS\NBIO Common Options\GFX Configuration and set iGPU Configuration to "Disabled”.
2. Press hotkey "F10” to save settings and exit the BIOS setup.
3. Boot into the OS and check if the "Record & Stream" menu appears in the AMD Radeon software.
Procedures
●Intel Graphics Card Driver
Go to Intel's official website to download and install the latest official graphics card driver.
● Update the Graphics Card FW
Step 1. Download and unzip IGFXUpdate(v1.01.1).
Step 2. Run "IGFXUpdate”
Step 3. Click Yes to restart the system.
Step 4. After the system has restarted, the FW update will begin.
*If this message doesn't show up, please disable the "Secure Boot” in BIOS and try again.
Step 5. During the update, the following security message will pop up.
Step 6. Click on Install this driver software anyway.
Step 7. The update process will proceed. The screen might blink during the update.
Step 8. Please restart your computer when the following prompt is shown.
● Set PCIe Power to Maximum Power Savings
Step 1. Go to [Control Panel\Hardware and Sound\Power Options\Edit Plan Settings\Change] and click [Change advanced power settings].
Step 2. Scroll down to PCI Express\Link State Power Management and select Maximum power savings. Make sure to click apply to apply the changes.
● Re-install the Graphics Card Driver and Check the GPU Power
Step 1. Reinstall the latest graphics card driver.
Step 2. To check the power consumption of the Intel ARC graphics card, please open Intel Arc Control and find the GPU Core Power.
BIOS Setting For ARC GPU Power Saving
● ASRock Intel Motherboard:
Required BIOS Version:
700-series motherboard: Please use the latest BIOS
600/500/400-series motherboard: Use the latest BIOS. It that does not work, please contact ASRock Technical Support. https://event.asrock.com/tsd.asp
BIOS Settings for all ASRock Intel models:
In BIOS > Advanced > Chipset Configuration, apply the following settings.
PCI Express Native Control: Enabled
PCIE ASPM Support: L1
PCH PCIE ASPM Support: L1
● ASRock AMD Motherboard:
Required BIOS Version:
Platform
600 series
500 series
400 series
300 series
BIOS version
Any version
Not supported
BIOS Setting for all AMD models:
There is no need to change BIOS settings.
● Other brands motherboard:
Please contact your motherboard vendor for further assistance.
Power Consumption After Updating FW and Changing the BIOS Settings
3. Run "insttool64.exe” as administrator. A command prompt window pop on and close immediately. It is a normal behavior.
4. Run Command prompt as administrator.
5. Enter the folder path to the extracted file and press [enter].
Default path and command:
cd C:\Users\[Username]\Downloads\VBIOS_L06_update\VBIOS update
*Please change the command if you change the download path.
6. Type command "Update.cmd” and press [enter].
Update procedure will start up. This mean the system is flashing the vBIOS. DO NOT turn off the system during the update.
7. Once the flashing has finished, Command Prompt will report it as shown below.
Q (Q&A-173|523):
Which BIOS settings do I need to adjust when using 13.3” Side Panel?(3/1/2023)
A:Before using your side panel, please set "Primary Graphics Adapter” to "Onboard” in the BIOS settings to ensure the display work properly.
Intel 700 series:
To do so, please go to "Advanced”> "Chipset Configuration” and set "Primary Graphics Adapter” to "Onboard”. Then press [F10] to save the settings and restart the system.
AMD AM5:
Please go to "Advanced”> "Onboard Device Configuration” and set "Display Priority” to "Internal Graphics”. Then press [F10] to save the settings and restart the system.
Q (Q&A-172|522):
Why can I not find a CSM option under the Boot tab in BIOS?(10/13/2022)
A:When you set Fast Boot to Ultra Fast under the boot tab in BIOS, CSM (Compatibility Support Module) will be disabled and hidden automatically. This is because Ultra Fast Boot is supported only when booting in full UEFI mode, so without enabling CSM.
Q (Q&A-171|520):
There is no sound output from the rear audio port. What can I do to fix it?(9/27/2022)
Q (Q&A-167|513):
How do I enable the Optane H10/H20 hybrid function on the Intel Z690/B660/H670 platform?(3/1/2022)
A:If you want to make a fresh Windows installation with Optane H10/H20 hybrid function, please refer to the following steps:
Step 1.
Make sure that H10/H20 Optane memory is installed in an M.2 socket which supports Optane. You can find the info by checking the storage section of the motherboard specifications page on ASRock's website.
Step 2.
Enable the Hybrid Storage Detection and Configuration Mode in BIOS and press "F10” to save the settings.
Advanced\Storage Configuration\Hybrid Storage Detection and Configuration Mode
Step 3.
Go to Advanced\Storage Configuration\VMD Configuration and set Enable VMD controller to [Enabled].
Then set Enable VMD Global Mapping to [Enabled]. Press F10 to save the changes and exit setup.
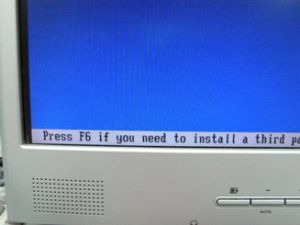
Installing Windows® on a VMD platform
After the BIOS setup, please follow the steps below.
Step 1.
Please download the "SATA Floppy Image” driver from ASRock's website (https://www.asrock.com/index.asp). Unzip the file to a USB flash drive or copy the files from ASRock's motherboard support CD.
Step 2.
Press at system POST to launch the boot menu and choose the item "UEFI:
installation media>” to install Windows® 10 64-bit / 11 64-bit OS
” to install Windows® 10 64-bit / 11 64-bit OS">
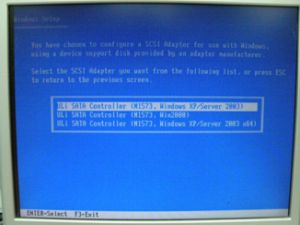
Step 3.
If during the Windows installation process the target drive is not available, please click .
Step 4.
Click and locate the driver on your USB flash drive.
Step 5.
Select "Intel RST VMD Controller” and then click .
.">
Step 6.
Select unallocated space and then click .
Step 7.
Please follow Windows' installation instructions to finish the process.
Step 8.
After the Windows installation is finished, please install the "Intel Rapid Storage Technology driver and utility” from ASRock's website. https://www.asrock.com/index.asp
Step 9.
Launch the Intel® Optane™ Memory and Storage Management tool from the Microsoft store.
Step 10.
Select the drive which you want to accelerate. Enable Intel® Optane™ Memory. (One restart is required)
Step 11.
Erase all data on the Intel® Optane™ memory module and click
Step 12.
After the system has restarted, the Optane Management tool will show that Optane memory is enabled.
Q (Q&A-165|509):
Why can my game not start with my Intel 600 series motherboard?(11/2/2021)
A:Some games use DRM (Digital Rights Management) protection. Please check for available updates for your game, where the DRM solution supports Alder Lake CPUs.
If the game development is discontinued and there is no update available for the DRM, please follow below steps to enable the "Legacy Game Compatibility Mode”.
Step 1.
Press [Del] or [F2] during the POST stage to boot into BIOS.
Step 2.
Press [F6] to enter "Advanced” mode and go to Advanced\CPU Configuration
Step 3.
Enable the "Legacy Game Compatibility Mode” in BIOS.
(The option is at the bottom of the CPU Configuration page)
Step 4.
Press [F10] to save the setting and restart the system.
Step 5.
The [Scroll Lock] key on your keyboard is now a hotkey. It can be used to enable/disable the Intel E-core parking feature. Before starting a game outdated DRM protection, please press [Scroll Lock] within the OS to enable Intel E-core parking.
Step 2.
The C.A.M. (Clever Access Memory) option is supported when integrated graphics are disabled.
By default integrated graphics will be disabled when a PCIe graphics card is detected.
Please make sure the monitor is connected to the graphic card.
Step 3.
Please go to BIOS\Advanced\Chipset Configuration and enable "C.A.M. (Clever Access Memory)”.
Step 4.
Press F10 to save the setting and restart.
Q (Q&A-164|504):
How do I check if the system can support Secure Boot?(10/1/2021)
A:In order to use Secure Boot, the drive with the operating system must use GPT partition style. Please refer to below steps to check the partition style.
Step 1: Right-click the Windows button on the desktop and select "Disk Management”.
Step 2: Right-click the disk where Windows is installed and select the "Properties”.
Step 3: Click the "Volumes” tab and check if the partition style is "GPT”.
Step 4: If the partition style is "MBR”, please make a backup of important data on the system and refer to steps 5 - 7 to convert the partition style to GPT.
Step 5: Type "CMD" in the Windows search bar, right-click on "Command Prompt” and choose to run as administrator.
Step 6: Type the command "mbr2gpt /convert /allowFullOS” to convert the partition style and press [Enter].
Step 7: Restart the system and the BIOS Mode/Partition style will be converted to UEFI/GPT.
Q (Q&A-162|501):
I want to turn off the LED while the system is off. Where can I find the setting?(7/1/2021)
A:Please follow the steps below and set the "Turn on Onboard LED in S5” setting to disabled under the BIOS.
Step 1.
While the system is starting, press hotkey "F2” or "Del” repeatedly to enter BIOS setup.
Step 2.
Disable the "Turn On Onboard LED in S5” under the BIOS.
AMD platform: Advanced\Onboard Devices Configuration\Turn On Onboard LED in S5\Disabled
Intel platform: Advanced\Chipset Configuraiton\Turn on Onboard LED in S5\Disabled
Step 3.
Press hotkey "F10” to save the changes.
Q (Q&A-162|500):
TPM2.0 module is required in Windows 11 specification, does it need TPM2.0 hardware module?(7/1/2021)
A:No, please enabled [Intel® Platform Trust Technology (Intel® PTT)] or [AMD CPU fTPM] feature under UEFI BIOS. It supports the TPM2.0 feature without TPM2.0 hardware module.
ASRock Intel Platform
For the new Microsoft® Windows 11 installation, we recommend disabling the CSM setting before using the Intel® PTT.
Supported platform.
Generation
Supported Chipset
Intel 300 series
Z390, Z370, H370, B360, B365, H310, H310C
Intel 400 series
Z490, H470, B460, H410
Intel 500 series
Z590, B560, H510, H570
Intel X299 series
X299
Intel SoC series
Gemi Lake, Gemi Lake Refresh
*Intel® PTT is supported. The actual support may be varied based on official release of Windows 11 by Microsoft®.
BIOS option
(a) Go to "Security page” to find the "Intel® Platform Trust Technology” option.
(b) Enabled "Intel® Platform Trust Technology” under UEFI BIOS
Q (Q&A-160|498):
How to enable C.A.M in the BIOS? Also known as Resizable BAR.(4/1/2021)
A:Step 1: On the ASRock website please find the BIOS download page for you motherboard.
Check the descriptions to see if C.A.M. is supported already.
Intel 500-series models support C.A.M. since the first version.
Step 2: While the system is starting press "DEL” to boot into BIOS setup and go to BIOS\Boot\CSM.
If you cannot find the CSM menu then please set "Fast Boot” to "Disabled”.
Step 3: In BIOS\Boot\CSM please set "CSM” to "Disabled”.
Step 4: Go to BIOS\Advanced\Chipset Configuration and set "Above 4G Decoding” to "Enabled”.
Step 5: After step 4, the option "C.A.M” will appear below the option "Above 4G Decoding”.
Please set it to "Enabled”.
Step 6: Press "F10” to save the settings and restart the system.
Q (Q&A-158|494):
The SB fan on my X570 motherboard is not spinning. Is this normal?(1/1/2021)
A:Your motherboard might be using a semi-passive mode for this fan.
In this mode the fan will not spin at lower temperatures, and only become active at higher temperatures. This is normal. If you want to let the fan spin, you can select a different mode for the fan in BIOS.
Path: BIOS\H/W Monitor\SB_FAN1 Setting
Q (Q&A-157|493):
How do I enable IGPU Multi-Monitor on B550/A520 series motherboard?(10/1/2020)
A:To enable IGPU Multi Monitor, please refer to the following path and set the [iGPU Configuration] to [UMA_AUTO].
Advanced\AMD CBS\NBIO Common Options\GFX Configuration
Q (Q&A-156|492):
How do I enable Optane H10 when another Intel M.2 SSD is installed on Intel 300/400 series platform?(9/1/2020)
A:To enable an Optane H10 while another Intel M.2 SSD is installed, please refer to the following steps:
Step 1. Make sure that H10 Optane memory is installed in the Optane supporting M.2 socket by checking the storage section of the motherboard web page.
Step 4. Enable the Teton Glacier Mode in BIOS and press F10 to save the settings.
Advanced\Storage Configuration\Teton Glacier Mode\Dynamic Configuration for Hybrid Storage Device Enable
Step 5. Launch the Intel Optane Memory and Storage Management tool from the Microsoft store.
Step 6. Enable Optane memory. (One restart is required)
Step 7. After the system has restarted, the Optane Management tool will show Optane memory is enabled.
Q (Q&A-153|489):
How can I remap M2_3 slot and other M.2 slots to configure a PCIE SSD RAID on Z490 Taichi?(6/1/2020)
A:Please make sure to use identical PCIE SSDs that are the same type and volume.
Follow the steps below to adjust the BIOS settings to configure the PCIe RAID.
STEP 1. Enter the UEFI Setup Utility by pressing or < Del > hotkey during the post screen.
STEP 2. Go to Advanced -> Storage Configuration and set SATA Mode Selection to [RAID Mode].
STEP 3. Go to Boot -> CSM and set Launch Storage OpROM policy to [UEFI only].
STEP 4. Adjust the M.2 slots - RST PCie Storage Remapping that you've installed PCIE SSDs to [Enabled]. Press to save the settings and exit setup.
STEP 5. Go to Advanced -> USB Configuration and set Third Party USB 3.2 Controller to [Disabled]. Press to save the configuration changes and exit setup. Caution: After disabling the Third Party USB3.2 Controller, the onboard Type-C port will be turned off.
STEP 6. Enter Intel(R) Rapid Storage Technology in Advanced page.
STEP 7. Select the option Create RAID Volume and press .
STEP 8. Key-in a volume name and press , or simply press to accept the default name.
STEP 9. Select your desired RAID Level and press .
STEP 10. Select the target hard drives which you want to build in RAID array and press .
STEP 11. Select a stripe size for the RAID array and press .
STEP 12. Select Create Volume and press to start creating the RAID array.
Q (Q&A-150|486):
When I install Windows 10 with a CPU that has 6 or more cores (3900, 3900X, 3950, etc.) on X470 Gaming-ITX/ac, the system will BSOD. What should I do?(12/1/2019)
A:If a CPU with 6 or more cores is used on X470 Gaming-ITX/ac, please refer to the following steps to install Windows 10.
Step 1: Power on the system and press [Del] or [F2] to boot into BIOS.
Step 2: Go to Advanced\ AMD Overclocking \Accept
Step 3: Adjust the following settings:
- [CCD Control] to [1 CCD]
- [Core control] to [TWO(1+1)]
Step 4: Press [F10] to save the settings and exit.
Step 5: Install Windows 10.
Step 6: Refer to ASRock website to download and install all drivers. (Reboot the system when required)
Step 7: Refer to previous steps 1 ~ 3 to restore following settings to default.
-[CCD Control] set to [Auto]
-[Core Control] set to [Auto].
Step 8: Press[F10] to save the settings and exit.
Q (Q&A-143|471):
How to enable WiFi with AC 8260 card on H370 Performance motherboard?(1/1/2019)
A:In order to make AC 8260 Wifi work, please adjust the setting in BIOS below:
Set M2_3/PCIE_3 Switch to Force_M.2 under the path Advanced\Chipset Configuration
After adjusting the above setting, please press "F10” button to save the change.
Q (Q&A-141|467):
I would like to use AMD Threadripper 2 CPU on ASRock X399 platform, what should I do?(7/1/2018)
A:ASRock X399 platform has supported AMD Threadripper 2 CPU since BIOS version P3.XX.
If your BIOS version is older than P3.XX, please update BIOS without powering on the system (without CPU) by using the BIOS Flashback feature that X399 supports.
Please refer to the following procedures to update the BIOS.
1.Visit ASRock website and enter the BIOS download page of your motherboard to download the latest BIOS.
Link: https://www.asrock.com/mb/
2.Copy the BIOS file to your USB flash drive. Please make sure that the file system on the USB flash drive is FAT32.
3.Extract BIOS file from the zip file and rename the file to "CREATIVE.ROM”.
4.Plug the 24 pin power connector on the motherboard without other devices. Then turn on the power supply's AC switch. Please DO NOT power on the system.
5.Then plug your USB drive to the USB BIOS Flashback port.
*Please refer to the user manual for the detail information of USB Flashback port.
Model
USB BIOS Flashback port
X399 Taichi
USB3_6
X399M Taichi
USB3_6
Fatal1ty X399 Professional Gaming
USB3_6
6.Press the BIOS Flashback Switch for about three seconds. Then the LED starts to blink.
7.Wait a few seconds. The BIOS flashing process is completed when the LED stops blinking.
*If the LED light turns solid green, the BIOS Flashback is not operating properly. Please make sure that you plug the USB drive to the USB BIOS Flashback port properly.
Q (Q&A-140|466):
How do the BIOS recovery and secure Backup UEFI functions work on the Intel H170 motherboards with two BIOS ROM chips?(6/1/2018)
A:For Intel H170 motherboards with two BIOS ROM chips, if main BIOS (BIOS_A1) is corrupted please follow the steps below to have main BIOS recovered.
Step 1. Please unplug the power cable and move the jumper cap to short pin2 and pin3 on the "BIOS_SEL1” header.
Step 2. Please plug the power cable and boot into BIOS(BIOS_B1).
Step 3. Click Secure Backup UEFI (B->A). This will copy the backup BIOS file to the main BIOS file.
Step 4. After updating BIOS, kindly remove the power cable and move the jumper cap to short pin1 and pin2 (header BIOS_SEL1)
Step 5. Plug the power cable and the system should be boot up with main BIOS file
Q (Q&A-139|465):
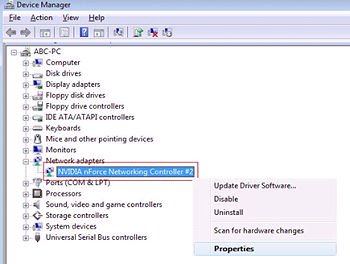
When I use VGA card with onboard graphics AM4 CPU, onboard display adapter driver shows exclamation mark,
what should I do?(3/1/2018)
A:If you are using the VGA card and onboard display adapter shows an exclamation mark as the picture below,
please follow the steps to remove exclamation mark.
1. Please press "F2” or "Del” during POST to enter BIOS setup
2. Choose primary video adapter as internal graphics
Path: Advanced\AMD PBS\Primary Video Adapter\Int Graphics (IGD)
3. After adjusting above options , press "F10” to save the configuration.
You can try below method as well.
1. Please press "F2” or "Del” during POST to enter BIOS setup
2. Disable CSM
Path: Boot/CSM/Disable
3. After adjusting above option, press "F10” to save the configuration.
Q (Q&A-139|464):
How do I adjust the shared memory while using Raven Ridge CPU on AM4 platform?(3/1/2018)
A:If you'd like to adjust shared memory, please follow the steps below to find and adjust the OC settings.
1. Please press "F2” or "Del” during POST to enter BIOS setup
2. Refer to the following path to adjust the OC setting.
a. Advanced\AMD CBS\NBIO Common Options\GFX Config IGC :Forces
b. Advanced\AMD CBS\NBIO Common Options\UMA Mode : UMA_Spec
c. Advanced\AMD CBS\NBIO Common Options\UMA Frame Buffer Size: Choose a prefer size
d. OC Tweaker\OC Mode Change Switch\AMD CBS Setting
3. After adjusting above options, press "F10” to save the configuration
Q (Q&A-137|457):
I'd like to use the Windows Mixed Reality Headset on on-board HDMI, what should I do?(12/1/2017)
2. If an external graphics card is installed, please enable "IGPU Multi-Monitor” under BIOS.
BIOS Path: Advanced > Chipset Configuration > IGPU Multi-Monitor
3. Download the VGA driver version 15.60.01.4877 from the Intel download center and Install it on your system.
Download Link: https://downloadcenter.intel.com/product/128199/Graphics-for-8th-Generation-Intel-Processors
4. Install the "Windows Mixed Reality Headset” USB 3.0 connector to the on-board USB3.0 port.
5. Install the "Windows Mixed Reality Headset” HDMI connector to the on-board HDMI port
The Windows Mixed Reality Headset should work now.
Q (Q&A-137|459):
How do I get WiFi function work after my system resumes from sleep mode on X299 platform?(12/1/2017)
A:Please follow the steps below to set up your system.
Step1. Please install the WiFi utility driver v19. 60.00 from the link below.
Link: https://download.asrock.com/Drivers/Intel/WLAN/Intel_WiFi(v19.60.00).zip
Step2. Please enter BIOS setup and set "WAN Radio” to [Enabled]. Then please press [F10] to save the setting.
(Path: BIOS > Advanced > Chipset Configuration > WAN Radio)
After applying the setting as above, the WiFi function can work properly.
Q (Q&A-135|455):
How do I play Dolby ATMOS through a receiver on Z270 Gaming-ITX/ac?(10/1/2017)
A:Please refer to the following requirements, configurations and setup procedures.
[Requirements]
OS: Windows 10
Receiver / decoder: Onkyo TX-NR 747 or other receiver supporting HDCP 2.2
Player: Pioneer Ultra HD Blu-ray drive
BD Disk: Most 3D / 4K BD disk movie
Playback Software: Power DVD 14 or later version
[Setup]
1. When the system boots up, press "F2" to enter UEFI setup screen.
Go to Advanced > CPU Configuration and enable "Software Guard Extensions" in BIOS setting.
Press "F10" to save and exit the BIOS setup screen.
2. Boot into O.S. Install all drivers for the M/B.
Install ME driver ver: 11.6.0.1126 (supports Ultra HD Blu-ray). Download the driver from the following link: http://www.asrock.com/MB/Intel/Fatal1ty%20Z270%20Gaming-ITXac/index.asp#osW1064
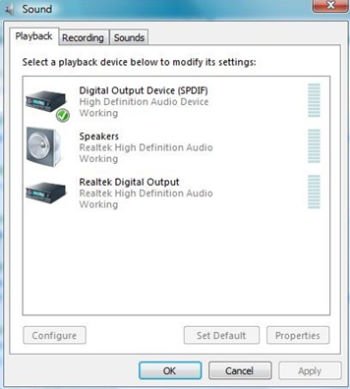
3. Go to Control Panel > Hardware and sound > Sound and select "Receiver output”.
Q (Q&A-133|447):
I'd like to install the TR4 1900X CPU on X399Taichi or X399 Prof. Gaming, what should I do?
Please refer to the following steps to update the BIOS P1.30 or later version to support TR4 1900X CPU.(8/1/2017)
A:Step 1. Download the BIOS P1.30 or later version from ASRock's website
X399 Taichi: https://www.asrock.com/mb/AMD/X399%20Taichi/index.asp#BIOS
X399 Prof. Gaming: https://www.asrock.com/MB/AMD/Fatal1ty%20X399%20Professional%20Gaming/index.asp#BIOS
Step 2. Please make sure that the file system of your USB flash drive is FAT32.
Go to This PC → Right click on the mouse → Select Properties → File system
Step 3. If the USB drive is not FAT32 format, please create an USB flash with FAT32 format.
Go to This PC → Right click on the mouse → Select Format → Select FAT32 → Start
Step 4. Copy the BIOS file to your USB flash drive and extract BIOS file from the zip file.
Step 5. Rename the file to "creative.rom” and put the file on root directory
Step 6. Install the 24 pin power connector to the motherboard. Then turn on the AC switch of the power supply.
*There is no need to power on the system.
Step 7. Connect your USB drive to the USB BIOS Flashback port.
Step 8. Press the BIOS Flashback button for about three seconds. Then the LED starts to blink.
Step 9. Wait until the LED stops blinking, indicating that BIOS flashing has been completed.
*If the LED light turns solid green, this means that the BIOS Flashback is not operating properly.
1. Please make sure that you connect the USB drive to the USB BIOS Flashback port.
2. BIOS Flashback button (BIOS_FB1, see p.9, No. 19) allows users to flash the BIOS.
3. Flash the BIOS again from step 5.
Q (Q&A-132|446):
If I'd like to install the mining VGA card without display output, what should I do? (7/1/2017)
A:Please refer to the following path to adjust the "Primary Graphics Adapter” to [Onboard].
Path: BIOS → Advanced → Chipset configuration → Primary Graphics Adapter Onboard
Q (Q&A-132|445):
I'd like to use the PS2 mouse on PS2 port. What should I do?(7/1/2017)
A:If your motherboard has two PS2 ports, just connect the PS2 mouse to the green PS2 port, and then the PS2 mouse can be used.
If your motherboard only has one PS2 port, please set "PS2 Y-cable” to "Enabled”. Please press "F2” or "Del” during POST to enter BIOS, select the "Advanced” menu, "Super IO Configuration”, and set the "PS2 Y-cable” option to "Enabled”. Press "F10” to save the configuration. Then the PS2 mouse can be used.
Q (Q&A-132|444):
How do I turn off USB port power under S5 mode? (7/1/2017)
A:USB port power can be turned off by enabling "Deep Sleep” option.
Please press "F2” or "Del” during POST to enter BIOS setup, select the "Advanced” menu and enter the "Chipset Configuration” page, and adjust the "Deep Sleep” option to "Enabled in S5”.
After adjusting the setting, press "F10” to save the configuration. Then USB port power will be turned off under S5 mode.
Q (Q&A-130|435):
What is the requirement to support Intel Optane Memory?(4/1/2017)
A:To support Intel Optane Memory, please make sure if your system meet the followings:
1. Choose Z270, H270 or B250 series platform and 7th Generation (Kaby Lake) Intel® Core™ Processor.
2. Install Windows 10 64bit OS.
3. The system drive needs to be GPT format.
4. Update to supported BIOS P2.00 or later version.
5. Only supported for SATA-based boot drive
Q (Q&A-130|434):
Which BIOS version should I update to support and optimize Intel Optane Memory feature?(4/1/2017)
A:Z270, H270 and B250 platform can support Intel Optane memory since BIOS P2.00 version.
Please download BIOS P2.00 or later BIOS version for compatibility with Intel Optane memory.
Download link: https://www.asrock.com/support/index.nl.asp?cat=BIOS
Q (Q&A-130|433):
How do I play a 4K BD movie through a Pioneer Ultra HD Blu-ray drive on Z170 Gaming-ITX/ac?(4/1/2017)
A:Requirements:
O/S: Windows 10
Receiver / decoder: Onkyo TX-NR 747 or other receiver supports HDCP 2.2
Playback Software: Power DVD 14 (from Pioneer Ultra HD Blu-ray Drive)
http://www.pioneerelectronics.com/PUSA/Computer/Computer+Drives/BDR-211UBK#overview
Configuration:
M/B: Z170 Gaming-ITX/AC
BIOS: P7.10
CPU: 7th generation Intel® Core™ i7/i5 processor for Desktop PC (Kaby Lake-S)
Setup:
1. Please connect the HDMI cable to HDMI2 port of Z170 Gaming-ITX/ac.
2. When the system boots up, press "F2” to enter UEFI setup screen.
Go to Advanced > CPU Configuration and enable "Software Guard Extensions” in BIOS setting.
Press "F10” to save and exit the BIOS setup screen.
3. Boot into O/S. Install all drivers for the M/B.
Install ME driver(v11.6.0.1126_SW_MSI). Download the driver from the following link: https://www.asrock.com/MB/Intel/Fatal1ty%20Z270%20Gaming-ITXac/index.asp#osW1064
4. Please enter Control Panel > Hardware and sound > Sound.
Select "HDMI output”
5. Enable the "UHD color” on the TV.
Please run "Ultra Blu-ray advisor” to see if all "Pass”.
Pioneer UHDBD Advisor: http://pioneer.jp/pcperipherals/bdd/eula.php
6. Due to the fact that HDR is not supported by Intel 100 series chipset, please disable ”UHD color” from TV.
Put a 4K movie BD disc into the Pioneer Ultra HD Blu-ray drive.
7. Click " Power DVD”.
8. Then you can play the content.
Q (Q&A-130|432):
How do I play a 4K BD movie through a Pioneer Ultra HD Blu-ray drive on Z270 Gaming-ITX/ac?(4/1/2017)
A:Requirements:
O/S: Windows 10
Receiver / decoder: Onkyo TX-NR 747 or other receiver supports HDCP 2.2
Playback Software: Power DVD 14 (from Pioneer Ultra HD Blu-ray Drive) http://pioneer.jp/pcperipherals/bdd/products/bdr_s11j/spec/
Configuration:
M/B: Z270 Gaming-ITX/ac
BIOS: P1.20
Setup:
1. When the system boots up, press "F2” to enter UEFI setup screen.
Go to Advanced > CPU Configuration and enable "Software Guard Extensions” in BIOS setting.
Press "F10” to save and exit the BIOS setup screen.
2. Boot into O/S. Install all drivers for the M/B.
Install ME driver (v11.6.0.1126_SW_MSI). Download the driver from the following link: https://www.asrock.com/MB/Intel/Fatal1ty%20Z270%20Gaming-ITXac/index.asp
3. Go to Control Panel > Hardware and sound > Sound and select "HDMI output”.
4. Enable the "UHD color” on the TV.
Please run "Ultra Blu-ray advisor” to see if all "Pass”.
Pioneer UHDBD Advisor: http://pioneer.jp/pcperipherals/bdd/eula.php
5. Put a 4K movie BD disc into the Pioneer Ultra HD Blu-ray drive.
6. Click "Power DVD”.
7. Then you can play the content.
Q (Q&A-128|423):
How can I update BIOS by ASRock Instant Flash on AM4 platform?(3/1/2017)
A:Since AMD AM4 is a new structure and we just found BIOS cannot be completely updated by our Instant Flash. Thus, for the old BIOS version released before 2017/03/07, there is no "Instant Flash” option under BIOS. To make sure BIOS update can be executed completely, please use DOS or Windows BIOS update methods to do update temporarily.
After updating to the following version, Instant Flash functions and options are supported under BIOS and it can be used for updating the newer BIOS file in the future.
Model
BIOS Version
Fatal1ty X370 Professional Gaming
P1.50
X370 Taichi
P1.50
X370 Killer SLI/ac
P1.60
X370 Killer SLI
P1.60
Fatal1ty X370 Gaming K4
P1.60
Fatal1ty AB350 Gaming K4
P1.40
AB350 Pro4
P1.40
AB350M
P1.20
Q (Q&A-128|420):
The system doesn't boot properly after loading DRAM XMP Profile. How do I do?(3/1/2017)
A:Please update the latest BIOS from ASRock official website firstly.
Download link: https://www.asrock.com/support/index.nl.asp?cat=BIOS
Because of AM4 memory compatibility issue, some high frequency memory modules may not work with XMP profile successfully. ASRock keeps updating the latest AMD AGESA code to enhance the high frequency memory capability. Please keep tracking the latest BIOS update on ASRock official website.
We have tested some memory modules on AM4 platform and users can refer to our suggested module list for choosing the finest ones to pair with your AM4 motherboard.
Memory support list link: X370 Professional Gaming, X370 Taichi, X370 Killer SLI/ac, X370 Killer SLI, X370 Gaming K4, AB350 Pro4, AB350M Pro4, AB350 Gaming K4
Q (Q&A-128|426):
If I change the setting in BIOS of AM4 series motherboards, is there any notice before updating BIOS?(3/1/2017)
A:If you change any setting in BIOS and want to update the BIOS, please enter BIOS setup to load default setting. After reboot, please update the BIOS.
Q (Q&A-128|427):
Which fan type can I use on AM4 motherboard to support fan speed control?(3/1/2017)
A:Please refer to the following table for the fan type specification and information.
Model Name
FAN Header
Which kinds of Cooler type can support Fan speed Control
Control Method
Note
Fatal1ty X370 Professional Gaming X370 Taichi
CPU_OPT/W_PUMP
Both 4-Pin and 3-Pin
Controlled By BIOS setting
Using 3-Pin fan, please set [DC mode] Using 4-Pin fan, please set [PWM mode]
CPU_FAN1
Both 4-Pin and 3-Pin
Auto detect*
System will auto detect the fan type
CHA_FAN1
Both 4-Pin and 3-Pin
Auto detect*
System will auto detect the fan type
CHA_FAN2
Both 4-Pin and 3-Pin
Auto detect*
System will auto detect the fan type
CHA_FAN3/W_PUMP
Both 4-Pin and 3-Pin
Controlled By BIOS setting
Using 3-Pin fan, please set [DC mode] Using 4-Pin fan, please set [PWM mode]
Using 3-Pin fan, please set [DC mode] Using 4-Pin fan, please set [PWM mode]
CPU_FAN1
Only 4 Pin
When using 3-Pin fan, it works at full speed
CHA_FAN1
Only 4 Pin
When using 3-Pin fan, it works at full speed
CHA_FAN2
Both 4-Pin and 3-Pin
Auto detect*
System will auto detect the fan type
CHA_FAN3/W_PUMP
Both 4-Pin and 3-Pin
Controlled By BIOS setting
Using 3-Pin fan, please set [DC mode] Using 4-Pin fan, please set [PWM mode]
Fatal1ty AB350 Gaming K4 AB350 Pro4
CPU_FAN1
Only 4 Pin
When using 3-Pin fan, it works at full speed
CHA_FAN1
Only 4 Pin
When using 3-Pin fan, it works at full speed
CHA_FAN2
Both 4-Pin and 3-Pin
Auto detect*
System will auto detect the fan type
CHA_FAN3
Both 4-Pin and 3-Pin
Auto detect*
System will auto detect the fan type
AB350M Pro4 A320M Pro4
CPU_FAN1
Only 4 Pin
When using 3-Pin fan, it works at full speed
CHA_FAN1
Both 4-Pin and 3-Pin
Auto detect*
System will auto detect the fan type
CHA_FAN2
Doesn't support fan control
AB350M-HDV AB350M A320M-HDV A320M A320M-DGS
CPU_FAN1
Only 4 Pin
When using 3-Pin fan, it works at full speed
CHA_FAN1
Only 4 Pin
When using 3-Pin fan, it works at full speed
CHA_FAN2
Doesn't support fan control
*Auto detect – system will automatically detect the fan type installed, so user doesn't set "DC or PWM" mode additionally under BIOS setup.
Q (Q&A-128|431):
If I want to change voltage in BIOS setting for Ryzen CPU on AB350 series motherboards, how do I do?(3/1/2017)
A:The voltage setting option for Ryzen CPU is supported by the new BIOS update.
(BIOS ->OC Tweaker-> CPU frequency & Voltage Change-> Manual)
Please visit ASRock Download zone and update the BIOS to the following BIOS or later versions.
Download link: https://www.asrock.com/support/index.nl.asp
Model
BIOS Version
Fatal1ty AB350 Gaming K4
L1.43
AB350 Pro4
L1.43
AB350M
L1.23
AB350M Pro4
L1.03
AB350M-HDV
L1.03
Q (Q&A-128|422):
How can I adjust "CPU Frequency Multiplier Change” setting on AM4 platform?(3/1/2017)
A:CPU Frequency Multiplier Change option is already supported by the new BIOS update.
Please visit ASRock Download zone and update the BIOS to the following BIOS or later versions.
Download link: https://www.asrock.com/support/index.nl.asp
Model
BIOS Version
Fatal1ty X370 Professional Gaming
P1.50
X370 Taichi
P1.50
X370 Killer SLI/ac
P1.40
X370 Killer SLI
P1.40
Fatal1ty X370 Gaming K4
P1.40
Fatal1ty AB350 Gaming K4
P1.40
AB350 Pro4
P1.40
AB350M
P1.20
Q (Q&A-129|429):
How do the BIOS recovery and Secure Backup UEFI functions work with the Intel Z270 motherboards with two BIOS ROM chips?(2/1/2017)
A:For the Intel Z270 motherboards with two BIOS ROM chips, there is no need to switch BIOS ROM when doing recovery.
When booting properly, the system works on the active BIOS_A1 as picture below.
However, if the active BIOS_A1 is corrupted or damaged, after several failed boot attempts, it will automatically do BIOS recovery from the backup BIOS_B1 and then the system will still work on the active BIOS_A1. And the monitor will show Secure Backup UEFI (B-->A) function as picture below.
After finishing this function, the system will reboot and work on the active BIOS_A1.
Q (Q&A-127|418):
If I have a TPM module on the motherboard and want to update the BIOS, what should I do?(12/1/2016)
A:If you have a TPM module on the motherboard and want to update BIOS, please follow the steps below to disable TPM function before flashing BIOS.
In OS:
1. Right-click the Menu button.
2. Left-click > Control Panel > System and Security > BitLocker Drive Encryption
3. Turn off BitLocker
In BIOS
1. BIOS setup > Advanced > Trusted Computing
2. Security Device Support to "Disable”
After flashing the BIOS, please enable the function.
Q (Q&A-125|414):
Do ASRock Intel X99 motherboards support Intel Broadwell-E CPU?(6/1/2016)
Q (Q&A-123|409):
After installing the onboard VGA driver on my 100 series platform with Windows 10, the system keeps on blinking and pops up "Graphics driver stopped responding and has recovered".
How can I fix it?(2/1/2016)
A:Please set "Package C State Support" to "Auto" in the BIOS.
(BIOS -> Advanced -> CPU Configuration -> Set "Package C State Support" to "Auto")
Q (Q&A-122|407):
I've connected a PS/2 mouse to the PS/2 connector on my Intel 100 series platform but it doesn't work.(12/1/2015)
A:Please set "PS/2 Y-cable" to "Auto" in the BIOS.
(BIOS -> Advanced -> Super IO Configuration -> Set "PS/2 Y-cable" item to "Auto")
Q (Q&A-122|405):
Kiedy próbuję użyć 64-bitowego systemu operacyjnego na wirtualnej maszynie VMware, system wyrzuca komunikat "This host supports Intel VT-X, but Intel VT-X is disabled" ("Ten gospodarz obsługuje Intel VT-X, lecz Intel VT-X jest wyłączony/niedostępny").(12/1/2015)
A:Please configure "Intel Virtualization Technology" in the BIOS to enable VT-x.
(BIOS -> Advanced -> CPU Configuration -> Set "Intel Virtualization Technology" to "Enabled")
Q (Q&A-122|404):
Under Windows 10 version 1511 (Threshold 2 Build 10586), Z170 Extreme6 and Z170 Gaming K6 series models may not resume from Sleep mode (S3) or enter into Hibernation mode (S4) properly.(12/1/2015)
Q (Q&A-120|400):
My DDR4-2133 DRAM module only runs at DDR4-1866 frequency on Intel 100 series motherboards. How can I fix this?(9/1/2015)
A:Please visit ASRock website and download the latest BIOS for your model.
Q (Q&A-118|394):
When using Intel G3258 CPUs on H81/P81/H87/B85/H91/H97 platforms, I can't install Windows 10. What should I do?(7/1/2015)
A:For Intel G3258 CPUs to support Windows 10, please download the following BIOS or later versions with Microcode 19 from the download links on our website.
If your model isn't listed in the table, please visit the beta zone of your model and then update the latest beta BIOS.
Model
P BIOS
H81M-VG4 R2.0
P1.40
H81M-DGS R2.0
P1.60
H81M-HDS R2.0
P1.30
H81M-HDS
P2.10
H81M-DG4
P1.10
H97 Anniversary
P1.50
H97M Anniversary
P2.10
B85 Anniversary
P1.40
B95M-DGS
P1.60
B85M-DGS
P1.50
B85M Pro3
P1.40
H97M Pro4
P2.00
B85M-HDS
P1.70
B85 Pro4
P2.30
B85M
P2.50
H81M-HG4
P1.50
H81M
P1.90
H81M-GL
P2.00
H81M-G
P1.40
H97 Pro4
P1.90
H97M
P2.00
Q (Q&A-117|392):
How can I improve the Wi-Fi performance of my M8 system?(6/1/2015)
Step 2. Un-install Intel® Smart Connect Technology driver from your system.
Q (Q&A-116|388):
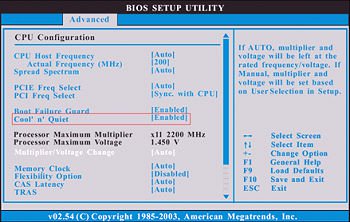
Mijn CPU kan de maximale turbo frequentie op de 970 Performance niet behalen, hoe krijg ik dit werkend?(3/1/2015)
A:Om de maximale turbo frequentie op de 970 Performance te bereiken moet u "Core C6 Mode" in het BIOS op [Enabled] instellen en het nogmaals proberen. (Menu volgorde: BIOS -> Advanced -> CPU Configuration -> Core C6 Mode)
Q (Q&A-116|387):
Na het plaatsen van twee R9 295x2 VGA kaarten op mijn X99 platform start het systeem niet meer op. Hoe fix ik dit? (3/1/2015)
A:Refereer aan de volgende stappen om het BIOS te updaten vanaf ASRock's website.
Model
BIOS Versie
X99 Extreme3
P1.80
X99 Extreme4
P1.80
X99 Extreme6
P1.80
X99 Extreme6/ac
P1.60
X99 Extreme11
P1.10
X99 OC Formula
P1.80
X99 Professional
P1.60
X99 WS
P1.70
X99 WS-E
P1.20
X99 WS-E/10G
P1.20
X99M Extreme4
P1.70
X99M Killer
P1.80
X99X Killer
P1.80
Stap 1. Verwijder alle onnodige PCI-E apparaten, inclusief 1 R9 295x2 VGA kaart, en zorg dat er slechts een enkele VGA kaart in het systeem is geplaatst als videouitgang.
Stap 2. Start het systeem op en ga het BIOS in.
Stap 3. Laad de standaard instellingen van het BIOS en sla deze op.
Stap 4. Ga de BIOS setup in en kies "Instant Flash" om te upgraden naar de nieuwste BIOS versie.
Stap 5. Na een succesvolle update kunt u de tweede R9 295x2 VGA kaart in uw systeem plaatsen.
Q (Q&A-116|391):
Als ik twee beeldschermen (DVI en D-sub) op een FM2A88X Extreme6+ aansluit en het systeem opstart, blijft het systeem hangen tijdens het opstarten van Windows 8.1. Hoe los ik dit probleem op?(3/1/2015)
Q (Q&A-115|384):
Wanneer 3DMark draait hangt het systeem tijdens sommige tests of krijg ik soms de foutmelding "process exited unexpectedly". Wat kan ik doen?(12/1/2014)
A:Controleer of de BIOS optie "APCI HPET table" is ingeschakeld, or zet de "Systeminfo Scan" optie uit in 3DMark.
Voor meer suggesties over 3DMark kunt u de 3DMark FAQ raadplegen op: http://www.futuremark.com/support/3dmark
Q (Q&A-112|363):
Ik gebruik een M.2 SATA3 6.0 Gbps module op een Fatal1ty 990FX Killer, zijn er tips om de prestaties te maximaliseren?(5/1/2014)
A:U kunt [IDE combine mode] uitzetten in BIOS > Advanced > Storage Configuration en de instellingen opslaan.
Alternatief kunt u het BIOS naar P1.10 of een nieuwere versie updaten, waarna het systeem deze instelling automatisch voor u zal aanpassen. BIOS download link
Q (Q&A-111|361):
Hoe zet ik de AMD Dual Graphics functie op AMD platformen aan?(3/1/2014)
A:Stap 1:
Zorg ervoor dat u twee geheugenmodules met een frequentie van 1866MHz of hoger in dual channel heeft geplaatst, en dat uw BIOS de nieuwste versie is, waarbij u de standaard UEFI "Dual Graphics" instelling op [Auto] heeft staan.
BIOS download link: https://www.asrock.com/support/download.asp
Stap 2:
Plaats een AMD RADEON PCI Express grafische kaart in de PCI-E sleuf.
Stap 3:
Sluit de monitor kabel aan op de onboard VGA aansluiting. Let er op dat het huidige VGA stuurprogramma / VBIOS alleen Dual Graphics via de onboard videouitgang kan uitvoeren. Voor toekomstige updates kunt u op onze website terecht voor meer informatie.
Stap 4:
Start uw besturingssysteem op.
Verwijder het AMD stuurprogramma als u deze op uw systeem geïnstalleerd heeft staan.
Stap 5:
Installeer het stuurprogramma voor de onboard VGA vanaf de ondersteunings-CD voor zowel de onboard VGA als de aparte grafische kaart.
Stap 6:
Herstart uw computer. Rechtsklik op de desktop. Klik "AMD VISION Engine Control Center" om deze te starten.
Stap 7:
Het is ook mogelijk om "AMD VISION Engine Control Center" op uw Windows taakbalk aan te klikken om deze te starten.
Stap 8:
In het AMD VISION Engine Control Center kiest u "Performance". Klik "AMD CrossFireTM".
Stap 9:
Klik "Enable CrossFire" en klik "Toepassen" om uw aanpassing op te slaan.
Stap 10:
Herstart uw systeem. Hierna kunt u gebruikmaken van de voordelen van de Dual Graphics functie.
Q (Q&A-107|358):
Mijn DN2800MT systeem heeft een vervormd beeld op het LVDS paneel bij het Windows 7 opstart scherm. Wat moet ik doen?(10/1/2013)
Q (Q&A-107|356):
Wanneer ik Windows 8.1 in GPT modus installeer staat er een watermerk in de hoek rechtsonder; "Secure boot isn't configured correctly". Hoe kan ik dit verhelpen?(10/1/2013)
A:Ga naar de BIOS\Security pagina om [Secure Boot] aan te zetten en kies "Install Default Secure Boot Keys", druk hierna op [F10] om de instellingen op te slaan en het systeem opnieuw op te starten .
Q (Q&A-105|348):
Ik kan mijn BIOS niet updaten via Internet Flash, wat moet ik doen?(7/1/2013)
A:U kunt de volgende stappen volgen:
1. Laad de default instellingen voor het BIOS en verzeker u ervan dat uw systeem is aangesloten aan het Internet.
2. Als uw Internet omgeving PPPoE is gaat u het "Network Configuration" in.
Stel "Internet Setting" in als "PPPoE" en vul uw gebruikersnaam en wachtwoord in.
3. U kunt de UEFI Download Server kiezen die het dichtst bij u in de buurt is.
4. Indien het probleem zich nog steeds voordoet kunt u het nieuwste BIOS vanaf ASRock's website downloaden en deze flashen, via Internet Flash updaten zal daarna voor de volgende BIOS versie wel beschikbaar zijn.
Download link: https://www.asrock.com/support/download.nl.asp
Q (Q&A-104|345):
Hoe kan ik de Wake On LAN functie in Ubuntu (Kernal versie 3.2.0-23) op de Vision 3D serie gebruiken?(4/1/2013)
A:Volg de onderstaande stappen op om de WOL functie te gebruiken.
1. Zet "Onboard LAN power on" aan in BIOS\Advanced\ACPI configuration.
2. Sluit een LAN kabel aan.
3. Zoek naar "terminal" in Dash Home en open het.
4. Installeer ethtool om WOL aan te zetten met het volgende commando. (Zie afbeelding)
#sudo apt-get update
#sudo apt-get install ethtool
#sudo ethtool –s eth0 wol g
#sudo reboot
5. Nu is het systeem klaar om via LAN gewekt te worden door andere computers.
Q (Q&A-104|343):
Hoe zet ik de geïntegreerde video op een FM2 moederbord uit?(4/1/2013)
A:Ga naar de BIOS\Advanced\North Bridge Configuration pagina, zet de [Share Memory] optie op Auto, en zet de [Dual Graphics] optie uit.
Q (Q&A-102|335):
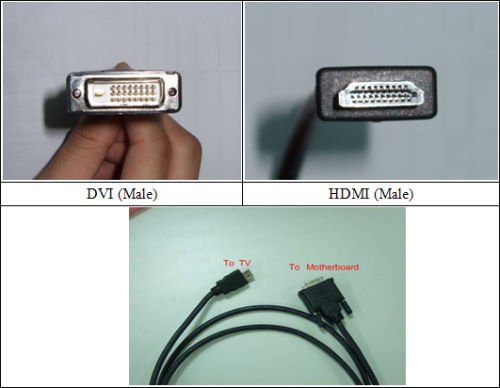
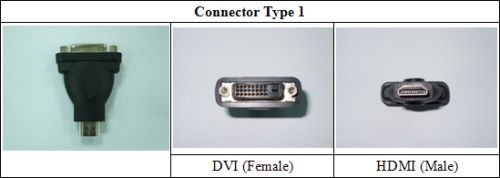
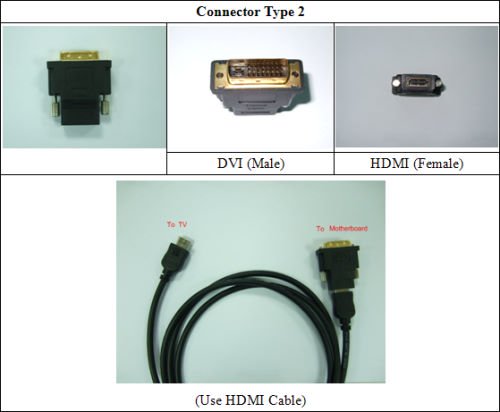
Kan mijn DVI poort audio signalen versturen, net als HDMI? Hoe laat ik dit werken met mijn HDMI monitor?(2/1/2013)
A:Zorgt u er alstublieft voor dat u aan de onderstaande voorwaarden voldoet.
1. De DVI poort op het moederbord moet HDCP ondersteunen.
Als u niet zeker bent over de specificaties van de DVI poort, kunt u deze informatie terugvinden op onze website.
2. Sluit een DVI naar HDMI adapter aan.
3. Wijzig de DVI functie optie naar [as HDMI] in BIOS\Advanced\North Bridge Configuration.
4. Stel HDMI bij Configuratiescherm\Geluid als standaard afspeelapparaat in.
Q (Q&A-101|333):
Waarom kan het systeem mijn HDDs niet detecteren bij een installatie van Windows XP?(1/1/2013)
A:Er zijn verschillende mogelijkheden die dit probleem kunnen veroorzaken, bekijk de volgende suggesties om uw systeem na te lopen.
1. Controleer of de SATA stroomkabel en SATA datakabel op het moederbord zijn aangesloten
2. Ga het BIOS scherm in, naar de "Advanced" pagina, en ga naar "Storage Configuration", stel de SATA modus hier in op [IDE].
Als u Windows XP in [AHCI] modus wilt installeren zult u, door de vereisten van Windows XP, eerst het SATA stuurprogramma moeten installeren, kijkt u in de volgende FAQ voor meer details.
Link: https://www.asrock.com/support/qa/TSDQA-45.pdf
3. Als u bovenstaande suggesties al heeft geprobeerd kunt u het beste uw SATA kabels en / of SATA poorten verwisselen ter verificatie.
Q (Q&A-101|330):
Na een update van het BIOS krijgen mijn Intel IVY Bridge CPU en Intel 6 serie chipset moederbord een Blauw scherm en kan Windows 8 niet meer opgestart worden. Wat moet ik doen?(1/1/2013)
A:Door de ME versie update heeft Intel ME het opstartgedrag van Windows 8 veranderd.
Gebruikt u de Windows 8 CD om uw systeem te repareren.
Q (Q&A-97|319):
Ik kan het LSI MegaRaid 9240-8i RAID ROM met het ASRock X79 platform niet binnenkomen, hoe doe ik dit?(8/1/2012)
A:Zet alle bootable apparaten in het BIOS uit, sla uw aanpassingen op en ga uit het UEFI.
Zodra het systeem opstart drukt u op om het LSI RAID ROM in te gaan.
Wanneer u klaar bent met de setup kunt u de bootable apparaten weer goed zetten door het BIOS in te gaan en de standaard (default) instellingen te laden.
Q (Q&A-97|318):
Na het updaten van het BIOS om Ivy Bridge CPUs te ondersteunen staat er een onbekend apparaat "INT33A0" in de device manager. Wat moet ik doen? (8/1/2012)
A:Dit is het Intel Smart Connect apparaat. U kunt de Intel Smart Connect optie in het BIOS uitzetten, of de onderstaande stappen volgen om het overeenkomende stuurprogramma te installeren.
Stap 1: Download het Intel Smart Connect stuurprogramma van onze website: https://www.asrock.com/support/download.nl.asp
Stap 2: Installeer het stuurprogramma en start het systeem opnieuw op.
Q (Q&A-96|317):
Mijn systeem herkent de VGA kaart niet en geeft d6 weer op Dr. Debug.(6/1/2012)
A:Aangezien sommige VGA-kaarten incorrecte informatie in hun vBIOS (Video BIOS) hebben staan, kunt u het beste contact opnemen met uw VGA-kaart verkoper, of uw moederbord BIOS naar de nieuwste versie updaten vanaf onze website: https://www.asrock.com/support/download.asp
Als u vragen heeft kunt u contact opnemen met ASRock TSD.
Q (Q&A-95|316):
Hoe installeer ik een besturingssysteem op een RAID volume van meer dan 2.2TB op een ASRock 970/990FX moederbord?(5/1/2012)
A:Volg onderstaande stappen om het Windows Vista/7 64bit besturingssysteem op het RAID volume te installeren:
Stap 1: Flash het BIOS naar de nieuwste versie.
Stap 2: Sluit alle HDDs aan en stel daarna het volgende in:
Zet de [SATA Mode] op [RAID Mode]
Wijzig [Onboard RAID 3TB+ Unlocker] naar [EFI Compatible ROM]
Deze opties kunt u vinden in het BIOS onder [Advanced] > [Storage Configuration]
Druk hierna op F10 om de instellingen op te slaan.
Stap 3: Druk F11 tijdens het opstarten en kies [Built-in EFI Shell].
Stap 4: Type "drvcfg", en u zult informatie zoals hieronder te zien krijgen:
Drv[4E] Ctrl[B5] Lang[eng]
Stap 5: Type "dh [Drv nummer]", bijvoorbeeld: "dh 4E".
Stap 6: Type "drvcfg –s [Drv nummer] [Ctrl nummer]" om de RAID Utility in te gaan.
Bijvoorbeeld: "drvcfg –s 4E B5"
Stap 7: Kies [Logical Drive Main Menu] om de RAID schijf in te stellen.
Stap 8: Kies [Logical Drive Create Menu] om een RAID schijf te creëren.
Stap 9: Kies [Usable Physical Drive List] om de RAID HDD te selecteren.
Stap 10: Druk op de spatiebalk op het toetsenbord om het selectievakje om te zetten.
Stap 11: Kies [Ld Size setting], en type de RAID grootte in.
Stap 12: Zodra de RAID grootte is ingesteld kiest u [Start to Create]
Stap 13: Druk op "F10" om het programma af te sluiten.
Stap 14: Tijdens het opnieuw opstarten drukt u op F11 om het Opstart Menu in te gaan.
Kies UEFI: CD/DVD Drive
* Deze optie wordt alleen getoond bij Windows7 64bit en Vista 64bit besturingssystemen.
Stap 15: Volg de Windows Installatie Handleiding om het besturingssysteem te installeren.
Laadt het nieuwste SATA RAID stuurprogramma ver.3.3.1540.22 tijdens de installatie van het besturingssysteem van onze website.
Stap 16: Installeer de nieuwste stuurprogramma's van de ASRock website.
Q (Q&A-95|312):
Wat zijn de basis benodigdheden voor Intel Smart Response Technologie?(5/1/2012)
A:Volgens het Intel document moet een systeem voor ondersteuning van Intel Smart Response Technologie over het volgende beschikken:
• Op Intel® Z68/Z77 Express Chipset-gebaseerd desktop moederbord
• Intel® Core™ i3/i5/i7 Processor in LGA 1155 uitvoering
• Systeem BIOS met SATA modus ingesteld op RAID
• Intel Rapid Storage Technologie software versie 10.5 of nieuwer
• Enkel of meerdere Hard Disk Drive(s) (HDD) in een enkel RAID volume
• Solid State Drive (SSD) met een minimale capaciteit van 18.6GB
• Besturingssysteem: Microsoft Windows Vista 32-bit Editie en 64-bit Editie, Microsoft Windows 7 32-bit en 64-bit Editie.
Meer informatie kunt u vinden in de gebruikersgids voor Intel Smart Response Technologie: http://download.intel.com/support/chipsets/sb/intel_smart_response_technology_user_guide.pdf
Q (Q&A-93|309):
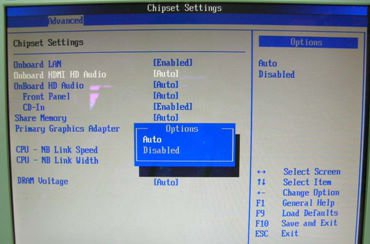
Hoe kan ik Dual-link DVI aanzetten op de AMD 880G en 890GX chipset series moederborden?(3/1/2012)
A:Zet in het BIOS de [Onboard HDMI HD Audio] optie op [Disabled].
Zie: BIOS -> Advanced -> North Bridge Configuration -> [Onboard HDMI HD Audio] -> Disabled.
A:Voor ondersteuning van Intel's next-gen 22nm CPU is een corresponderende BIOS versie, stuurprogramma's en een AXTU update nodig.
Volg onderstaande stappen op om het BIOS, de stuurprogramma's en hulpprogramma's te updaten.
Stap 1: Controleer uw BIOS versie.
Bekijk onderstaande tabel en update naar minimaal de aangegeven versie voor uw moederbord.
Als u dezelfde of een nieuwere versie van het BIOS op uw moederbord heeft hoeft u niet te updaten en kunt u stap 2 overslaan.
Model
BIOS Versie
H61M-VS R2.0
P2.10
H61M-HGS
P1.50
H61M-HVS
P1.90
H61M-HVGS
P1.70
H61M/U3S3
P1.70
H61M-ITX
P1.60
H61iCafe
P1.70
H61DE/S3
P1.70
H61DE/SI
P1.70
H61M-PS
P1.40
H61M
P1.70
H61DEL
P1.70
H61M-GE
P1.70
P65iCafe
P1.40
H61M-VS
P2.10
H61M-S
P1.50
H61M-GS
P1.50
Model
BIOS Version
Fatal1ty Z68 Professional Gen3
P2.10
Z68 Extreme3 Gen3
P2.10
Z68 Extreme4 Gen3
P2.10
Z68 Extreme7 Gen3
P2.10
Z68 Pro3
P2.10
Z68 Pro3 Gen3
P2.10
Z68 Pro3-M
P2.10
Z68M/USB3
P2.10
Z68M-ITX/HT
P2.20
Z68 Extreme4
P2.20
Model
BIOS Versie
Fatal1ty P67 Performance
P2.10
Fatal1ty P67 Professional
P3.10
P67 Extreme4
P3.10
P67 Extreme4 Gen3
P2.10
P67 Extreme6
P2.10
P67 Pro
P2.10
P67 Pro3
P3.10
P67 Pro3 SE
P2.10
Model
BIOS Versie
H67DE3
P2.10
H67M
P2.10
H67M-GE
P2.10
H67M-GE/HT
P2.10
H67M-ITX
P2.10
H67M-ITX/HT
P2.10
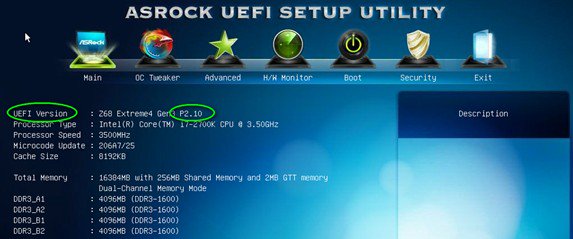
Er zijn twee manieren om uw BIOS-versie te controleren.
1) Start uw systeem op en druk op [F2] of [Delete] wanneer het ASRock opstart logo verschijnt, u kunt de BIOS of UEFI versie op het hoofdscherm vinden, zoals hieronder wordt weergegeven.
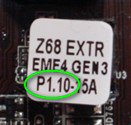
2) U kunt op de sticker die zich op de BIOS ROM chip bevindt de BIOS versie zien staan die vanaf de fabriek is meegeleverd toen uw moederbord werd gefabriceerd.
Stap 2: Het BIOS updaten
A), Als u een Sandy Bridge CPU heeft, of er een kan lenen van een vriend, kunt u gemakkelijk het BIOS zelf updaten.
Download het geschikte BIOS uit de bovenstaande tabel, en update het BIOS.
Voor verdere instructies klikt u op het "How to update" / "Hoe te Updaten" icoon in de corresponderende rij.
B), Als u geen Sandy Bridge CPU tot uw beschikking heeft, en er geen kunt lenen, kunt u contact opnemen met de winkel waar u het moederbord heeft gekocht om uw BIOS te laten updaten.
Dat is de een-na-snelste mogelijkheid om uw moederbord de Ivy Bridge CPUs te laten ondersteunen.
Als dit niet mogelijk is kunt u contact opnemen met de ASRock Technische Ondersteuning voor verdere hulp.
*Aantekening: Als u voor de update gebruik maakt van een USB flash drive moet u nadat het nieuwe BIOS naar de chip is geschreven op een toets drukken om het systeem opnieuw op te starten. Verwijder de USB flash drive nog niet. De Intel ME firmware update zal automatisch starten als deze benodigd is.
**Aantekening: Maak enkel gebruik van BIOS bestanden die u vanaf de ASRock website heeft verkregen.
Stap 3: Update het juiste Intel HD graphics stuurprogramma vanaf de ASRock website
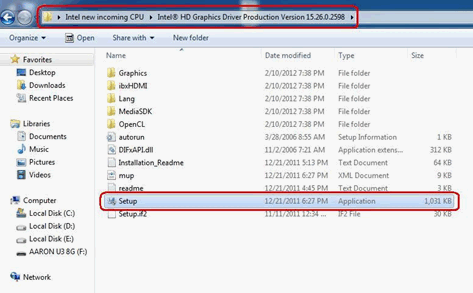
*Hoe u het Intel HD graphics stuurprogramma update:
1. Pak het bestand uit, open de map en start "setup".
2. Volg de aanwijzingen van het installatieprogramma op om het grafisch stuurprogramma te installeren.
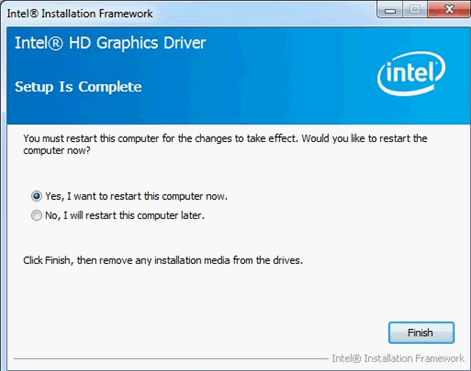
3. Wanneer de installatie klaar is ziet u de onderstaande melding, start uw systeem nu opnieuw op.
Stap 4: Installeer de juiste versie van de Intel Management Engine vanaf de ASRock website:
*Hoe u de Intel Management Engine update:
1. Pak het bestand uit, open de map en start "setup".
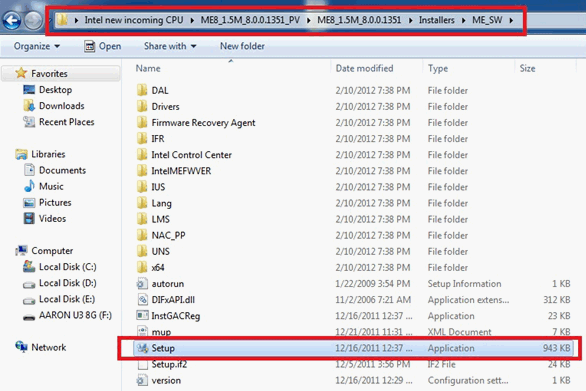
Route: Open de Intel ME8 map -> ME8_1.5M_8.0.0.1351 -> Installers -> ME_SW -> Kies "Setup".
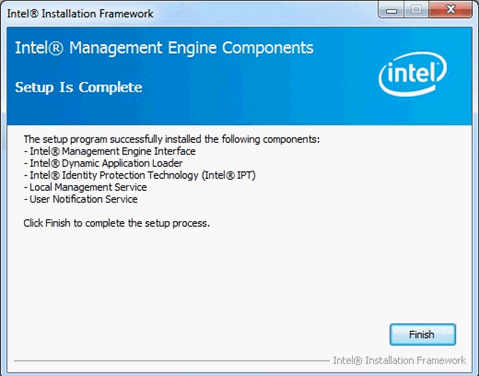
2. Volg de Intel installatie aanwijzingen op om het ME stuurprogramma te installeren.
3. Wanneer de installatie klaar is ziet u de onderstaande melding. Klik op "Finish".
Stap 5: Installeer het Intel Smart Connect stuurprogramma voor Microsoft Windows7 / 7 64-bit Besturingssysteem.
Stap 6: Update het ASRock AXTU Hulpprogramma.
Update naar de nieuwste versie van AXTU vanaf de ASRock website:
Stap 7: Vervang uw huidige CPU met een Intel Ivy Bridge CPU.
Q (Q&A-90|300):
Ik wil de OCZ RevoDrive PCI-E SSD uitbreidingskaart op het X58 platform gebruiken, welke aanpassingen moet ik in het BIOS maken?(12/1/2011)
A:Update het BIOS naar de nieuwste versie en controleer of [PCIE Max Payload Size] ingesteld staat op [128B].
U kunt deze optie vinden in het BIOS in [Advanced] -> [PCIE Max Payload Size]
De nieuwste BIOS versie vindt u via deze link: https://www.asrock.com/support/download.nl.asp
Q (Q&A-90|302):
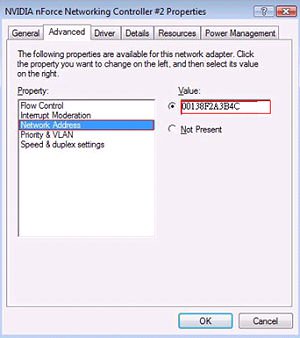
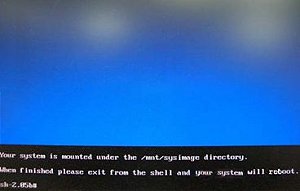
Wanneer het systeem uitgeschakeld is branden de lampjes op mijn USB toetsenbord en muis nog steeds, hoe zet ik deze uit?(12/1/2011)
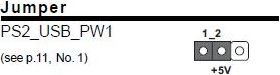
A:Als uw moederbord een PS2_USB_PWR1 jumper heeft, kunt u deze op pin 1-2 (+5V) zetten, zoals uitgebeeld op de onderstaande afbeelding.
Heeft u deze jumper niet, zet dan in uw BIOS de [Deep SX] optie op [Enable] of de [On/Off Play] optie op [Disabled].
Q (Q&A-90|301):
Hoe stel ik volledig gebruik van het geheugen in voor de RAM disk tool op een Intel platform?(12/1/2011)
A:Zet de [No-Execute Memory Protection] optie aan in het BIOS, u vindt deze in [Advanced] -> [CPU Configuration] -> [No-Execute Memory Protection]
Q (Q&A-89|298):
Als mijn muis of toetsenbord afwijkend functioneert in het BIOS, hoe kan ik dit probleem oplossen?(11/1/2011)
Q (Q&A-88|294):
Hoe kan ik de "Data Execution Protection (DEP)" ondersteuning van de processor aanzetten?(9/1/2011)
A:In het BIOS zet u [No execute Memory Protection] op [Enabled].
U kunt deze optie in het BIOS vinden bij Advanced -> CPU Configuration -> [No execute Memory Protection]
Q (Q&A-88|291):
Wanneer ik een ATI HD6670, HD6570, of HD6450 installeer op een A75/A55 serie moederbord krijg ik geen beeld via de videokaart. Wat kan ik doen?(9/1/2011)
Ook kunt u in het BIOS naar North Bridge Configuration gaan en daar [Dual Graphics] op [Disabled] zetten.
Q (Q&A-86|289):
Nadat ik een Microsoft® Windows® OS heb geinstalleerd in GPT modus en Ubuntu in MBR modus op twee verschillende hardeschijven, kan ik niet meer booten naar mijn Microsoft® Windows® omgeving, hoe los ik dit op?(6/1/2011)
A:U dient als eerste stap beide besturingsystemen ofwel in GPT ofwel in MBR modus te installeren.
Om beide besturingsystemen in GPT mode te installeren volgt u de volgende stappen:
1. Boot naar het BIOS [Boot] [PCI ROM Priority] kies [EFI Compatible ROM] en klik vervolgens op F10 om de wijzigingen op de slaan, en af te sluiten.
2. Klik vervolgens tijdens het booten op F11 en kies voor UEFI:[Jouw ODD naam] om het besturingsysteem te installeren.
Om beide besturingsystemen in MBR modus te installeren volgt u de volgende stap:
Klik tijdens het booten op F11 en kies voor AHCI/SATA [Jouw ODD naam] om het besturingsysteem te installeren.
Q (Q&A-85|285):
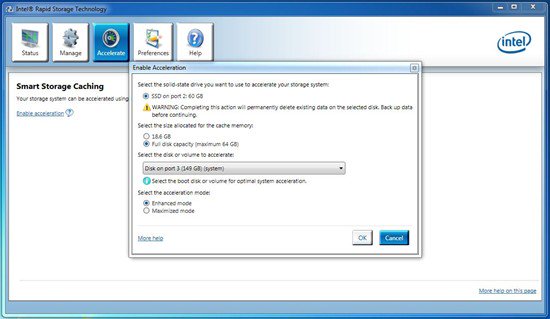
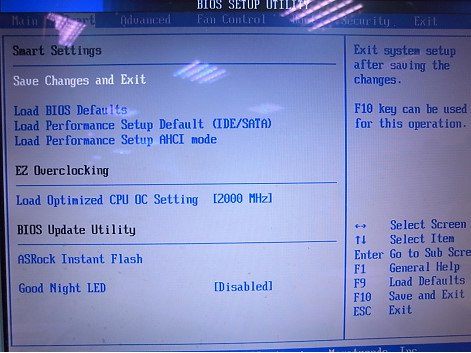
Nadat ik alle drivers vanaf de CD heb geinstalleerd kan ik de Intel Smart Response Technology niet aanzetten op mijn Z68 moederbord, wat moet ik nu doen?(5/1/2011)
A:Download en update als eerst zowel de BIOS als de Rapid Storage Driver van onderstaande links:
Als u dit gedaan heeft dient u onderstaande stappen te volgen voor het opzetten van de Intel Smart Response:
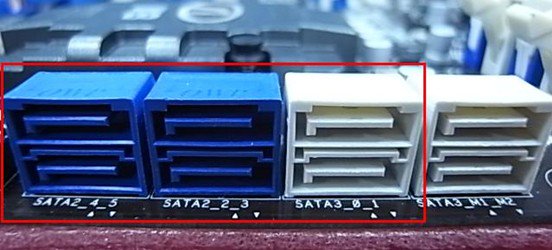
Stap 1. Verzeker uzelf ervan dat u uw hardeschijf op de ondersteunde sata aansluiting heeft aangesloten, voor de Z68 Extreme4 is dat op een van de hieronder getoonde aansluitingen.
Dit zijn de aansluitingen van de Intel PCH chipset welke Intel Smart Response Technologie ondersteunen.
Neem in acht dat op de Z68 Pro3 of de Z68 Pro3-M alle SATA aansluitingen ondersteund worden.
※ Note:
Wij raden gebruikers aan welke een SATA3 HDD gebruiken om deze ook op de SATA3 poort aan te sluiten. Sluit tijdens dit proces geen SSD's aan!
Stap 2. Druk op F2 of DEL om in het BIOS te komen > Advanced > Storage Configuration.
Stap 3. Zet SATA modus op [RAID Mode] zoals hieronder is aangegeven
Stap 4. In het RAID ROM scherm staat de status nu op " Non-RAID Disk"
Stap 5. Installeer uw OS op de SATA HDD, sluit na installatie het systeem af en sluit de SSD aan op de hierboven genoemde SATA aansluiting.
Stap 7. Als de installatie voltooid is herstart dan het systeem en open de Intel Rapid Storage Technologie.
Stap 8. Kies voor de optie "Accelerate" en kies voor de optie "Enable acceleration"
Stap 9. U kunt de standaard instellingen wijzigen als u dat wilt, klik hierna op ok.
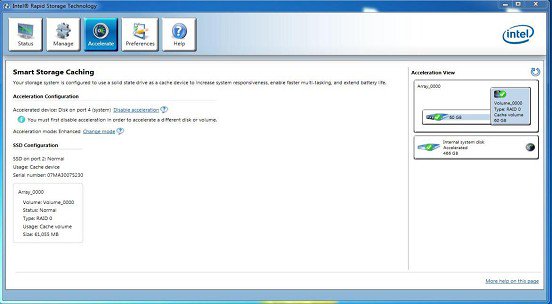
Stap 10. Zoals op opderstaande afbeelding is aangegeven ziet u dat de Storage Caching nu is ingeschakeld:
Q (Q&A-84|286):
What's the meaning of AMI UEFI BIOS Beep code?(4/1/2011)
A:Please refer to below form for the beep code and debug code of AMI UEFI BIOS.
Condition
Beeps Code
Debug Code
Normal
No beep
With goodnight LED enabled, debug code will disappear after the beep.
Bad CPU
No beep
No debug code
Bad memory
No beep
45
Without memory
3 long beeps
53
Without CPU
No beep(No Power)
No debug code
Without VGA card
5 long beeps
Beeps at"d6", then show "0d"
Q (Q&A-84|283):
I am an owner of AD425PV3/AD525PV3. I could not get any display after booting up my system; I could see CPU fan and power fan are spinning but no display, what should I do?(4/1/2011)
Q (Q&A-82|275):
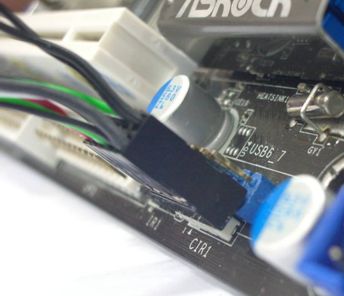
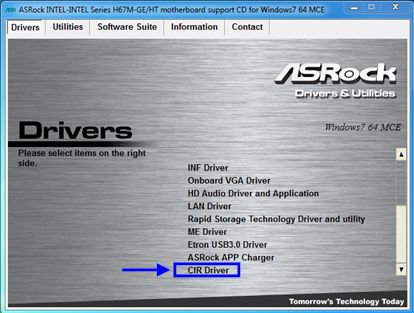
How do I connect the CIR receiver which bundle with H67M-GE/HT?(1/14/2011)
A:Step1. Please connect the USB front panel cable to CIR1 and USB 6_7 header.
The pin header mark in red is required to connect.
The properly connecting USB front panel cable with CIR header as below picture.
Step2: Please connect CIR receiver to USB front panel before booting up system.
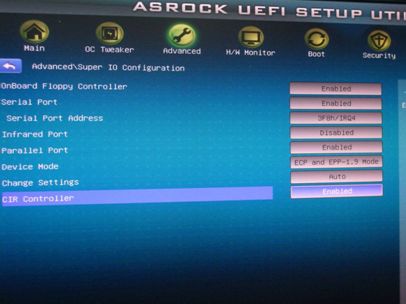
Step3: Enter BIOS setting screen and make sure the CIR controller is setting at [Enabled] (Advanced -> Super IO Configuration –> CIR Controller -> [Enabled])
(If you didn't see the CIR Controller option in BIOS, please shut down your system and plug CIR receiver to another USB port on front panel then try again)
Step4: Enter Windows, Execute ASRock support CD and install CIR Driver (it would be listed at the bottom of driver list)
Note: Please connect the CIR receiver to USB front panel before you boot up system.
Q (Q&A-78|263):
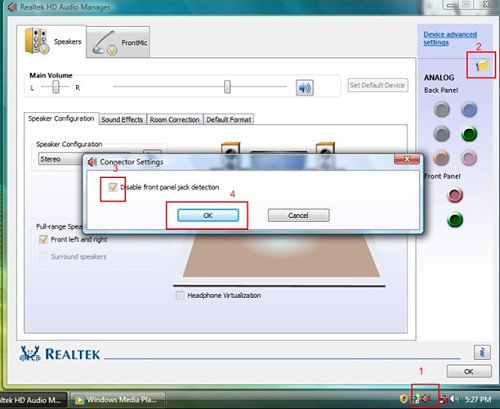
Als ik de AC'97 front audio panel wil gebruiken met een VIA codec moederbord, hoe moet ik de AC'97 front audio panel dan aalsuiten op de meoderbord header?(2/10/2010)
A:Als u gebruik maakt van de AC'97 front audio header sluit deze dan op de volgende HD audio header aan:
A. Verbind Mic_IN (MIC) met MIC2_L.
B. Verbind Audio_R (RIN) met OUT2_R en Audio_L (LIN) met OUT2_L. C. Verbind Grond (GND) met grond (GND).
D. MIC_RET en OUT_RET zijn exclusief voor HD audio panel. Als u uitsluiten AC'97 gebruikt is het niet noodzakelijk om deze aan te sluiten.
E. Ga naar uw BIOS Setup Utility. Kies voor Advanced Settings, and selecteer hier
Chipset Configuration. Zet de Front Panel Control optie van [Auto] naar [Enabled]. Voor Windows® XP
F. Sart Windows op. Klik rechtsonderin in het scherm op VIA ADeck.
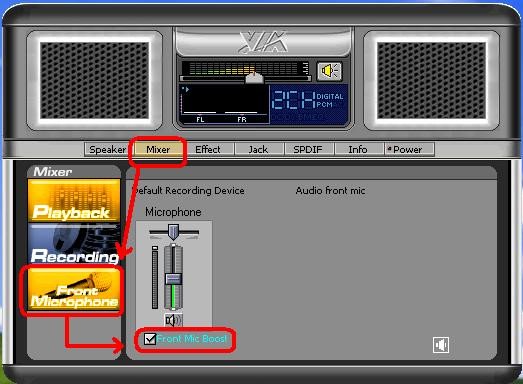
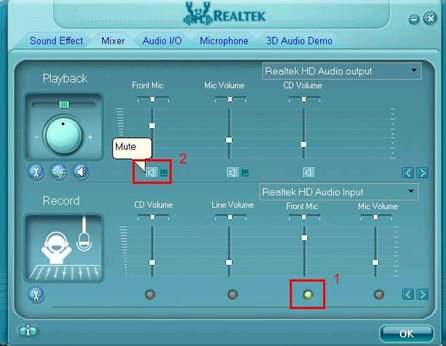
Klik hier op "Mixer", selecteer "Front Microphones", kies voor "Front Mic Boost", sluit vervolgens af zoals op onderstaande afbeelding:
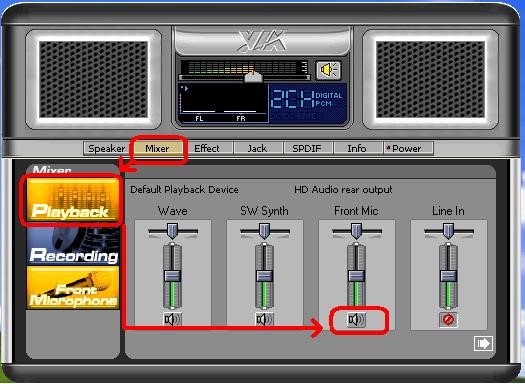
H. Als u uw eigen stem door de Front Mic wilt horen klikt u op "Mixer", selecteer "Play Back", kies dan voor "Front Mic" en sluit weer af, zoals op onderstaande afbeelding is voorgedaan: Voor Windows® Vista™ / Windows® 7
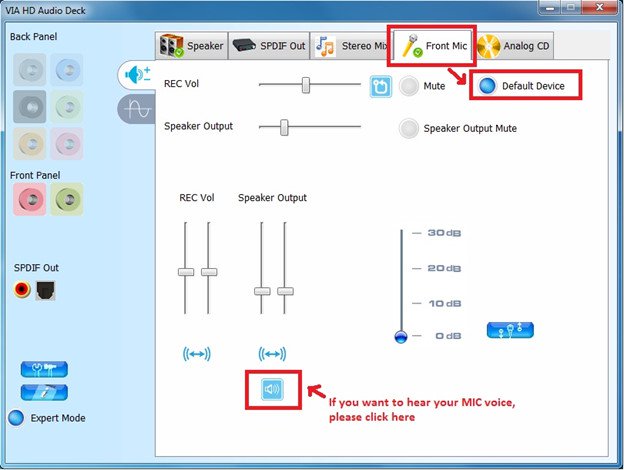
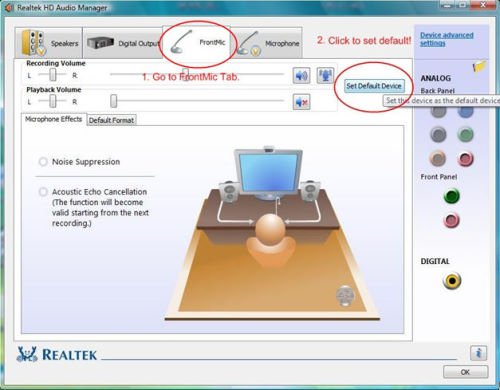
F. Ga naar uw BIOS "Chipset Settings" pagina, manual [Front Panel] naar [Enable].
G. Start Windows op. Klik rechtsonderin in het scherm op VIA ADeck. Klik op "Front Mic", selecteer hier "Default Device"
H. Als u uw eigen stem door de Front Mic wilt horen klikt u op de "Speaker Output" icoon, onderstaande afbeelding is een voorbeeld:
Q (Q&A-77|261):
Waarom krijg ik nogsteeds uitroeptekens in apparaatbeheer, na het installeren van windows7 en alle drivers op een AliveNF7G-Glan of een N68PV-GS?(11/21/2009)
Q (Q&A-76|258):
Is ere en mogelijkheid om de led uit te zeggen bij ION 330 ?(10/22/2009)
A:Ja dit is mogelijk. Update eerst de BIOS naar P1.60. Als dit gedaan is vind u in uw BIOS onder het tab SMART de optie "Good Night LED". Zie ook onderstaande afbeelding.
If you set "Good Night LED" to [Enabled], the system would turn LED off.
Q (Q&A-74|253):
Nadat ik EZ OC ingesteld heb om een hogere frequentie te nemen op mijn ION330 komt er geen POST meer, wat doe ik nu?(8/11/2009)
A:lees alstublieft de volgende instructies.:
Druk eerst 3 keer op de aan/uit knop.
Zet daarna de ION330 drie keer aan en weer uit.
Druk op tijdens het opstarten en zet in het BIOS de standaard instellingen terug..
Als u nogsteeds een zwart scherm krijgt probeer dan een clear CMOS uit te voeren.
Maakt u de bovemkant op en en verwijder de DVD-ROM.
Q (Q&A-73|250):
Ik kan een 64Bit OS niet virtualiseren in Sun's xVM virtual Box met een AMD CPU, wat kan ik doen?(6/25/2009)
A:1. Wees er zeker van dat uw OS 64Bit is en dat uw CPU AMD-V ondersteunt
2. Schakel [Secure Virtual Machine] in binnen het BIOS.
3. kies voor de [Enable Nested Paging] in Sun's xVM virtual box software.
Nu kunt u 64Bit virtualiseren.
Q (Q&A-72|248):
Als ik een eSATA HDD inplug kan deze wel in het BIOS worden herkend, en word hij ook herkend in het OS, maar krijg ik de melding dat het apparaat niet gebruikt kan worden. Wat moet ik nu doen? (3/28/2009)
A:Volgt u alstublieft onderstaande stappen om dit probleem op te lossen:
1.Opent u de Intel® Matrix Storage Console,en klik met rechts op eSATA hard device. Klik op [Reset Hard Drive to Non-RAID].
2.nadat u op [Reset Hard Drive to Non-RAID] geklikt heeft herstart u de PC.
3.Start het schijfbeheer, deze herkent uw eSATA HDD, creëer hier een nieuw simpel volume op.
4.Hierna kan de eSATA HDD herkend worden.
Q (Q&A-72|247):
ik wil Linux CentOS 5.2 op mijn X58SuperComputer installeren. Na het starten van de installatie van CentOS 5.2blijft het system mijn hardware controleren Ik kan niet verdergaan met de installatie, wat kan ik doen?(3/28/2009)
A:Volg onderstaande stappen om Linux CentOS 5.2 te installeren.
1.Ga naar het BIOS en schakel daar lan1 en lan2 uit.
2.Enter Ga naar het boot menu en start de Linux CentOS 5.2 installatie.
3.Selecteer de opties zoals in onderstaande afbeelding word aangegeven.
4.Na de installatie van CentOS 5.2 kunt u hier uw LAN drivers downloaden.
Link:http://www.realtek.com/downloads/downloadsView.aspx?Langid=1&PNid=13&PFid=5&Level=5&Conn=4&DownTypeID=3&GetDown=false#2
5.verwijder alstublieft standaard en de r8169 LAN driver met het volgende commando:
# cp -p r8168-8.011.00.tar.bz2 ~
# cd ~
# tar vjxf r8168-8.011.00.tar.bz2
# cd /lib/modules/`uname -r`/kernel/drivers/net/
# rm -f r8169.ko
# cd ~
# cd r8168-8.011.00
# make clean
# make modules
# make install
# depmod –a
# reboot
6.Als het upgraden van de LAN driver is gelukt start u de PC opnieuw op, ga tijdens het opstarten naar het BIOS en schakel daar LAN1 en LAN2 weer in.
Q (Q&A-71|246):
Bij gebruik van Vista 64bit SP1 OS, geeft de [Event viewer] in het OS de error Kernel-Processor-Power error, Maar het OS werkt gewoon goed. Hoe kan ik deze foutmelding kwijtraken uit de [Event viewer]?(2/27/2009)
A:Dit is vanwege een limitatie in het OS, Windows XP kan geen MBR aan groter dan 2TB.
Controleer de BIOS instellingen.
A)-> Als u een Intel CPU gebruikt [Enable] de [Intel® Speedstep ™ tech] optie in het BIOS.
B)-> Als u een AMD CPU gebruikt [Enable] de [Cool'n'Quiet] optie in het BIOS.
C)->Als uw CPU geen [Intel® Speedstep ™ tech] of [Cool'n'Quiet] ondersteunt, neem dan contact op met ASRock TSD via deze link: https://www.asrock.com/support/TSD.asp
Q (Q&A-70|244):
Na het instellen van een RAID configuratie groter dan 2TB kan deze niet meer herkend worden in XP na de installatie van de drivers, hoe kan dit?(1/12/2009)
A:Dit is vanwege een limitatie in het OS, Windows XP kan geen MBR aan groter dan 2TB.
Als u toch gebruikt wilt maken van een 2TB RAID configuratie dan heeft u de volgende 3 opties:
1. Uw OS moet Windows Vista x86 SP1 of Windows 7 x64 of hoger zijn.
2. EFI BIOS.
3. GPT disk formaat.
Onderstaande link is een referentie naar meer informatie.
Link: http://support.microsoft.com/?scid=kb;en-us;946557&x=9&y=7
http://www.microsoft.com/whdc/device/storage/GPT_FAQ.mspx
Q (Q&A-68|238):
I am using Intel® chipset X48 / X38 / P45 / P43 / G43 / P35 / G31 / P965 series motherboard with 4GB memory modules installed. But it always detects the memory size as 3GB instead of 4GB at POST screen. What should I do?(10/23/2008)
A:Please enter BIOS setup and enable the "Memory Remap Feature" option.
(BIOS / Advanced / Chipset Configuration / Memory Remap Feature)
Q (Q&A-67|237):
When I install a Terratec Cinergy C PCI TV card or Technisat Cablestar HD2 TV card on VIA® chipset based motherboards, such like 4CoreDual-SATA2 (PT880 series motherboards) or ALiveSATA2-GLAN, it always show "PCI IRQ routing table error" message after BIOS POST, or simply hang up during BIOS POST. Any way to fix the problem?(9/5/2008)
A:Due to compatibility issue of VIA® chipset with Terratec Cinergy C PCI TV card and Technisat Cablestar HD2 TV card.
We don't recommend using this kind of TV card on VIA® chipset motherboards. Sorry for your inconvenience.
Q (Q&A-66|233):
I use Intel® CPUs, why the Vcore sometimes is lower than the value in the BIOS?(7/31/2008)
A:VCore on Pentium 4 (and newer generation CPUs) is no longer static. Please refer to the Intel® document below. It shows that the Vcore will decrease with the CPU loading increasing. That's why the Vcore may be lower.
(From: http://download.intel.com/design/processor/datashts/318732.pdf)
Q (Q&A-65|231):
When installing NVIDIA GeForce 8400/8500 series PCIE VGA card on K10N78hSLI-WiFi / K10N78hSLI-1394 / K10N78hSLI-GLAN under Windows® XP/ XP 64-bit, I can not get full system memory. Besides, system shows two display adapters in the Device Manager. What can I do? (6/26/2008)
A:While system boot up, please press "F2" to enter BIOS set up screen. Please go into BIOS setup and set "Hybrid SLI" option to [Disabled] in BIOS>Advanced>Chipset Configuration.
Q (Q&A-64|227):
How do I get my onboard LAN to work properly?(4/28/2008)
A:Here are some suggestions:
1.Make sure the "Onboard LAN" option was enabled in BIOS.
2.Make sure the LAN driver was installed properly. Please check it in "Device Manager".
3.Update the BIOS of your motherboard to the latest one.
4.Try the newer LAN driver from ASRock or chipset vendor's website.
ASRock: https://www.asrock.com/support/Download.asp
Realtek: http://www.realtek.com.tw/default.aspx
NVIDIA: http://www.nvidia.com/Download/index.aspx?lang=en-us
VIA
5.Change another LAN cable. (For Gigabit LAN, please make sure your LAN cable could fully work with Gigabit LAN.)
6.Reinstall the operating system.
Q (Q&A-61|218):
When I install AMD® Phenom CPU on ALiveNF6G-VSTA, I found Windows® Vista™ shows yellow " ! " mark on PCI Express standard Root Port in Device Manager. What do I solve it?(1/14/2008)
A:Please kindly update BIOS P2.20 or later for ALiveNF6G-VSTA to solve the problem.
BIOS Download: https://www.asrock.com/mb/download.asp?Model=ALiveNF6G-VSTA#bios
Q (Q&A-61|221):
My motherboard is 4Core1600Twins-P35/4Core1600P35-WiFi(+). I want to overclock my FSB 800 CPU. Are there any tips to increase the overclocking capability of my system?(1/14/2008)
A:First of all, please update the BIOS to P1.10 or later.
(Download: https://www.asrock.com/support/download.asp?Model=P35 )
Secondly, please adjust the FSB jumper setting on the motherboard according to the following instructions (this will set the DRAM: FSB (frequency) to 1:1)
After doing the above steps, you may set the "Overclock Mode" to [Manual] in the BIOS>Advanced> CPU Configuration and then adjust the "CPU Frequency" to overclock your system.
Q (Q&A-61|219):
I can not access my SATA ODD drives (such like: LG BD/HD Player GGC-H20L, Pioneer BDC-SB20K, Pioneer DVR-212BK…) on ALiveNF7G-HDReady under Vista™. What can I do?(1/14/2008)
A:Please refer to below steps to run these SATA ODD drives with AHCI mode.
1. Please set AHCI Mode in BIOS setting (-> BIOS -> Advanced -> IDE Configuration -> SATA Operation Mode -> AHCI Mode).
2. Reinstall Windows® Vista™ with AHCI Mode.
3. After Windows® Vista™ installation, please re-install all drivers and software.
Q (Q&A-60|215):
I'm using the AMD® AM2 Athlon 64X2 5000+ Black Edition CPU. The ratio of this CPU is unlocked. I would like to overclock it by adjusting the ratio. But after adjust the CPU ratio in BIOS and boot into the Windows, the ratio of this CPU does not change. What should I do?(12/19/2007)
A:Actually, it is AMD® CPU driver's behavior. To perform overclocking please disable the "Cool 'n' Quiet" function in BIOS-> Advanced-> CPU Configuration-> Cool'n'Quiet. Please refer to the following picture.
Q (Q&A-59|214):
I use a NVIDIA® 8800GT PCIE VGA card on VIA® chipset motherboard. But I got black screen on the monitor. How do I solve it?(11/5/2007)
A:The NVIDIA® 8800GT PCIE VGA card is GEN2 mode VGA card. Unfortunately VIA® chipset does not support GEN2 mode VGA card. The only solution is to set 8800GT PCIE VGA card to GEN1 mode.
We have tested 8800GT PCIE VGA card. After flashing GEN1 mode BIOS for 8800GT, it works fine on VIA® chipset motherboard.
Please contact VGA card vender to get the VGA BIOS with GEN1 mode for your 8800GT PCIE VGA card.
Q (Q&A-55|203):
I use an external USB HDD on ALiveNF7G-HD720P/ALiveNF7G-HDready. I feel that the speed of USB is slower. Is there any method to improve it?(6/25/2007)
A:Please kindly refer to below steps for try.
1.Open Notepad and type following registry entry.
2.Save file as "USB.reg".
3.Double click this file to add the information to the registry.
4.Reboot system.
Q (Q&A-55|202):
ALiveNF7G-HD720P/ALiveNF7G-HDready support HDMI output?(6/25/2007)
A:Yes, ALiveNF7G-HD720P/ALiveNF7G-HDready supports HDMI output.
However, a DVI to HDMI cable or adapter is required.
DVI to HDMI cable
DVI to HDMI Connector
Besides the DVI to HDMI cable/adapter, please also do the following settings in BIOS SETUP and Windows® Vista™/Vista 64-bit:
1.In BIOS SETUP, go to "Advanced"->"Chipset Configuration", and set the option "Onboard HDMI HD Audio" to [Auto].
2.Under Windows® Vista™/Vista 64-bit, go to "Sound" settings and select the Digital Output Device (SPDIF) as a playback device.
You can find more detail information in user manual page 13:
Q (Q&A-52|197):
If the MIDI/GAME port is enabled in the BIOS setup, the device manager will show yellow "!" under Windows® Vista™. Why?(3/19/2007)
A:Microsoft® had removed the support for MIDI/GAME port under Windows® Vista™. Please kindly refer to below Q&A No.4:
http://forums.microsoft.com/TechNet/ShowPost.aspx?PostID=2319740&SiteID=17
Q (Q&A-51|195):
I am using the ConRoeXFire-eSATA2/ 775XFire-eSATA2+/ 775XFire-eSATA2/ 775XFire-VSTA/ 775XFire-RAID motherboard. My Operating system was installed in a SATA/ SATA2 HDD with "IDE" mode. When I install the SATA2 driver (Intel® Matrix Storage Manager), system always pops an error message "This computer does not meet the minimum requirements for installing this software". Why?
IDE mode (In BIOS setup):
SATA2 driver:
Error Message: (2/15/2007)
A:The Intel® Matrix Storage Manager (SATA2 driver) is for RAID or AHCI mode. If your operating system was built by "IDE" mode, you don't need to install it.
Q (Q&A-49|189):
I have AM2NF6G-VSTA/ALiveNF6G-DVI motherboard. The onboard LAN does not work properly under Windows® Vista™. How can I solve this?(12/19/2006)
Solution2.
Or please refer following steps to re-write MAC address under Windows® Vista™.
Step1: Check MAC address.
When system boot up, press "F2" to enter BIOS setting.
Boot-> "Boot settings Configuration" -> set "Boot From Onboard LAN" to "enable".
Press "F10". System will restart.
Please "F11" and select "NVIDIA Boot Agent".
Then you will see MAC address, pls. record it with no space for later usage.
Step2: Boot system into Window Vista
Right click "Computer" and click "Properties"
Step3:
Click "Device Manager"
Step4:
Click "Continue"
Step5.
Right click "Networking Controller" and click "Properties".
Step6:
Choose "Network Address" in "Advanced " folder.
Write "MAC Address" which got from step1 into Value item.
Then click "OK".
Q (Q&A-49|188):
I am using an AMD® AM2 rev.G CPU on AM2V890-VSTA/ ALiveSATA2-GLAN. I have enabled the "Cool'n'Quiet" in BIOS setup, installed the "K8 CPU driver" from support CD and chosen the "Minimal Power Management" in OS, but the Cool'n'Quiet function still does not work. What can I do?(12/19/2006)
A:First, please make sure that if your CPU supports the Cool'n'Quiet function.
Second, please download the new "AMD® Cool'n'Quiet Driver" from the following website and install it. It will activate the Cool'n'Quiet function properly.
AM2V890-VSTA:
https://www.asrock.com/mb/download.asp?Model=AM2V890-VSTA
ALiveSATA2-GLAN:
https://www.asrock.com/mb/download.asp?Model=ALiveSATA2-GLAN
Q (Q&A-49|13):
I am using the AMD® AM2 rev.G CPU. But the system always stops at POST after I turn on the system. I can't go into the operating system. What should I do?(12/19/2006)
A:For supporting AMD® AM2 rev.G CPU, please follow the steps to update the BIOS of your motherboard to the latest one.
1.Please press the "F2" key continuously right after turn on the system until it goes into the BIOS setup.
2.Please disable the "Cool'n'Quiet" function in BIOS setup.
3.Press "F10" key to save configuration changes and exit setup.
4.You can start to update the BIOS now.
How to update BIOS?
https://www.asrock.com/support/DOS.html
BIOS download page.
https://www.asrock.com/support/download.asp?c=All
Q (Q&A-48|187):
I have 939Dual-SATA2 / 939Dual-VSTA / 939A8X-M / K8A8X-M / K8Upgrade-1689/K8Combo-Z motherboard. When using Nvidia 7600GS/6600LE/6800GS/7800GS "AGP" card, I am not able to install the VGA card driver. How can I solve this?(11/19/2006)
A:This problem will occur on some AGP cards which does not use native AGP chip, but use native PCI-E chip with an "PCI-E to AGP Bridge" to become AGP interface.
Please set "AGP P2P Deep Fifo" to [Enable] in the BIOS. (Advanced>Chipset Settings>AGP P2P Deep Fifo)
It may need to upgrade the BIOS for this option:
Q (Q&A-46|183):
My system is based on 775Dual-VSTA / ALiveSATA2-GLAN / AM2V890-VSTA with Windows® XP / Windows® 2000 operating system. After updating to the latest BIOS, I found two issues.
1.I can't find the "HD Audio Driver and Application" link in the menu of support CD.
2.There is a yellow exclamation mark in Device Manager.
What could I do?(9/19/2006)
A:1.If your CD is IVD12/ IVD12b (775Dual-VSTA), AV890-10 (ALiveSATA2-GLAN) or AV31/ AV31b (AM2V890-VSTA), you will get the issue.
Please execute the "Setup.exe" file from following directory of support CD.
775Dual-VISTA-> IVD12
CD\Drivers\Audio\REALTEK\MCE_XP_2K (R1.36)\
775Dual-VISTA->IVD12b
CD\Drivers\Audio/ REALTEK\MCE_XP_2K (R1.41)\
ALiveSATA2-GLAN -> AV890-10
CD\Drivers\Audio\REALTEK\MCE_XP_2K (R1.39)\
AM2V890-VSTA -> AV31/ AV31b
CD\Drivers\Audio\REALTEK\MCE_XP_2K (R1.39)\
2:The yellow exclamation mark in Device Manager is unnecessary. It will not affect the system at all. Please follow below steps to remove it.
Right-click "My Computer" on your desktop, and click "Properties".
Select "Hardware", and click "Device Manager".
In "Device Manager", double-click the option "System Devices". You will find "VIA® Standard PCI to PCIE Bridge" item with a yellow exclamation mark.
Right-click "VIA® Standard PCI to PCIE Bridge", and select "Uninstall". Confirm your choice by clicking "OK".
After a few seconds, click "Scan for hardware changes" icon on the top.
Q (Q&A-46|182):
I'm using the Core 2 Duo E6XXX CPU and DDRII 533/667 RAM on 775Dual-VSTA motherboard. But the system is very unstable. Sometimes it gets blue screen or fail when installing the Windows® XP or some applications. How do I fix this problem?(9/19/2006)
A:Please refer to following steps to fix this problem.
Please set the "DRAM Frequency" as "[333MHz (DDRII 667)]" in BIOS setup if you use DDRII 667 RAM. (BIOS/ Advanced/ Chipset Configuration/ DRAM Frequency)
Please enable the "Flexibility Option" in BIOS setup if you use DDRII 533 RAM. (BIOS/ Advanced/ Chipset Configuration/ Flexibility Option)
If the problem still remains, please update the BIOS to P1.80 or later version.
https://www.asrock.com/mb/download.asp?Model=775Dual-VSTA#bios
Q (Q&A-45|181):
What key should I press to enter into BIOS setup? What key should I press to enter into boot menu?(8/18/2006)
A:To enter BIOS setup, please press "F2" repeatedly right after you turn on the computer until system goes into BIOS setup.
If you want to enter into boot menu, please press "F11"
Q (Q&A-45|180):
When I use Maxtor Diamond Max 17 SATAII HDD to install Windows® XP on 775i65GV / 775i65G / P4i65G / ConRoe865PE / ConRoe865GV, the first screen of Windows® XP installation takes long time and system hang up at partition HDD stage. What could I do?(8/18/2006)
A:You could refer to the following steps for try.
1. Enter the BIOS and Load BIOS default setting (F9).
2. Disable "Spread Spectrum" option. BIOS -> Advanced -> CPU configuration -> Spread Spectrum -> Disable.
3. Save changes and Exit BIOS (F10).
Q (Q&A-45|179):
My motherboard is AM2XLI-eSATA2. How do I install Windows® XP on SATA HDD in AHCI mode?(8/18/2006)
A:You need to make a SATA driver diskette before you start the OS installation. Please refer to the following steps:
Enter "SATA Operation Mode" in BIOS setup to set the option to [RAID].
Insert the ASRock Support CD into your optical drive to boot your system.
During POST at the beginning of system boot-up, press key, and then a window for boot devices selection appears. Please select CDROM as the boot device.
When you see the message on the screen, "Do you want to generate Serial ATA driver diskette [YN]?", press .
Then you will see these messages, Please insert a diskette into the floppy drive.
WARNING! Formatting the floppy diskette will lose ALL data in it!
Start to format and copy files [YN]?
Please insert a floppy diskette into the floppy drive, and press .
The system will start to format the floppy diskette and copy SATA drivers into the floppy diskette.
Restart and enter "SATA Operation Mode" in BIOS setup to set the option to [AHCI].
At the beginning of Windows® setup, press F6 to install a third-party SCSI or RAID driver. When prompted, insert a floppy disk containing the ULi® RAID driver. After reading the floppy disk, the driver will be presented. Select the driver to install according to the mode you choose and the OS you install.
Q (Q&A-44|177):
I'm using a SATA HDD. My computer was running fine. But one day I turn on my computer, it keeps restarting itself after Windows® Logo page (at startup). Do you have any idea what possibility causes this?(7/21/2006)
A:This may be that your system was installed in IDE (or non-RAID) mode. But now it is set to RAID (AHCI) Mode. Please try to set it back to the IDE (non-RAID) mode in the BIOS>Advanced>IDE Configuration.
Here are some examples, please refer to the user manual for details.
VIA® and Nvidia chipset:
Please set SATA Operation Mode to [non-RAID]
Intel® Chipset:
Please set Configure SATA as [IDE]
775Twins-HDTV (R2.0) or P4Twins-HDTV:
Please set ATA Combination Mode to [Enable]
Q (Q&A-44|176):
I use 775VM800/P4VM800/K7S41GX/K7S41 motherboards. Do these models support 1440x900 resolution?(7/21/2006)
A:If your board is 775VM800, please update BIOS to P1.50 or later version.
https://www.asrock.com/mb/download.asp?Model=775VM800
If your board is P4VM800, please update BIOS to P1.60 or later version.
https://www.asrock.com/mb/download.asp?Model=P4VM800
If your board is K7S41GX, Please update BIOS to P2.50 or later and VGA driver to 3.73 or later version.
https://www.asrock.com/mb/download.asp?Model=K7S41GX&s=462
If your board is K7S41, Please update BIOS to P2.30 or later and VGA driver to 3.73 or later version.
https://www.asrock.com/mb/download.asp?Model=K7S41&s=462
VGA Driver for K7S41 / K7S41GX: http://www.sis.com/download/agreement.php?id=155931
Q (Q&A-43|175):
How do I use 4 SATA HDDs to build system in RAID0 mode on K8SLI-eSATA2, 939SLI-eSATA2 and 939SLI32-eSATA2?(5/24/2006)
A:If you want to build a system in RAID 0 mode with 4 SATA HDDs, please follow below steps:
1.Enter the BIOS and set "SATA Operation Mode" to RAID mode.
BIOS -> Advance -> IDE Configuration -> SATA Operation Mode -> RAID
2.Set "eSATAII Support" to Disable.
BIOS -> Advance -> IDE Configuration -> eSATAII Support -> Disable
3.Press "F10" to save and exit.
4.When you boot up system, press "CTRL+ A" to go into ULI RAID Utility screen, and choose "Create RAID 0 Stripe X4 for Performance" option to build a RAID system with 4 SATA HDDs.
You could refer BIOS SETUP UTILITY of user manual to adjust BIOS setting.
K8SLI-eSATA2 user manual page 42.
https://download.asrock.com/Manual/K8SLI-eSATA2.pdf
939SLI-eSATA2 user manual page 43.
https://download.asrock.com/Manual/939SLI-eSATA2.pdf
939SLI32-eSATA2 user manual page 41.
https://download.asrock.com/Manual/939SLI32-eSATA2.pdf
Q (Q&A-43|174):
If I use Conroe 1066-CPU on 775Dual-VSTA. What kind of memory should I use?(5/24/2006)
A:If the BIOS version is P1.00, we recommend to use DDR400 and DDRII667 memory module; however, BIOS version is P1.10 and later can support DDR400, DDRII533 and DDRII667, so if you will use DDRII533 modules on your system, we suggest you update bios to P1.10 or later version.
https://www.asrock.com/mb/download.asp?Model=775Dual-VSTA#bios
Q (Q&A-42|173):
How do I enable Intel® Matrix Storage Manager on 775XFire-eSATA2 and 775XFire-RAID?(4/21/2006)
A:In order to enable Intel® Matrix Storage Manager, please refer to the following steps:
Enter into BIOS to set your SATA hard disk in AHCI mode or RAID mode.
(BIOS->Advance->IDE Configuration ->Configure SATA as-> [ AHCI or RAID] )
Make a SATA driver diskette with support CD before installing your system.
Please press "F6" to load Intel® SATA driver during operating system setup.
Please refer to Setting Up a "RAID Ready" System of User Manual of Support CD. (...\Information\Manual\User\)
Install the SATA2 Driver from support CD after the installation of Windows® 2000 / Windows® XP / Windows® XP 64-bit OS.
Q (Q&A-42|170):
When I use DDR 400 (200 MHz) memory on my board, it shows that the DRAM frequency is running at DDR 333 (166MHz) in BIOS main page. The BIOS option "DRAM Frequency" is set at default setting "Auto". Why?(4/21/2006)
A:In order to get the best system compatibility and stability, we make it to run at DDR 333 (166MHz) when DDR 400 (200MHz) memory is installed and BIOS option "DRAM Frequency" is selected to "Auto". If you want to run DDR 400 (200MHz), please kindly adjust the BIOS option "DRAM Frequency" to DDR 400 (200 MHz) manually.
Q (Q&A-41|167):
I installed a SATA hard disk and a CD/DVD drive on 775Twins-HDTV/P4Twins-HDTV, connected the hard disk to SATA1 connector and the CD/DVD to IDE1. Enabled "ATA Combination Mode" in BIOS settings. But the motherboard could not detect the CD/DVD drive. Why?(3/20/2006)
A:Please connect SATA hard disk to SATA1 connector and CD/DVD drive to IDE2. When you enable "ATA Combination Mode", only SATA1 and IDE2 connectors can work, other connectors are disabled. We recommend you to disable "ATA Combination Mode". In that case all 4 SATA and 2 IDE channel can work, and you can get the advantages of SATA hard disks.
Q (Q&A-41|168):
My motherboard is 775XFire-RAID, its SATA controller is in Intel® ICH6R. But when I install windows 2000/XP and press F6 to load the SATA driver diskette, I cannot see the items for ICH6R. What should I do?(3/20/2006)
A:Please press "↓" to expend the menu. The items of ICH6R are under the items of ICH7R. Please choose RAID or AHCI that correspond with the item "Configure SATA as" in BIOS settings.
Q (Q&A-40|164):
If I use AC'97 front audio panel with, how do I connect to the High Definition Audio header on the motherboard and get front audio work?(2/17/2006)
A:If you use AC'97 audio panel, please install it to the front panel audio header as below:
A. Connect Mic_IN (MIC) to MIC2_L.
B. Connect Audio_R (RIN) to OUT2_R and Audio_L (LIN) to OUT2_L.
C. Connect Ground (GND) to Ground (GND).
D. MIC_RET and OUT_RET are for HD audio panel only. You don't need to connect them for AC'97 audio panel.
E. Enter BIOS Setup Utility. Enter Advanced Settings, and then select Chipset Configuration. Set the Front Panel Control option from [Auto] to [Enabled]. For Windows® XP
F. Enter Windows® system. Click the icon on the lower right hand taskbar to enter Realtek HD Audio Manager. Click "Audio I/O", select "Connector Settings", choose "Disable front panel jack detection", and save the change by clicking "OK". For Windows® Vista™
F. Enter Windows® system, 1: Double click the icon on the lower right hand taskbar to enter Realtek HD Audio Manager. 2: Click the "Folder" icon at the top-right corner. 3. Check "Disable front panel jack detection". 4. Click "OK".
(Please refer to the following picture)
G. To activate the front mic: For Windows® XP:
Please select the Front Mic as default record device in No. 1.
If you want to hear your voice through Front Mic, please deselect "Mute" in No. 2 For Windows® Vista™:
1.Go to the "FrontMic" Tab in the Realtek Control panel.
Click "Set Default Device" to make the Front Mic as the default record device.
Q (Q&A-37|156):
I am a K8NF4G-SATA2 / 939NF4G-SATA2 user. Is it possible that I can adjust the onboard VGA shared memory to 256MB?(11/18/2005)
A:In BIOS SETUP, the Maximum onboard VGA shared memory option is 128MB. If you want to set it to 256MB, please install 512MB or greater system memory and set the onboard VGA option to "Auto" in BIOS SETUP. Then the VGA driver will dynamically allocate the shared memory size to 256MB.
Q (Q&A-37|155):
When I play media files with SATA hard disk on 939A8X-M / K8A8X-M / K8Upgrade-1689 / K8COMBO-Z, the screen lags and the sound also becomes abnormal. How should I fix this problem?(11/18/2005)
A:Please install the ULi SATA RAID drivers. Even you set non-RAID mode in BIOS and install OS successfully, please still install the Uli SATA RAID driver to get better performance on SATA devices.
Q (Q&A-37|157):
I installed a Windows XP operating system for 775Twins-HDTV in my SATA HDD. I want to duplicate my SATA HDD to another new SATA HDD by using GHOST program. After finished, the new duplicated SATA HDD cannot boot up. What should I do?(11/18/2005)
A:We recommend you to install Windows XP on your original SATA HDD again and install the SATA drivers at the beginning of Windows XP installation. Please refer to the following steps:
Step 1: Please go to BIOS to disable the "ATA Combination Mode", or you can reserve it as default value. (BIOS/ Advanced/ IDE Configuration/ ATA Combination Mode/ Disabled)
Step 2: Please press "F6" to install SATA drivers at the beginning of the Windows XP installation.
Step 3: Install the SATA drivers. (Please make a SATA Driver Diskette at first. Please refer to the 775Twins-HDTV user manual page 25.)
Step 4: Start to install the operating system.
Step 5: After finished the Windows XP installation, we recommend you to install the SATA driver from support CD.
Step 6: Now, you can start to duplicate the HDD by using GHOST program.
Q (Q&A-36|152):
How do I use "Boot from Network" function on ASRock motherboard?(10/17/2005)
A:Please press F2 when power on, enter the BIOS setting menu. Select the screen "Boot". Go to the sub screen "Boot settings Configuration". Set the item "Boot From Network" to "Enable". Press F10 to save the setting and reboot.
After restart, press F11 and select Network as the boot device. Or press F2 and enter the sub screen "Boot Device Priority" in BIOS "Boot" screen to change the boot priority of Network.
Q (Q&A-35|151):
I use an AMD Sempron 2500+ 64bit CPU with K8Upgrade NF3/ K8 Combo-Z/ K8Upgrade-VM800/ K8Upgrade-PCIE/ K8Upgrade-1689/ K8A8X-M motherboard. According to the specification of the boards, it supports CPU Vcore adjustment and CPU multiplier setting functions. However, the "Processor Voltage" and "Processor Multiplier" options are showed as gray in BIOS, I can't change it. Why?(9/20/2005)
A:According to AMD CPU specification, some of AMD 754 pin Sempron 64bit rev. E CPUs (e.g. Sempron 64bit 2500+, 2600+ and 2800+) have only one allowable state on CPU Vcore, so if user plugs in this kind of CPU, the "Processor Voltage" and "Processor Multiplier" options will be shown as gray and cannot be adjusted in BIOS.
Q (Q&A-33|146):
I would like to install Red Hat Linux 9.0 on my VIA 8237/8237R based motherboards. But after I finished the installation of Red Hat Linux 9.0, it hung with kernel panic during boot-up. The error message is shown as below:
How do I fix this problem?(7/15/2005)
A:Please add VIA vmlinuz-2.4.20-8-IDE patch to Linux kernel by following steps.
First, copy the patched kernel (vmlinuz-2.4.20-8-ide) into floppy disk. Then, select one of the cases applies to your situation below.
(a)Clean install the Red Hat Linux 9.0.
Before exiting the installation of Red Hat Linux 9.0, press ++ to enter console mode. Then skip the case (b) to proceed.
(b)Use the kernel in existing Red Hat Linux 9.0 system.
Make sure the first boot device is CD_ROM in your system BIOS, then put the installation CD 1 into CD-ROM. When booting the installation CD, type the following command when the "boot:" message appears on the screen.
linux rescue /* press enter */
Then follow the instructions, and select the partition that the existing Red Hat Linux 9.0 is located in the "system to rescue" window. Then it will enter the console mode after a while.
Console mode:
After entering the console mode, run the following commands.
# cd /mnt/sysimage /* press enter */
# mount /dev/fdo mnt /* after type this command, insert the floppy and press "enter" */
# cp mnt/vmlinuz-2.4.20-8-ide boot/ /* reading the floppy for a while */
# vi boot/grub/menu.lst /* press enter and it will enter /mnt/sysimage/boot/grub/menu.lst file */
Under /mnt/sysimage/boot/grub/menu.lst file press "A" to enter insert mode.
Add the following lines into /mnt/sysimage/boot/grub/menu.lst file.
title Red Hat Linux (2.4.20-8) IDE-patched /* press enter */
root (hd0,0) /* press enter */
kernel /vmlinuz-2.4.20-8-ide ro root=LABEL=/ /* press enter */
initrd /initrd-2.4.20-8.img /* press Esc to leave insert mode */
Press Esc to leave insert mode and type the command below.
:w! /* press enter to save file */
It will appear the message "boot/grub/menu.lst" 24L, 802C
Then, reboot system and enter the "Red Hat Linux (2.4.20-8) IDE-patched" kernel. The problem would not happen again.
Q (Q&A-32|144):
I am using AMD FSB 200Mhz CPU on K7VT4A PRO, I cannot set my DDR333/ DDR400 memory to DDR333/ DDR400 under BIOS setting. Why?(6/23/2005)
A:For K7VT4A PRO, if you are running with FSB 200 MHz CPU, DDR SDRAM supports 266Mhz only. So you are not able to change the memory speed under BIOS setting.
Q (Q&A-32|143):
I have a P4i65PE motherboard. The SPEC of P4i65PE supports "Bypass Access Technology (BAT)" on ASRock website. How do I get this function to work?(6/23/2005)
A:If you want to use Bypass Access Technology, the configuration of your system has to conform to the following conditions:
1.FSB 800 CPU
2.DDR 400 memory
3.BIOS version P1.10 or higher
Please refer to our website to download the BIOS.
https://www.asrock.com/mb/download.asp?Model=P4i65PE
If your configuration conforms to these conditions, please enter BIOS setup => Advanced => Chipset Configuration to enable "Bypass Access".
Q (Q&A-32|142):
I used Sempron 2600+/2800+ CPU with K8Upgrade-760GX / K8Combo-Z. The specification of the boards can support CPU Vcore adjustment and CPU multiplier setting functions. But in the BIOS setting, this option is showed as gray and can not change the setting. Why?(6/23/2005)
A:We found some of Sempron 2600+/2800+ which lock the Vcore and multiplier. It is not able to change the CPU setting even we have the option in BIOS. Please leave this option as default setting.
Q (Q&A-31|139):
I am going to use K8 Combo-Z / 939A8X-M / K8Upgrade-1689 / K8A8X-M to build up my system. I found that there is a new option "SATA Operation Mode" was added in the latest production BIOS. What is the option for? How should I set it?(5/15/2005)
A:The "SATA Operation Mode" provides two choices to install OS on the SATA hard disk.
There are two options for "SATA Operation Mode": RAID (Default) and non-RAID.
a. When choosing "RAID" mode, you have to create a SATA floppy image diskette by the support CD and press "F6" to install SATA driver at the beginning of Windows XP/2000 installation.
If you want to install Windows XP/2000 on the SATA hard disk and also want to use RAID function, please set the option to "RAID".
If you want to install Windows 98SE/ME on the SATA hard disk, please set the option to "RAID". Please also install the latest LAN driver (3.10a or newer version) for your new system.
b. When choosing "non-RAID" mode, it is not necessary to create a SATA floppy image diskette by the support CD nor press "F6" to install SATA driver at the beginning of Windows XP/2000 installation.
It is also convenient for users who do not have floppy drive.
If you want to install Windows XP/2000 on the SATA hard disk but do not want to use RAID function, please set the option to "non-RAID".
Q (Q&A-31|140):
I am a K8Upgrade-VM800 / P4VM8 / 775VM8 / P4V88+ / 775V88+ user. I found that a new option "SATA Operation Mode" was added in the latest production BIOS. What is the option for? How should I set it?(5/15/2005)
A:The "SATA Operation Mode" provides two choices to install OS on the SATA hard disk.
There are two options for "SATA Operation Mode": RAID (Default) and non-RAID.
a. When choosing "RAID" mode, you have to create a SATA floppy image diskette by the support CD and press "F6" to install SATA driver at the beginning of Windows XP/2000 installation.
If you want to install Windows XP/2000 on the SATA hard disk and also want to use RAID function, please set the option to "RAID".
If you want to install Windows 98SE/Me on the SATA hard disk, please set the option to "RAID".
b. When choosing "non-RAID" mode, it is not necessary to create a SATA floppy image diskette by the support CD nor press "F6" to install SATA driver at the beginning of Windows XP/2000 installation.
It is also convenient for users who do not have floppy drive.
If you want to install Windows XP/2000 on the SATA hard disk but do not want to use RAID function, please set the option to "non-RAID".
Q (Q&A-31|138):
My Windows® 98SE / ME system is built by K8 Combo-Z / 939A8X-M / K8Upgrade-1689 / K8A8X-M. I found the latest released BIOS which was added a new option-SATA Operation Mode. Can I use the BIOS for my system?(5/15/2005)
A:Before flashing to the latest BIOS, please update your LAN driver to the latest one (3.10a or newer version). Please refer to our download site to find the latest LAN driver.
https://www.asrock.com/support/download.asp
Q (Q&A-28|126):
I am a P4i48 user. After I installed Intel INF driver and restarted the system, it could not enter into OS. Why?(2/18/2005)
A:Please make sure that the "Floppy Drive" option which in the BIOS SETUP is not set to "Not Install". Doing so may cause the system cannot enter into OS after Intel INF driver installation.
If you want to disable floppy drive in the BIOS SETUP, please disable "Floppy Controller" at the same time to prevent the problem.
Q (Q&A-27|125):
I want to install Linux Red Hat 9.0 with HT CPU on my P4i65GV. After installation completed and entered into OS, there are two kinds of OS for choosing: 2.4.20-8smp, and 2.4.20-8. When entering into OS 2.4.20-8smp and selecting shut down, it will not shut down properly. How should I solve the problem?(1/18/2005)
A:All ASRock motherboards support ACPI. Since Red Hat 9.0 is APM mode O/S, please refer to https://www.asrock.com/support/Download/P4i65GV.asp to download special BIOS which supports APM. After special BIOS updated, please type the command "Linux apm=power_off" at the beginning of Linux Red Hat 9.0 installation.
Q (Q&A-27|124):
If I use only one 128MB memory on the ASRock board with integrated VGA (ex. K7VM3, K7S41/GX, etc...), what share memory size should I choose?(1/18/2005)
A:Since the share memory uses the system memory, for better system performance, we recommend you to set share memory size to 32MB or less in the BIOS setting. (For Intel chipset based motherboards, please refer to TSD-QA-08 (June, 13th, 2003) https://www.asrock.com/support/QA/TSDQA-08.pdf)
Q (Q&A-27|123):
If I use a SATA HDD and an IDE HDD together on P4i65GV, how do I boot from SATA HDD?(1/18/2005)
A:If you connect SATA HDD and IDE HDD together on P4i65GV, you will see an item of the BIOS setting- Hard Disk Drives (please refer to the following pictures).
Please entry the setting, choose your SATA drive as the "1st Drive" and then press "F10" to save the setting and exit.
Q (Q&A-27|122):
My hard drives are Maxtor Diamond MAX 10 and MaxLine III SATA 250 GB and 300 GB with 16 MB cache buffer. My hard drives can not be detected correctly during the POST, what can I do?(1/18/2005)
A:Please update to the newest BIOS of motherboard. If you still encounter problem, please contact Maxtor and update to the newest firmware of hard drives.
Q (Q&A-26|121):
I used Prescott CPU and P4i45GV/P4i65GV. I wanted to use NT4.0, but the installation can not be completed. What should I do?(12/15/2004)
A:For Prescott CPU, some OSes (ex.NT4.0) can not be installed. In order to boot legacy OSes that cannot support CPUs with extended CPUID functions, please flash to the latest BIOS to enable "Max CPUID Value Limit" (Advanced => CPU Configuration)
We don't provide drivers for NT4.0. If you need drivers for NT 4.0, please refer to following websites to get them.
VGA driver for P4I45GV/P4I65GV: http://downloadcenter.intel.com/
Q (Q&A-24|115):
My motherboard is K7S41(GX), what should I set in the BIOS setup to use the on-board VGA with a PCI VGA card for dual monitors function?(10/15/2004)
A:To use on-board VGA with a PCI VGA card for dual monitors function, please enter the "Advanced" -> "Chipset Configuration" -> "Onboard Share memory" and adjust "Auto" to any other values (32MB, 64 MB, or 128 MB) in the BIOS setup.
Q (Q&A-23|112):
My ASRock motherboard supports Hybrid Booster. Is Hybrid Booster a utility to install? Where can I get it?(9/14/2004)
A:The Hybrid Booster features supported on each models are a little different.
Please go to https://www.asrock.com/mb/index.asp and find the specification of your motherboard and check the exact features supported.
Actually, Hybrid Booster is a combination of several features which have already been provided with the motherboards.
1. CPU Multiplier: Adjusted by setting onboard FID jumpers.
2. CPU Vcore adjustment: Adjusted by setting BIOS setup option.
3. CPU Frequency Stepless control: Adjusted by setting BIOS setup option.
4. AGP/PCI Frequency control: Adjusted by setting BIOS setup option.
5. ASRock U-COP: Hardware feature, no need to be adjusted.
6. Boot Failure Guard: BIOS feature, no need to be adjusted.
Please refer to https://www.asrock.com/feature/HybridBooster/HybridBooster.html for detailed explanations.
Q (Q&A-23|111):
I use 3.2G/3.4GHz CPU on P4i65GV / P4i48 / 775i65GV. But CPU speed shows 2.8G? How do I fix it?(9/14/2004)
A:Because you use the new CPU and it is necessary to update the microcode for CPU support. Please update to the latest BIOS.
https://www.asrock.com/mb/download.asp?Model=P4i65GV#bios
https://www.asrock.com/mb/download.asp?Model=P4i48#bios
https://www.asrock.com/mb/download.asp?Model=775i65GV#bios
Q (Q&A-22|109):
My motherboard is K7S8X. I can't format my Samsung hard drive and install OS. What should I do?(8/16/2004)
A:Please try to update latest BIOS for K7S8X first and then go to BIOS SETUP -> Advanced -> Chipset Configuration -> IDE Driving. Please try to adjust the option.
Q (Q&A-22|106):
Does my ASRock K7 motherboard, which supports Athlon XP FSB 333 MHz CPU, support AMD® Sempron CPU?(8/16/2004)
A:Yes, all ASRock motherboards, which support Athlon XP FSB 333 MHz CPU, would support AMD® Sempron CPU by updating the BIOS. Also ASRock K8S8X motherboard would support AMD® Sempron CPU by updating the BIOS. Please refer to ASRock web site for more information. https://www.asrock.com/support/CPU.asp
Q (Q&A-21|105):
I have an ASRock INTEL ICH5 south bridge based motherboard (P4i65GV, P4i48..). In BIOS setup---IDE Configuration---Onboard IDE Operate Mode, there are two options "Enhanced Mode" and "Compatible Mode". Which one should I select? What is the difference between them?(7/12/2004)
A:Please select [Compatible Mode] if you are using legacy OS (Windows ME / 98SE) with both IDE and SATA devices. If you are using legacy OS (Windows ME / 98SE) with IDE device only, please select [Enhanced Mode]. If native OS (Windows 2000 / XP) is used, please select [Enhanced Mode] no matter you are using either IDE and SATA devices or IDE device only.
When [Enhanced Mode] is selected, the next option will be "OnBoard IDE Controller".
You may enable either the primary IDE channel or the secondary IDE channel. Or you may enable both the primary and the secondary IDE channels by selecting [Both]. Set to [Disabled] will disable the both. Configuration options: [Disabled], [Primary], [Secondary], [Both].
When [Compatible Mode] is selected, the next option will be "Combined Mode Option".
It allows you to select between [Pri IDE + SATA] and [SATA + Sec IDE]. If it is set to [Pri IDE + SATA], then the secondary IDE will not work. Likewise, if it is set to [SATA + Sec IDE], then the primary IDE will not work.
Q (Q&A-21|104):
My motherboard is K7S8X. When I connect my HDD on primary IDE with jumper setting at master and AOpen DVD\CD-RW combo drive on primary IDE with jumper setting at slave, it takes more than 1 minute to login Windows XP. How can I solve this problem?(7/12/2004)
A:To solve this issue, please connect the HDD on primary IDE with jumper setting at master and AOpen DVD\CD-RW combo drive on secondary IDE with jumper setting at master. Or you can update the motherboard's BIOS to version 2.40 or later to solve this https://www.asrock.com/mb/download.asp?Model=K7S8X#bios
Q (Q&A-20|99):
I have installed 1 SATA HDD and 1 IDE HDD (or SCSI card with SCSI HDD) on my P4i48 motherboard, how can I select IDE HDD (or SCSI HDD) in the Boot Device Priority?(6/11/2004)
A:If you would like to select IDE HDD in the Boot Device Priority menu, please set the IDE HDD to the first device of boot sequence in the Hard Disk Drives menu first.
AMI core 8 based BIOS would separate connected bootable devices into 3 groups, Hard Disk, Removable, and CD/DVD drives. Only first boot sequence of device in each group can be selected in the Boot Device Priority menu.
Q (Q&A-18|91):
I bought a new large size (80GB) HDD. After I installed it to my ASRock M/B, the BIOS only recognized it as a 32GB HDD. How can I get the full capacity of the HDD?(4/15/2004)
A:Please understand that most HDDs provide a jumper setting that will limit the maximum capacity, such as 32GB or 2GB. Please kindly double check the jumper setting of your HDD, and adjust the jumper setting to the correct position instead of the "Limit drive capacity" position.
Q (Q&A-18|89):
My on-board LAN is not working, I found that the MAC address of my on-board LAN is 00-00-00-00-00-00 or FF-FF-FF-FF-FF-FF. What's wrong?(4/15/2004)
A:The MAC address of the on-board LAN is erased. After updating the BIOS or clearing the CMOS, please boot up the system and enter the BIOS setup. After loading the BIOS default, please exit and save changes. Failing to do so may cause the MAC address disappeared. If the MAC address is gone, please contact ASRock technical support engineer for help. ( https://www.asrock.com/general/about.asp?cat=Contact )
Q (Q&A-17|88):
My motherboard is P4S61. If I connect the hard drive and non-UDMA CD-ROM on the same IDE channel, I can not install Windows® XP. What can I do?(3/15/2004)
A:Please try the latest BIOS from https://www.asrock.com/mb/download.asp?Model=P4S61&s=478 or connect the hard drive and CD-ROM to two different IDE channels.
Q (Q&A-17|86):
My motherboard is Intel or ALi south bridge based motherboard. When I connect the ATX power connector to the motherboard, the system power on right away. Why?(3/15/2004)
A:This issue will happen if CMOS checksum is bad. Please enter the BIOS setup then load BIOS default setting to solve this issue.
Q (Q&A-16|84):
My motherboard is K7S8XE, what is the function of USB 2.0 controller option in the BIOS setup?(2/17/2004)
A:If USB 2.0 controller is disabled, the USB controller will be 1.1 only. We realized that some USB devices, especially external USB box of hard disk drive, are over the USB 2.0 specification and it may not be recognized in the Windows OS. Under this situation, please disable the USB 2.0 controller.
Q (Q&A-15|80):
My motherboard is K7S8X R 3.0. How much Vcore voltage would be increased if I enable "Over Vcore Voltage" in the BIOS setup?(1/14/2004)
A:If the "Over Vcore Voltage" is enabled in the BIOS setup, the Vcore voltage would be increased by 5 %.
Q (Q&A-15|79):
My motherboard is K7S8XE+. There are error messages appeared when I am making the SATA driver diskette. What should I do?(1/14/2004)
A:If you have trouble to make this floppy disk, you can follow the instructions below to solve the problem.
1, Please update BIOS to P1.50 or higher version. You can find the latest BIOS version on our website: https://www.asrock.com/mb/download.asp?Model=K7S8XE%2b&s=462
2, Please connect a hard disk drive to your system when making this floppy disk.
3, Please do not use Mitsumi 48A0W CD drive or Mitsumi 5600W CD drive on your system when making this floppy disk. However, you can use them on your system after you finish making this floppy disk.
Q (Q&A-15|78):
In GE Pro-M2 latest BIOS advanced menu, there is one option named "Flexibility". What's the function?(1/14/2004)
A:The default value of this option is "Disabled". It allows better tolerance for memory compatibility when it is set to "Enabled".
ASRock also offers the hot key "Home" to enable Flexibility. Before the system boot up, please keep pressing hot key "Home" first, then push the power button to boot the system up. When the POST screen appears, the function "Flexibility" is enabled.
Q (Q&A-14|75):
My parallel port printer can't work normally with my ASRock motherboard. What should I do now?(12/12/2003)
A:Please try to go to BIOS SETUP -> Advanced menu -> Peripheral Configuration -> Parallel Port Mode, and set it to "Normal".
Q (Q&A-14|74):
I'm using an add-on LAN card on my ASRock motherboard. The LAN card provides a "Wake On LAN" connector with a cable. Is there a connector on the motherboard so that I can plug this cable?(12/12/2003)
A:There's no need to connect this cable to the motherboard and you are still able to use the "Wake On LAN" feature with the add-on LAN card. To use it, please remember to enable the "PCI Device Power On" option in BIOS.
Q (Q&A-13|68):
My motherboard is SiS chipset based K7S8XE, why my USB 2.0 hard disk box can not be recognized under Windows XP?(11/14/2003)
A:We have experienced that some USB 2.0 boxes may not conscientiously follow the USB 2.0 specification to design, so it cannot operate properly with USB 2.0 specification. Please update the newest BIOS, and then disable the USB 2.0 controller in the BIOS SETUP. At this moment, the USB 2.0 box may have chance to operate with USB 1.1 specification.
Q (Q&A-13|69):
In the beginning of P4VT8 SATA driver diskette creating process, my USB keyboard seems doesn't work. What should I do?(11/14/2003)
A:In order to fix this problem, please go to BIOS SETUP -> Advanced menu -> Chipset Configuration -> USB Device Legacy Support and set it to "Enable". For best system stability, please set it back to "Disable" after the SATA driver diskette creating process.
Q (Q&A-13|70):
When I try to create my K7S8XE+ SATA driver diskette and boot up with the driver CD, the system locks up. What should I do now?(11/14/2003)
A:Before the SATA driver diskette creating process, please go to BIOS SETUP -> Advanced menu -> Peripheral Configuration -> Onboard SATA and set it to "Disable".
After the driver diskette creating process completed, please set Onboard SATA back to "Enable" in the BIOS.
Q (Q&A-12|63):
When I was installing the Windows 98SE on K7VT4-4X motherboard, the H/W info error message appeared while last 3 minutes of installation, what should I do?(10/15/2003)
A:Please make sure the year is correctly set in BIOS setup. For example: year 2003.
Q (Q&A-12|62):
I'm using an ASRock motherboard which supports Hyper-Threading technology. How come there is no Hyper-Threading technology option in BIOS setup?(10/15/2003)
A:The Hyper-Threading technology option in BIOS will appear only when a Hyper-Threading technology CPU is installed.
Q (Q&A-11|59):
I'm using an AGP 8X card to replace the old AGP 4X card on P4VX4. In the BIOS, I can see AGP mode icon when the AGP 4X card is installed. But there is no AGP mode option when AGP 8X card is installed. Why?(9/15/2003)
A:When an AGP 8X card is detected, the system will run at AGP 8X automatically. At this moment, the AGP mode option is not provided.
Q (Q&A-11|58):
When I run the "GHOST" program on my K7S8X, the speed of "GHOST" seems slower than others. How could I improve it?(9/15/2003)
A:Please set "PCI IDE BusMaster" to "Enable" in the BIOS SETUP IDE Devices menu, thanks.
Q (Q&A-10|52):
What is Boot Failure Guard (B.F.G)? How do I enable this function?(8/15/2003)
A:It is an ASRock new technology. While the system could not boot up normally at overclocking setting, the safe boot up mode will be issued from B.F.G and provides a BIOS setting interface for parameter reset/correction.
You don't need to adjust any setting to enable B.F.G. It is a basic function for ASRock motherboard.
Q (Q&A-9|46):
How could I use Wake on LAN function?(7/9/2003)
A:All of ASRock motherboards support Wake on LAN. Please enable the "PCI Device Power On" in the Power menu of BIOS. After saving the changes and exit the BIOS, please boot into the Windows OS then shut down the system.
Now, the system is ready to be woken up through LAN by other computers.
Q (Q&A-9|45):
I'm using ASRock motherboard. In the BIOS, I found that the Vcore is a little bit higher. Is this normal?(7/9/2003)
A:The value is still in tolerance of the CPU SPEC. It's more stable to set the Vcore a little higher under CPU SPEC. Please do not worry about it.
Q (Q&A-9|44):
When I manually increase CPU host frequency in the BIOS on K7S8X(E), will AGP and PCI speed up at the same time?(7/9/2003)
A:When CPU host frequency is increased, BIOS will automatically run the AGP/PCI frequency around 66/33MHz. Therefore, AGP card and PCI devices can work under SPEC even CPU frequency is set to perform over clocking.
Q (Q&A-8|41):
I found two digits or letters changing at the right bottom corner during POST screen. What is it?(6/13/2003)
A:This is the BIOS POST code. It represents each step BIOS does during POST screen.
Q (Q&A-8|39):
When I use ASRock P4i45G(L) M/B, I see there is 1MB shared memory from the system memory shown in the POST screen during boot process. What is the 1MB shared memory used for? (6/13/2003)
A:The 1MB memory is used for VGA BIOS (before loading OS).
A:Please unplug the ATX power and remove the battery, use a metal material like paper clip to short the CLRCMOS1 soldering points or CLRCMOS2 jumpers for 3 seconds. After that, install the battery and plug the ATX power back to the motherboard.
Note: Please do not clear the CMOS right after you update the BIOS.
Q (Q&A-8|38):
How do I get the correct CPU speed after updating the BIOS?(6/13/2003)
A:After updating the BIOS, the default of BIOS will be loaded with stable setting and the system runs with slower speed to secure the first boot runs successfully. In order to make your system running with the optimum setting, please remember to load turbo/default setting after you update the BIOS.
Q (Q&A-6|29):
K7S8X supports AGP 8X, but why can't I adjust to AGP 8X mode in BIOS?(4/15/2003)
A:Please install an AGP 8X card first. The AGP 8X option will be available only when an AGP 8X card is installed.
Q (Q&A-6|25):
Sometimes I cannot boot up from my floppy disk, Why?(4/15/2003)
A:Please try to enable the "Floppy Seek" in the BIOS utility.
Q (Q&A-5|23):
Where can I get the detailed BIOS setting description?(3/3/2003)
A:You can find the detailed user manual and BIOS setting description in ASRock support CD.
Q (Q&A-5|20):
After I updated BIOS, ASRock LOGO disappeared when booting up. Why?(3/3/2003)
A:Please don't worried! ASRock has removed LOGO in the new BIOS for all ASRock model. It is normal that ASRock LOGO disappeared after flashing BIOS.
Q (Q&A-4|17):
Should I clear the CMOS after I upgrade the BIOS?(1/30/2003)
A:If your system is running fine, you do not have to clear the CMOS. Also please do not clear the CMOS right after you upgrade the BIOS. After upgrading the BIOS, please reboot your system once then you can clear the CMOS if you need to do it.
Q (Q&A-4|16):
How can I set CPU FSB (Front Side Bus) correctly?(1/30/2003)
A:For Intel CPU: You do not need to do any setting. When you install CPU at the first time, all that you need to do is go to BIOS and "Load setup defaults", then the system will auto detect the correct CPU FSB.
For K7VT2 and K7VM2: There is a FSB_SEL jumper on the motherboard .
FSB 100Mhz set 2-3
FSB 133Mhz set 1-2
Q (Q&A-4|15):
When I want to install an add-on AGP graphics card, do I need to adjust any settings in the BIOS if my motherboard has Onboard VGA?(1/30/2003)
A:No! You do not need to adjust any settings in the BIOS. ASRock motherboard will switch between add-on AGP and Onboard VGA automatically when you install or uninstall it.
Q (Q&A-3|14):
If I want to use add-on AGP card on G Pro, do I need to change anything in the BIOS utility?(12/25/2002)
A:When you were using on board VGA and want to switch to add-on VGA, you do not need to set anything in the BIOS. The BIOS will auto switch to add-on VGA if it is installed. Also the BIOS will auto switch back to on-board VGA if add-on VGA is not installed.
Q (Q&A-1|2):
What's the meaning of AMI BIOS Beep Codes?(10/29/2002)
A:The following are AMI BIOS Beep Codes that can occur.
 Menu
Menu
 (11/1/2023)
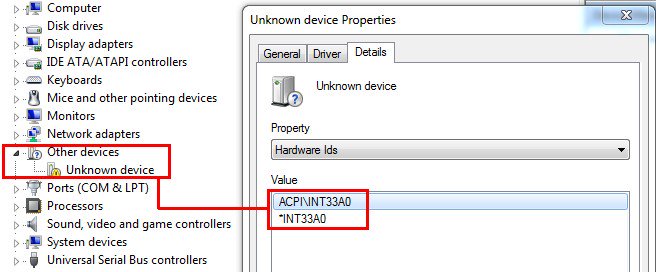 (8/1/2012)
 (3/28/2009)
 (6/26/2008)
 (2/15/2007)


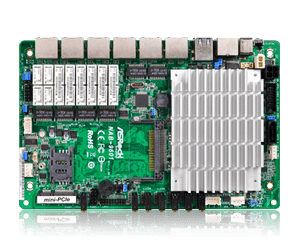
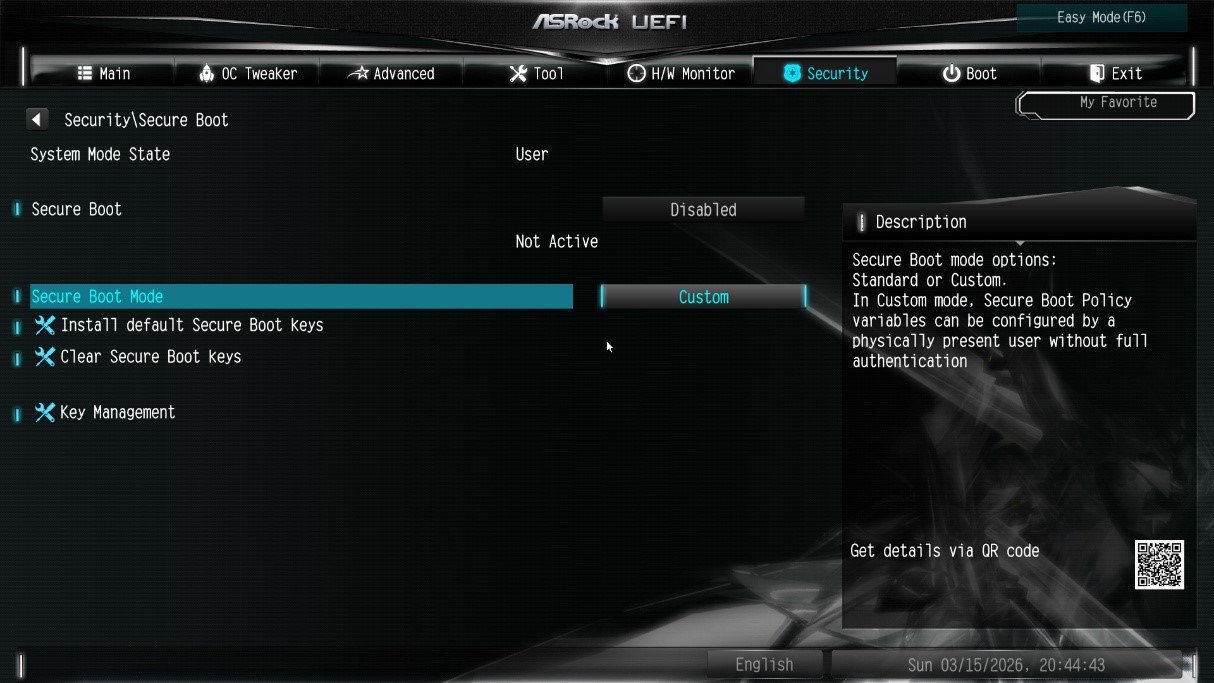
![Select Clear Secure Boot Keys, then choose [Yes].](/support/faq/190-2.jpg)

![After clearing the keys, select Install Default Secure Boot Keys, then choose [Yes].](/support/faq/190-4.jpg)

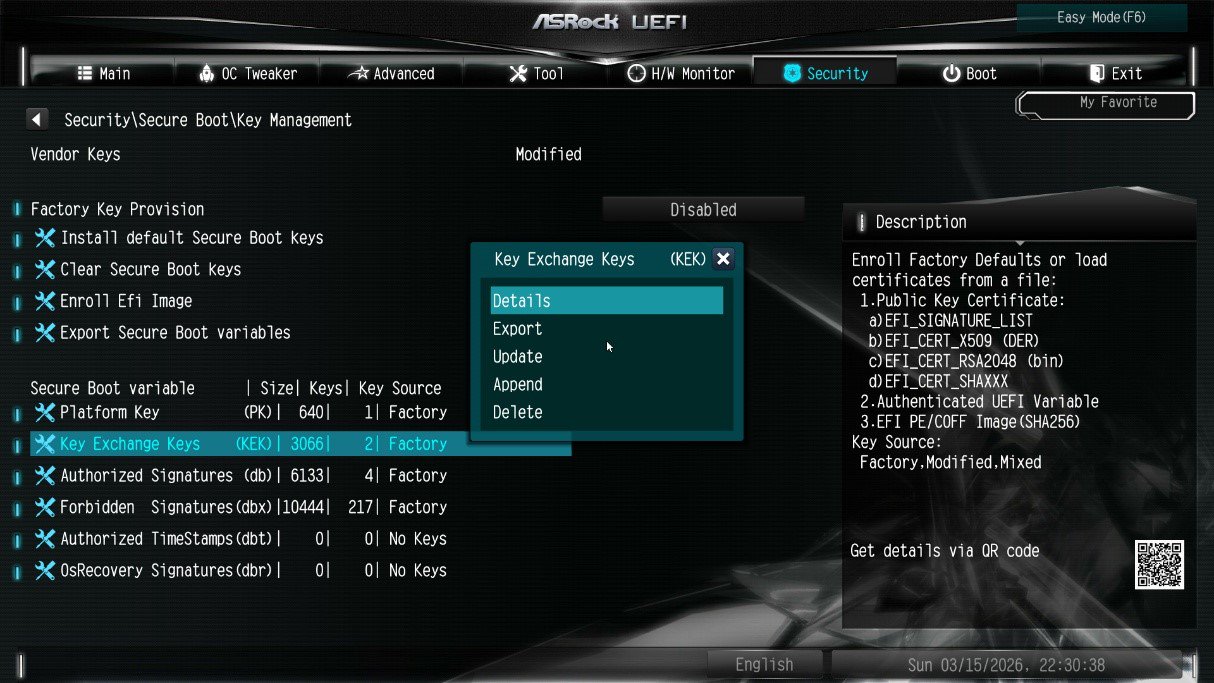
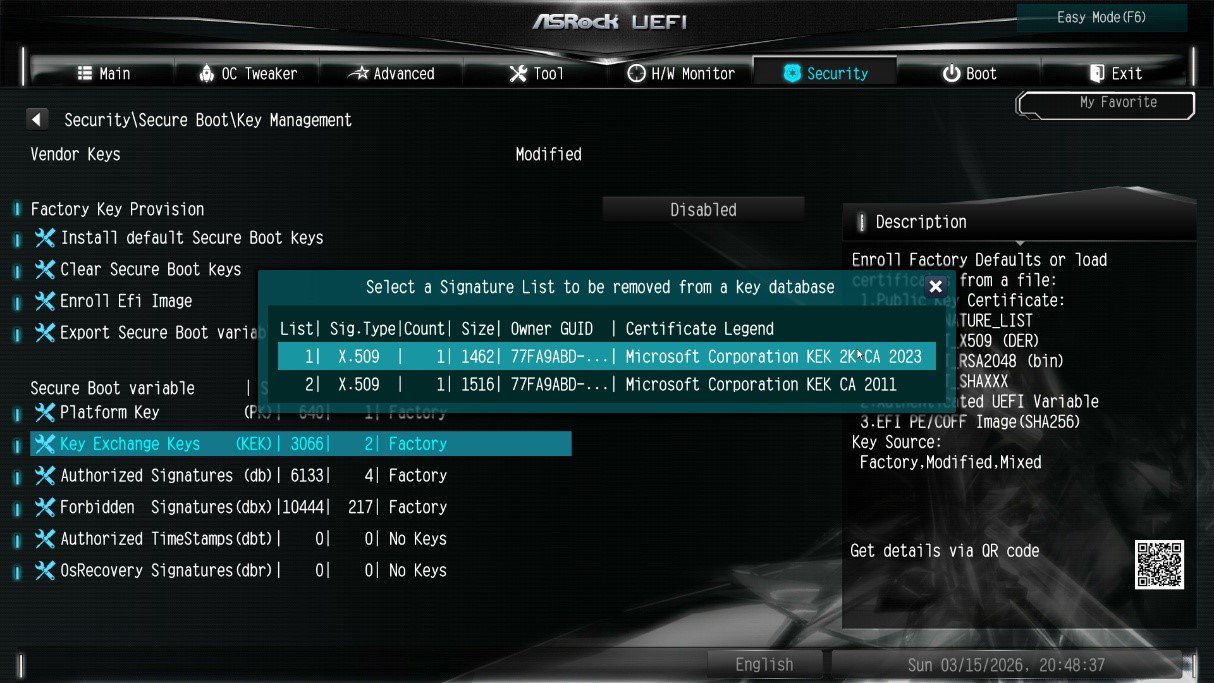
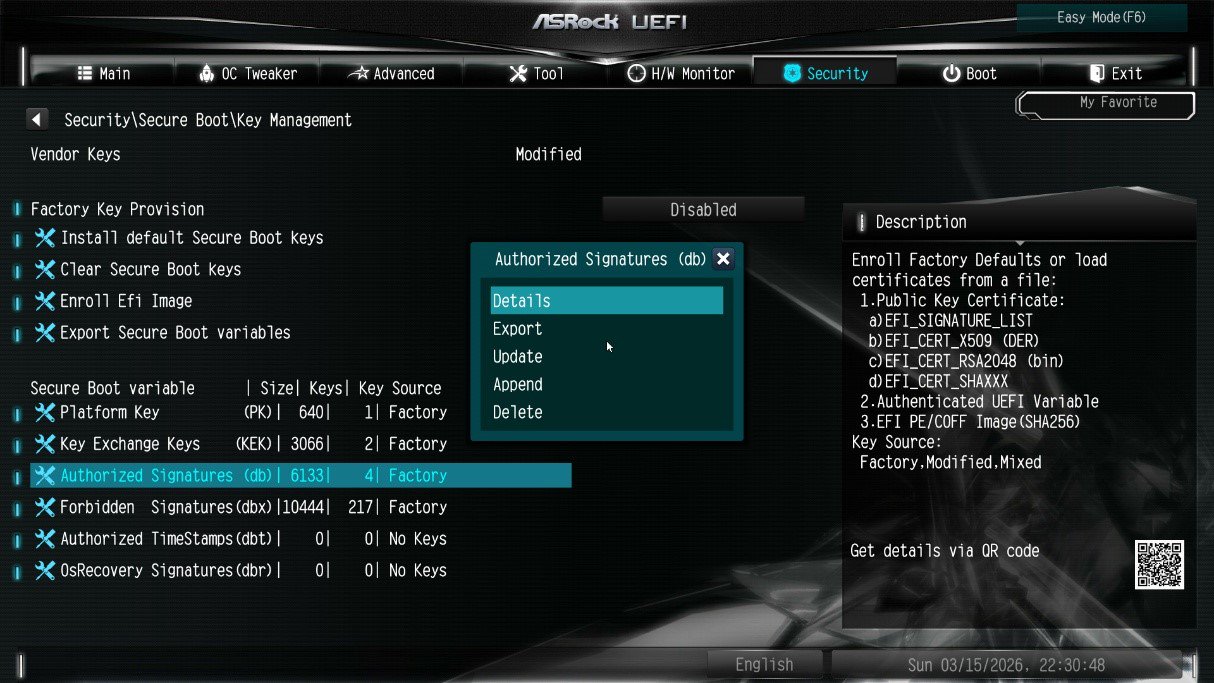
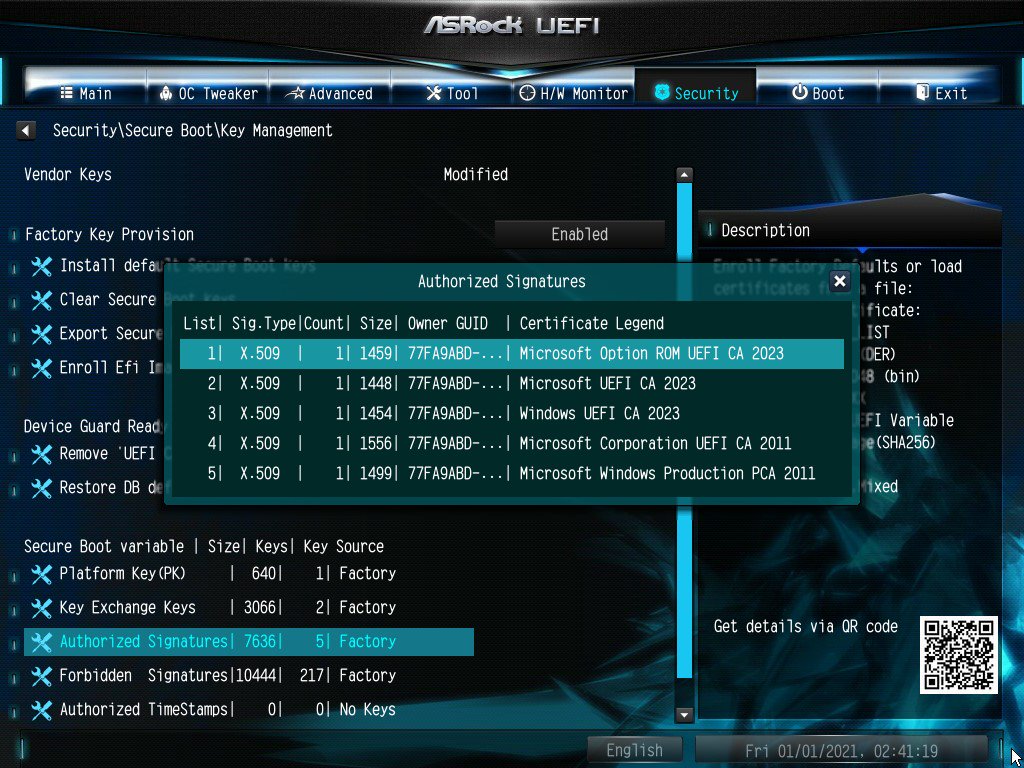
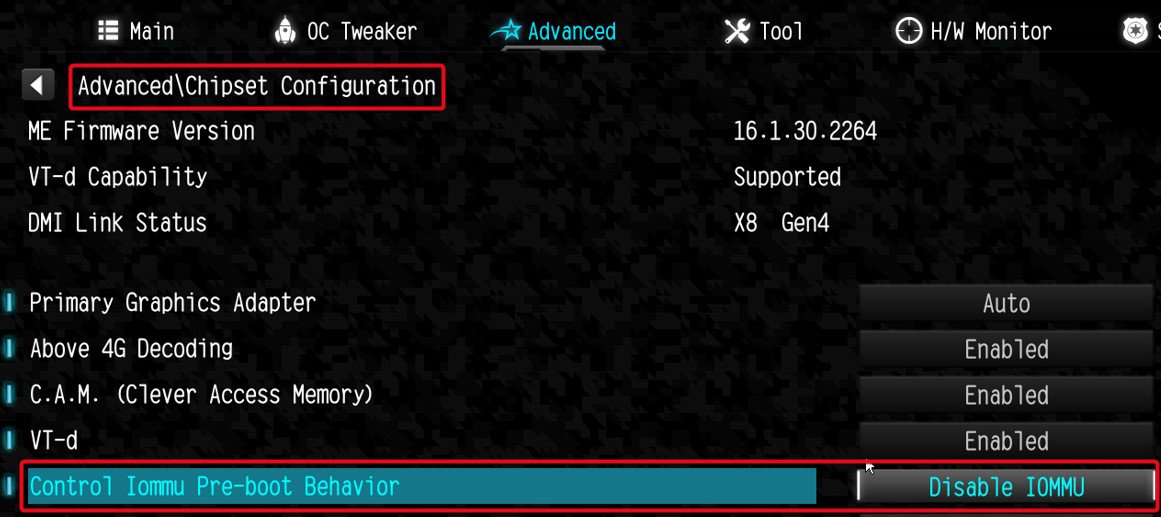
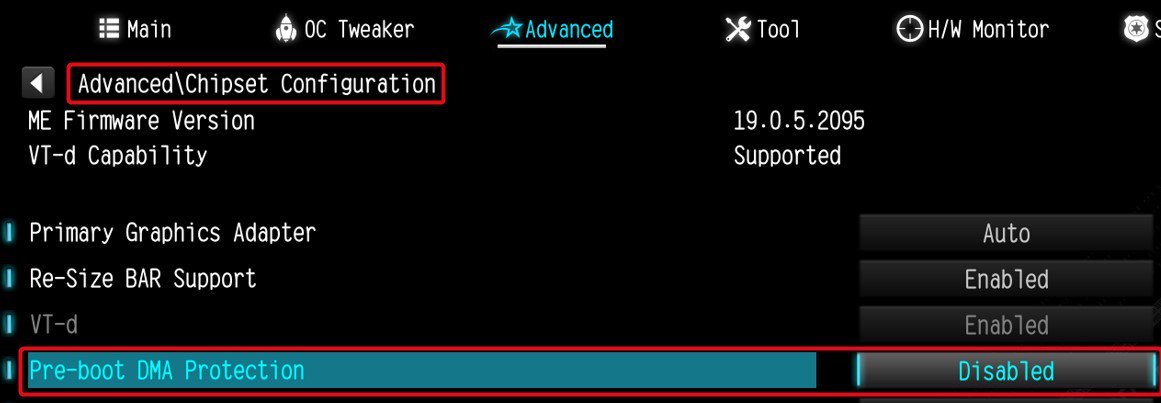
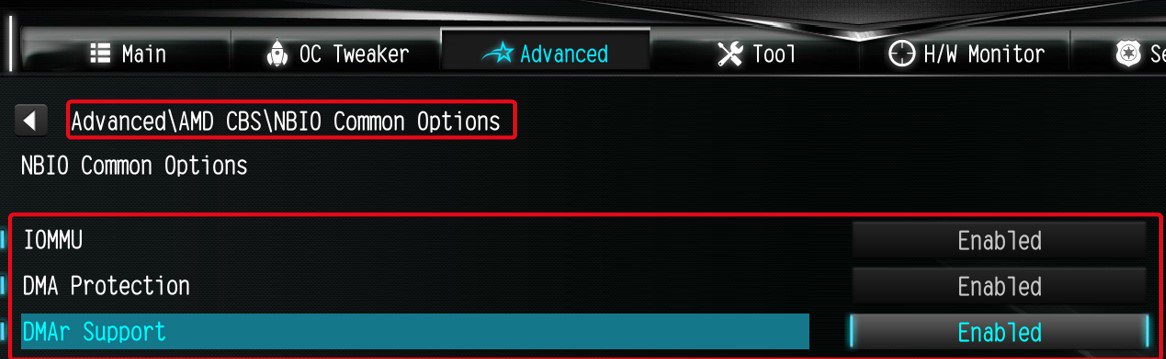
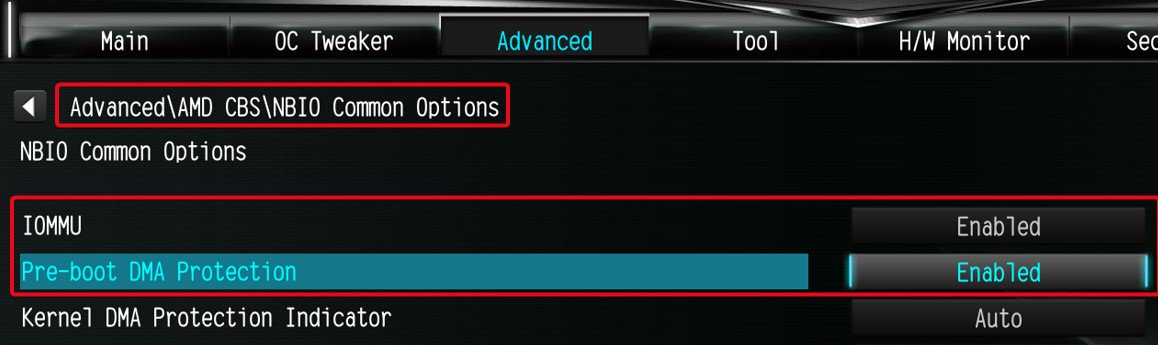


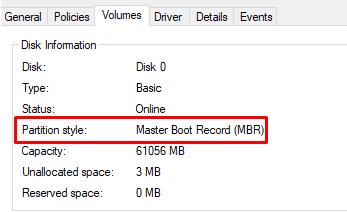


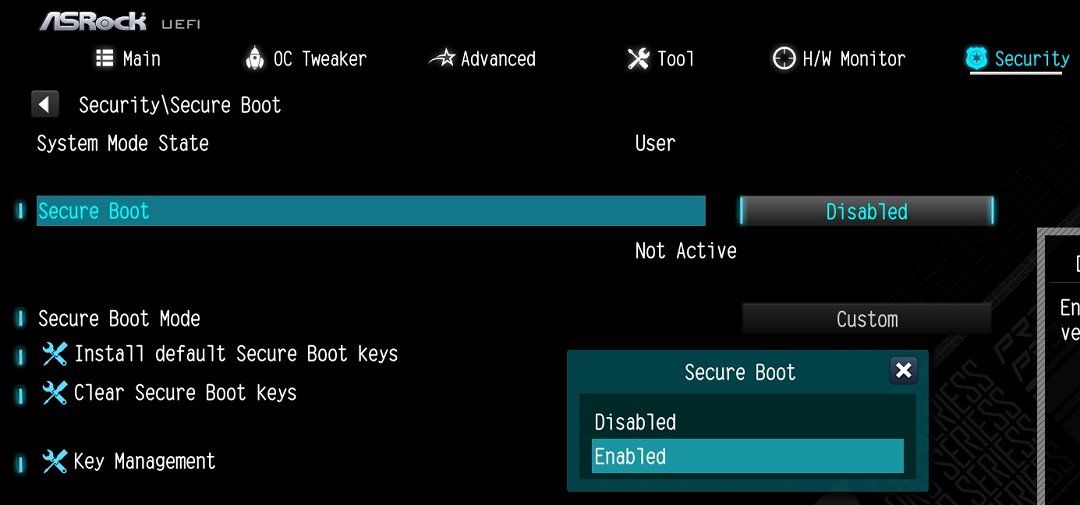
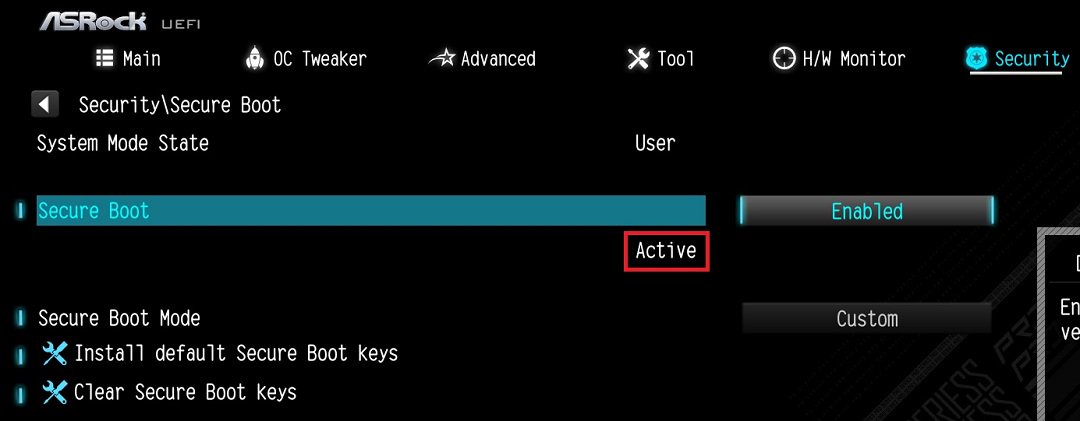
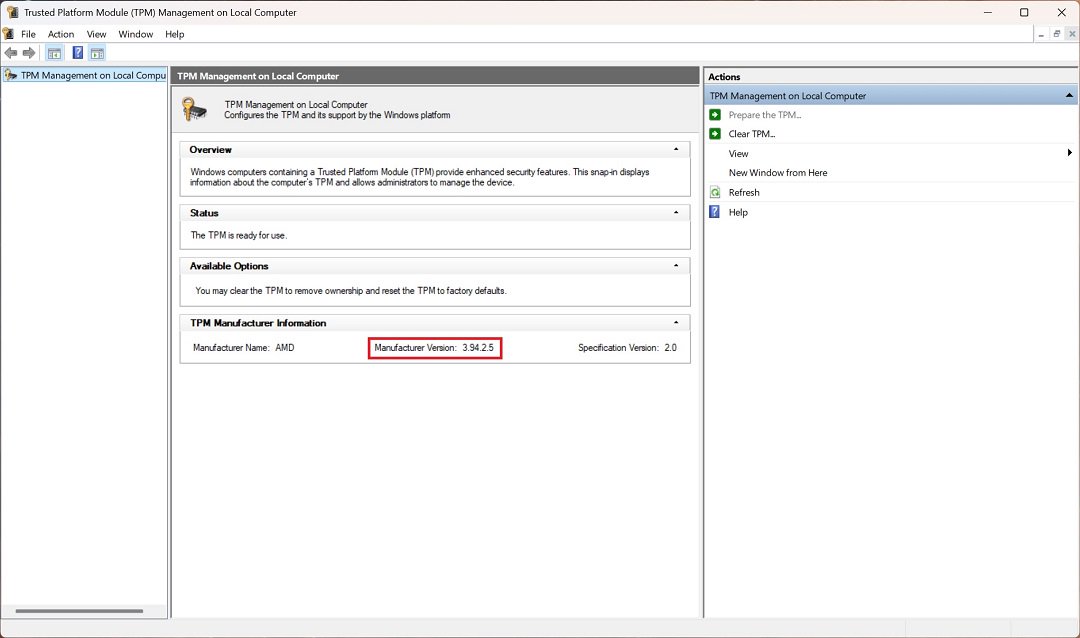


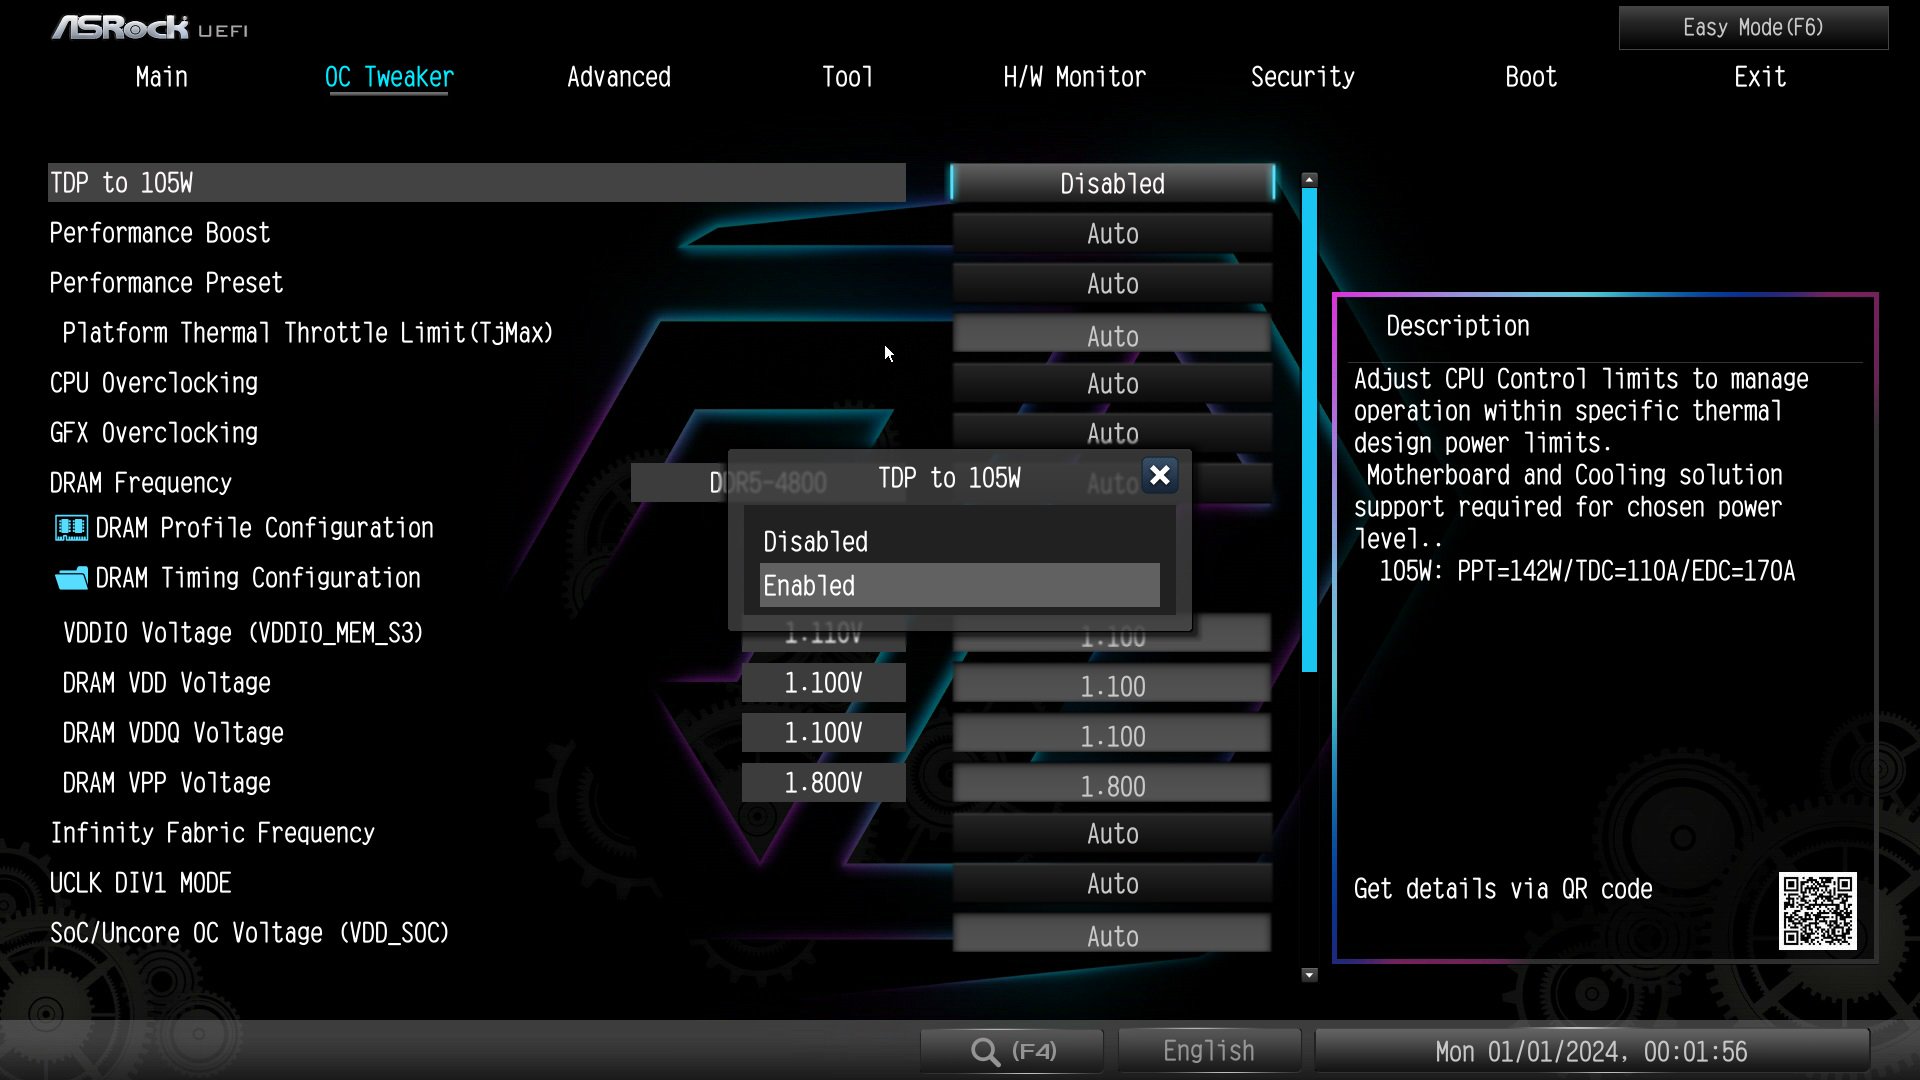
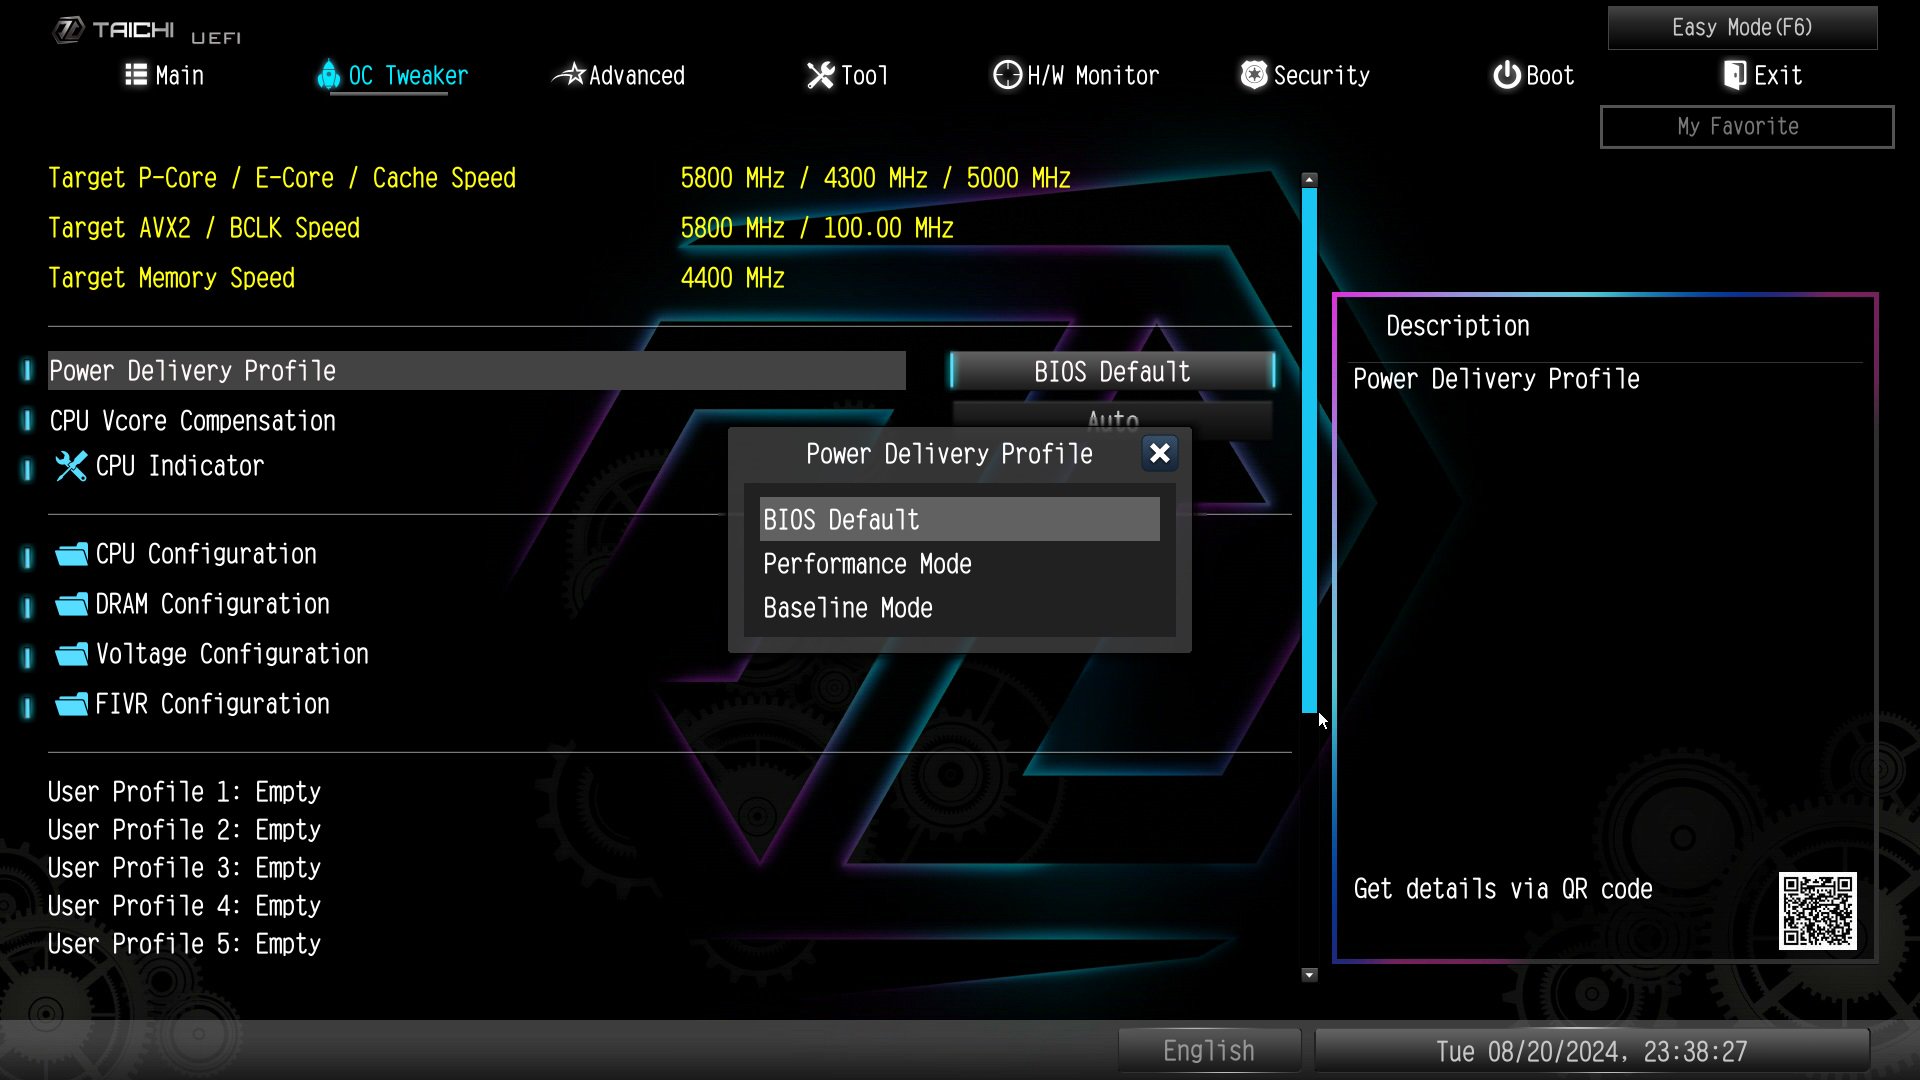
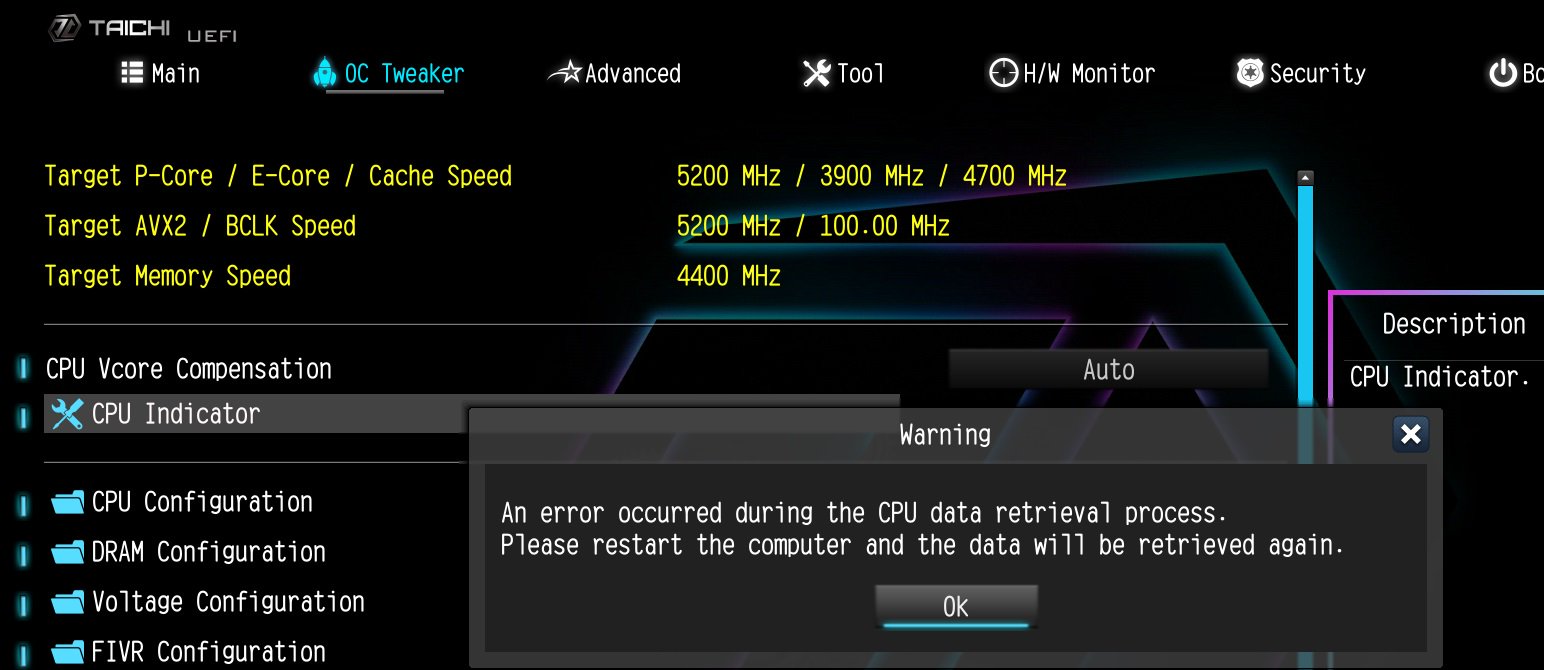
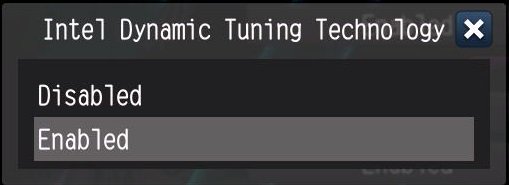
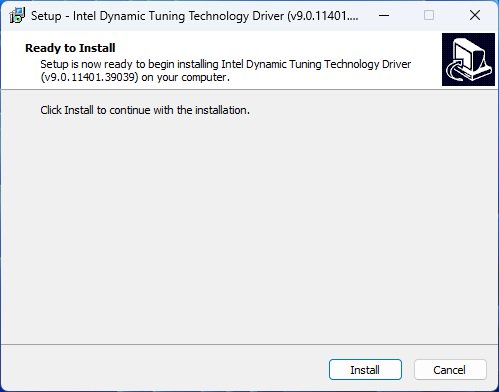
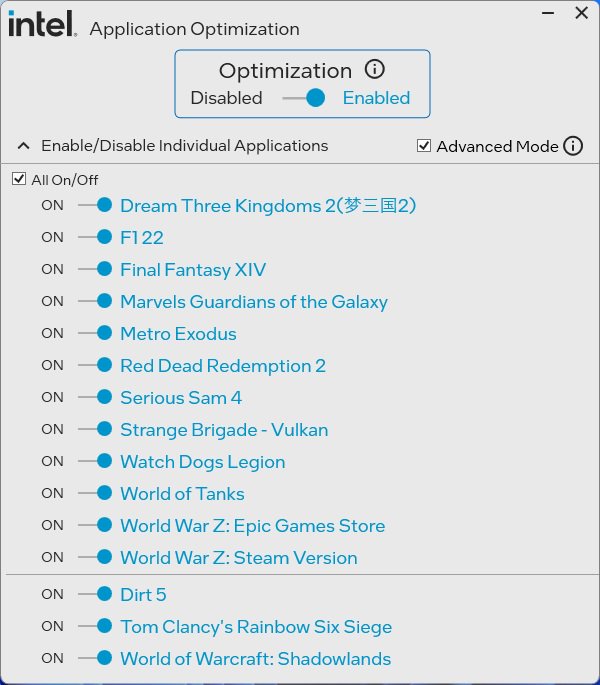
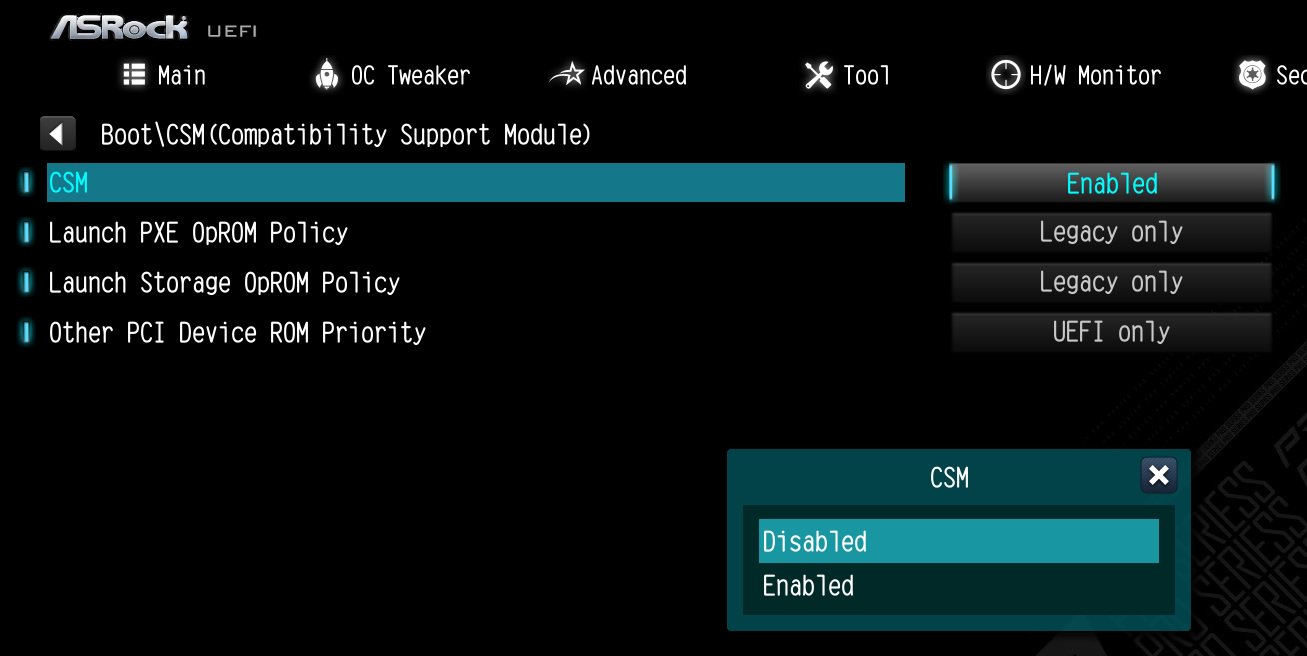
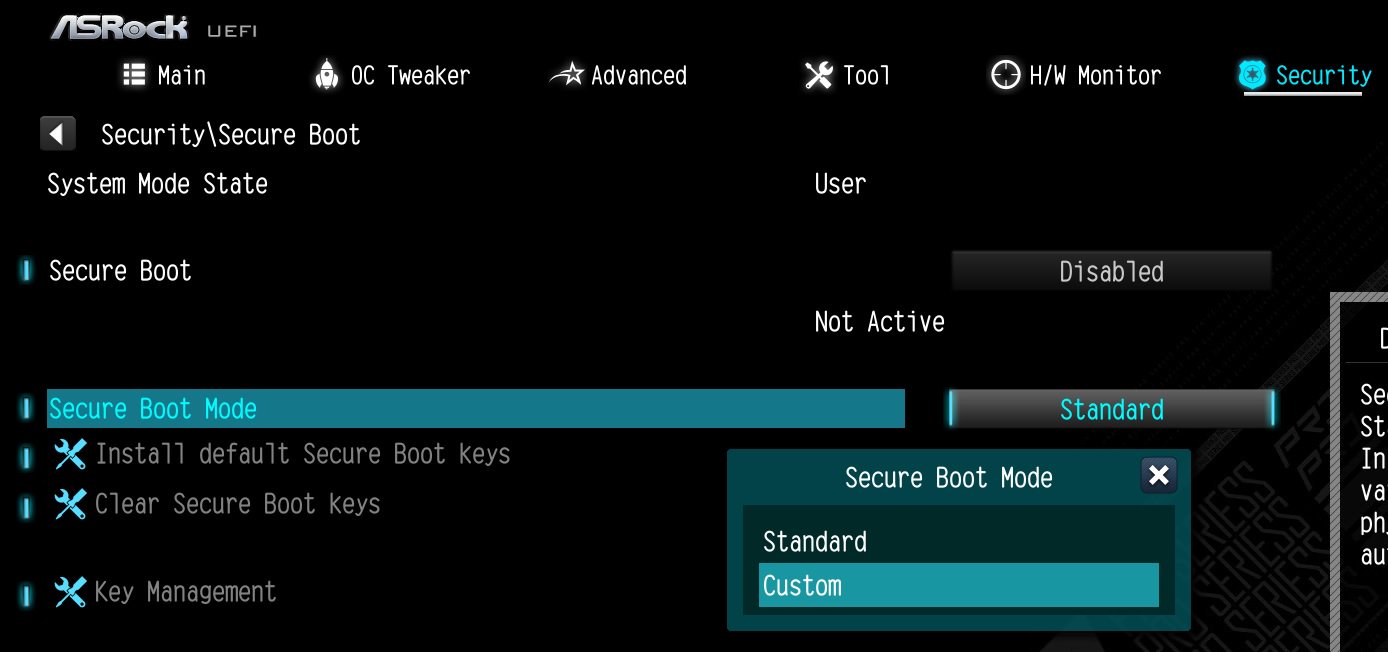
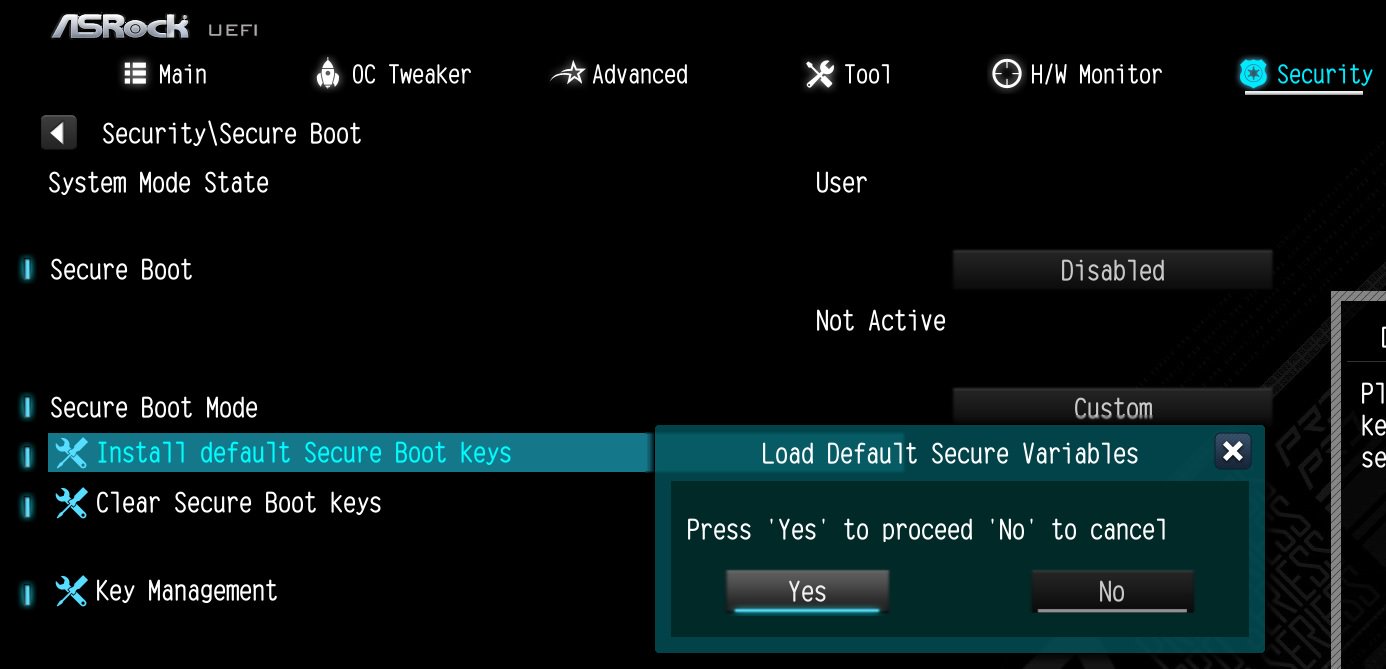


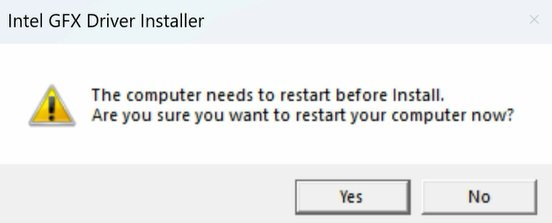

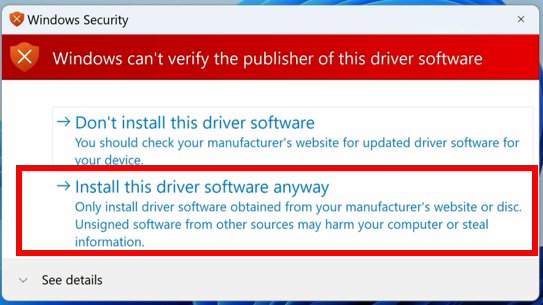
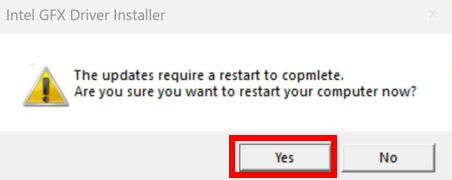
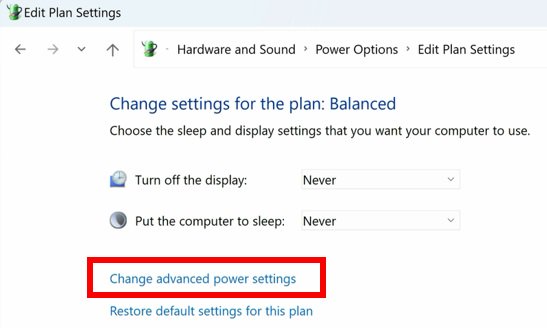
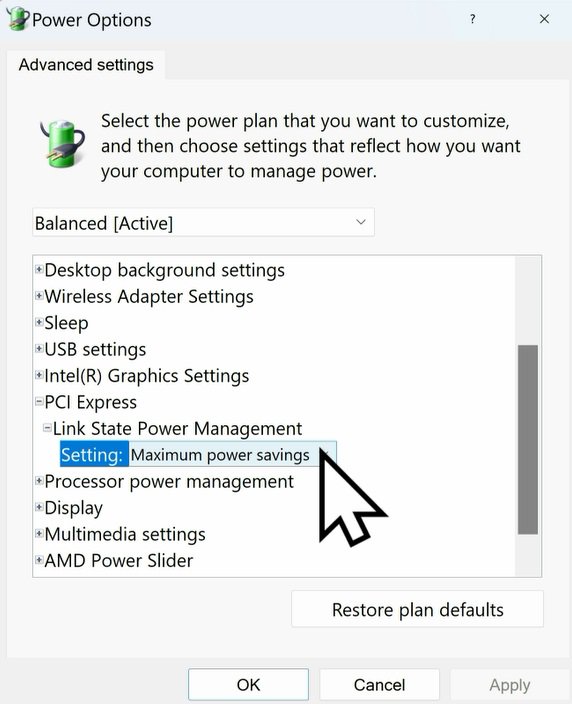
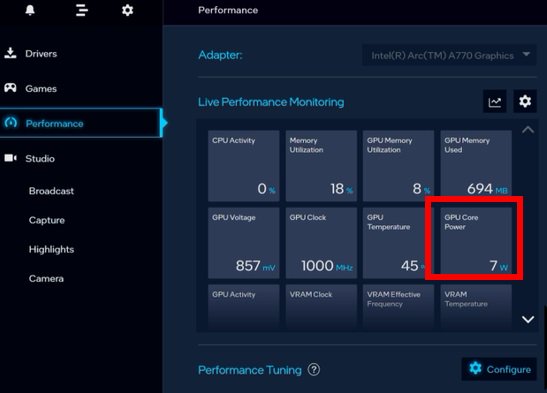
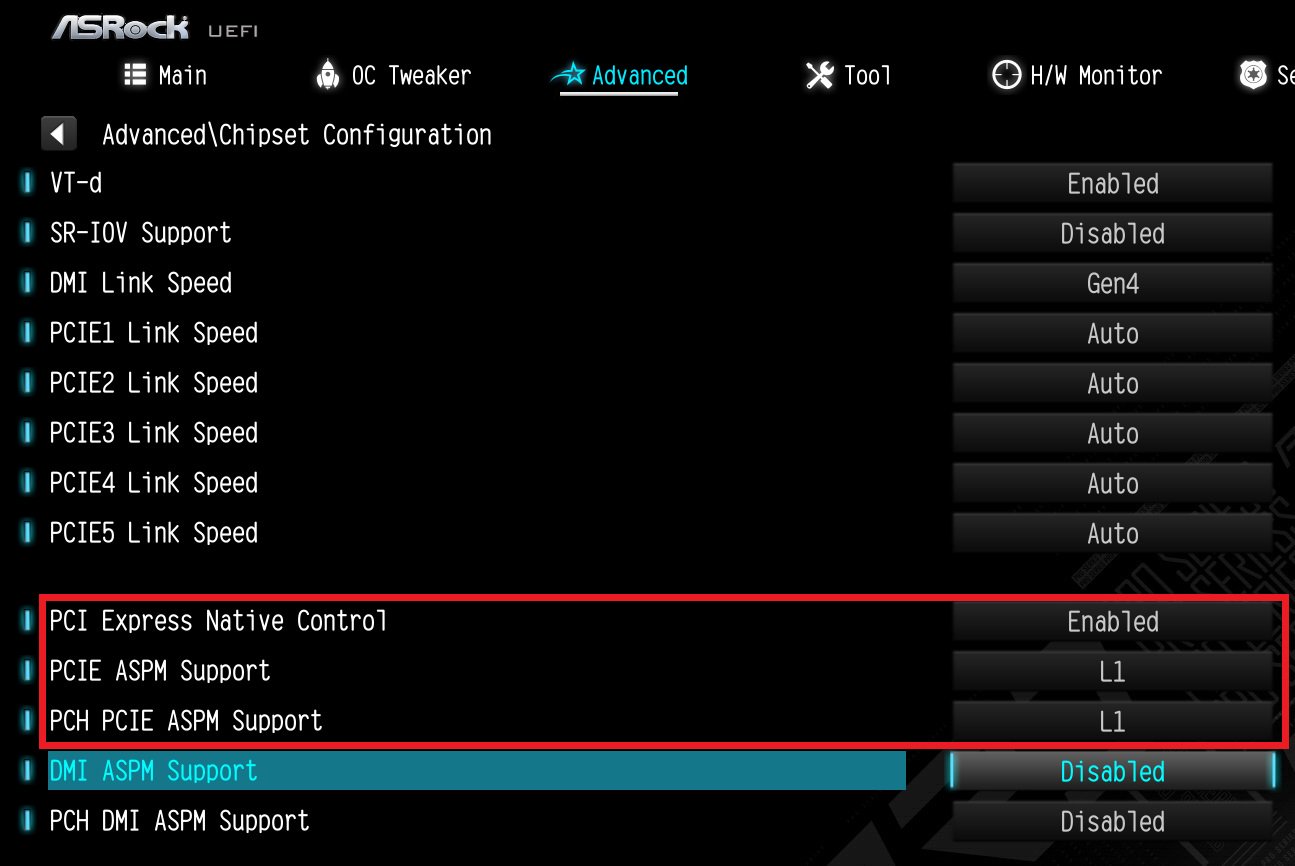
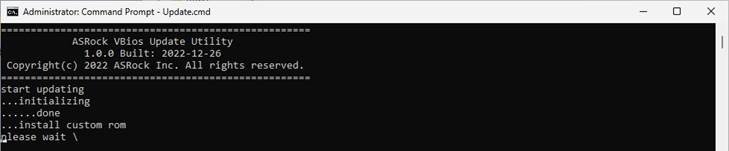
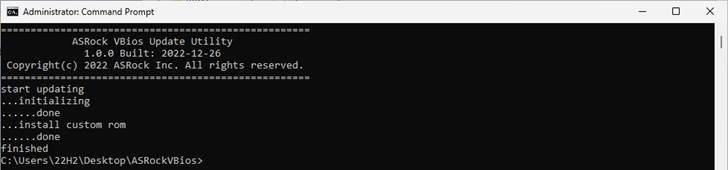
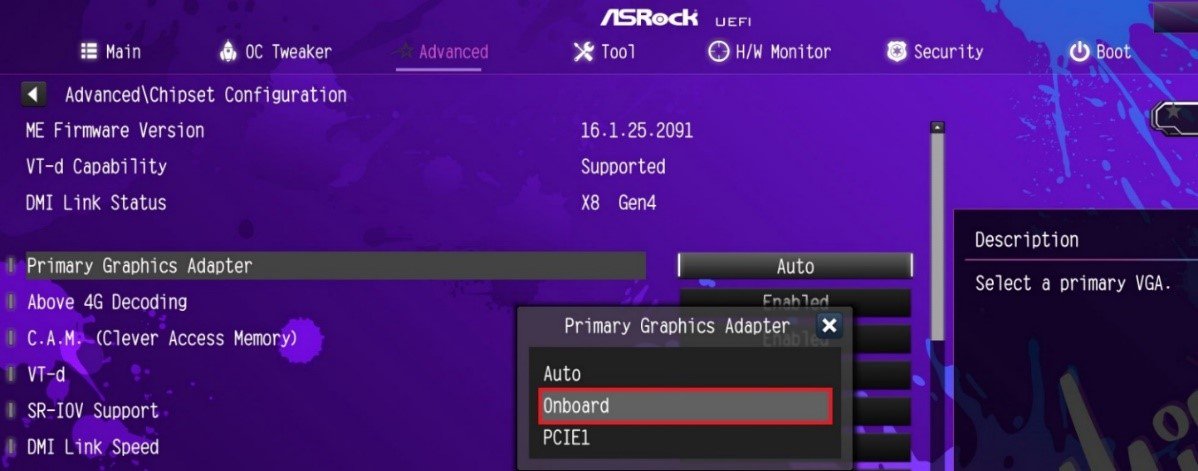
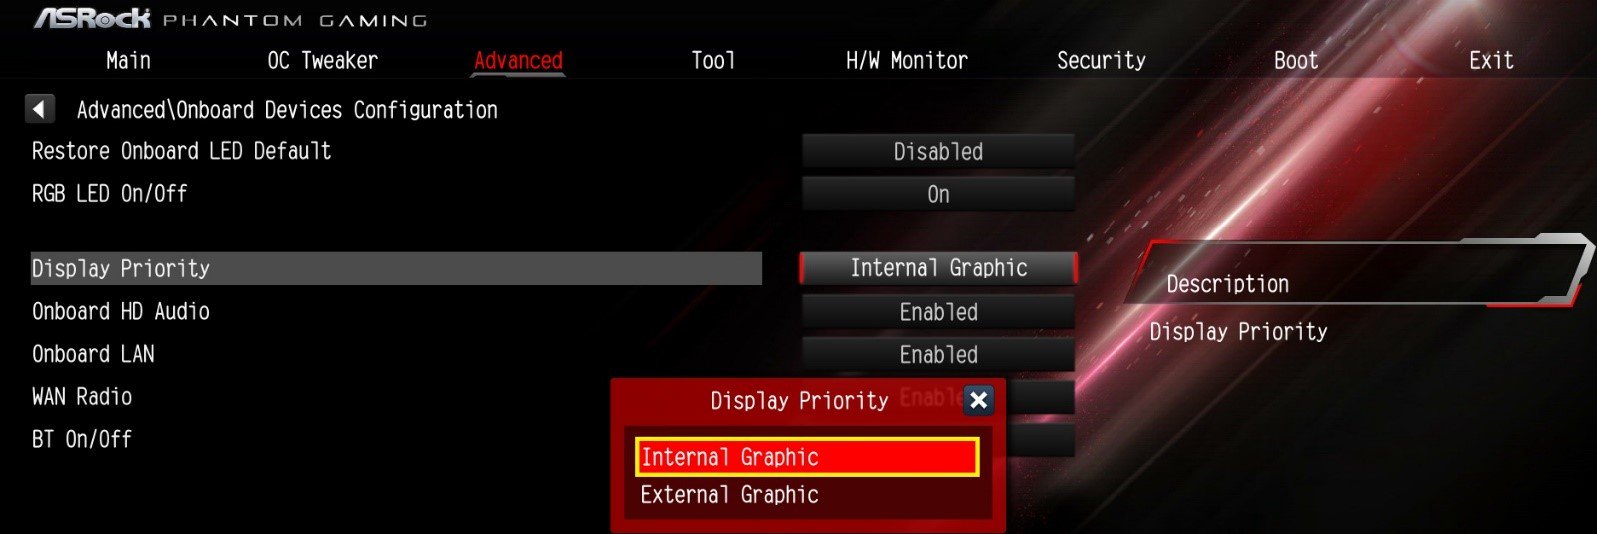

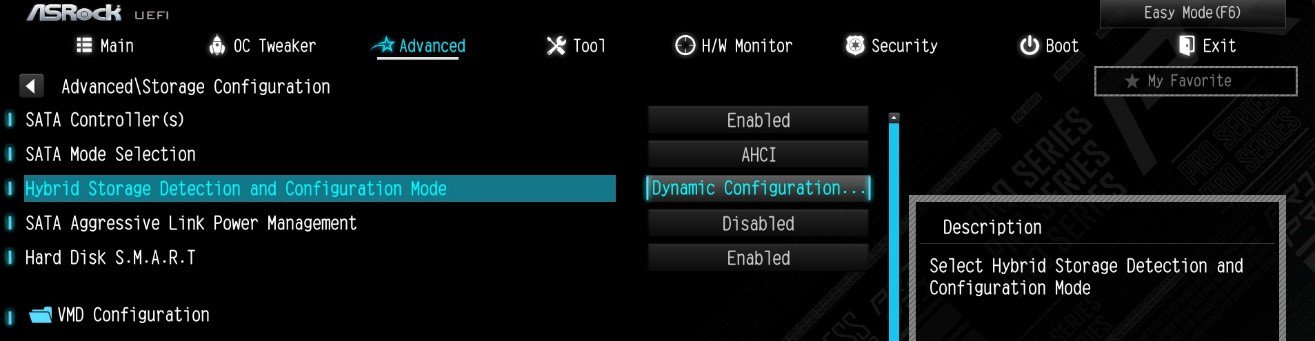
![Set Enable VMD Global Mapping to [Enabled]. Press F10 to save the changes and exit setup.](/support/faq/167-4.jpg)
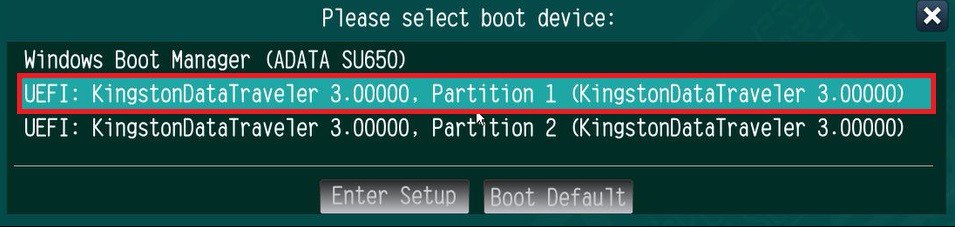 ” to install Windows® 10 64-bit / 11 64-bit OS">
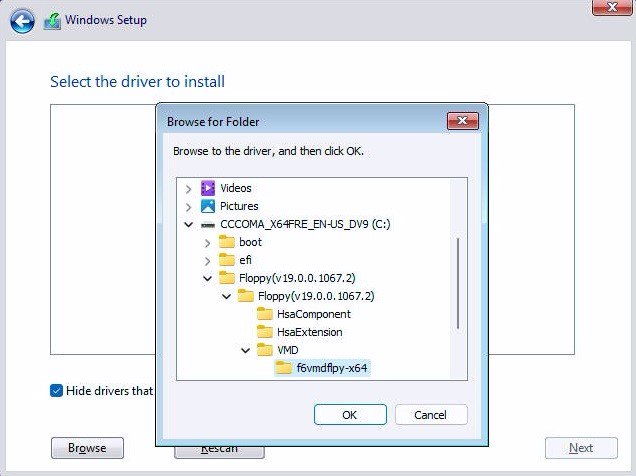
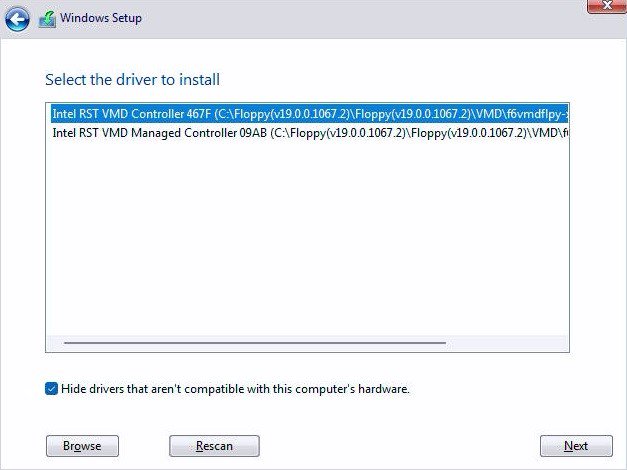 .">
.">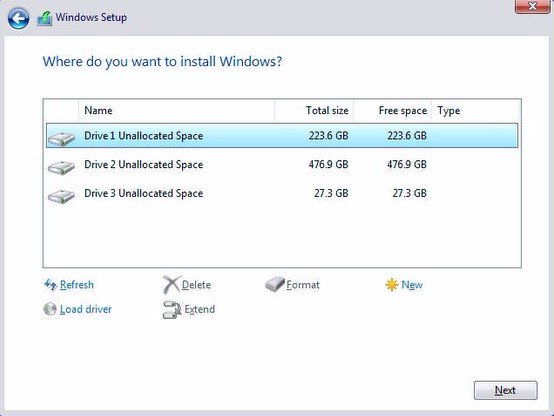
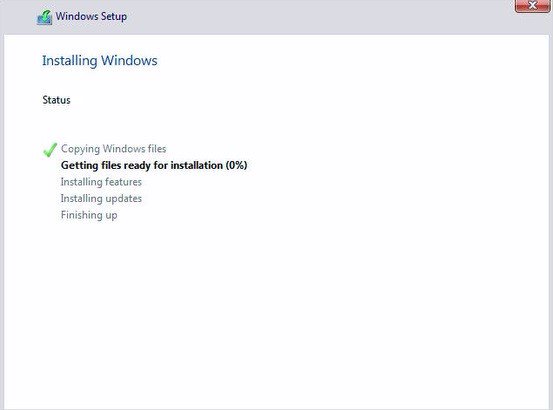
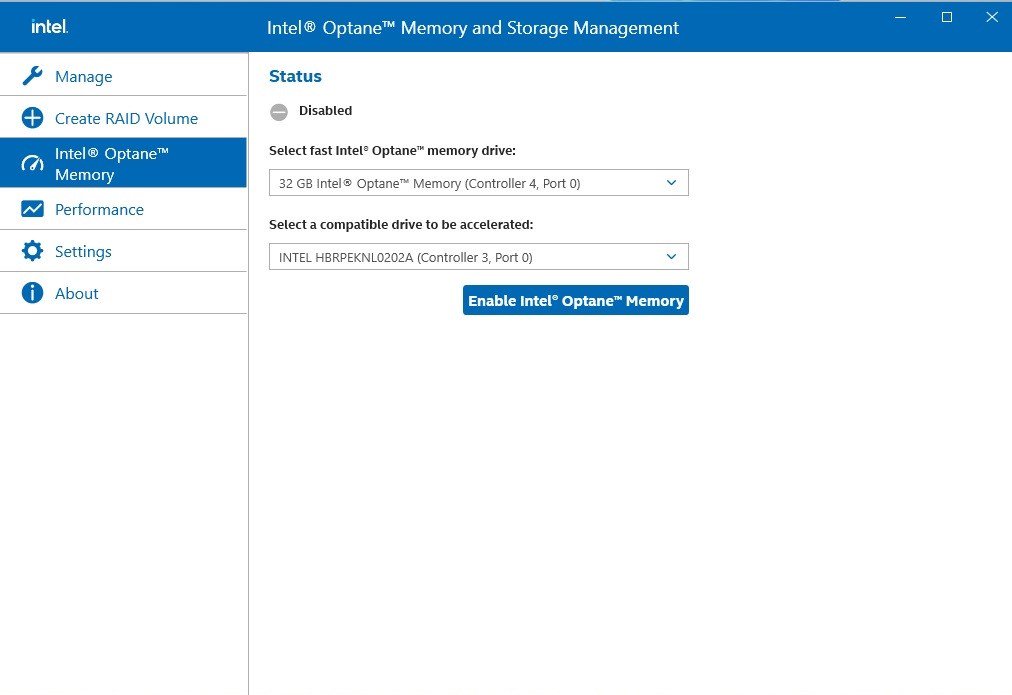
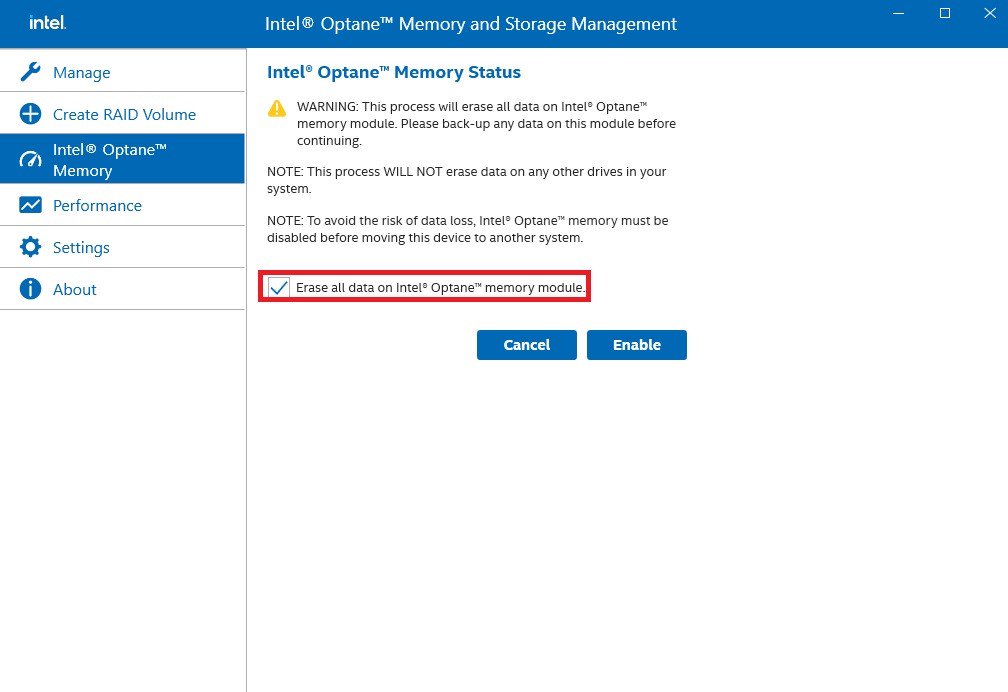
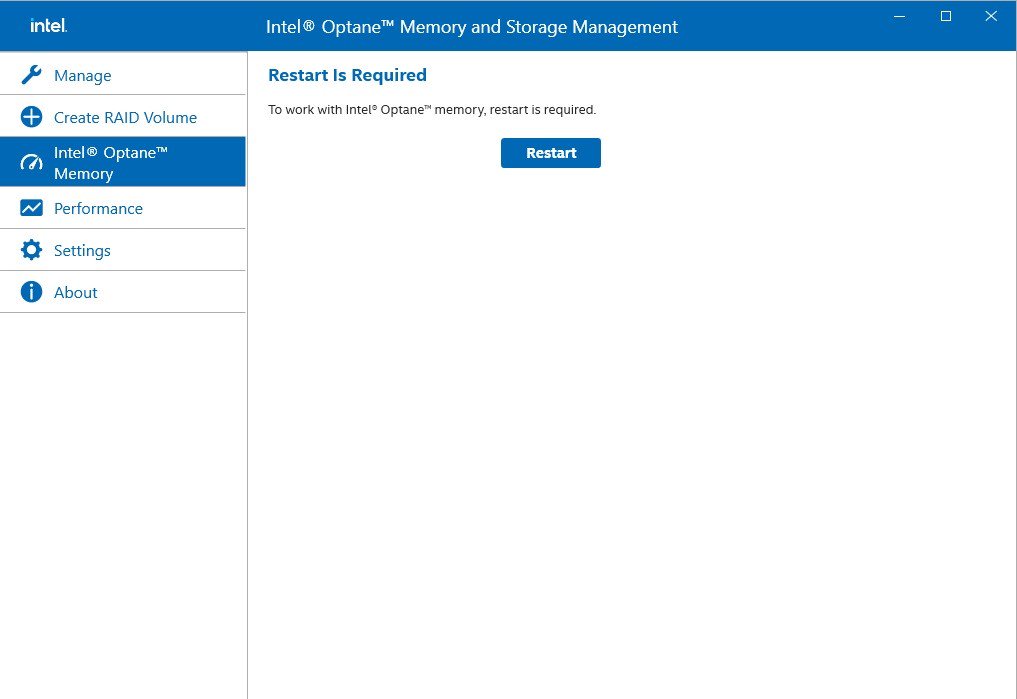
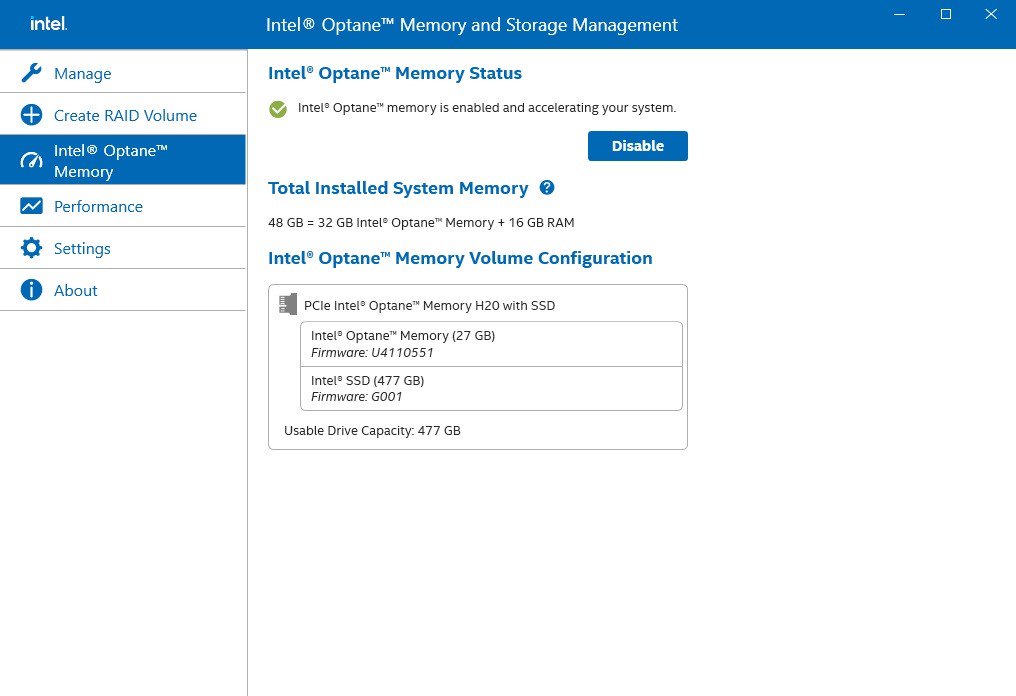
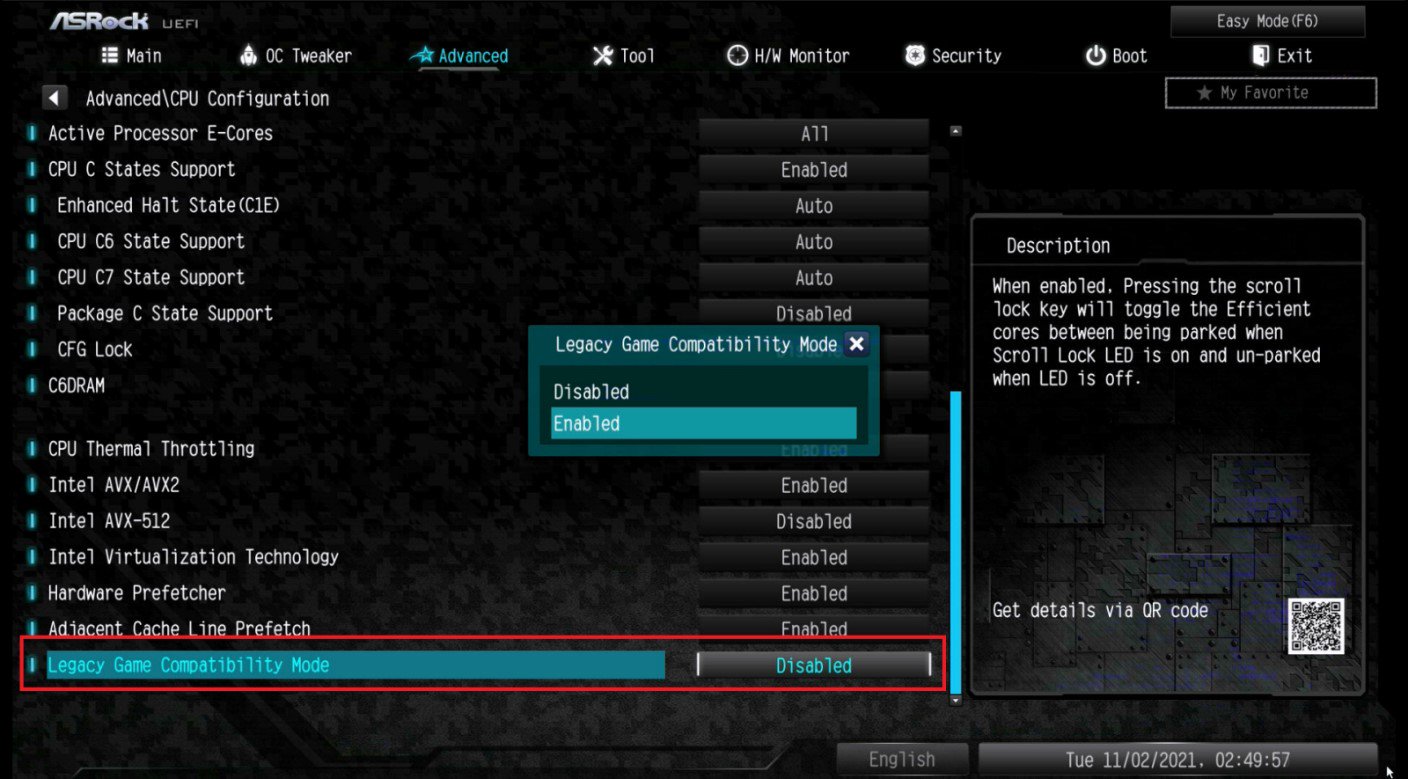
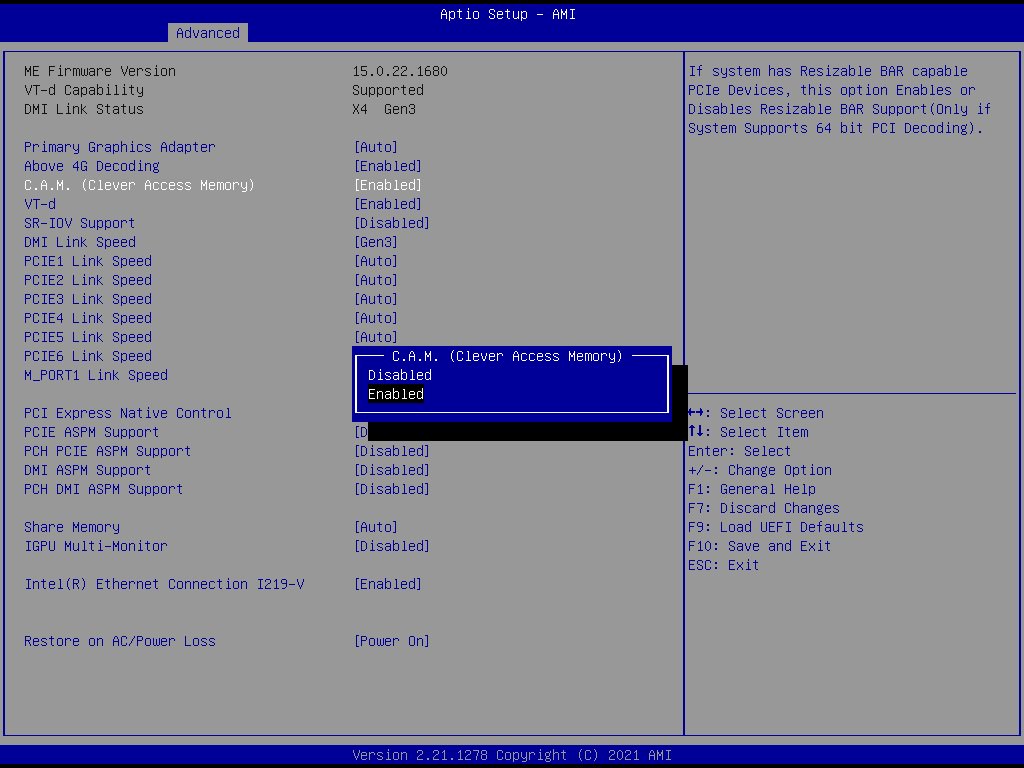

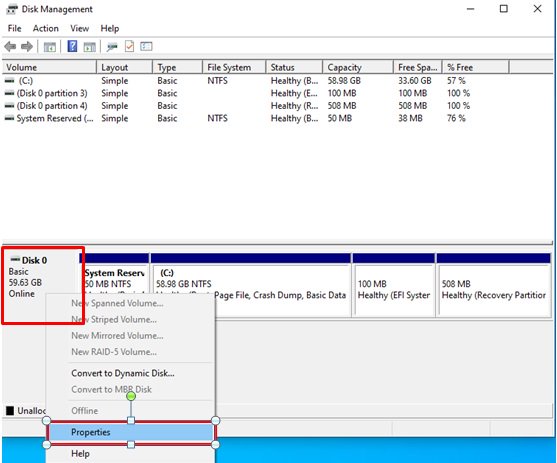
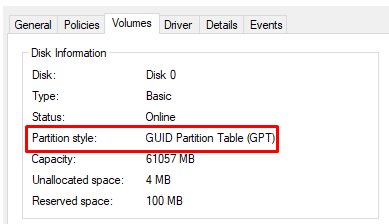

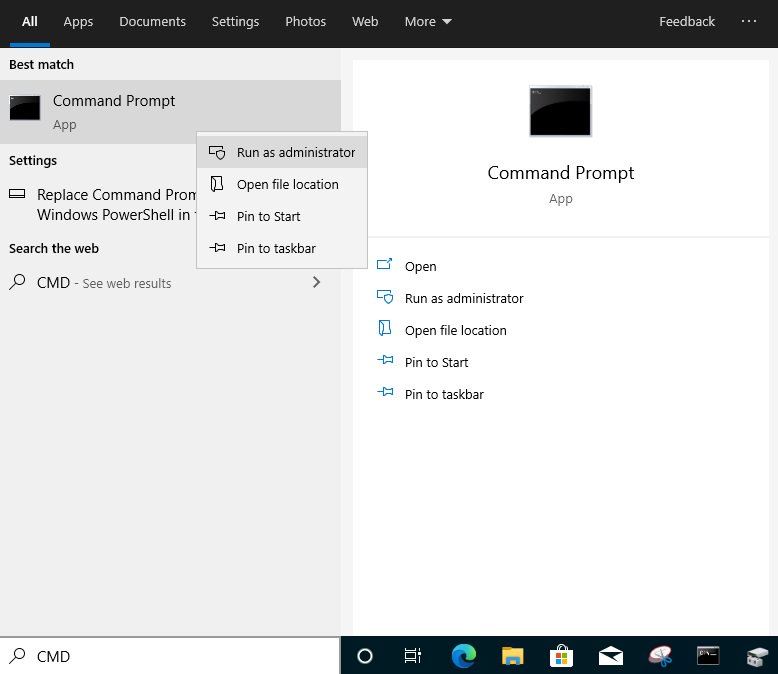
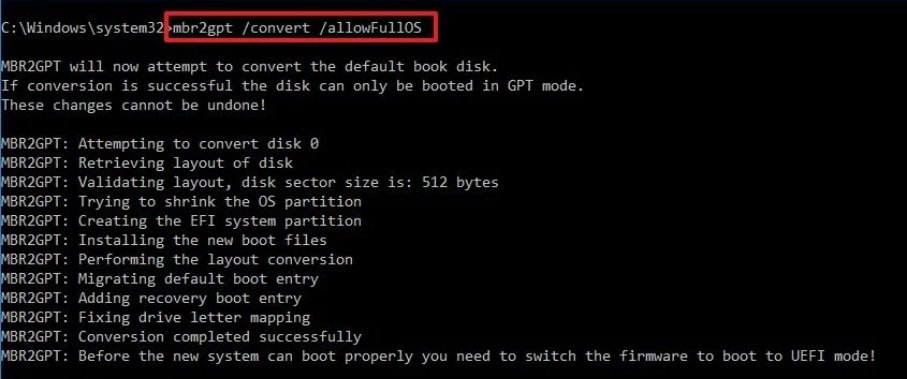
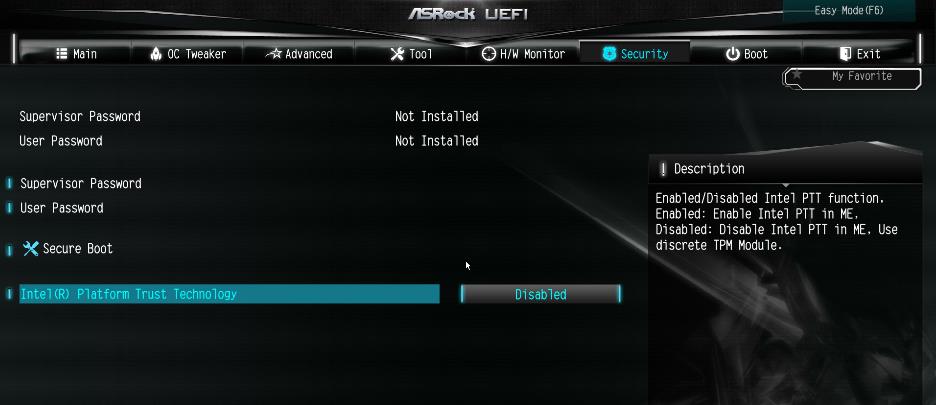
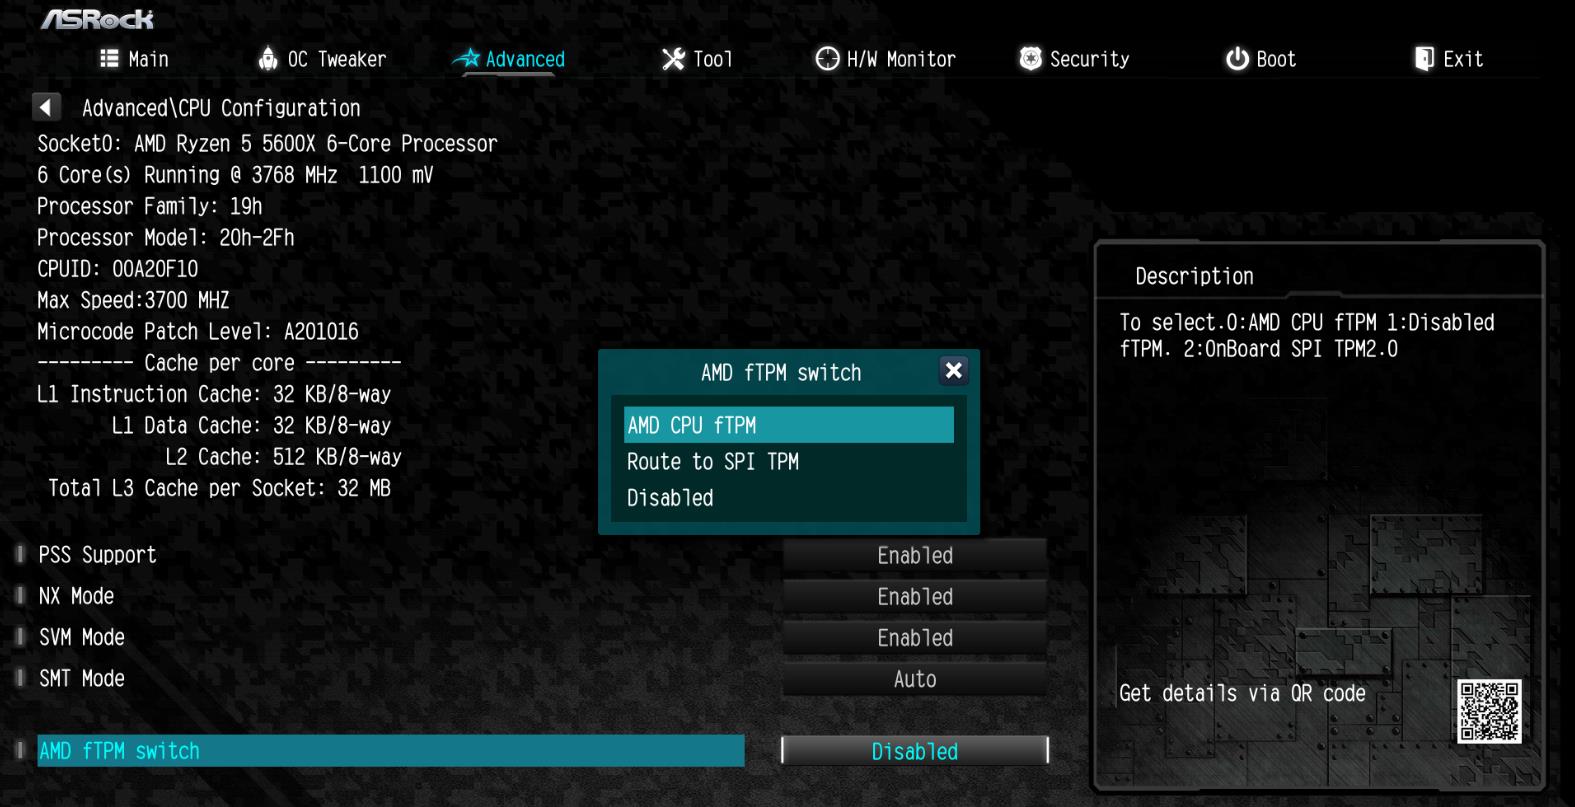
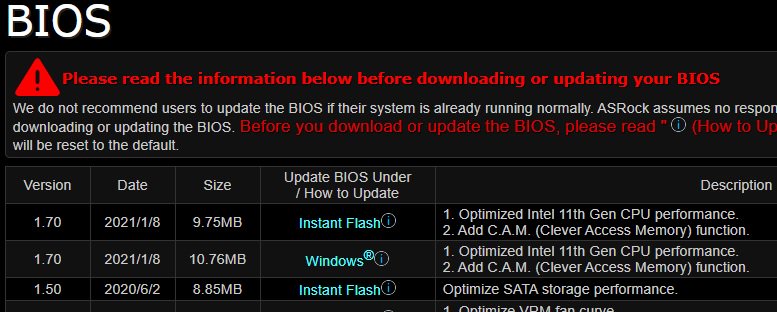
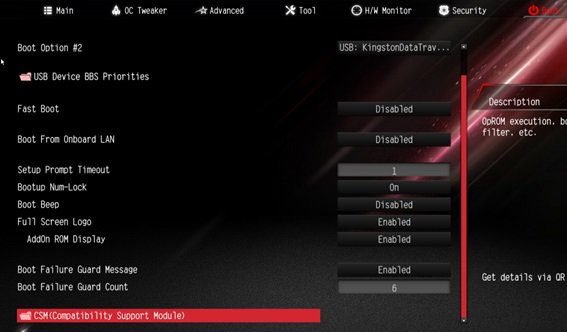
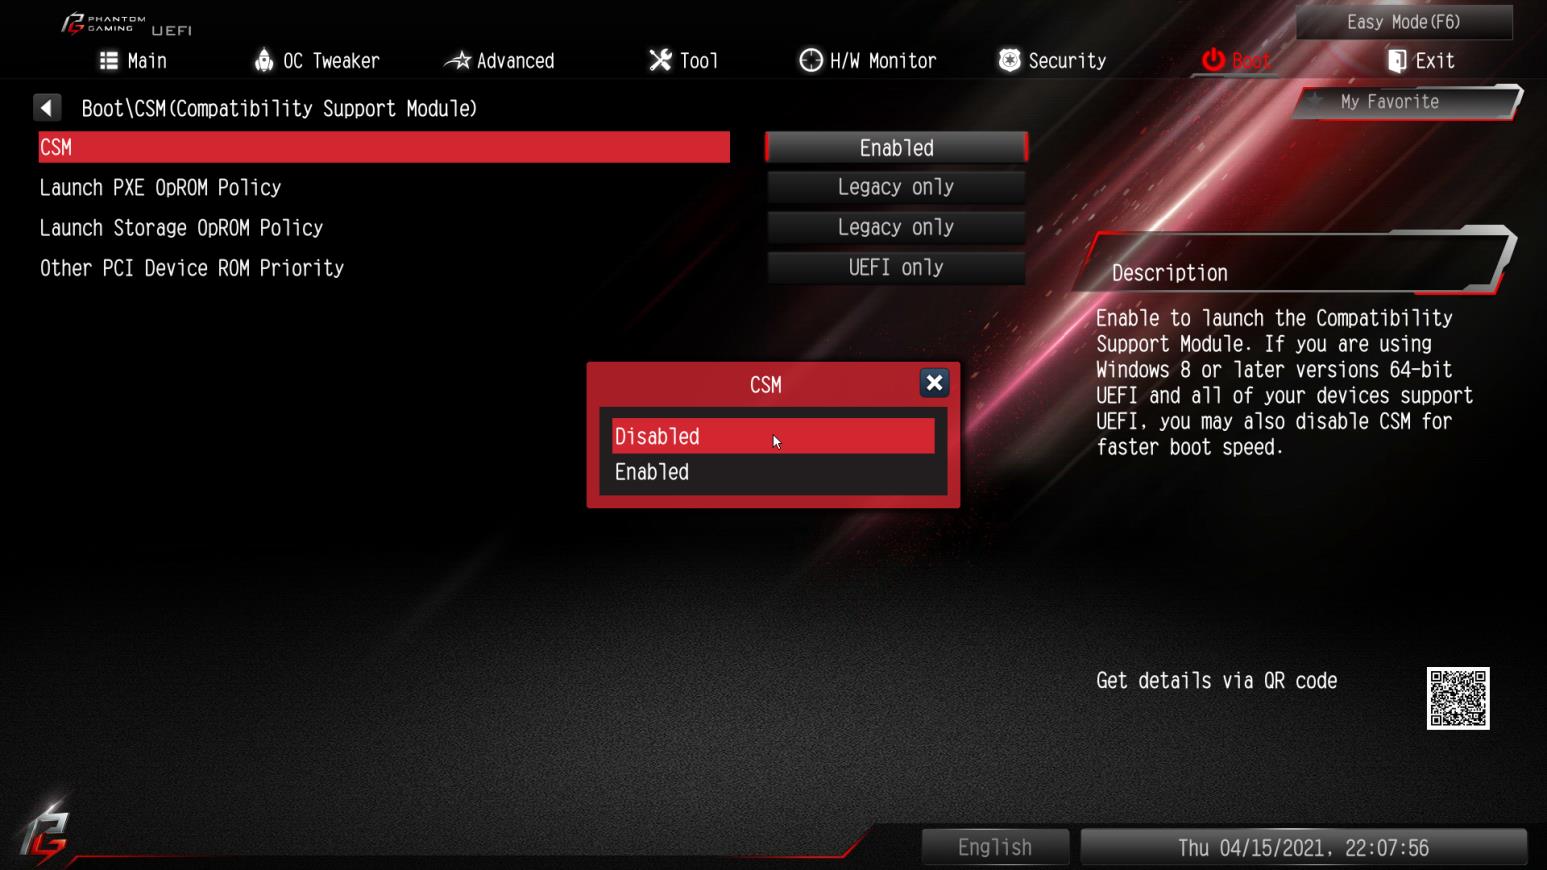
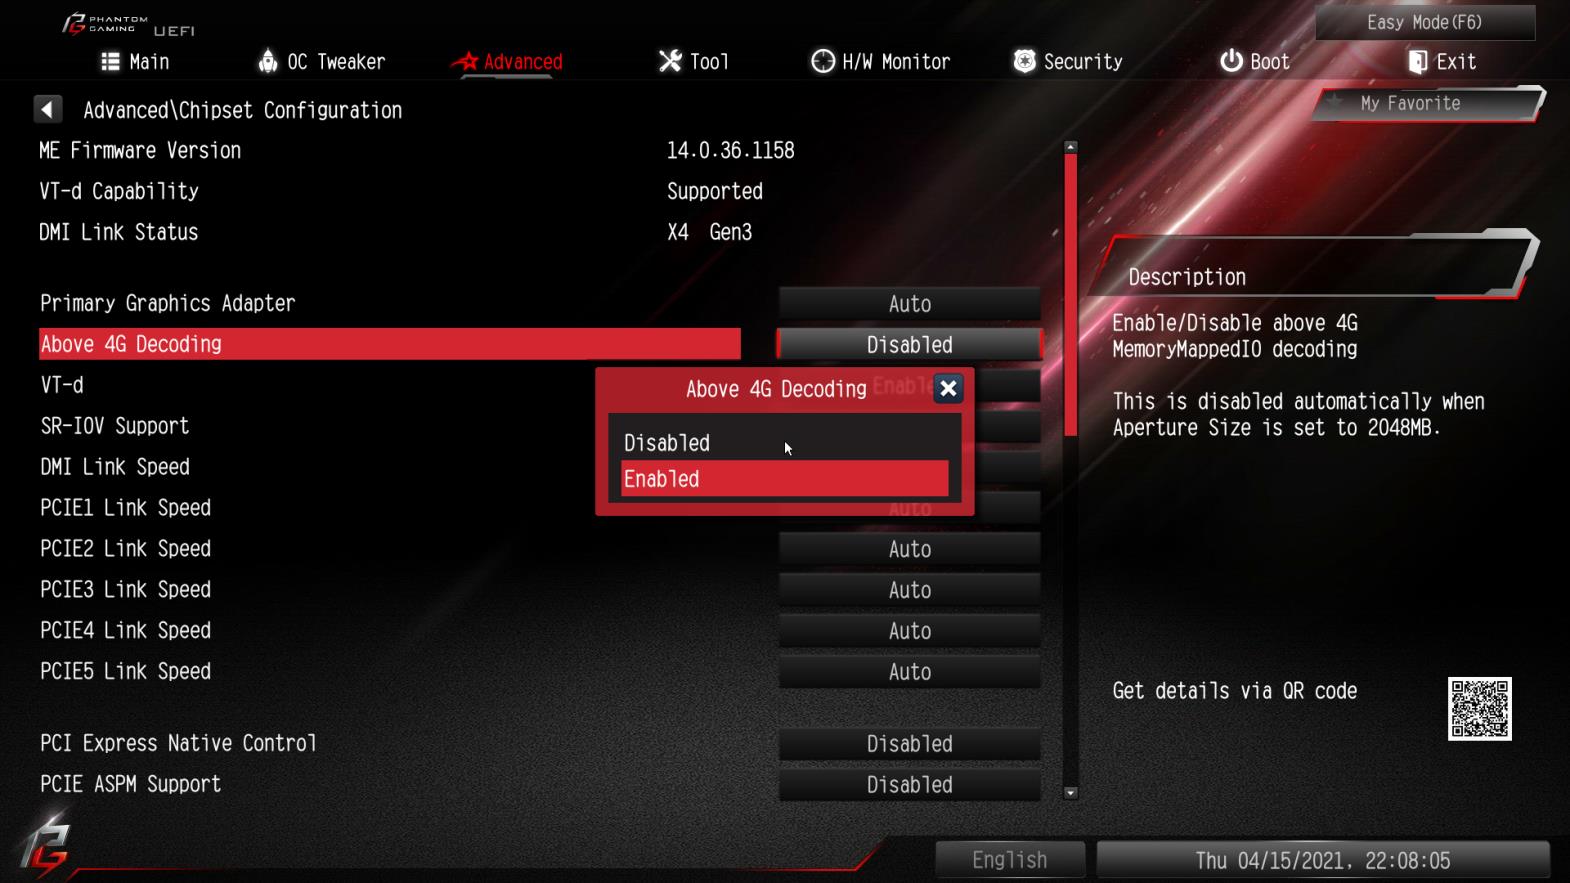
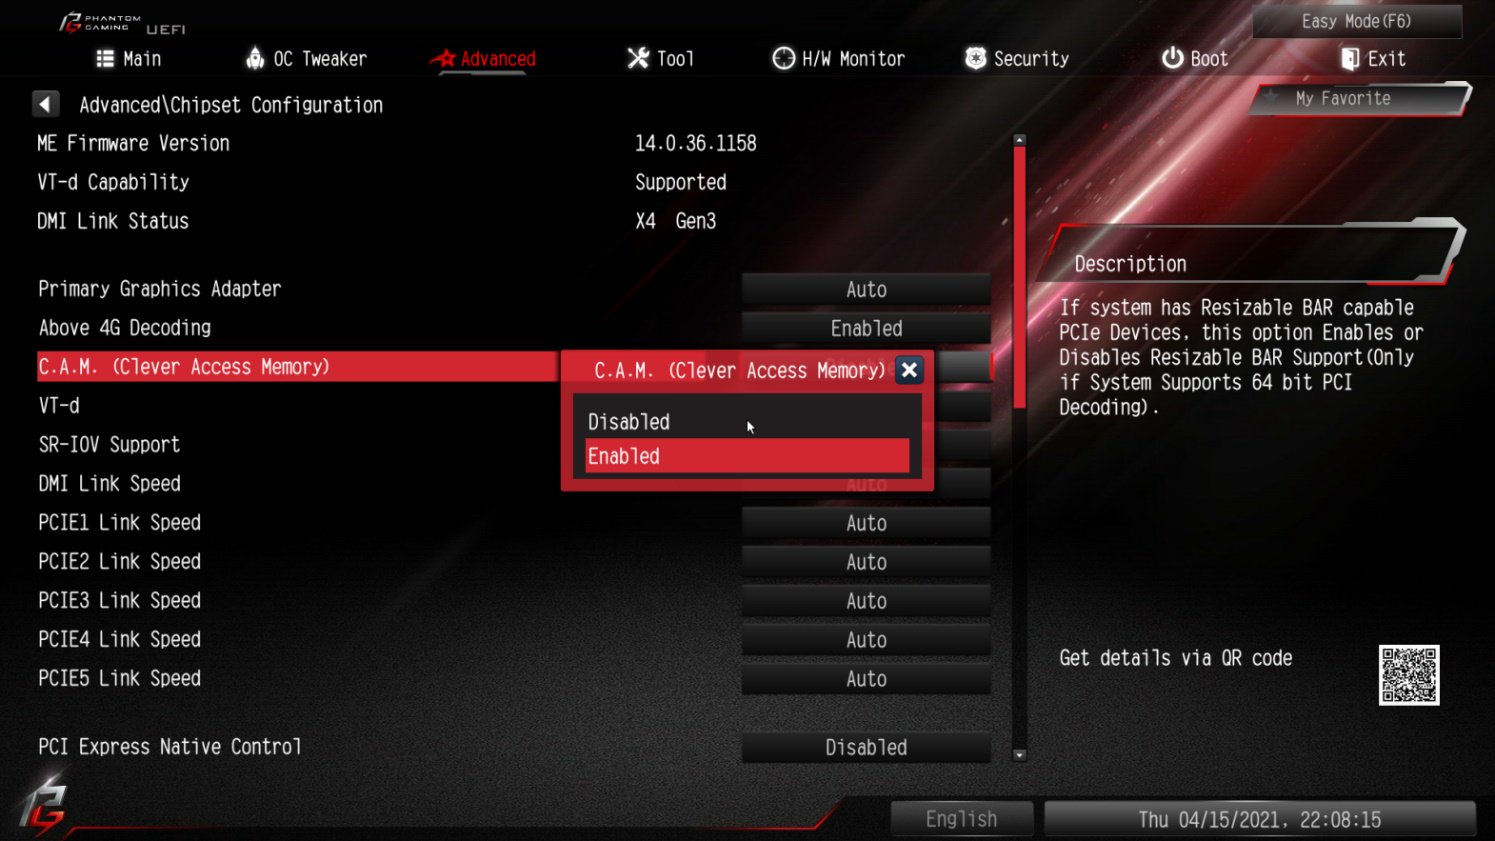
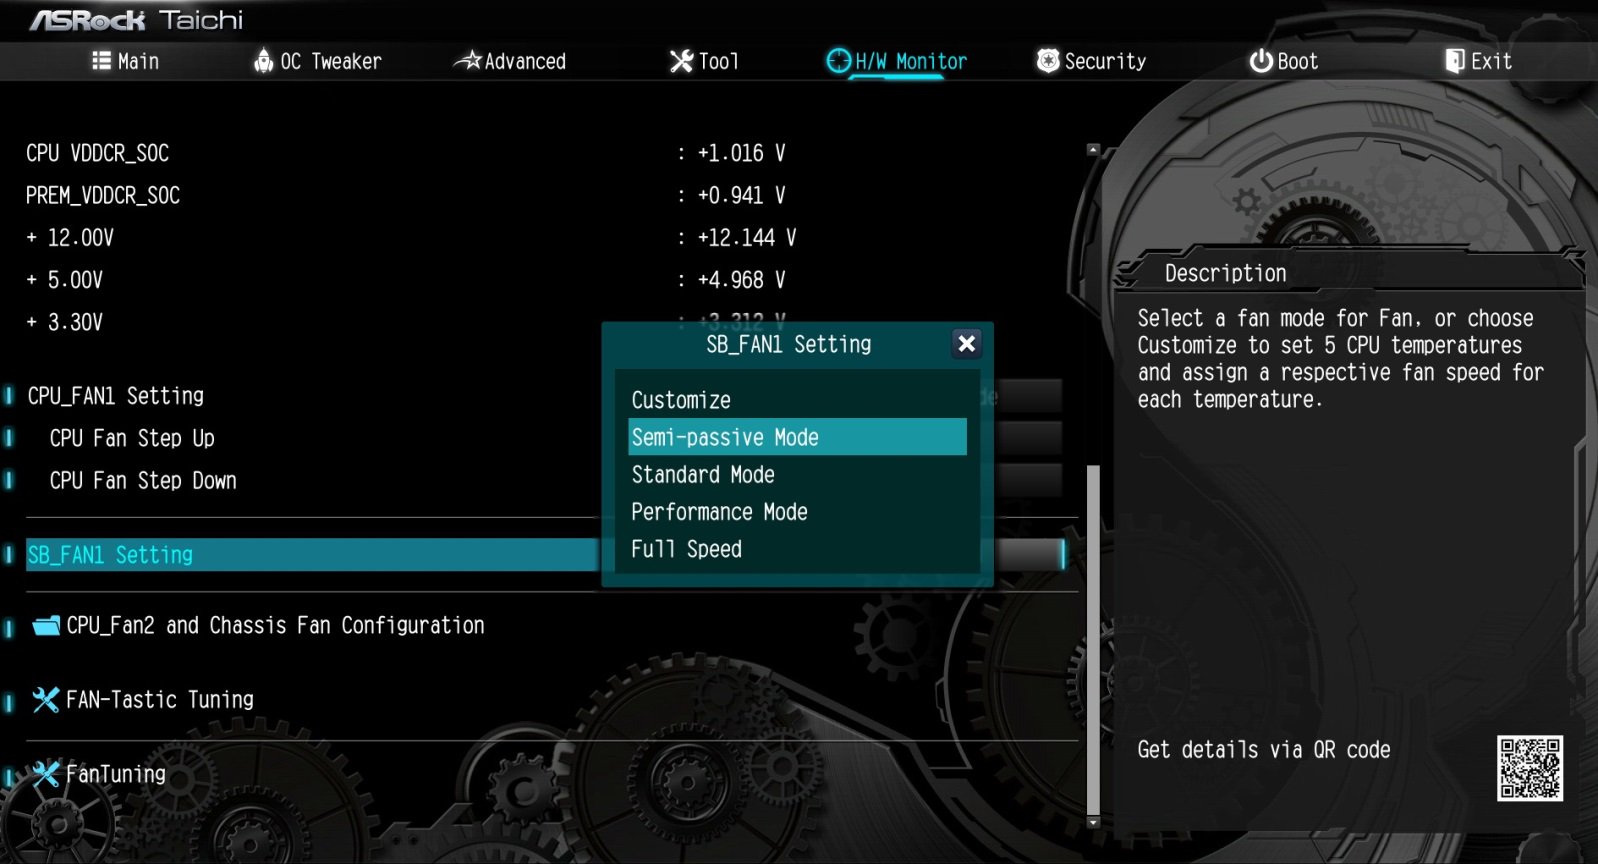
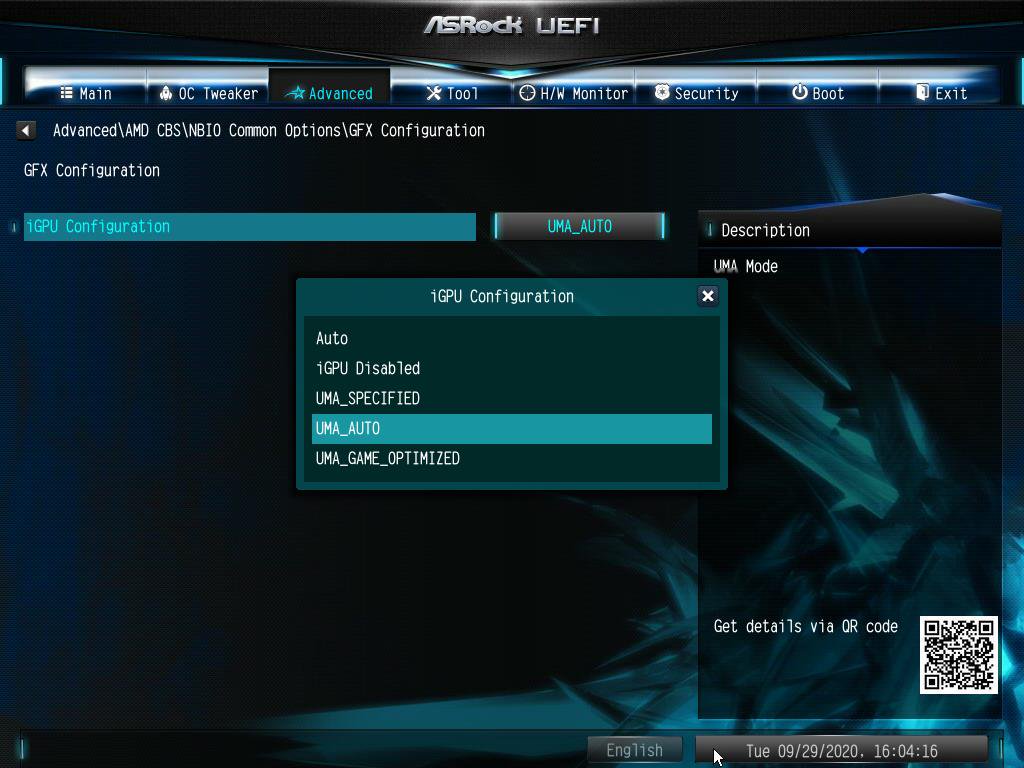
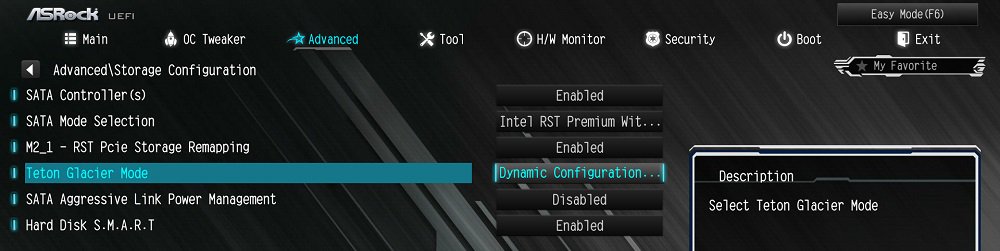
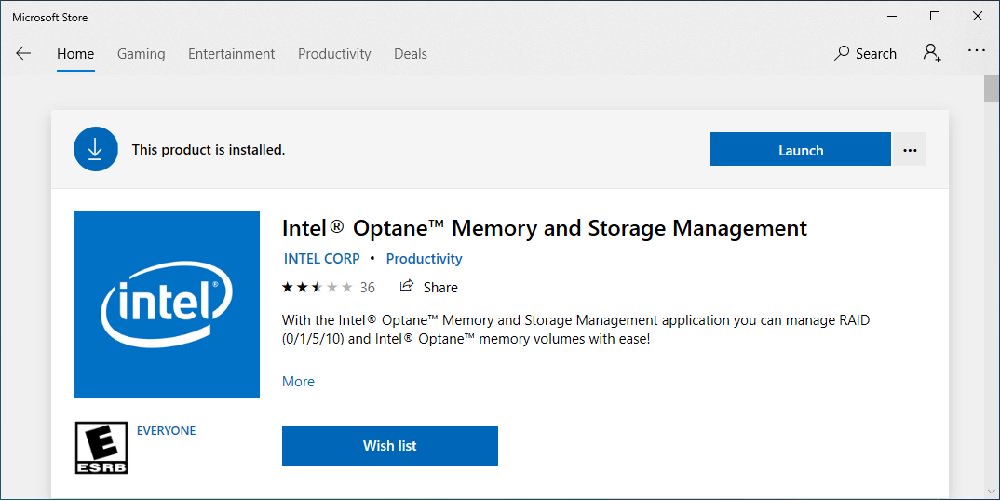
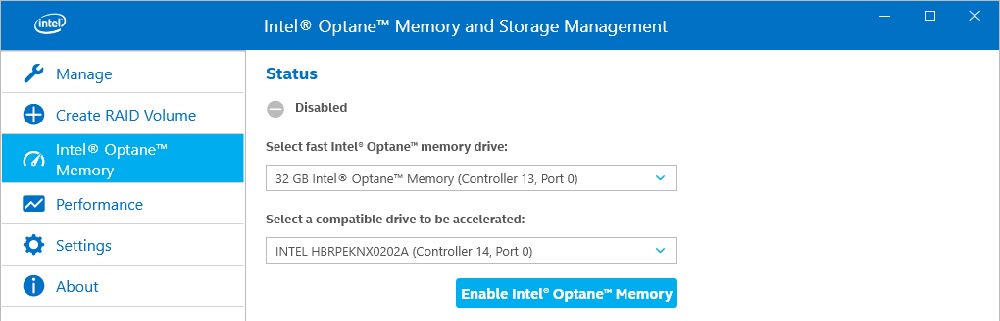
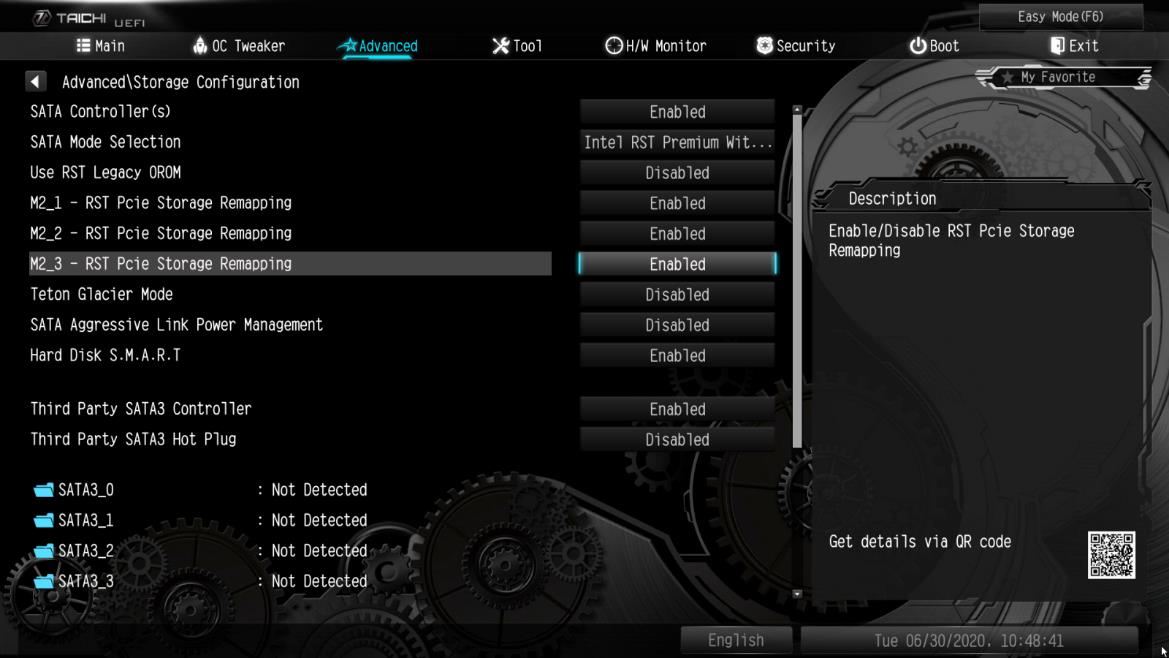
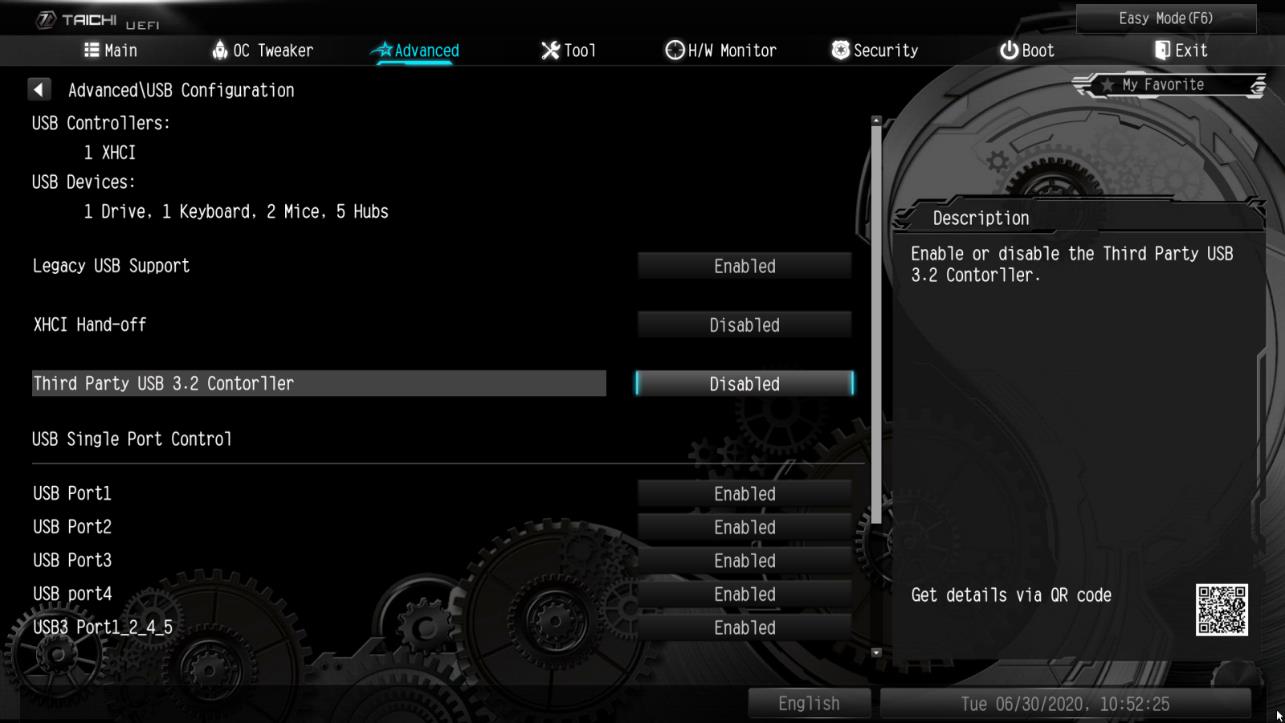
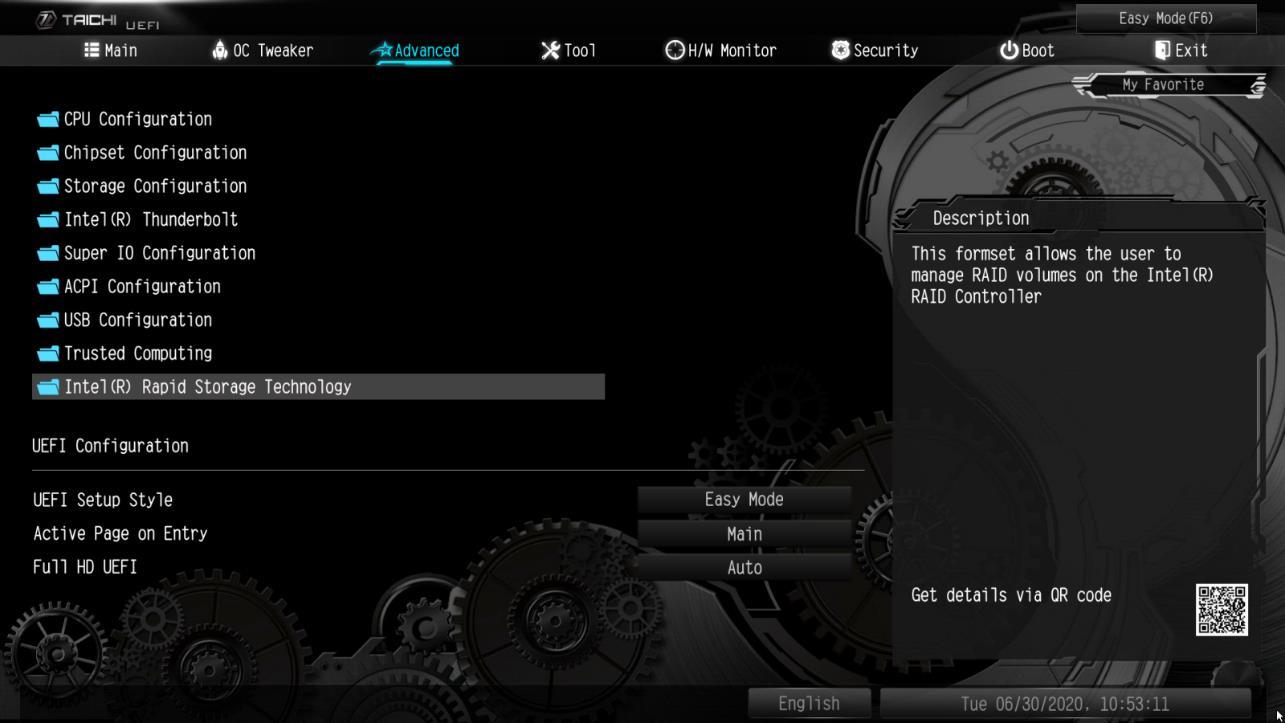
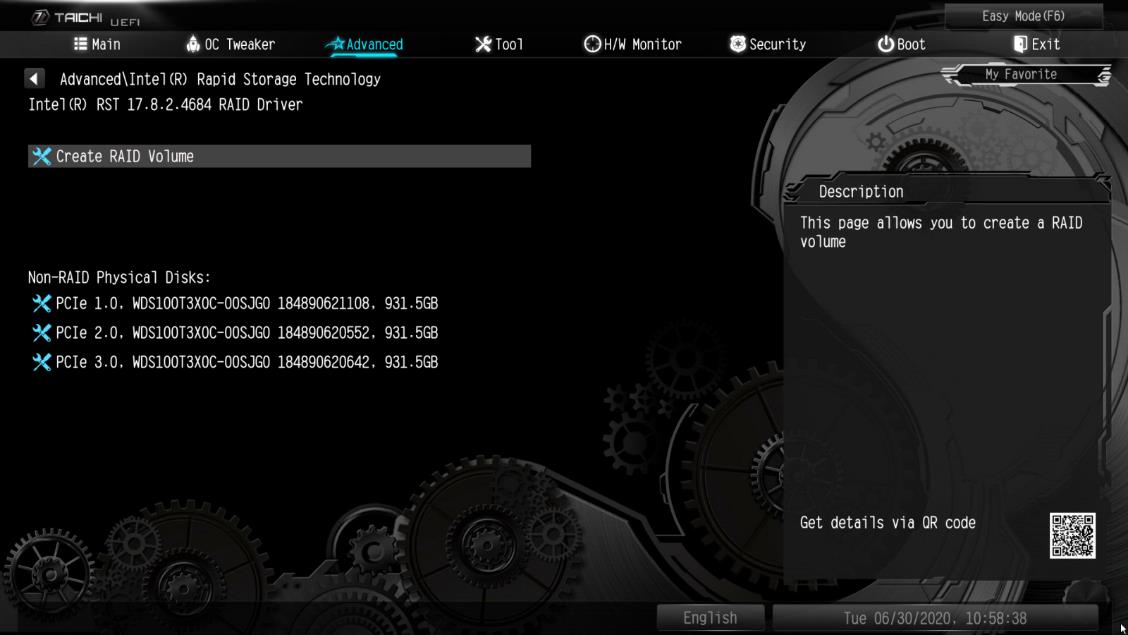
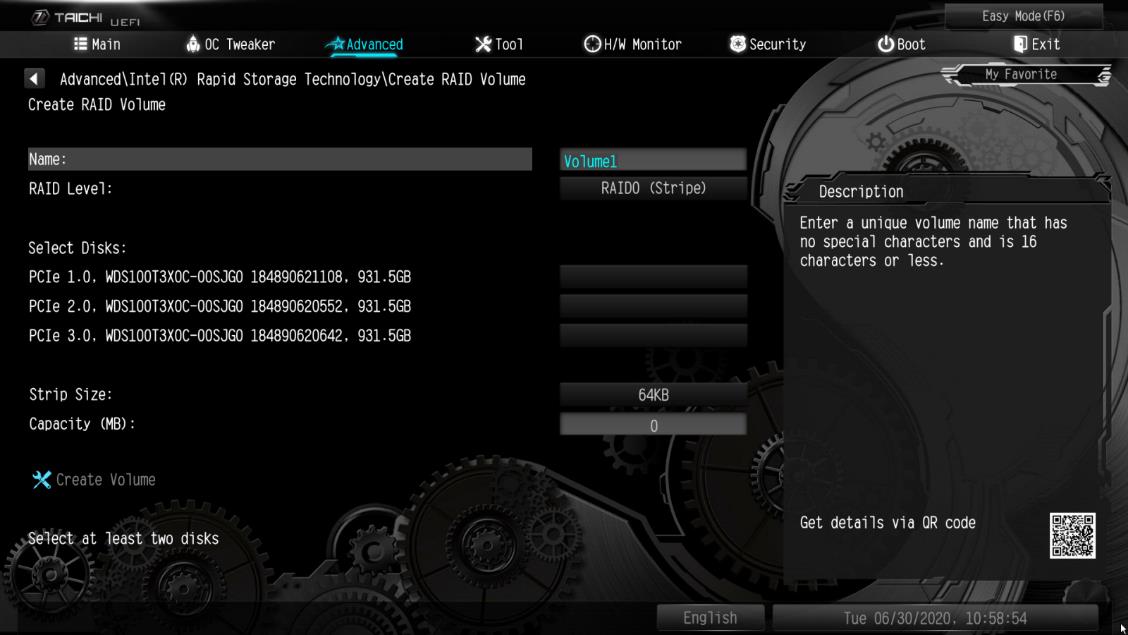

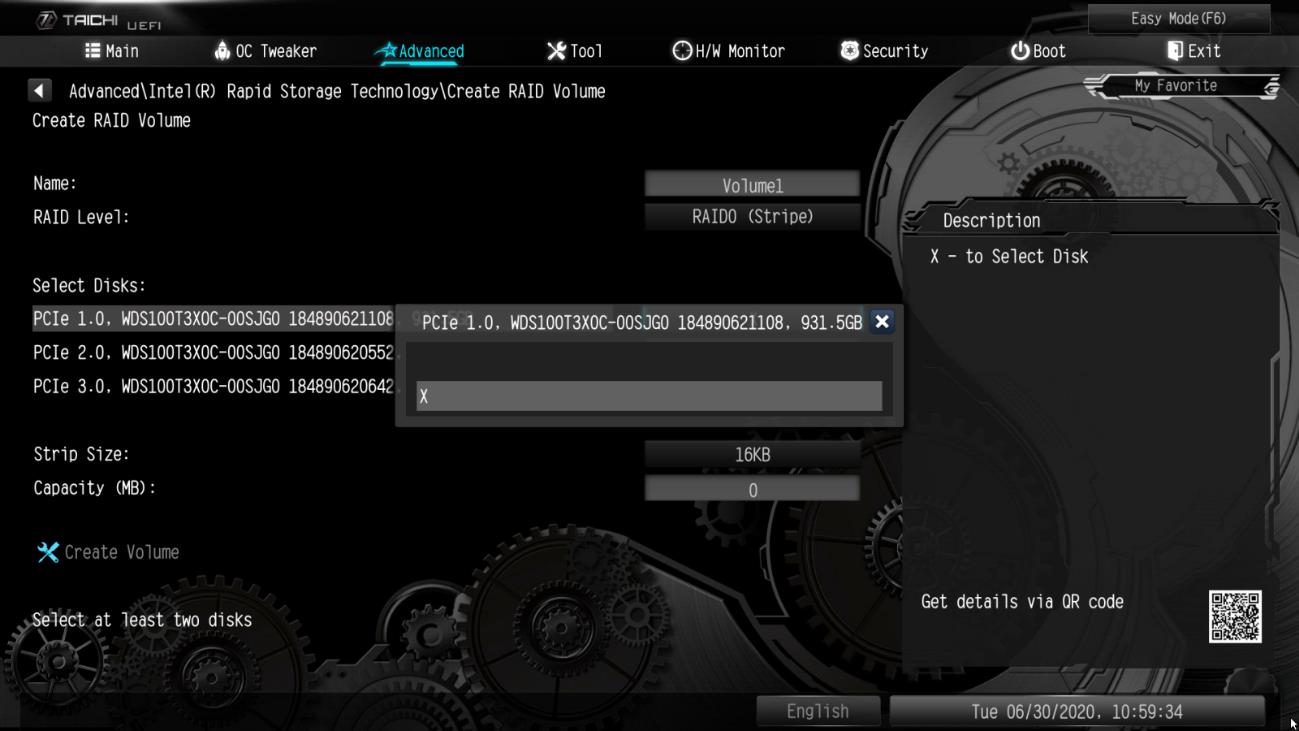
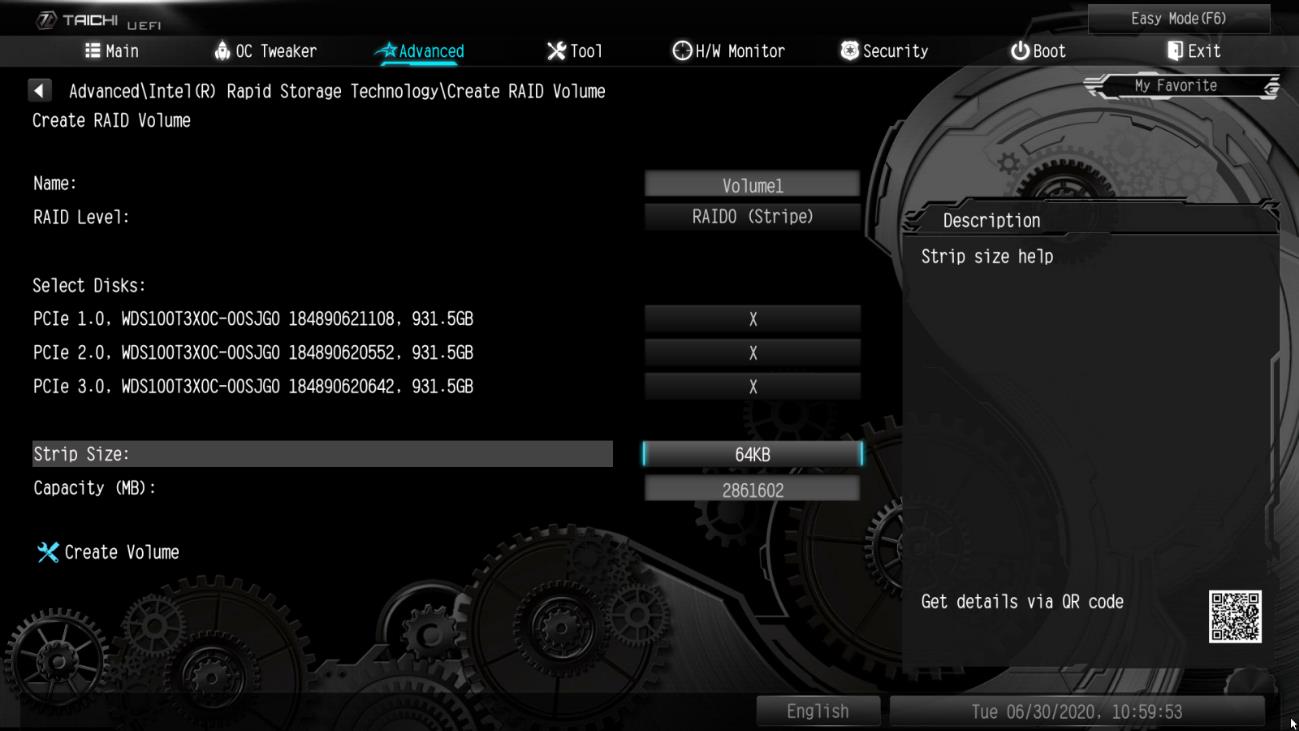

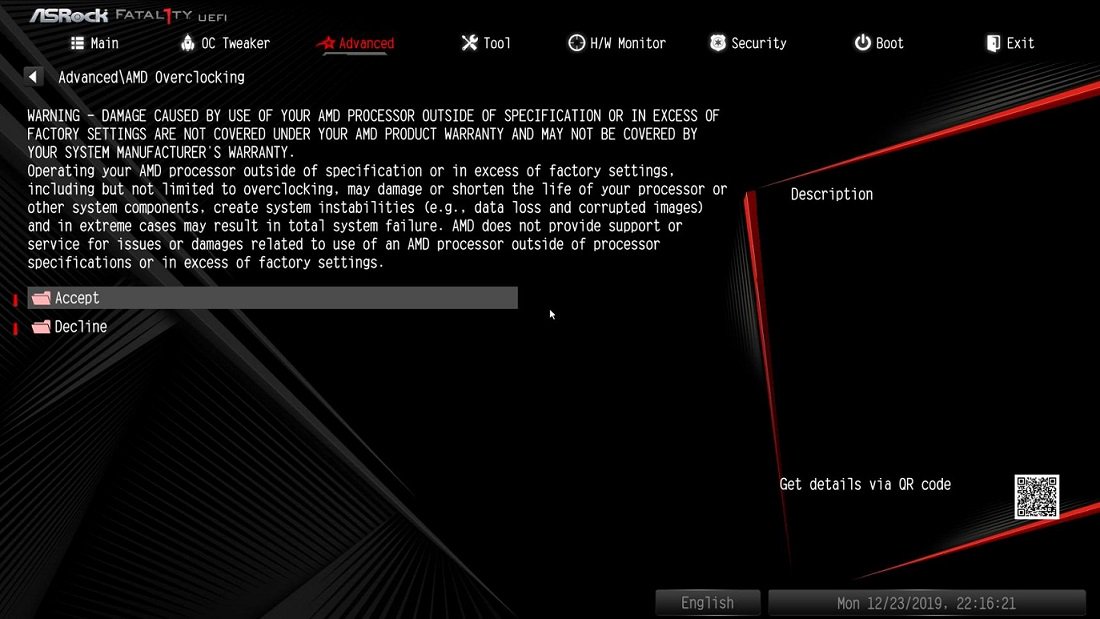

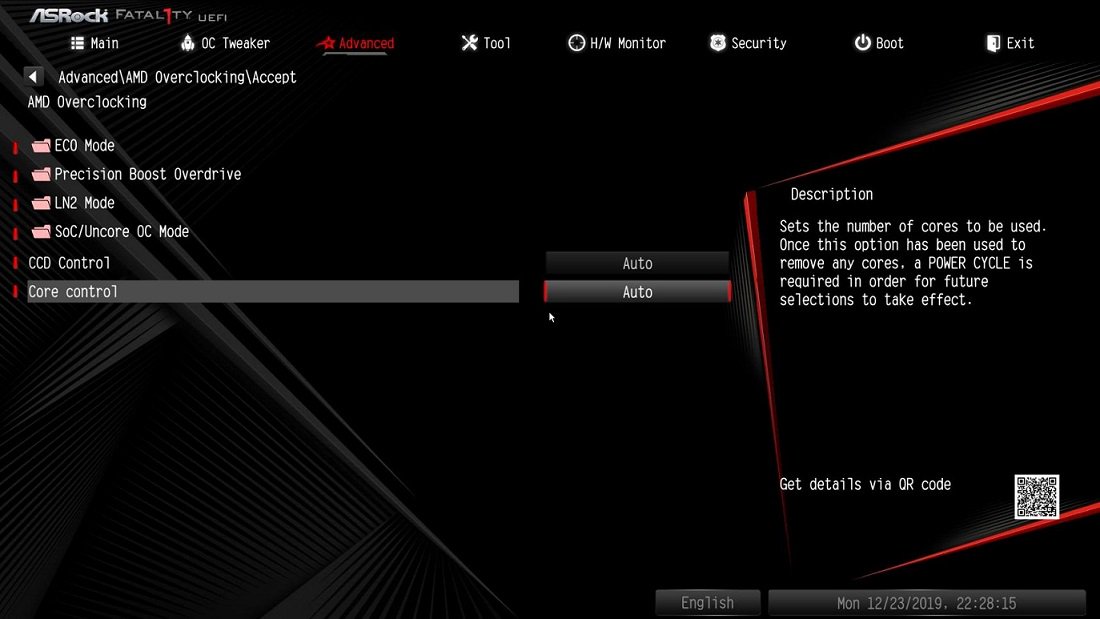

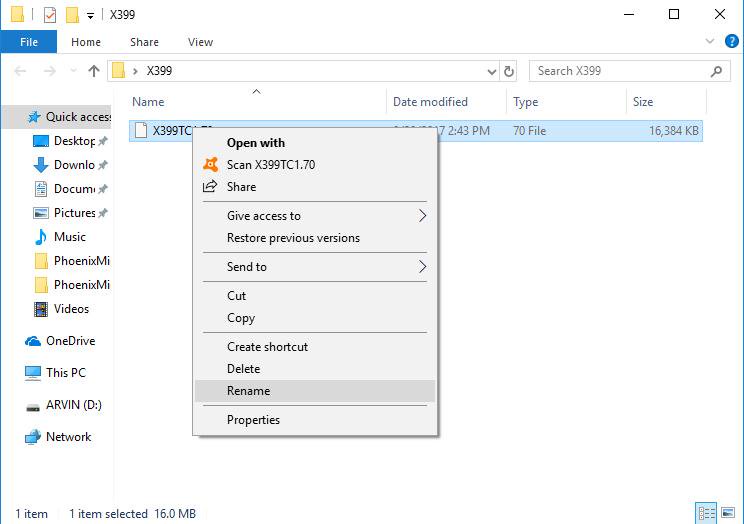
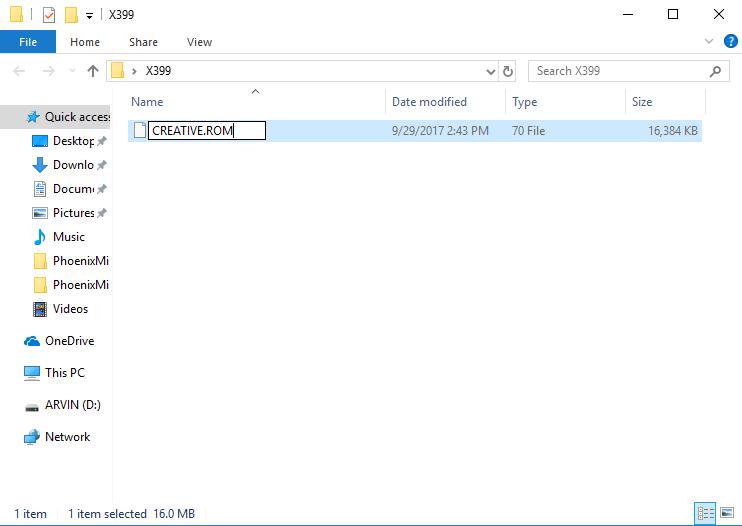
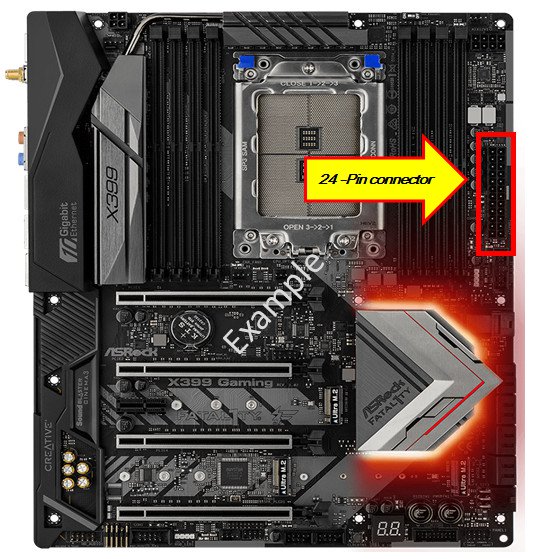

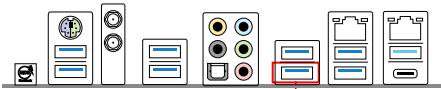
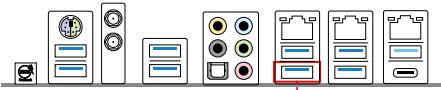

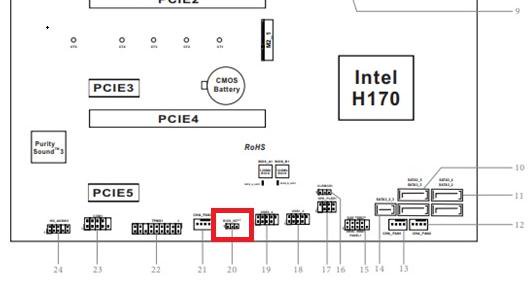
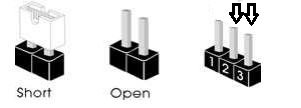
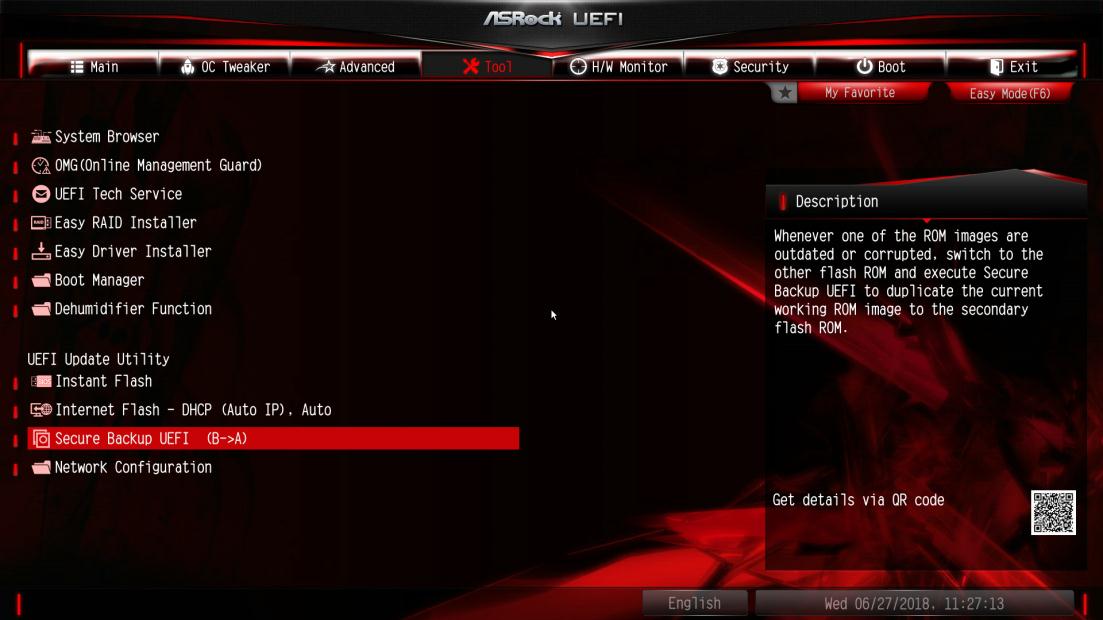
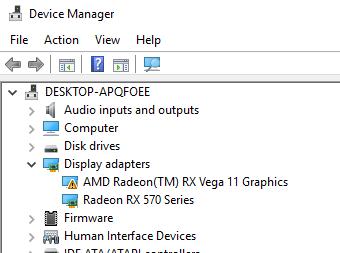
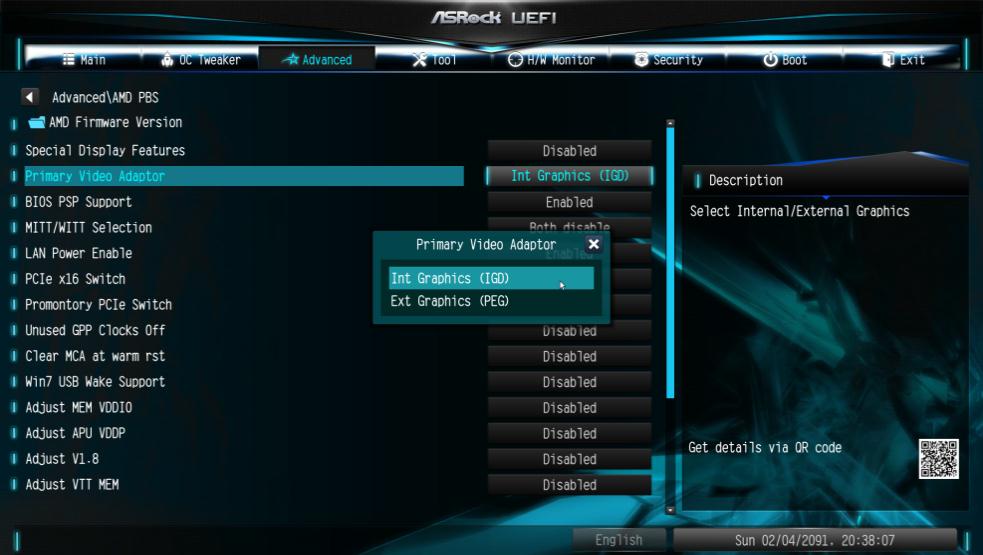

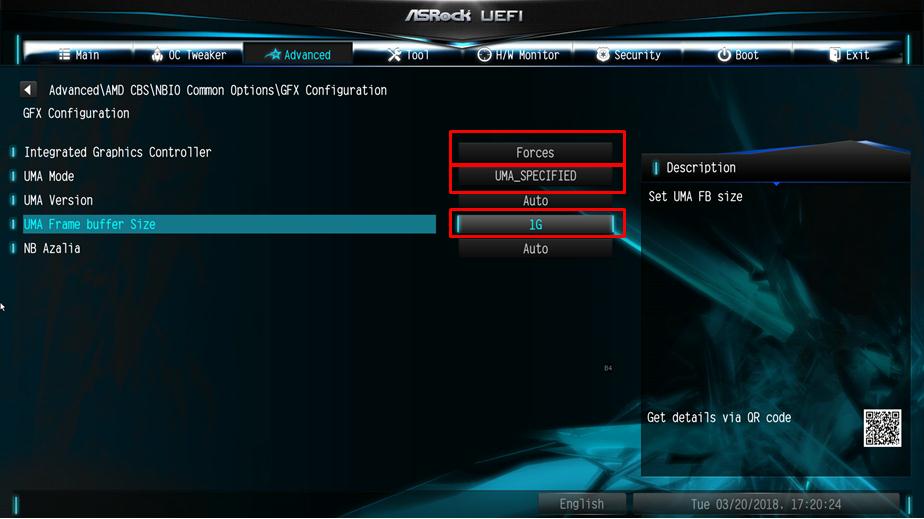
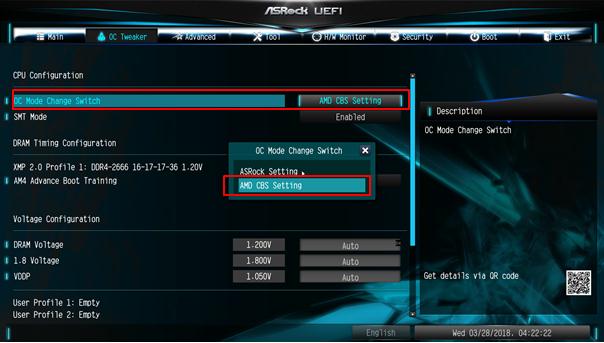
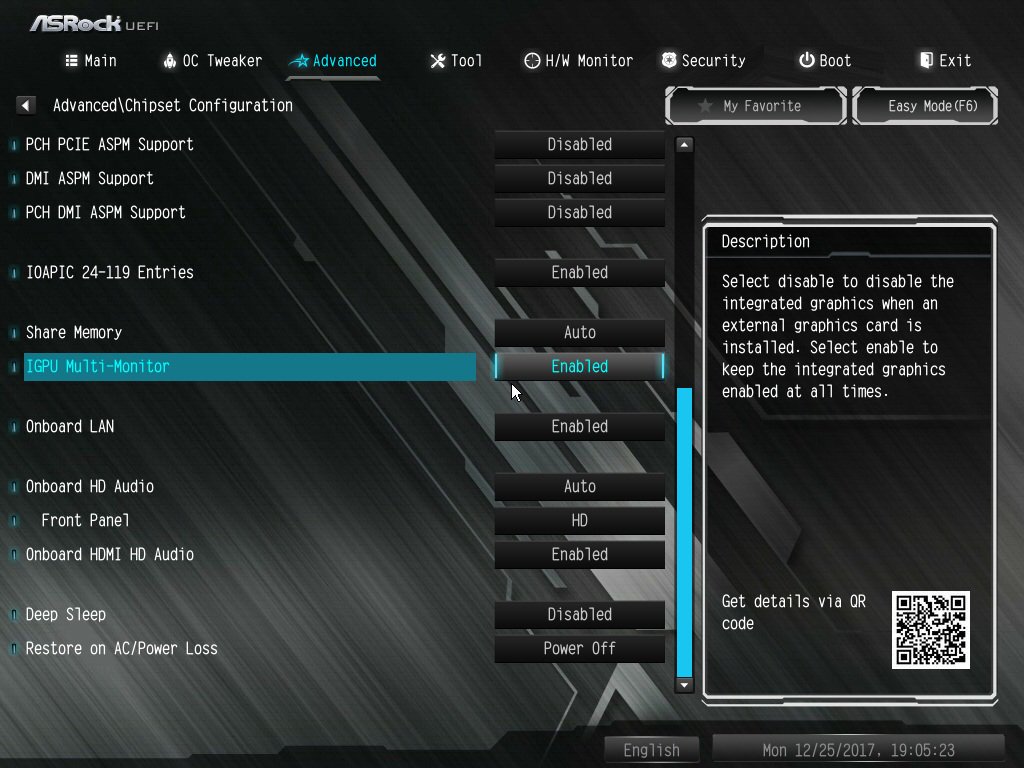

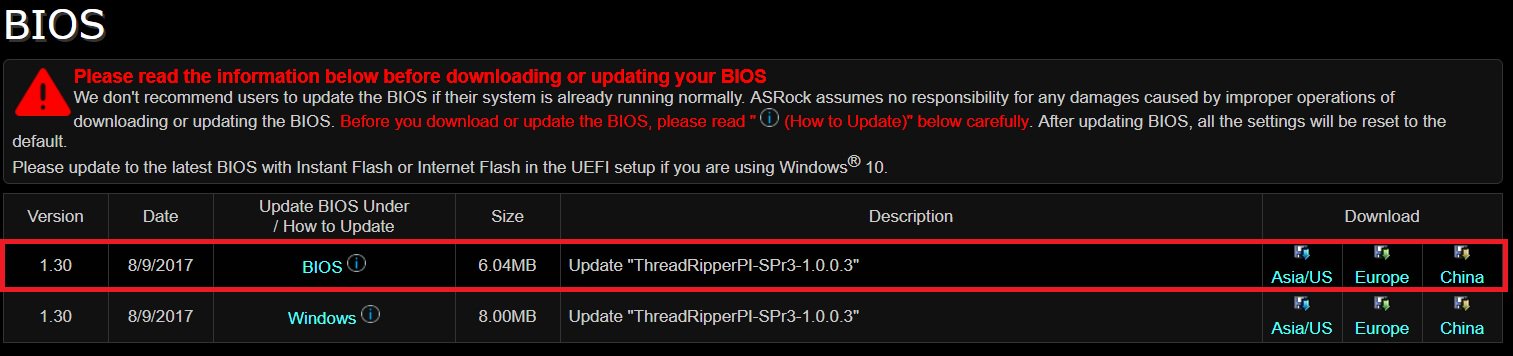
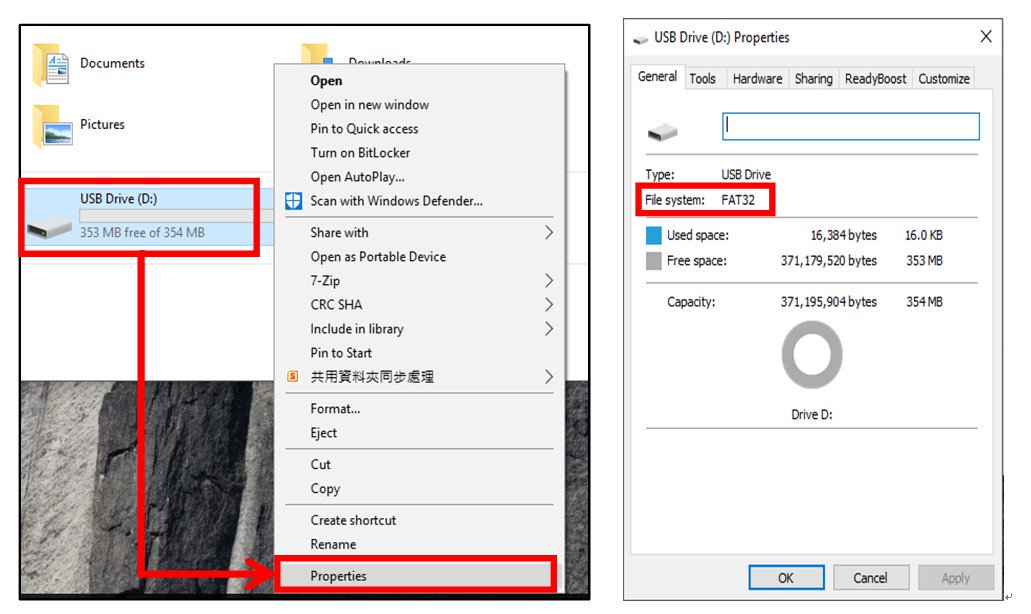
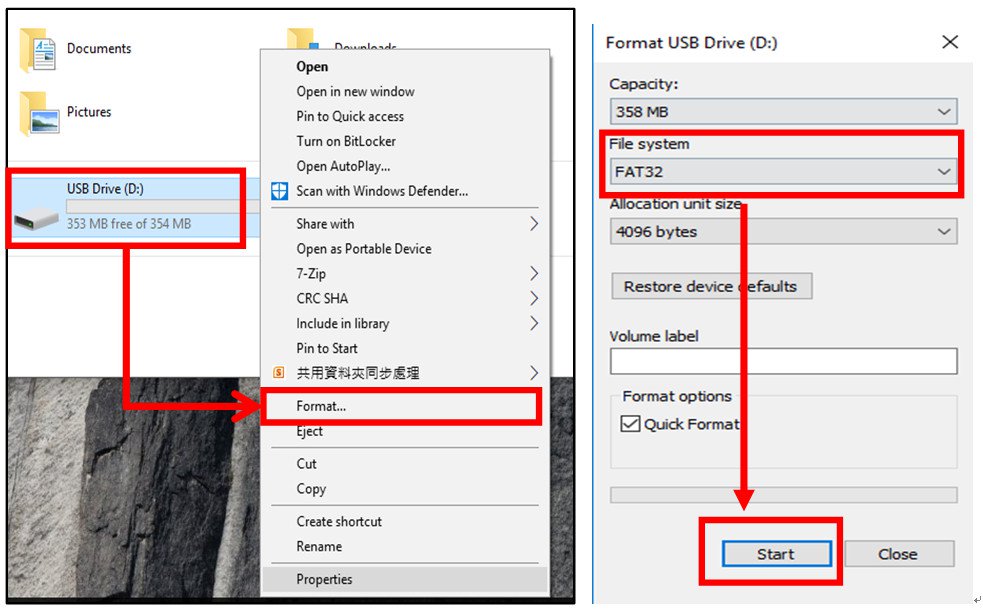


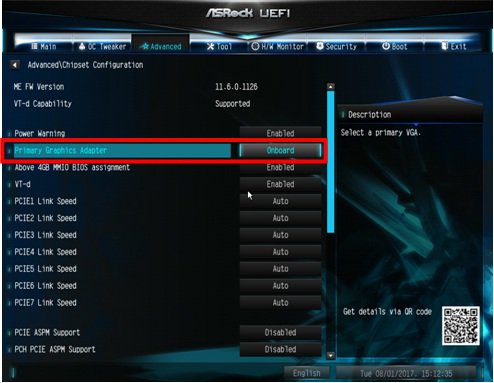

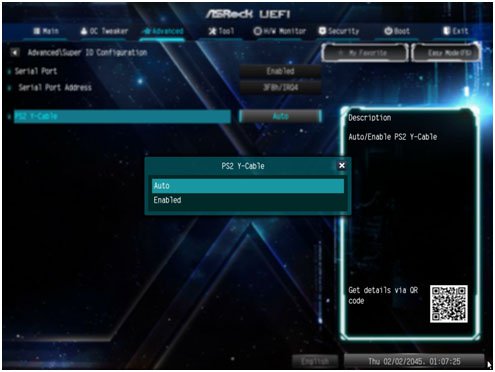
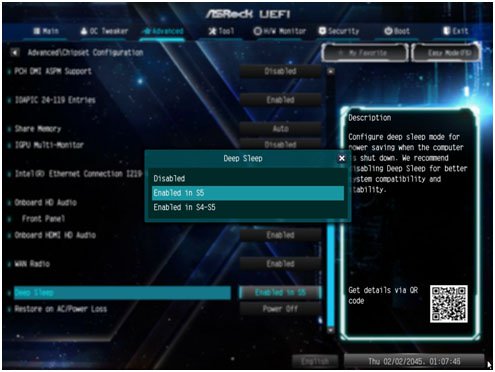
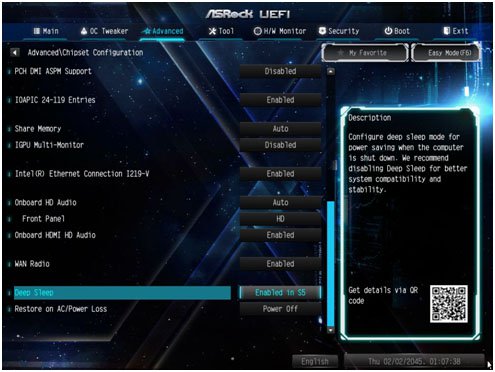

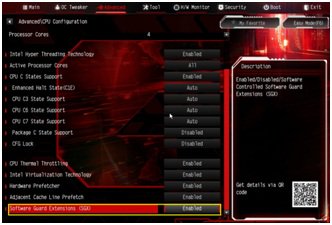
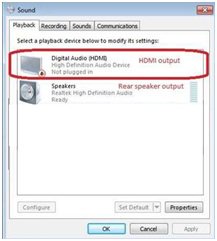
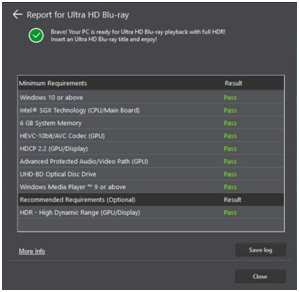
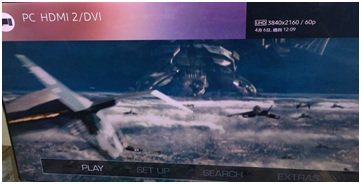

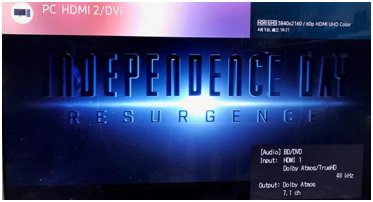
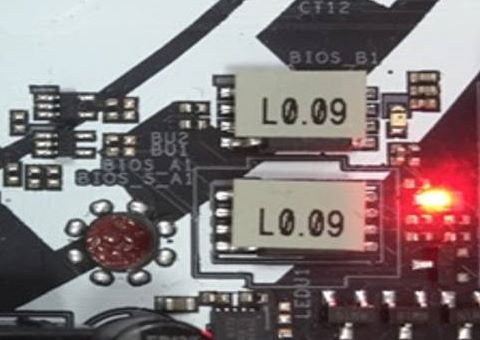
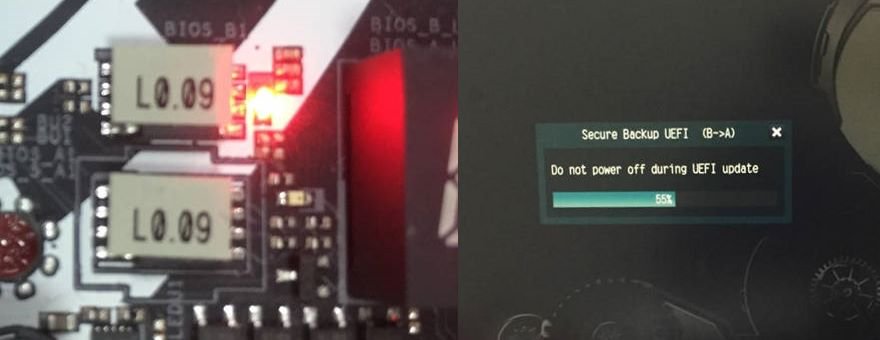
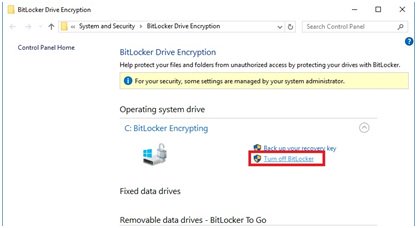
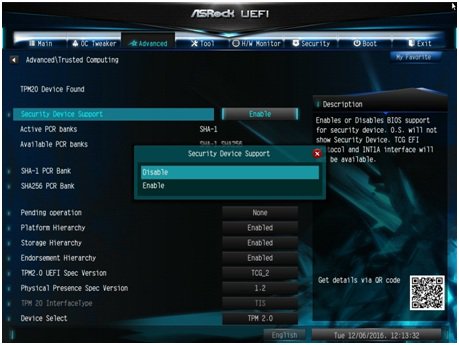
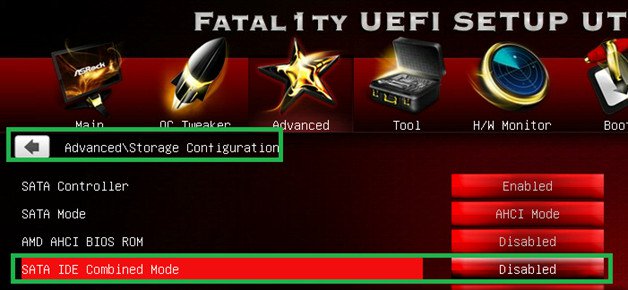
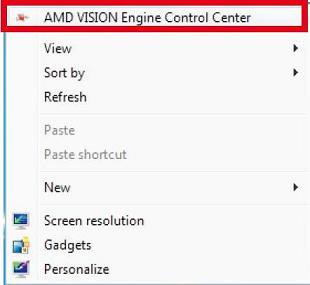
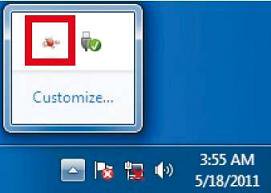
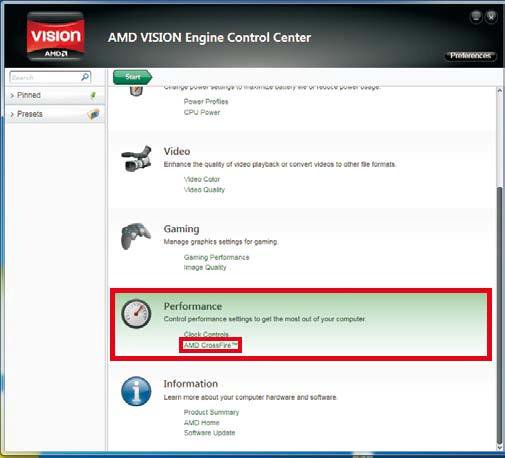
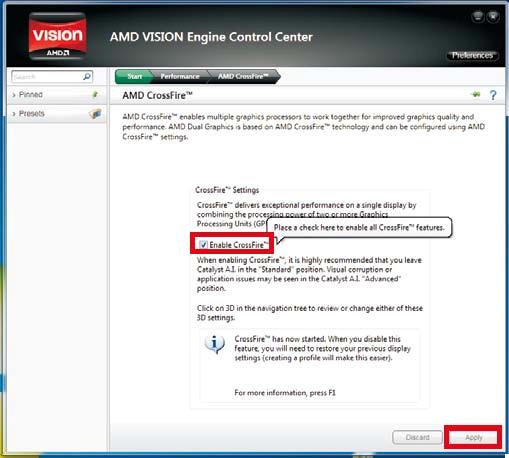
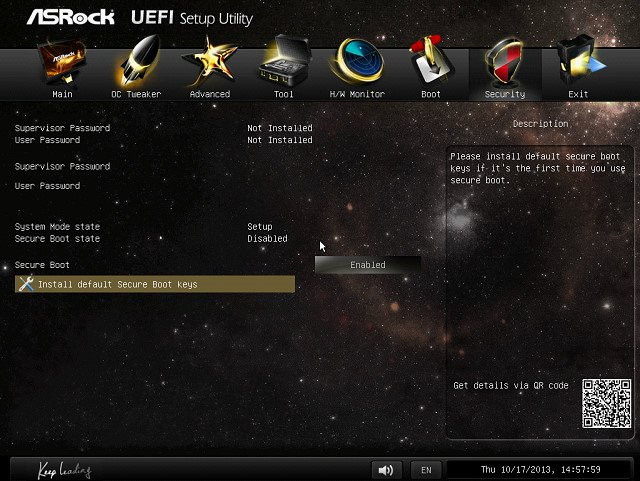
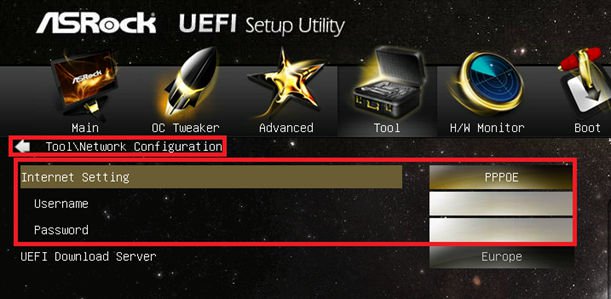

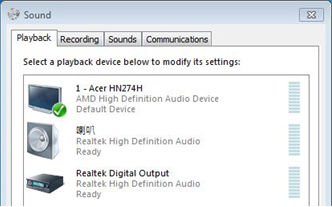
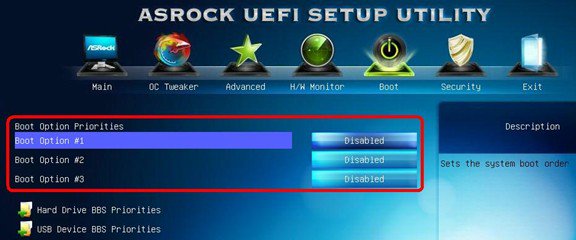
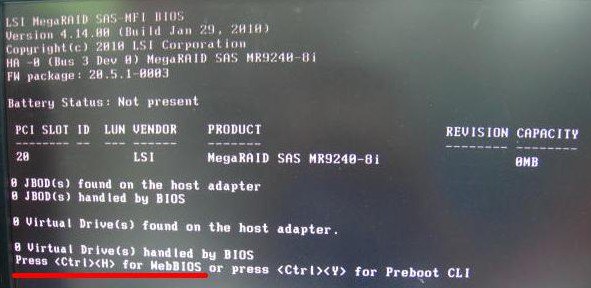

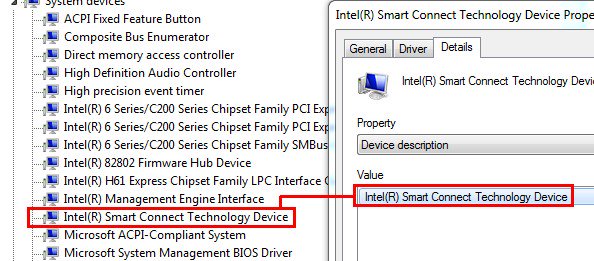
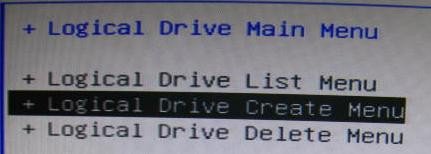
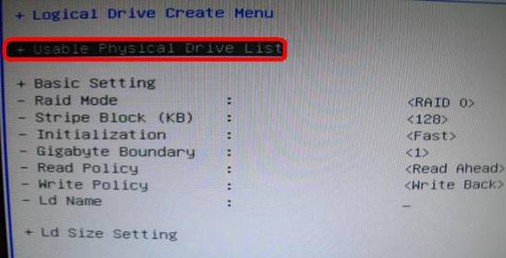

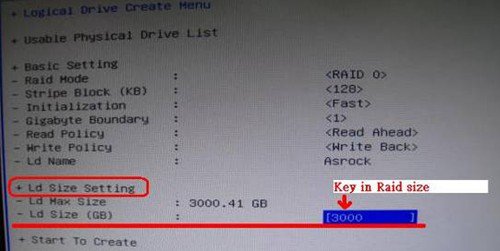
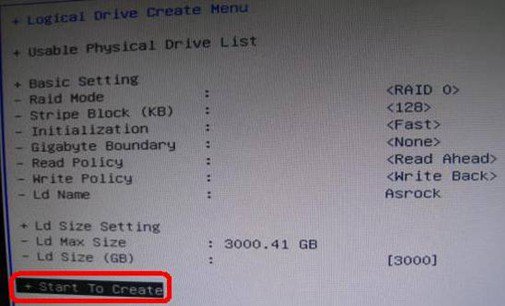

![Disabled [Onboard HDMI HD Audio] option](/support/faq/093.jpg)