Utilizziamo i cookie per offrirti un'esperienza più personalizzata e fluida. Visitando questo sito web, acconsenti all’utilizzo dei cookie da parte nostra. Se preferisci non accettare i cookie o hai bisogno di maggiori informazioni, consulta la nostra Informativa sulla privacy.
Cookie necessari Questi cookie sono essenziali per il corretto funzionamento del sito web e non possono essere disattivati.
Cookie analitici Questi cookie ci aiutano a capire come i visitatori utilizzano il nostro sito web.
Cookie di marketing Questi cookie vengono utilizzati per tracciare i visitatori e mostrare annunci pubblicitari pertinenti.
Cookie dei social media Questi cookie ti consentono di condividere pagine e contenuti sui social media.
Se siete pienamente consapevoli della categoria della vostra domanda, si può scegliere una delle categorie qui sotto per le domande più frequenti. Catalogo:
Risultati:
Q (519):
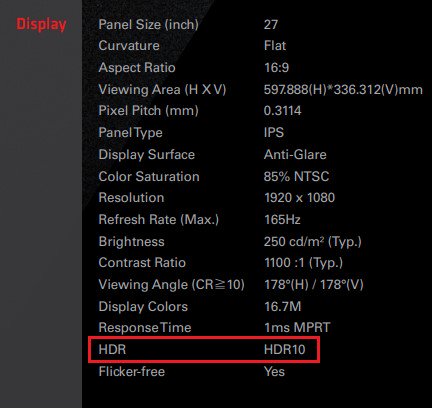
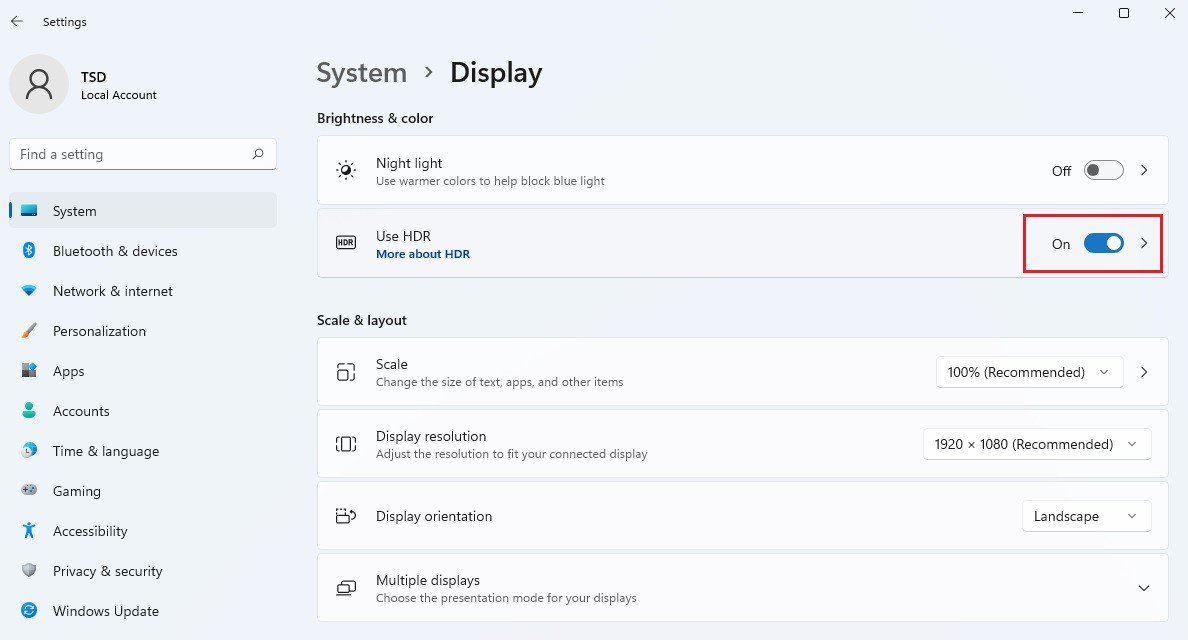
How to enable HDR function under Windows?(8/9/2022)
A:First check if your monitor supports HDR function. (High Dynamic Range)
You may check the product specifications on the ASRock website: https://www.asrock.com/index.asp
E.g. ASRock Gaming Monitor PG27FF1A supports HDR function.
Settings under Windows 11:
1) Go to Settings> System> Display.
2) If your monitor supports HDR function, you may enable it.
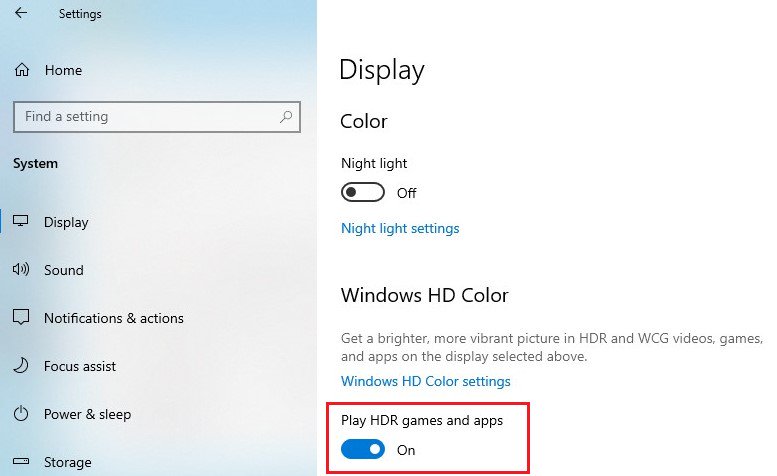
Settings under Windows 10:
1) Go to Settings> System> Display.
2) If your monitor supports HDR function, you may enable it.
Hardware requirements
- Processor: Intel 7th gen. processor or later
- Graphics card: NVidia GTX 10 Series or later/AMD RX500 Series or later
Software requirements
- OS: Windows 10 (ver:1709 or later)
- Software: Movies & TV with HEVC Codec installed
- Microsoft Edge Browser, PowerDVD 17 or later and VLC v3.0 (64bit) or later
Q (515):
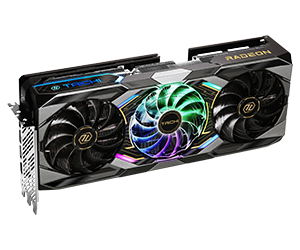
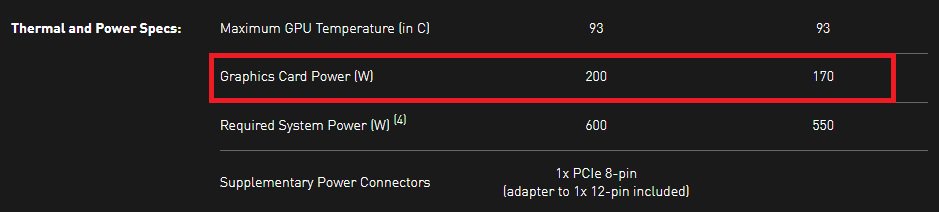
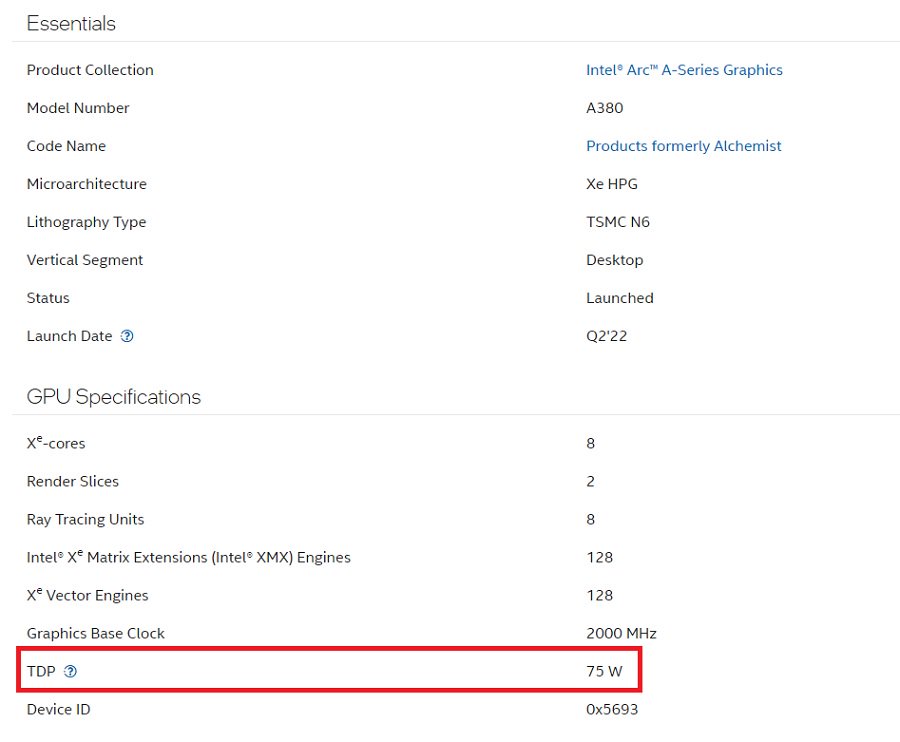
Which graphics cards are supported on my Deskmeet?(7/18/2022)
A:We recommend using a graphic card that consumes up to 200 watt, and supports a discrete Dual slot Graphics card up to 20CM.
The Deskmeet supports CPUs that are up to 65W ("Default TDP” or "Processor Base Power”). The peak power draw of a 65W CPU is about 200W.
The Deskmeet comes with a 500W PSU. So it is able to handle a graphic card with a power draw up to 200W.
For the graphics card's power consumption, please check the specifications provided by the graphic card's vendor.
When checking the power consumption of the graphics card, please refer to the examples below. The power consumption is marked red here:
AMD
NVidia
Intel
Q (449):
Se voglio costruire un sistema di 'mining' con la H110 Pro BTC+, quanta alimentazione mi serve per il mio sistema?(9/1/2017)
A:Dipende dalla configurazione completa del sistema. Consigliamo di calcolarla in 2 parti:
(1) Scheda madre + CPU + memoria + SSD:
Per un sistema con una CPU Intel® Pentium® con 2 memorie DIMM, si consiglia di riservare 250W per questa parte.
(2) Schede grafiche:
Suggeriamo di visitare il sito ufficiale del fornitore della scheda grafica per controllare il TDP della scheda grafica. Fare riferimento all'esempio seguente.
Nvidia GTX1060: richiede 120W di alimentazione per ogni scheda.
Se il sistema utilizza otto RX470 e cinque GTX1060, la somma totale degli altri componenti è 1810W. Considerando l'efficienza nella conversione di potenza, l'alimentazione elettrica consigliata per questo esempio è almeno 2400W.
H110 Pro BTC+ CPU + memoria + SSD
RX470 x Qtà
GTX1060 x Qtà
Totale
250W
120W x 8
120W x 5
1810W
Q (323):
La mia scheda madre supporta Windows8?(10/1/2012)
A:Fai riferimento al nostro sito web per la lista di supporto Windows 8. Link del sito web
Se il tuo modello non è elencato sulla lista di supporto di Windows 8, prova gentilmente prima i driver contenuti nella confezione.
Q (304):
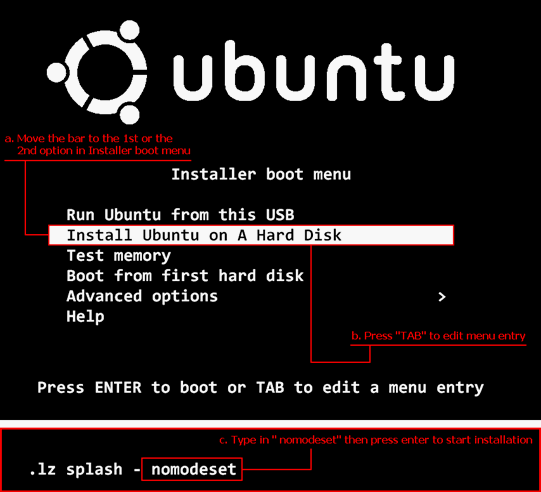
Come installo Ubuntu 11.10 sulla serie Vision 3D (Sandy Bridge)?(1/1/2012)
A:Ti preghiamo di seguire i passaggi qui sotto:
Fase 1. Aggiungere il parametro "nomodeset" prima di installare. (uno spazio e poi nomodeset)
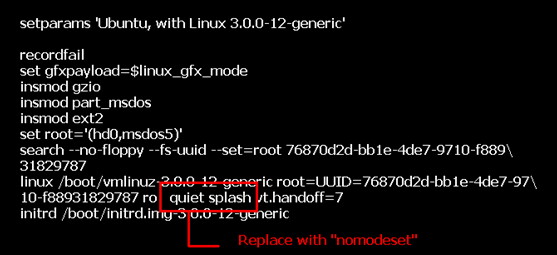
Fase 2. Quando avvii per la prima volta dal HDD dopo l'installazione, ti preghiamo di premere shift all'avvio fino a che appare il menu GRUB.
Fase 3. Premere "e" per modificare l'opzione. Sostituire "quiet splash" con "nomodeset".
Fase 4. Premere Ctrl+X per continuare il processo di avvio.
Fase 5. Connettersi a Internet e iniziare ad aggiornare i driver della scheda grafica.
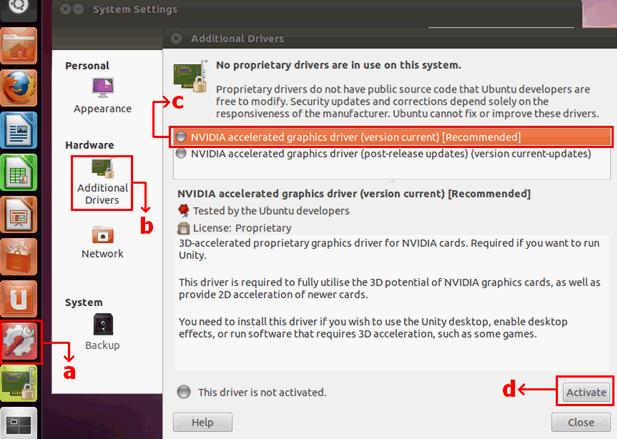
[System Settings] > [Hardware] > [Additional Drivers] > Attivare [NVIDIA accelerated graphics driver]
Q (296):
Come posso attivare la funzione 3D su sistemi ASRock Vision 3D e ION3D?(11/1/2011)
A:I software per monitor/TV/contenuti/riproduzione possono avere diverse impostazioni.
Usiamo l'esempio di seguito:
3D TV: Samsung UA46C7000WM 46"
Software di riproduzione: Power DVD10 v10.0.2025.52
Contenuto da riprodurre: Step UP 3D blu-ray
1. Vi preghiamo di seguire i seguenti passaggi da impostare sotto OS.
A. Vi preghiamo di installare tutti i driver su SCD prima di eseguire i seguenti passaggi in questa guida.
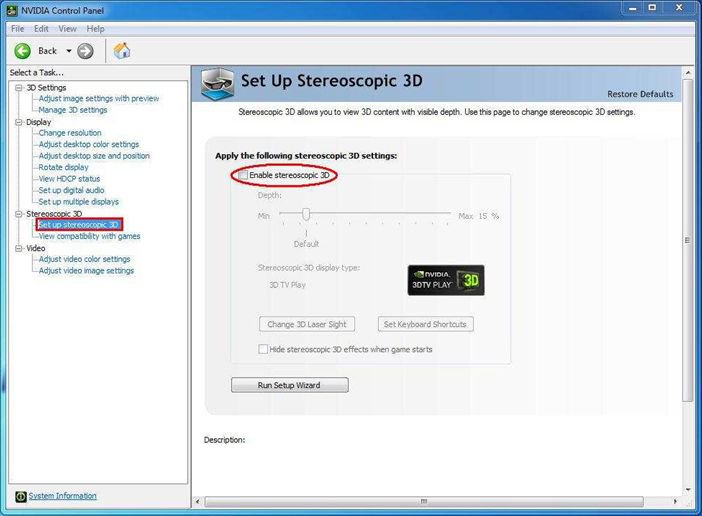
B. Vi preghiamo di cliccare con il tasto destro del mouse sul desktop ed entrare nel Pannello di controllo NVIDIA.
C. Selezionate "Setup Stereoscopic 3D task" nel Pannello di controllo NVIDIA e selezionate "Enable Stereoscopic 3D"
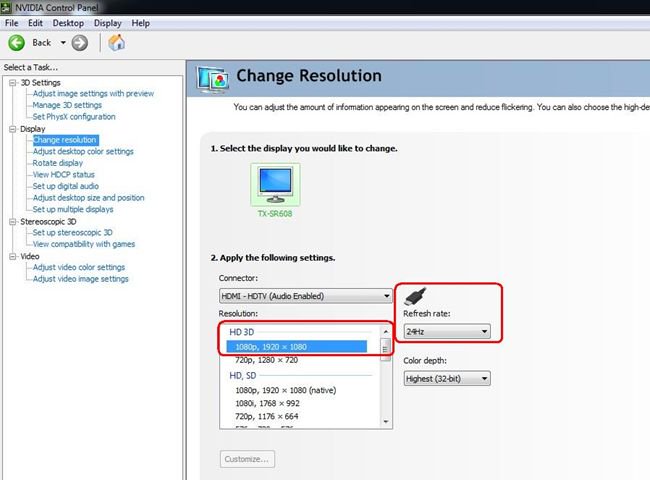
D. Se è la prima volta che s'imposta la funzionalità 3D, il sistema può portare ad eseguire la Procedura guidata d'installazione. Si prega di seguire le istruzioni e terminare l'installazione guidata.
E. Dopo aver terminato la procedura guidata d'installazione, inserite Display > Modifica risoluzione, impostare la risoluzione su "HD, 3D" con un'adeguata soluzione e "Frequenza di aggiornamento".
Lo abbiamo impostato su "1080p" e 24Hz durante le nostre prove.
F. Cliccare "Apply" per salvare le modifiche.
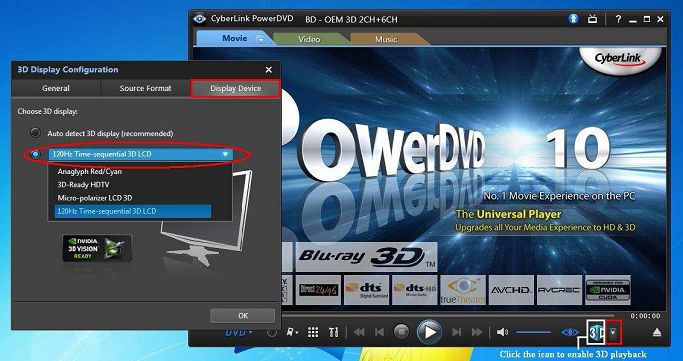
2. Vi preghiamo di seguire i seguenti passaggi per impostare il vostro PowerDVD10
A. Fare clic sulla freccia a destra accanto all'icona "3D" su PowerDVD10 per avviare la configurazione della visualizzazione 3D.
B. Impostare il tipo corretto di monitor/TV in Display Device. Come mostrato nella figura in basso, selezioniamo 120Hz Time-sequential 3D LCD, ad esempio.
* Nota: Si prega di notare che altri monitor/TV/contenuti possono avere diverse impostazioni, vi consigliamo di controllare i manuali del monitor/TV/contenuti per ulteriori dettagli.
C. Quindi è possibile riprodurre il contenuto 3D.
Q (290):
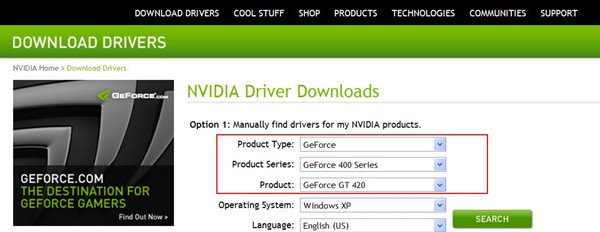
Vorrei aggiornare il driver VGA 3D Vision di NVIDIA dal sito ufficiale, che cosa devo fare?(6/1/2011)
A:Si prega di fare riferimento al link qui sotto per la sezione Download dei driver sul sito Nvidia: http://www.nvidia.com/Download/index.aspx
Selezionare come di seguito,
Tipo di prodotto: GeForce
Serie del prodotto: GeForce 400 Series
Prodotto: Geforce GT420
Si prega di fare riferimento alla foto qui sotto:
Selezionare il sistema operativo e la lingua e sarai in grado di cercare il driver.
Q (259):
Does my motherboard support Windows® 7?(11/21/2009)
A:Please refer our website for windows7 support list.
Website link: https://www.asrock.com/news/events/2009win7/index.asp
If your models are not listed on Windows® 7 support list, please kindly try inbox driver first.
Or go to chipset vender website to download the chipset driver.
Intel® website: http://downloadcenter.intel.com/Default.aspx
AMD® website: http://support.amd.com/us/gpudownload/Pages/index.aspx
NVIDIA® website: http://www.nvidia.com/Download/index.aspx?lang=en-us
Realtek website: http://www.realtek.com.tw/downloads/
VIA® website: http://www.via.com.tw/en/support/drivers.jsp
If you got any further issues, please contact ASRock TSD : Asrock_TSD@asrock.com.tw
Q (256):
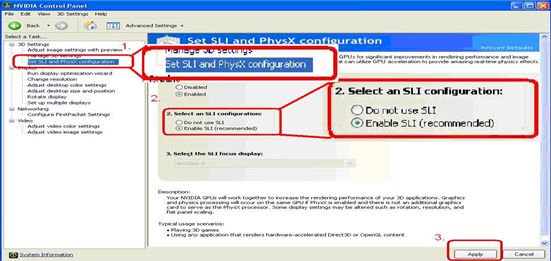
I have plug two NVIDIA® VGA cards on my motherboard but, I cannot find the Enable SLI option in NVIDIA® Control panel?(9/3/2009)
A:Following steps as below may help you to solve this issue.
1. If your motherboard has the SLI/XFire switch card, please put the SLI/XFire Switch card to 8x/8x, if there is no switch card on your motherboard, please skip this step.
2. Remove the graphics card from the PCI-E 1 slot.
3. Restart Windows.
4. Install the driver for the graphics card (again).
5. Put the VGA card back into the PCI-E 1 slot, and put the SLI bridge on.
6. Activate SLI function by NVIDIA® control panel ..
7. Or please download the latest VGA driver from NVIDIA® Web Site and try the new
driver. http://www.nvidia.com/Download/index.aspx?lang=en-us
Q (255):
Why I cannot hear audio playback under Windows® XP when I connect HDMI cable with ION330?(9/3/2009)
A:Some suggestions as below may solve the issue,
1. Please re-install your Windows® XP and install required driver in such order :
a. HD Audio Driver and Application(VIA® HD Audio driver)
b. Onboard HDMI HD driver (NVIDIA® HDMI driver)
c. All in 1 driver.
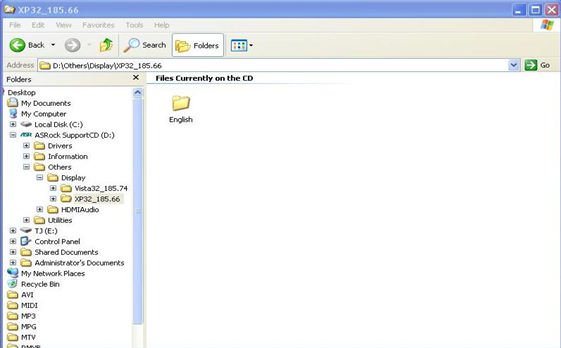
2. Refering to the attached picture, please install a display driver in support CD -> Others -> Display -> XP32_185.66 -> Setup.exe
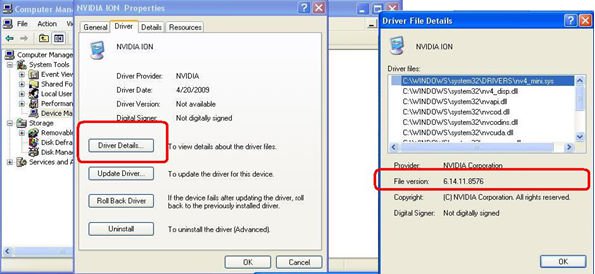
3. Please check your VGA driver version has been update to 6.14.11.8576 by device management.
4. Since when ever you plugged the rear speaker to ION330, the sound playback would AUTOMATICALLY set to "HD Audio Rear Output", therefore, during the test, please ONLY connect HDMI to the TV, and make sure the sound playback is set to "NVIDIA® HD Audio"
Q (254):
ION330 support Dolby Digital 5.1 or DTS 5.1?(9/3/2009)
A:ION330 can support Dolby Digital 5.1, DTS 5.1 and LPCM 7.1 only under Windows® Vista™ or later version.
Please refer to below steps to setting your system.
1. Please update the HOTFIX: KB959458 or update your Vista Service Package to SP2.
Hotfix download link: http://support.microsoft.com/kb/959458
2. Install the drivers in the order listed as below
a. VIA® HD Audio Driver 7100d
b. NVIDIA® HD Audio driver 1.0.0.51
c. NVIDIA® nForce All in 1 v20.14
3. Install a proper AP, we used PowerDVD 9.0 for tests here.
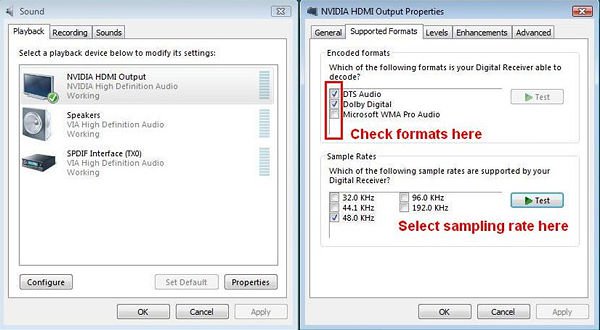
4. Enter Control Panel -> Sound -> Configure to choose Stereo, 5.1.
5. Enter Control Panel -> Sound -> Properties to set the sampling rate, Max Fs. for Dolby-Digital DTS is 48 KHz.
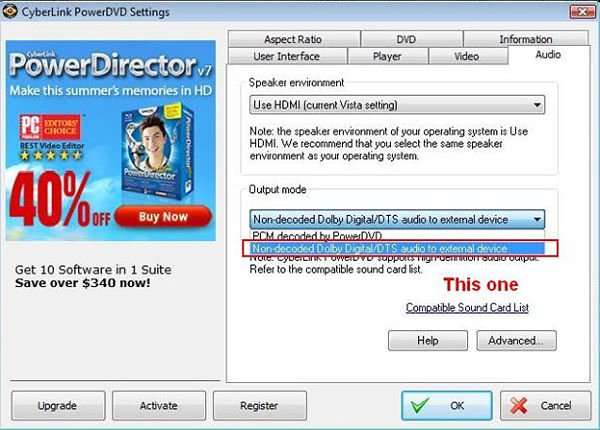
6. RIGHT CLICK in PowerDVD -> Settings -> Audio
a. Speaker Environment -> Use HDMI (Current Vista Setting)
b. Output Mode -> Non-Decoded DD/DTS to external device.
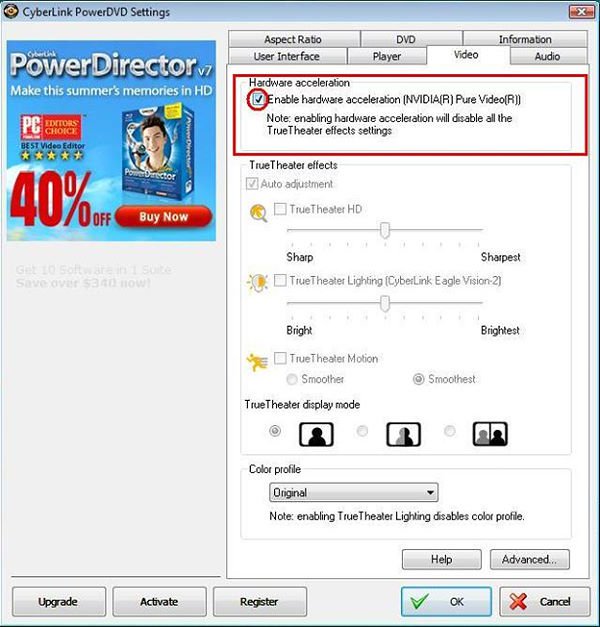
7. RIGHT CLICK in PowerDVD -> Settings -> Video. Enable Hardware Acceleration
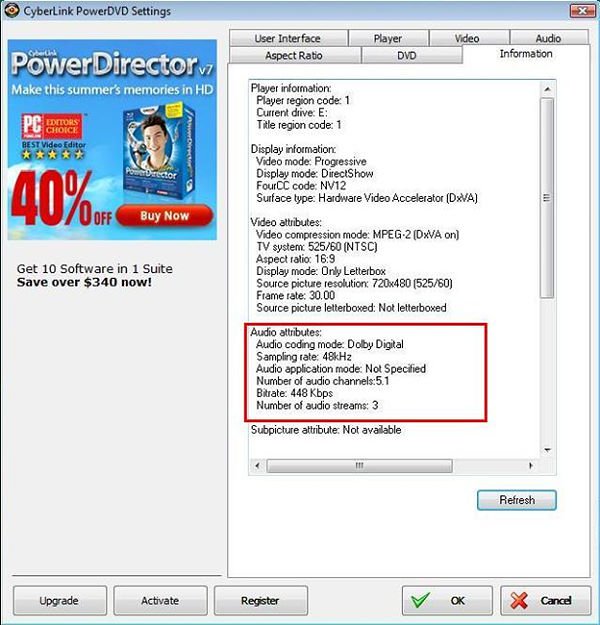
8. As you can see in the picture below, the audio output is Dolby Digital 5.1.
*If you want to output DTS 5.1, please select it in audio menu of DVD.
*For your information, the source of the test is a DVD which supports both DD5.1 and DTS 5.1.
Q (252):
If I use HDMI output, the desktop size can not fully fit the monitor.
How can I do?(8/11/2009)
A:
If your monitor has "PC mode", please try to adjust monitor to PC mode. If not, please contact your monitor vender for help.
Or you can do some setting on driver.
ATI VGA output, please refer setting A.
NVIDIA® VGA output, please refer setting B.
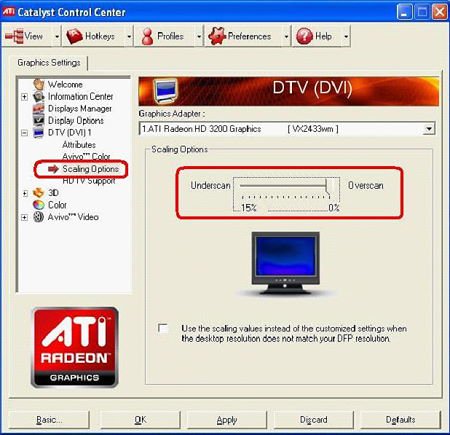
A. If you use ATI VGA output, please enter [ATI driver controller] to adjust [Scaling Option]
1. Right check the mouse, and enter ATI driver controller.
2. Find the [Scaling Option] to setting the bar until to fit the size.
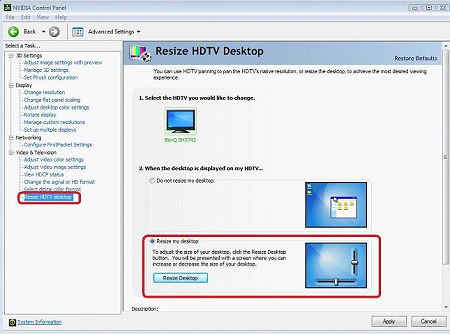
B. If you use NVIDIA® VGA output, please enter [NVIDIA® driver controller] to adjust [Resize desktop]
1. Right check the mouse, and enter NVIDIA® driver controller.
2. Find the [Resize desktop] option to setting the bar until to fit the size.
Q (249):
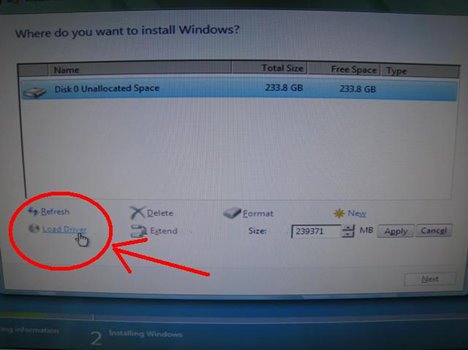
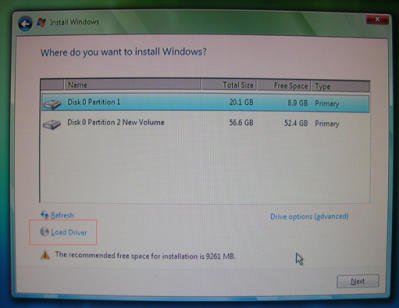
I installed Vista x64 sp1 on ALiveNF6G-GLAN, but I cannot shut down my system after I execute the "sysprep" program under operating system. What do I do?(6/25/2009)
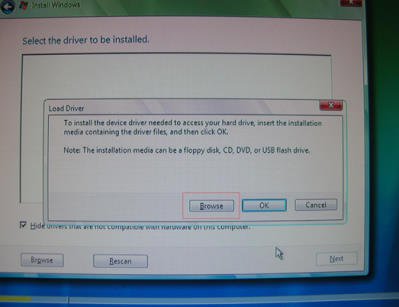
A:Due to the NVIDIA® chipset specification, the HDD driver is requirement, please install the HDD driver during the installation of operating system.
Please refer to below steps to install the HDD driver:
1. Please download the driver and save the driver to floppy disk, USB driver, CD or DVD.
HDD driver download link : https://www.asrock.com/mb/download.asp?Model=NF6-GLAN&s=AM2
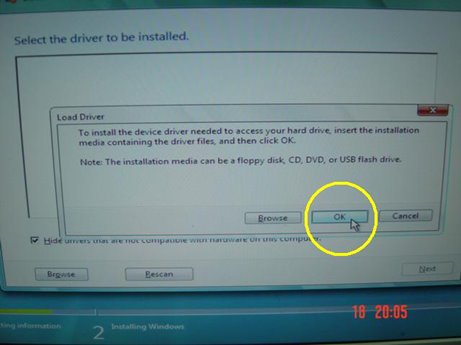
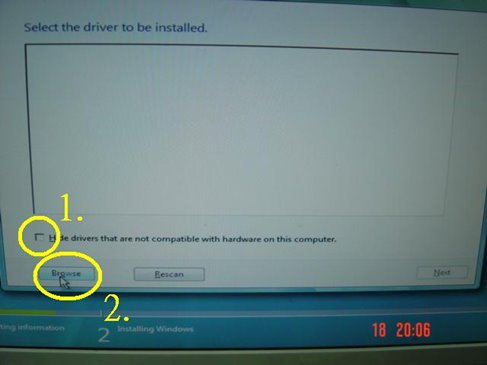
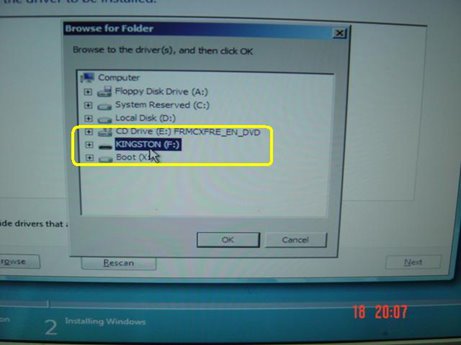
2. Click "Load driver" icon at the "Where do you want to install Windows?" stage.
3. Then click "OK"
4. Check the icon and click "Brows"
5. Then choose the driver from the source which you saved.
6. Select the HDD driver and click "Next" to install the driver.
Q (243):
I use a Samsung SATA optical device (SH-203) on ALiveNF6P-VSTA. How do I get the system to work under Windows® XP properly?(11/27/2008)
A:Please update NVIDIA® 10.3.0.21IDE driver.
You are able to download the driver from following link.
https://www.asrock.com/mb/download.asp?Model=ALiveNF6P-VSTA
Q (239):
I want to use a Phenom CPU with NVIDIA® 7600 and 7800 series AGP VGA card on AM2NF3-VSTA or ALiveDual-eSATA2 under Windows® XP. Is there any point for attention?(10/23/2008)
A:If you adopt AMD® Phenom™ X4 AM2+ CPU on AM2NF3-VSTA or ALiveDual-eSATA2 with NVIDIA® 7600 and 7800 series AGP VGA card under Windows® XP, please install AGP gart driver 3.77. The AGP gart driver is in NVIDIA® all-in-1 driver package. You are able to download the driver from following link.
https://www.asrock.com/mb/download.asp?Model=AM2NF3-VSTA
https://www.asrock.com/mb/download.asp?Model=ALiveDual-eSATA2&s=AM2
Q (240):
How should I make my SATA HDD working with "Hot Plug" function properly on my ALiveNF6P-VSTA / ALiveNF6G-GLAN / NF6-GLAN motherboard?(10/23/2008)
A:Under Windows® XP, please install NVIDIA® all in 1 driver ver. 1107 to support Hot plug function. The NVIDIA® all in 1 driver ver.1107 is available at:
https://www.asrock.com/mb/download.asp?Model=AM2NF6G-VSTA&s=AM2
Under Windows® Vista™, please install NVIDIA® all in 1 driver ver 1520 to support hot plug function. The NVIDIA® all in 1 driver ver. 1520 is available at:
https://www.asrock.com/mb/download.asp?Model=N61P-S&s=AM2
Q (234):
My motherboard is with NVIDIA® Geforce 7050/6150/6100 chipset. I use the VGA driver 175.19 from NVIDA website under Windows® XP SP1. After installing the driver, I get 640X480 4bit color under Windows® XP. But using the driver from your support CD, it has no problem.(7/31/2008)
A:We recommend using the driver provided by ASRock. We tested it on our products to make sure it has the best compatibility and stability. If you still want to use the VGA drivers from NVIDIA® website, please update to Windows® XP service pack 2. It is able to solve this problem.
Q (231):
When installing NVIDIA GeForce 8400/8500 series PCIE VGA card on K10N78hSLI-WiFi / K10N78hSLI-1394 / K10N78hSLI-GLAN under Windows® XP/ XP 64-bit, I can not get full system memory. Besides, system shows two display adapters in the Device Manager. What can I do? (6/26/2008)
A:While system boot up, please press "F2" to enter BIOS set up screen. Please go into BIOS setup and set "Hybrid SLI" option to [Disabled] in BIOS>Advanced>Chipset Configuration.
Q (228):
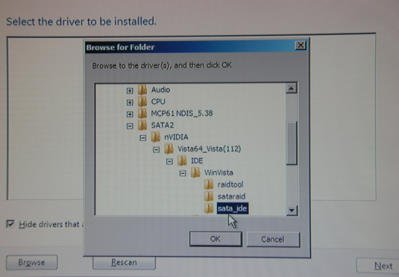
My motherboard is ALiveNF6P-VSTA / ALiveNF6G-VSTA (MCP61 chipset). I'm encountering some problems with SATA HDD when installing the drivers of the motherboard under Windows® Vista™. What should I do?(4/28/2008)
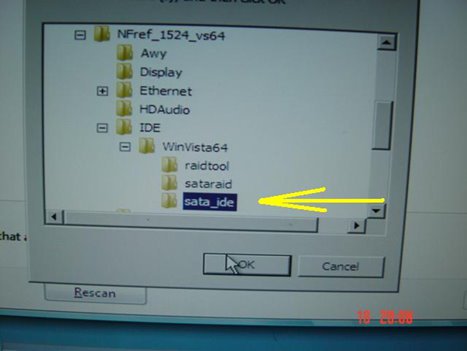
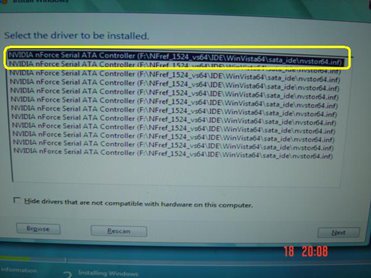
A:Please refer to below suggestions.
If you want to install the Windows® Vista™ with non-RAID mode:
Install the SATA driver v998 from support CD during the installation of Windows® Vista™.
The driver path in support CD is
Support CD/Drivers/ SATA2/ nVIDIA/ Vista64_Vista(112)/ IDE/ WinVista/ sata_ide.
Step1:
Step2:
Step3:
You can also download the SATA driver v998 from ASRock website and save it to a floppy diskette, USB flash drive or CD/DVD disk.
Then install the SATA driver v998 from floppy diskette, USB flash drive or CD/DVD disk during the installation of Windows® Vista™.
If you want to install the Windows® Vista™ with RAID mode:
Please refer to the NVIDIA RAID installation guide.
https://download.asrock.com/Manual/raid/ALiveNF6P-VSTA/English.pdf
Q (227):
How do I get my onboard LAN to work properly?(4/28/2008)
A:Here are some suggestions:
1.Make sure the "Onboard LAN" option was enabled in BIOS.
2.Make sure the LAN driver was installed properly. Please check it in "Device Manager".
3.Update the BIOS of your motherboard to the latest one.
4.Try the newer LAN driver from ASRock or chipset vendor's website.
ASRock: https://www.asrock.com/support/Download.asp
Realtek: http://www.realtek.com.tw/default.aspx
NVIDIA: http://www.nvidia.com/Download/index.aspx?lang=en-us
VIA
5.Change another LAN cable. (For Gigabit LAN, please make sure your LAN cable could fully work with Gigabit LAN.)
6.Reinstall the operating system.
Q (214):
I use a NVIDIA® 8800GT PCIE VGA card on VIA® chipset motherboard. But I got black screen on the monitor. How do I solve it?(11/5/2007)
A:The NVIDIA® 8800GT PCIE VGA card is GEN2 mode VGA card. Unfortunately VIA® chipset does not support GEN2 mode VGA card. The only solution is to set 8800GT PCIE VGA card to GEN1 mode.
We have tested 8800GT PCIE VGA card. After flashing GEN1 mode BIOS for 8800GT, it works fine on VIA® chipset motherboard.
Please contact VGA card vender to get the VGA BIOS with GEN1 mode for your 8800GT PCIE VGA card.
Q (213):
I'm using NVIDIA® AGP card under Windows® Vista™ on my 775Dual-VSTA / 4CoreDual-VSTA / 4CoreDual-SATA2. When I rate the computer's performance, the screen suddenly becomes abnormal. Why?(11/5/2007)
A:The problem happens with newer NVIDIA® VGA driver version 1xx.xx (i.e. 163.69) Please change your NVIDIA® driver to older version 9x.xx (i.e. 97.19) to solve this problem.
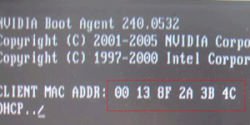
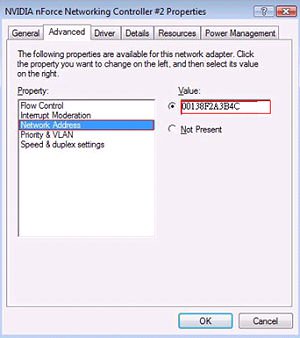
Q (189):
I have AM2NF6G-VSTA/ALiveNF6G-DVI motherboard. The onboard LAN does not work properly under Windows® Vista™. How can I solve this?(12/19/2006)
Solution2.
Or please refer following steps to re-write MAC address under Windows® Vista™.
Step1: Check MAC address.
When system boot up, press "F2" to enter BIOS setting.
Boot-> "Boot settings Configuration" -> set "Boot From Onboard LAN" to "enable".
Press "F10". System will restart.
Please "F11" and select "NVIDIA Boot Agent".
Then you will see MAC address, pls. record it with no space for later usage.
Step2: Boot system into Window Vista
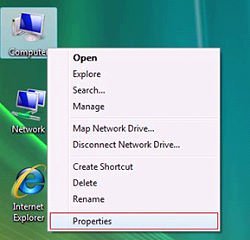
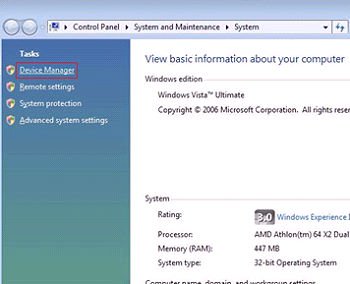
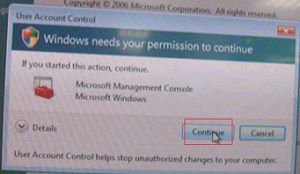
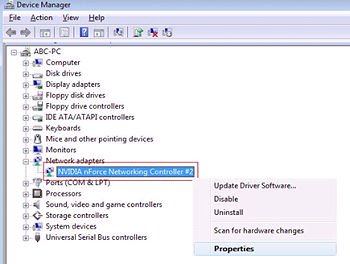
Right click "Computer" and click "Properties"
Step3:
Click "Device Manager"
Step4:
Click "Continue"
Step5.
Right click "Networking Controller" and click "Properties".
Step6:
Choose "Network Address" in "Advanced " folder.
Write "MAC Address" which got from step1 into Value item.
Then click "OK".
Q (187):
I have 939Dual-SATA2 / 939Dual-VSTA / 939A8X-M / K8A8X-M / K8Upgrade-1689/K8Combo-Z motherboard. When using Nvidia 7600GS/6600LE/6800GS/7800GS "AGP" card, I am not able to install the VGA card driver. How can I solve this?(11/19/2006)
A:This problem will occur on some AGP cards which does not use native AGP chip, but use native PCI-E chip with an "PCI-E to AGP Bridge" to become AGP interface.
Please set "AGP P2P Deep Fifo" to [Enable] in the BIOS. (Advanced>Chipset Settings>AGP P2P Deep Fifo)
It may need to upgrade the BIOS for this option:
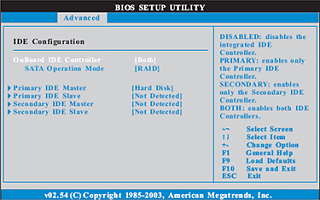
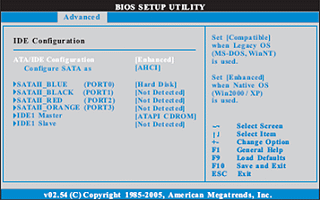
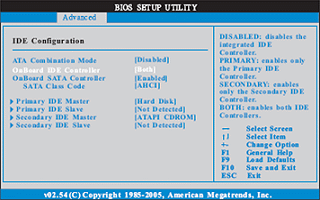
Q (177):
I'm using a SATA HDD. My computer was running fine. But one day I turn on my computer, it keeps restarting itself after Windows® Logo page (at startup). Do you have any idea what possibility causes this?(7/21/2006)
A:This may be that your system was installed in IDE (or non-RAID) mode. But now it is set to RAID (AHCI) Mode. Please try to set it back to the IDE (non-RAID) mode in the BIOS>Advanced>IDE Configuration.
Here are some examples, please refer to the user manual for details.
VIA® and Nvidia chipset:
Please set SATA Operation Mode to [non-RAID]
Intel® Chipset:
Please set Configure SATA as [IDE]
775Twins-HDTV (R2.0) or P4Twins-HDTV:
Please set ATA Combination Mode to [Enable]
Q (162):
I use a Samsung HD080HJ (P80SD) 80GB SATA II HDD on K8Upgrade-NF3. After installing Nvidia all in one driver from the support CD, it takes a little bit long time to boot into Windows® XP. How could I solve this problem?(1/16/2006)
A:Please follow below steps to update Nvidia IDE driver:
1. Under Windows® XP, please go to "Control panel" and choose "Add/Remove program" to remove the Nvidia IDE driver.
2. Please download the new Nvidia IDE driver from https://download.asrock.com/Drivers/Special/NVIDIA_4.84IDE.zip
3. After driver download is completed, please install the new IDE driver for your system.
Q (147):
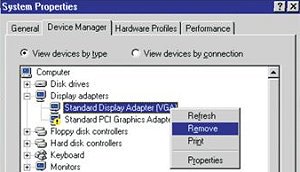
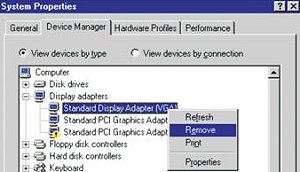
I use PCI Express VGA card on my ASRock motherboard. My operation system is Windows 98SE / ME. In "Device Manager", there are two "Display Adapter Controllers" in "Display Adapters" option. What should I do?(7/15/2005)
A:Please follow the below steps to install PCIE VGA card driver.
a. Please enter "Device Manager" and you will see "Standard Display Adapter (VGA) and "Standard PCI Graphics Adapter (VGA)" in the "Display Adapters" option.
b. Please Choose "Standard Display Adapter (VGA)" and right-click "Remove".
c. After removing the device, please reboot your system. Then, you will only see "Standard Display Adapter (VGA)" in "Display Adapter" option.
d. Please start to install your PCIE VGA card driver.
 Menu
Menu
 (6/26/2008)