Usamos cookies para oferecer uma experiência mais personalizada e suave. Ao visitar este site, você concorda com o nosso uso de cookies. Se preferir não aceitar cookies ou exigir mais informações, visite nossa Política de Privacidade.
Cookies necessários Estes cookies são essenciais para o correto funcionamento do site e não podem ser desativados.
Cookies analíticos Estes cookies ajudam-nos a entender como os visitantes usam o nosso site.
Cookies de marketing Estes cookies são utilizados para rastrear visitantes e exibir anúncios relevantes.
Cookies de redes sociais Estes cookies permitem partilhar páginas e conteúdos nas redes sociais.
Caso você saiba a categoria da sua dúvida, você pode escolher uma das categorias abaixo para perguntas frequentes. Catalogo:
Resultados:
Q (551):
Microsoft will update the Secure Boot certificates. What do I need to do?(3/16/2026)
A:You only need to follow one of the update methods below and wait for the new Windows Boot Manager to take effect:
Method 1: Update through Windows Update
If Windows Update is turned on and Secure Boot is enabled (see "How to enable Secure Boot”), supported Windows devices will automatically download and install the new Secure Boot certificates and the new Boot Manager.
Since 2024, Microsoft has been rolling out the new Secure Boot database update in phases. All devices with Secure Boot enabled will receive the update automatically before the certificate expires in June 2026.
With default settings, users usually do not need to do anything manually. Just keep Windows Update enabled and wait for the update to install automatically.
Method 2: Manually update the UEFI / BIOS
Note:After updating the BIOS, the system may ask for your BitLocker recovery key to unlock Windows.
You may also choose to turn off Device Encryption and Standard BitLocker Encryption before updating the BIOS, then turn them back on afterward to keep your data safe.
If your device cannot get the update through Windows Update, you can download and install the latest UEFI BIOS from the official website to get the updated Secure Boot certificates.
1. Visit the ASRock official website, search for your motherboard model, and download the latest UEFI BIOS from the support page.
2. Clear the Secure Boot keys.
① After updating the BIOS and rebooting, enter BIOS Setup and go to:
Advanced \ Security > Secure Boot
② If Secure Boot Mode is set to Standard, change it to Custom.
③ Select Key Management.
④ Select Clear Secure Boot Keys, then choose [Yes].
⑤ Confirm that all UEFI Secure Boot keys (PK, KEK, DB, DBX) have been cleared.
3. Install the default Secure Boot keys.
① After clearing the keys, select Install Default Secure Boot Keys, then choose [Yes].
② Confirm that the Size/Number of Keys for PK / KEK / DB / DBX is not 0, and the Key Source shows [Factory]. This means the Secure Boot key update is complete.
4. How to check the Secure Boot key status?
① In BIOS, go to: Security > Secure Boot > Key Management
② Select Key Exchange Keys (KEK) choose "Details”:
③ Make sure that KEK Management contains:
- Microsoft Corporation KEK 2K CA 2023
Q (549):
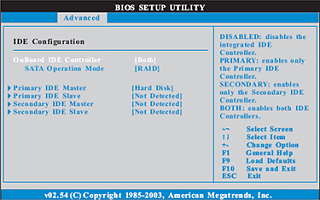
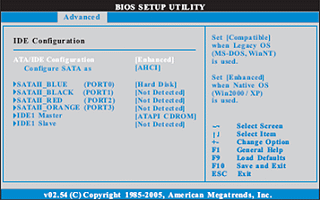
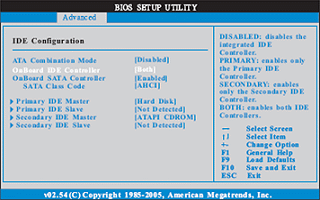
I am looking for Pre-boot DMA Protection option, but I cannot find it in the BIOS interface. Where can I locate this option?(12/16/2025)
A:The option name varies across different platforms. Please refer to the following screenshots to identify the correct option and its location in the BIOS menu.
Intel platform
● Intel 600, 700 series
● Intel 800 series
Note:
Please first update BIOS to the latest version to obtain this option on Intel 600, 700 and 800 platforms.
AMD Platform
● AM4 series
● AM5 series
Users can enable this option if they encounter game‑related or security‑related problems.
#DMA #Pre-boot #IOMMU #DMA Protection
Q (548):
Some new games like Battlefield 6 or Call of Duty: Black Ops 7 require Secure Boot and TPM 2.0 to provide kernel level anti cheat protection. How do I enable these options on ASRock AM4 motherboards?(10/3/2025)
A:On recent platforms such as AMD 800 and AMD 600 series, Secure Boot and TPM 2.0 are enabled by default. With these platforms, there is no need to change BIOS settings.
However, if you are still using an AM4 motherboard, Secure Boot and TPM 2.0 might not be enabled. Also, the TPM firmware might have to be updated.
Before enabling Secure Boot, you must check your disk partition style and BIOS settings to ensure they meet the requirements for Secure Boot.
Secure Boot System Requirements
1. Partition Style: GPT (GUID Partition Table). If the disk is MBR (Master Boot Record), please convert it to GPT.
2. BIOS Mode: UEFI only. Legacy or CSM mode doesn't support secure boot.
How to check if the current partition type supports Secure Boot
1. Right-click the Windows button on the desktop and select "Disk Management”.
2. Right-click the disk where Windows is installed and select the ""Properties"".
3. Click the "Volumes” tab and check if the partition style is "GPT”.
GPT partition style can support Secure Boot. You can skip below steps 4-7.
4. If the partition style is "MBR”, please make a backup of important data on the system and refer to steps 5-7 to convert the partition style to GPT.
If you have multiple OS installations or if some system partition is on a different drive than where the OS is, the conversion might not have the desired result. Please backup your DATA and reinstall the OS.
5. Type "CMD" in the Windows search bar, right-click on "Command Prompt” and choose to run as administrator.
6. Type the command "mbr2gpt /convert /allowFullOS” to convert the partition style and press [Enter].
7. Restart the system, and the BIOS Mode/Partition style will be converted to UEFI/GPT.
Switching to UEFI Mode and Enabling Secure Boot in BIOS
1. Please press the "F2” key during POST to enter BIOS setup.
Go to Boot\CSM (Compatibility Support Module) and set "CSM” to "Disabled”.
Press the "F10” key to save configuration changes.
2. Go to Security\Secure Boot and set "Secure Boot Mode” to "Custom”.
3. Please press "Install default Secure Boot keys” and select "Yes” to install Secure Boot keys. If at this point this option is greyed out, Secure Boot key have been loaded already.
4. Set "Secure Boot” to "Enabled”. Then press the "F10” key to save configuration changes.
5. After the system restarts, go to Security\Secure Boot, and make sure that Secure Boot is showing "Active”.
Update BIOS and AMD fTPM
To ensure compatibility between games and Secure Boot/TPM 2.0, ASRock has released new BIOS versions for AM4 motherboards, to update to AMD fTPM 3.x.2.x version.
Type "TPM.msc" in the Windows search bar to find the current fTPM version.
If your current fTPM version is 3.x.0.x, we recommend updating to the latest BIOS version to get the fTPM update. This BIOS version should help you to enable anti-cheat on for example Battlefield 6 or Call of Duty:Black Ops 7.
fTPM 3.*.2.* (TPMB) Information
AMD has informed us that only CPUs with below former codename support fTPM 3.*.2.* (TPMB).
If your CPU is not in the supported CPU lineup for TPMB compatibility, based on AMD's official specifications, your CPU does not meet the security requirements necessary for your game.
Q (540):
If I encounter an issue with LED lighting not working on the Intel Z890 series and adjusting ASRock Polychrome RGB in the BIOS has no effect, what should I do?(11/29/2024)
A:If you notice that the LED lighting on your Intel Z890 series is not functioning, please visit ASRock's official website and download ASRock Polychrome RGB version 2.0.190 or a newer version for your operating system.
Q (538):
After I tried to overclock the memory, my system with Z890 motherboard cannot power on. What should I do?(10/29/2024)
A:Overclocking results may vary between different CPUs and hardware configurations.
If the system fails to power on boot when the power button is pressed (no fans spinning) after loading XMP or overclocking memory, please follow below steps.
1. Switch off power completely. Wait at least 20 seconds. Switch power back on and start the system.
2. If that fails, please clear the CMOS. See the user manual for the clear CMOS procedure for your motherboard.
3. In case that does not help, use flashback to update to the latest BIOS. The BIOS is available via the ASRock website. Please make sure to select the correct model, as some model names are similar.
Visit ASRock's website: https://www.asrock.com/support/index.asp?Model=Z890
Q (537):
How do I configure Realtek 5.1ch audio output on N100M under Windows 10?(10/29/2024)
A:Please follow the steps below.
1. Go to BIOS\Chipset Configuration and set Intel SST to "Enabled”.
2. Boot into Windows. Download and install Realtek high definition audio driver version:6.0.9503.1_RTK_SST and follow the instructions, restarting the system after the installation.
Realtek high definition audio driver ver:6.0.9503.1_RTK_SST:
Q (536):
How can I allow the cTDP of my 9700X/9600X to boost to 105W?(9/20/2024)
A:To adjust the cTDP of the 9700X/9600X to 105W, please download a BIOS version with AGESA code 1.2.0.2 or later from ASRock's official website.
After updating the BIOS, go to OC Tweaker and enable the option to set the TDP to 105W. Please note that not all AM5 motherboards might support this option.
#9700X #9600X #AM5 #X670 #TDP #105
Q (535):
How can I use Intel default settings on my Intel 600/700-series motherboard?(8/28/2024)
A:ASRock provides 3 profiles for users to select. Two of these profiles are provided by Intel.
We recommend trying the BIOS Default profile first.
If your system is not stable with the BIOS default profile, you can try Baseline Mode.
Q (534):
How to fix the information of the 'CPU Indicator' utility displaying "N/A" and "0" on the Intel Z790/Z690 platform?
(11/1/2023)
A:Minimum system requirement: K-Series CPU+ Latest BIOS
If the system encounters an unexpected restart during boot-up, the CPU Indicator utility will display the following warning message when entering the BIOS.
After that, please press "OK” and restart the system and the data will be retrieved again or you can shut down the system and refer to the user manual to clear CMOS and go to the BIOS again to check if the 'CPU Indicator' utility displaying the correct information.
#Intel #Z790 #Z690 #K-series #CPU #Indicator
Q (533):
How to enable Intel Application Optimization with Intel Core 14th Generation processors?(11/1/2023)
A:Please make sure your system meets the minimum requirements and follow below steps to enable Intel Application Optimization.
Supported Processors:
Intel® Core™ 12th i5/i7/i9 processor
Intel® Core™ 13th i5/i7/i9 processor
Intel® Core™ 14th i5/i7/i9 processor
Supported OS:
Windows 11 22H2 or later
Motherboard:
ASRock Intel 700 or 600 series motherboard with the latest BIOS.
Instructions for enabling Intel Application Optimization.
1. Enable the BIOS option "Intel Dynamic Tuning Technology”. It can be found under OC Tweaker\CPU Configuration.
Q (531):
My software requires Secure Boot to be enabled. How can I set it up?(8/16/2023)
A:Please follow the steps below to enable Secure Boot.
Step 1.
Please press the "F2” key during POST to enter BIOS setup.
Go to Boot\CSM (Compatibility Support Module) and set "CSM" to "Disabled".
Press the "F10” key to save configuration changes.
Step 2.
Go to Security\Secure Boot and set "Secure Boot Mode" to "Custom".
Step 3.
Please press "Install default Secure Boot keys" and select "Yes" to install Secure Boot keys.
Step 4.
Set "Secure Boot" to "Enabled". Then press the "F10" key to save configuration changes.
Step 5.
After the system restarts, go to Security\Secure Boot, and make sure that Secure Boot is showing "Active".
*AM5 platform
If a prompt "Discard Changes and Exit" appears after clicking "Install default Secure Boot keys" and selecting "Yes", please select "No" and continue to step 4.
Q (530):
When I installed the APU+AMD GPU on the AMD AM4 platform, the "Record & Stream" icon disappears in AMD Radeon software after disabling the CSM. How can I fix it?(6/30/2023)
A:Please follow the steps below to disable the iGPU.
This problem happens when using an AM4 motherboard and APU (CPU with integrated graphics), if you also have an AMD discrete graphics card and the Compatibility Support Module (CSM) is disabled in BIOS.
1. Go to BIOS\Advanced\AMD CBS\NBIO Common Options\GFX Configuration and set iGPU Configuration to "Disabled”.
2. Press hotkey "F10” to save settings and exit the BIOS setup.
3. Boot into the OS and check if the "Record & Stream" menu appears in the AMD Radeon software.
Procedures
●Intel Graphics Card Driver
Go to Intel's official website to download and install the latest official graphics card driver.
● Update the Graphics Card FW
Step 1. Download and unzip IGFXUpdate(v1.01.1).
Step 2. Run "IGFXUpdate”
Step 3. Click Yes to restart the system.
Step 4. After the system has restarted, the FW update will begin.
*If this message doesn't show up, please disable the "Secure Boot” in BIOS and try again.
Step 5. During the update, the following security message will pop up.
Step 6. Click on Install this driver software anyway.
Step 7. The update process will proceed. The screen might blink during the update.
Step 8. Please restart your computer when the following prompt is shown.
● Set PCIe Power to Maximum Power Savings
Step 1. Go to [Control Panel\Hardware and Sound\Power Options\Edit Plan Settings\Change] and click [Change advanced power settings].
Step 2. Scroll down to PCI Express\Link State Power Management and select Maximum power savings. Make sure to click apply to apply the changes.
● Re-install the Graphics Card Driver and Check the GPU Power
Step 1. Reinstall the latest graphics card driver.
Step 2. To check the power consumption of the Intel ARC graphics card, please open Intel Arc Control and find the GPU Core Power.
BIOS Setting For ARC GPU Power Saving
● ASRock Intel Motherboard:
Required BIOS Version:
700-series motherboard: Please use the latest BIOS
600/500/400-series motherboard: Use the latest BIOS. It that does not work, please contact ASRock Technical Support. https://event.asrock.com/tsd.asp
BIOS Settings for all ASRock Intel models:
In BIOS > Advanced > Chipset Configuration, apply the following settings.
PCI Express Native Control: Enabled
PCIE ASPM Support: L1
PCH PCIE ASPM Support: L1
● ASRock AMD Motherboard:
Required BIOS Version:
Platform
600 series
500 series
400 series
300 series
BIOS version
Any version
Not supported
BIOS Setting for all AMD models:
There is no need to change BIOS settings.
● Other brands motherboard:
Please contact your motherboard vendor for further assistance.
Power Consumption After Updating FW and Changing the BIOS Settings
3. Run "insttool64.exe” as administrator. A command prompt window pop on and close immediately. It is a normal behavior.
4. Run Command prompt as administrator.
5. Enter the folder path to the extracted file and press [enter].
Default path and command:
cd C:\Users\[Username]\Downloads\VBIOS_L06_update\VBIOS update
*Please change the command if you change the download path.
6. Type command "Update.cmd” and press [enter].
Update procedure will start up. This mean the system is flashing the vBIOS. DO NOT turn off the system during the update.
7. Once the flashing has finished, Command Prompt will report it as shown below.
Q (523):
Which BIOS settings do I need to adjust when using 13.3” Side Panel?(3/1/2023)
A:Before using your side panel, please set "Primary Graphics Adapter” to "Onboard” in the BIOS settings to ensure the display work properly.
Intel 700 series:
To do so, please go to "Advanced”> "Chipset Configuration” and set "Primary Graphics Adapter” to "Onboard”. Then press [F10] to save the settings and restart the system.
AMD AM5:
Please go to "Advanced”> "Onboard Device Configuration” and set "Display Priority” to "Internal Graphics”. Then press [F10] to save the settings and restart the system.
Q (522):
Why can I not find a CSM option under the Boot tab in BIOS?(10/13/2022)
A:When you set Fast Boot to Ultra Fast under the boot tab in BIOS, CSM (Compatibility Support Module) will be disabled and hidden automatically. This is because Ultra Fast Boot is supported only when booting in full UEFI mode, so without enabling CSM.
Q (520):
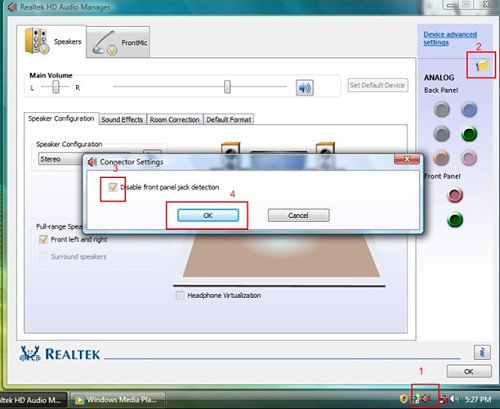
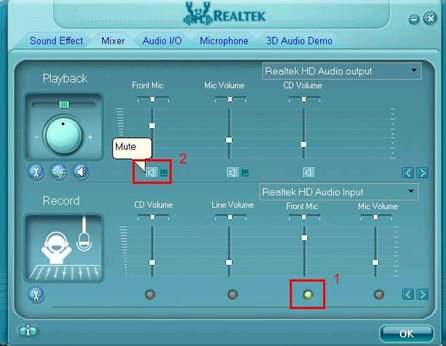
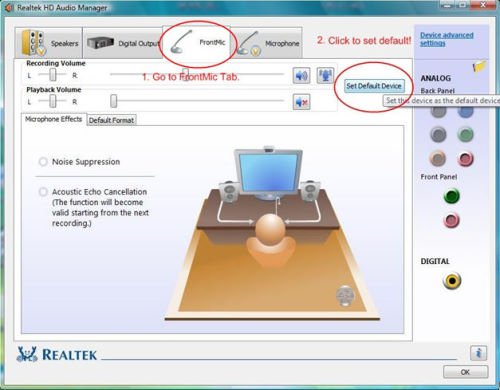
There is no sound output from the rear audio port. What can I do to fix it?(9/27/2022)
Q (513):
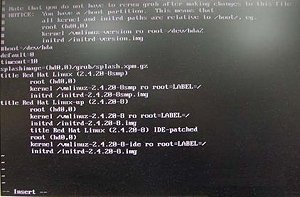
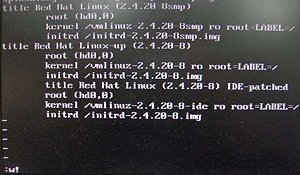
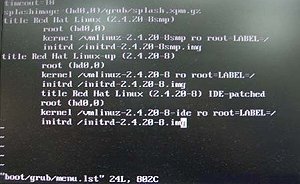
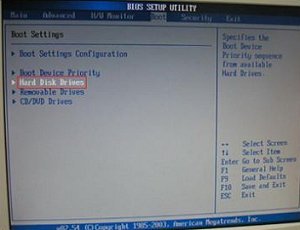
How do I enable the Optane H10/H20 hybrid function on the Intel Z690/B660/H670 platform?(3/1/2022)
A:If you want to make a fresh Windows installation with Optane H10/H20 hybrid function, please refer to the following steps:
Step 1.
Make sure that H10/H20 Optane memory is installed in an M.2 socket which supports Optane. You can find the info by checking the storage section of the motherboard specifications page on ASRock's website.
Step 2.
Enable the Hybrid Storage Detection and Configuration Mode in BIOS and press "F10” to save the settings.
Advanced\Storage Configuration\Hybrid Storage Detection and Configuration Mode
Step 3.
Go to Advanced\Storage Configuration\VMD Configuration and set Enable VMD controller to [Enabled].
Then set Enable VMD Global Mapping to [Enabled]. Press F10 to save the changes and exit setup.
Installing Windows® on a VMD platform
After the BIOS setup, please follow the steps below.
Step 1.
Please download the "SATA Floppy Image” driver from ASRock's website (https://www.asrock.com/index.asp). Unzip the file to a USB flash drive or copy the files from ASRock's motherboard support CD.
Step 2.
Press at system POST to launch the boot menu and choose the item "UEFI:
installation media>” to install Windows® 10 64-bit / 11 64-bit OS
” to install Windows® 10 64-bit / 11 64-bit OS">
Step 3.
If during the Windows installation process the target drive is not available, please click .
Step 4.
Click and locate the driver on your USB flash drive.
Step 5.
Select "Intel RST VMD Controller” and then click .
.">
Step 6.
Select unallocated space and then click .
Step 7.
Please follow Windows' installation instructions to finish the process.
Step 8.
After the Windows installation is finished, please install the "Intel Rapid Storage Technology driver and utility” from ASRock's website. https://www.asrock.com/index.asp
Step 9.
Launch the Intel® Optane™ Memory and Storage Management tool from the Microsoft store.
Step 10.
Select the drive which you want to accelerate. Enable Intel® Optane™ Memory. (One restart is required)
Step 11.
Erase all data on the Intel® Optane™ memory module and click
Step 12.
After the system has restarted, the Optane Management tool will show that Optane memory is enabled.
Q (509):
Why can my game not start with my Intel 600 series motherboard?(11/2/2021)
A:Some games use DRM (Digital Rights Management) protection. Please check for available updates for your game, where the DRM solution supports Alder Lake CPUs.
If the game development is discontinued and there is no update available for the DRM, please follow below steps to enable the "Legacy Game Compatibility Mode”.
Step 1.
Press [Del] or [F2] during the POST stage to boot into BIOS.
Step 2.
Press [F6] to enter "Advanced” mode and go to Advanced\CPU Configuration
Step 3.
Enable the "Legacy Game Compatibility Mode” in BIOS.
(The option is at the bottom of the CPU Configuration page)
Step 4.
Press [F10] to save the setting and restart the system.
Step 5.
The [Scroll Lock] key on your keyboard is now a hotkey. It can be used to enable/disable the Intel E-core parking feature. Before starting a game outdated DRM protection, please press [Scroll Lock] within the OS to enable Intel E-core parking.
Step 2.
The C.A.M. (Clever Access Memory) option is supported when integrated graphics are disabled.
By default integrated graphics will be disabled when a PCIe graphics card is detected.
Please make sure the monitor is connected to the graphic card.
Step 3.
Please go to BIOS\Advanced\Chipset Configuration and enable "C.A.M. (Clever Access Memory)”.
Step 4.
Press F10 to save the setting and restart.
Q (504):
How do I check if the system can support Secure Boot?(10/1/2021)
A:In order to use Secure Boot, the drive with the operating system must use GPT partition style. Please refer to below steps to check the partition style.
Step 1: Right-click the Windows button on the desktop and select "Disk Management”.
Step 2: Right-click the disk where Windows is installed and select the "Properties”.
Step 3: Click the "Volumes” tab and check if the partition style is "GPT”.
Step 4: If the partition style is "MBR”, please make a backup of important data on the system and refer to steps 5 - 7 to convert the partition style to GPT.
Step 5: Type "CMD" in the Windows search bar, right-click on "Command Prompt” and choose to run as administrator.
Step 6: Type the command "mbr2gpt /convert /allowFullOS” to convert the partition style and press [Enter].
Step 7: Restart the system and the BIOS Mode/Partition style will be converted to UEFI/GPT.
Q (501):
I want to turn off the LED while the system is off. Where can I find the setting?(7/1/2021)
A:Please follow the steps below and set the "Turn on Onboard LED in S5” setting to disabled under the BIOS.
Step 1.
While the system is starting, press hotkey "F2” or "Del” repeatedly to enter BIOS setup.
Step 2.
Disable the "Turn On Onboard LED in S5” under the BIOS.
AMD platform: Advanced\Onboard Devices Configuration\Turn On Onboard LED in S5\Disabled
Intel platform: Advanced\Chipset Configuraiton\Turn on Onboard LED in S5\Disabled
Step 3.
Press hotkey "F10” to save the changes.
Q (500):
TPM2.0 module is required in Windows 11 specification, does it need TPM2.0 hardware module?(7/1/2021)
A:No, please enabled [Intel® Platform Trust Technology (Intel® PTT)] or [AMD CPU fTPM] feature under UEFI BIOS. It supports the TPM2.0 feature without TPM2.0 hardware module.
ASRock Intel Platform
For the new Microsoft® Windows 11 installation, we recommend disabling the CSM setting before using the Intel® PTT.
Supported platform.
Generation
Supported Chipset
Intel 300 series
Z390, Z370, H370, B360, B365, H310, H310C
Intel 400 series
Z490, H470, B460, H410
Intel 500 series
Z590, B560, H510, H570
Intel X299 series
X299
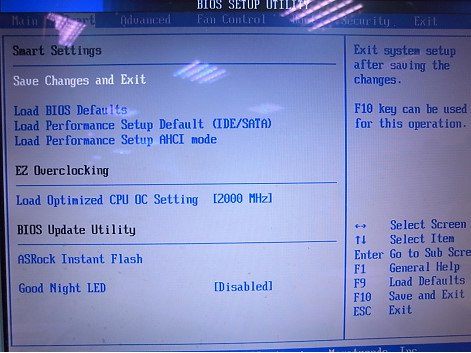
Intel SoC series
Gemi Lake, Gemi Lake Refresh
*Intel® PTT is supported. The actual support may be varied based on official release of Windows 11 by Microsoft®.
BIOS option
(a) Go to "Security page” to find the "Intel® Platform Trust Technology” option.
(b) Enabled "Intel® Platform Trust Technology” under UEFI BIOS
Q (498):
How to enable C.A.M in the BIOS? Also known as Resizable BAR.(4/1/2021)
A:Step 1: On the ASRock website please find the BIOS download page for you motherboard.
Check the descriptions to see if C.A.M. is supported already.
Intel 500-series models support C.A.M. since the first version.
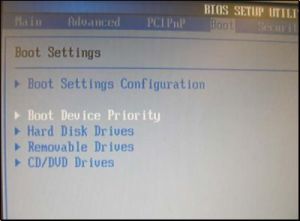
Step 2: While the system is starting press "DEL” to boot into BIOS setup and go to BIOS\Boot\CSM.
If you cannot find the CSM menu then please set "Fast Boot” to "Disabled”.
Step 3: In BIOS\Boot\CSM please set "CSM” to "Disabled”.
Step 4: Go to BIOS\Advanced\Chipset Configuration and set "Above 4G Decoding” to "Enabled”.
Step 5: After step 4, the option "C.A.M” will appear below the option "Above 4G Decoding”.
Please set it to "Enabled”.
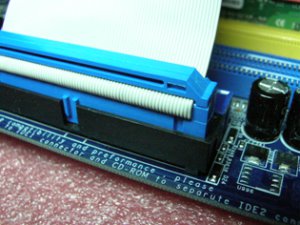
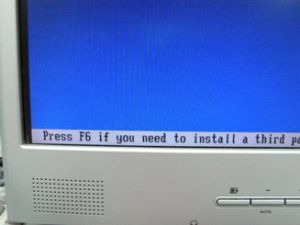
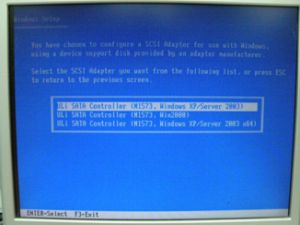
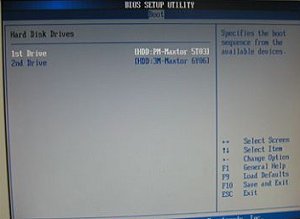
Step 6: Press "F10” to save the settings and restart the system.
Q (494):
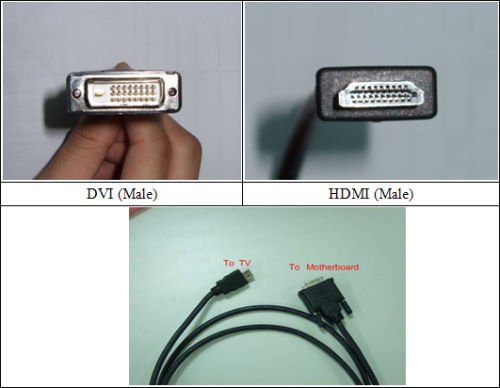
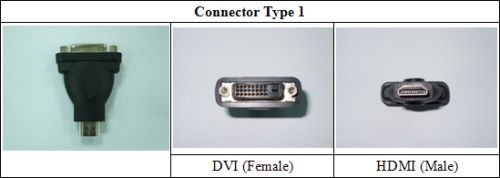
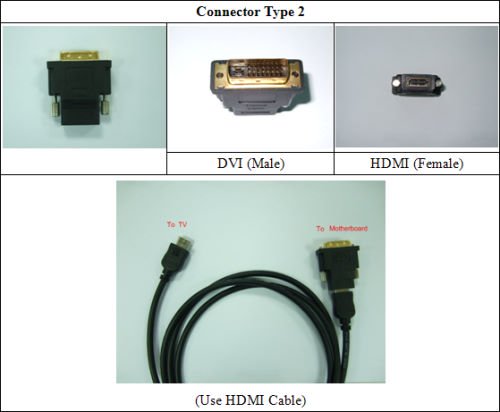
The SB fan on my X570 motherboard is not spinning. Is this normal?(1/1/2021)
A:Your motherboard might be using a semi-passive mode for this fan.
In this mode the fan will not spin at lower temperatures, and only become active at higher temperatures. This is normal. If you want to let the fan spin, you can select a different mode for the fan in BIOS.
Path: BIOS\H/W Monitor\SB_FAN1 Setting
Q (493):
How do I enable IGPU Multi-Monitor on B550/A520 series motherboard?(10/1/2020)
A:To enable IGPU Multi Monitor, please refer to the following path and set the [iGPU Configuration] to [UMA_AUTO].
Advanced\AMD CBS\NBIO Common Options\GFX Configuration
Q (492):
Como eu habilito a Optane H10 quando outro SSD Intel M.2 estiver instalado na Plataforma Intel Série 300/400?(9/1/2020)
A:Para habilitar a memória Optane H10 enquanto outro SSD Intel M.2 estiver instalado, por favor siga os seguintes passos:
Passo 1. Certifique-se de que a memória H10 Optane está instalada no soquete M.2 que suporta Optane checando a seção de armazenamento na página da placa-mãe.
Passo 4. Ative a opção Teton Glacier Mode na BIOS e pressione F10 para salvar as configurações.
Advanced\Storage Configuration\Teton Glacier Mode\Dynamic Configuration for Hybrid Storage Device Enable
Passo 5. Execute a ferramenta Intel Optane Memory and Storage Management da Microsoft store.
Passo 6. Ative a memória Optane. (Será necessário reiniciar)
Passo 7. Após o reinicio do sistema, a ferramenta Optane Management irá exibir que a memória Optane está ativada.
Q (489):
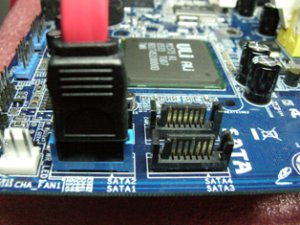
Como eu posso remapear o slot M2_3 e outros slots M.2 para configurar um RAID SSD PCIE?(6/1/2020)
A:Por favor certifique-se de utilizar SSDs PCIE idênticos que sejam do mesmo tipo e capacidade.
Siga os passos abaixo para ajustar a BIOS para configurar o RAID PCIe.
PASSO 1. Entre no Utilitário de Configuração da UEFI pressionando ou durante a tela de post.
PASSO 2. Vá em Advanced -> Storage Configuration e defina SATA Mode Selection para [RAID Mode].
PASSO 3. Vá em Boot -> CSM e defina Launch Storage OpROM policy para [UEFI only].
PASSO 4. Ajuste a opção M.2 - RST PCie Storage Remapping dos slots M.2 que você instalou os SSDs PCIE para [Enabled]. Pressione para salvar as configurações e sair.
PASSO 5. Vá em Advanced -> USB Configuration e defina Third Party USB 3.2 Controller para [Disabled].
Pressione para salvar as alterações e sair.
Atenção: Depois de desabilitar a opção Third Party USB3.2 Controller, a porta Type-C onboard será desativada.
PASSO 6. Entre emm Intel(R) Rapid Storage Technology na página Advanced.
PASSO 7. Selecione a opção Create RAID Volume e pressione .
PASSO 8. Digite um nome de volume e pressione , ou simplesmente pressione para aceitar o nome padrão.
PASSO 9. Selecione o RAID Level deseja e pressione .
PASSO 10. Selecione os discos alvo em que você deseja criar o RAID e pressione .
PASSO 11. Selecione o tamanho do stripe para o RAID e pressione .
PASSO 12. Selecione Create Volume e pressione para começar a criar o RAID.
Q (486):
Quando eu instalo o Windows 10 com uma CPU que tem 6 ou mais núcleos (3900, 3900X, 3950, etc.) em uma X470 Gaming-ITX/ac, o sistema exibe tela azul (BSOD). O que eu devo fazer?(12/1/2019)
A:Se for utilizada uma CPU com 6 ou mais núcleos na X470 Gaming-ITX/ac, por favor siga os seguintes passos para instalar o Windows 10.
Passo 1: Ligue o sistema e pressione [Del] ou [F2] para acessar a BIOS.
Passo 2: Vá em Advanced\ AMD Overclocking \Accept
Passo 3: Ajuste as seguintes configurações:
- [CCD Control] para [1 CCD]
- [Core control] para [TWO(1+1)]
Passo 4: Pressione [F10] para salvar as configurações e sair.
Passo 5: Instale o Windows 10.
Passo 6: Visite o site da ASRock para fazer o download e instalar todos os drivers. (Reinicie o sistema quando necessário)
Passo 7: Consulte os passos anteriores 1 ~ 3 para restaurar a seguinte configuração para o padrão.
-[CCD Control] definido para [Auto]
-[Core Control] definido para [Auto].
Passo 8: Pressione [F10] para salvar as configurações e sair.
Q (471):
Como eu habilito o WiFi com uma placa AC 8260 na placa-mãe H370 Performance?(1/1/2019)
A:Para fazer o WiFi AC 8260 funcionar, por favor ajuste a configuração abaixo, na BIOS:
Defina M2_3/PCIE_3 Switch para Force_M.2 em Advanced\Chipset Configuration
Após ajustar a configuração acima, por favor pressione "F10” para salvar as alterações.
Q (467):
Eu gostaria de utilizar a CPU AMD Threadripper 2 na plataforma ASRock X399, o que eu devo fazer?(7/1/2018)
A:A plataforma ASRock X399 suporta a CPU AMD Threadripper 2 desde a BIOS versão P3.XX.
Se a sua versão de BIOS é mais velha que P3.XX, por favor atualize a BIOS sem ligar o sistema (sem CPU) utilizando o recurso BIOS Flashback que a X399 suporta.
Por favor siga os procedimentos abaixo para atualizar a BIOS.
1. Visite o site da ASRock e entre na página de download da BIOS de sua placa-mãe para fazer o download da última BIOS.
Link: https://www.asrock.com/mb/
2. Copie o arquivo da BIOS para uma unidade de memória flash USB. Por favor certifique-se de que o sistema na unidade USB seja FAT32.
3. Extraia o arquivo da BIOS a partir do arquivo zip e renomeie o arquivo para "CREATIVE.ROM”.
4. Conecte o cabo de alimentação de 24 pinos na placa-mãe sem quaisquer outros dispositivos. Então ligue a energia na fonte de alimentação. Por favor NÃO ligue o sistema.
5. Então conecte a unidade USB na porta USB BIOS Flashback.
*Por favor consulte o manual do usuário para informações detalhadas da porta USB Flashback.
Modelo
Porta USB BIOS Flashback
X399 Taichi
USB3_6
X399M Taichi
USB3_6
Fatal1ty X399 Professional Gaming
USB3_6
6. Pressione o botão BIOS Flashback por aproximadamente três segundos. Então o LED começara a piscar.
7. Aguarde alguns segundos. O processo de gravação da BIOS estará completo quando o LED parar de piscar.
*Se o LED ficar aceso na cor verde, o BIOS Flashback não está funcionando corretamente. Por favor certifique-se de que você conectou corretamente a unidade USB na porta USB BIOS Flashback.
Q (466):
Como as funções BIOS recovery e secure Backup UEFI funcionam nas placas-mãe Intel H170 com dois chips de BIOS?(6/1/2018)
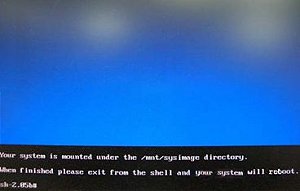
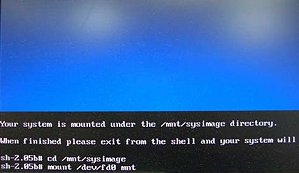
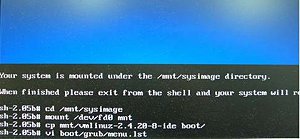
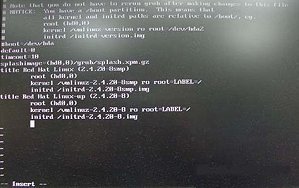
A:Para as placas-mãe Intel H170 com dois chips de BIOS, se a BIOS principal (BIOS_A1) estiver corrompida por favor siga os passos abaixo para recuperar a BIOS.
Passo 1. Por favor desconecte o cabo de energia e mova o jumper para os pinos pin2 e pin3 no conector "BIOS_SEL1”.
Para as placas-mãe Intel H170 com dois chips de BIOS, se a BIOS principal (BIOS_A1) estiver corrompida por favor siga os passos abaixo para recuperar a BIOS.
Passo 1. Por favor desconecte o cabo de energia e mova o jumper para os pinos pin2 e pin3 no conector "BIOS_SEL1”.
Passo 4. Após atualizar a BIOS, por favor remova o cabo de energia e mova o jumper para os pinos pin1 e pin2 (conector BIOS_SEL1)
Passo 5. Conete o cabo de energia e o sistema deverá iniciar com a BIOS principal
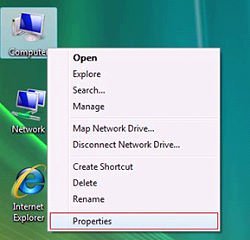
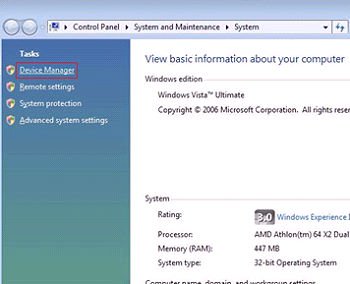
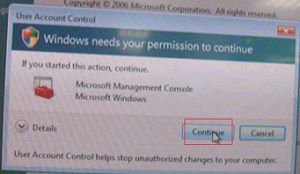
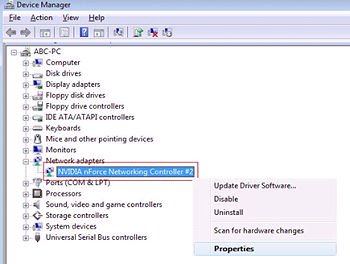
Q (465):
Quando eu uso uma placa de vídeo com uma CPU AM4 com vídeo onboard, o driver do adaptador de vídeo onboard exibe uma marca de exclamação, o que eu devo fazer?(3/1/2018)
A:Se você está usando uma placa de vídeo e o adaptador de vídeo onboard exibe uma marca de exclamação como na imagem abaixo, por favor siga os seguintes passos para remover a marca de exclamação.
1. Por favor pressione "F2” ou "Del” durante o POST para entrar na BIOS
2. Defina o adaptador de vídeo primário como internal graphics
Caminho: Advanced\AMD PBS\Primary Video Adapter\Int Graphics (IGD)
3. Após ajustar a opção acima, pressione "F10” para salvar a configuração.
Você também pode tentar o método abaixo.
1. Por favor pressione "F2” ou "Del” durante o POST para entrar na BIOS
2. Desative o CSM
Caminho: Boot/CSM/Disable
3. Após ajustar a configuração acima, pressione "F10” para salvar a configuração.
Q (464):
Como eu ajusto a memória compartilhada ao utilizar CPU Raven Ridge na plataforma AM4?(3/1/2018)
A:Se você quiser ajustar a memória compartilhada, por favor siga os seguintes passos para encontrar e ajustar as configurações de OC.
1. Por favor pressione "F2” ou "Del” durante o POST para entrar na BIOS
2. Siga caminho abaixo para ajustar a configuração de OC.
a. Advanced\AMD CBS\NBIO Common Options\GFX Config IGC :Forces
b. Advanced\AMD CBS\NBIO Common Options\UMA Mode : UMA_Spec
c. Advanced\AMD CBS\NBIO Common Options\UMA Frame Buffer Size: Escolha o tamanho
d. OC Tweaker\OC Mode Change Switch\AMD CBS Setting
3. Após ajustar as opções acima, pressione "F10” para salvar a configuração
Q (457):
Eu gostaria de utilizar o Windows Mixed Reality Headset na HDMI on-board, o que eu devo fazer?(12/1/2017)
2. Se uma placa de vídeo externa estiver instalada, por favor ative "IGPU Multi-Monitor” na BIOS.
Caminho da BIOS: Advanced > Chipset Configuration > IGPU Multi-Monitor
3. Faça o download do driver da VGA versão 15.60.01.4877 a partir do centro de downloads da Intel e instale em seu sistema.
Link de Download: https://downloadcenter.intel.com/product/128199/Graphics-for-8th-Generation-Intel-Processors
4. Instale o conector USB 3.0 do "Windows Mixed Reality Headset” na porta USB3.0 on-board.
5. Instale o conector HDMI do "Windows Mixed Reality Headset” na porta HDMI on-board
O Windows Mixed Reality Headset deverá funcionar agora.
Q (459):
Como eu faço a função WiFi funcionar após meu sistema despertar do modo de descanso na plataforma X299?(12/1/2017)
A:Por favor siga os passos abaixo para configurar seu sistema.
Passo1. Por favor instale o driver WiFi v19. 60.00 do link abaixo.
Link: https://download.asrock.com/Drivers/Intel/WLAN/Intel_WiFi(v19.60.00).zip
Passo2. Por favor entre na BIOS e defina "WAN Radio” para [Enabled]. Então pressione [F10] para salvar as configurações.
(Caminho: BIOS > Advanced > Chipset Configuration > WAN Radio)
Após aplicar as configurações acima, a função WiFi funcionará corretamente.
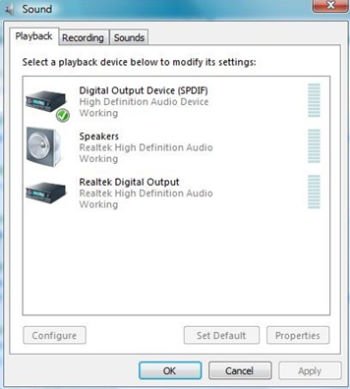
Q (455):
Como eu reproduzo Dolby ATMOS através de um receiver na Z270 Gaming-ITX/ac?(10/1/2017)
A:Por favor consulte os requerimentos, configurações e procedimentos a seguir.
[Requerimentos]
SO: Windows 10
Receiver / decodificador: Onkyo TX-NR 747 ou outro receiver que suporte HDCP 2.2
Reprodutor: Drive Blu-ray Pioneer Ultra HD
Disco BD: A maioria dos filmes BD 3D / 4K
Software de Reprodução: Power DVD 14 ou mais novo
[Instalação]
1. Quando o sistema iniciar, pressione "F2" para entrar na tela de configuração da UEFI.
Vá para Advanced > CPU Configuration e ative "Software Guard Extensions" na BIOS.
Pressione "F10" para salvar e sair da tela de configuração da BIOS.
Press "F10" to save and exit the BIOS setup screen.
2. Inicialize no S.O. Instale todos os drivers da placa-mãe.
Instale o driver ME ver: 11.6.0.1126 (suporta Blu-ray Ultra HD). Faça o download do driver no endereço a seguir: http://www.asrock.com/MB/Intel/Fatal1ty%20Z270%20Gaming-ITXac/index.asp#osW1064
3. Vá para Control Panel > Hardware and sound > Sound e selecione "Receiver output”.
Q (447):
Eu quero instalar a CPU TR4 1900X na X399Taichi ou X399 Prof. Gaming, o que eu devo fazer?
Por favor siga os seguintes passos para atualizar a BIOS para a versão P1.30 ou superior, para suportar a CPU TR4 1900X CPU.(8/1/2017)
A:Passo 1. Faça o download da BIOS P1.30 ou superior a partir do site da ASRock
X399 Taichi: https://www.asrock.com/mb/AMD/X399%20Taichi/index.asp#BIOS
X399 Prof. Gaming: https://www.asrock.com/MB/AMD/Fatal1ty%20X399%20Professional%20Gaming/index.asp#BIOS
Passo 2. Por favor certifique-se de que o sistema de arquivos da sua unidade USB é FAT32.
Vá em Este Computador → Clique com o botão direito do mouse → Selecione propriedades → Sistema de arquivos
Passo 3. Se a unidade USB não estiver no formato FAT32, por favor crie uma unidade USB em formato FAT32.
Vá em Este Computador → Cliquei com o botão direito do mouse → Selecione Formatar → Selecione FAT32 → Iniciar
Passo 4. Copie o arquivo da BIOS para sua unidade USB e extraia a BIOS do arquivo zip.
Passo 5. Renomeio o arquivo para "creative.rom” e coloque o arquivo na raiz da unidade
Passo 6. Instale o conector de energia de 24 pinos na placa-mãe. Então ligue o botão da fonte.
*Não há necessidade de ligar o sistema.
Passo 7. Conecte sua unidade USB à porta USB BIOS Flashback.
Passo 8. Pressione o botão BIOS Flashback por aproximadamente três segundos. E então o LED começará a piscar.
Passo 9. Espere até que o LED pare de piscar, indicando que a gravação da BIOS foi finalizada.
*Se o LED ficar aceso na cor verde, significa que o BIOS Flashback não está operando corretamente.
1. Por favor certifique-se de conectar a unidade USB à porta USB BIOS Flashback.
2. O botão BIOS Flashback (BIOS_FB1, veja p.9, No. 19) permite que os usuários gravem a BIOS.
3. Grave a BIOS novamente a partir do passo 5.
Q (446):
Se eu quiser instalar uma placa de vídeo de mineração sem saída gráfica, o que eu devo fazer? (7/1/2017)
A:Por favor siga o seguinte caminho para ajustar "Primary Graphics Adapter” para [Onboard].
Caminho: BIOS → Advanced → Chipset configuration → Primary Graphics Adapter → Onboard
Q (445):
Eu gostaria de usar um mouse PS2 na porta PS2. O que eu devo fazer?(7/1/2017)
A:Se a sua placa-mãe tiver duas portas PS2, simplesmente conecte o mouse PS2 na porta PS2 verde, e o mouse PS2 poderá ser utilizado.
Se a sua placa-mãe tiver apenas uma porta PS2 port, por favor defina "PS2 Y-cable” para "Enabled”. Por favor pressione "F2” ou "Del” durante o POST para acessar a BIOS, selecione "Advanced”, "Super IO Configuration”, e defina a opção "PS2 Y-cable” para "Enabled”. Pressione "F10” para salvar a configuração. E então o mouse PS2 poderá ser utilizado.
Q (444):
Como eu desligo a alimentação da porta USB no modo S5?(7/1/2017)
A:A alimentação da porta USB pode ser desligada ativando a opção "Deep Sleep”.
Por favor pressione "F2” ou "Del” durante o POST para acessar a BIOS, selecione "Advanced” e então entre em "Chipset Configuration”, e ajuste a opção "Deep Sleep” para "Enabled in S5”.
Após ajustar a configuração, pressione "F10” para salvar a configuração. E então a alimentação da porta USB será desabilitada em modo S5.
Q (435):
Quais são os requisitos para o suporte à Memória Intel Optane?(4/1/2017)
A:Para suporta a Memória Intel Optane, por favor certifique-se de que seu sistema atende aos seguintes critérios:
1. Escolha a plataforma série Z270, H270 ou B250 e Processador Intel® Core™ de 7ª Geração (Kaby Lake).
2. Instale o sistema operacional Windows 10 64bits.
3. A unidade do sistema precisa estar no formato GPT.
4. Atualize para a BIOS P2.00 ou superior.
5. Suportado apenas para unidade de boot SATA
Q (434):
Qual versão de BIOS eu devo atualizar para suportar e otimizar o recurso de Memória Intel Optane?(4/1/2017)
A:As plataformas Z270, H270 e B250 suportam a memória Intel Optane desde a BIOS versão P2.00.
Por favor faça o download da BIOS P2.00 ou versão superior para obter compatibilidade com a memória Intel Optane.
Link de download: https://www.asrock.com/support/index.pt.asp?cat=BIOS
Q (433):
Como eu reproduzo um filme BD 4K através de um drive Pioneer Ultra HD Blu-ray na Z170 Gaming-ITX/ac?(4/1/2017)
A:Requerimentos:
S/O: Windows 10
Receiver / decoder: Onkyo TX-NR 747 ou outro receiver que suporte HDCP 2.2
Software de Reprodução: Power DVD 14 (do Drive Pioneer Ultra HD Blu-ray)
http://www.pioneerelectronics.com/PUSA/Computer/Computer+Drives/BDR-211UBK#overview
Configuração:
M/B: Z170 Gaming-ITX/AC
BIOS: P7.10
CPU: Processador Intel de 7ª geração Intel® Core™ i7/i5 para PC Desktop (Kaby Lake-S)
Configuração:
1. Por favor conecte o cabo HDMI à porta HDMI2 da Z170 Gaming-ITX/ac.
2. Quando o sistema inicia, pressione "F2” para entrar na UEFI.
Vá para Advanced > CPU Configuration e ative a opção "Software Guard Extensions” na BIOS.
Pressione "F10” para salvar e sair da BIOS.
3. Inicie o S/O. Instale todos os drivers para a placa-mãe.
Instale o driver ME (v11.6.0.1126_SW_MSI). Faça o download do driver a partir do seguinte endereço: https://www.asrock.com/MB/Intel/Fatal1ty%20Z270%20Gaming-ITXac/index.asp#osW1064
4. Por favor entre no Painel de Controle > Hardware e Som > Som.
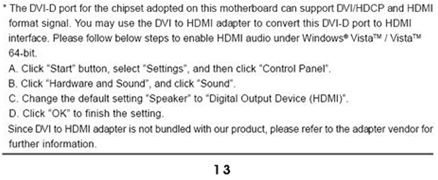
Selecione "Saída HDMI”
5. Ative "UHD color” na TV.
Please run "Ultra Blu-ray advisor” to see if all "Pass”.
Pioneer UHDBD Advisor: http://pioneer.jp/pcperipherals/bdd/eula.php
6. Devido ao fato de o HDR não ser suportado pela série de chipsets Intel 100, por favor desative ”UHD color” na TV.
Coloque um filme DB 4K no drive Pioneer Ultra HD Blu-ray.
7. Clique " Power DVD”.
8. Então você poderá reproduzir o conteúdo.
Q (432):
Como eu reproduzo um filme DB 4K BD através do drive Pioneer Ultra HD Blu-ray na Z270 Gaming-ITX/ac?(4/1/2017)
A:Requisitos:
S/O: Windows 10
Receiver / decoder: Onkyo TX-NR 747 ou outro receiver que suporte HDCP 2.2
Software de Reprodução: Power DVD 14 (do Drive Pioneer Ultra HD Blu-ray) http://pioneer.jp/pcperipherals/bdd/products/bdr_s11j/spec/
Configuração:
M/B: Z270 Gaming-ITX/ac
BIOS: P1.20
Configuração:
1. Quando o sistema iniciar, pressione "F2” para entrar na tela configuração UEFI.
Vá para Advanced > CPU Configuration e ative "Software Guard Extensions” na BIOS.
Pressione "F10” para salvar e sair da BIOS.
2. Boot into O/S. Install all drivers for the M/B.
Install ME driver (v11.6.0.1126_SW_MSI). Download the driver from the following link: https://www.asrock.com/MB/Intel/Fatal1ty%20Z270%20Gaming-ITXac/index.asp
3. Vá para Painel de Controle > Hardware e Sons > Som e selecione "Saída HDMI”.
4. Ative "UHD color” na TV.
Por favor execute o "Ultra Blu-ray advisor” para verificar se todas as etapas passam.
Pioneer UHDBD Advisor: http://pioneer.jp/pcperipherals/bdd/eula.php
5. Coloque um filme DB 4K no drive Pioneer Ultra HD Blu-ray.
6. Clique em "Power DVD”.
7. Então você poderá reproduzir o conteúdo.
Q (423):
W jaki sposób mogę dokonać aktualizacji BIOS dzięki narzędziu ASRock Instant Flash na platformie AM4?(3/1/2017)
A:Since AMD AM4 is a new structure and we just found BIOS cannot be completely updated by our Instant Flash. Thus, for the old BIOS version released before 2017/03/07, there is no "Instant Flash” option under BIOS. To make sure BIOS update can be executed completely, please use DOS or Windows BIOS update methods to do update temporarily.
After updating to the following version, Instant Flash functions and options are supported under BIOS and it can be used for updating the newer BIOS file in the future.
Model
BIOS Version
Fatal1ty X370 Professional Gaming
P1.50
X370 Taichi
P1.50
X370 Killer SLI/ac
P1.60
X370 Killer SLI
P1.60
Fatal1ty X370 Gaming K4
P1.60
Fatal1ty AB350 Gaming K4
P1.40
AB350 Pro4
P1.40
AB350M
P1.20
Q (420):
The system doesn't boot properly after loading DRAM XMP Profile. How do I do?(3/1/2017)
A:Please update the latest BIOS from ASRock official website firstly.
Download link: https://www.asrock.com/support/index.pt.asp?cat=BIOS
Because of AM4 memory compatibility issue, some high frequency memory modules may not work with XMP profile successfully. ASRock keeps updating the latest AMD AGESA code to enhance the high frequency memory capability. Please keep tracking the latest BIOS update on ASRock official website.
We have tested some memory modules on AM4 platform and users can refer to our suggested module list for choosing the finest ones to pair with your AM4 motherboard.
Memory support list link: X370 Professional Gaming, X370 Taichi, X370 Killer SLI/ac, X370 Killer SLI, X370 Gaming K4, AB350 Pro4, AB350M Pro4, AB350 Gaming K4
Q (426):
If I change the setting in BIOS of AM4 series motherboards, is there any notice before updating BIOS?(3/1/2017)
A:If you change any setting in BIOS and want to update the BIOS, please enter BIOS setup to load default setting. After reboot, please update the BIOS.
Q (427):
Which fan type can I use on AM4 motherboard to support fan speed control?(3/1/2017)
A:Please refer to the following table for the fan type specification and information.
Model Name
FAN Header
Which kinds of Cooler type can support Fan speed Control
Control Method
Note
Fatal1ty X370 Professional Gaming X370 Taichi
CPU_OPT/W_PUMP
Both 4-Pin and 3-Pin
Controlled By BIOS setting
Using 3-Pin fan, please set [DC mode] Using 4-Pin fan, please set [PWM mode]
CPU_FAN1
Both 4-Pin and 3-Pin
Auto detect*
System will auto detect the fan type
CHA_FAN1
Both 4-Pin and 3-Pin
Auto detect*
System will auto detect the fan type
CHA_FAN2
Both 4-Pin and 3-Pin
Auto detect*
System will auto detect the fan type
CHA_FAN3/W_PUMP
Both 4-Pin and 3-Pin
Controlled By BIOS setting
Using 3-Pin fan, please set [DC mode] Using 4-Pin fan, please set [PWM mode]
Using 3-Pin fan, please set [DC mode] Using 4-Pin fan, please set [PWM mode]
CPU_FAN1
Only 4 Pin
When using 3-Pin fan, it works at full speed
CHA_FAN1
Only 4 Pin
When using 3-Pin fan, it works at full speed
CHA_FAN2
Both 4-Pin and 3-Pin
Auto detect*
System will auto detect the fan type
CHA_FAN3/W_PUMP
Both 4-Pin and 3-Pin
Controlled By BIOS setting
Using 3-Pin fan, please set [DC mode] Using 4-Pin fan, please set [PWM mode]
Fatal1ty AB350 Gaming K4 AB350 Pro4
CPU_FAN1
Only 4 Pin
When using 3-Pin fan, it works at full speed
CHA_FAN1
Only 4 Pin
When using 3-Pin fan, it works at full speed
CHA_FAN2
Both 4-Pin and 3-Pin
Auto detect*
System will auto detect the fan type
CHA_FAN3
Both 4-Pin and 3-Pin
Auto detect*
System will auto detect the fan type
AB350M Pro4 A320M Pro4
CPU_FAN1
Only 4 Pin
When using 3-Pin fan, it works at full speed
CHA_FAN1
Both 4-Pin and 3-Pin
Auto detect*
System will auto detect the fan type
CHA_FAN2
Doesn't support fan control
AB350M-HDV AB350M A320M-HDV A320M A320M-DGS
CPU_FAN1
Only 4 Pin
When using 3-Pin fan, it works at full speed
CHA_FAN1
Only 4 Pin
When using 3-Pin fan, it works at full speed
CHA_FAN2
Doesn't support fan control
*Auto detect – system will automatically detect the fan type installed, so user doesn't set "DC or PWM" mode additionally under BIOS setup.
Q (431):
Se eu quiser mudar a voltagem na BIOS para a CPU Ryzen nas placas-mãe série AB350, como eu faço?(3/1/2017)
A:A opção de voltagem para a CPU Ryzen é suportada pela nova atualização de BIOS.
(BIOS ->OC Tweaker-> CPU frequency & Voltage Change-> Manual)
Por favor visite a área de Download da ASRock e atualize a BIOS para as seguintes versões ou posteriores.
Link de Download: https://www.asrock.com/support/index.pt.asp
Model
BIOS Version
Fatal1ty AB350 Gaming K4
L1.43
AB350 Pro4
L1.43
AB350M
L1.23
AB350M Pro4
L1.03
AB350M-HDV
L1.03
Q (422):
How can I adjust "CPU Frequency Multiplier Change” setting on AM4 platform?(3/1/2017)
A:CPU Frequency Multiplier Change option is already supported by the new BIOS update.
Please visit ASRock Download zone and update the BIOS to the following BIOS or later versions.
Download link: https://www.asrock.com/support/index.pt.asp
Model
BIOS Version
Fatal1ty X370 Professional Gaming
P1.50
X370 Taichi
P1.50
X370 Killer SLI/ac
P1.40
X370 Killer SLI
P1.40
Fatal1ty X370 Gaming K4
P1.40
Fatal1ty AB350 Gaming K4
P1.40
AB350 Pro4
P1.40
AB350M
P1.20
Q (429):
Como as funções de BIOS Recovery e Secure Backup UEFI funcionam com as placas-mãe Intel Z270 com dois chips ROM de BIOS?(2/1/2017)
A:Para as placas-mãe Intel Z270 com dois chips ROM de BIOS, não há necessidade alternar a BIOS quando fizer uma recuperação.
Ao iniciar corretamente, o sistema funciona na BIOS_A1 conforme imagem abaixo.
No entanto, se a BIOS_A1 estiver corrompida ou danificada, após diversas tentativas falhas de boot, ela fará automaticamente a recuperação de BIOS a partir da BIOS_B1 de backup e então o sistema ainda irá funcionar na BIOS_A1. E o monitor irá exibir a função Secure Backup UEFI (B-->A) conforme a imagem abaixo.
Após finalizar esta função, o sistema irá reiniciar e funcionar na BIOS ativa BIOS_A1.
Q (418):
Eu tenho um módulo TPM na placa-mãe e quero atualizar a BIOS, o que eu devo fazer?(12/1/2016)
A:Se você tem um módulo TPM na placa-mãe e quer atualizar a BIOS, por favor siga os passos abaixo para desabilitar a função TPM antes de atualizar a BIOS.
No S.O.:
1. Clique com o botão direito no botão do Menu.
2. Clique com o botão esquerdo > Painel de Controle > Sistema e Segurança > Criptografia de Unidade de Disco BitLocker
3. Desligar BitLocker
Na BIOS
1. BIOS > Advanced > Trusted Computing
2. Security Device Support para "Disable”
Após atualizar a BIOS, por favor ative a função.
Q (414):
As placas ASRock Intel X99 suportam CPU Intel Broadwell-E?(6/1/2016)
A:Para suportar a CPU Intel Broadwell-E, por favor siga a seguinte tabela e atualize a versão da sua BIOS. Link de Download: https://www.asrock.com/support/index.asp
Model
BIOS Version
X99 Extreme11
P3.00
X99 Extreme6
P3.00
X99 Extreme6/3.1
P3.00
X99 Extreme4
P3.30
X99 Extreme4/3.1
P3.00
X99 Extreme3
P3.30
X99 OC Formula
P3.00
X99 OC Formula/3.1
P3.20
X99 Professional
P3.10
X99 Professional/3.1
P3.20
X99E-ITX/ac
P3.10
X99M Killer
P3.00
X99M Killer/3.1
P3.30
X99X Killer
P3.00
X99X Killer/3.1
P3.00
X99 WS-E/10G
P3.00
X99 WS-E
P3.00
X99 WS
P3.10
Q (409):
Após instalar o driver de vídeo onboard na minha plataforma série 100 com Windows 10, o sistema fica piscando e exibe "O driver de vídeo parou de responder e se recuperou”.
Como eu corrijo isso?(2/1/2016)
A:Por favor defina "Package C State Support” para "Auto” na BIOS.
(BIOS -> Advanced -> CPU Configuration -> Defina "Package C State Support” para "Auto”)
Q (407):
Eu conectei um mouse PS/2 no conector PS/2 da minha plataforma Intel série 100 mas ele não funciona.(12/1/2015)
A:Por favor defina "PS/2 Y-cable" para "Auto" na BIOS.
(BIOS -> Advanced -> Super IO Configuration -> Defina "PS/2 Y-cable" para "Auto")
Q (405):
Quando eu tento utilizar um sistema operacional convidade de 64-bit no VMware, o sistema exibe "This host supports Intel VT-X, but Intel VT-X is disabled".(12/1/2015)
A:Por favor configure "Intel Virtualization Technology" na BIOS para ativar o VT-x.
(BIOS -> Advanced -> CPU Configuration -> Defina "Intel Virtualization Technology" para "Enabled")
Q (404):
No Windows 10 versão 1511 (Threshold 2 Build 10586), os modelos Z170 Extreme6 e Z170 Gaming K6 podem não retornar do modo Sleep (S3) ou entrar no modo Hibernação (S4) corretamente.(12/1/2015)
Q (400):
Meu modulo DRAM DDR4-2133 opera apenas na frequência DDR4-1866 nas placas-mãe Intel série 100. Como eu corrijo isso?(9/1/2015)
A:Por favor visite o site da ASRock e faça o download da última BIOS para seu modelo.
Q (394):
Quando utilizo CPUs Intel G3258 nas plataformas H81/P81/H87/B85/H91/H97, I não consigo instalar o Windows 10. O que eu devo fazer?(7/1/2015)
A:Para que as CPUs Intel G3258 suportem o Windows 10, por favor faça o download da seguinte BIOS (ou posteriores) com o Microcode 19 a partir dos links de download de nosso website.
Caso seu modelo não esteja litado na tabela, por favor visite a área beta para seu modelo e então atualize para a última versão beta de BIOS.
Modelo
P BIOS
H81M-VG4 R2.0
P1.40
H81M-DGS R2.0
P1.60
H81M-HDS R2.0
P1.30
H81M-HDS
P2.10
H81M-DG4
P1.10
H97 Anniversary
P1.50
H97M Anniversary
P2.10
B85 Anniversary
P1.40
B95M-DGS
P1.60
B85M-DGS
P1.50
B85M Pro3
P1.40
H97M Pro4
P2.00
B85M-HDS
P1.70
B85 Pro4
P2.30
B85M
P2.50
H81M-HG4
P1.50
H81M
P1.90
H81M-GL
P2.00
H81M-G
P1.40
H97 Pro4
P1.90
H97M
P2.00
Q (392):
Como eu posso melhorar o desempenho do Wi-Fi no meu sistema M8?(6/1/2015)
Passo 2. Desinstale o driver Intel® Smart Connect Technology do seu sistema.
Q (388):
Minha CPU não consegue atingir a velocidade de frequência turbo máxima na 970 Performance, como eu faço isso funcionar?(3/1/2015)
A:Para alcançar o a velocidade de frequência turbo máxima na 970 Performance, por favor ajuste a opção "Core C6 Mode" para [Enabled] na BIOS e tente novamente. (Caminho: BIOS -> Advanced -> CPU Configuration -> Core C6 Mode)
Q (387):
Após instalar duas placas de video R9 295x2 na minha plataforma X99, o sistema falha ao inicializar. Como eu resolvo isso? (3/1/2015)
A:Por favor siga os passos abaixo para atualizar a BIOS a partir do site da ASRock.
Modelo
Versão de BIOS
X99 Extreme3
P1.80
X99 Extreme4
P1.80
X99 Extreme6
P1.80
X99 Extreme6/ac
P1.60
X99 Extreme11
P1.10
X99 OC Formula
P1.80
X99 Professional
P1.60
X99 WS
P1.70
X99 WS-E
P1.20
X99 WS-E/10G
P1.20
X99M Extreme4
P1.70
X99M Killer
P1.80
X99X Killer
P1.80
Passo 1. Por favor remova todos os dispositivos PCI-E desnecessários incluindo 1 placa de vídeo R9 295x2, e instale apenas uma placa de vídeo no sistema para saída de vídeo.
Passo 2. Inicie o sistema e então entre na configuração da BIOS.
Passo 3. Por favor carregue as configurações padrão da BIOS e então salve as configurações.
Passo 4. Entre na configuração da BIOS e escolha "Instant Flash" para atualizar para a última versão da BIOS
Passo 5. Após atualizar a BIOS, por favor instale a segunda placa de vídeo R9 295x2 no sistema.
Q (391):
Se eu instalo dois monitores (DVI e D-sub) na FM2A88X Extreme6+ e inicializo o sistema, o sistema trava durante o processo de boot do Windows 8.1. How do I solve this problem?(3/1/2015)
Q (384):
Quando o 3DMark está rodando, o sistema trava durante os testes ou as vezes dá uma mensagem de erro "process exited unexpectedly". O que eu devo fazer?(12/1/2014)
A:Por favor verifique se a opção "APCI HPET table" está ativada na BIOS, ou por favor desabilite "Systeminfo Scan" no 3Dmark.
Para mais sugestões sobre o 3Dmark, por favor consulte o FAQ do 3Dmark: http://www.futuremark.com/support/3dmark
Q (363):
Estou usando o módulo M.2 SATA3 6.0 Gbps na Fatal1ty 990FX Killer, existe alguma dica para maximizar o desempenho?(5/1/2014)
A:Por favor desative [IDE combine mode] na BIOS > Advanced > Storage Configuration e salve as configurações.
Ou, atualize a BIOS para P1.10 ou posterior, e o sistema irá mudar a configuração automaticamente para você. Link de download da BIOS
Q (361):
Como eu ativo o recurso AMD Dual Graphics emu ma plataforma AMD?(3/1/2014)
A:Passo 1:
Por favor certifique-se de que a sua BIOS está na última versão, e mantenha a configuração padrão da UEFI para a opção "Dual Graphics" como [Auto].
Endereço para download da BIOS: https://www.asrock.com/support/download.asp
Passo 2:
Instale uma placa de vídeo AMD RADEON PCI Express no slot PCIE.
Passo 3:
Conecte o cabo do monitor na porta VGA onboard. Por favor note que o driver VGA / VBIOS atual permite apenas Dual Graphics utilizando a saída de vídeo onboard.
Para atualizações futuras, por favor verifique nosso website para mais informações.
Passo 4:
Inicialize o Sistema.
Então, por favor, remova o driver AMD caso você tenha instalado em seu sistema.
Passo 5:
Instale o driver da VGA onboard a partir do CD de suporte para a VGA onboard e offboard.
Passo 6:
Reinicie seu computador. Clique com o botão direito na área de trabalho. Clique em "AMD VISION Engine Control Center" para entrar no AMD VISION Engine Control Center.
Passo 7:
Você também pode clicar no "AMD VISION Engine Control Center" na sua barra de tarefas para entrar no AMD VISION Engine Control Center.
Passo 8:
No AMD VISION Engine Control Center, por favor escolha "Performance". Clique em "AMD CrossFire™".
Passo 9:
Clique em "Enable CrossFireTM" e clique "Apply" para salvar suas alterações.
Passo 10:
Reinicie seu sistema. E então você pode desfrutar do Dual Graphics.
Q (358):
Meu sistema DN2800MT fica com a tela distorcida através do painel LVDS na tela de boot do Windows 7. O que eu devo fazer?(10/1/2013)
Q (356):
Quando eu instalo o Windows 8.1 em modo GPT, tem uma marca d'água no canto inferior direito que diz "Secure boot isn't configured correctly". Como eu posso corrigir isso ?(10/1/2013)
A:Por favor entre em BIOS\Security para ativar a opção [Secure Boot] e escolha Install Default Secure Boot Keys, e então pressione [F10] para salvar as configurações e reiniciar o sistema.
Q (348):
I não posso atualizar a BIOS pelo Internet Flash, o que eu devo fazer?(7/1/2013)
A:Você pode seguir os seguintes passos:
1. Por favor carregue as configurações padrão da BIOS e certifique-se de que seu sistema esteja conectado à Internet.
2. Se seu ambiente de Internet for PPPoE, por favor entre no item "Network Configuration".
Selecione "Internet Setting" como "PPPoE" e então digite seu login e senha.
3. Você pode selecionar o Servidor de Download UEFI mais próximo a você.
4. Se o problema persistir, por favor faça o download e atualize para última BIOS através do website da ASRock, e então você poderá atualizar a BIOS pelo Internet Flash da próxima vez.
Link de Download: https://www.asrock.com/support/download.br.asp
Q (345):
Como eu posso utilizar a função de Wake On LAN no Ubuntu (Kernel versão 3.2.0-23) na série Vision 3D?(4/1/2013)
A:Por favor siga os passos abaixo para utilizar a função WOL.
1. Por favor ative "Onboard LAN power on" em BIOS\Advanced\ACPI.
2. Conecte o cabo de rede.
3. Procure o terminal na Dash e abra-o.
4. Por favor instale o ethtool para ativar o WOL seguindo os seguintes comandos (conforme a imagem)
#sudo apt-get update
#sudo apt-get install ethtool
#sudo ethtool –s eth0 wol g
#sudo reboot
5. Agora, o Sistema está pronto para ser acordado pela rede por outros computadores.
Q (343):
Como desabilitar a VGA integrada em placas-mãe FM2?(4/1/2013)
A:Por favor entre em BIOS\Advanced\North Bridge Configuration, ajuste a opção [Share Memory] para Auto, e desative a opção [Dual Graphics].
Q (335):
Minha entrada DVI pode transferir sinais de áudio como o HDMI? Como fazer funcionar com meu monitor HDMI?(2/1/2013)
A:Por favor, certifique-se de que checou as condições listadas abaixo.
1. A entrada DVI na placa-mãe tem que suportar HDCP.
Se não tiver certeza sobre as especificações da entrada DVI, consulte as especificações para o seu M/B em nosso site.
2. Conecte um DVI a um adaptador HDMI.
3. Defina o DVI Function [como HDMI] em BIOS/Advanced/North Bridge Configuration.
4. Defina o HDMI como dispositivo de reprodução padrão em Control Panel\Sound.
Q (333):
Porque o sistema não consegue detectar meus HDDs quando estou instalando o Windows XP?(1/1/2013)
A:Há varias possibilidades que podem causar este problema, por favor siga as seguintes sugestões para checar seus sistema.
1. Por favor certifique-se de que os cabos SATA e de energia de seus HDDs estão conectados.
2. Entre na tela de configuração da BIOS, vá até a página "Advanced" e entre em "Storage Configuration", defina o "SATA mode" para [IDE].
Se você quiser instalar o Windows XP em modo [AHCI], devido a necessidade do Windows XP, você deverá pre-instalar o driver SATA primeiro, por favor consulte o seguinte P&R para mais detalhes.
Link: https://www.asrock.com/support/qa/TSDQA-45.pdf
3. Se você já tentou as sugestões acima, por favor troque os cabos SATA de porta para teste.
Q (330):
Após atualizar a BIOS, minha CPU Intel IVY Bridge e placa-mãe com chipset Intel série 6 apresenta uma tela azul e não inicializa mais no Windows 8. O que devo fazer?(1/1/2013)
A:Por causa da atualização o Intel ME modifica o comportamento de boot do Windows 8.
Por favor utilize o CD o Windows 8 para reparar o sistema.
Q (319):
Eu não consigo entrar na ROM RAID LSI MegaRaid 9240-8i com a plataforma ASRock X79, o que devo fazer?(8/1/2012)
A:Por favor desabilite todos os dispositivos de boot na BIOS e então salve e saia.
Quando o sistema inicializar, por favor pressione para entrar na ROM RAID LSI.
Após finalizar a configuração, para restaurar os dispositivos de boot, por favor entre novamente na BIOS e carregue as configurações padrão.
Q (318):
Após atualizar a BIOS para suportar a CPU Ivy Bridge, há um dispositivo desconhecido "INT33A0" no gerenciador de dispositivos. O que devo fazer? (8/1/2012)
A:Este é o dispositivo Intel Smart Connect. Você pode desabilitar a opção Intel Smart Connect na BIOS, ou seguir os seguintes passos para instalar o driver correspondente.
Passo 1: Faça o download do driver Intel Smart Connect de nosso site: https://www.asrock.com/support/download.asp
Passo 2: Instale o driver e reinicie o sistema.
Q (317):
Meu sistema não reconhece a VGA e mostra d6 no Dr. Debug.(6/1/2012)
A:Como há algumas placas VGA com informações incorretas na vBIOS (Video BIOS), por favor entre em contato com o fabricante de sua placa VGA ou atualize a BIOS da placa-mãe para a última versão de nosso site: https://www.asrock.com/support/download.asp
Caso tenha quaisquer dúvidas, por favor entre em contato com o TSD ASRock.
Q (316):
Como instalar o SO em volumes RAID com mais de 2.2TB na placa-mãe ASRock 970/990FX?(5/1/2012)
A:Por favor siga o SOP abaixo para instalar o Windows Vista/7 64bit no volume RAID:
Passo 1: Atualize a BIOS para a última versão.
Passo 2: Conecte todos os HDDs e então faça os ajustes a seguir:
Defina o [SATA Mode] como [RAID Mode]
Mude [Onboard RAID 3TB+ Unlocker] para [EFI Compatible ROM]
As opções estão localizadas em BIOS > [Advanced] > [Storage Configuration]
Então pressione F10 para salvar as configurações.
Passo 3: Pressione F11 durante o boot e escolha [Built-in EFI Shell].
Passo 4: Digite "drvcfg" e você verá as informações como mostrado abaixo:
Drv[4E] Ctrl[B5] Lang[eng]
Passo 5: Digite "dh [número do Drv]", por exemplo: digite "dh 4E".
Passo 6: Digite "drvcfg –s [número do Drv] [número de Ctrl]" para entrar no Utilitário Raid.
Por exemplo: Digite "drvcfg –s 4E B5"
Passo 7: Escolha [Logical Drive Main Menu] para definir o Drive Raid.
Passo 8: Escolha [Logical Drive Create Menu] para criar o Drive Raid Drive.
Passo 9: Escolha [Usable Physical Drive List] para selecionar o HDD Raid.
Passo 10: Pressione a Barra de Espaço no teclado para marcar a opção.
Passo 11: Escolha [Ld Size setting], e digite o tamanho do Raid.
Passo 12: Após definir o tamanho do Raid, por favor escolha [Start to Create]
Passo 13: Pressione "F10" para Sair do Utilitário.
Passo 14: Durante a inicialização, por favor pressione "F11" para entrar no Menu de Boot.
Escolha UEFI: CD/DVD Drive
* Esta opção aparece apenas no Windows7 64bit e Vista 64bit.
Passo 15: Siga o Guia de Instalação do Windows para instalar o sistema.
Por favor carregue o mais novo driver SATA RAID versão 3.3.1540.22, disponível em nosso site, durante a instalação.
Passo 16: Instale os drivers mais novos do site da ASRock.
Q (312):
Quais são os requisitos básixos para a Tecnologia Intel Smart Response?(5/1/2012)
A:De acordo com a documentação da Intel, para um sistema suportar a Tencologia Smart Response Technology ele deve possuir o seguinte:
• Placa desktop baseada no Chipset Intel® Z68/Z77 Express
• Processador Intel® Core™ i3/i5/i7 em encapsulamento LGA 1155
• BIOS do Sistema com o modo SATA configurado para RAID
• Software da Tecnologia Intel Rapid Storage em versão 10.5 ou posterior
• Um único Hard Disk Drive (HDD) ou múltiplos HDD's em um único volume RAID
• Solid State Drive (SSD) com capacidade mínima de 18.6GB
• Sistema operacional: Microsoft Windows Vista 32-bit e 64-bit, Microsoft Windows 7 32-bit e 64-bit.
Para mais informações, por favor consulte o guia do usuário da Tecnologia Intel Smart Response http://download.intel.com/support/chipsets/sb/intel_smart_response_technology_user_guide.pdf
Q (309):
Como eu posso ativar o DVI Dual-link na série de placas-mãe com chipset AMD 880G, 890GX?(3/1/2012)
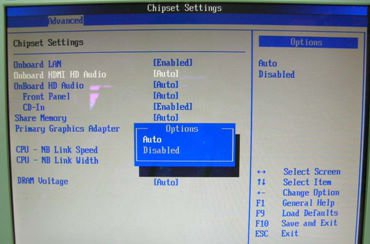
A:Por favor defina a opção [Onboard HDMI HD Audio] para [Disabled] na BIOS.
Caminho: BIOS-> Advanced-> North Bridge Configuration-> Disabled opção [Onboard HDMI HD Audio].
Q (306):
Minha placa-mãe ASRock Intel série-6 tem suporte a CPU Intel Ivy Bridge?(2/1/2012)
A:Para suportar a CPU Intel da proxima geração de 22nm, é necessário ter a versão de BIOS correspondente, drivers, e AXTU atualizado.
Por favor siga os passos abaixo par atualizar a BIOS, drivers, e utilitários correspondentes.
Passo 1: Verifique a versão da BIOS.
Por favor verifique a tabela abaixo e atualize a BIOS com a versão citada ou superior.
Se você possuir a mesma versão de BIOS ou uma versão superior na sua placa-mãe, não há necessidade de fazer a atualização da BIOS e você poderá pular para o passo 2
Model
BIOS Version
H61M-VS R2.0
P2.10
H61M-HGS
P1.50
H61M-HVS
P1.90
H61M-HVGS
P1.70
H61M/U3S3
P1.70
H61M-ITX
P1.60
H61iCafe
P1.70
H61DE/S3
P1.70
H61DE/SI
P1.70
H61M-PS
P1.40
H61M
P1.70
H61DEL
P1.70
H61M-GE
P1.70
P65iCafe
P1.40
H61M-VS
P2.10
H61M-S
P1.50
H61M-GS
P1.50
Model
BIOS Version
Fatal1ty Z68 Professional Gen3
P2.10
Z68 Extreme3 Gen3
P2.10
Z68 Extreme4 Gen3
P2.10
Z68 Extreme7 Gen3
P2.10
Z68 Pro3
P2.10
Z68 Pro3 Gen3
P2.10
Z68 Pro3-M
P2.10
Z68M/USB3
P2.10
Z68M-ITX/HT
P2.20
Z68 Extreme4
P2.20
Model
BIOS Version
Fatal1ty P67 Performance
P2.10
Fatal1ty P67 Professional
P3.10
P67 Extreme4
P3.10
P67 Extreme4 Gen3
P2.10
P67 Extreme6
P2.10
P67 Pro
P2.10
P67 Pro3
P3.10
P67 Pro3 SE
P2.10
Model
BIOS Version
H67DE3
P2.10
H67M
P2.10
H67M-GE
P2.10
H67M-GE/HT
P2.10
H67M-ITX
P2.10
H67M-ITX/HT
P2.10
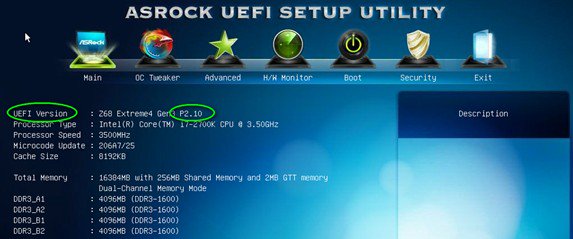
Há duas formas de checar a versão da BIOS.
1 Inicialize seus sistema e pressione [F2] ou [Delete] quando o logo da ASRock aparecer, você poderá encontrar a versão da BIOS ou UEFI na tela principal como mostrado abaixo.
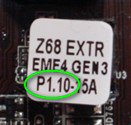
2 Ou encontrar a etiqueta no chip da BIOS como mostrado abaixo, você pode checar qual versão de BIOS foi implementada quando a placa-mãe foi produzida.
Passo 2: Atualizando a BIOS
A), Se você tiver uma CPU Sandy Bridge ou puder emprestar uma de um amigo então você poderá facilmente atualizar a BIOS por sua conta.
Por favor faça o download da BIOS da tabela acima, e atualiza a BIOS.
Para mais instruções por favor clique no ícone "Como atualizar" na coluna correspondente.
B), Se você não tiver uma CPU Sandy Bridge e não puder emprestar uma de outra pessoa, por favor entre em contato com o fornecedor onde você comprou para que ele atualize a BIOS para você.
Esta é a segunda opção mais rápida para fazer com que sua placa suporte a CPU Ivy Bridge.
Caso isso não seja possível, por favor entre em contato com o Suporte Técnico ASRock para obter ajuda adicional.
*Nota: Se você utilizar um disco removível USB para atualizar a BIOS, após a imagem da nova BIOS ser gravada no chip, por favor pressione qualquer tecla para reiniciar o sistema. Neste momento, por favor não remova o disco USB. O procedimento de atualização do firmware Intel ME irá continuar automaticamente caso necessário.
**Nota: Por favor utilize apenas a imagem de BIOS oferecida no site da ASRock.
Passo 3: Atualize o driver Gráfico Intel HD do site da ASRock
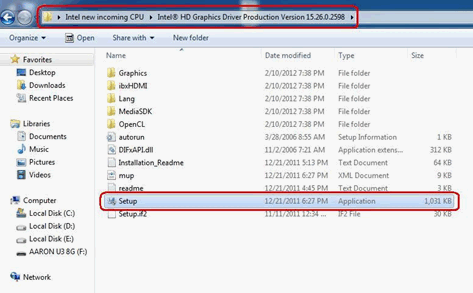
*Como atualizar o driver Gráfico Intel HD:
1. Por favor desconpacte e abra a pasta para executar o "setup".
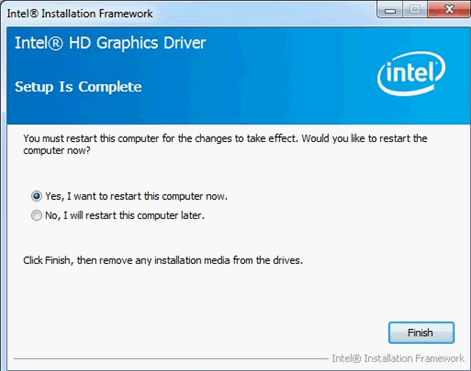
2. Siga o instalador da Intel para instalar o driver gráfico.
3. Após o termino da instalação você verá a seguinte mensagem, por favor reinicie o sistema neste momento.
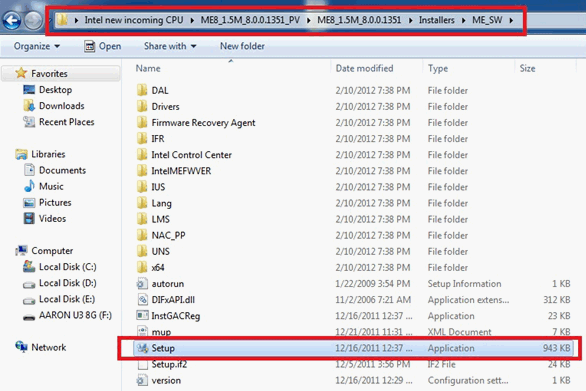
Passo 4: Instale a versão correta do Intel Management Engine do site da ASRock:
*Como atualizar o Intel Management Engine:
1. Por favor descompacte e abra a pasta para executar o "setup".
Caminho: Entre na pasta Intel ME8 -> ME8_1.5M_8.0.0.1351 -> Installers-> ME_SW-> e escolha "Setup".
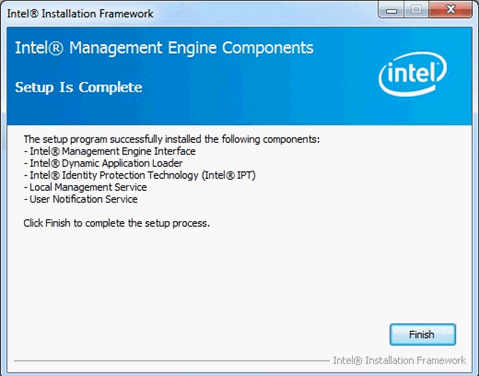
2. Siga o instalador da Intel para instalar o driver ME.
3. Após o termino da instalação, você verá a mensagem abaixo. Por favor clique em "Finish".
Passo 5: Instale o driver Intel Smart Connect para Microsoft Windows7/7 64 bit.
Passo 6: Atualize o Utilitário ASRock AXTU.
Please update new AXTU version on ASRock website.
Passo 7: Substitua a CPU para a Intel Ivy Bridge.
Q (300):
I want to use OCZ RevoDrive PCI-E SSD add-on card on X58 platform, what should I setup in BIOS?(12/1/2011)
A:Please flash BIOS to the latest version and make sure [PCIE Max Payload Size] is set to [128B] in BIOS.
You can find the option in BIOS -> [Advanced] -> [PCIE Max Payload Size]
BIOS download link: https://www.asrock.com/support/download.asp
Q (302):
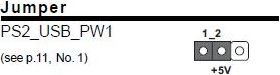
After I shut down the system, my USB keyboard and mouse are still light on. How could I turn them off?(12/1/2011)
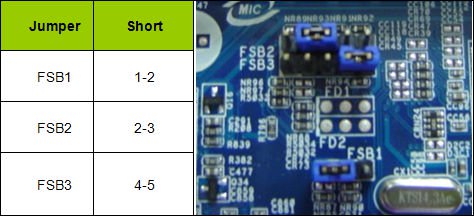
A:If your motherboard has PS2_USB_PWR1 jumper, please adjust the PS2_USB_PWR1 header to pin 1-2(+5V), like below picture.
If not, please set [Deep SX] to [Enable] in BIOS.
Or set [On/Off Play] to [Disabled] in BIOS.
Q (301):
How do I setup full space of memory with RAM disk tool on Intel platform?(12/1/2011)
Q (294):
How could I enabled "Data Execution Protection (DEP)" supported from CPU?(9/1/2011)
A:Please enter BIOS, and set [No execute Memory Protection] to [Enabled].
You could find the option by BIOS-> Advanced-> CPU Configuration-> Set [No execute Memory Protection] to [Enabled.]
Q (291):
When I install ATI HD6670, HD6570, and HD6450 on A75/A55 series motherboards, there is no display output from VGA card. What can I do?(9/1/2011)
Or, enter BIOS > North Bridge Configuration, and set [Dual Graphics] to [Disabled].
Q (289):
I install Microsoft Windows OS in GPT mode and Ubuntu in MBR mode with two different HDD, and I cannot boot into Microsoft Windows OS, how to solve that?(6/1/2011)
A:Please install OS both in GPT or MBR mode.
Both in GPT mode, please refer below steps:
1. Boot into BIOS→[Boot]→[PCI ROM Priority]→choose [EFI Compatible ROM], then press "F10" to save changes and exit.
2. Then press "F11" when booting up and choose "UEFI:[your ODD name]" to install OS.
Both in MBR mode, please refer below step:
Please press "F11" when booting up and choose "AHCI/SATA:[your ODD name]" to install OS.
Q (285):
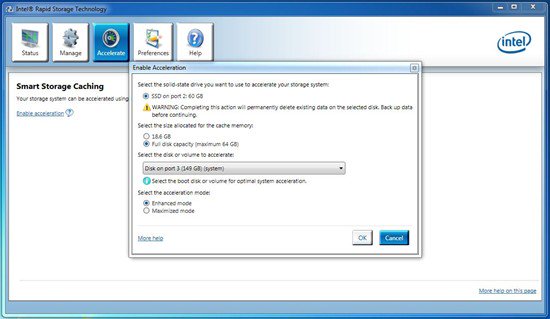
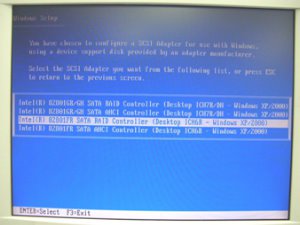
I have installed all the drivers from support CD, but I could not enable the Intel Smart Response Technology on my Z68 motherboard. What should I do?(5/1/2011)
A:First, please download and update BOTH of your BIOS and Intel Rapid Storage Driver.
After doing so, please follow the steps below to setup Intel Smart Response:
Step 1. Before booting up the system, please make sure to connect your HDD to supported SATA ports.
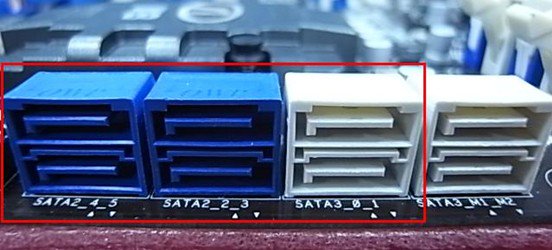
For Z68 Extreme4, please connect to the ports as shown below.
These ports are from Intel PCH chipset, which support Intel Smart Response Technology.
Please note that, for Z68 Pro3 or Z68 Pro3-M, all the SATA ports are supported.
※ Note:
We recommend users to connect your HDD to SATA3 ports if your HDD is SATA3 spec.
Please DO NOT connect SSD to the system at the moment.
Step 2. Please press F2 or DEL to enter BIOS > Advanced > Storage Configuration.
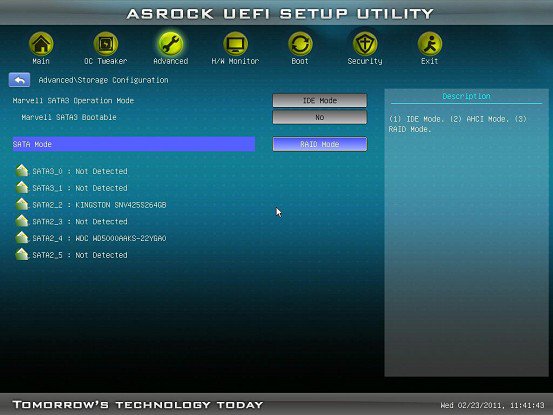
Step 3. Please set SATA mode to [RAID Mode] as shown below
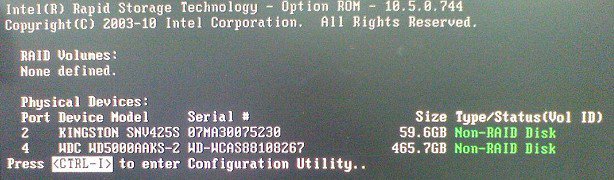
Step 4. In RAID ROM screen, HDD status should be "Non-RAID Disk"
Step 5. Please install OS in SATA HDD, after installation, please shut down your system and connect SSD to SATA ports listed above.
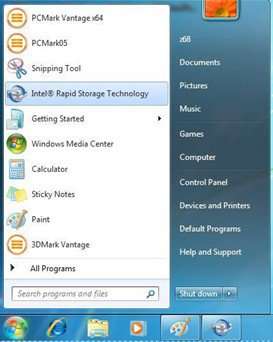
Step 7. After installation is completed, reboot the system and open Intel Rapid Storage Technology.
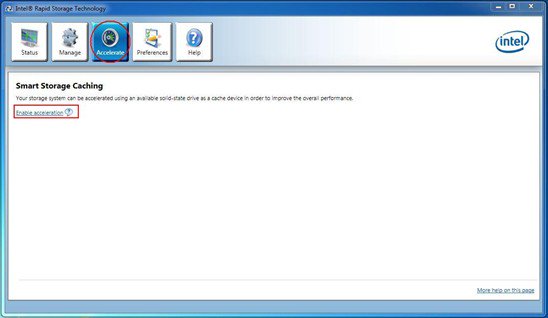
Step 8. Choose "Accelerate", and click "Enable acceleration"
Step 9. You could change the default settings as you want it, then click "OK"
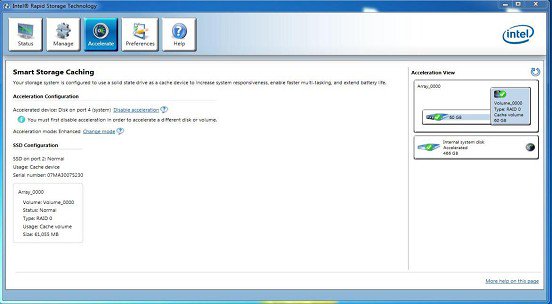
Step 10. You could see the Smart Storage Caching is enabled as shown below:
Q (286):
What's the meaning of AMI UEFI BIOS Beep code?(4/1/2011)
A:Please refer to below form for the beep code and debug code of AMI UEFI BIOS.
Condition
Beeps Code
Debug Code
Normal
No beep
With goodnight LED enabled, debug code will disappear after the beep.
Bad CPU
No beep
No debug code
Bad memory
No beep
45
Without memory
3 long beeps
53
Without CPU
No beep(No Power)
No debug code
Without VGA card
5 long beeps
Beeps at"d6", then show "0d"
Q (283):
I am an owner of AD425PV3/AD525PV3. I could not get any display after booting up my system; I could see CPU fan and power fan are spinning but no display, what should I do?(4/1/2011)
Q (275):
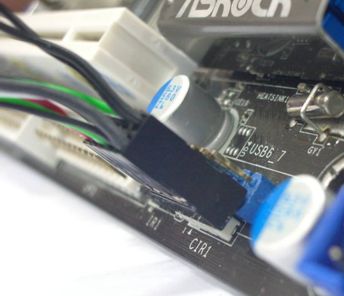
How do I connect the CIR receiver which bundle with H67M-GE/HT?(1/14/2011)
A:Step1. Please connect the USB front panel cable to CIR1 and USB 6_7 header.
The pin header mark in red is required to connect.
The properly connecting USB front panel cable with CIR header as below picture.
Step2: Please connect CIR receiver to USB front panel before booting up system.
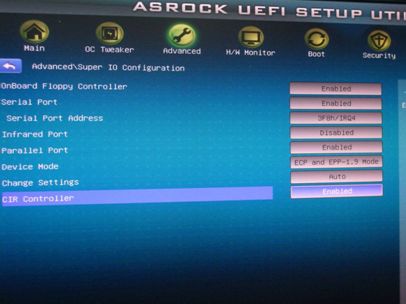
Step3: Enter BIOS setting screen and make sure the CIR controller is setting at [Enabled] (Advanced -> Super IO Configuration –> CIR Controller -> [Enabled])
(If you didn't see the CIR Controller option in BIOS, please shut down your system and plug CIR receiver to another USB port on front panel then try again)
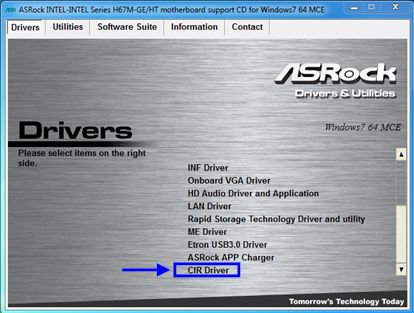
Step4: Enter Windows, Execute ASRock support CD and install CIR Driver (it would be listed at the bottom of driver list)
Note: Please connect the CIR receiver to USB front panel before you boot up system.
Q (263):
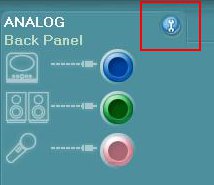
If I use AC'97 front audio panel with VIA® audio codec motherboard, how do I connect AC'97 front panel to HD Audio header on the motherboard?(2/10/2010)
A:If you use AC'97 front audio panel, please install it to the HD audio header as below:
A. Connect Mic_IN (MIC) to MIC2_L.
B. Connect Audio_R (RIN) to OUT2_R and Audio_L (LIN) to OUT2_L.
C. Connect Ground (GND) to Ground (GND).
D. MIC_RET and OUT_RET are for HD audio panel only. You don't need to connect them for AC'97 audio panel.
E. Enter BIOS Setup Utility. Enter Advanced Settings, and then select
Chipset Configuration. Set the Front Panel Control option from [Auto] to [Enabled]. For Windows® XP
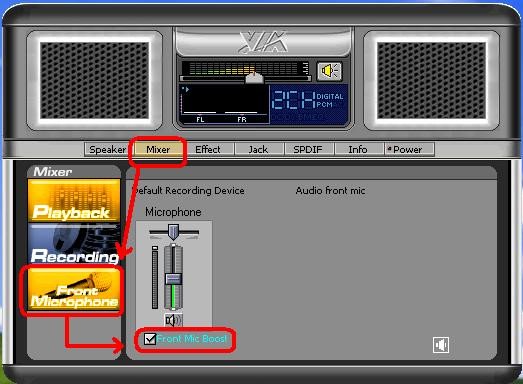
F. Enter Windows® system. Click the icon on the lower right hand taskbar to enter VIA® ADeck. Click "Mixer", select "Front Microphones", choose "Front Mic Boost", and leave.
Like below picture:
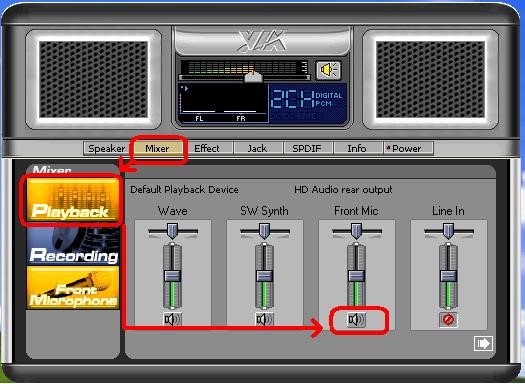
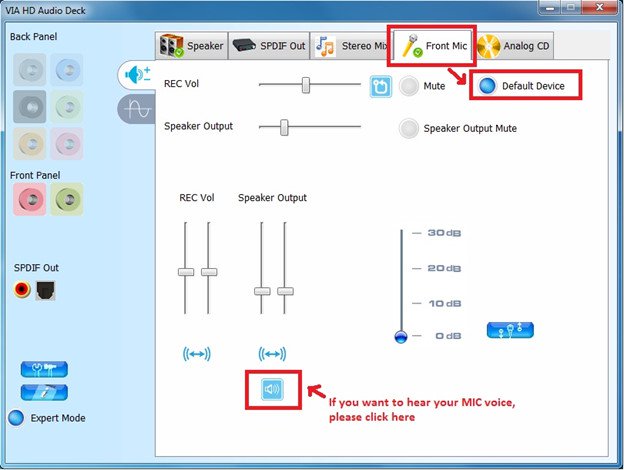
H. If you want to hear your voice through Front Mic, Please click "Mixer", select "Play Back", choose "Front Mic", and leave.
Like below picture: For Windows® Vista™ / Windows® 7
F. Enter BIOS "Chipset Settings" page, manual [Front Panel] to [Enable].
G. Enter Windows® system. Click the icon on the lower right hand taskbar to enter VIA® VDeck. Click "Front Mic", select "Default Device"
H. If you want to hear your voice through Front Mic, Please click "Speaker Output" icon.
Like below picture:
Q (261):
After installing windows7 on ALiveNF7G-GLan or N68PV-GS I installed all the windows7 driver from the website, why I still get an exclamation mark on "co-processor" in device manager?(11/21/2009)
Q (258):
Is there any possibility to disable the LED of ION 330 ?(10/22/2009)
A:Yes. Please update your BIOS to P1.60 first. After doing so, you may find the "Good Night LED" option in BIOS -> Smart, please refer to the following picture.
If you set "Good Night LED" to [Enabled], the system would turn LED off.
Q (253):
After I selected EZ OC to higher frequency option in ION330. There will be no post image or get black screen. How can I do?(8/11/2009)
A:Please kindly refer to the following suggestions:
First, push the power button for three times.
Please power on the ION330 then off it for three times.
Press during post screen and go into BIOS to load BIOS defaults.
If you still have black screen, please try to clear CMOS.
Please open the upper chassis and remove the DVD-OM device.
Q (250):
I can not virtual 64bit OS, when I adopt AMD® CPU with Sun's xVM virtual Box software. How can I do?(6/25/2009)
A:1. Please make sure your OS is 64bit and also check your CPU, whether support AMD-V.
2. [Enable] [Secure Virtual Machine] option in the BIOS.
3. Please check the [Enable Nested Paging] box in Sun's xVM virtual box software.
And then you can virtual 64bit OS.
Q (248):
When I plug in an eSATA HDD, it can be recognized in the BIOS. But in the OS, it will show a massage "Storage Device Connected". And I can not use this eSATA HDD, ether. How can I fix it? (3/28/2009)
A:Please follow below steps to set:
1.Please enter Intel® Matrix Storage Console, and click the mouse right button on eSATA hard device. And press [Reset Hard Drive to Non-RAID].
2.After setting [Reset Hard Drive to Non-RAID], please restart your computer.
3.Enter to Disk Management, it can recognize your eSATA HDD, please crate a New Simple Volume on it.
4.After than, the eSATA HDD can be recognized.
Q (247):
I want to install Linux CentOS 5.2 on X58 SuperComputer. After start the installation of CentOS 5.2, the system stays on checking hardware device. I cannot continue the Linux installation, what can I do?(3/28/2009)
A:Please follow below steps to install your Linux CentOS 5.2 installation.
1.Disable the Onboard LAN 1 and Onboard LAN 2 in BIOS setting.
2.Enter Boot menu and starting the Linux CentOS 5.2 installation.
3.Please install the system packages like below picture.
4.After install CentOS 5.2 completely , download your LAN driver by following link.
Link:http://www.realtek.com/downloads/downloadsView.aspx?Langid=1&PNid=13&PFid=5&Level=5&Conn=4&DownTypeID=3&GetDown=false#2
5.Please remove the in-box driver and remove the r8169 LAN driver by following command.
# cp -p r8168-8.011.00.tar.bz2 ~
# cd ~
# tar vjxf r8168-8.011.00.tar.bz2
# cd /lib/modules/`uname -r`/kernel/drivers/net/
# rm -f r8169.ko
# cd ~
# cd r8168-8.011.00
# make clean
# make modules
# make install
# depmod –a
# reboot
6.After upgrade your LAN driver complete, please reboot your system and enable the Onboard LAN 1 and Onboard LAN 2 in BIOS setting.
Q (246):
When I use Vista 64bit SP1 OS, the [Event viewer] in the OS shows
Kernel-Proessor-Power error, but the OS works fine. How can I solve this error in the [Event viewer]?(2/27/2009)
A:Please check the BIOS setting.
A)-> If you use Intel® CPU, please [Enable] the [Intel® Speedstep ™ tech] option in
the BIOS
B)-> If you use AMD® CPU, please [Enable] the [Cool'n'Quiet] option in the BIOS
C)-> If your CPU not support [Intel® Speedstep ™ tech] or [Cool'n'Quiet] function,
please contact ASRock TSD from the link:
https://www.asrock.com/support/TSD.asp
Q (244):
When I create a RAID volume over 2TB capacity, the RAID volume cannot be recognized after installing the RAID driver during XP installation. Why?(1/12/2009)
A:Due to the operating system limitation, Windows® XP only supports MBR disk format, the MBR disk format cannot support the hard drive capacity over 2TB.
If you want to use over 2TB RAID volume to be your boot disk, below three conditions must be required:
1.Your operating system must be Windows® Vista™ x64 SP1 or Windows® 7 64bit.
2.EFI BIOS.
3.GPT disk format.
Please refer to following link to get more information.
Link:
http://support.microsoft.com/?scid=kb;en-us;946557&x=9&y=7
http://www.microsoft.com/whdc/device/storage/GPT_FAQ.mspx
Q (238):
I am using Intel® chipset X48 / X38 / P45 / P43 / G43 / P35 / G31 / P965 series motherboard with 4GB memory modules installed. But it always detects the memory size as 3GB instead of 4GB at POST screen. What should I do?(10/23/2008)
A:Please enter BIOS setup and enable the "Memory Remap Feature" option.
(BIOS / Advanced / Chipset Configuration / Memory Remap Feature)
Q (237):
When I install a Terratec Cinergy C PCI TV card or Technisat Cablestar HD2 TV card on VIA® chipset based motherboards, such like 4CoreDual-SATA2 (PT880 series motherboards) or ALiveSATA2-GLAN, it always show "PCI IRQ routing table error" message after BIOS POST, or simply hang up during BIOS POST. Any way to fix the problem?(9/5/2008)
A:Due to compatibility issue of VIA® chipset with Terratec Cinergy C PCI TV card and Technisat Cablestar HD2 TV card.
We don't recommend using this kind of TV card on VIA® chipset motherboards. Sorry for your inconvenience.
Q (233):
I use Intel® CPUs, why the Vcore sometimes is lower than the value in the BIOS?(7/31/2008)
A:VCore on Pentium 4 (and newer generation CPUs) is no longer static. Please refer to the Intel® document below. It shows that the Vcore will decrease with the CPU loading increasing. That's why the Vcore may be lower.
(From: http://download.intel.com/design/processor/datashts/318732.pdf)
Q (231):
When installing NVIDIA GeForce 8400/8500 series PCIE VGA card on K10N78hSLI-WiFi / K10N78hSLI-1394 / K10N78hSLI-GLAN under Windows® XP/ XP 64-bit, I can not get full system memory. Besides, system shows two display adapters in the Device Manager. What can I do? (6/26/2008)
A:While system boot up, please press "F2" to enter BIOS set up screen. Please go into BIOS setup and set "Hybrid SLI" option to [Disabled] in BIOS>Advanced>Chipset Configuration.
Q (227):
How do I get my onboard LAN to work properly?(4/28/2008)
A:Here are some suggestions:
1.Make sure the "Onboard LAN" option was enabled in BIOS.
2.Make sure the LAN driver was installed properly. Please check it in "Device Manager".
3.Update the BIOS of your motherboard to the latest one.
4.Try the newer LAN driver from ASRock or chipset vendor's website.
ASRock: https://www.asrock.com/support/Download.asp
Realtek: http://www.realtek.com.tw/default.aspx
NVIDIA: http://www.nvidia.com/Download/index.aspx?lang=en-us
VIA
5.Change another LAN cable. (For Gigabit LAN, please make sure your LAN cable could fully work with Gigabit LAN.)
6.Reinstall the operating system.
Q (218):
When I install AMD® Phenom CPU on ALiveNF6G-VSTA, I found Windows® Vista™ shows yellow " ! " mark on PCI Express standard Root Port in Device Manager. What do I solve it?(1/14/2008)
A:Please kindly update BIOS P2.20 or later for ALiveNF6G-VSTA to solve the problem.
BIOS Download: https://www.asrock.com/mb/download.asp?Model=ALiveNF6G-VSTA#bios
Q (221):
My motherboard is 4Core1600Twins-P35/4Core1600P35-WiFi(+). I want to overclock my FSB 800 CPU. Are there any tips to increase the overclocking capability of my system?(1/14/2008)
A:First of all, please update the BIOS to P1.10 or later.
(Download: https://www.asrock.com/support/download.asp?Model=P35 )
Secondly, please adjust the FSB jumper setting on the motherboard according to the following instructions (this will set the DRAM: FSB (frequency) to 1:1)
After doing the above steps, you may set the "Overclock Mode" to [Manual] in the BIOS>Advanced> CPU Configuration and then adjust the "CPU Frequency" to overclock your system.
Q (219):
I can not access my SATA ODD drives (such like: LG BD/HD Player GGC-H20L, Pioneer BDC-SB20K, Pioneer DVR-212BK…) on ALiveNF7G-HDReady under Vista™. What can I do?(1/14/2008)
A:Please refer to below steps to run these SATA ODD drives with AHCI mode.
1. Please set AHCI Mode in BIOS setting (-> BIOS -> Advanced -> IDE Configuration -> SATA Operation Mode -> AHCI Mode).
2. Reinstall Windows® Vista™ with AHCI Mode.
3. After Windows® Vista™ installation, please re-install all drivers and software.
Q (215):
I'm using the AMD® AM2 Athlon 64X2 5000+ Black Edition CPU. The ratio of this CPU is unlocked. I would like to overclock it by adjusting the ratio. But after adjust the CPU ratio in BIOS and boot into the Windows, the ratio of this CPU does not change. What should I do?(12/19/2007)
A:Actually, it is AMD® CPU driver's behavior. To perform overclocking please disable the "Cool 'n' Quiet" function in BIOS-> Advanced-> CPU Configuration-> Cool'n'Quiet. Please refer to the following picture.
Q (214):
I use a NVIDIA® 8800GT PCIE VGA card on VIA® chipset motherboard. But I got black screen on the monitor. How do I solve it?(11/5/2007)
A:The NVIDIA® 8800GT PCIE VGA card is GEN2 mode VGA card. Unfortunately VIA® chipset does not support GEN2 mode VGA card. The only solution is to set 8800GT PCIE VGA card to GEN1 mode.
We have tested 8800GT PCIE VGA card. After flashing GEN1 mode BIOS for 8800GT, it works fine on VIA® chipset motherboard.
Please contact VGA card vender to get the VGA BIOS with GEN1 mode for your 8800GT PCIE VGA card.
Q (203):
I use an external USB HDD on ALiveNF7G-HD720P/ALiveNF7G-HDready. I feel that the speed of USB is slower. Is there any method to improve it?(6/25/2007)
A:Please kindly refer to below steps for try.
1.Open Notepad and type following registry entry.
2.Save file as "USB.reg".
3.Double click this file to add the information to the registry.
4.Reboot system.
Q (202):
ALiveNF7G-HD720P/ALiveNF7G-HDready support HDMI output?(6/25/2007)
A:Yes, ALiveNF7G-HD720P/ALiveNF7G-HDready supports HDMI output.
However, a DVI to HDMI cable or adapter is required.
DVI to HDMI cable
DVI to HDMI Connector
Besides the DVI to HDMI cable/adapter, please also do the following settings in BIOS SETUP and Windows® Vista™/Vista 64-bit:
1.In BIOS SETUP, go to "Advanced"->"Chipset Configuration", and set the option "Onboard HDMI HD Audio" to [Auto].
2.Under Windows® Vista™/Vista 64-bit, go to "Sound" settings and select the Digital Output Device (SPDIF) as a playback device.
You can find more detail information in user manual page 13:
Q (197):
If the MIDI/GAME port is enabled in the BIOS setup, the device manager will show yellow "!" under Windows® Vista™. Why?(3/19/2007)
A:Microsoft® had removed the support for MIDI/GAME port under Windows® Vista™. Please kindly refer to below Q&A No.4:
http://forums.microsoft.com/TechNet/ShowPost.aspx?PostID=2319740&SiteID=17
Q (195):
I am using the ConRoeXFire-eSATA2/ 775XFire-eSATA2+/ 775XFire-eSATA2/ 775XFire-VSTA/ 775XFire-RAID motherboard. My Operating system was installed in a SATA/ SATA2 HDD with "IDE" mode. When I install the SATA2 driver (Intel® Matrix Storage Manager), system always pops an error message "This computer does not meet the minimum requirements for installing this software". Why?
IDE mode (In BIOS setup):
SATA2 driver:
Error Message: (2/15/2007)
A:The Intel® Matrix Storage Manager (SATA2 driver) is for RAID or AHCI mode. If your operating system was built by "IDE" mode, you don't need to install it.
Q (189):
I have AM2NF6G-VSTA/ALiveNF6G-DVI motherboard. The onboard LAN does not work properly under Windows® Vista™. How can I solve this?(12/19/2006)
Solution2.
Or please refer following steps to re-write MAC address under Windows® Vista™.
Step1: Check MAC address.
When system boot up, press "F2" to enter BIOS setting.
Boot-> "Boot settings Configuration" -> set "Boot From Onboard LAN" to "enable".
Press "F10". System will restart.
Please "F11" and select "NVIDIA Boot Agent".
Then you will see MAC address, pls. record it with no space for later usage.
Step2: Boot system into Window Vista
Right click "Computer" and click "Properties"
Step3:
Click "Device Manager"
Step4:
Click "Continue"
Step5.
Right click "Networking Controller" and click "Properties".
Step6:
Choose "Network Address" in "Advanced " folder.
Write "MAC Address" which got from step1 into Value item.
Then click "OK".
Q (188):
I am using an AMD® AM2 rev.G CPU on AM2V890-VSTA/ ALiveSATA2-GLAN. I have enabled the "Cool'n'Quiet" in BIOS setup, installed the "K8 CPU driver" from support CD and chosen the "Minimal Power Management" in OS, but the Cool'n'Quiet function still does not work. What can I do?(12/19/2006)
A:First, please make sure that if your CPU supports the Cool'n'Quiet function.
Second, please download the new "AMD® Cool'n'Quiet Driver" from the following website and install it. It will activate the Cool'n'Quiet function properly.
AM2V890-VSTA:
https://www.asrock.com/mb/download.asp?Model=AM2V890-VSTA
ALiveSATA2-GLAN:
https://www.asrock.com/mb/download.asp?Model=ALiveSATA2-GLAN
Q (13):
I am using the AMD® AM2 rev.G CPU. But the system always stops at POST after I turn on the system. I can't go into the operating system. What should I do?(12/19/2006)
A:For supporting AMD® AM2 rev.G CPU, please follow the steps to update the BIOS of your motherboard to the latest one.
1.Please press the "F2" key continuously right after turn on the system until it goes into the BIOS setup.
2.Please disable the "Cool'n'Quiet" function in BIOS setup.
3.Press "F10" key to save configuration changes and exit setup.
4.You can start to update the BIOS now.
How to update BIOS?
https://www.asrock.com/support/DOS.html
BIOS download page.
https://www.asrock.com/support/download.asp?c=All
Q (187):
I have 939Dual-SATA2 / 939Dual-VSTA / 939A8X-M / K8A8X-M / K8Upgrade-1689/K8Combo-Z motherboard. When using Nvidia 7600GS/6600LE/6800GS/7800GS "AGP" card, I am not able to install the VGA card driver. How can I solve this?(11/19/2006)
A:This problem will occur on some AGP cards which does not use native AGP chip, but use native PCI-E chip with an "PCI-E to AGP Bridge" to become AGP interface.
Please set "AGP P2P Deep Fifo" to [Enable] in the BIOS. (Advanced>Chipset Settings>AGP P2P Deep Fifo)
It may need to upgrade the BIOS for this option:
Q (183):
My system is based on 775Dual-VSTA / ALiveSATA2-GLAN / AM2V890-VSTA with Windows® XP / Windows® 2000 operating system. After updating to the latest BIOS, I found two issues.
1.I can't find the "HD Audio Driver and Application" link in the menu of support CD.
2.There is a yellow exclamation mark in Device Manager.
What could I do?(9/19/2006)
A:1.If your CD is IVD12/ IVD12b (775Dual-VSTA), AV890-10 (ALiveSATA2-GLAN) or AV31/ AV31b (AM2V890-VSTA), you will get the issue.
Please execute the "Setup.exe" file from following directory of support CD.
775Dual-VISTA-> IVD12
CD\Drivers\Audio\REALTEK\MCE_XP_2K (R1.36)\
775Dual-VISTA->IVD12b
CD\Drivers\Audio/ REALTEK\MCE_XP_2K (R1.41)\
ALiveSATA2-GLAN -> AV890-10
CD\Drivers\Audio\REALTEK\MCE_XP_2K (R1.39)\
AM2V890-VSTA -> AV31/ AV31b
CD\Drivers\Audio\REALTEK\MCE_XP_2K (R1.39)\
2:The yellow exclamation mark in Device Manager is unnecessary. It will not affect the system at all. Please follow below steps to remove it.
Right-click "My Computer" on your desktop, and click "Properties".
Select "Hardware", and click "Device Manager".
In "Device Manager", double-click the option "System Devices". You will find "VIA® Standard PCI to PCIE Bridge" item with a yellow exclamation mark.
Right-click "VIA® Standard PCI to PCIE Bridge", and select "Uninstall". Confirm your choice by clicking "OK".
After a few seconds, click "Scan for hardware changes" icon on the top.
Q (182):
I'm using the Core 2 Duo E6XXX CPU and DDRII 533/667 RAM on 775Dual-VSTA motherboard. But the system is very unstable. Sometimes it gets blue screen or fail when installing the Windows® XP or some applications. How do I fix this problem?(9/19/2006)
A:Please refer to following steps to fix this problem.
Please set the "DRAM Frequency" as "[333MHz (DDRII 667)]" in BIOS setup if you use DDRII 667 RAM. (BIOS/ Advanced/ Chipset Configuration/ DRAM Frequency)
Please enable the "Flexibility Option" in BIOS setup if you use DDRII 533 RAM. (BIOS/ Advanced/ Chipset Configuration/ Flexibility Option)
If the problem still remains, please update the BIOS to P1.80 or later version.
https://www.asrock.com/mb/download.asp?Model=775Dual-VSTA#bios
Q (181):
What key should I press to enter into BIOS setup? What key should I press to enter into boot menu?(8/18/2006)
A:To enter BIOS setup, please press "F2" repeatedly right after you turn on the computer until system goes into BIOS setup.
If you want to enter into boot menu, please press "F11"
Q (180):
When I use Maxtor Diamond Max 17 SATAII HDD to install Windows® XP on 775i65GV / 775i65G / P4i65G / ConRoe865PE / ConRoe865GV, the first screen of Windows® XP installation takes long time and system hang up at partition HDD stage. What could I do?(8/18/2006)
A:You could refer to the following steps for try.
1. Enter the BIOS and Load BIOS default setting (F9).
2. Disable "Spread Spectrum" option. BIOS -> Advanced -> CPU configuration -> Spread Spectrum -> Disable.
3. Save changes and Exit BIOS (F10).
Q (179):
My motherboard is AM2XLI-eSATA2. How do I install Windows® XP on SATA HDD in AHCI mode?(8/18/2006)
A:You need to make a SATA driver diskette before you start the OS installation. Please refer to the following steps:
Enter "SATA Operation Mode" in BIOS setup to set the option to [RAID].
Insert the ASRock Support CD into your optical drive to boot your system.
During POST at the beginning of system boot-up, press key, and then a window for boot devices selection appears. Please select CDROM as the boot device.
When you see the message on the screen, "Do you want to generate Serial ATA driver diskette [YN]?", press .
Then you will see these messages, Please insert a diskette into the floppy drive.
WARNING! Formatting the floppy diskette will lose ALL data in it!
Start to format and copy files [YN]?
Please insert a floppy diskette into the floppy drive, and press .
The system will start to format the floppy diskette and copy SATA drivers into the floppy diskette.
Restart and enter "SATA Operation Mode" in BIOS setup to set the option to [AHCI].
At the beginning of Windows® setup, press F6 to install a third-party SCSI or RAID driver. When prompted, insert a floppy disk containing the ULi® RAID driver. After reading the floppy disk, the driver will be presented. Select the driver to install according to the mode you choose and the OS you install.
Q (177):
I'm using a SATA HDD. My computer was running fine. But one day I turn on my computer, it keeps restarting itself after Windows® Logo page (at startup). Do you have any idea what possibility causes this?(7/21/2006)
A:This may be that your system was installed in IDE (or non-RAID) mode. But now it is set to RAID (AHCI) Mode. Please try to set it back to the IDE (non-RAID) mode in the BIOS>Advanced>IDE Configuration.
Here are some examples, please refer to the user manual for details.
VIA® and Nvidia chipset:
Please set SATA Operation Mode to [non-RAID]
Intel® Chipset:
Please set Configure SATA as [IDE]
775Twins-HDTV (R2.0) or P4Twins-HDTV:
Please set ATA Combination Mode to [Enable]
Q (176):
I use 775VM800/P4VM800/K7S41GX/K7S41 motherboards. Do these models support 1440x900 resolution?(7/21/2006)
A:If your board is 775VM800, please update BIOS to P1.50 or later version.
https://www.asrock.com/mb/download.asp?Model=775VM800
If your board is P4VM800, please update BIOS to P1.60 or later version.
https://www.asrock.com/mb/download.asp?Model=P4VM800
If your board is K7S41GX, Please update BIOS to P2.50 or later and VGA driver to 3.73 or later version.
https://www.asrock.com/mb/download.asp?Model=K7S41GX&s=462
If your board is K7S41, Please update BIOS to P2.30 or later and VGA driver to 3.73 or later version.
https://www.asrock.com/mb/download.asp?Model=K7S41&s=462
VGA Driver for K7S41 / K7S41GX: http://www.sis.com/download/agreement.php?id=155931
Q (175):
How do I use 4 SATA HDDs to build system in RAID0 mode on K8SLI-eSATA2, 939SLI-eSATA2 and 939SLI32-eSATA2?(5/24/2006)
A:If you want to build a system in RAID 0 mode with 4 SATA HDDs, please follow below steps:
1.Enter the BIOS and set "SATA Operation Mode" to RAID mode.
BIOS -> Advance -> IDE Configuration -> SATA Operation Mode -> RAID
2.Set "eSATAII Support" to Disable.
BIOS -> Advance -> IDE Configuration -> eSATAII Support -> Disable
3.Press "F10" to save and exit.
4.When you boot up system, press "CTRL+ A" to go into ULI RAID Utility screen, and choose "Create RAID 0 Stripe X4 for Performance" option to build a RAID system with 4 SATA HDDs.
You could refer BIOS SETUP UTILITY of user manual to adjust BIOS setting.
K8SLI-eSATA2 user manual page 42.
https://download.asrock.com/Manual/K8SLI-eSATA2.pdf
939SLI-eSATA2 user manual page 43.
https://download.asrock.com/Manual/939SLI-eSATA2.pdf
939SLI32-eSATA2 user manual page 41.
https://download.asrock.com/Manual/939SLI32-eSATA2.pdf
Q (174):
If I use Conroe 1066-CPU on 775Dual-VSTA. What kind of memory should I use?(5/24/2006)
A:If the BIOS version is P1.00, we recommend to use DDR400 and DDRII667 memory module; however, BIOS version is P1.10 and later can support DDR400, DDRII533 and DDRII667, so if you will use DDRII533 modules on your system, we suggest you update bios to P1.10 or later version.
https://www.asrock.com/mb/download.asp?Model=775Dual-VSTA#bios
Q (173):
How do I enable Intel® Matrix Storage Manager on 775XFire-eSATA2 and 775XFire-RAID?(4/21/2006)
A:In order to enable Intel® Matrix Storage Manager, please refer to the following steps:
Enter into BIOS to set your SATA hard disk in AHCI mode or RAID mode.
(BIOS->Advance->IDE Configuration ->Configure SATA as-> [ AHCI or RAID] )
Make a SATA driver diskette with support CD before installing your system.
Please press "F6" to load Intel® SATA driver during operating system setup.
Please refer to Setting Up a "RAID Ready" System of User Manual of Support CD. (...\Information\Manual\User\)
Install the SATA2 Driver from support CD after the installation of Windows® 2000 / Windows® XP / Windows® XP 64-bit OS.
Q (170):
When I use DDR 400 (200 MHz) memory on my board, it shows that the DRAM frequency is running at DDR 333 (166MHz) in BIOS main page. The BIOS option "DRAM Frequency" is set at default setting "Auto". Why?(4/21/2006)
A:In order to get the best system compatibility and stability, we make it to run at DDR 333 (166MHz) when DDR 400 (200MHz) memory is installed and BIOS option "DRAM Frequency" is selected to "Auto". If you want to run DDR 400 (200MHz), please kindly adjust the BIOS option "DRAM Frequency" to DDR 400 (200 MHz) manually.
Q (167):
I installed a SATA hard disk and a CD/DVD drive on 775Twins-HDTV/P4Twins-HDTV, connected the hard disk to SATA1 connector and the CD/DVD to IDE1. Enabled "ATA Combination Mode" in BIOS settings. But the motherboard could not detect the CD/DVD drive. Why?(3/20/2006)
A:Please connect SATA hard disk to SATA1 connector and CD/DVD drive to IDE2. When you enable "ATA Combination Mode", only SATA1 and IDE2 connectors can work, other connectors are disabled. We recommend you to disable "ATA Combination Mode". In that case all 4 SATA and 2 IDE channel can work, and you can get the advantages of SATA hard disks.
Q (168):
My motherboard is 775XFire-RAID, its SATA controller is in Intel® ICH6R. But when I install windows 2000/XP and press F6 to load the SATA driver diskette, I cannot see the items for ICH6R. What should I do?(3/20/2006)
A:Please press "↓" to expend the menu. The items of ICH6R are under the items of ICH7R. Please choose RAID or AHCI that correspond with the item "Configure SATA as" in BIOS settings.
Q (164):
If I use AC'97 front audio panel with, how do I connect to the High Definition Audio header on the motherboard and get front audio work?(2/17/2006)
A:If you use AC'97 audio panel, please install it to the front panel audio header as below:
A. Connect Mic_IN (MIC) to MIC2_L.
B. Connect Audio_R (RIN) to OUT2_R and Audio_L (LIN) to OUT2_L.
C. Connect Ground (GND) to Ground (GND).
D. MIC_RET and OUT_RET are for HD audio panel only. You don't need to connect them for AC'97 audio panel.
E. Enter BIOS Setup Utility. Enter Advanced Settings, and then select Chipset Configuration. Set the Front Panel Control option from [Auto] to [Enabled]. For Windows® XP
F. Enter Windows® system. Click the icon on the lower right hand taskbar to enter Realtek HD Audio Manager. Click "Audio I/O", select "Connector Settings", choose "Disable front panel jack detection", and save the change by clicking "OK". For Windows® Vista™
F. Enter Windows® system, 1: Double click the icon on the lower right hand taskbar to enter Realtek HD Audio Manager. 2: Click the "Folder" icon at the top-right corner. 3. Check "Disable front panel jack detection". 4. Click "OK".
(Please refer to the following picture)
G. To activate the front mic: For Windows® XP:
Please select the Front Mic as default record device in No. 1.
If you want to hear your voice through Front Mic, please deselect "Mute" in No. 2 For Windows® Vista™:
1.Go to the "FrontMic" Tab in the Realtek Control panel.
Click "Set Default Device" to make the Front Mic as the default record device.
Q (156):
I am a K8NF4G-SATA2 / 939NF4G-SATA2 user. Is it possible that I can adjust the onboard VGA shared memory to 256MB?(11/18/2005)
A:In BIOS SETUP, the Maximum onboard VGA shared memory option is 128MB. If you want to set it to 256MB, please install 512MB or greater system memory and set the onboard VGA option to "Auto" in BIOS SETUP. Then the VGA driver will dynamically allocate the shared memory size to 256MB.
Q (155):
When I play media files with SATA hard disk on 939A8X-M / K8A8X-M / K8Upgrade-1689 / K8COMBO-Z, the screen lags and the sound also becomes abnormal. How should I fix this problem?(11/18/2005)
A:Please install the ULi SATA RAID drivers. Even you set non-RAID mode in BIOS and install OS successfully, please still install the Uli SATA RAID driver to get better performance on SATA devices.
Q (157):
I installed a Windows XP operating system for 775Twins-HDTV in my SATA HDD. I want to duplicate my SATA HDD to another new SATA HDD by using GHOST program. After finished, the new duplicated SATA HDD cannot boot up. What should I do?(11/18/2005)
A:We recommend you to install Windows XP on your original SATA HDD again and install the SATA drivers at the beginning of Windows XP installation. Please refer to the following steps:
Step 1: Please go to BIOS to disable the "ATA Combination Mode", or you can reserve it as default value. (BIOS/ Advanced/ IDE Configuration/ ATA Combination Mode/ Disabled)
Step 2: Please press "F6" to install SATA drivers at the beginning of the Windows XP installation.
Step 3: Install the SATA drivers. (Please make a SATA Driver Diskette at first. Please refer to the 775Twins-HDTV user manual page 25.)
Step 4: Start to install the operating system.
Step 5: After finished the Windows XP installation, we recommend you to install the SATA driver from support CD.
Step 6: Now, you can start to duplicate the HDD by using GHOST program.
Q (152):
How do I use "Boot from Network" function on ASRock motherboard?(10/17/2005)
A:Please press F2 when power on, enter the BIOS setting menu. Select the screen "Boot". Go to the sub screen "Boot settings Configuration". Set the item "Boot From Network" to "Enable". Press F10 to save the setting and reboot.
After restart, press F11 and select Network as the boot device. Or press F2 and enter the sub screen "Boot Device Priority" in BIOS "Boot" screen to change the boot priority of Network.
Q (151):
I use an AMD Sempron 2500+ 64bit CPU with K8Upgrade NF3/ K8 Combo-Z/ K8Upgrade-VM800/ K8Upgrade-PCIE/ K8Upgrade-1689/ K8A8X-M motherboard. According to the specification of the boards, it supports CPU Vcore adjustment and CPU multiplier setting functions. However, the "Processor Voltage" and "Processor Multiplier" options are showed as gray in BIOS, I can't change it. Why?(9/20/2005)
A:According to AMD CPU specification, some of AMD 754 pin Sempron 64bit rev. E CPUs (e.g. Sempron 64bit 2500+, 2600+ and 2800+) have only one allowable state on CPU Vcore, so if user plugs in this kind of CPU, the "Processor Voltage" and "Processor Multiplier" options will be shown as gray and cannot be adjusted in BIOS.
Q (146):
I would like to install Red Hat Linux 9.0 on my VIA 8237/8237R based motherboards. But after I finished the installation of Red Hat Linux 9.0, it hung with kernel panic during boot-up. The error message is shown as below:
How do I fix this problem?(7/15/2005)
A:Please add VIA vmlinuz-2.4.20-8-IDE patch to Linux kernel by following steps.
First, copy the patched kernel (vmlinuz-2.4.20-8-ide) into floppy disk. Then, select one of the cases applies to your situation below.
(a)Clean install the Red Hat Linux 9.0.
Before exiting the installation of Red Hat Linux 9.0, press ++ to enter console mode. Then skip the case (b) to proceed.
(b)Use the kernel in existing Red Hat Linux 9.0 system.
Make sure the first boot device is CD_ROM in your system BIOS, then put the installation CD 1 into CD-ROM. When booting the installation CD, type the following command when the "boot:" message appears on the screen.
linux rescue /* press enter */
Then follow the instructions, and select the partition that the existing Red Hat Linux 9.0 is located in the "system to rescue" window. Then it will enter the console mode after a while.
Console mode:
After entering the console mode, run the following commands.
# cd /mnt/sysimage /* press enter */
# mount /dev/fdo mnt /* after type this command, insert the floppy and press "enter" */
# cp mnt/vmlinuz-2.4.20-8-ide boot/ /* reading the floppy for a while */
# vi boot/grub/menu.lst /* press enter and it will enter /mnt/sysimage/boot/grub/menu.lst file */
Under /mnt/sysimage/boot/grub/menu.lst file press "A" to enter insert mode.
Add the following lines into /mnt/sysimage/boot/grub/menu.lst file.
title Red Hat Linux (2.4.20-8) IDE-patched /* press enter */
root (hd0,0) /* press enter */
kernel /vmlinuz-2.4.20-8-ide ro root=LABEL=/ /* press enter */
initrd /initrd-2.4.20-8.img /* press Esc to leave insert mode */
Press Esc to leave insert mode and type the command below.
:w! /* press enter to save file */
It will appear the message "boot/grub/menu.lst" 24L, 802C
Then, reboot system and enter the "Red Hat Linux (2.4.20-8) IDE-patched" kernel. The problem would not happen again.
Q (144):
I am using AMD FSB 200Mhz CPU on K7VT4A PRO, I cannot set my DDR333/ DDR400 memory to DDR333/ DDR400 under BIOS setting. Why?(6/23/2005)
A:For K7VT4A PRO, if you are running with FSB 200 MHz CPU, DDR SDRAM supports 266Mhz only. So you are not able to change the memory speed under BIOS setting.
Q (143):
I have a P4i65PE motherboard. The SPEC of P4i65PE supports "Bypass Access Technology (BAT)" on ASRock website. How do I get this function to work?(6/23/2005)
A:If you want to use Bypass Access Technology, the configuration of your system has to conform to the following conditions:
1.FSB 800 CPU
2.DDR 400 memory
3.BIOS version P1.10 or higher
Please refer to our website to download the BIOS.
https://www.asrock.com/mb/download.asp?Model=P4i65PE
If your configuration conforms to these conditions, please enter BIOS setup => Advanced => Chipset Configuration to enable "Bypass Access".
Q (142):
I used Sempron 2600+/2800+ CPU with K8Upgrade-760GX / K8Combo-Z. The specification of the boards can support CPU Vcore adjustment and CPU multiplier setting functions. But in the BIOS setting, this option is showed as gray and can not change the setting. Why?(6/23/2005)
A:We found some of Sempron 2600+/2800+ which lock the Vcore and multiplier. It is not able to change the CPU setting even we have the option in BIOS. Please leave this option as default setting.
Q (139):
I am going to use K8 Combo-Z / 939A8X-M / K8Upgrade-1689 / K8A8X-M to build up my system. I found that there is a new option "SATA Operation Mode" was added in the latest production BIOS. What is the option for? How should I set it?(5/15/2005)
A:The "SATA Operation Mode" provides two choices to install OS on the SATA hard disk.
There are two options for "SATA Operation Mode": RAID (Default) and non-RAID.
a. When choosing "RAID" mode, you have to create a SATA floppy image diskette by the support CD and press "F6" to install SATA driver at the beginning of Windows XP/2000 installation.
If you want to install Windows XP/2000 on the SATA hard disk and also want to use RAID function, please set the option to "RAID".
If you want to install Windows 98SE/ME on the SATA hard disk, please set the option to "RAID". Please also install the latest LAN driver (3.10a or newer version) for your new system.
b. When choosing "non-RAID" mode, it is not necessary to create a SATA floppy image diskette by the support CD nor press "F6" to install SATA driver at the beginning of Windows XP/2000 installation.
It is also convenient for users who do not have floppy drive.
If you want to install Windows XP/2000 on the SATA hard disk but do not want to use RAID function, please set the option to "non-RAID".
Q (140):
I am a K8Upgrade-VM800 / P4VM8 / 775VM8 / P4V88+ / 775V88+ user. I found that a new option "SATA Operation Mode" was added in the latest production BIOS. What is the option for? How should I set it?(5/15/2005)
A:The "SATA Operation Mode" provides two choices to install OS on the SATA hard disk.
There are two options for "SATA Operation Mode": RAID (Default) and non-RAID.
a. When choosing "RAID" mode, you have to create a SATA floppy image diskette by the support CD and press "F6" to install SATA driver at the beginning of Windows XP/2000 installation.
If you want to install Windows XP/2000 on the SATA hard disk and also want to use RAID function, please set the option to "RAID".
If you want to install Windows 98SE/Me on the SATA hard disk, please set the option to "RAID".
b. When choosing "non-RAID" mode, it is not necessary to create a SATA floppy image diskette by the support CD nor press "F6" to install SATA driver at the beginning of Windows XP/2000 installation.
It is also convenient for users who do not have floppy drive.
If you want to install Windows XP/2000 on the SATA hard disk but do not want to use RAID function, please set the option to "non-RAID".
Q (138):
My Windows® 98SE / ME system is built by K8 Combo-Z / 939A8X-M / K8Upgrade-1689 / K8A8X-M. I found the latest released BIOS which was added a new option-SATA Operation Mode. Can I use the BIOS for my system?(5/15/2005)
A:Before flashing to the latest BIOS, please update your LAN driver to the latest one (3.10a or newer version). Please refer to our download site to find the latest LAN driver.
https://www.asrock.com/support/download.asp
Q (126):
I am a P4i48 user. After I installed Intel INF driver and restarted the system, it could not enter into OS. Why?(2/18/2005)
A:Please make sure that the "Floppy Drive" option which in the BIOS SETUP is not set to "Not Install". Doing so may cause the system cannot enter into OS after Intel INF driver installation.
If you want to disable floppy drive in the BIOS SETUP, please disable "Floppy Controller" at the same time to prevent the problem.
Q (125):
I want to install Linux Red Hat 9.0 with HT CPU on my P4i65GV. After installation completed and entered into OS, there are two kinds of OS for choosing: 2.4.20-8smp, and 2.4.20-8. When entering into OS 2.4.20-8smp and selecting shut down, it will not shut down properly. How should I solve the problem?(1/18/2005)
A:All ASRock motherboards support ACPI. Since Red Hat 9.0 is APM mode O/S, please refer to https://www.asrock.com/support/Download/P4i65GV.asp to download special BIOS which supports APM. After special BIOS updated, please type the command "Linux apm=power_off" at the beginning of Linux Red Hat 9.0 installation.
Q (124):
If I use only one 128MB memory on the ASRock board with integrated VGA (ex. K7VM3, K7S41/GX, etc...), what share memory size should I choose?(1/18/2005)
A:Since the share memory uses the system memory, for better system performance, we recommend you to set share memory size to 32MB or less in the BIOS setting. (For Intel chipset based motherboards, please refer to TSD-QA-08 (June, 13th, 2003) https://www.asrock.com/support/QA/TSDQA-08.pdf)
Q (123):
If I use a SATA HDD and an IDE HDD together on P4i65GV, how do I boot from SATA HDD?(1/18/2005)
A:If you connect SATA HDD and IDE HDD together on P4i65GV, you will see an item of the BIOS setting- Hard Disk Drives (please refer to the following pictures).
Please entry the setting, choose your SATA drive as the "1st Drive" and then press "F10" to save the setting and exit.
Q (122):
My hard drives are Maxtor Diamond MAX 10 and MaxLine III SATA 250 GB and 300 GB with 16 MB cache buffer. My hard drives can not be detected correctly during the POST, what can I do?(1/18/2005)
A:Please update to the newest BIOS of motherboard. If you still encounter problem, please contact Maxtor and update to the newest firmware of hard drives.
Q (121):
I used Prescott CPU and P4i45GV/P4i65GV. I wanted to use NT4.0, but the installation can not be completed. What should I do?(12/15/2004)
A:For Prescott CPU, some OSes (ex.NT4.0) can not be installed. In order to boot legacy OSes that cannot support CPUs with extended CPUID functions, please flash to the latest BIOS to enable "Max CPUID Value Limit" (Advanced => CPU Configuration)
We don't provide drivers for NT4.0. If you need drivers for NT 4.0, please refer to following websites to get them.
VGA driver for P4I45GV/P4I65GV: http://downloadcenter.intel.com/
Q (115):
My motherboard is K7S41(GX), what should I set in the BIOS setup to use the on-board VGA with a PCI VGA card for dual monitors function?(10/15/2004)
A:To use on-board VGA with a PCI VGA card for dual monitors function, please enter the "Advanced" -> "Chipset Configuration" -> "Onboard Share memory" and adjust "Auto" to any other values (32MB, 64 MB, or 128 MB) in the BIOS setup.
Q (112):
My ASRock motherboard supports Hybrid Booster. Is Hybrid Booster a utility to install? Where can I get it?(9/14/2004)
A:The Hybrid Booster features supported on each models are a little different.
Please go to https://www.asrock.com/mb/index.asp and find the specification of your motherboard and check the exact features supported.
Actually, Hybrid Booster is a combination of several features which have already been provided with the motherboards.
1. CPU Multiplier: Adjusted by setting onboard FID jumpers.
2. CPU Vcore adjustment: Adjusted by setting BIOS setup option.
3. CPU Frequency Stepless control: Adjusted by setting BIOS setup option.
4. AGP/PCI Frequency control: Adjusted by setting BIOS setup option.
5. ASRock U-COP: Hardware feature, no need to be adjusted.
6. Boot Failure Guard: BIOS feature, no need to be adjusted.
Please refer to https://www.asrock.com/feature/HybridBooster/HybridBooster.html for detailed explanations.
Q (111):
I use 3.2G/3.4GHz CPU on P4i65GV / P4i48 / 775i65GV. But CPU speed shows 2.8G? How do I fix it?(9/14/2004)
A:Because you use the new CPU and it is necessary to update the microcode for CPU support. Please update to the latest BIOS.
https://www.asrock.com/mb/download.asp?Model=P4i65GV#bios
https://www.asrock.com/mb/download.asp?Model=P4i48#bios
https://www.asrock.com/mb/download.asp?Model=775i65GV#bios
Q (109):
My motherboard is K7S8X. I can't format my Samsung hard drive and install OS. What should I do?(8/16/2004)
A:Please try to update latest BIOS for K7S8X first and then go to BIOS SETUP -> Advanced -> Chipset Configuration -> IDE Driving. Please try to adjust the option.
Q (106):
Does my ASRock K7 motherboard, which supports Athlon XP FSB 333 MHz CPU, support AMD® Sempron CPU?(8/16/2004)
A:Yes, all ASRock motherboards, which support Athlon XP FSB 333 MHz CPU, would support AMD® Sempron CPU by updating the BIOS. Also ASRock K8S8X motherboard would support AMD® Sempron CPU by updating the BIOS. Please refer to ASRock web site for more information. https://www.asrock.com/support/CPU.asp
Q (105):
I have an ASRock INTEL ICH5 south bridge based motherboard (P4i65GV, P4i48..). In BIOS setup---IDE Configuration---Onboard IDE Operate Mode, there are two options "Enhanced Mode" and "Compatible Mode". Which one should I select? What is the difference between them?(7/12/2004)
A:Please select [Compatible Mode] if you are using legacy OS (Windows ME / 98SE) with both IDE and SATA devices. If you are using legacy OS (Windows ME / 98SE) with IDE device only, please select [Enhanced Mode]. If native OS (Windows 2000 / XP) is used, please select [Enhanced Mode] no matter you are using either IDE and SATA devices or IDE device only.
When [Enhanced Mode] is selected, the next option will be "OnBoard IDE Controller".
You may enable either the primary IDE channel or the secondary IDE channel. Or you may enable both the primary and the secondary IDE channels by selecting [Both]. Set to [Disabled] will disable the both. Configuration options: [Disabled], [Primary], [Secondary], [Both].
When [Compatible Mode] is selected, the next option will be "Combined Mode Option".
It allows you to select between [Pri IDE + SATA] and [SATA + Sec IDE]. If it is set to [Pri IDE + SATA], then the secondary IDE will not work. Likewise, if it is set to [SATA + Sec IDE], then the primary IDE will not work.
Q (104):
My motherboard is K7S8X. When I connect my HDD on primary IDE with jumper setting at master and AOpen DVD\CD-RW combo drive on primary IDE with jumper setting at slave, it takes more than 1 minute to login Windows XP. How can I solve this problem?(7/12/2004)
A:To solve this issue, please connect the HDD on primary IDE with jumper setting at master and AOpen DVD\CD-RW combo drive on secondary IDE with jumper setting at master. Or you can update the motherboard's BIOS to version 2.40 or later to solve this https://www.asrock.com/mb/download.asp?Model=K7S8X#bios
Q (99):
I have installed 1 SATA HDD and 1 IDE HDD (or SCSI card with SCSI HDD) on my P4i48 motherboard, how can I select IDE HDD (or SCSI HDD) in the Boot Device Priority?(6/11/2004)
A:If you would like to select IDE HDD in the Boot Device Priority menu, please set the IDE HDD to the first device of boot sequence in the Hard Disk Drives menu first.
AMI core 8 based BIOS would separate connected bootable devices into 3 groups, Hard Disk, Removable, and CD/DVD drives. Only first boot sequence of device in each group can be selected in the Boot Device Priority menu.
Q (91):
I bought a new large size (80GB) HDD. After I installed it to my ASRock M/B, the BIOS only recognized it as a 32GB HDD. How can I get the full capacity of the HDD?(4/15/2004)
A:Please understand that most HDDs provide a jumper setting that will limit the maximum capacity, such as 32GB or 2GB. Please kindly double check the jumper setting of your HDD, and adjust the jumper setting to the correct position instead of the "Limit drive capacity" position.
Q (89):
My on-board LAN is not working, I found that the MAC address of my on-board LAN is 00-00-00-00-00-00 or FF-FF-FF-FF-FF-FF. What's wrong?(4/15/2004)
A:The MAC address of the on-board LAN is erased. After updating the BIOS or clearing the CMOS, please boot up the system and enter the BIOS setup. After loading the BIOS default, please exit and save changes. Failing to do so may cause the MAC address disappeared. If the MAC address is gone, please contact ASRock technical support engineer for help. ( https://www.asrock.com/general/about.asp?cat=Contact )
Q (88):
My motherboard is P4S61. If I connect the hard drive and non-UDMA CD-ROM on the same IDE channel, I can not install Windows® XP. What can I do?(3/15/2004)
A:Please try the latest BIOS from https://www.asrock.com/mb/download.asp?Model=P4S61&s=478 or connect the hard drive and CD-ROM to two different IDE channels.
Q (86):
My motherboard is Intel or ALi south bridge based motherboard. When I connect the ATX power connector to the motherboard, the system power on right away. Why?(3/15/2004)
A:This issue will happen if CMOS checksum is bad. Please enter the BIOS setup then load BIOS default setting to solve this issue.
Q (84):
My motherboard is K7S8XE, what is the function of USB 2.0 controller option in the BIOS setup?(2/17/2004)
A:If USB 2.0 controller is disabled, the USB controller will be 1.1 only. We realized that some USB devices, especially external USB box of hard disk drive, are over the USB 2.0 specification and it may not be recognized in the Windows OS. Under this situation, please disable the USB 2.0 controller.
Q (80):
My motherboard is K7S8X R 3.0. How much Vcore voltage would be increased if I enable "Over Vcore Voltage" in the BIOS setup?(1/14/2004)
A:If the "Over Vcore Voltage" is enabled in the BIOS setup, the Vcore voltage would be increased by 5 %.
Q (79):
My motherboard is K7S8XE+. There are error messages appeared when I am making the SATA driver diskette. What should I do?(1/14/2004)
A:If you have trouble to make this floppy disk, you can follow the instructions below to solve the problem.
1, Please update BIOS to P1.50 or higher version. You can find the latest BIOS version on our website: https://www.asrock.com/mb/download.asp?Model=K7S8XE%2b&s=462
2, Please connect a hard disk drive to your system when making this floppy disk.
3, Please do not use Mitsumi 48A0W CD drive or Mitsumi 5600W CD drive on your system when making this floppy disk. However, you can use them on your system after you finish making this floppy disk.
Q (78):
In GE Pro-M2 latest BIOS advanced menu, there is one option named "Flexibility". What's the function?(1/14/2004)
A:The default value of this option is "Disabled". It allows better tolerance for memory compatibility when it is set to "Enabled".
ASRock also offers the hot key "Home" to enable Flexibility. Before the system boot up, please keep pressing hot key "Home" first, then push the power button to boot the system up. When the POST screen appears, the function "Flexibility" is enabled.
Q (75):
My parallel port printer can't work normally with my ASRock motherboard. What should I do now?(12/12/2003)
A:Please try to go to BIOS SETUP -> Advanced menu -> Peripheral Configuration -> Parallel Port Mode, and set it to "Normal".
Q (74):
I'm using an add-on LAN card on my ASRock motherboard. The LAN card provides a "Wake On LAN" connector with a cable. Is there a connector on the motherboard so that I can plug this cable?(12/12/2003)
A:There's no need to connect this cable to the motherboard and you are still able to use the "Wake On LAN" feature with the add-on LAN card. To use it, please remember to enable the "PCI Device Power On" option in BIOS.
Q (68):
My motherboard is SiS chipset based K7S8XE, why my USB 2.0 hard disk box can not be recognized under Windows XP?(11/14/2003)
A:We have experienced that some USB 2.0 boxes may not conscientiously follow the USB 2.0 specification to design, so it cannot operate properly with USB 2.0 specification. Please update the newest BIOS, and then disable the USB 2.0 controller in the BIOS SETUP. At this moment, the USB 2.0 box may have chance to operate with USB 1.1 specification.
Q (69):
In the beginning of P4VT8 SATA driver diskette creating process, my USB keyboard seems doesn't work. What should I do?(11/14/2003)
A:In order to fix this problem, please go to BIOS SETUP -> Advanced menu -> Chipset Configuration -> USB Device Legacy Support and set it to "Enable". For best system stability, please set it back to "Disable" after the SATA driver diskette creating process.
Q (70):
When I try to create my K7S8XE+ SATA driver diskette and boot up with the driver CD, the system locks up. What should I do now?(11/14/2003)
A:Before the SATA driver diskette creating process, please go to BIOS SETUP -> Advanced menu -> Peripheral Configuration -> Onboard SATA and set it to "Disable".
After the driver diskette creating process completed, please set Onboard SATA back to "Enable" in the BIOS.
Q (63):
When I was installing the Windows 98SE on K7VT4-4X motherboard, the H/W info error message appeared while last 3 minutes of installation, what should I do?(10/15/2003)
A:Please make sure the year is correctly set in BIOS setup. For example: year 2003.
Q (62):
I'm using an ASRock motherboard which supports Hyper-Threading technology. How come there is no Hyper-Threading technology option in BIOS setup?(10/15/2003)
A:The Hyper-Threading technology option in BIOS will appear only when a Hyper-Threading technology CPU is installed.
Q (59):
I'm using an AGP 8X card to replace the old AGP 4X card on P4VX4. In the BIOS, I can see AGP mode icon when the AGP 4X card is installed. But there is no AGP mode option when AGP 8X card is installed. Why?(9/15/2003)
A:When an AGP 8X card is detected, the system will run at AGP 8X automatically. At this moment, the AGP mode option is not provided.
Q (58):
When I run the "GHOST" program on my K7S8X, the speed of "GHOST" seems slower than others. How could I improve it?(9/15/2003)
A:Please set "PCI IDE BusMaster" to "Enable" in the BIOS SETUP IDE Devices menu, thanks.
Q (52):
What is Boot Failure Guard (B.F.G)? How do I enable this function?(8/15/2003)
A:It is an ASRock new technology. While the system could not boot up normally at overclocking setting, the safe boot up mode will be issued from B.F.G and provides a BIOS setting interface for parameter reset/correction.
You don't need to adjust any setting to enable B.F.G. It is a basic function for ASRock motherboard.
Q (46):
How could I use Wake on LAN function?(7/9/2003)
A:All of ASRock motherboards support Wake on LAN. Please enable the "PCI Device Power On" in the Power menu of BIOS. After saving the changes and exit the BIOS, please boot into the Windows OS then shut down the system.
Now, the system is ready to be woken up through LAN by other computers.
Q (45):
I'm using ASRock motherboard. In the BIOS, I found that the Vcore is a little bit higher. Is this normal?(7/9/2003)
A:The value is still in tolerance of the CPU SPEC. It's more stable to set the Vcore a little higher under CPU SPEC. Please do not worry about it.
Q (44):
When I manually increase CPU host frequency in the BIOS on K7S8X(E), will AGP and PCI speed up at the same time?(7/9/2003)
A:When CPU host frequency is increased, BIOS will automatically run the AGP/PCI frequency around 66/33MHz. Therefore, AGP card and PCI devices can work under SPEC even CPU frequency is set to perform over clocking.
Q (41):
I found two digits or letters changing at the right bottom corner during POST screen. What is it?(6/13/2003)
A:This is the BIOS POST code. It represents each step BIOS does during POST screen.
Q (39):
When I use ASRock P4i45G(L) M/B, I see there is 1MB shared memory from the system memory shown in the POST screen during boot process. What is the 1MB shared memory used for? (6/13/2003)
A:The 1MB memory is used for VGA BIOS (before loading OS).
A:Please unplug the ATX power and remove the battery, use a metal material like paper clip to short the CLRCMOS1 soldering points or CLRCMOS2 jumpers for 3 seconds. After that, install the battery and plug the ATX power back to the motherboard.
Note: Please do not clear the CMOS right after you update the BIOS.
Q (38):
How do I get the correct CPU speed after updating the BIOS?(6/13/2003)
A:After updating the BIOS, the default of BIOS will be loaded with stable setting and the system runs with slower speed to secure the first boot runs successfully. In order to make your system running with the optimum setting, please remember to load turbo/default setting after you update the BIOS.
Q (29):
K7S8X supports AGP 8X, but why can't I adjust to AGP 8X mode in BIOS?(4/15/2003)
A:Please install an AGP 8X card first. The AGP 8X option will be available only when an AGP 8X card is installed.
Q (25):
Sometimes I cannot boot up from my floppy disk, Why?(4/15/2003)
A:Please try to enable the "Floppy Seek" in the BIOS utility.
Q (23):
Where can I get the detailed BIOS setting description?(3/3/2003)
A:You can find the detailed user manual and BIOS setting description in ASRock support CD.
Q (20):
After I updated BIOS, ASRock LOGO disappeared when booting up. Why?(3/3/2003)
A:Please don't worried! ASRock has removed LOGO in the new BIOS for all ASRock model. It is normal that ASRock LOGO disappeared after flashing BIOS.
Q (17):
Should I clear the CMOS after I upgrade the BIOS?(1/30/2003)
A:If your system is running fine, you do not have to clear the CMOS. Also please do not clear the CMOS right after you upgrade the BIOS. After upgrading the BIOS, please reboot your system once then you can clear the CMOS if you need to do it.
Q (16):
How can I set CPU FSB (Front Side Bus) correctly?(1/30/2003)
A:For Intel CPU: You do not need to do any setting. When you install CPU at the first time, all that you need to do is go to BIOS and "Load setup defaults", then the system will auto detect the correct CPU FSB.
For K7VT2 and K7VM2: There is a FSB_SEL jumper on the motherboard .
FSB 100Mhz set 2-3
FSB 133Mhz set 1-2
Q (15):
When I want to install an add-on AGP graphics card, do I need to adjust any settings in the BIOS if my motherboard has Onboard VGA?(1/30/2003)
A:No! You do not need to adjust any settings in the BIOS. ASRock motherboard will switch between add-on AGP and Onboard VGA automatically when you install or uninstall it.
Q (14):
If I want to use add-on AGP card on G Pro, do I need to change anything in the BIOS utility?(12/25/2002)
A:When you were using on board VGA and want to switch to add-on VGA, you do not need to set anything in the BIOS. The BIOS will auto switch to add-on VGA if it is installed. Also the BIOS will auto switch back to on-board VGA if add-on VGA is not installed.
Q (2):
What's the meaning of AMI BIOS Beep Codes?(10/29/2002)
A:The following are AMI BIOS Beep Codes that can occur.
 Cardápio
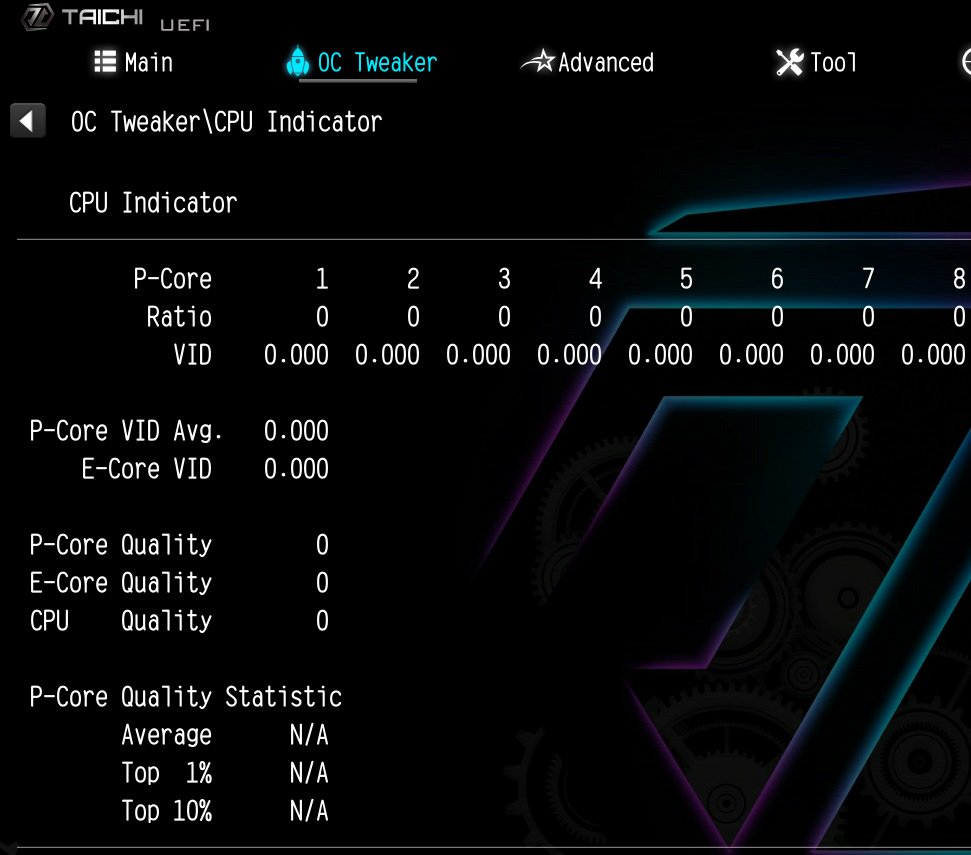 (11/1/2023)
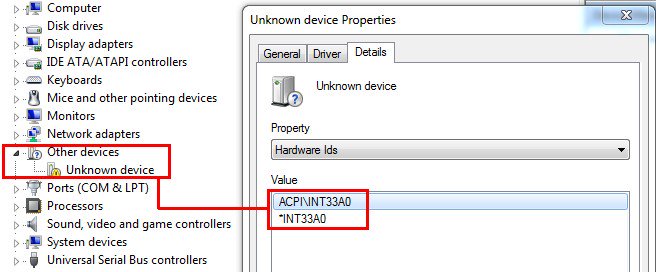 (8/1/2012)
 (3/28/2009)
 (6/26/2008)
 (2/15/2007)


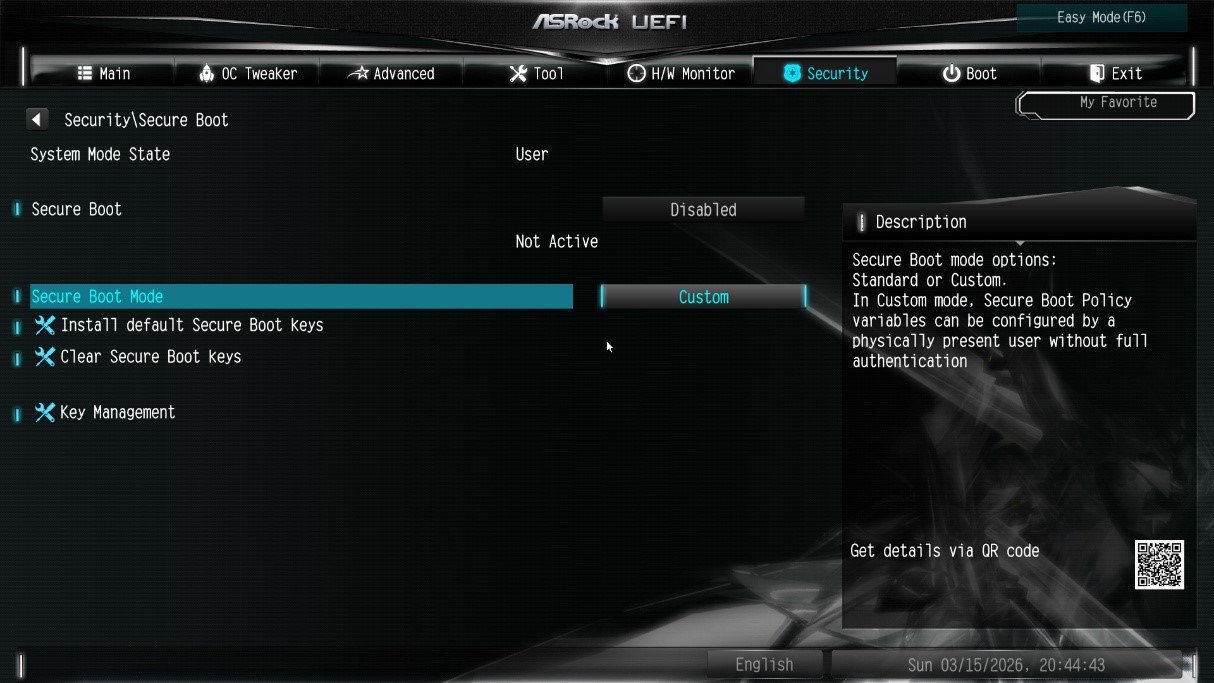
![Select Clear Secure Boot Keys, then choose [Yes].](/support/faq/190-2.jpg)

![After clearing the keys, select Install Default Secure Boot Keys, then choose [Yes].](/support/faq/190-4.jpg)

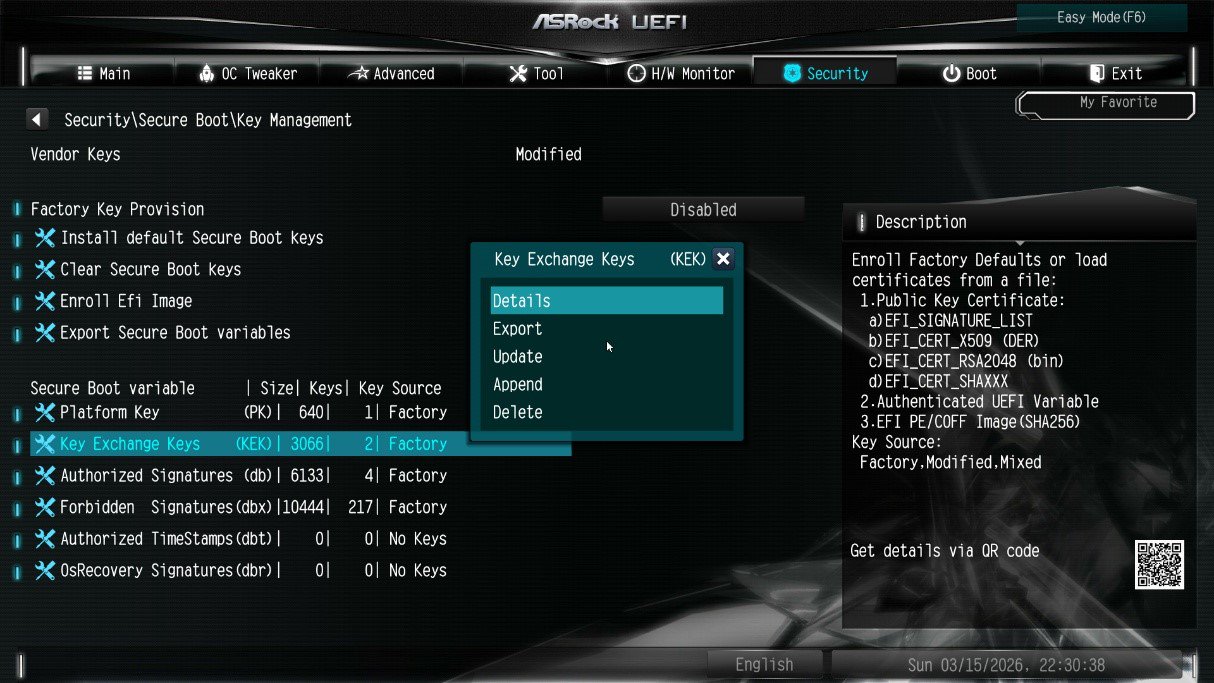
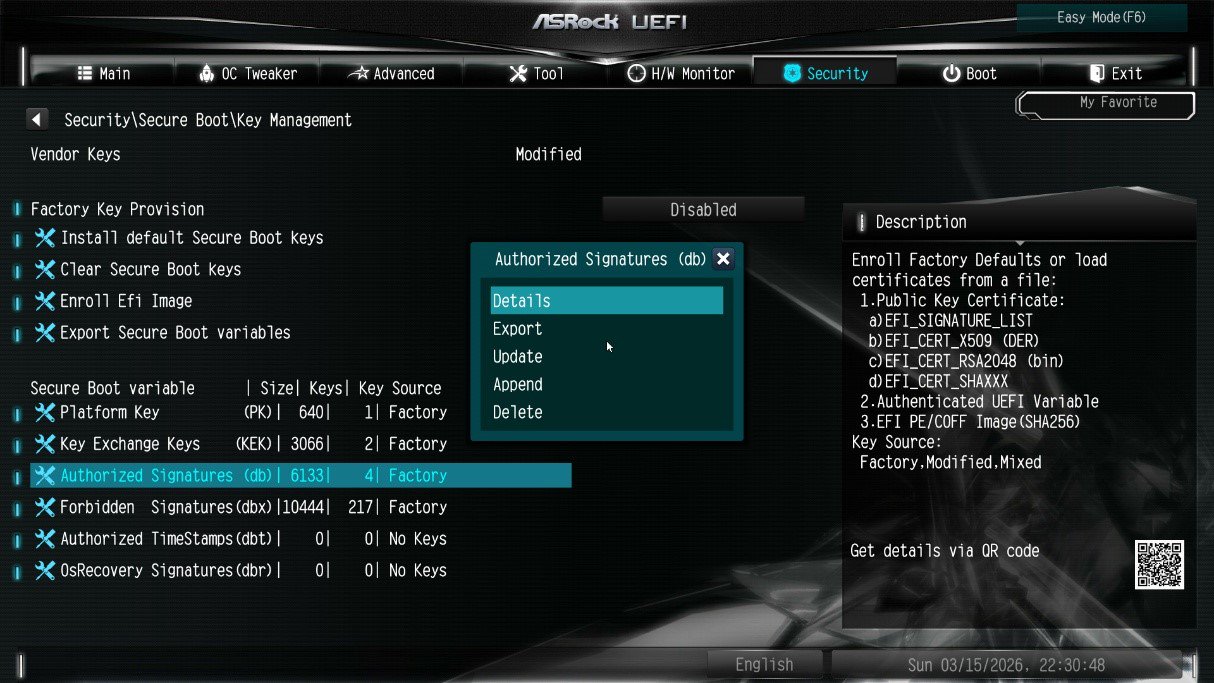
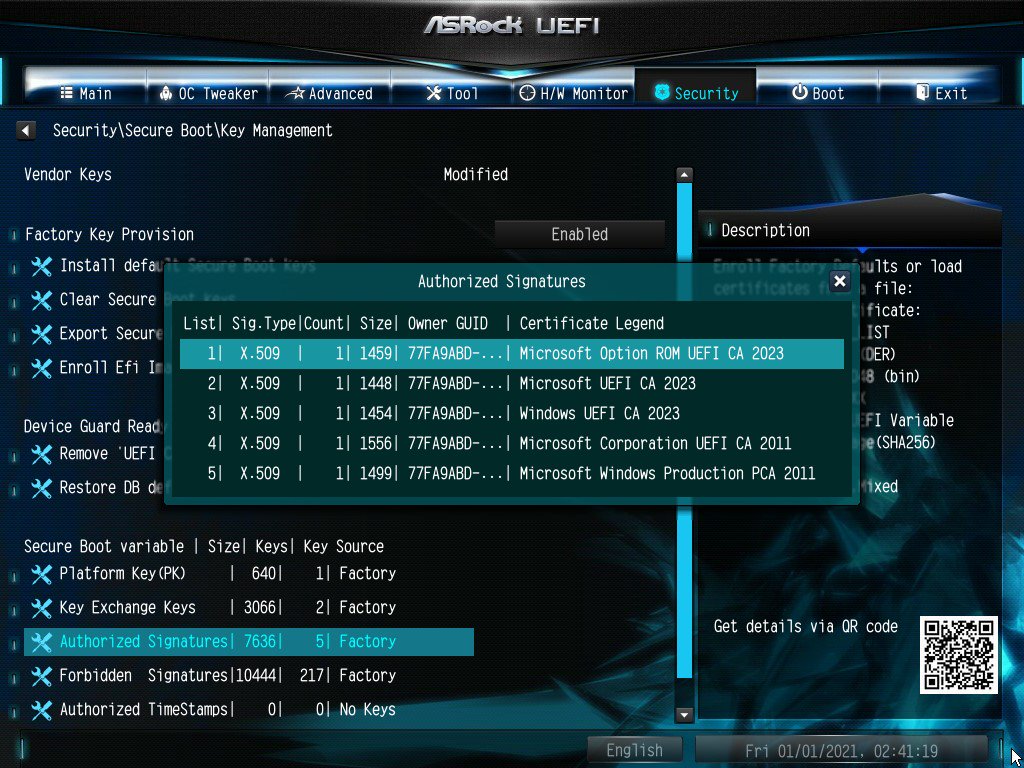
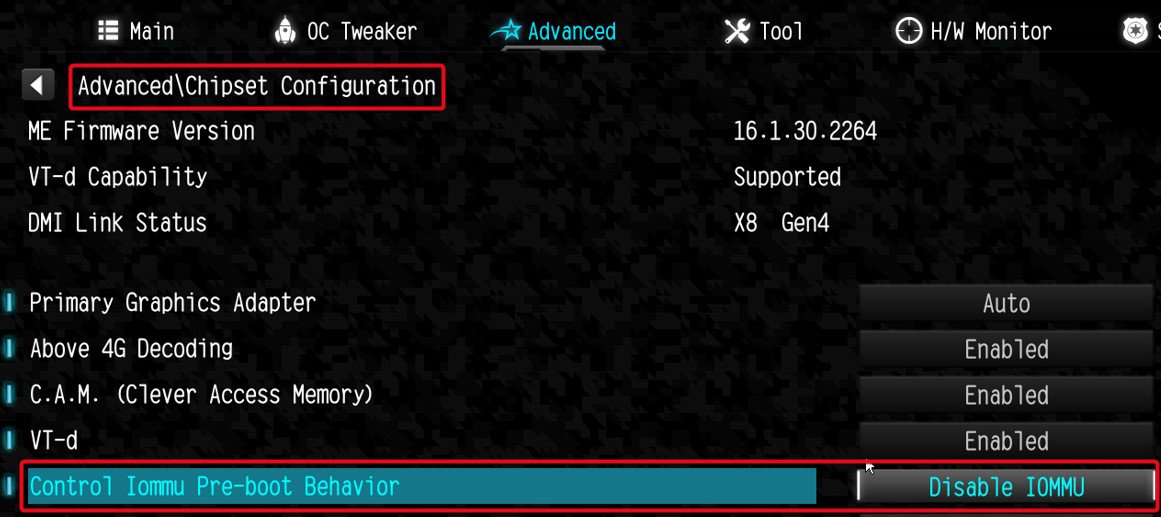
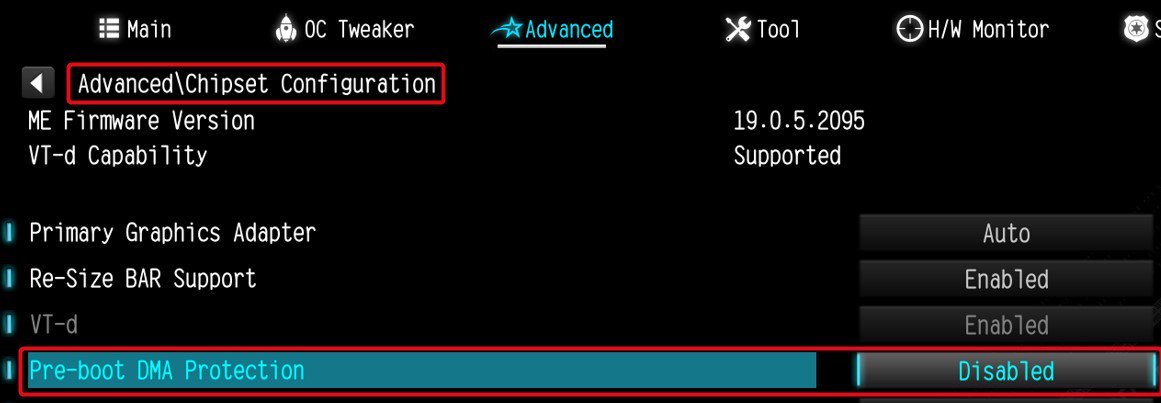
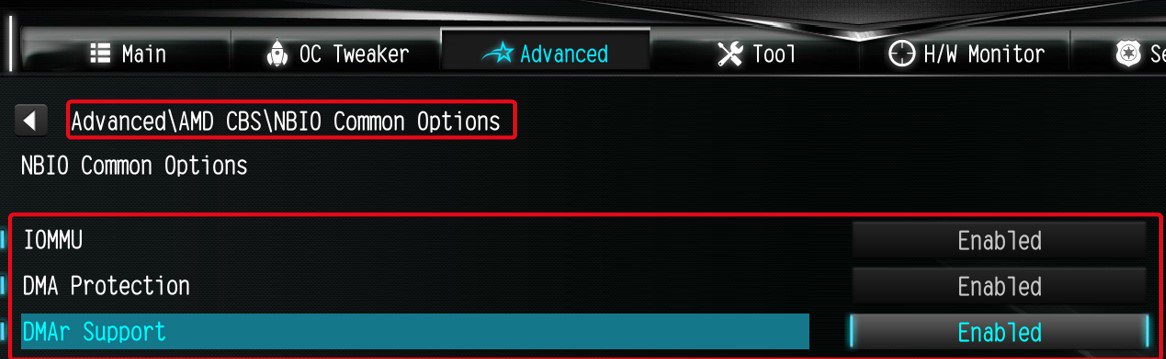
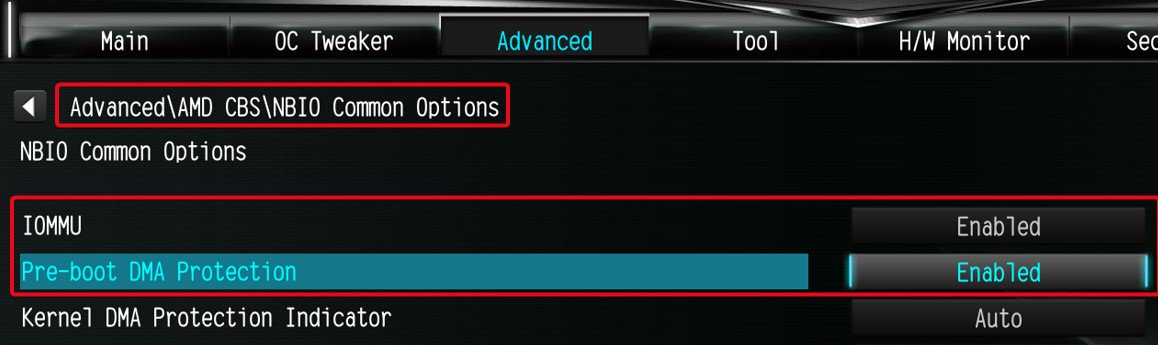


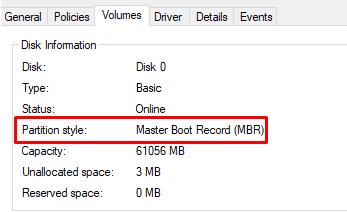


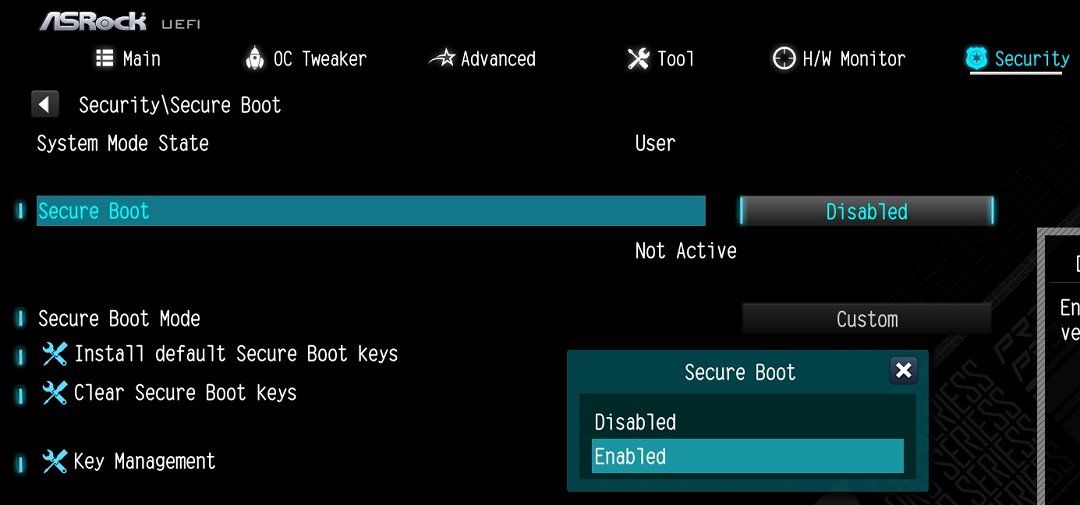
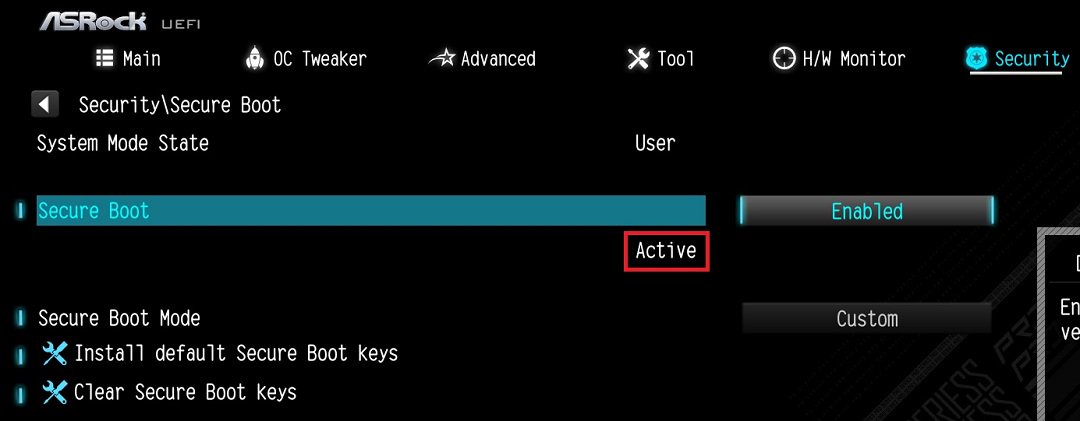
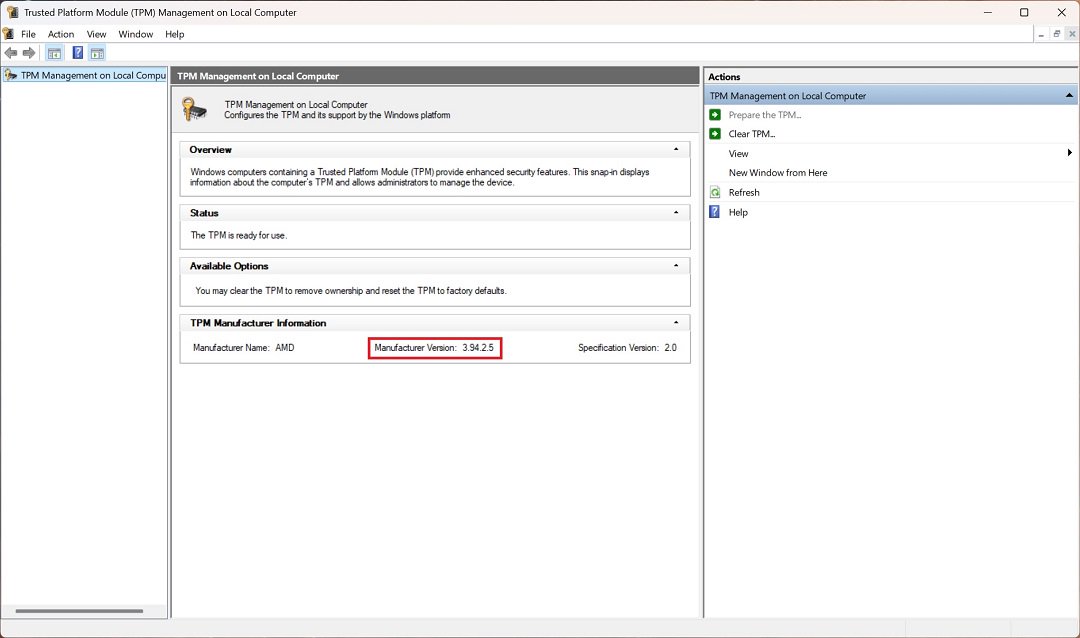


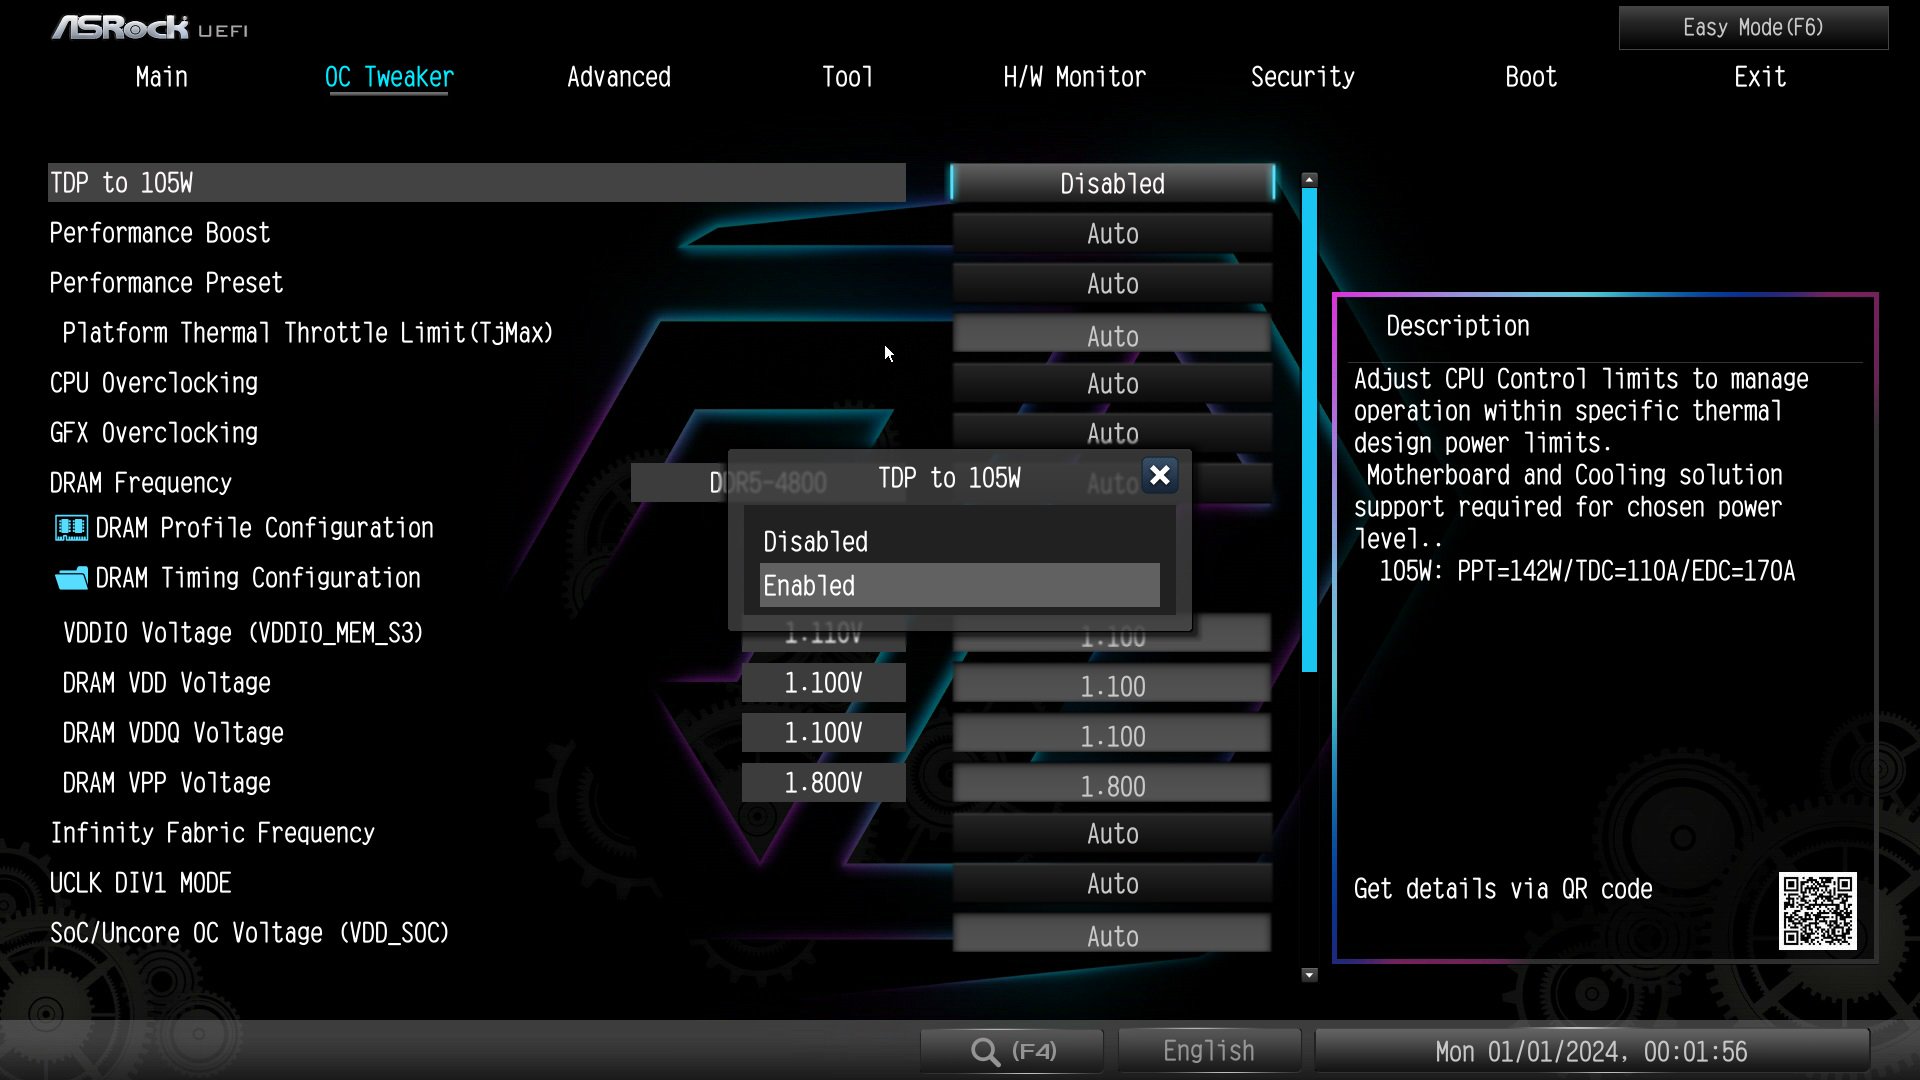
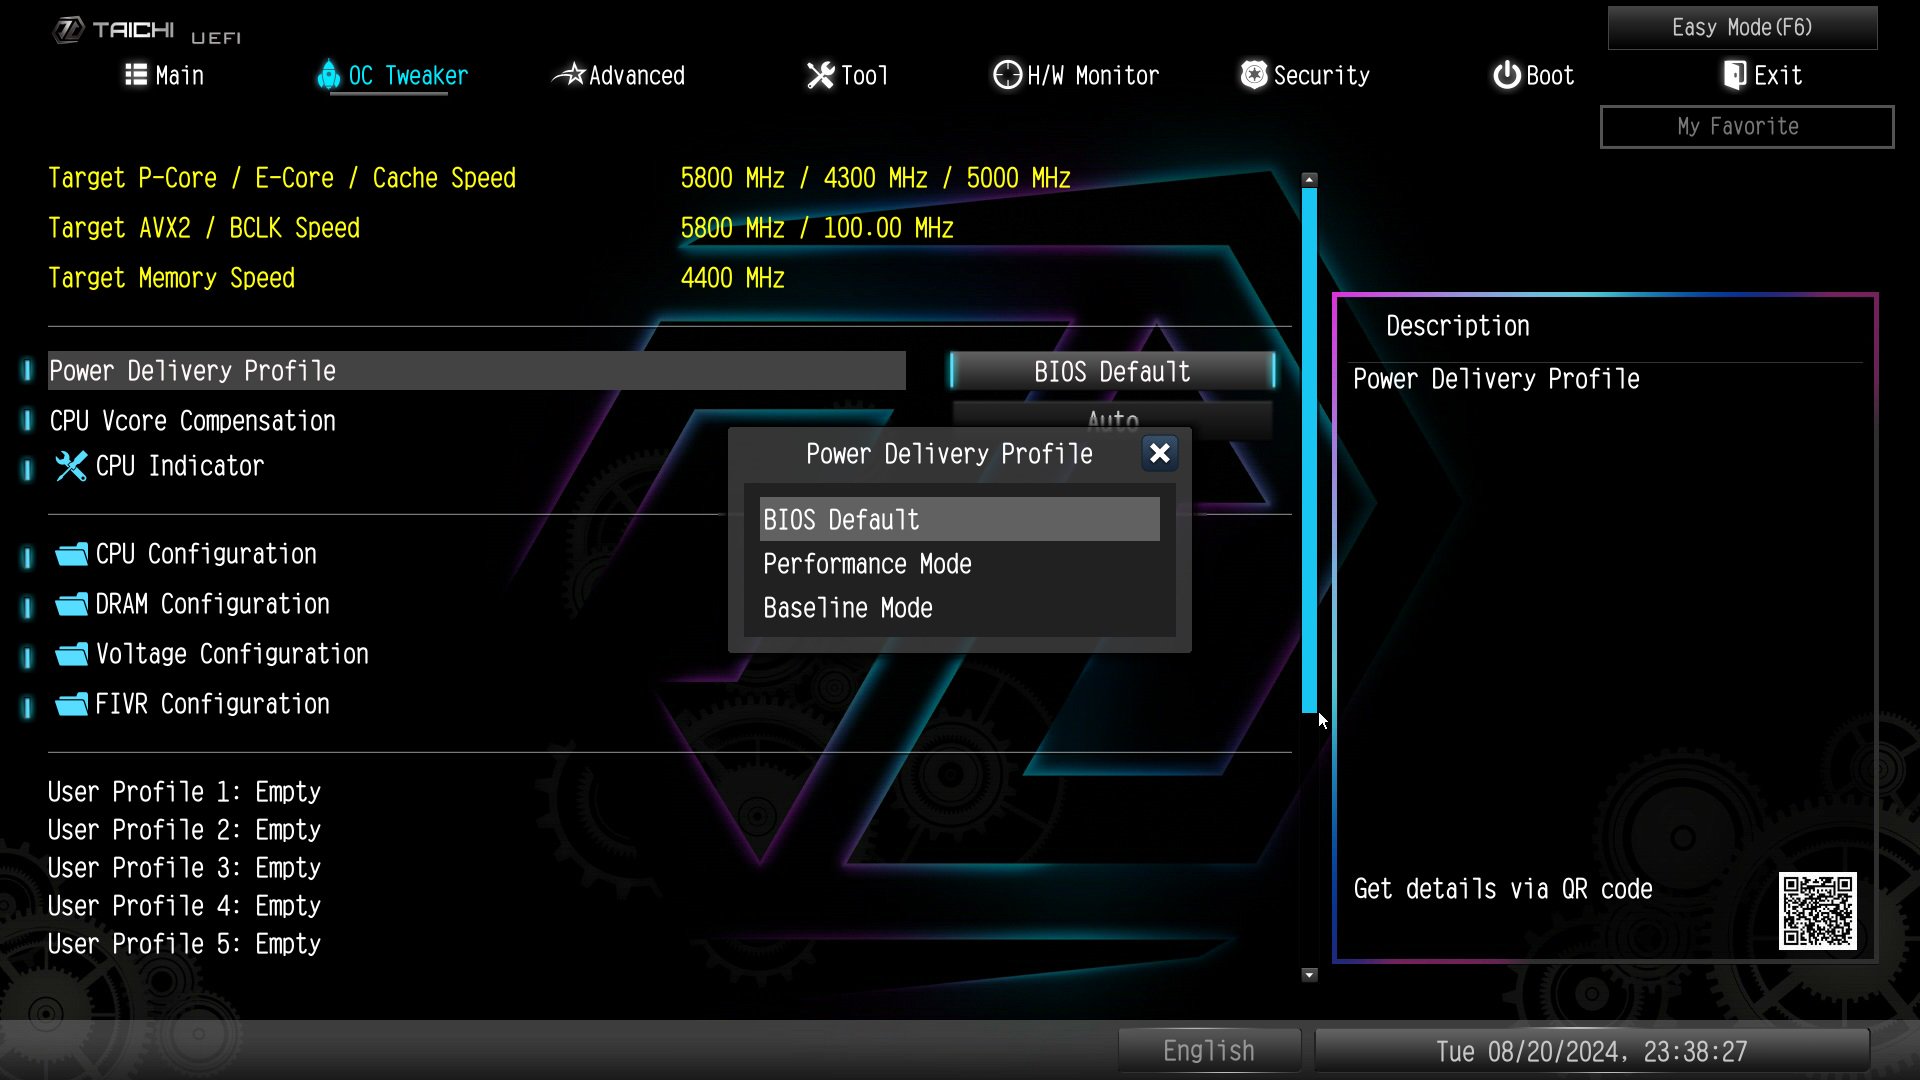
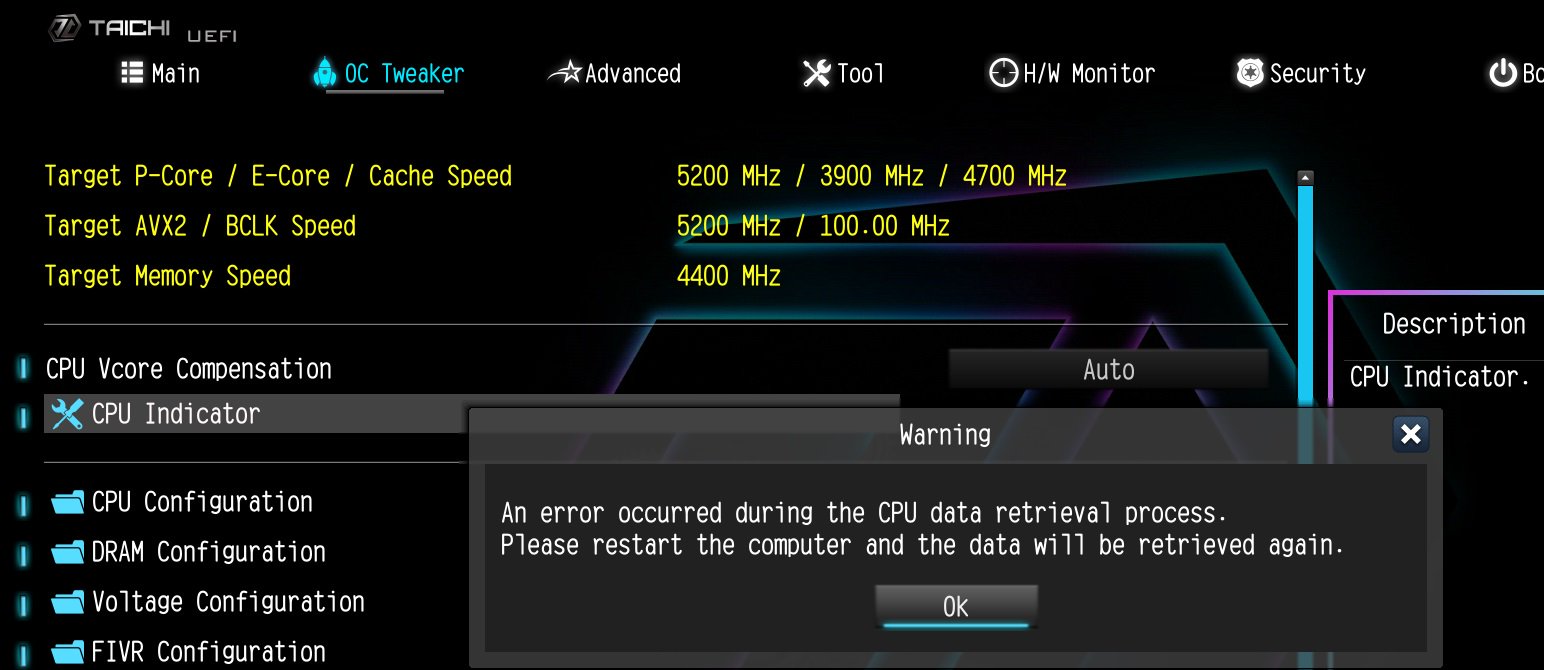
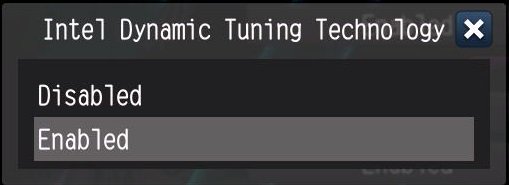
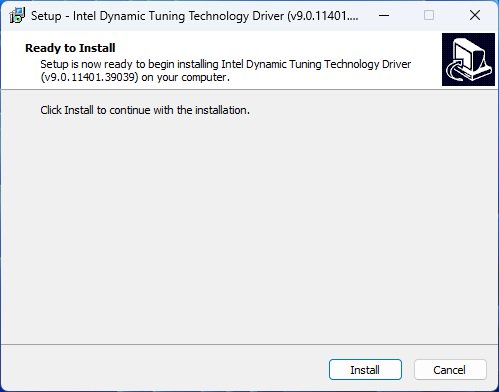
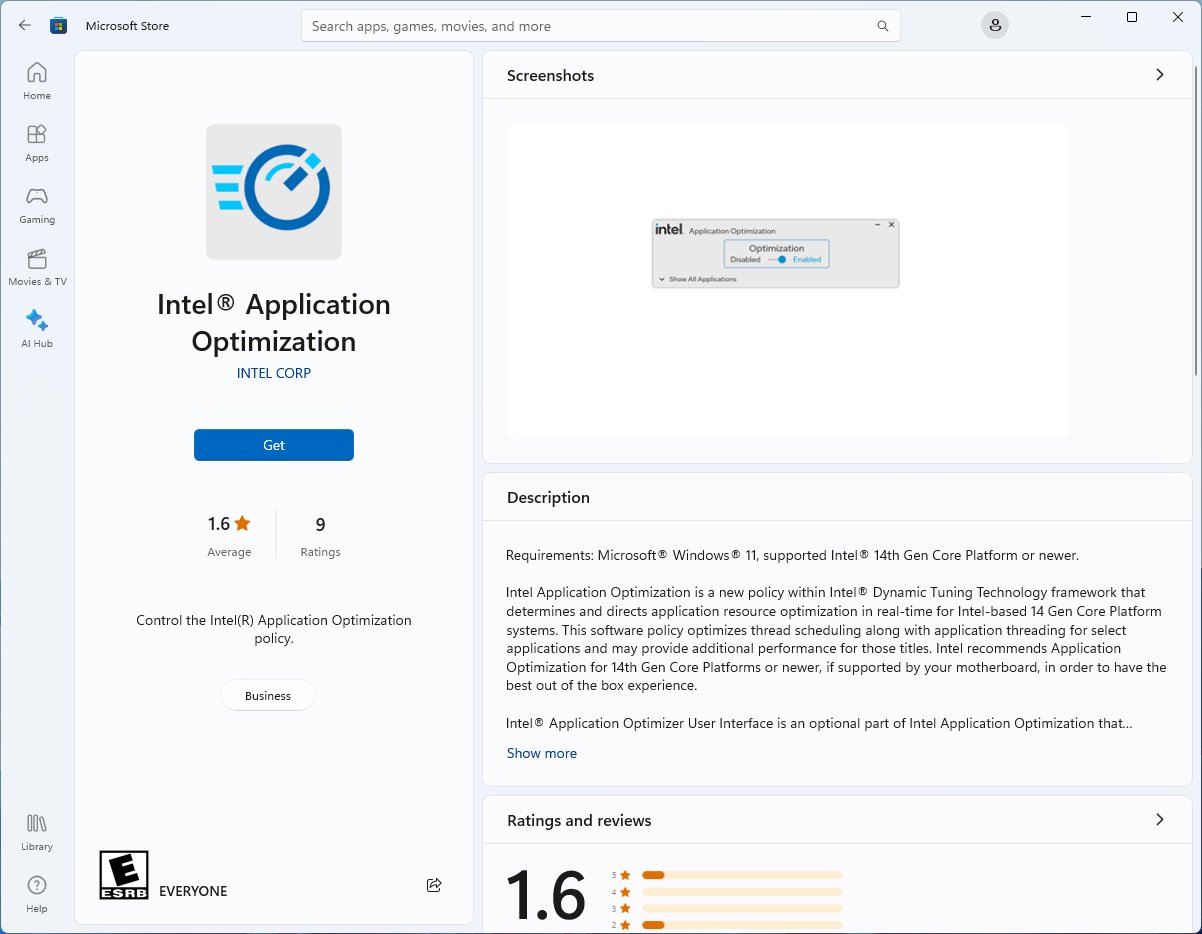
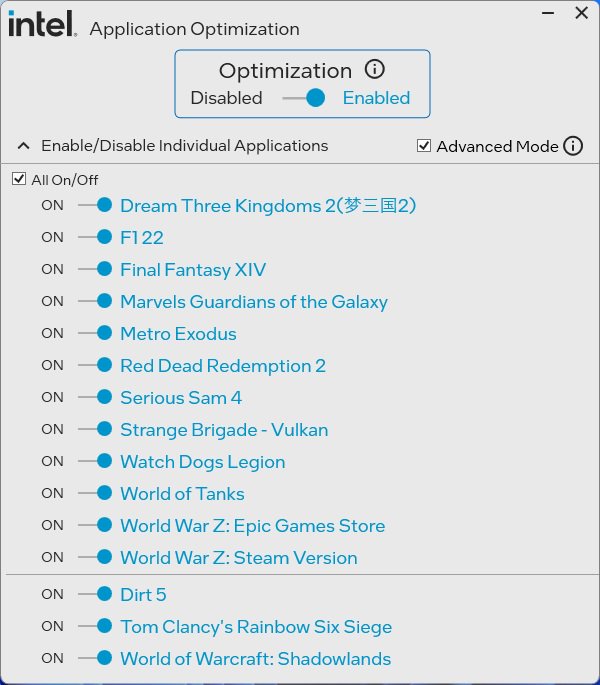
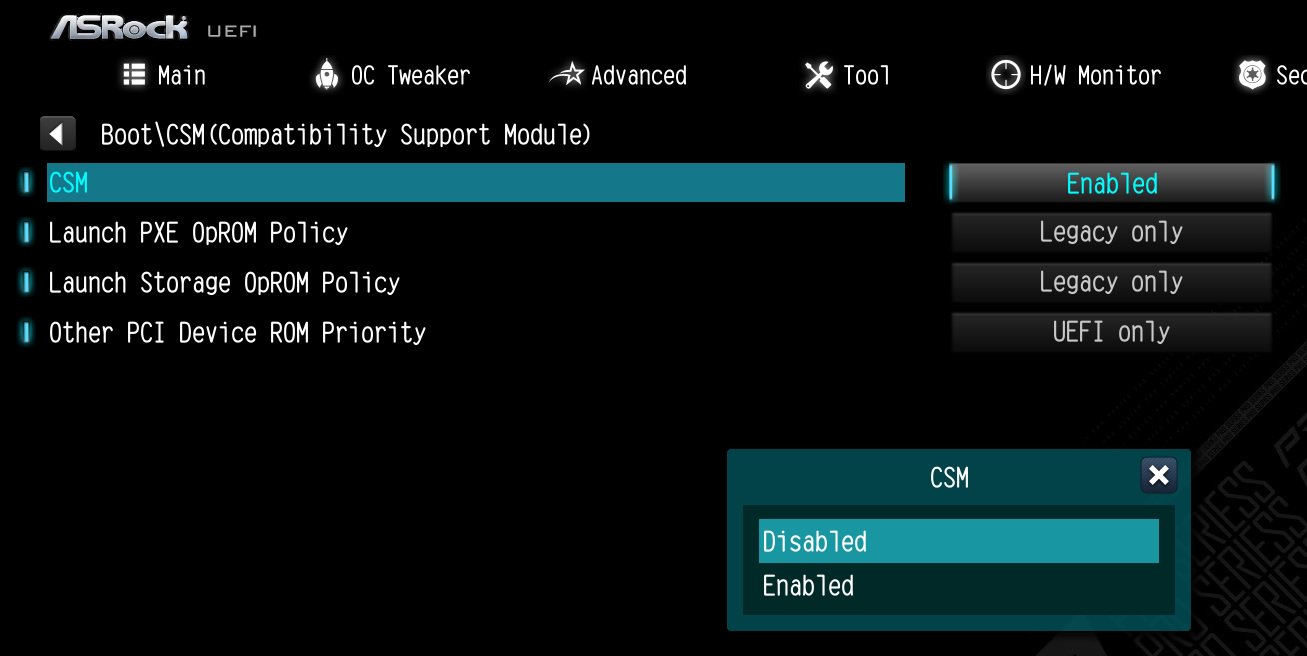
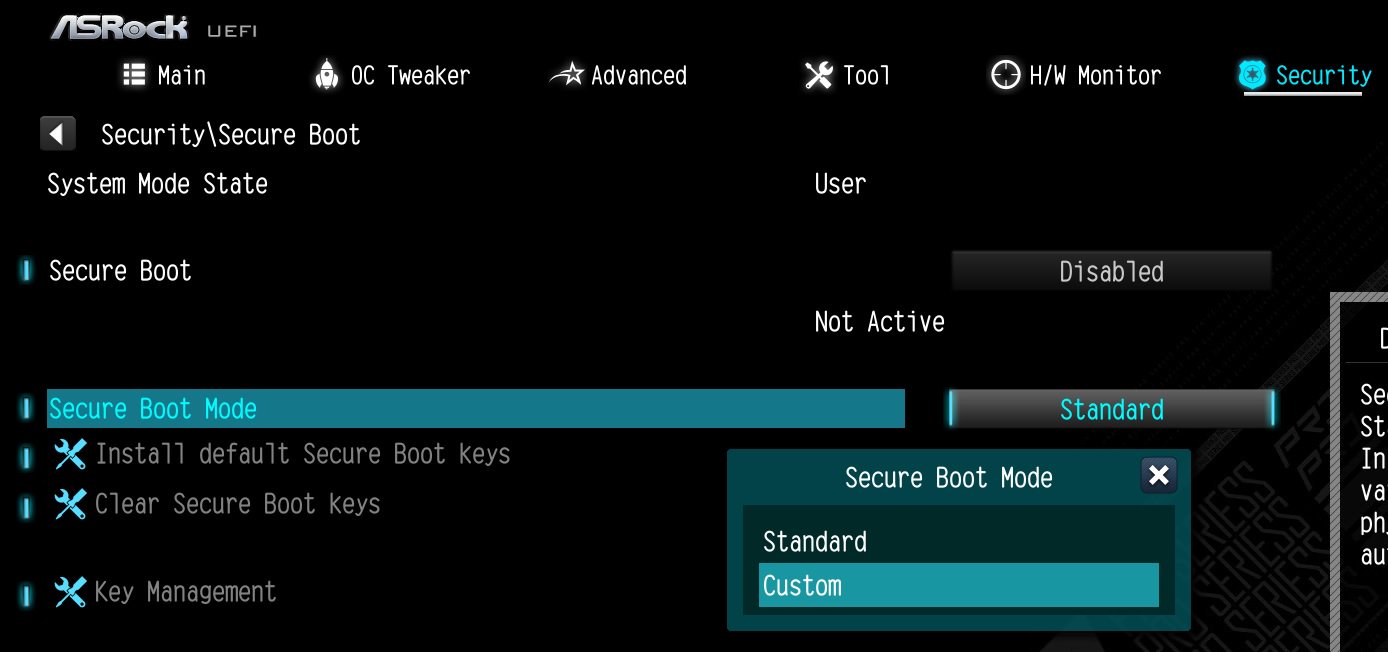
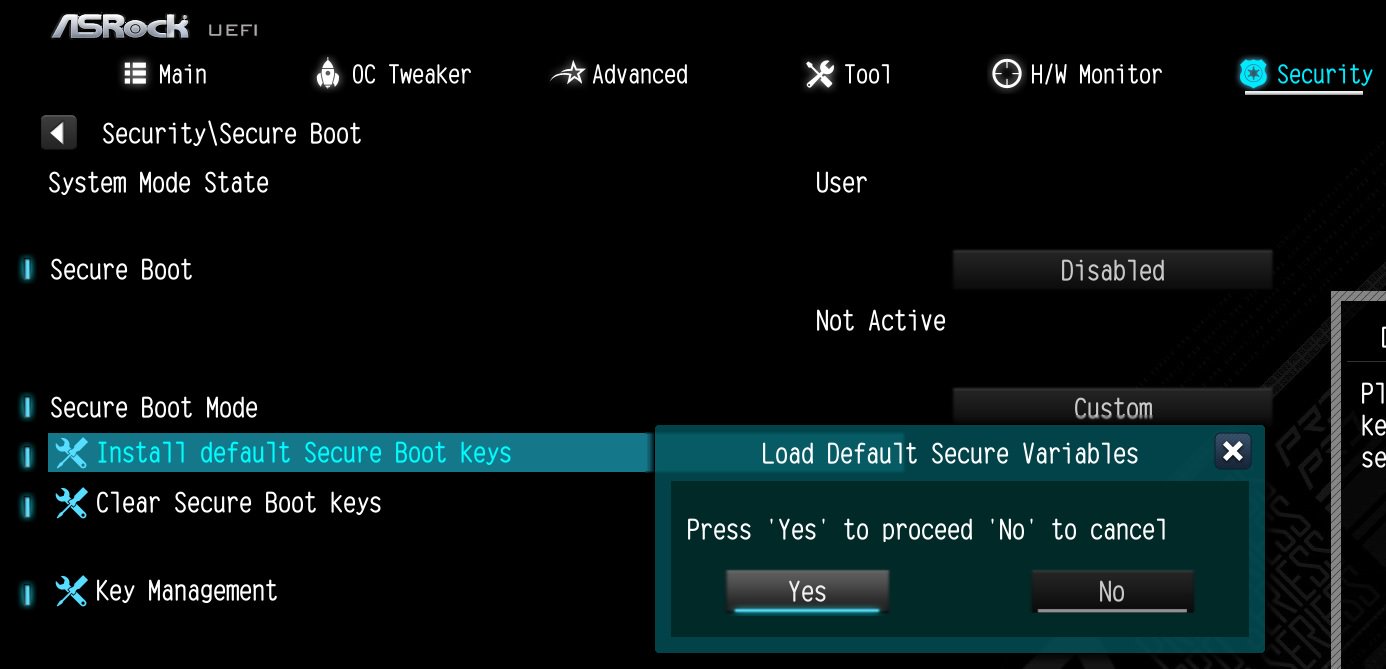


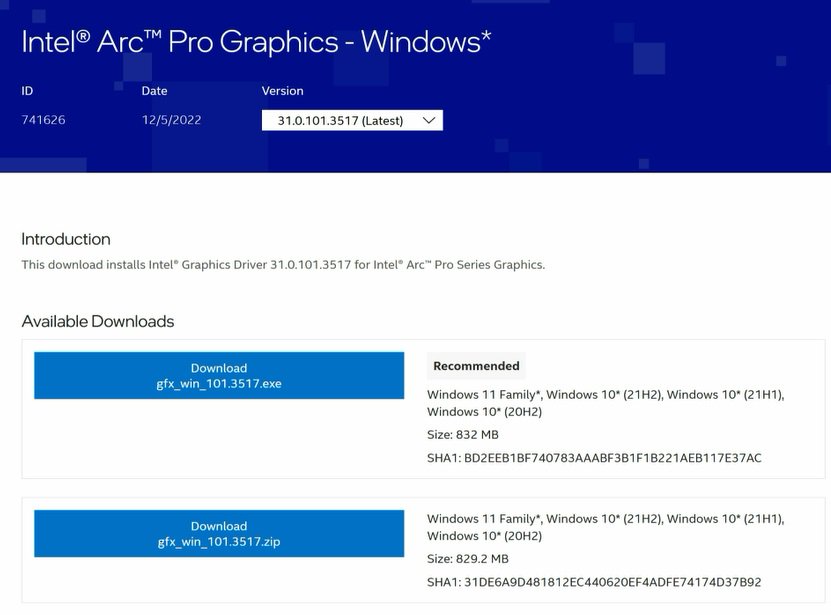

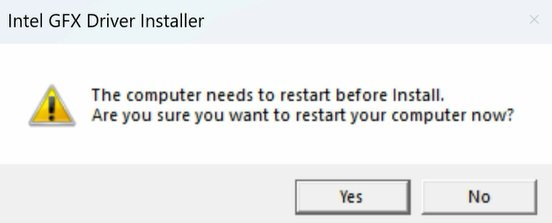

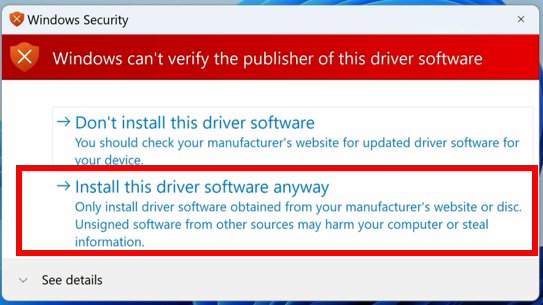
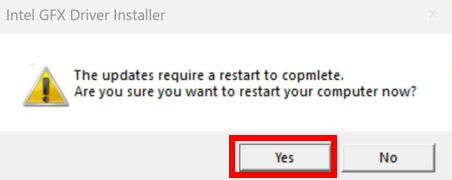
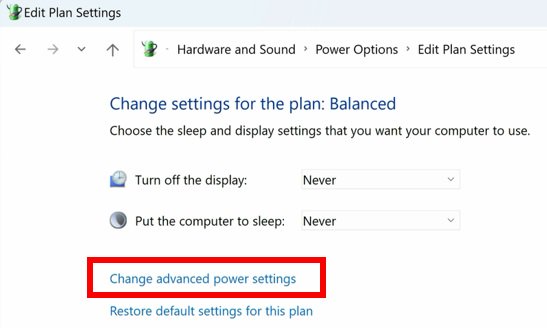
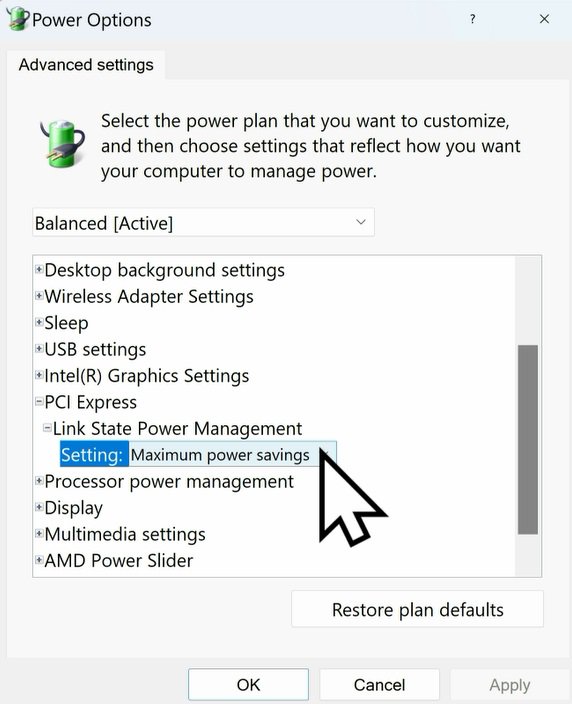
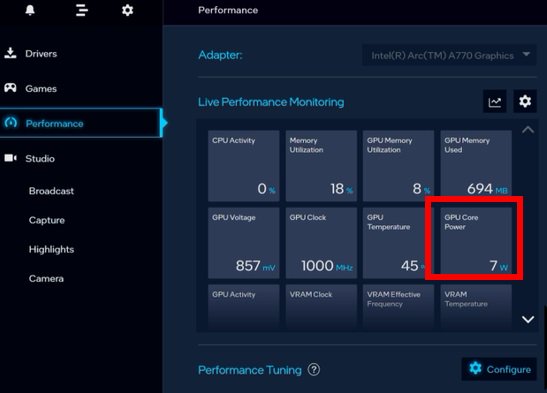
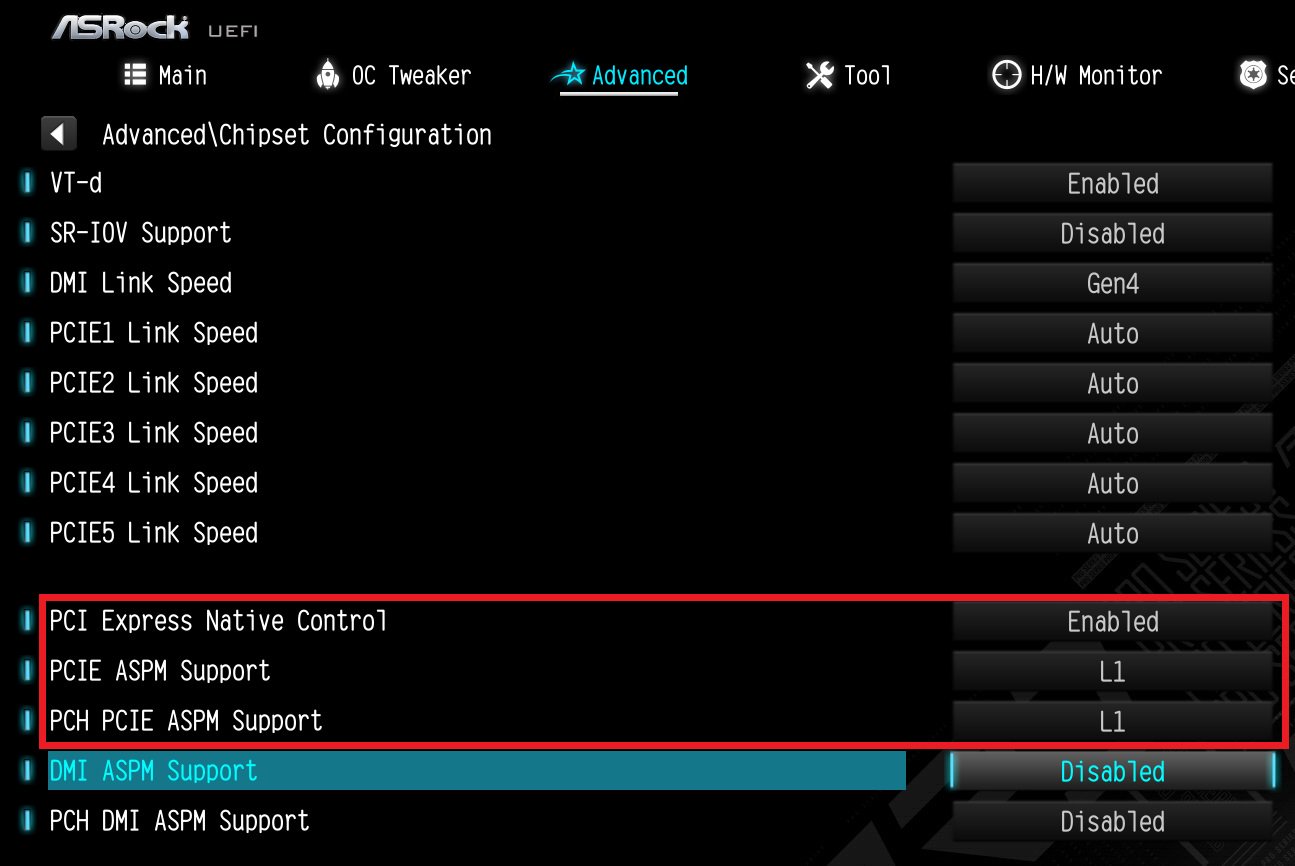
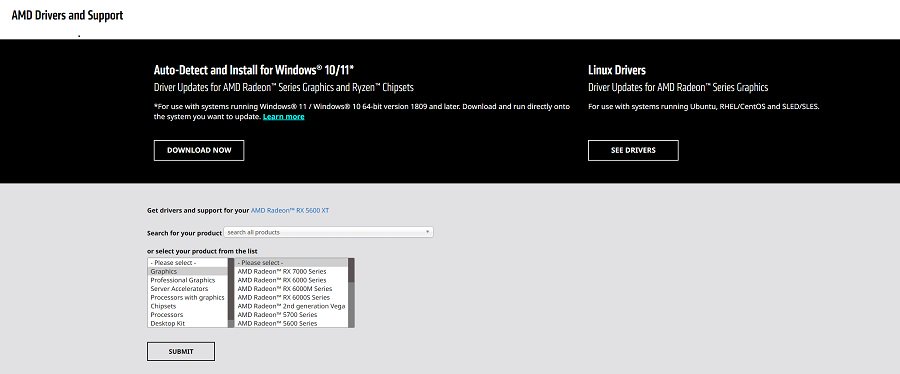
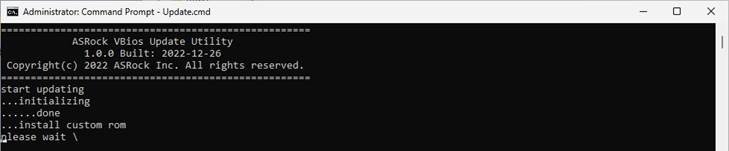
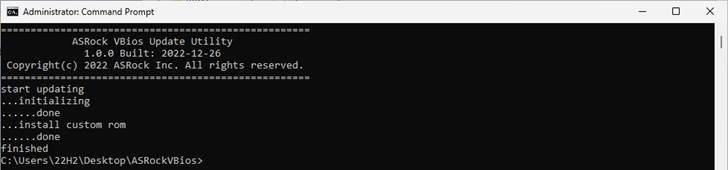
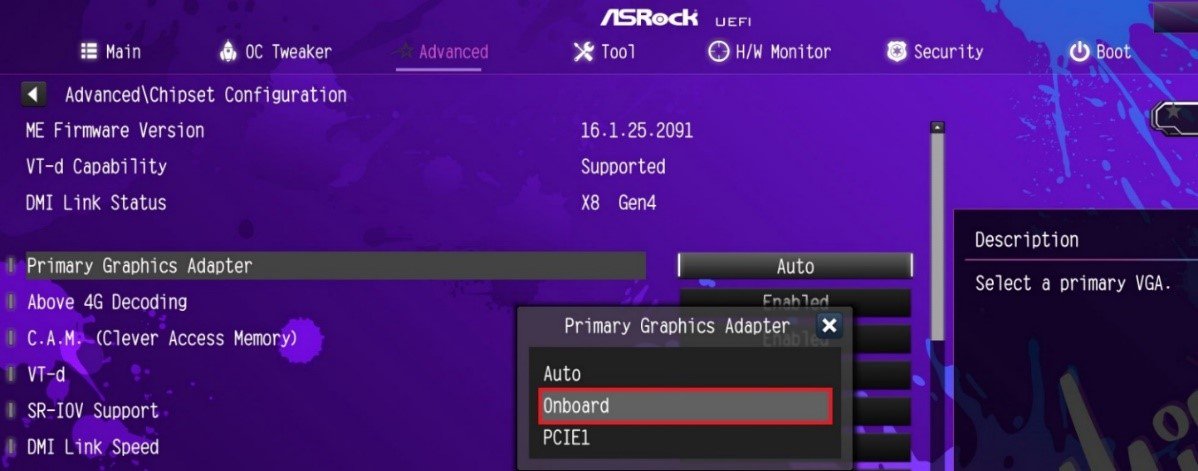
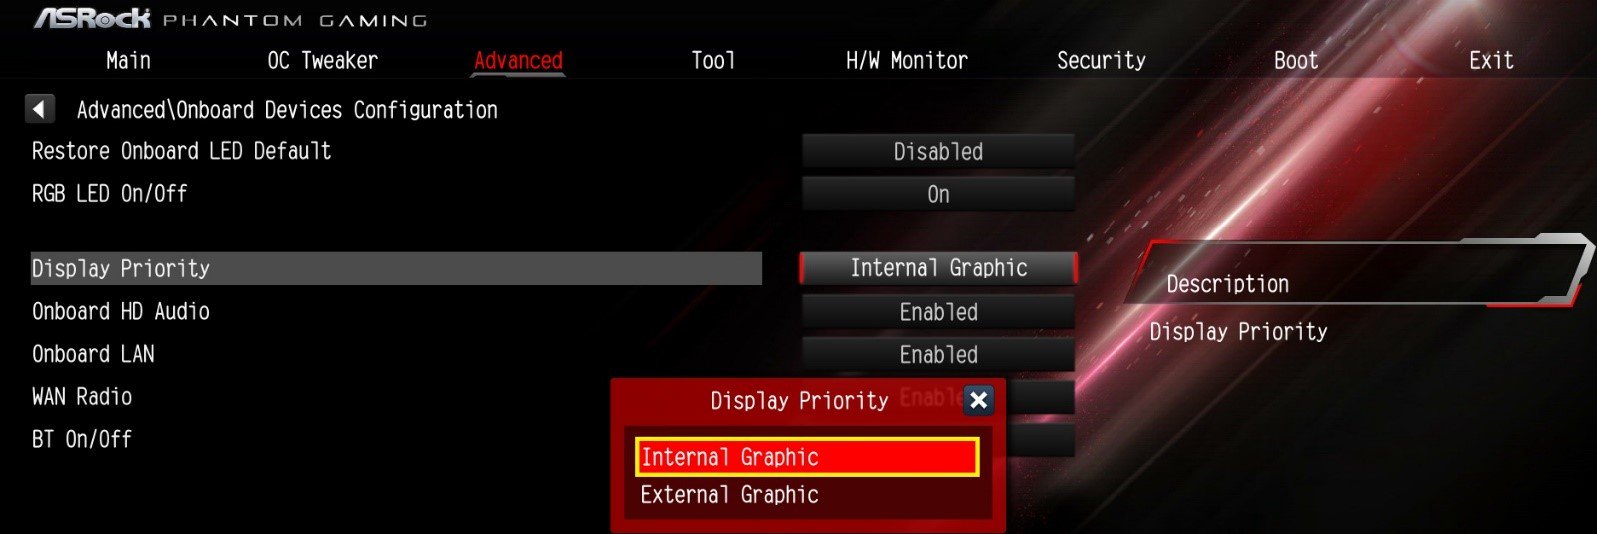

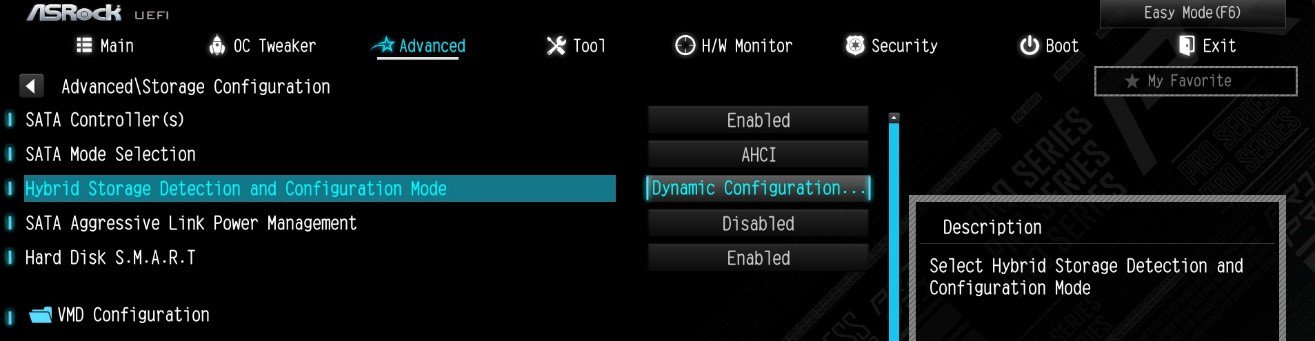
![Set Enable VMD Global Mapping to [Enabled]. Press F10 to save the changes and exit setup.](/support/faq/167-4.jpg)
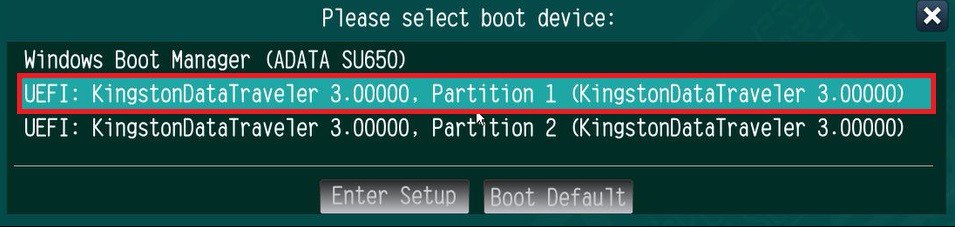 ” to install Windows® 10 64-bit / 11 64-bit OS">
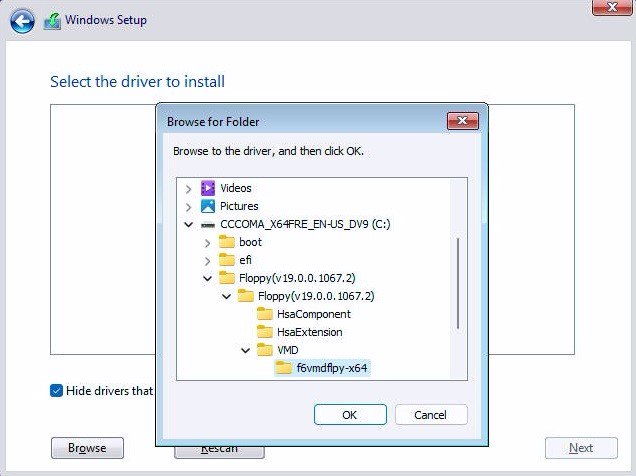
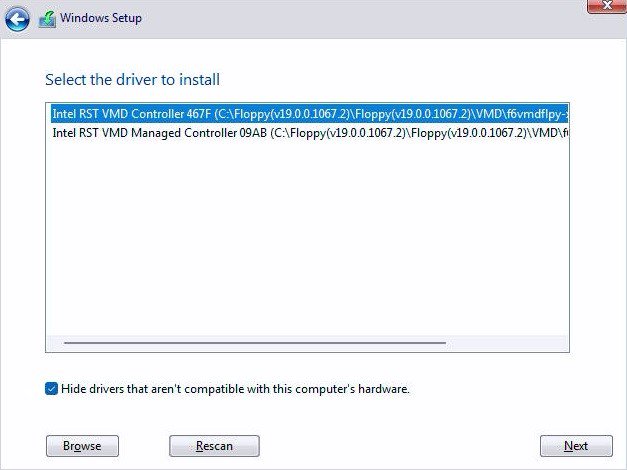 .">
.">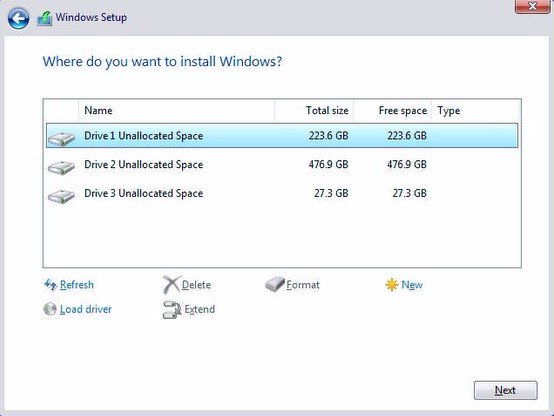
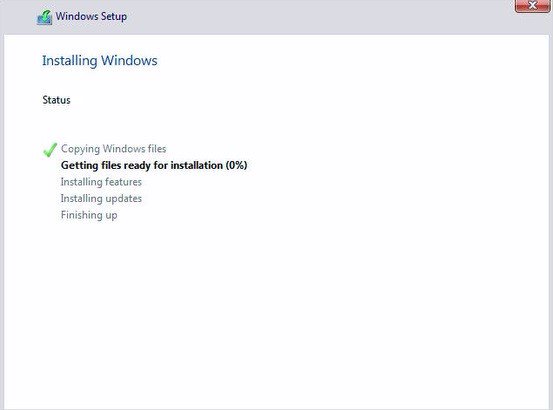
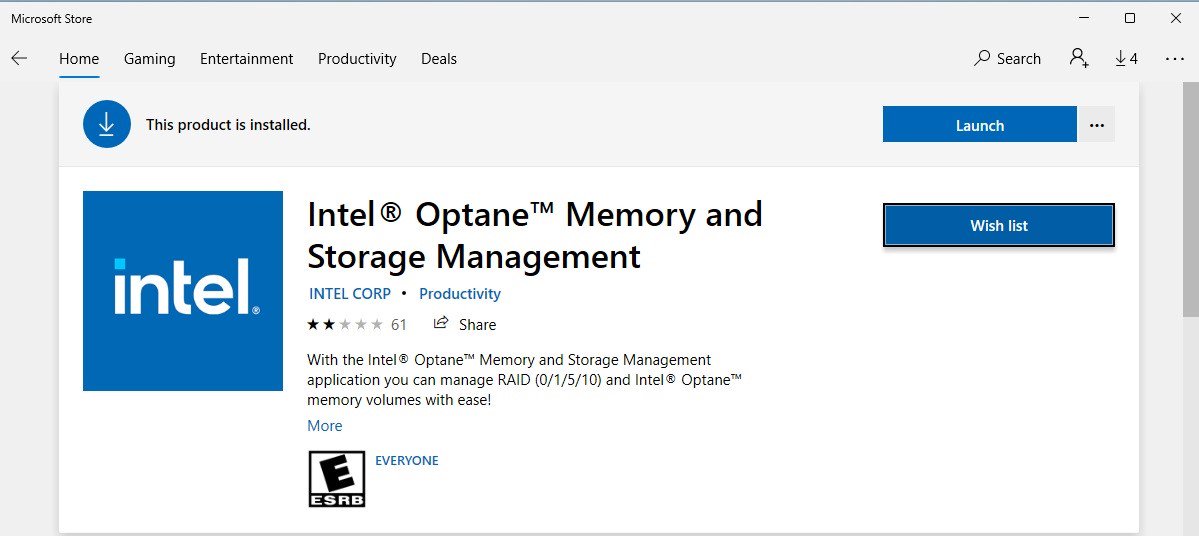
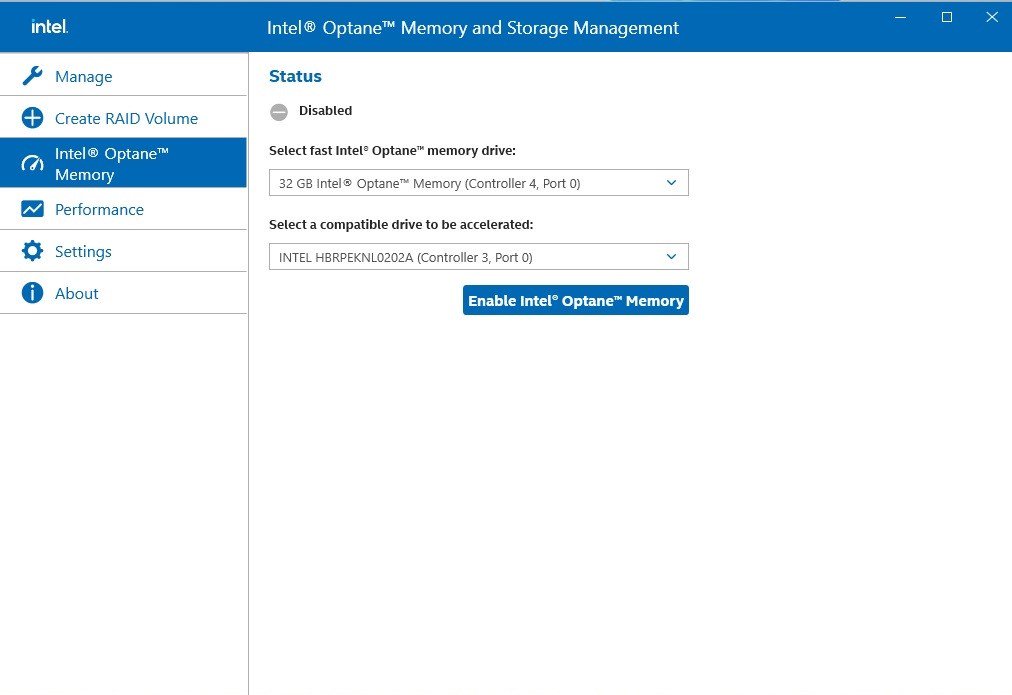
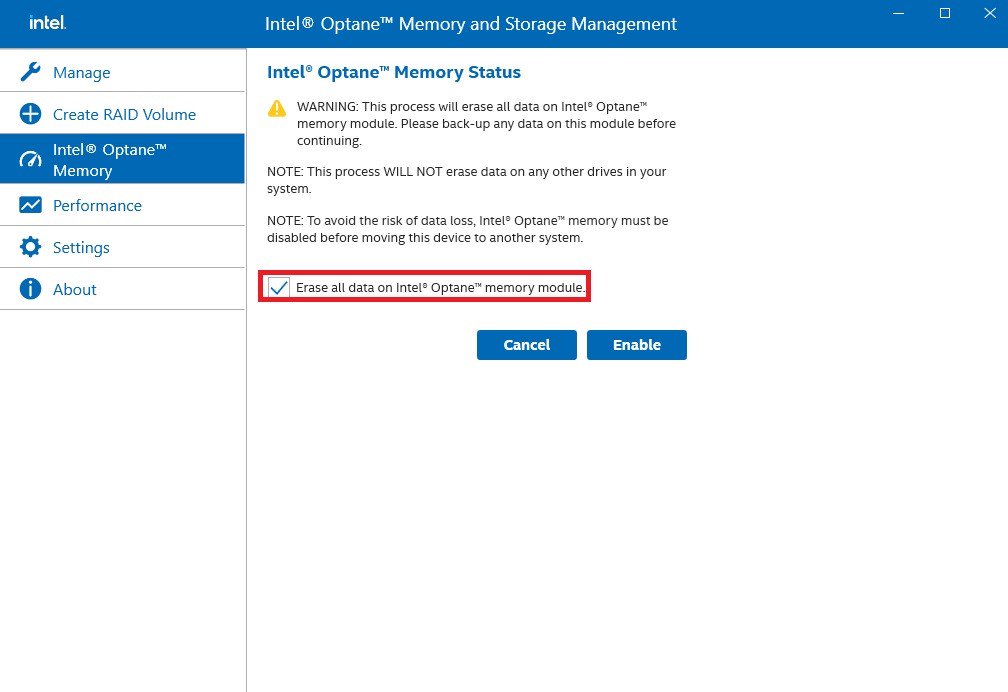
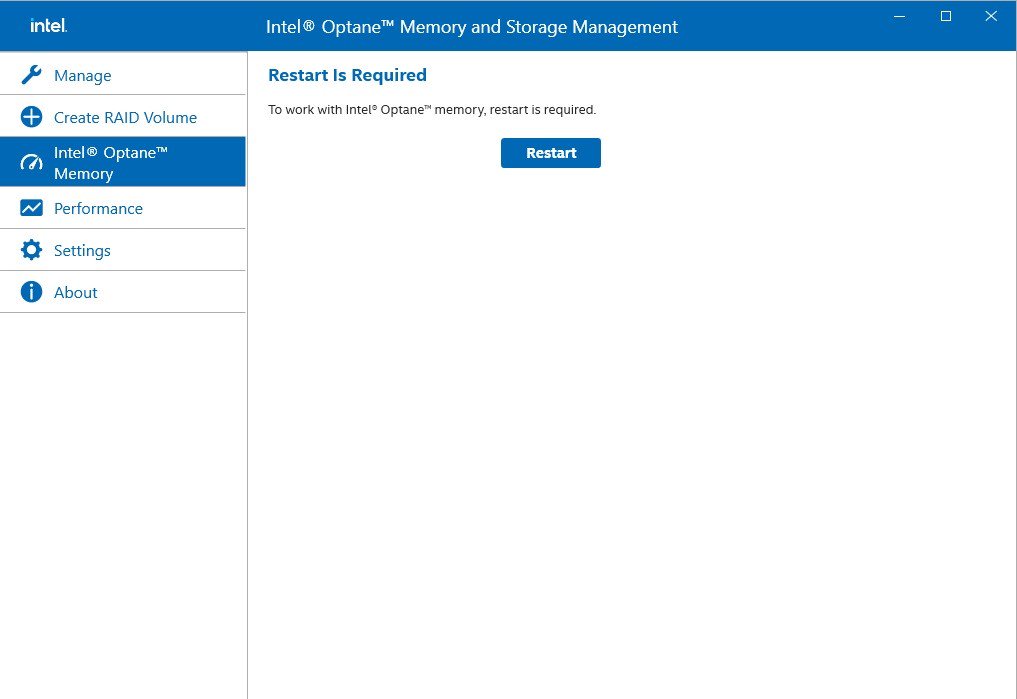
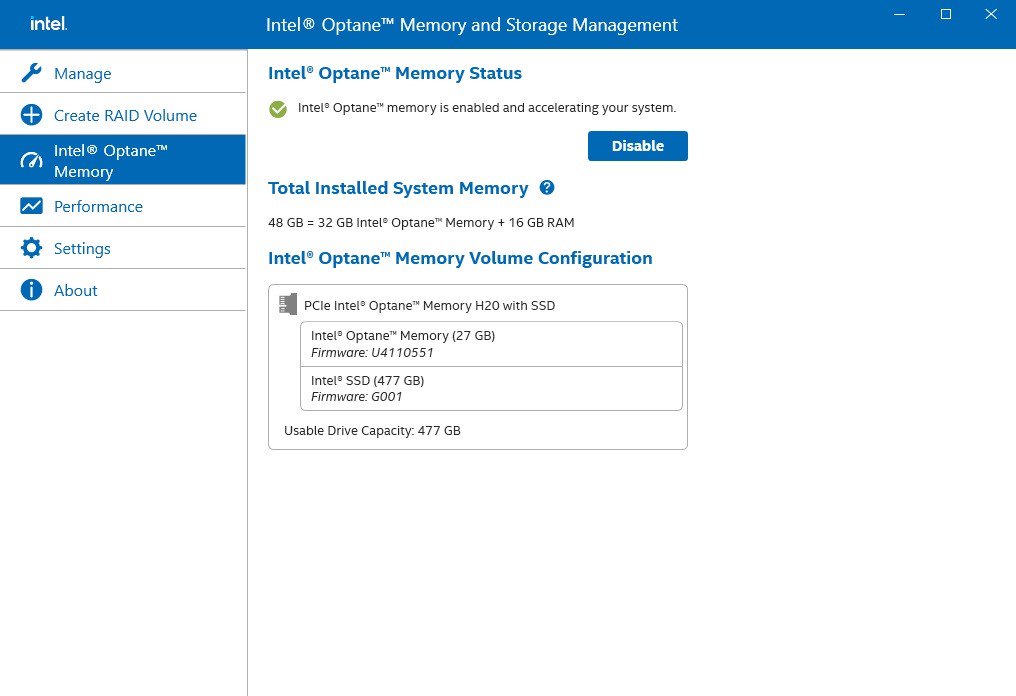


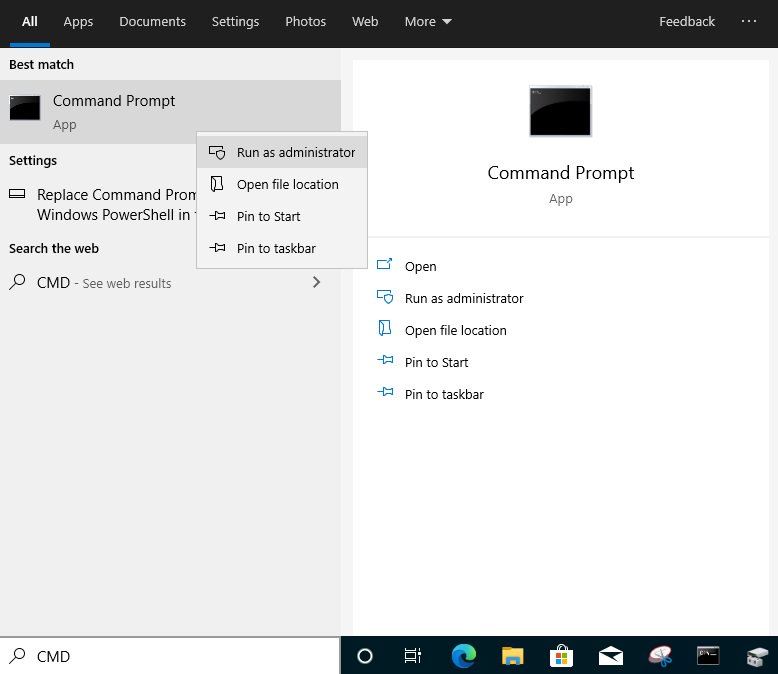
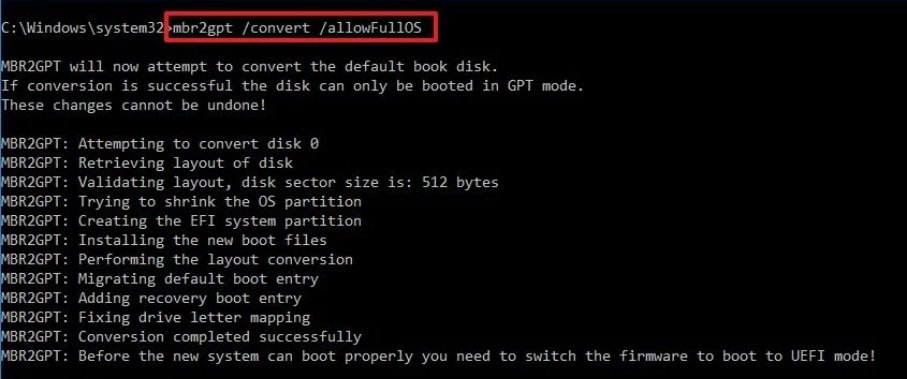
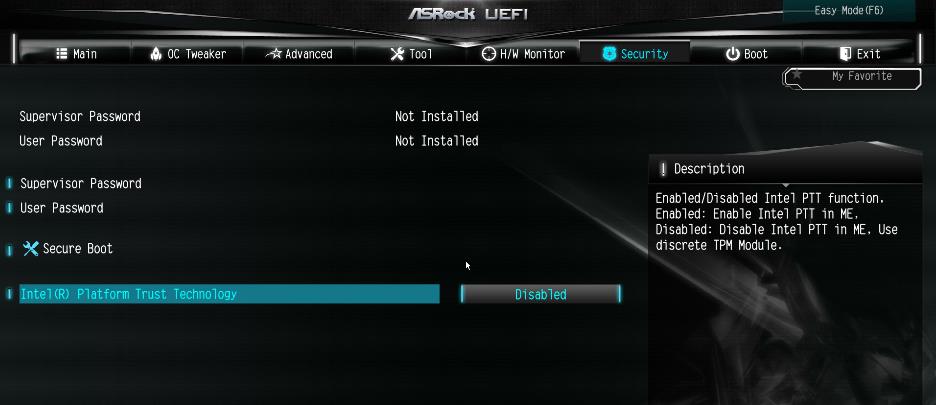
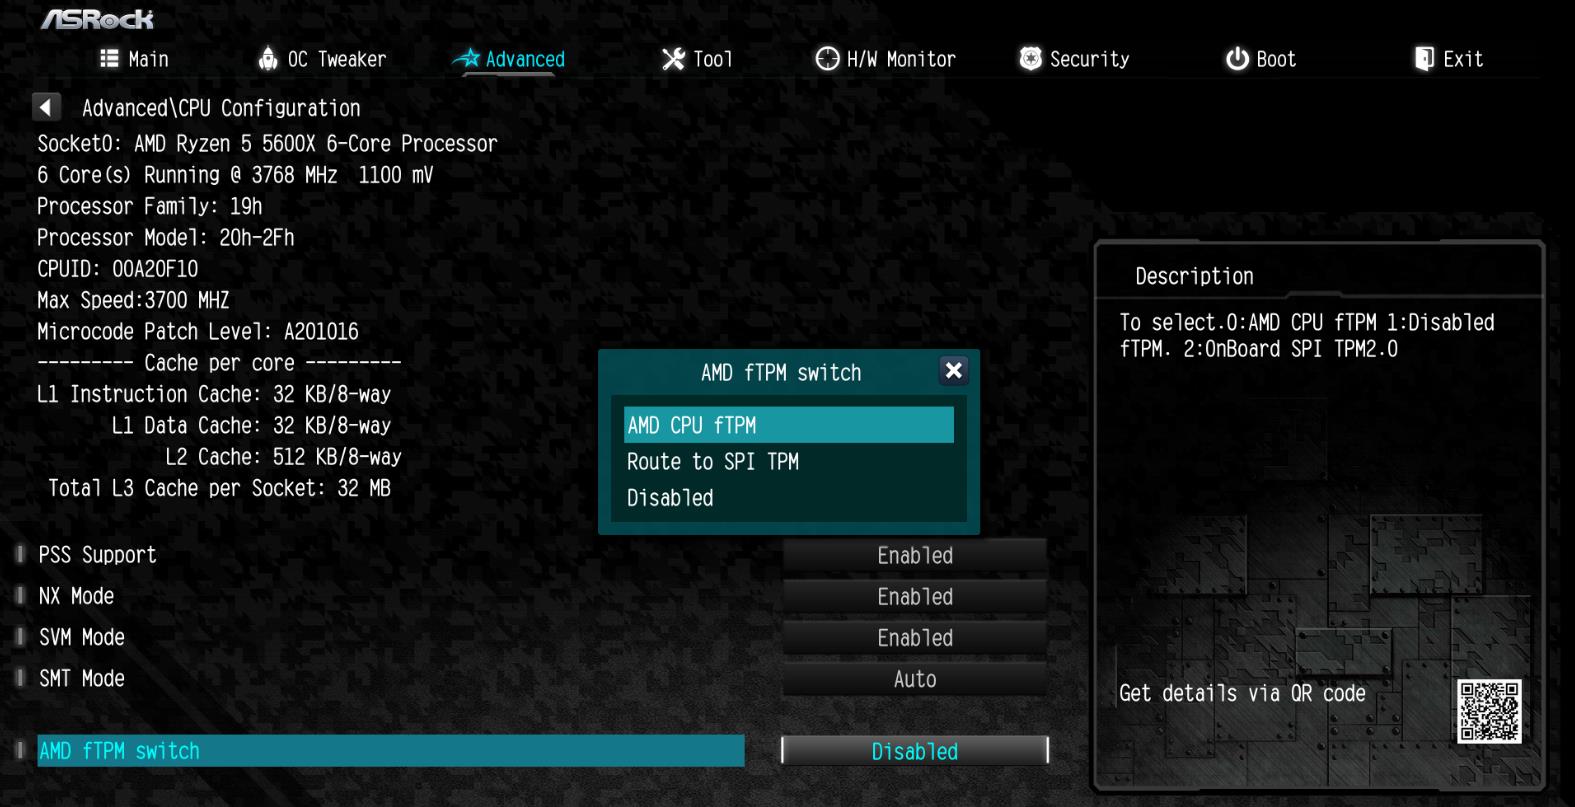
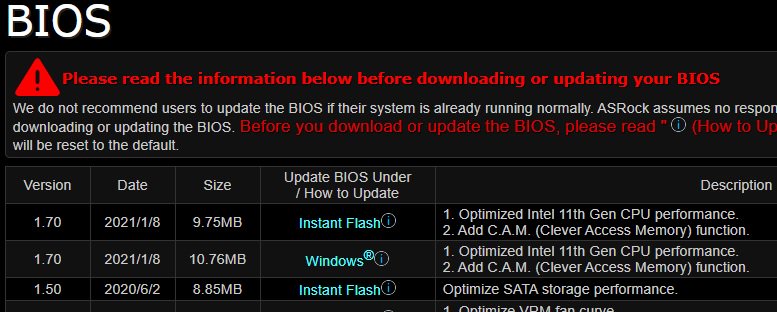
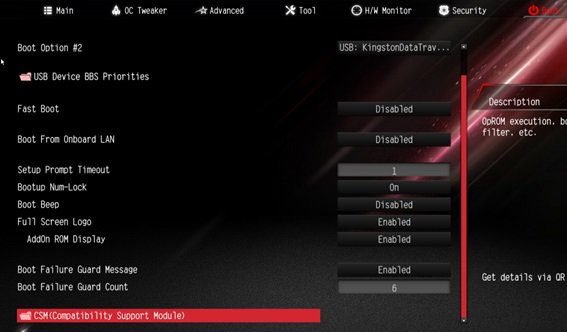
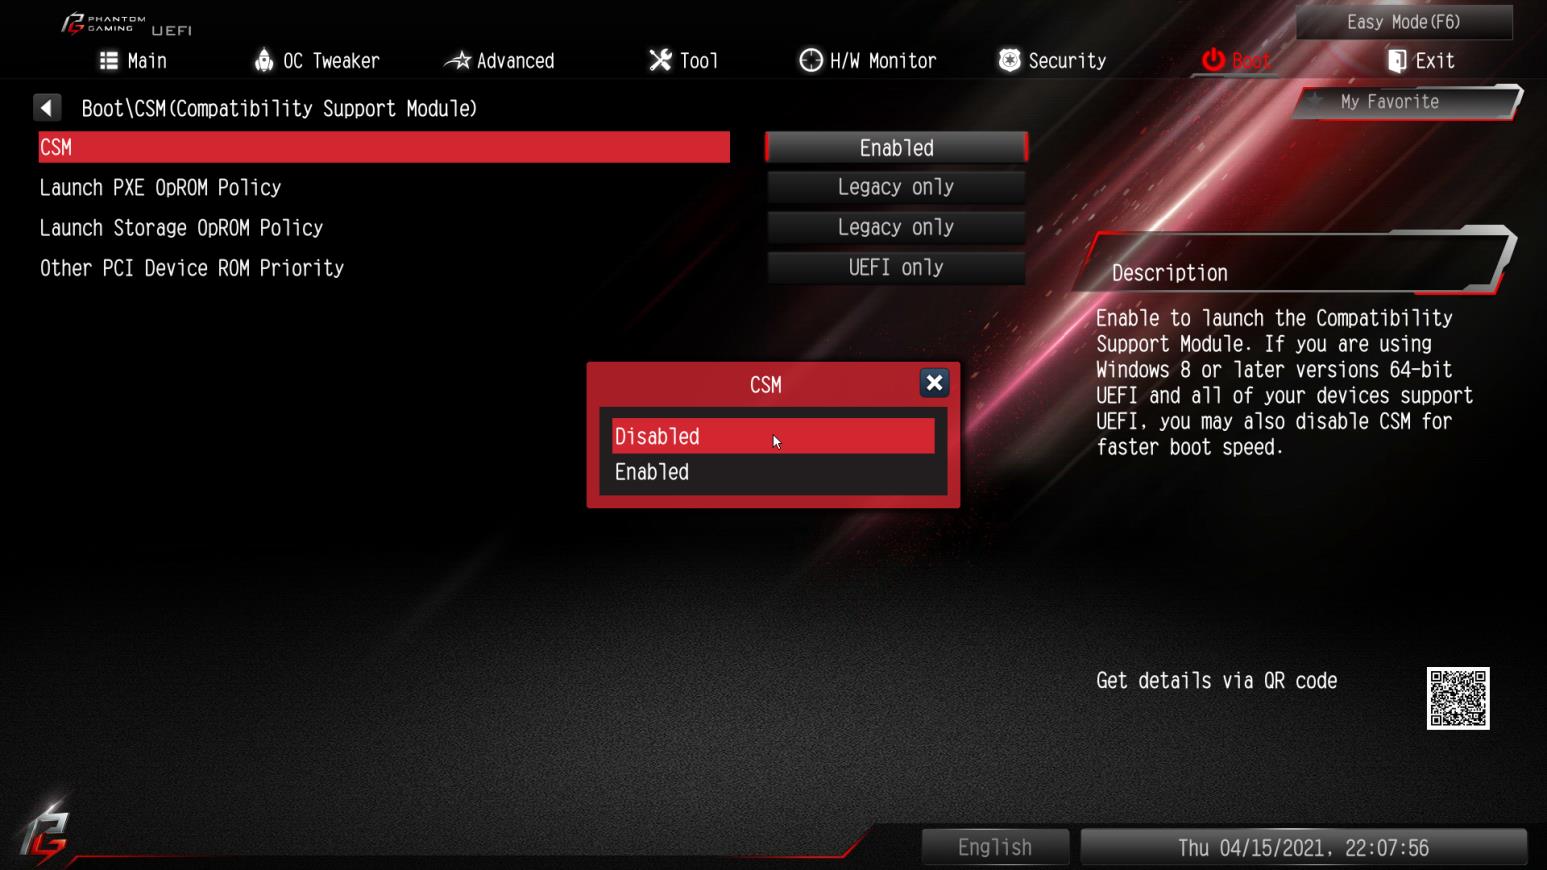
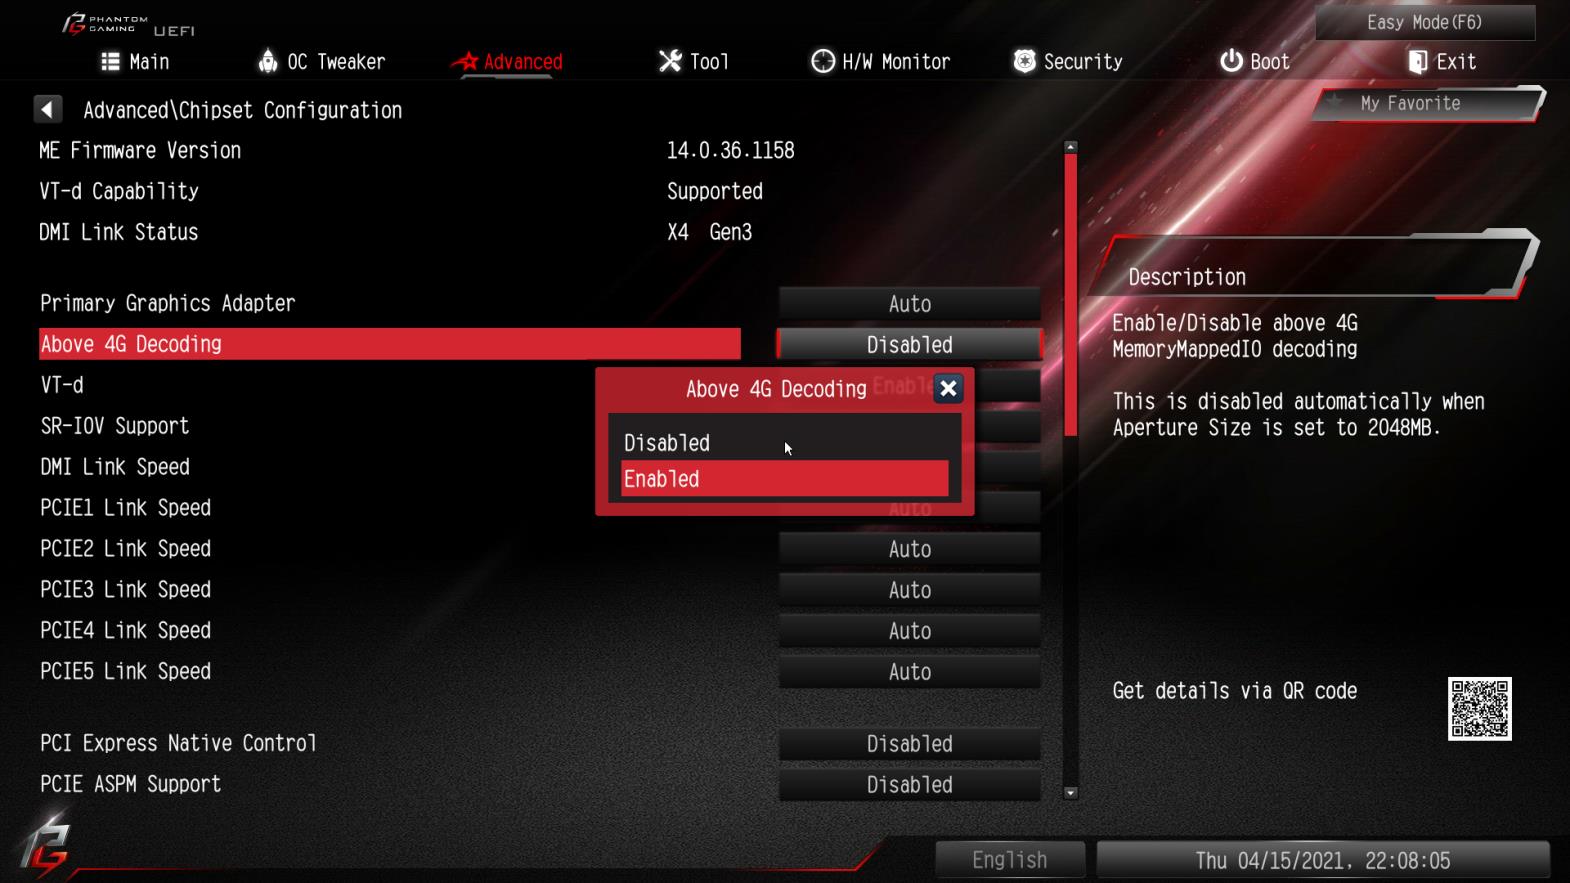
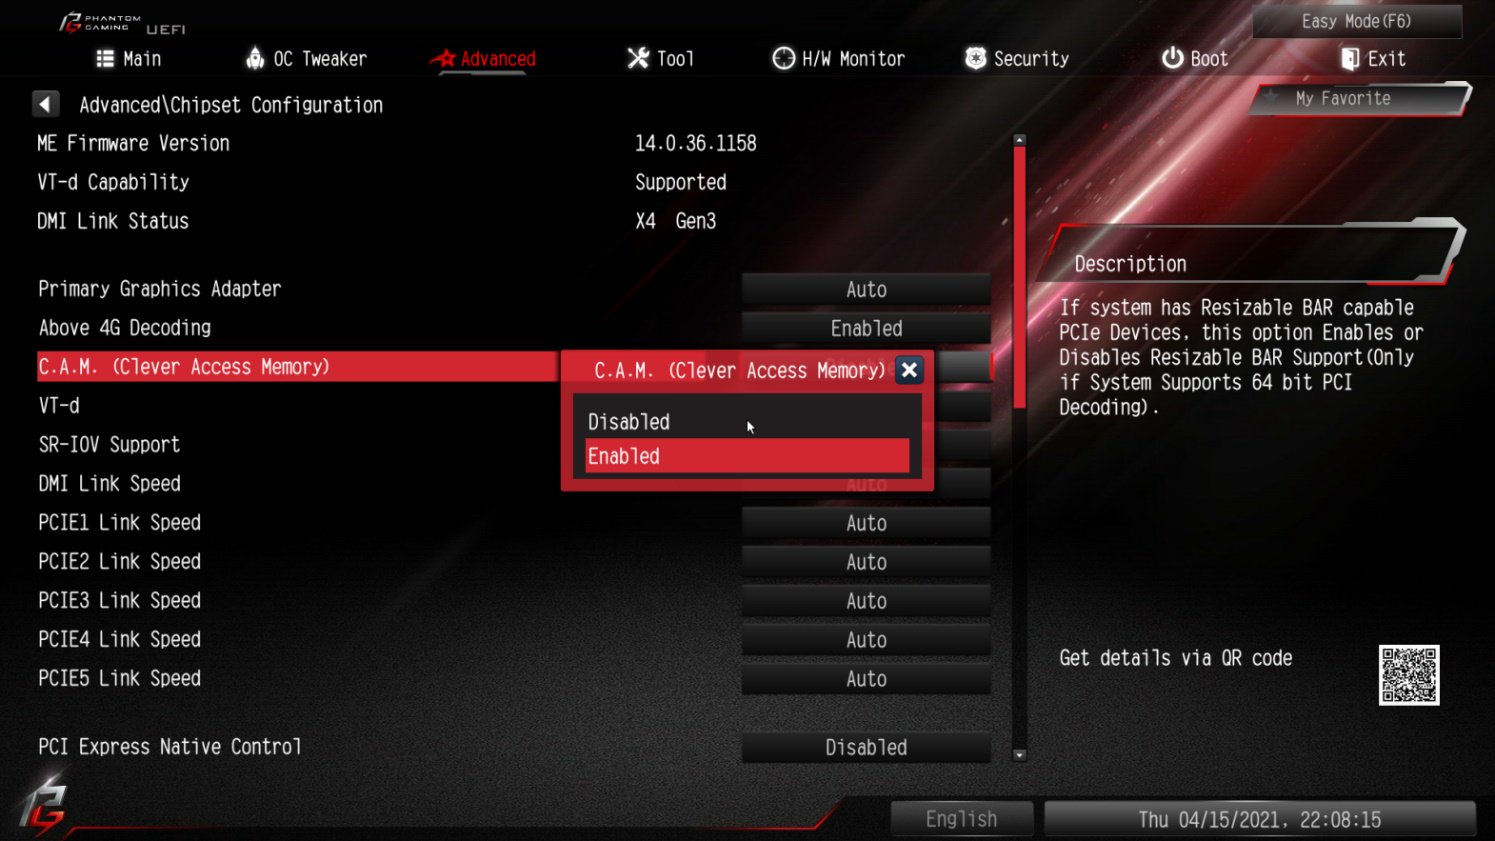
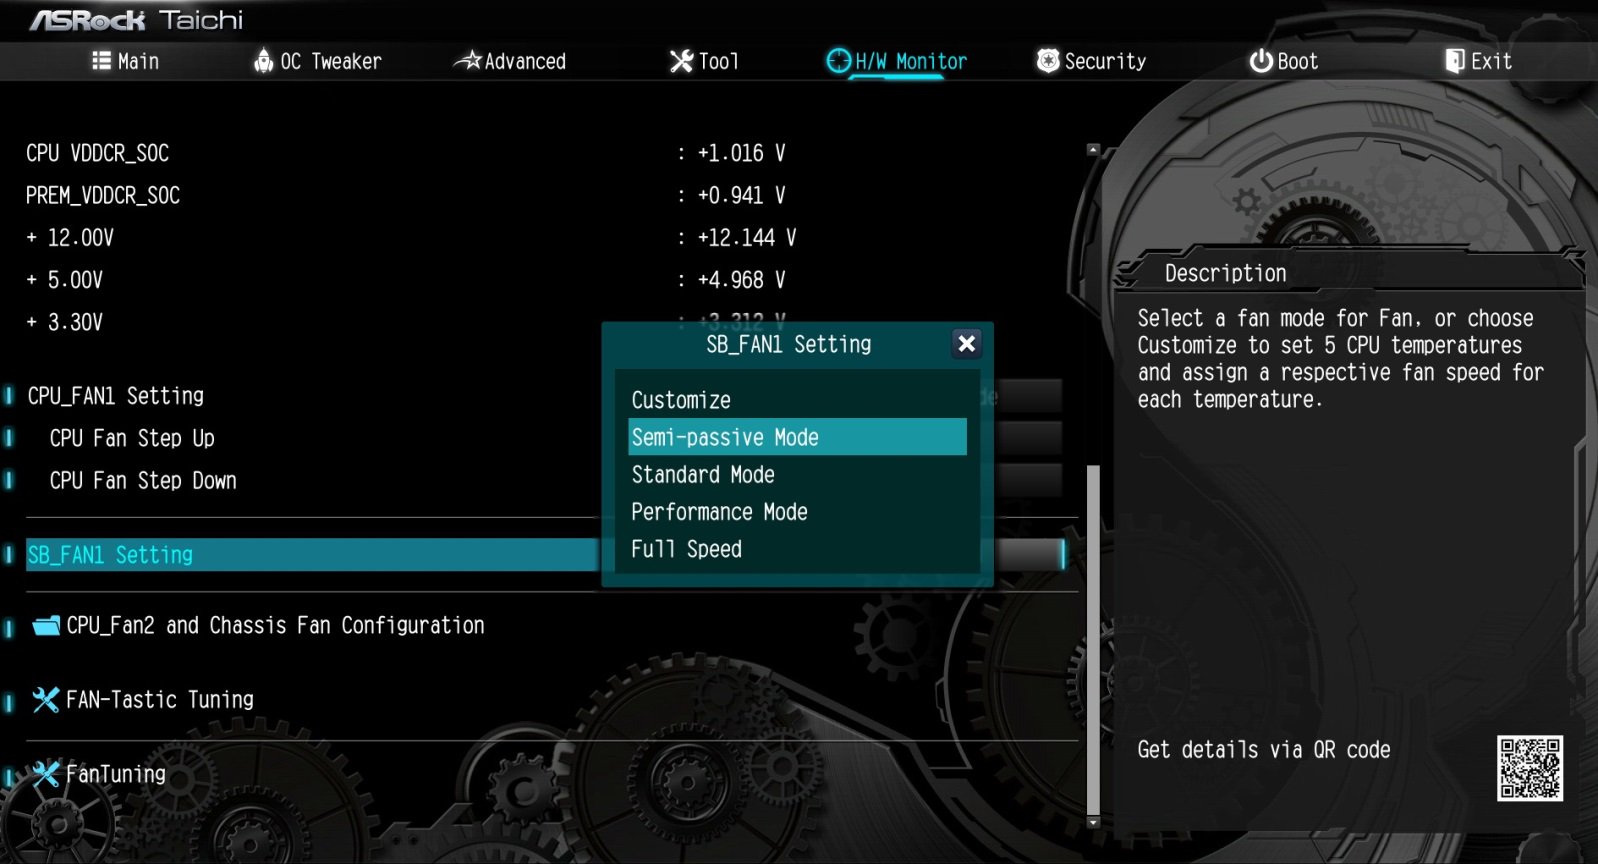
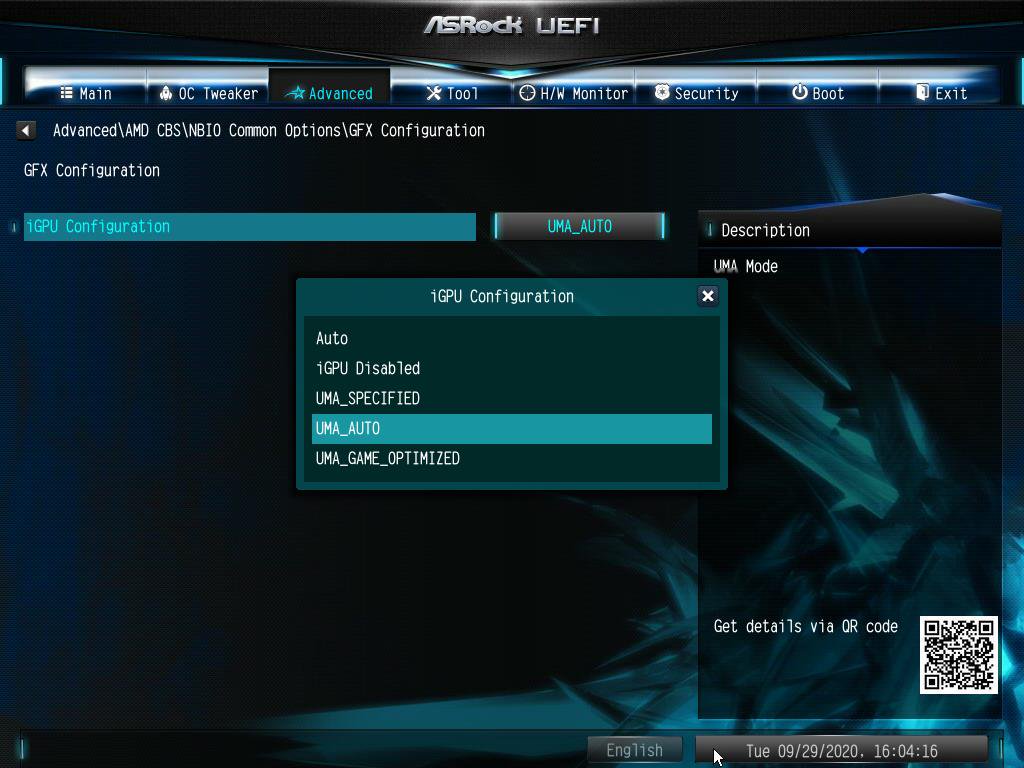
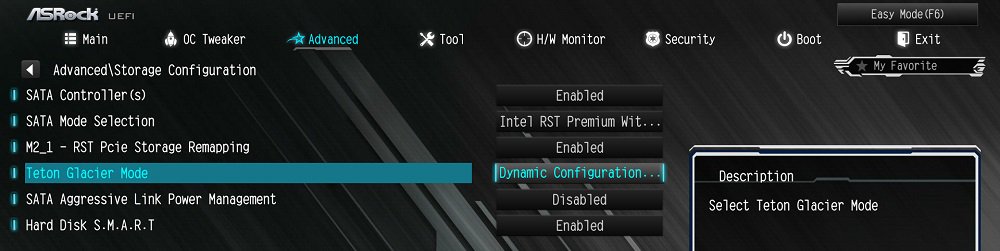
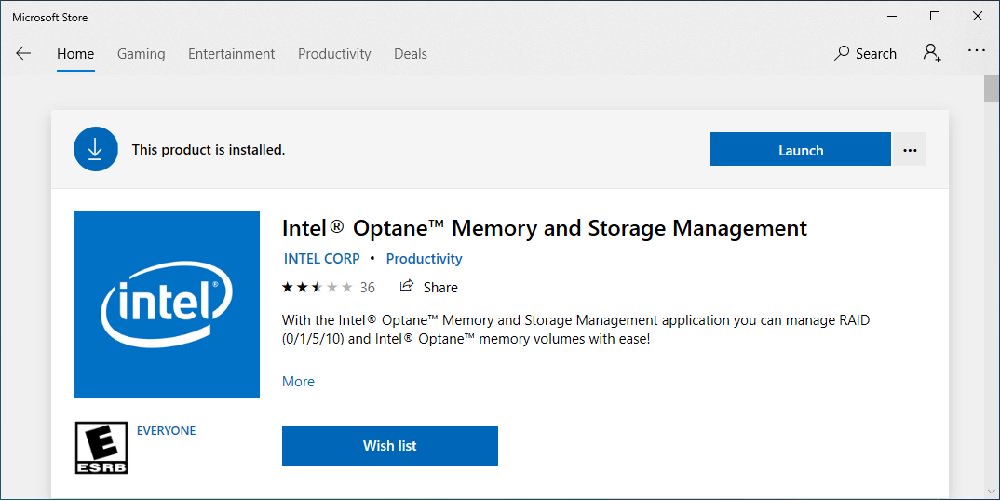
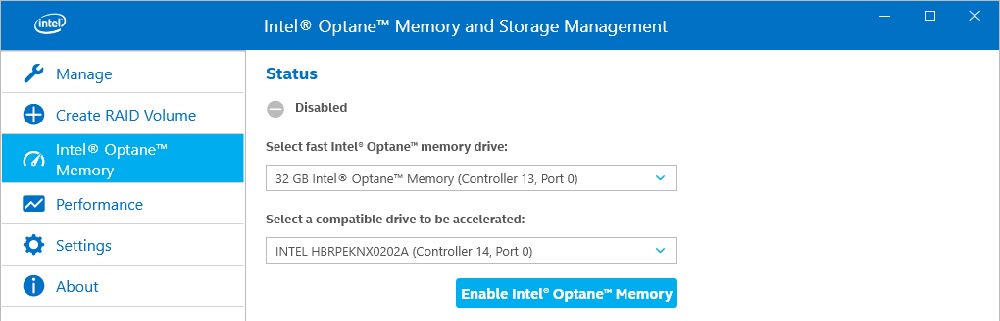
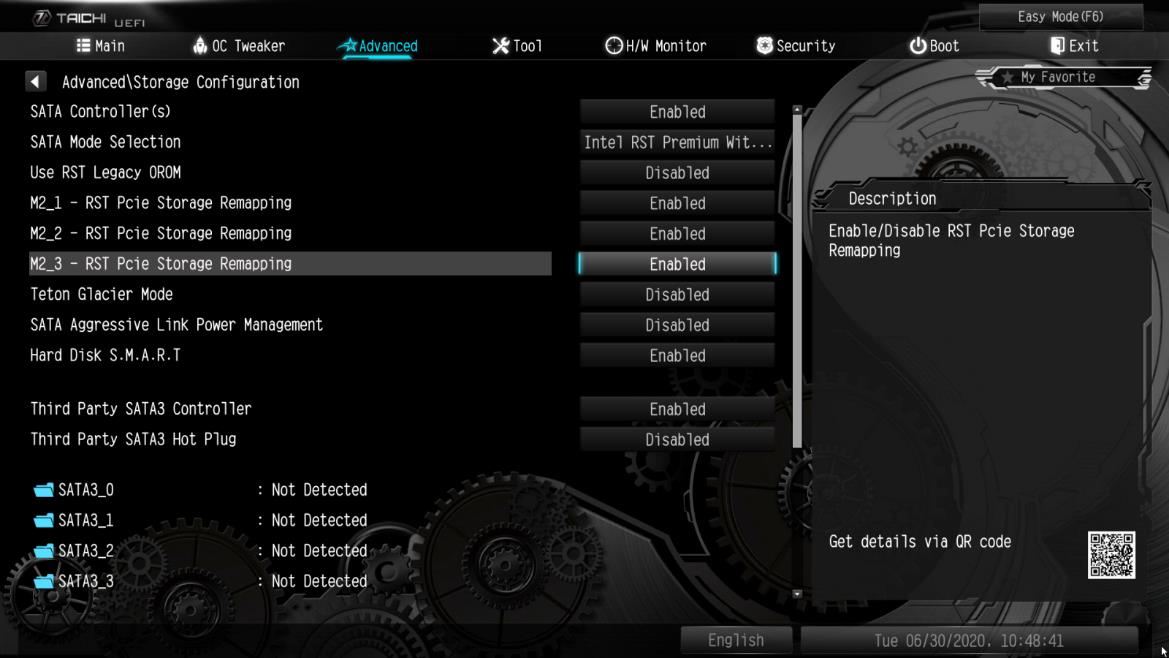
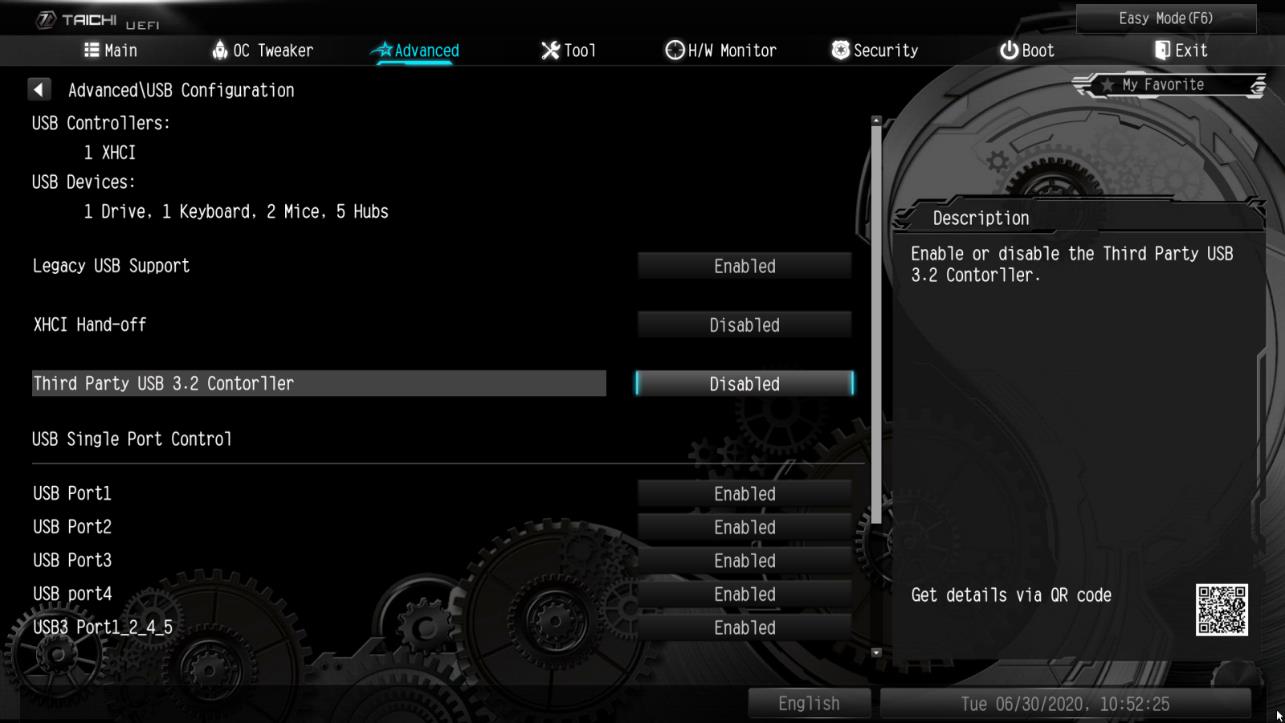
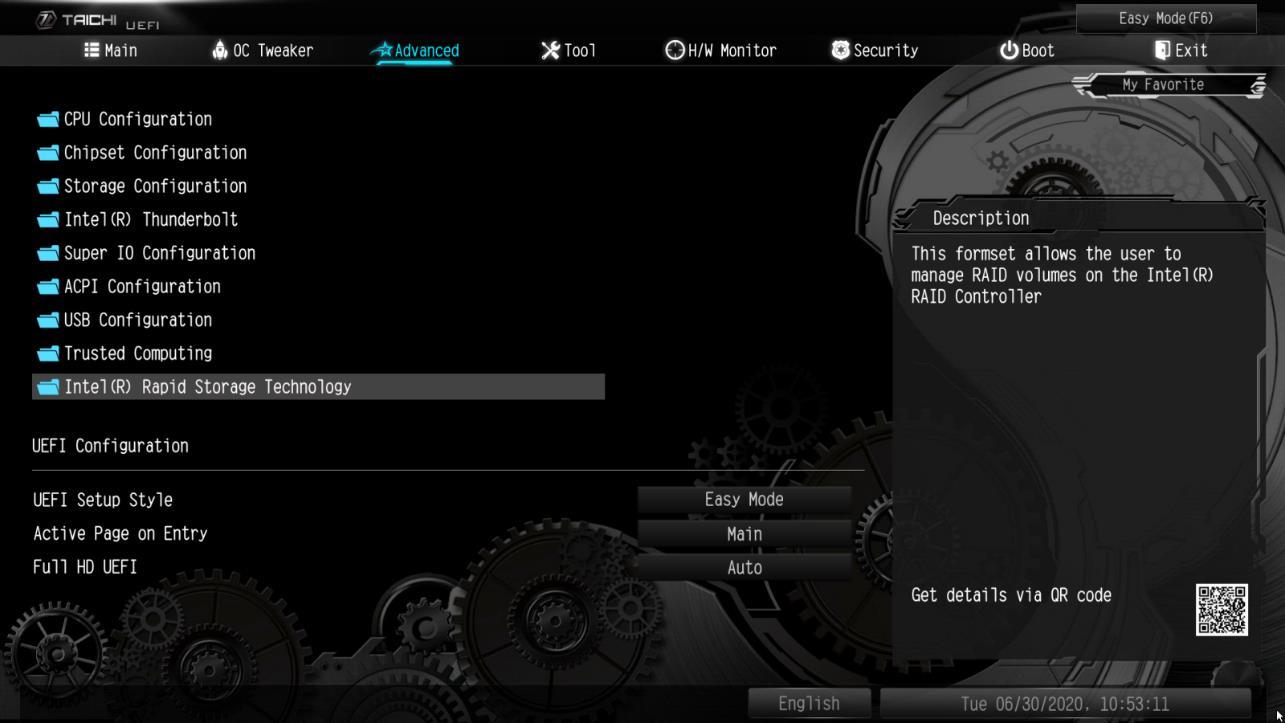
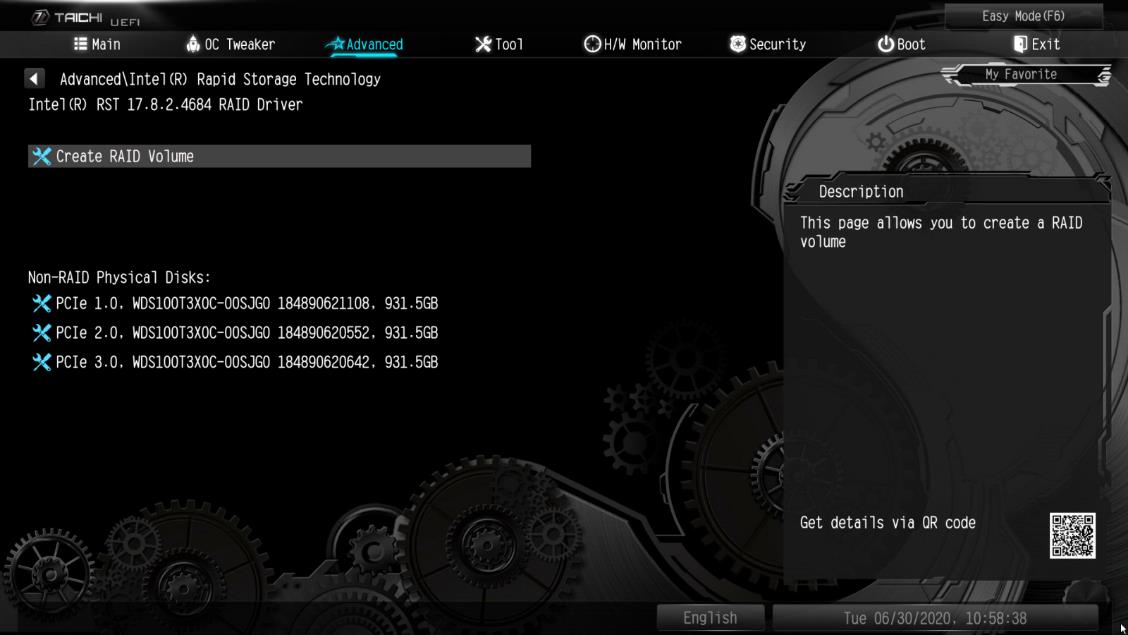
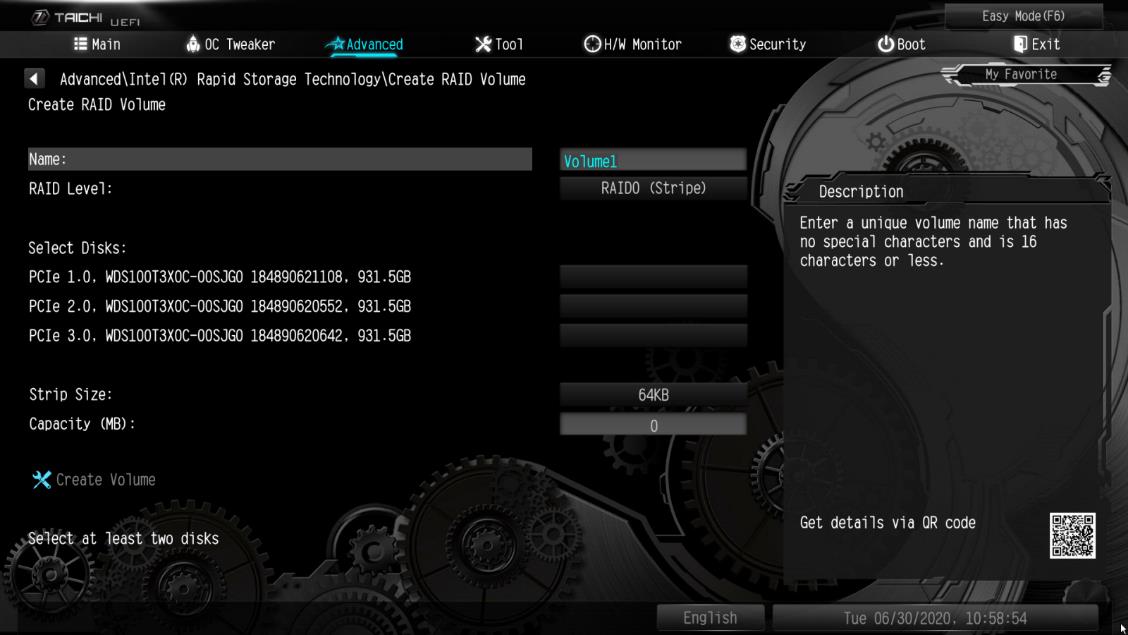

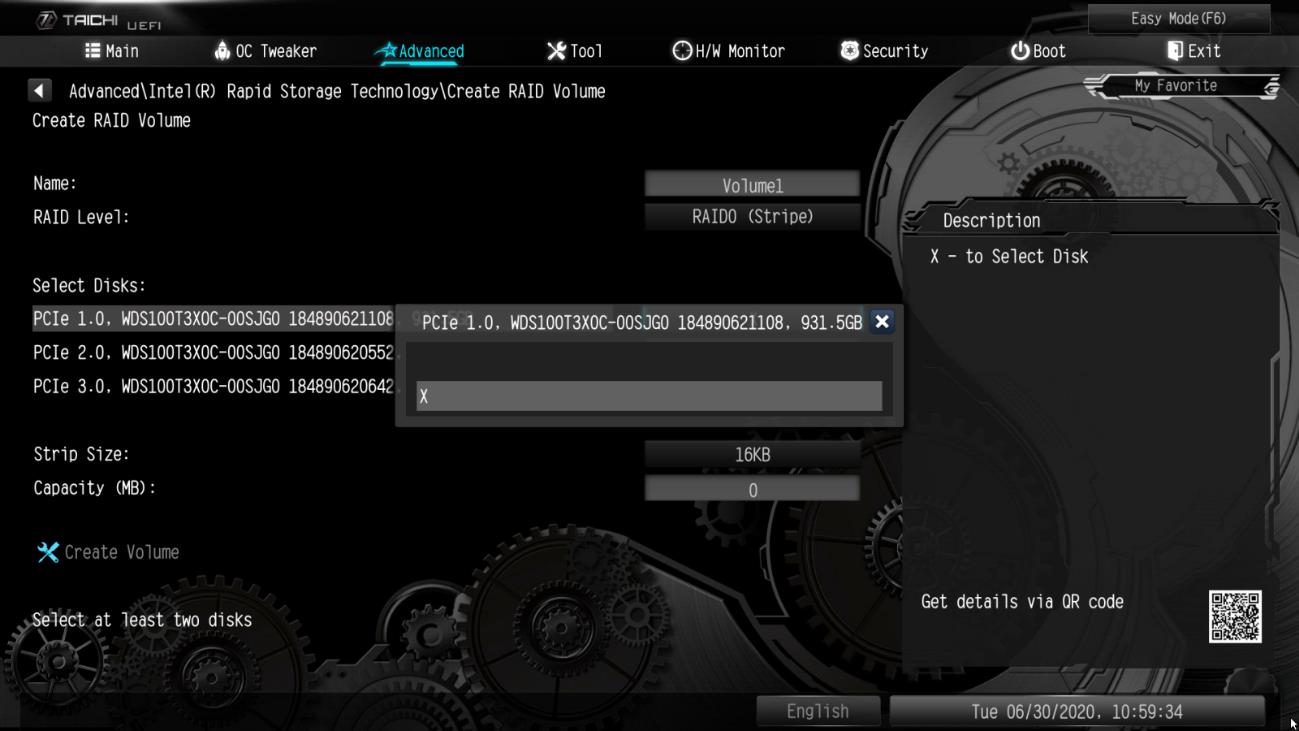
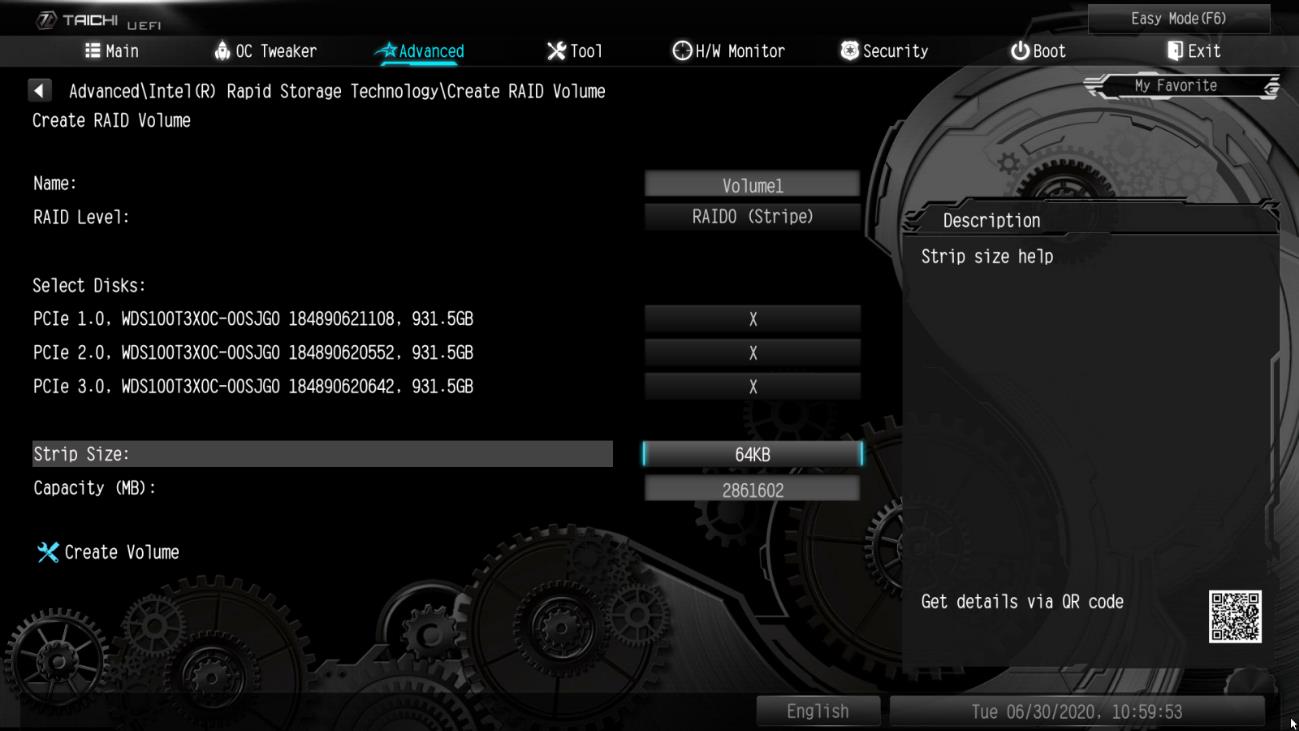

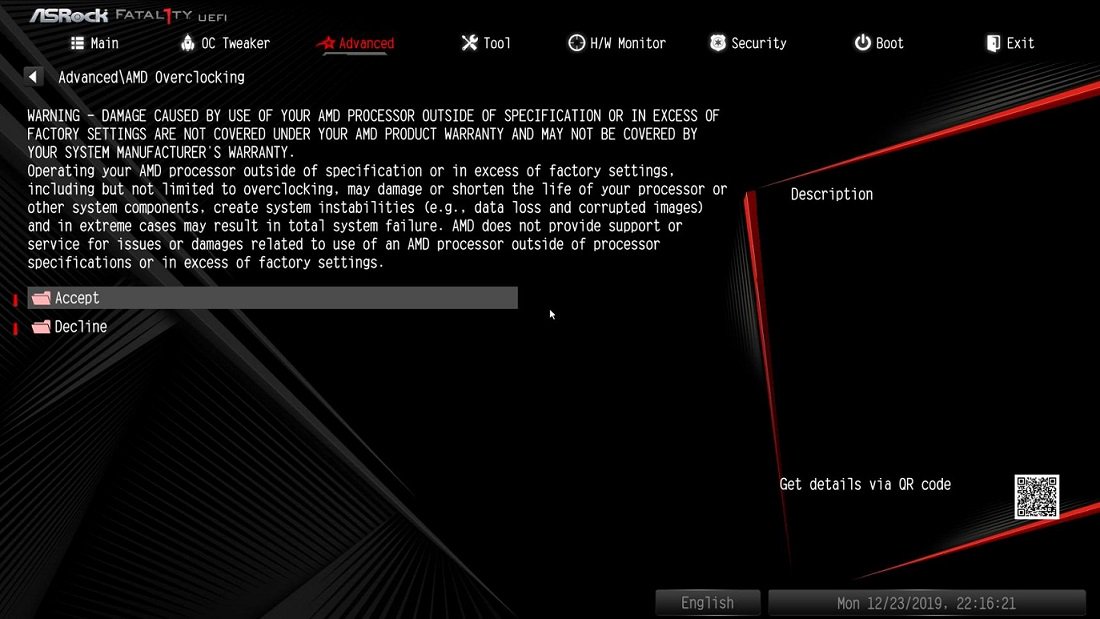

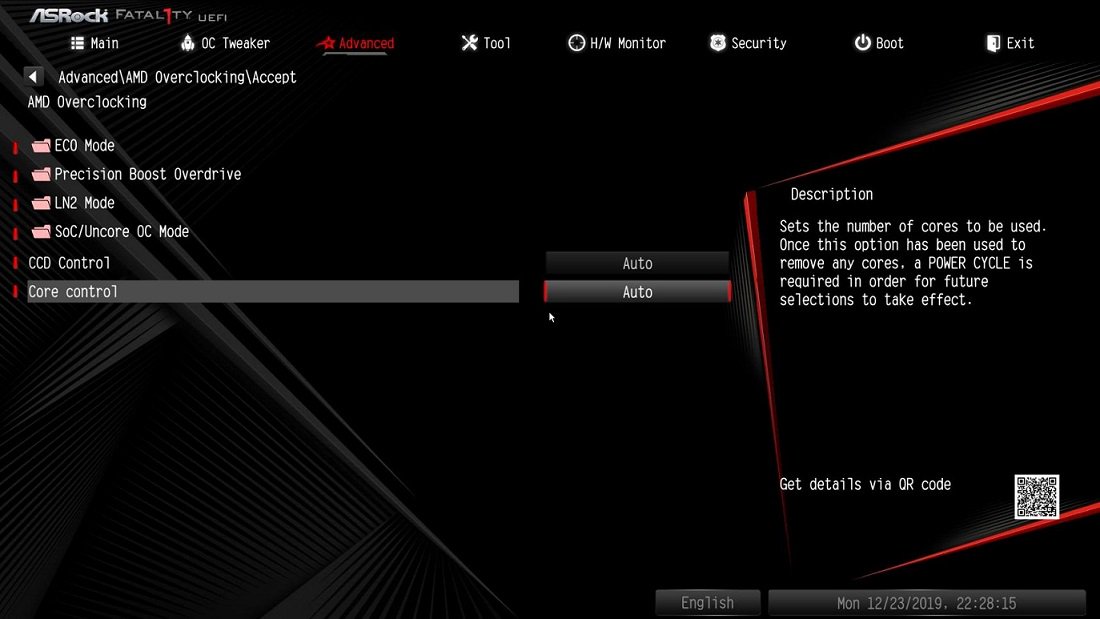

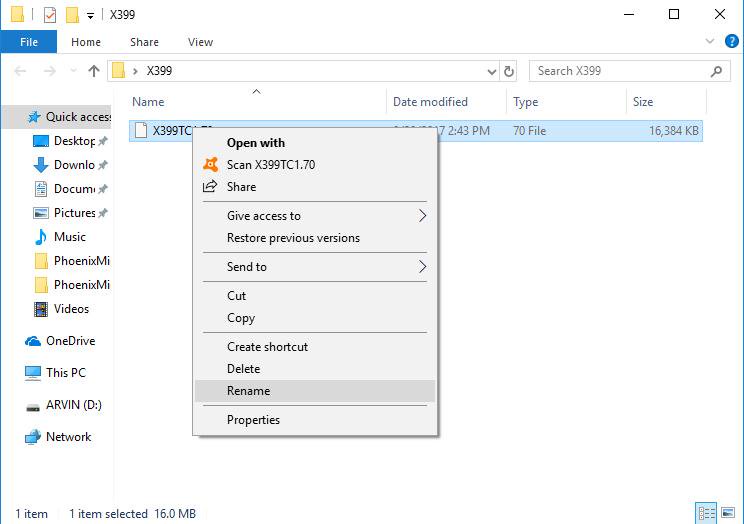
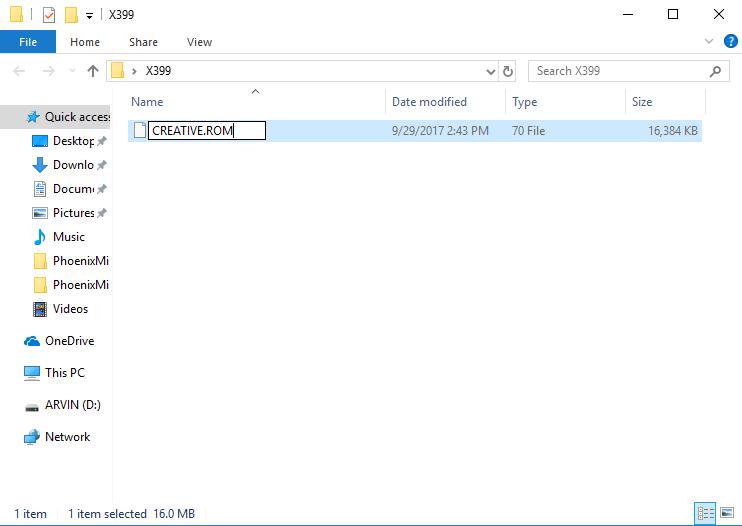
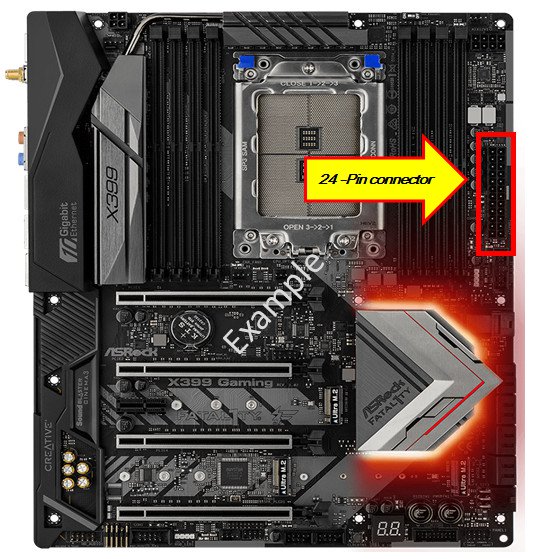

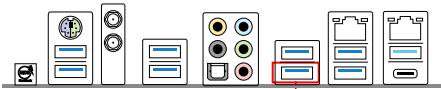
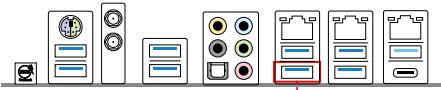

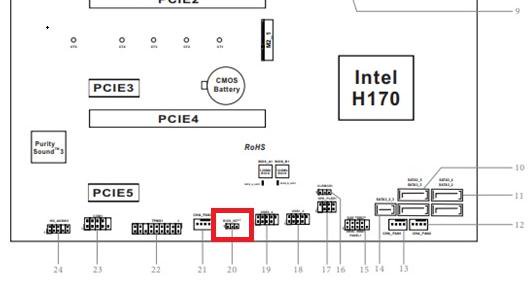
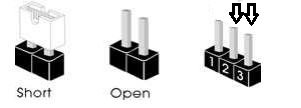
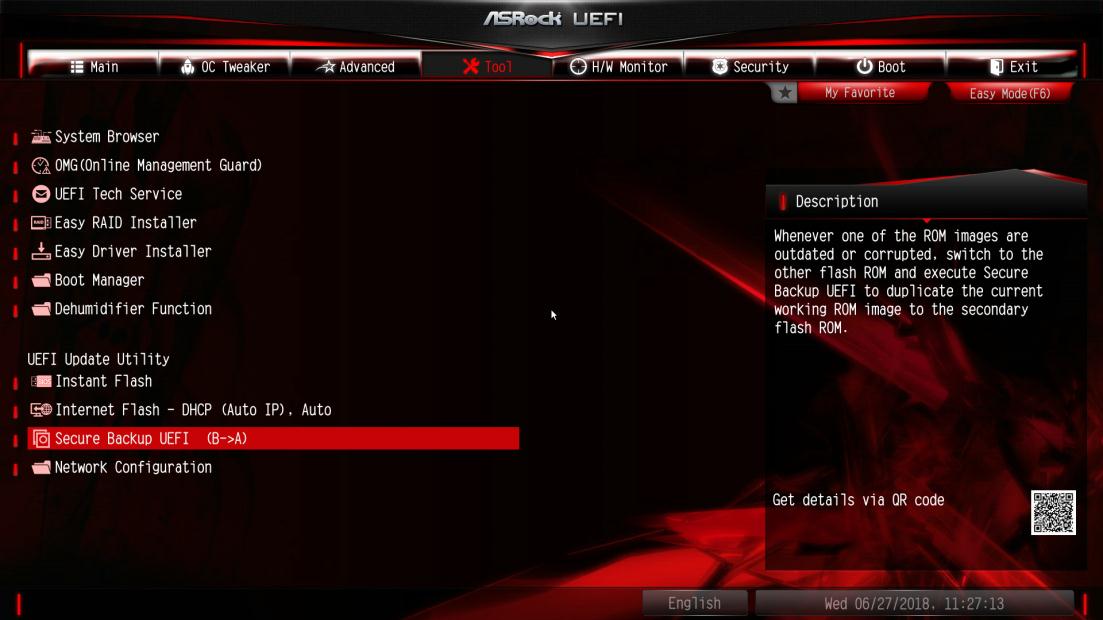
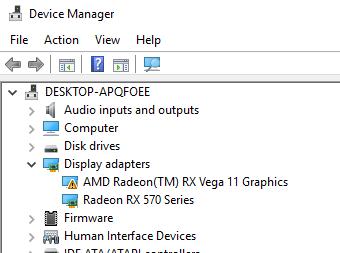
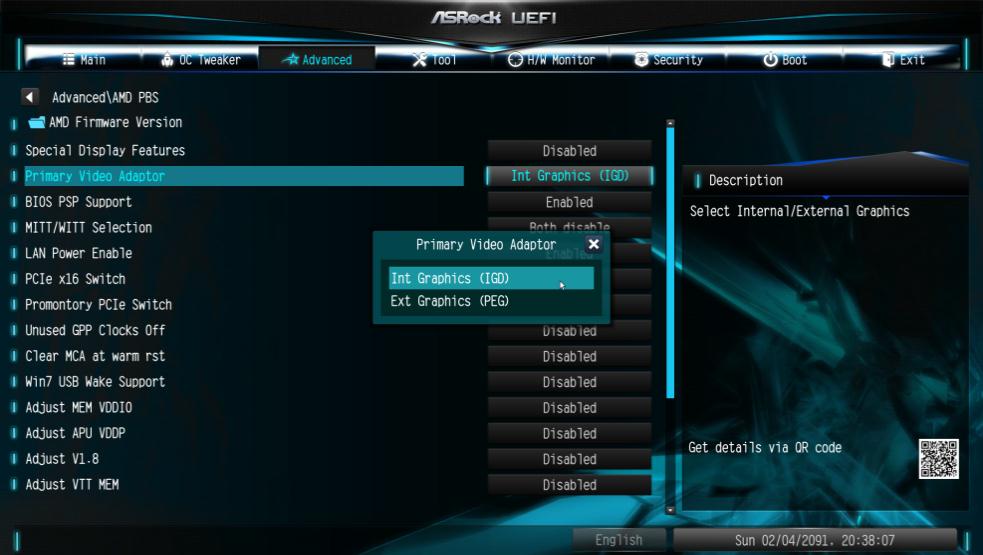

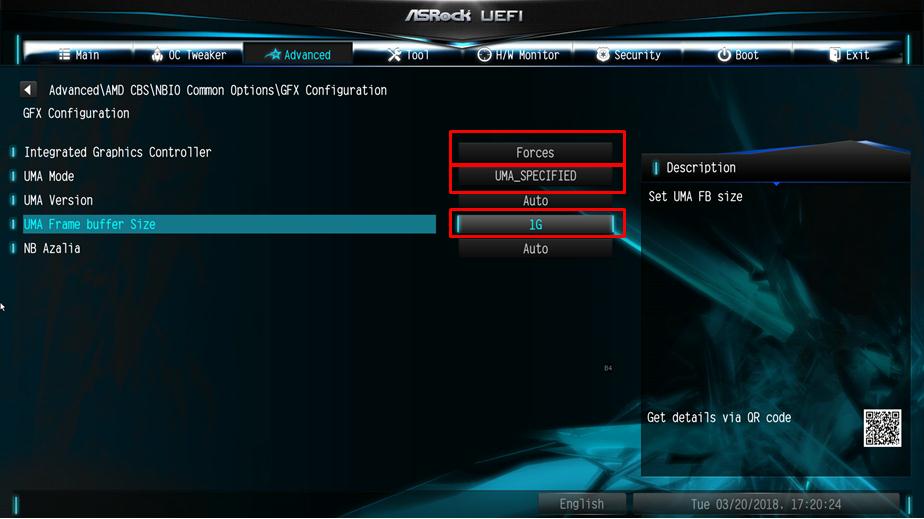
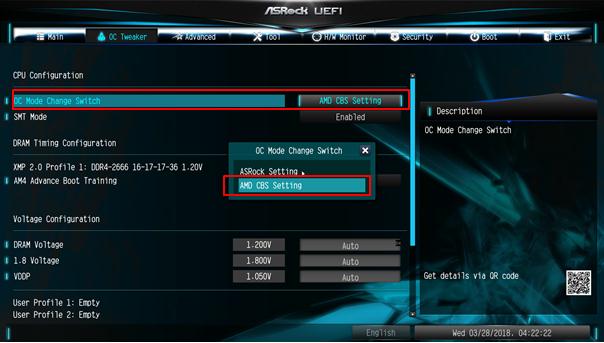
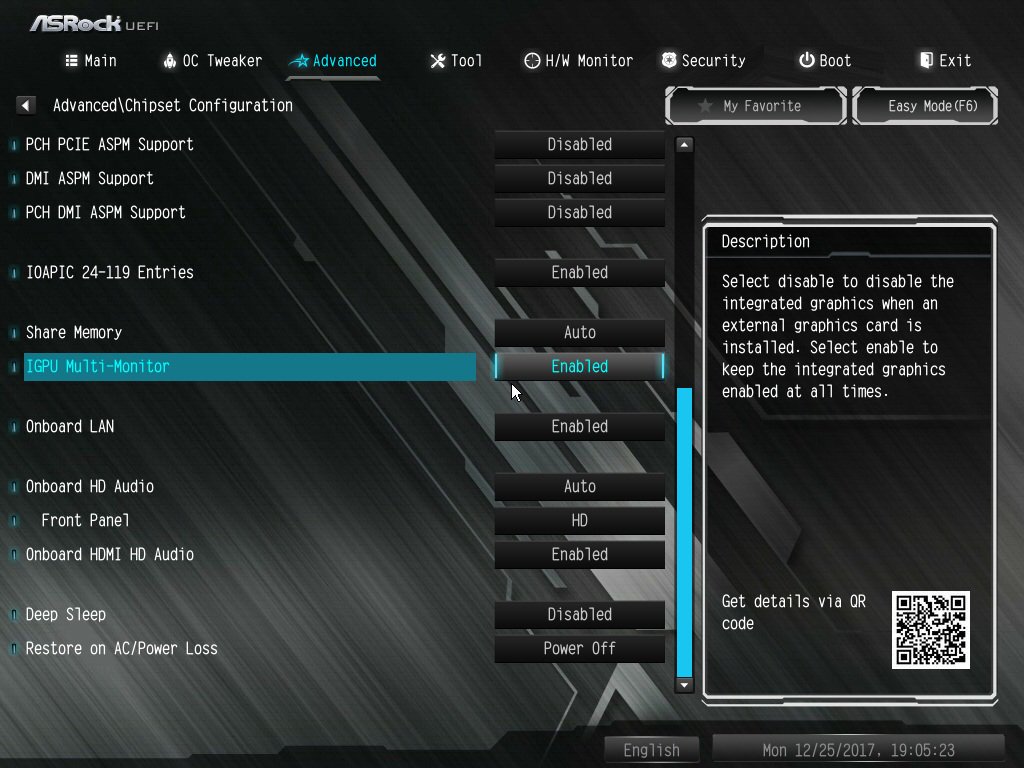

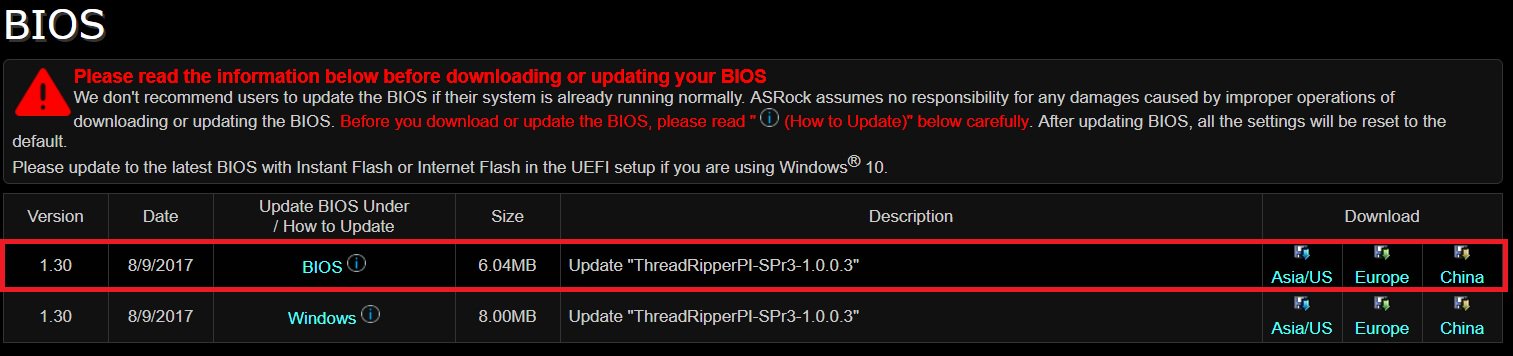
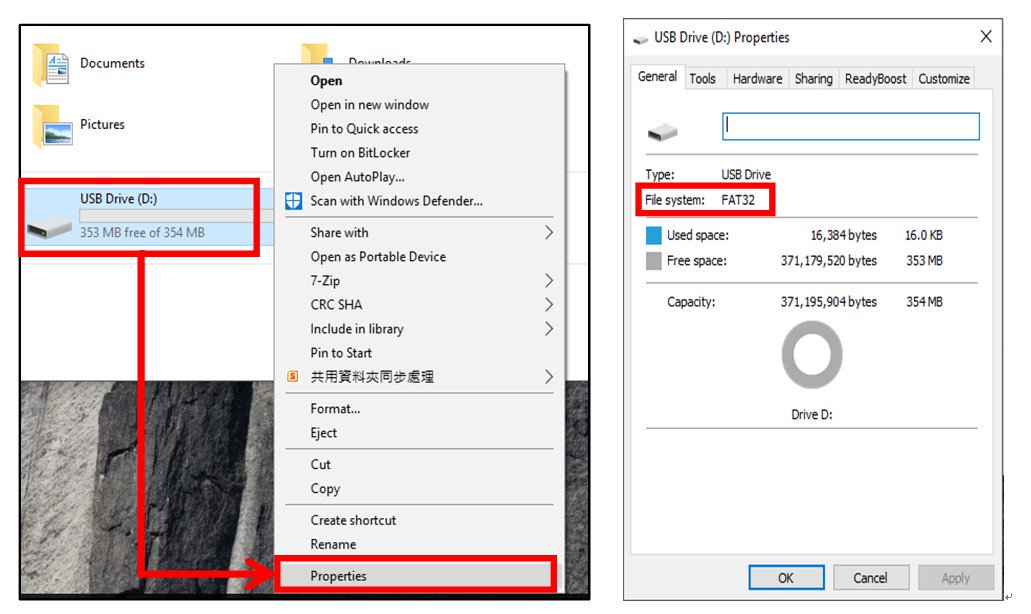
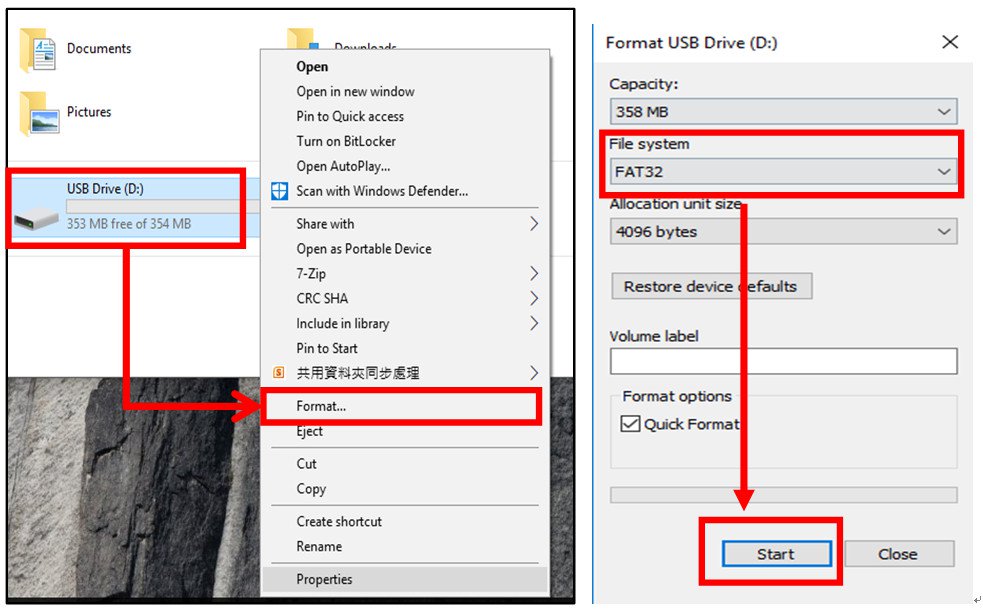


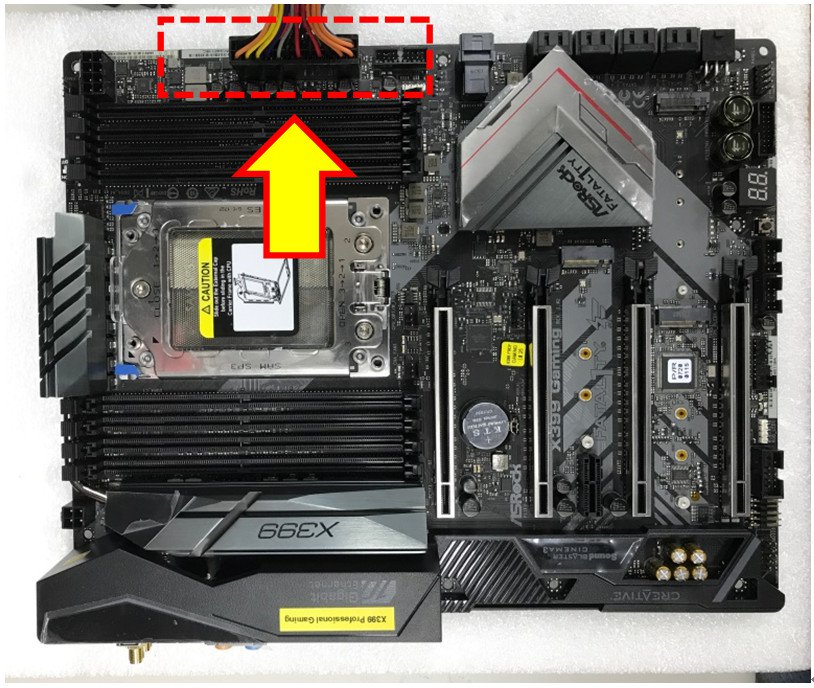
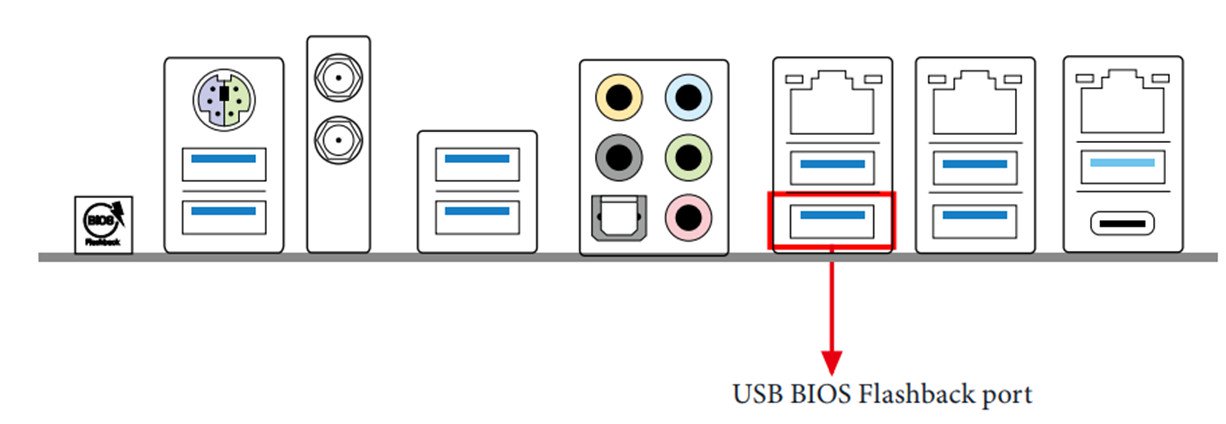
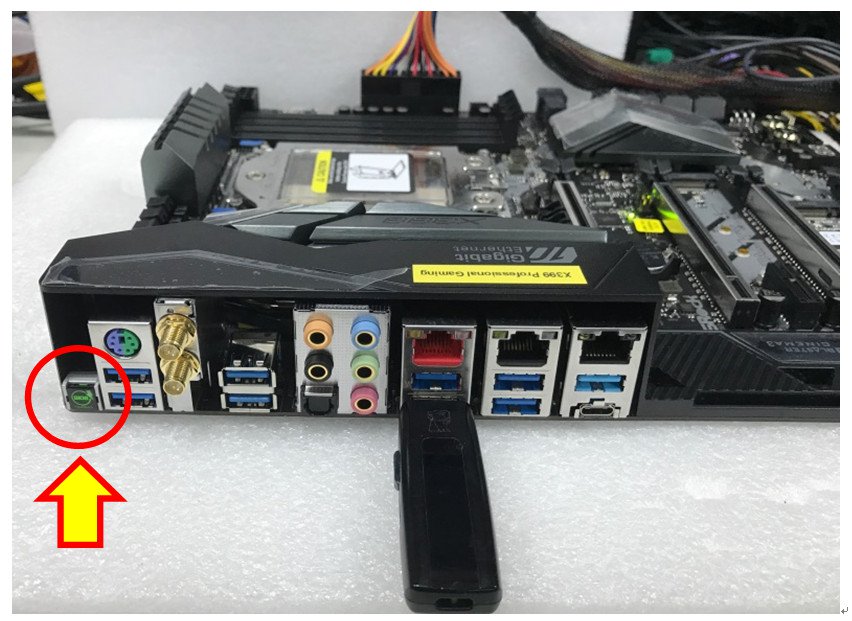
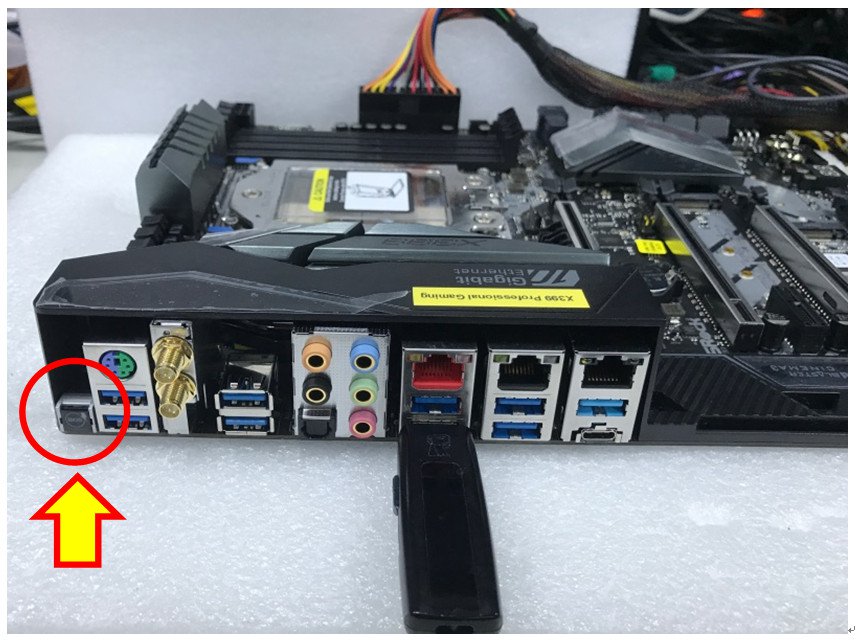
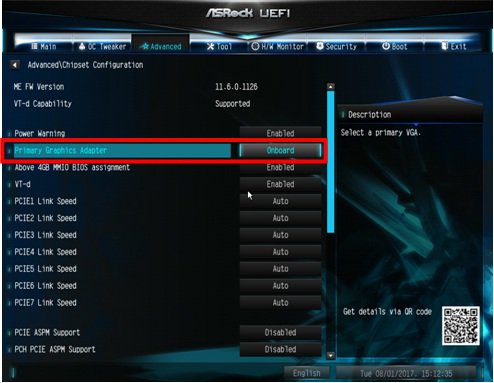

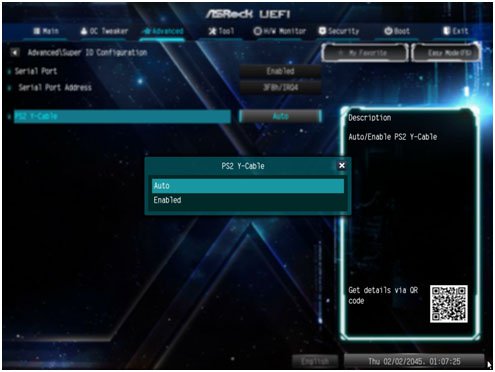
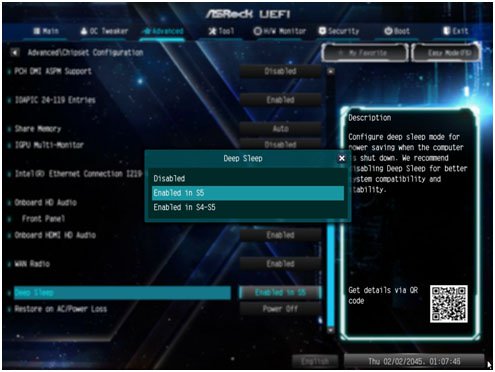
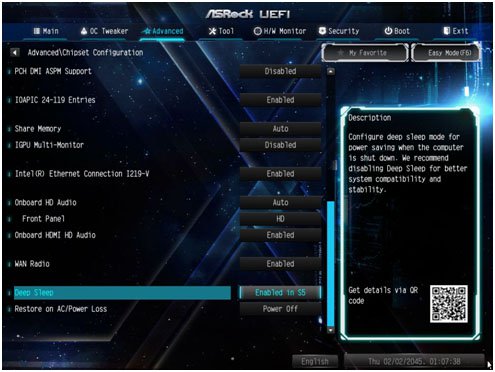

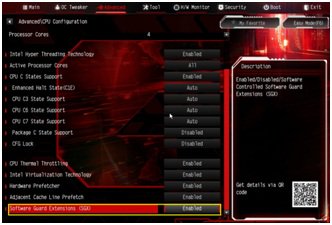
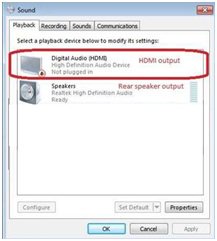
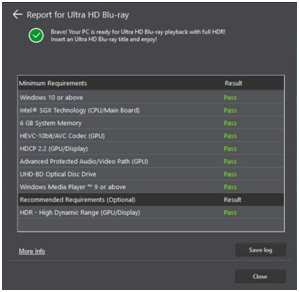
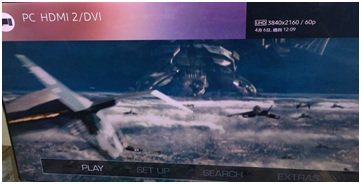

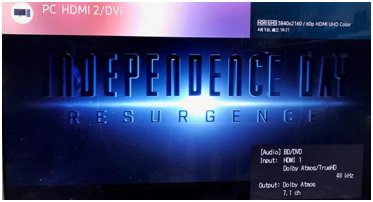
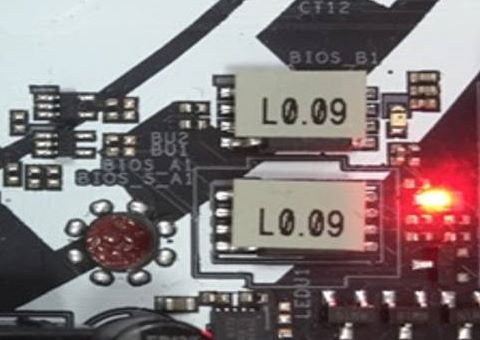
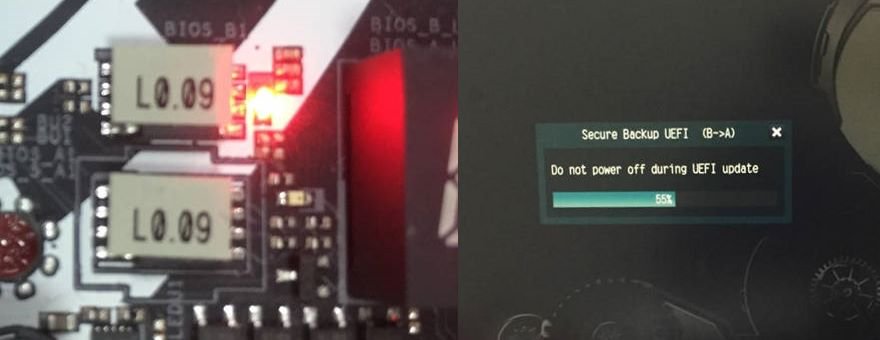
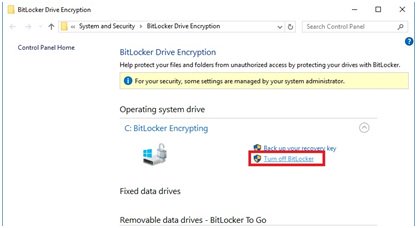
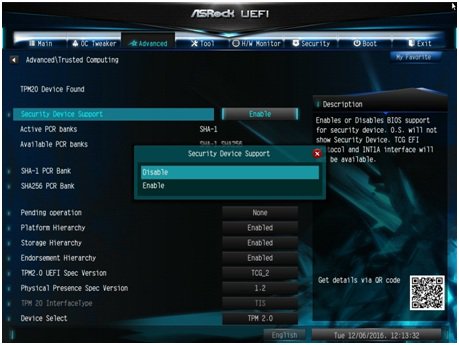
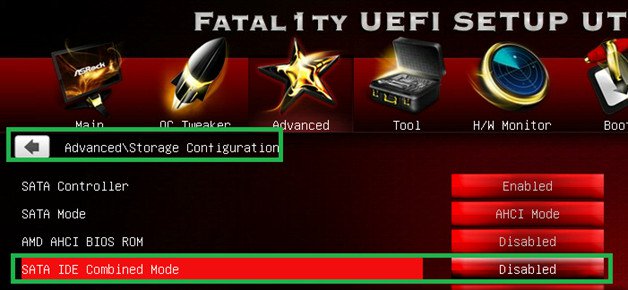
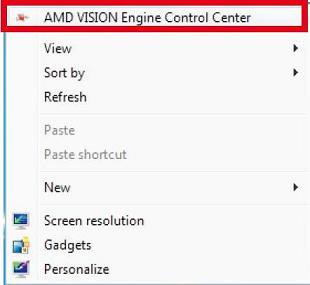
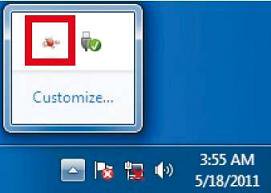
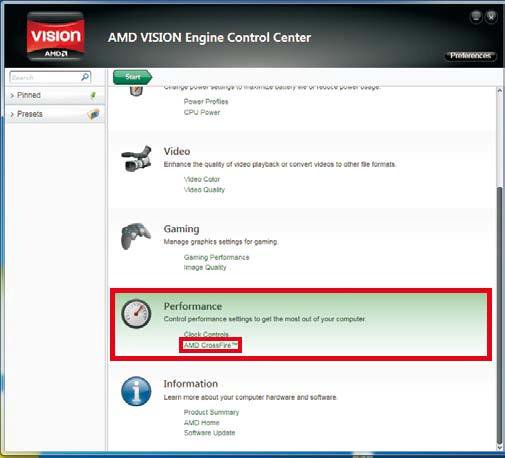
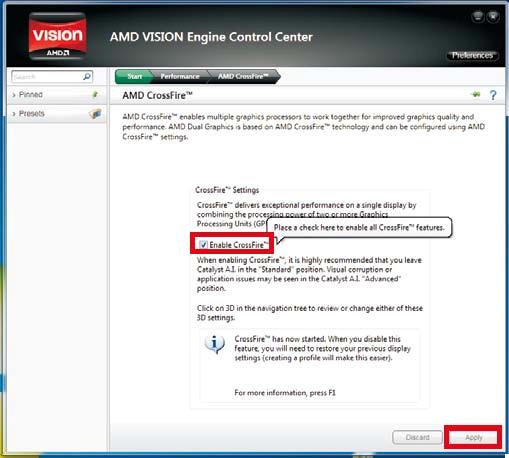
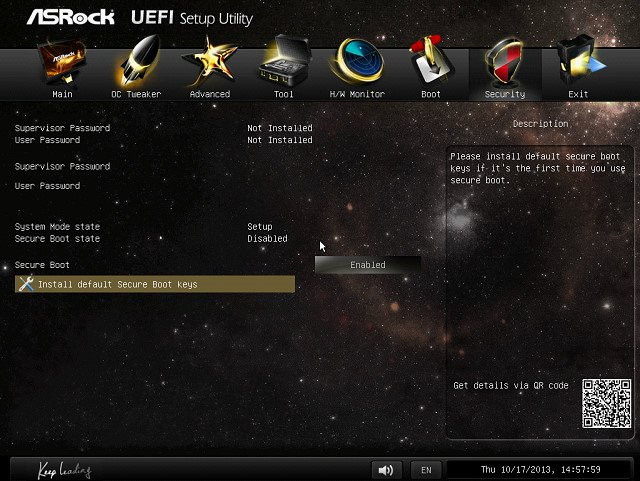
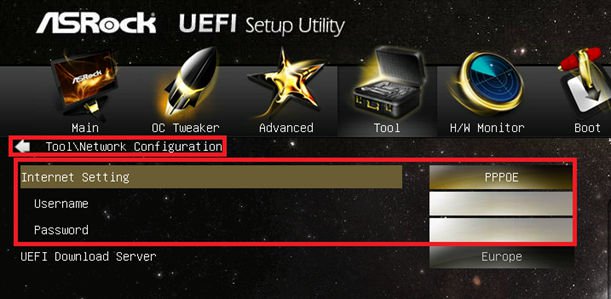
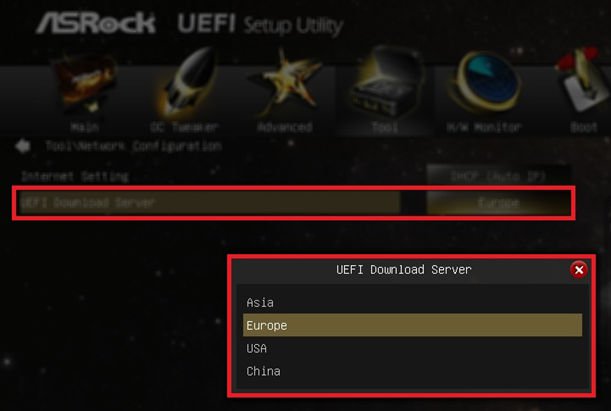

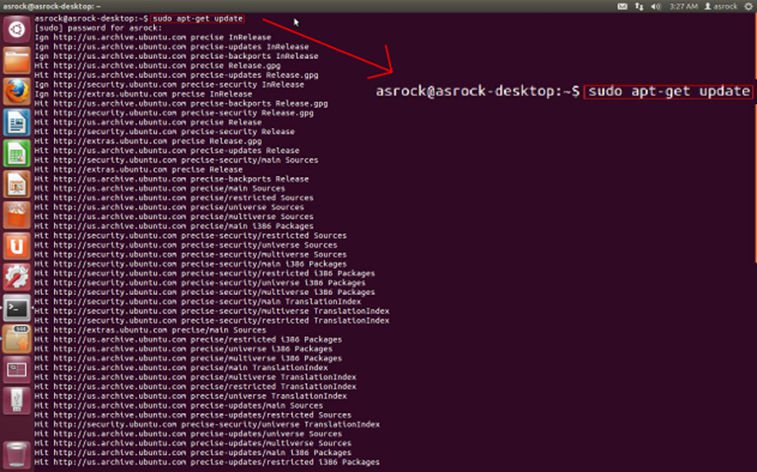
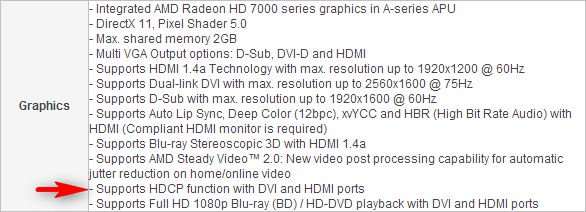
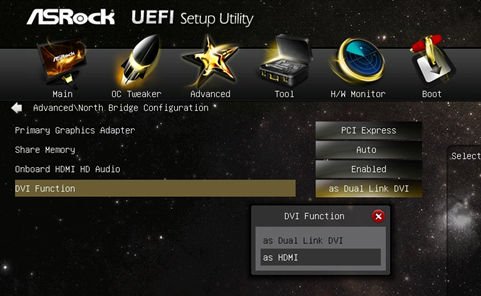
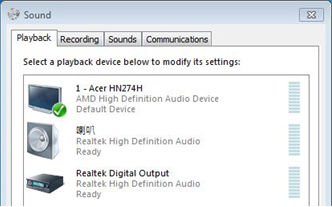
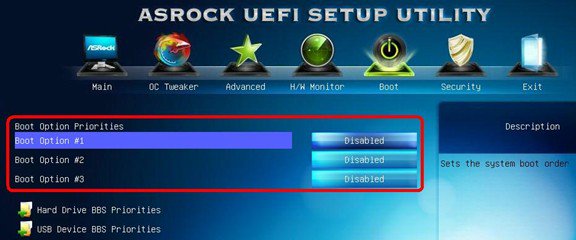
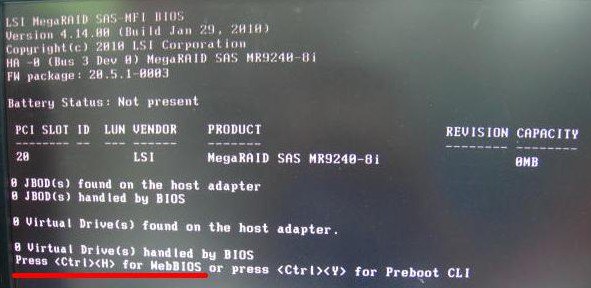

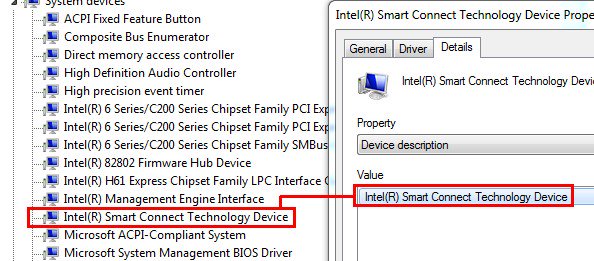
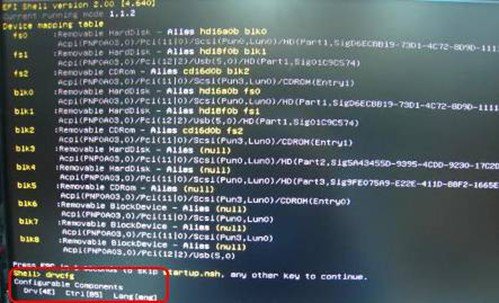
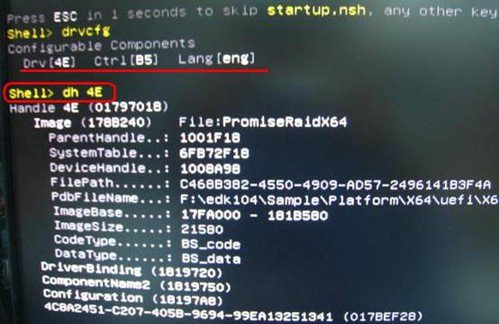
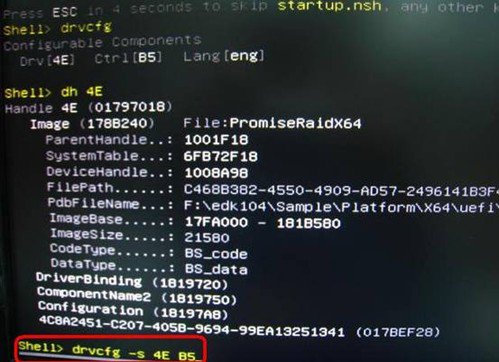
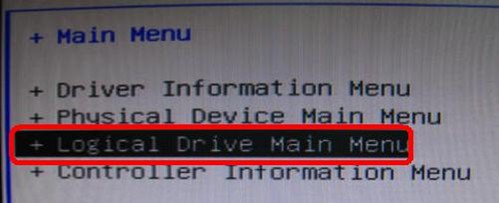
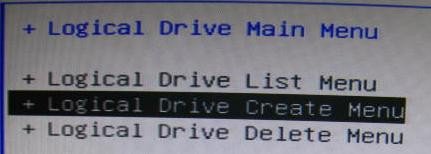
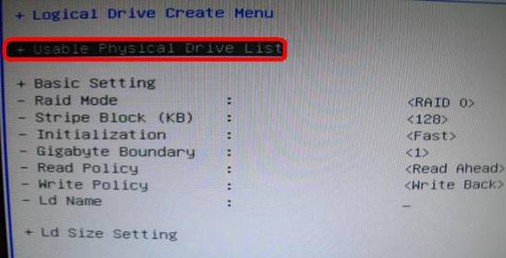

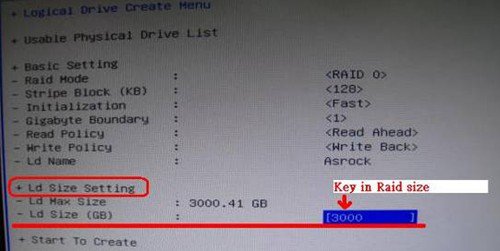
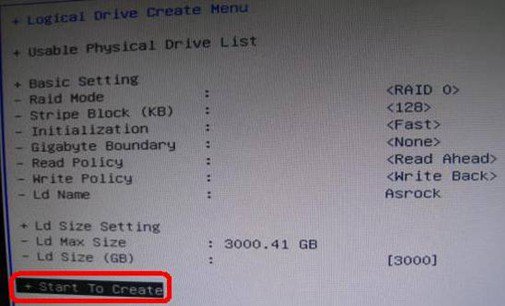

![Disabled [Onboard HDMI HD Audio] option](/support/faq/093.jpg)