Wir verwenden Cookies, um Ihnen ein individuelles und reibungsloses Erlebnis zu bieten. Wenn Sie diese Website besuchen, stimmen Sie unserer Verwendung von Cookies zu. Wenn Sie es vorziehen, keine Cookies zu akzeptieren oder weitere Informationen benötigen, lesen Sie bitte unsere Datenschutzerklärung.
Notwendige Cookies Diese Cookies sind für die einwandfreie Funktion der Website unerlässlich und können nicht deaktiviert werden.
Analyse-Cookies Diese Cookies helfen uns zu verstehen, wie Besucher unsere Website nutzen.
Marketing-Cookies Diese Cookies werden verwendet, um Besucher zu verfolgen und relevante Werbung anzuzeigen.
Soziale Medien-Cookie Diese Cookies ermöglichen es Ihnen, Seiten und Inhalte in sozialen Medien zu teilen.
Fallls Sie wissen, in welche Kategorie Ihre Frage gehört, können Sie hier die Kategorie der häufig gestellten Fragen auswählen. Katalog:
Ergebnisse:
Q (Q&A-191|552):
I am trying to play the game, but it keeps showing an error regarding TPM attestation requisite and asking me to update BIOS firmware.(6/10/2026)
A:Due to the known TPM attestation issue on the AM4 platform, errors may occur when launching games that require anti cheat enforcement if the system's TPM firmware version is outdated.
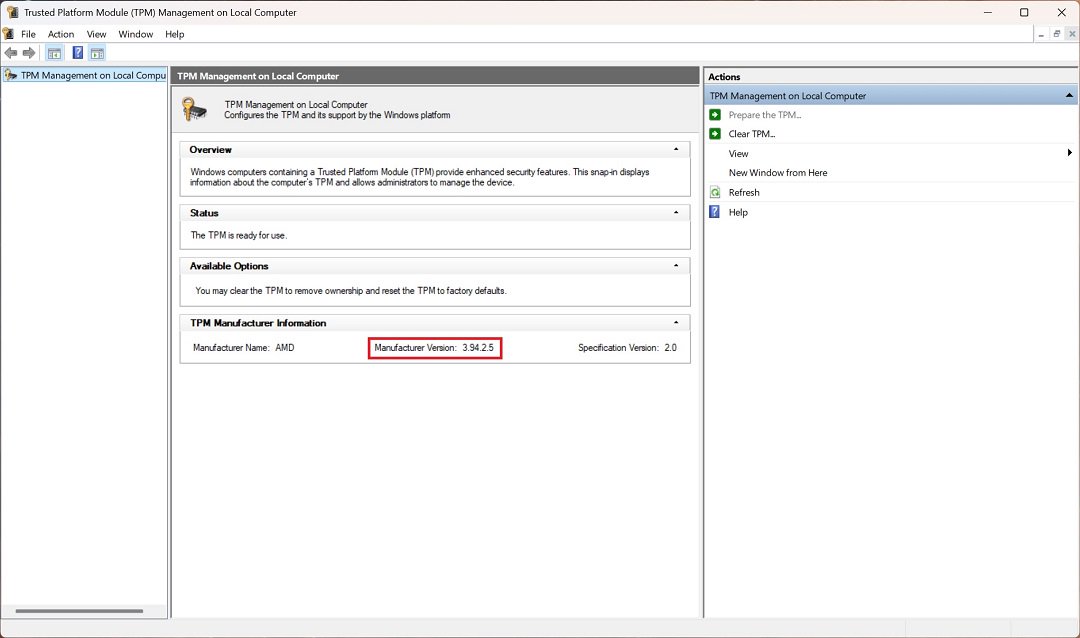
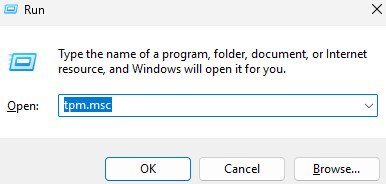
1. Press Win key + R in Windows OS
2. Type tpm.msc and press Enter
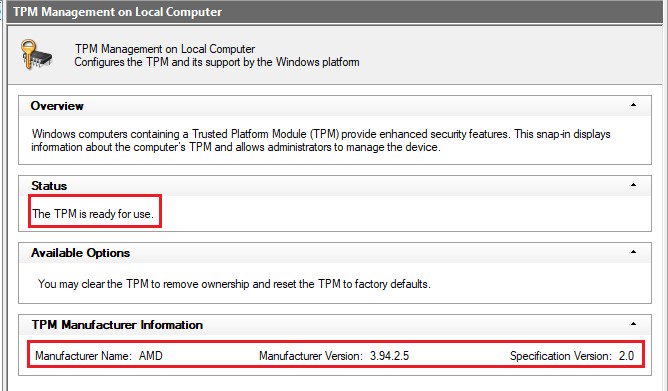
3. You can check the TPM status and the TPM firmware version in the window.
On AM4 platform, the fTPM version should be 3.*.2.* to ensure proper operation of the games.
ASRock has released BIOS including updated fTPM to address this issue.
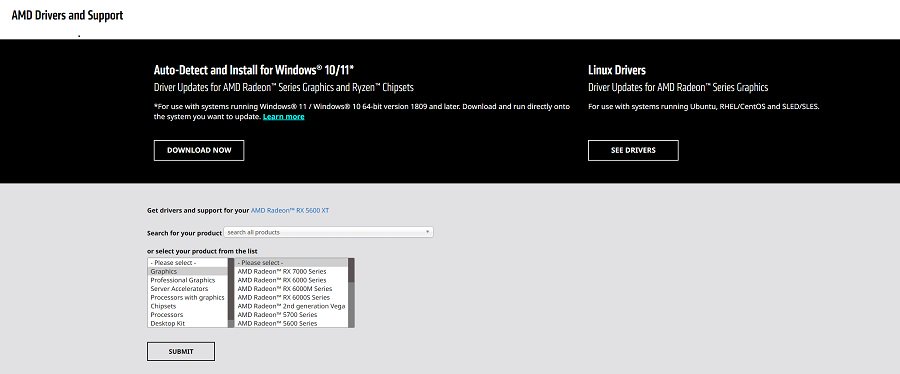
Please visit ASRock website and search the model name of the motherboard you are using to obtain the updated BIOS file from support page. https://www.asrock.com/index.asp
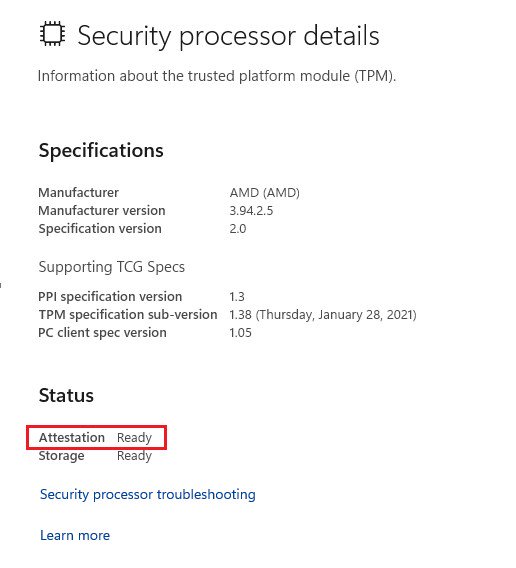
Please ensure that TPM attestation shows as Ready in the Windows Security processor details page after performing the BIOS update.
If it shows Not Ready, please ensure that the system has a proper network connection, then reboot the system and recheck the status.
1. Press Win key + R in Windows OS
2. Type windowsdefender://securityprocessor and press OK
Based on AMD's official response, the updated fTPM is only available for following CPU series. If the CPU model you are using is not included in the supported lineup, it will not be able to meet the TPM attestation requisite of the games that require anti-cheat.
#CoD#Call of Duty#fTPM#firmware TPM#anti-cheat#TPM Attestation#TPMB
Q (Q&A-190|551):
Microsoft will update the Secure Boot certificates. What do I need to do?(3/16/2026)
A:You only need to follow one of the update methods below and wait for the new Windows Boot Manager to take effect:
Method 1: Update through Windows Update
If Windows Update is turned on and Secure Boot is enabled (see "How to enable Secure Boot”), supported Windows devices will automatically download and install the new Secure Boot certificates and the new Boot Manager.
Since 2024, Microsoft has been rolling out the new Secure Boot database update in phases. All devices with Secure Boot enabled will receive the update automatically before the certificate expires in June 2026.
With default settings, users usually do not need to do anything manually. Just keep Windows Update enabled and wait for the update to install automatically.
Method 2: Manually update the UEFI / BIOS
Note:After updating the BIOS, the system may ask for your BitLocker recovery key to unlock Windows.
You may also choose to turn off Device Encryption and Standard BitLocker Encryption before updating the BIOS, then turn them back on afterward to keep your data safe.
If your device cannot get the update through Windows Update, you can download and install the latest UEFI BIOS from the official website to get the updated Secure Boot certificates.
1. Visit the ASRock official website, search for your motherboard model, and download the latest UEFI BIOS from the support page.
2. Clear the Secure Boot keys.
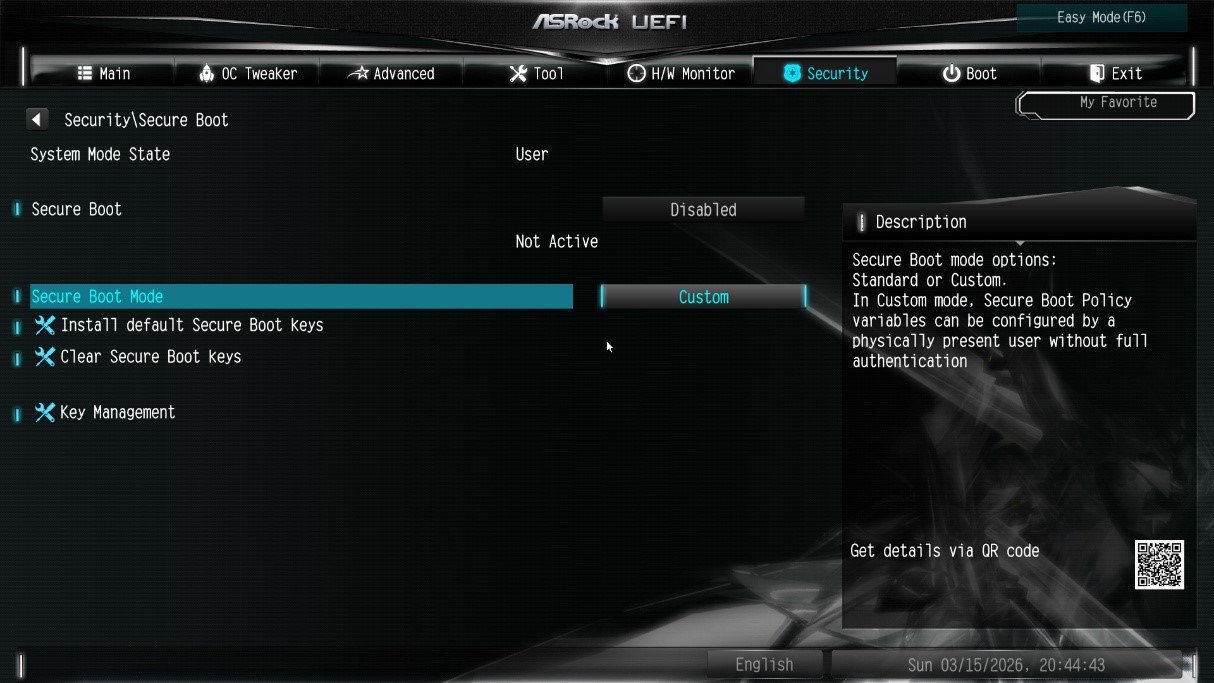
① After updating the BIOS and rebooting, enter BIOS Setup and go to:
Advanced \ Security > Secure Boot
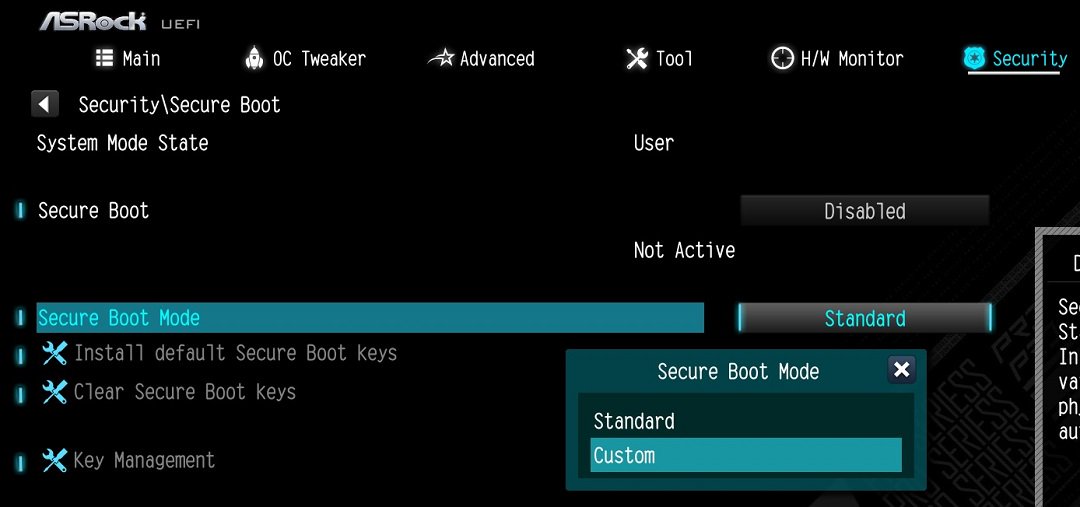
② If Secure Boot Mode is set to Standard, change it to Custom.
③ Select Key Management.
④ Select Clear Secure Boot Keys, then choose [Yes].
⑤ Confirm that all UEFI Secure Boot keys (PK, KEK, DB, DBX) have been cleared.
3. Install the default Secure Boot keys.
① After clearing the keys, select Install Default Secure Boot Keys, then choose [Yes].
② Confirm that the Size/Number of Keys for PK / KEK / DB / DBX is not 0, and the Key Source shows [Factory]. This means the Secure Boot key update is complete.
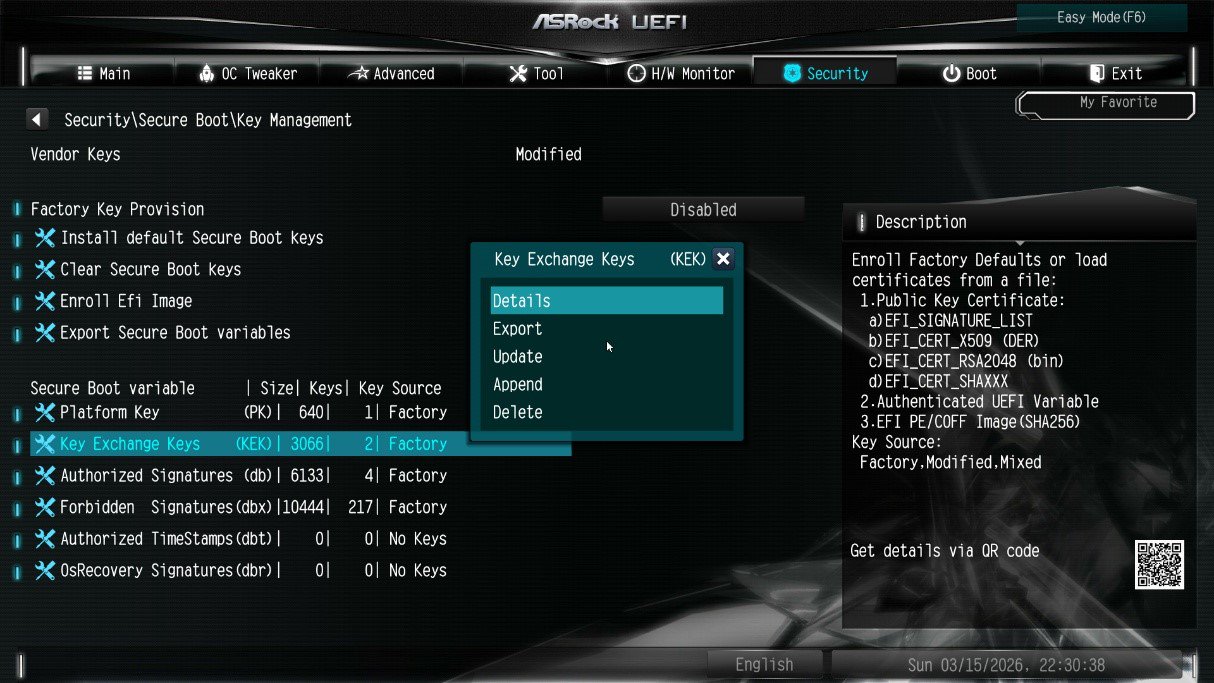
4. How to check the Secure Boot key status?
① In BIOS, go to: Security > Secure Boot > Key Management
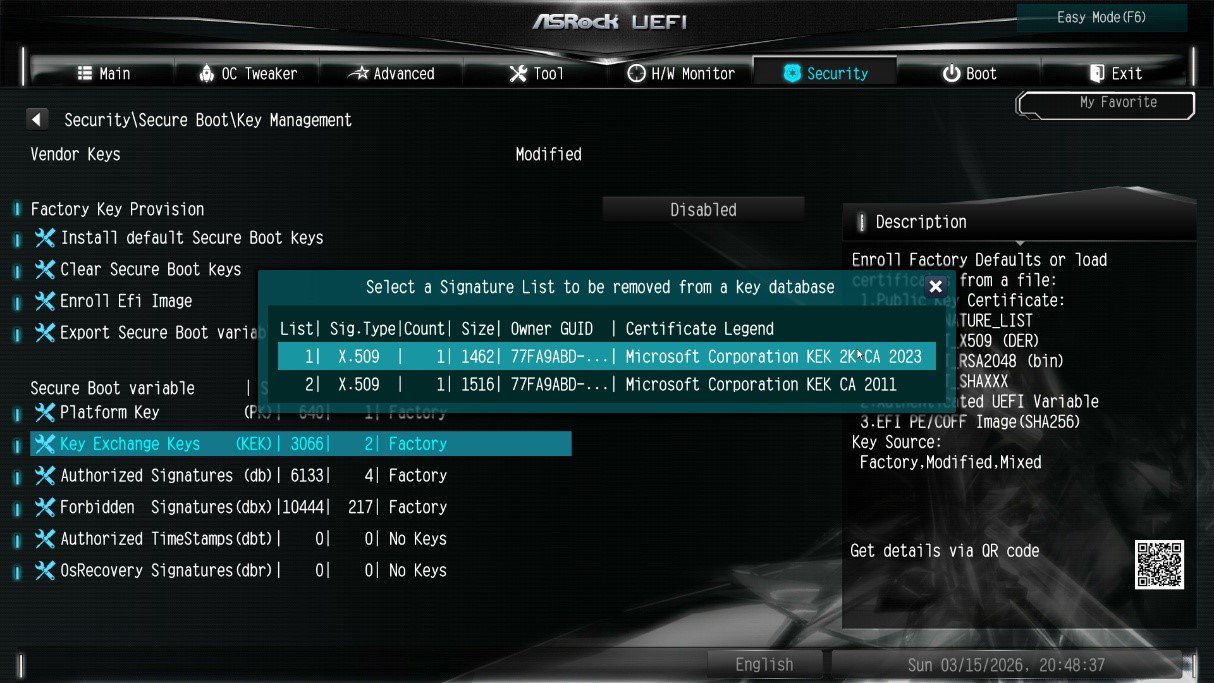
② Select Key Exchange Keys (KEK) choose "Details”:
③ Make sure that KEK Management contains:
- Microsoft Corporation KEK 2K CA 2023
Q (Q&A-188|549):
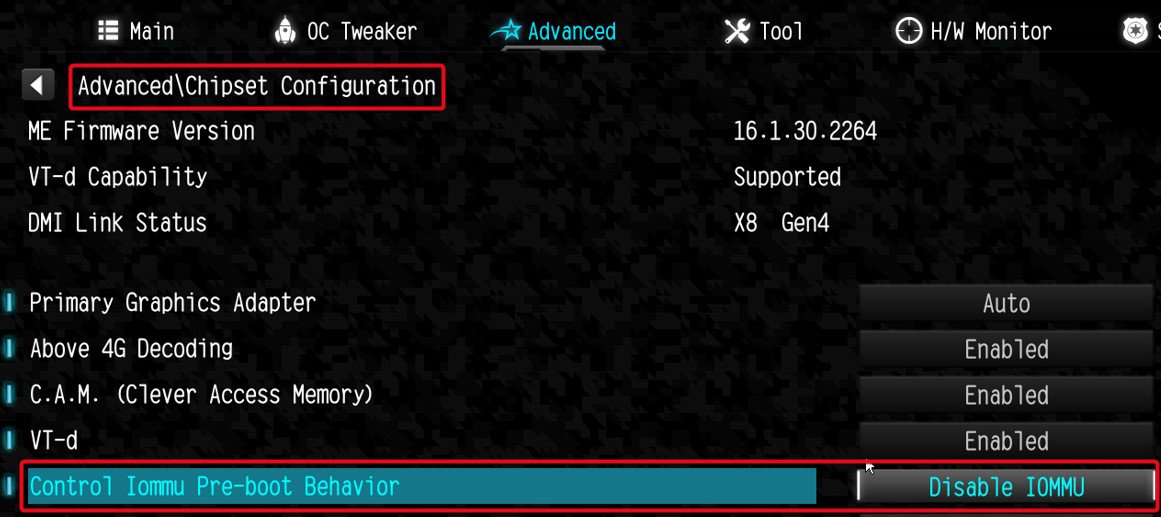
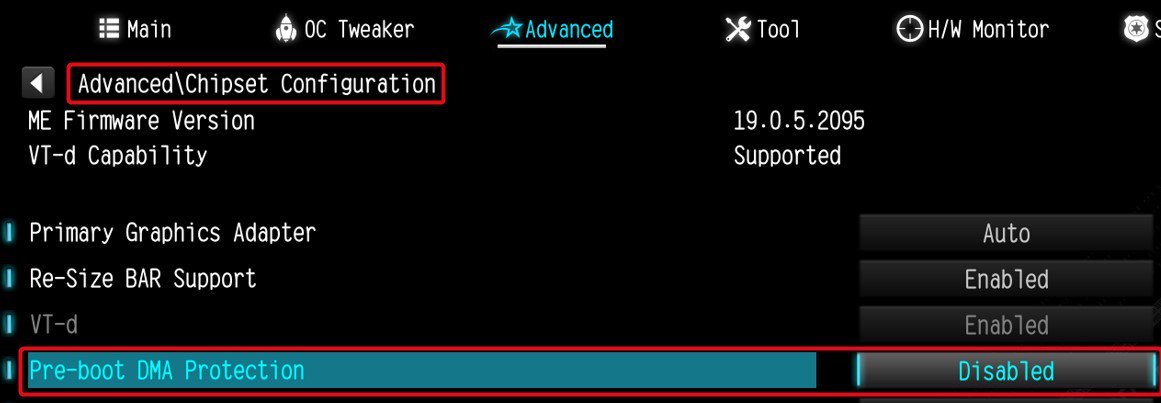
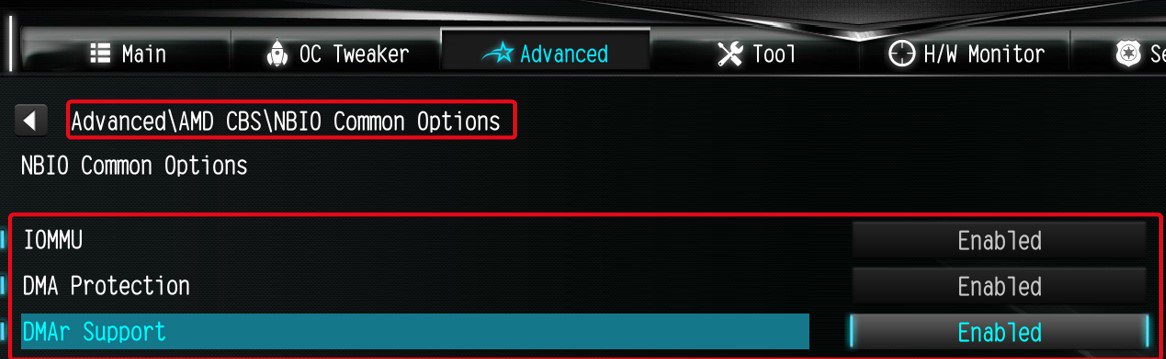
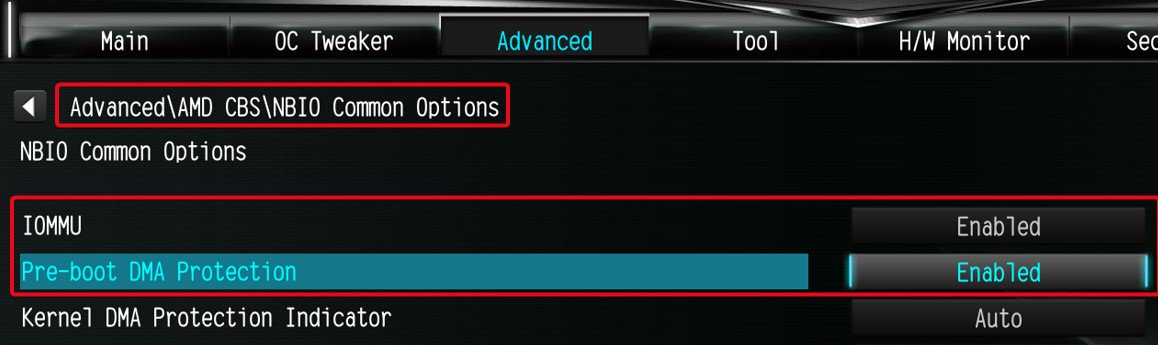
I am looking for Pre-boot DMA Protection option, but I cannot find it in the BIOS interface. Where can I locate this option?(12/16/2025)
A:The option name varies across different platforms. Please refer to the following screenshots to identify the correct option and its location in the BIOS menu.
Intel platform
● Intel 600, 700 series
● Intel 800 series
Note:
Please first update BIOS to the latest version to obtain this option on Intel 600, 700 and 800 platforms.
AMD Platform
● AM4 series
● AM5 series
Users can enable this option if they encounter game‑related or security‑related problems.
#DMA #Pre-boot #IOMMU #DMA Protection
Q (Q&A-187|548):
Some new games like Battlefield 6 or Call of Duty: Black Ops 7 require Secure Boot and TPM 2.0 to provide kernel level anti cheat protection. How do I enable these options on ASRock AM4 motherboards?(10/3/2025)
A:On recent platforms such as AMD 800 and AMD 600 series, Secure Boot and TPM 2.0 are enabled by default. With these platforms, there is no need to change BIOS settings.
However, if you are still using an AM4 motherboard, Secure Boot and TPM 2.0 might not be enabled. Also, the TPM firmware might have to be updated.
Before enabling Secure Boot, you must check your disk partition style and BIOS settings to ensure they meet the requirements for Secure Boot.
Secure Boot System Requirements
1. Partition Style: GPT (GUID Partition Table). If the disk is MBR (Master Boot Record), please convert it to GPT.
2. BIOS Mode: UEFI only. Legacy or CSM mode doesn't support secure boot.
How to check if the current partition type supports Secure Boot
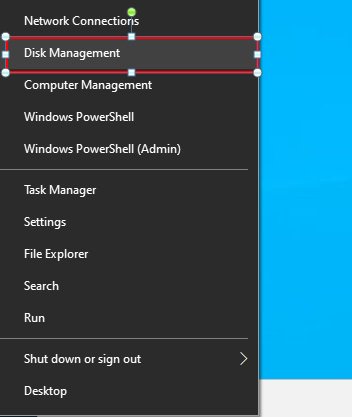
1. Right-click the Windows button on the desktop and select "Disk Management”.
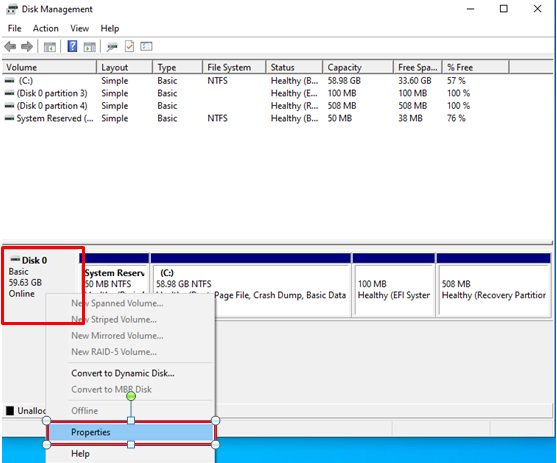
2. Right-click the disk where Windows is installed and select the ""Properties"".
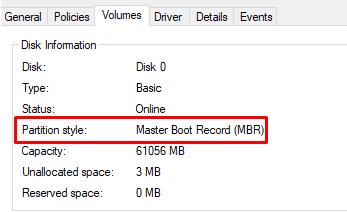
3. Click the "Volumes” tab and check if the partition style is "GPT”.
GPT partition style can support Secure Boot. You can skip below steps 4-7.
4. If the partition style is "MBR”, please make a backup of important data on the system and refer to steps 5-7 to convert the partition style to GPT.
If you have multiple OS installations or if some system partition is on a different drive than where the OS is, the conversion might not have the desired result. Please backup your DATA and reinstall the OS.
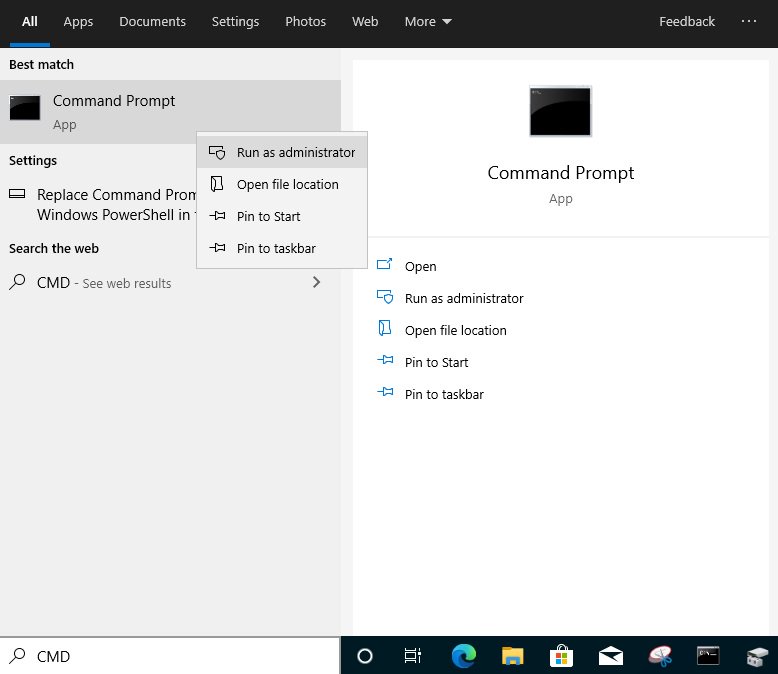
5. Type "CMD" in the Windows search bar, right-click on "Command Prompt” and choose to run as administrator.
6. Type the command "mbr2gpt /convert /allowFullOS” to convert the partition style and press [Enter].
7. Restart the system, and the BIOS Mode/Partition style will be converted to UEFI/GPT.
Switching to UEFI Mode and Enabling Secure Boot in BIOS
1. Please press the "F2” key during POST to enter BIOS setup.
Go to Boot\CSM (Compatibility Support Module) and set "CSM” to "Disabled”.
Press the "F10” key to save configuration changes.
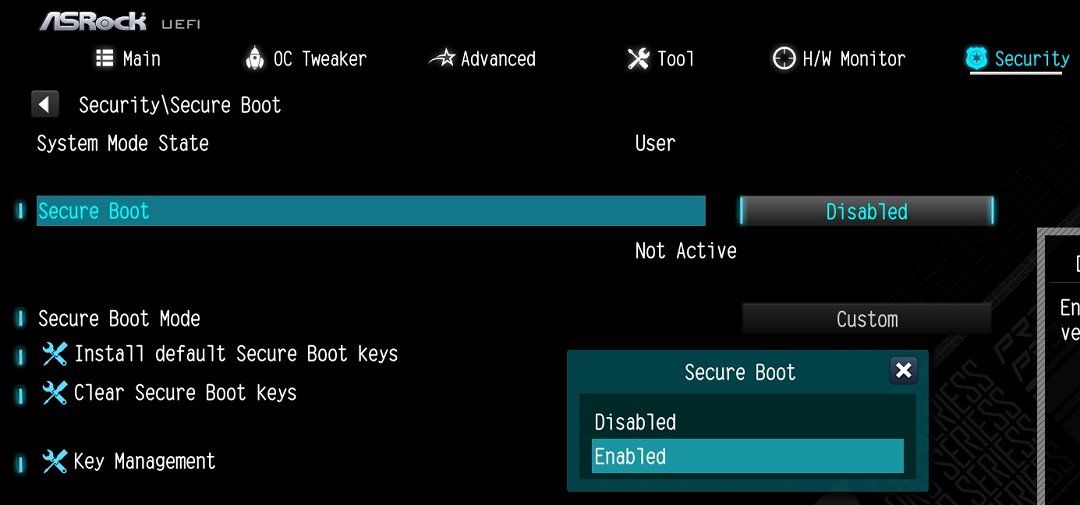
2. Go to Security\Secure Boot and set "Secure Boot Mode” to "Custom”.
3. Please press "Install default Secure Boot keys” and select "Yes” to install Secure Boot keys. If at this point this option is greyed out, Secure Boot key have been loaded already.
4. Set "Secure Boot” to "Enabled”. Then press the "F10” key to save configuration changes.
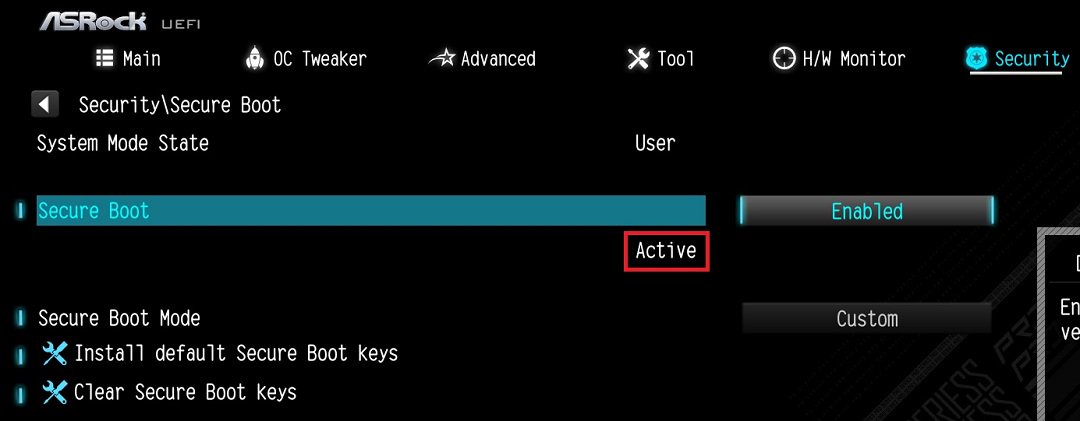
5. After the system restarts, go to Security\Secure Boot, and make sure that Secure Boot is showing "Active”.
Update BIOS and AMD fTPM
To ensure compatibility between games and Secure Boot/TPM 2.0, ASRock has released new BIOS versions for AM4 motherboards, to update to AMD fTPM 3.x.2.x version.
Type "TPM.msc" in the Windows search bar to find the current fTPM version.
If your current fTPM version is 3.x.0.x, we recommend updating to the latest BIOS version to get the fTPM update. This BIOS version should help you to enable anti-cheat on for example Battlefield 6 or Call of Duty:Black Ops 7.
fTPM 3.*.2.* (TPMB) Information
AMD has informed us that only CPUs with below former codename support fTPM 3.*.2.* (TPMB).
If your CPU is not in the supported CPU lineup for TPMB compatibility, based on AMD's official specifications, your CPU does not meet the security requirements necessary for your game.
Q (Q&A-181|538):
After I tried to overclock the memory, my system with Z890 motherboard cannot power on. What should I do?(10/29/2024)
A:Overclocking results may vary between different CPUs and hardware configurations.
If the system fails to power on boot when the power button is pressed (no fans spinning) after loading XMP or overclocking memory, please follow below steps.
1. Switch off power completely. Wait at least 20 seconds. Switch power back on and start the system.
2. If that fails, please clear the CMOS. See the user manual for the clear CMOS procedure for your motherboard.
3. In case that does not help, use flashback to update to the latest BIOS. The BIOS is available via the ASRock website. Please make sure to select the correct model, as some model names are similar.
Visit ASRock's website: https://www.asrock.com/support/index.asp?Model=Z890
Procedures
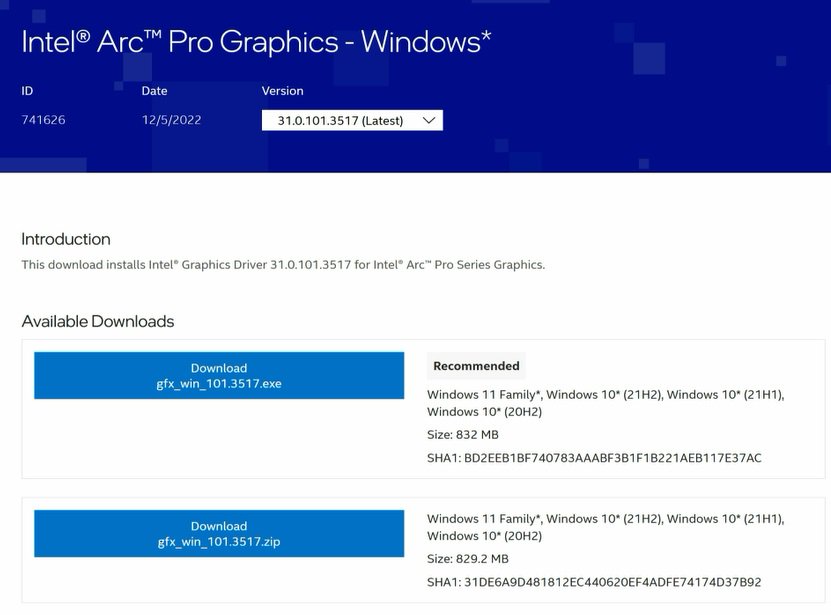
●Intel Graphics Card Driver
Go to Intel's official website to download and install the latest official graphics card driver.
● Update the Graphics Card FW
Step 1. Download and unzip IGFXUpdate(v1.01.1).
Step 2. Run "IGFXUpdate”
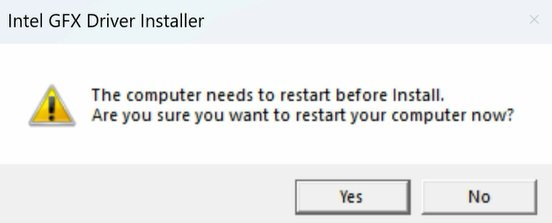
Step 3. Click Yes to restart the system.
Step 4. After the system has restarted, the FW update will begin.
*If this message doesn't show up, please disable the "Secure Boot” in BIOS and try again.
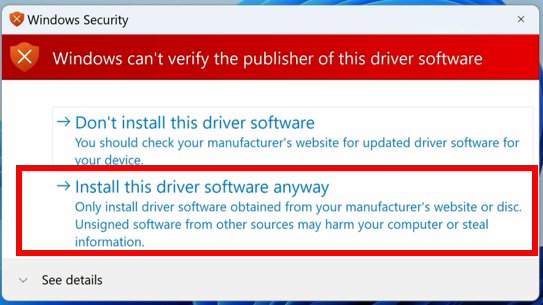
Step 5. During the update, the following security message will pop up.
Step 6. Click on Install this driver software anyway.
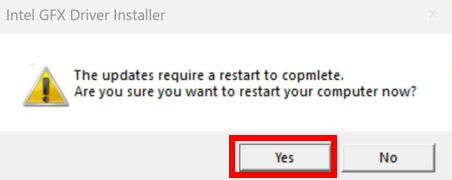
Step 7. The update process will proceed. The screen might blink during the update.
Step 8. Please restart your computer when the following prompt is shown.
● Set PCIe Power to Maximum Power Savings
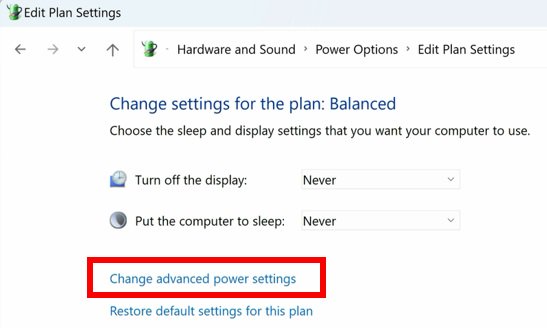
Step 1. Go to [Control Panel\Hardware and Sound\Power Options\Edit Plan Settings\Change] and click [Change advanced power settings].
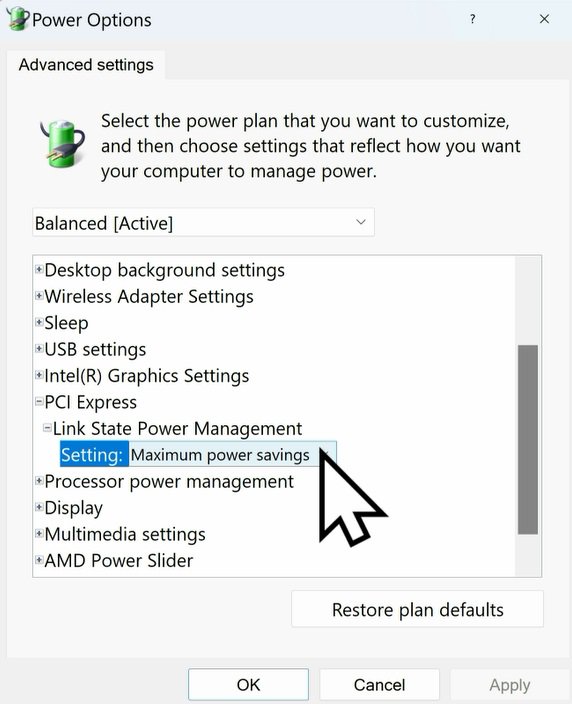
Step 2. Scroll down to PCI Express\Link State Power Management and select Maximum power savings. Make sure to click apply to apply the changes.
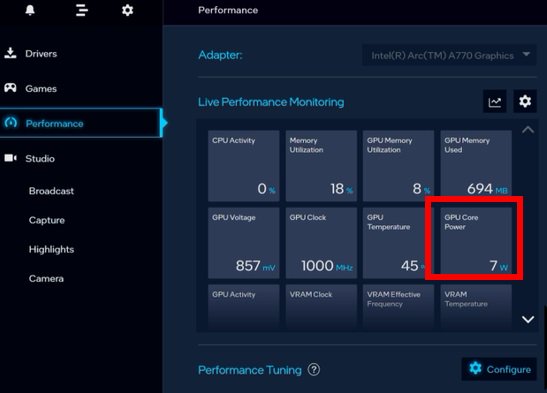
● Re-install the Graphics Card Driver and Check the GPU Power
Step 1. Reinstall the latest graphics card driver.
Step 2. To check the power consumption of the Intel ARC graphics card, please open Intel Arc Control and find the GPU Core Power.
BIOS Setting For ARC GPU Power Saving
● ASRock Intel Motherboard:
Required BIOS Version:
700-series motherboard: Please use the latest BIOS
600/500/400-series motherboard: Use the latest BIOS. It that does not work, please contact ASRock Technical Support. https://event.asrock.com/tsd.asp
BIOS Settings for all ASRock Intel models:
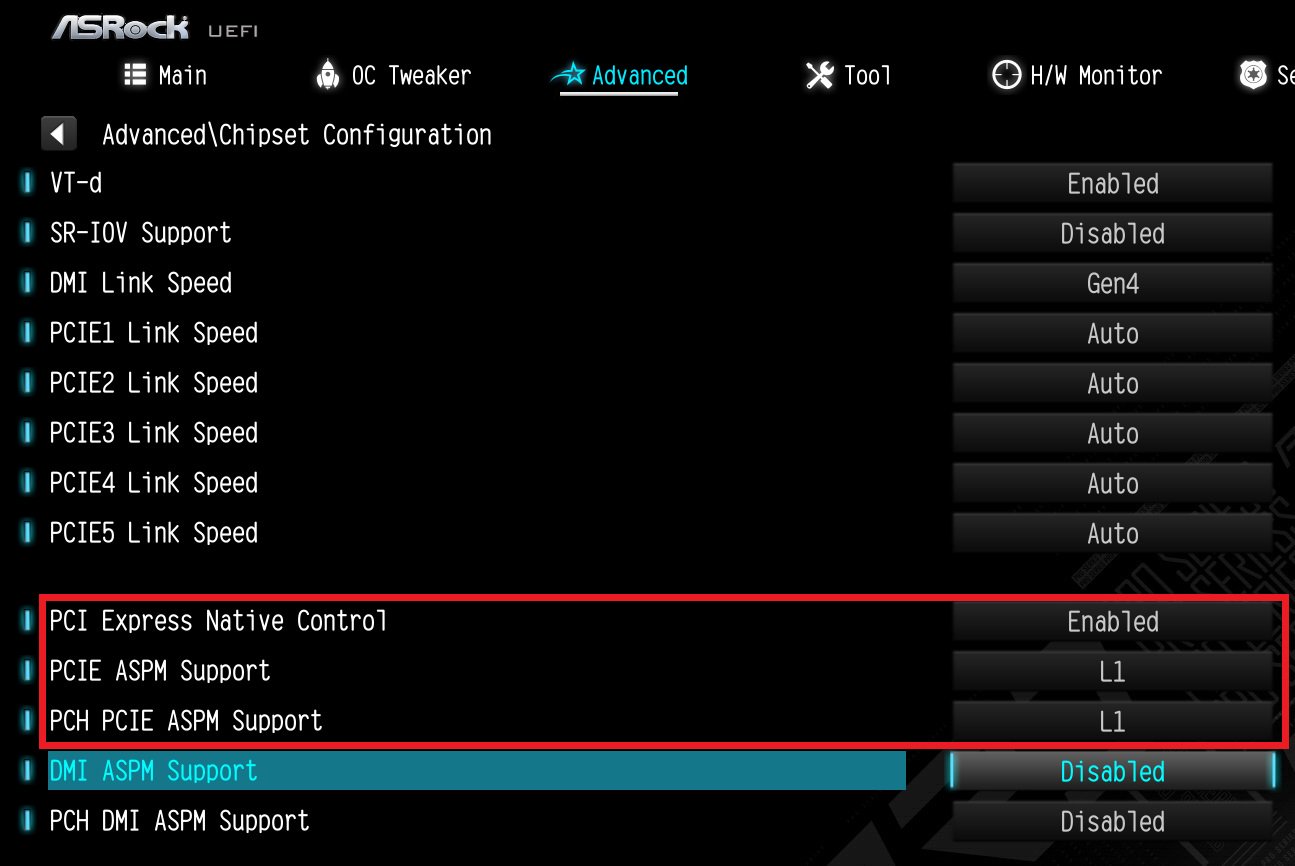
In BIOS > Advanced > Chipset Configuration, apply the following settings.
PCI Express Native Control: Enabled
PCIE ASPM Support: L1
PCH PCIE ASPM Support: L1
● ASRock AMD Motherboard:
Required BIOS Version:
Platform
600 series
500 series
400 series
300 series
BIOS version
Any version
Not supported
BIOS Setting for all AMD models:
There is no need to change BIOS settings.
● Other brands motherboard:
Please contact your motherboard vendor for further assistance.
Power Consumption After Updating FW and Changing the BIOS Settings
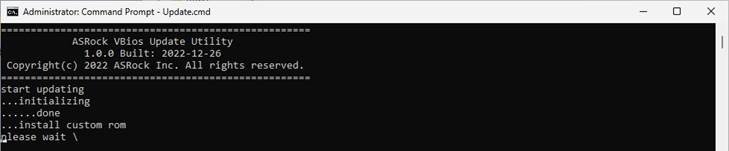
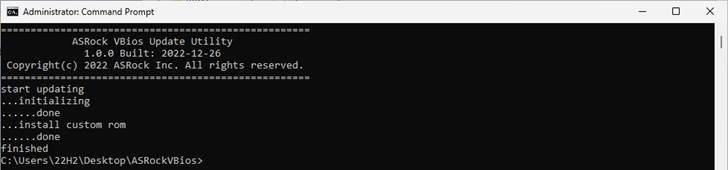
3. Run "insttool64.exe” as administrator. A command prompt window pop on and close immediately. It is a normal behavior.
4. Run Command prompt as administrator.
5. Enter the folder path to the extracted file and press [enter].
Default path and command:
cd C:\Users\[Username]\Downloads\VBIOS_L06_update\VBIOS update
*Please change the command if you change the download path.
6. Type command "Update.cmd” and press [enter].
Update procedure will start up. This mean the system is flashing the vBIOS. DO NOT turn off the system during the update.
7. Once the flashing has finished, Command Prompt will report it as shown below.
Q (Q&A-165|509):
Why can my game not start with my Intel 600 series motherboard?(11/2/2021)
A:Some games use DRM (Digital Rights Management) protection. Please check for available updates for your game, where the DRM solution supports Alder Lake CPUs.
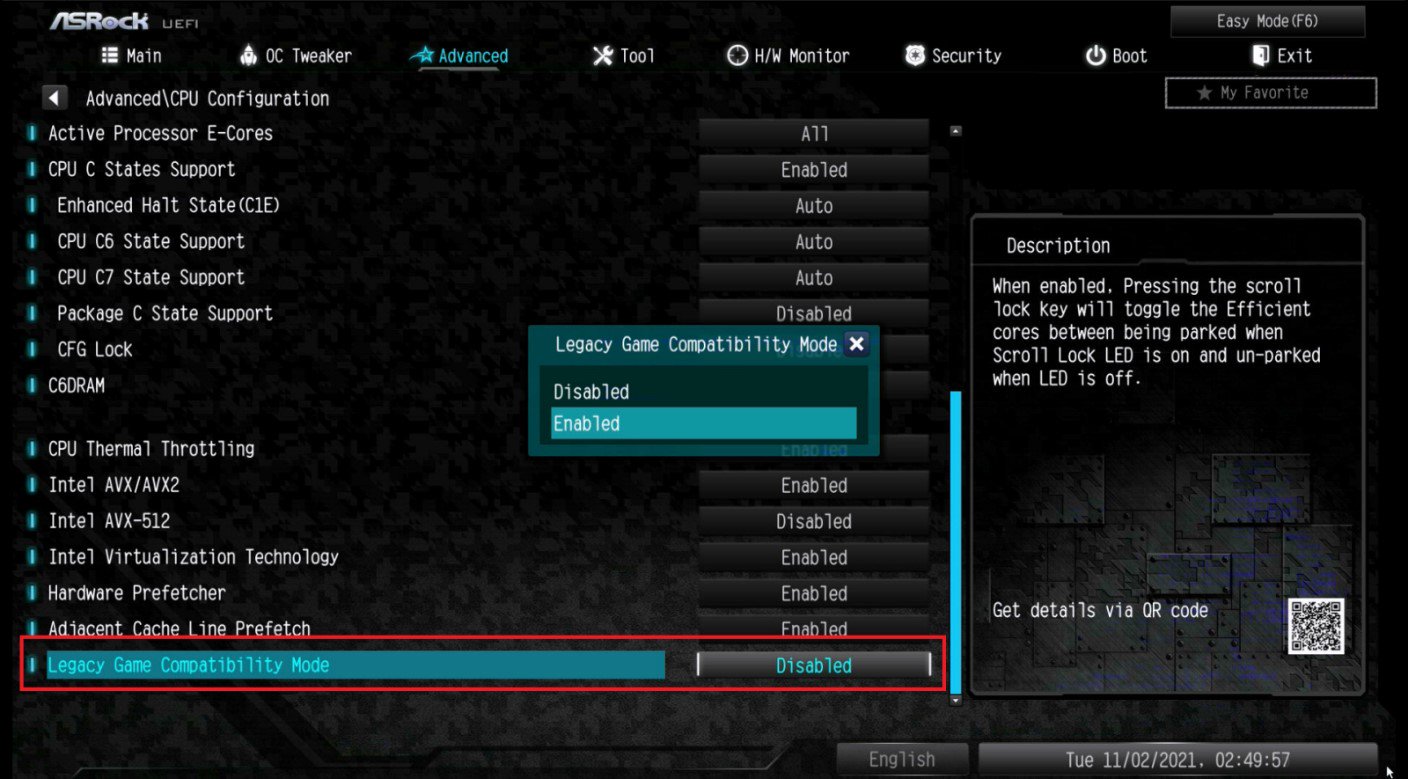
If the game development is discontinued and there is no update available for the DRM, please follow below steps to enable the "Legacy Game Compatibility Mode”.
Step 1.
Press [Del] or [F2] during the POST stage to boot into BIOS.
Step 2.
Press [F6] to enter "Advanced” mode and go to Advanced\CPU Configuration
Step 3.
Enable the "Legacy Game Compatibility Mode” in BIOS.
(The option is at the bottom of the CPU Configuration page)
Step 4.
Press [F10] to save the setting and restart the system.
Step 5.
The [Scroll Lock] key on your keyboard is now a hotkey. It can be used to enable/disable the Intel E-core parking feature. Before starting a game outdated DRM protection, please press [Scroll Lock] within the OS to enable Intel E-core parking.
Step 2.
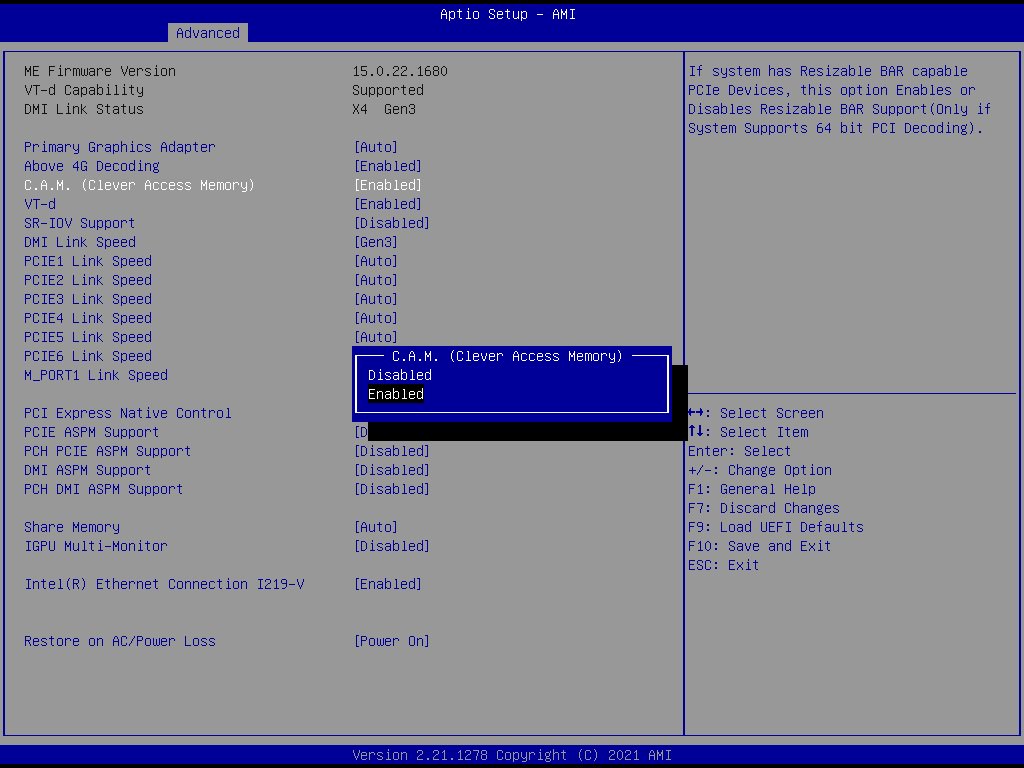
The C.A.M. (Clever Access Memory) option is supported when integrated graphics are disabled.
By default integrated graphics will be disabled when a PCIe graphics card is detected.
Please make sure the monitor is connected to the graphic card.
Step 3.
Please go to BIOS\Advanced\Chipset Configuration and enable "C.A.M. (Clever Access Memory)”.
Step 4.
Press F10 to save the setting and restart.
Q (Q&A-141|467):
Ich möchte eine CPU aus der Serie AMD Threadripper 2 auf der Plattform ASRock X399 nutzen. Was muss ich beachten?(7/1/2018)
A:Die Plattform ASRock X399 unterstützt die Threadripper-2-CPUs von AMD seit der BIOS-Version P3.XX.
Wenn Ihr BIOS älter ist, als Version P3.XX, müssen Sie Ihr BIOS updaten, ohne dabei das System zu starten (ohne eingebaute CPU), indem Sie das Feature BIOS Flashback nutzen, dass von der X399-Plattform unterstützt wird.
Halten Sie sich für das BIOS-Update bitte an die folgende Update-Prozedur:
1. Besuchen Sie die BIOS-Download-Sektion für Ihr Mainboard auf der Webseite von ASRock und laden Sie das neueste BIOS herunter.
Link: https://www.asrock.com/mb/
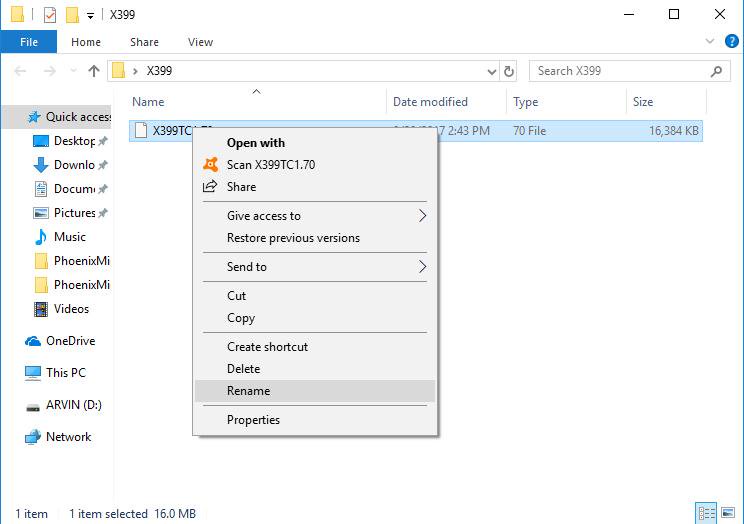
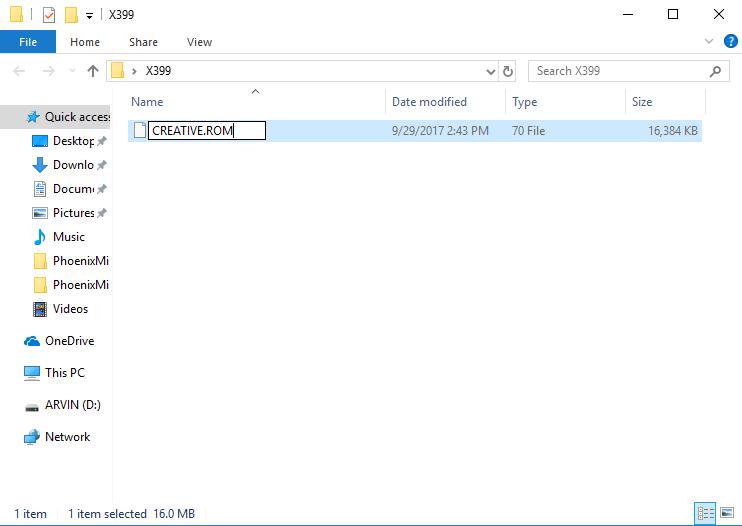
2. Kopieren Sie die heruntergeladene Datei auf einen USB-Stick. Stellen Sie dabei sicher, dass der USB-Stick das Dateisystem FAT32 nutzt.
3. Entpacken Sie die BIOS-Datei aus der ZIP-Datei und bennenen Sie die BIOS-Datei in "CREATIVE.ROM” um.
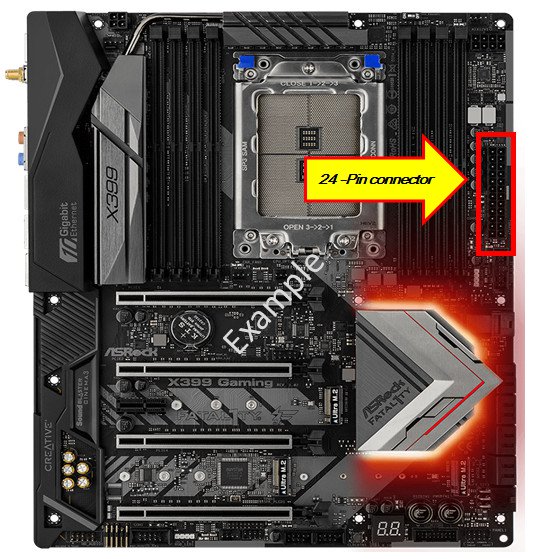
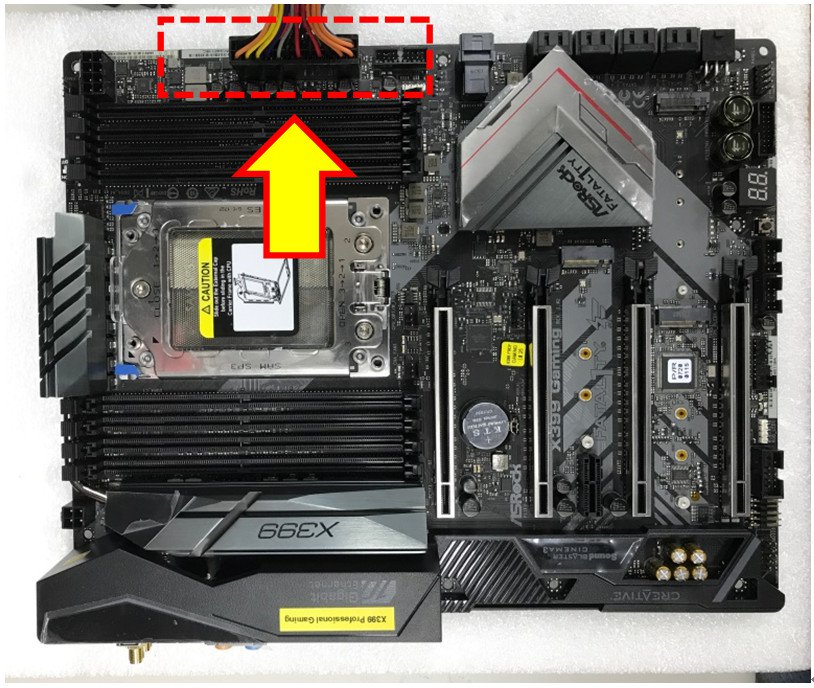
4. Schließen Sie den 24-Pin-Stecker (ATX-Stecker) an dem Mainboard an, ohne andere Geräte angeschlossen oder installiert zu haben. Schalten Sie den Hauptschalter des Netzteils ein. Starten Sie jedoch NICHT das System.
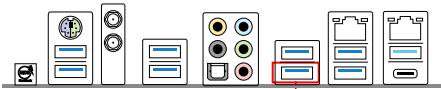
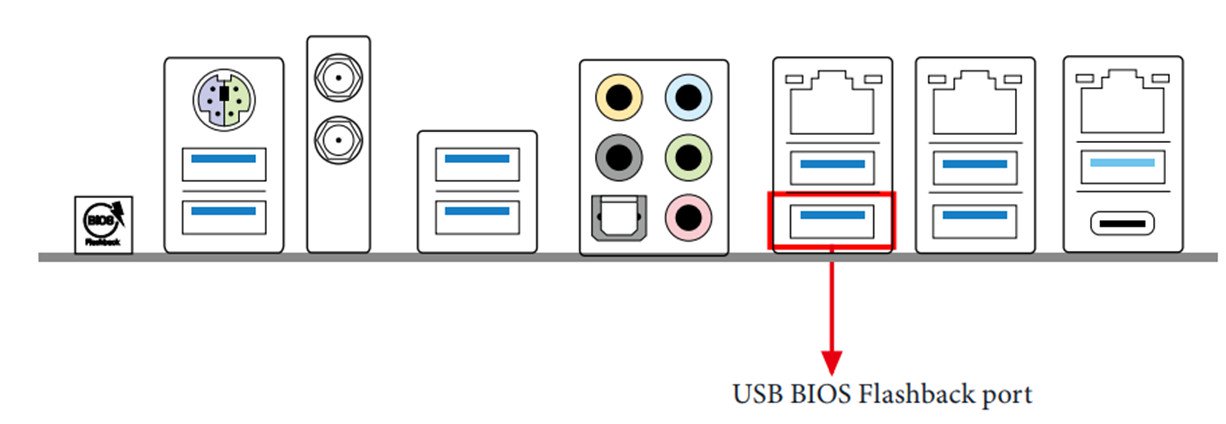
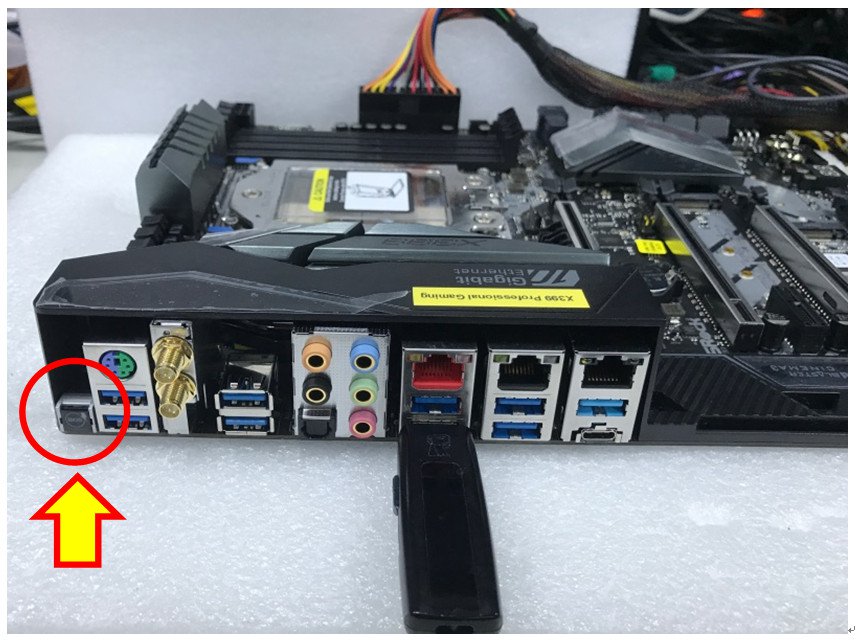
5. Stecken Sie nun den USB-Stick in den USB-BIOS-Flashback-Port.
*Bitte nutzen Sie das Benutzerhandbuch, um mehr Informationen über den USB-Flashback-Port zu erhalten.
Modell
USB-BIOS-Flashback-Port
X399 Taichi
USB3_6
X399M Taichi
USB3_6
Fatal1ty X399 Professional Gaming
USB3_6
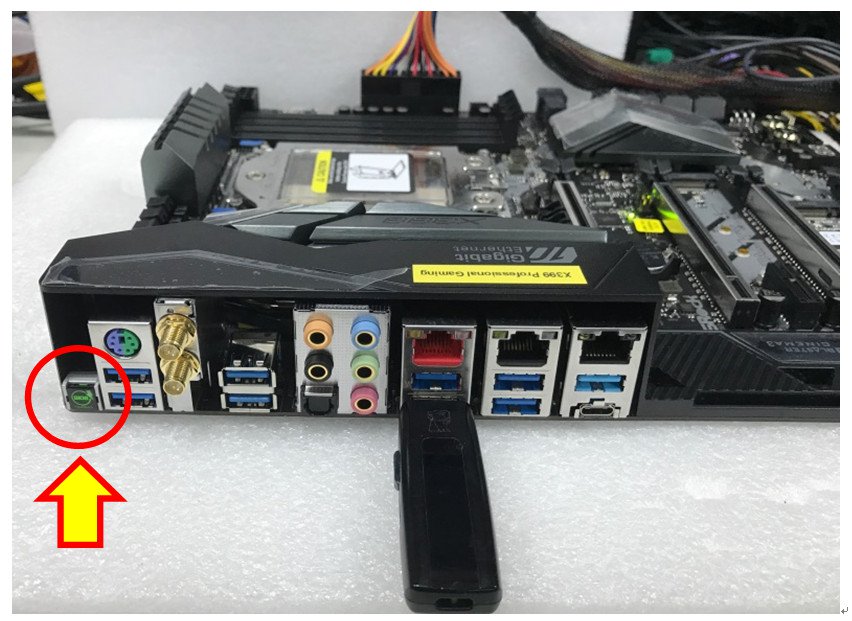
6. Drücken Sie den BIOS-Flashback-Schalter für etwa drei Sekunden. Nun wir die dazugehörige LED anfangen zu blinken.
7. Warten Sie einige Sekunden. Der Flash-Vorgang ist abgeschlossen, wenn die LED nicht mehr blinkt.
*Wenn das LED-Licht durchgehend in Grün leuchtet, funktioniert der BIOS-Flashback nicht ordnungsgemäß. Stellen Sie in diesem Fall sicher, dass der USB-Stick korrekt im USB-BIOS-Flashback-Port steckt.
Q (Q&A-133|447):
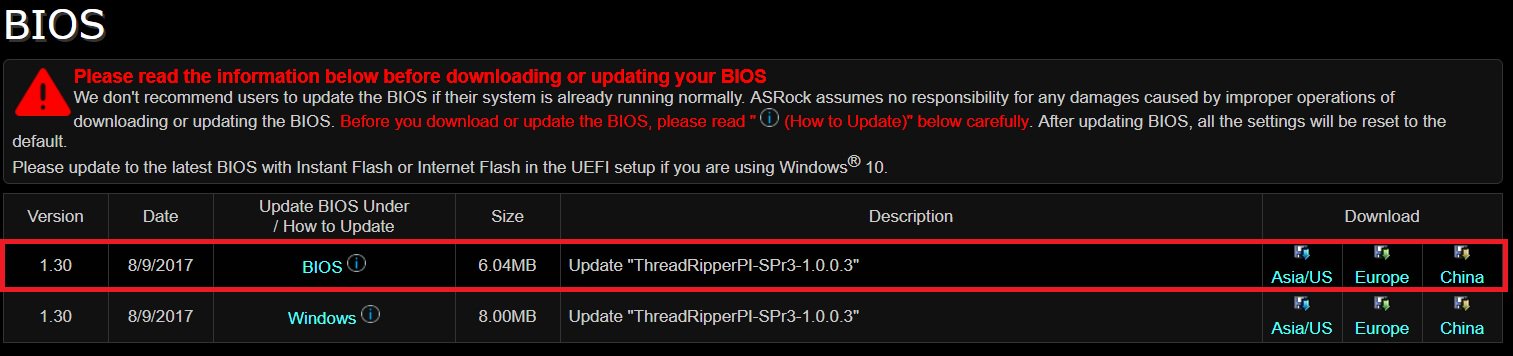
Ich möchte die CPU TR4 1900X auf einem Mainboard vom Typ X399 Taichi oder X399 Prof. Gaming nutzen. Was muss ich dafür berücksichtigen?
Bitte halten Sie sich an die folgenden Schritte und installieren Sie die BIOS-Version P1.30 oder neuer, um Unterstützung für die CPU TR4 1900X zu erhalten.(8/1/2017)
A:Step 1. Laden Sie die BIOS-Version P1.30 oder neuer von der ASRock-Webseite herunter.
X399 Taichi: https://www.asrock.com/mb/AMD/X399%20Taichi/index.asp#BIOS
X399 Prof. Gaming: https://www.asrock.com/MB/AMD/Fatal1ty%20X399%20Professional%20Gaming/index.asp#BIOS
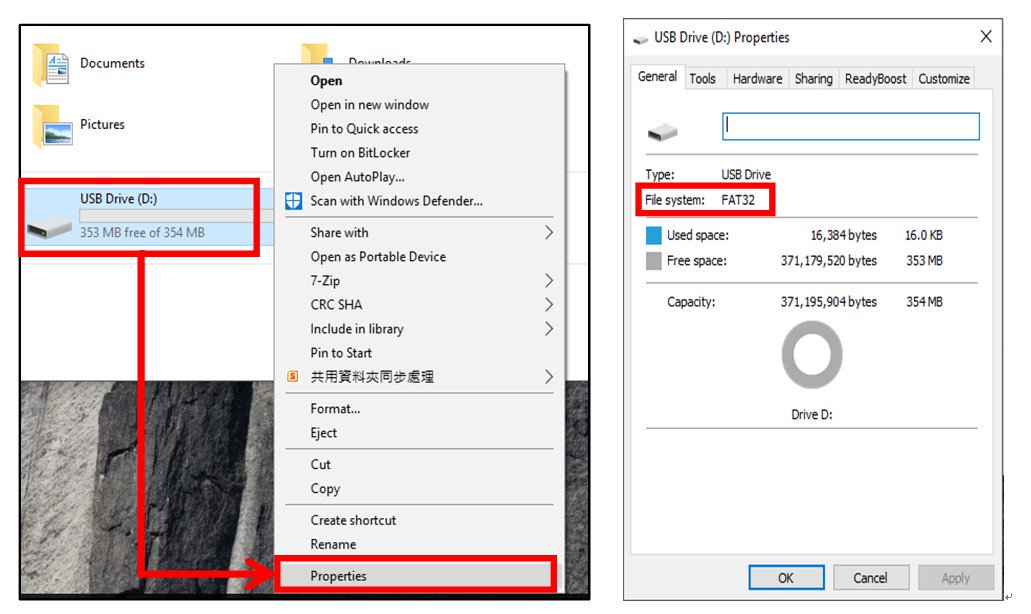
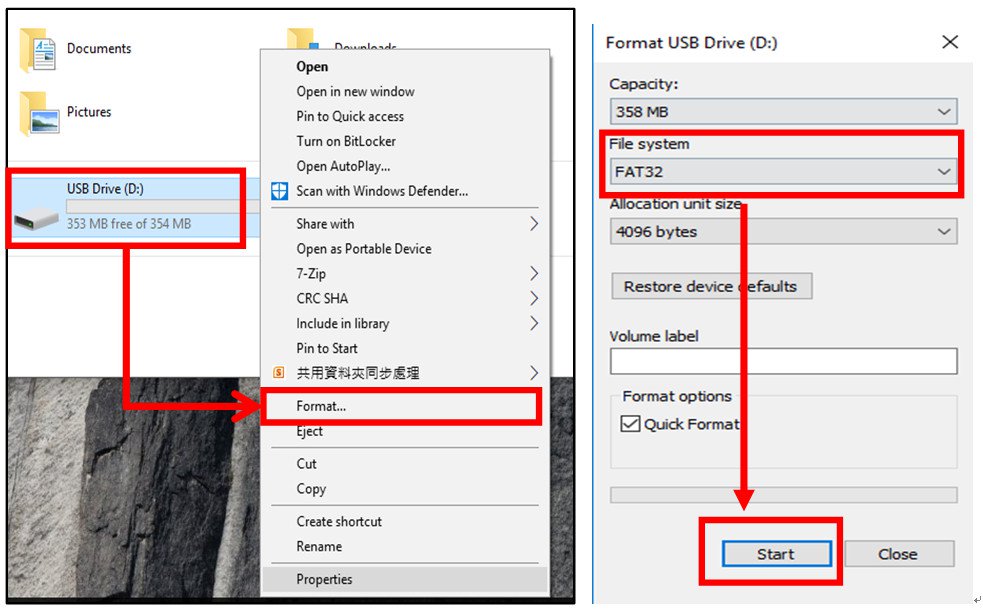
Step 2. Stellen Sie sicher, dass Sie über ein USB-Laufwerk mit dem FAT32-Dateisystem verfügen.
Gehen Sie zu "Dieser PC" → Rechtsklicken Sie auf das USB-Laufwerk → Wählen Sie "Eigenschaften" → Dateisystem
Step 3. Wenn das USB-Laufwerk nicht mit FAT32 formatiert ist, formatieren Sie bitte ein USB-Laufwerk mit dem FAT32-Dateisystem.
Gehen Sie zu "Dieser PC" → Rechtsklicken Sie auf das USB-Laufwerk → Wählen Sie "Formatieren" → Wählen Sie "FAT32" → Starten Sie die Formatierung.
Step 4. Kopieren Sie die BIOS-Datei auf das USB-Laufwerk und entpacken Sie die ZIP-Datei.
Step 5. Nennen Sie die entpackte Datei in "creative.rom” um und verschieben Sie diese in das Root-Verzeichnis.
Step 6. Schließen Sie den 24-Pin-Stromanschluss an Ihrem Mainboard an. Aktivieren Sie daraufhin den AC-Schalter am Netzteil.
*Das System muss nicht gestartet werden.
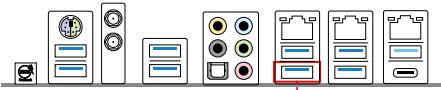
Step 7. Schließen Sie das vorbereitete USB-Laufwerk am hinteren USB-BIOS-Flashback-Port an.
Step 8. Drücken Sie den BIOS-Flashback-Knopf für etwa drei Sekunden, bis die LED anfängt zu blinken.
Step 9. Warten Sie, bis die LED aufgehört hat zu blinken, wodurch der Abschluss des Flash-Vorgangs angezeigt wird.
* Wenn die LED dauerhaft in Grün aufleuchtet, bedeutet dies, dass die BIOS-Flashback-Funktion nicht ordnungsgemäß funktioniert.
1. Stellen Sie sicher, dass das USB-Laufwerk am USB-BIOS-Flashback-Port angeschlossen ist.
2. Der BIOS-Flashback-Knopf ermöglicht es, das BIOS zu flashen (BIOS_FB1, Seite 9, Nr. 19).
3. Wiederholen Sie den Flash-Vorgang ab dem Schritt 5.
Q (Q&A-130|434):
Welche BIOS-Version sollte ich installieren, um Unterstützung und die beste Optimierung für Intel Optane Memory zu erhalten?(4/1/2017)
A:Die Plattformen Z270, H270 und B250 unterstützen Intel Optane Memory seit der BIOS-Version P2.00.
Installieren Sie bitte die BIOS-Version P2.00 oder neuer, um die Kompatibilität mit Intel Optane Memory herzustellen.
Download-Link: https://www.asrock.com/support/index.de.asp?cat=BIOS
Q (Q&A-130|435):
Was wird benötigt, damit Intel Optane Memory unterstützt wird?(4/1/2017)
A:Für die Unterstützung von Intel Optane Memory, muss Ihr System folgende Bedingungen erfüllen:
1. Wählen Sie ein Mainboard aus den Serien Z270, H270 oder B250 und einen Intel-Core-Prozessor der siebten Generation (Kaby Lake).
2. Installieren Sie Windows 10 in der 64-Bit-Version.
3. Das System-Laufwerk muss mit dem GPT-System formatiert werden.
4. Installieren Sie die BIOS-Version P2.00 oder neuer.
5. Es werden nur Boot-Laufwerke auf SATA-Basis unterstützt.
Q (Q&A-128|420):
Das System startet nach dem Laden des XMP Profils nicht mehr richtig. Was kann ich tun?(3/1/2017)
A:Bitte aktualisieren Sie zuerst das BIOS von der offiziellen ASRock Webseite:
Download: https://www.asrock.com/support/index.de.asp?cat=BIOS
Wegen eventueller AM4 Speicherinkompatibilität funktionieren manche schnelle Speichermodule eventuell nicht richtig wenn das XMP Profil geladen wird. ASRock aktualisiert den AMD AGESA Code regelmäßig um die Kompatibilität der schnellen Speichermodule zu verbessern.
Wir haben diverse Speichermodule auf unserer AM4 Plattform getestet und Nutzer können diese auf unserer empfohlenen Speichermodul Liste einsehen um das beste Paar für Ihr AM4 Mainboard zu wählen: X370 Professional Gaming, X370 Taichi, X370 Killer SLI/ac, X370 Killer SLI, X370 Gaming K4, AB350 Pro4, AB350M Pro4, AB350 Gaming K4
Q (Q&A-128|422):
Wie kann ich den "CPU Frequenz Multiplier” auf der AM4 Plattform einstellen?(3/1/2017)
A:Diese Option ist schon in den neueren BIOS Version enthalten. Bitte besuchen Sie die ASRock Download Seite
und aktualisieren Sie das BIOS zu dieser oder neueren Version: https://www.asrock.com/support/index.de.asp
Model
BIOS Version
Fatal1ty X370 Professional Gaming
P1.50
X370 Taichi
P1.50
X370 Killer SLI/ac
P1.40
X370 Killer SLI
P1.40
Fatal1ty X370 Gaming K4
P1.40
Fatal1ty AB350 Gaming K4
P1.40
AB350 Pro4
P1.40
AB350M
P1.20
Q (Q&A-128|423):
Wie kann ich das BIOS mittels ASRock „Instant Flash" Programm auf der AM4 Plattform aktualisieren?(3/1/2017)
A:Wegen der neuen Struktur der AMD AM4 können die veröffentlichten BIOS Versionen vor dem 07.03.2017
nicht per „Instant Flash" aktualisiert werden und auch nicht im BIOS verfügbar. Um das BIOS Update durchzuführen benutzen Sie bitte die DOS- oder Windows Methode. Ab der genannten Version wird „Instant Flash" vom BIOS aus voll unterstützt und die neuere Versionen können damit aktualisiert werden.
Model
BIOS Version
Fatal1ty X370 Professional Gaming
P1.50
X370 Taichi
P1.50
X370 Killer SLI/ac
P1.60
X370 Killer SLI
P1.60
Fatal1ty X370 Gaming K4
P1.60
Fatal1ty AB350 Gaming K4
P1.40
AB350 Pro4
P1.40
AB350M
P1.20
Q (Q&A-128|431):
If I want to change voltage in BIOS setting for Ryzen CPU on AB350 series motherboards, how do I do?(3/1/2017)
A:The voltage setting option for Ryzen CPU is supported by the new BIOS update.
(BIOS ->OC Tweaker-> CPU frequency & Voltage Change-> Manual)
Please visit ASRock Download zone and update the BIOS to the following BIOS or later versions.
Download link: https://www.asrock.com/support/index.de.asp
Model
BIOS Version
Fatal1ty AB350 Gaming K4
L1.43
AB350 Pro4
L1.43
AB350M
L1.23
AB350M Pro4
L1.03
AB350M-HDV
L1.03
Q (Q&A-128|426):
If I change the setting in BIOS of AM4 series motherboards, is there any notice before updating BIOS?(3/1/2017)
A:If you change any setting in BIOS and want to update the BIOS, please enter BIOS setup to load default setting. After reboot, please update the BIOS.
Q (Q&A-127|418):
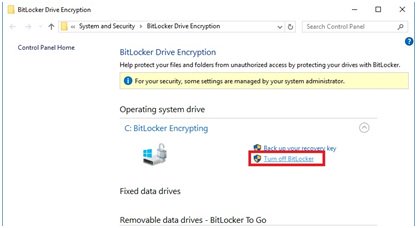
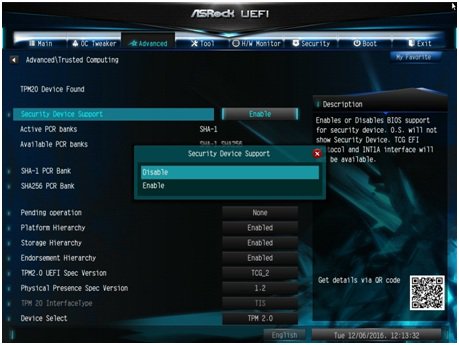
Wie geht man bei einem BIOS-Update vor, wenn ein TPM-Modul auf dem Mainboard sitzt?(12/1/2016)
A:Wenn Sie ein TPM-Modul haben, und das BIOS updaten wollen, befolgen Sie bitte die folgenden Schritte um die TPM-Funktion vor dem BIOS-Update zu deaktivieren.
Im Betriebssystem:
1. Rechtsklick auf das Windows-Symbol.
2. Linksklick auf > Systemsteuerung > BitLocker-Laufwerksverschlüsselung.
3. Deaktivieren Sie BitLocker.
Im BIOS
1. BIOS-Setup> Advanced > Trusted Computing.
2. Stellen Sie die Option "Security Device Support" auf "Disable".
Aktivieren Sie die Funktion nach dem BIOS-Update bitte wieder.
Q (Q&A-125|414):
Unterstützten X99-Mainboards von ASRock Intel-CPUs aus der Broadwell-E-Familie?(6/1/2016)
A:Bitte halten Sie sich an die folgenden Tabelle und updaten Sie das BIOS auf die neueste Version, um die Unterstützung für Intel-CPUs aus der Broadwell-E-Familie herzustellen.
Download-Link: https://www.asrock.com/support/index.asp
Model
BIOS Version
X99 Extreme11
P3.00
X99 Extreme6
P3.00
X99 Extreme6/3.1
P3.00
X99 Extreme4
P3.30
X99 Extreme4/3.1
P3.00
X99 Extreme3
P3.30
X99 OC Formula
P3.00
X99 OC Formula/3.1
P3.20
X99 Professional
P3.10
X99 Professional/3.1
P3.20
X99E-ITX/ac
P3.10
X99M Killer
P3.00
X99M Killer/3.1
P3.30
X99X Killer
P3.00
X99X Killer/3.1
P3.00
X99 WS-E/10G
P3.00
X99 WS-E
P3.00
X99 WS
P3.10
Q (Q&A-122|404):
Unter der Version 1511 von Windows 10 (Threshold 2 Build 10586), kann es passieren, dass das Z170 Extreme6 und die Modelle der Serie Z170 Gaming K6 nicht aus dem Schlafmodus (S3) erwachen oder den Hibernation-Modus (S4) nicht ordnungsgemäß starten. Wie löse ich das Problem?(12/1/2015)
A:Bitte suchen Sie den Download-Bereich bei ASRock auf und updaten Sie Ihr BIOS mit einer der folgenden (oder neueren) BIOS-Versionen.
Download-Link: https://www.asrock.com/support/download.asp
Model
BIOS Version
Z170 Extreme6+
P1.80
Z170 Extreme6
P1.80
Z170 Gaming K6+
P1.90
Z170 Gaming K6
P1.90
Q (Q&A-118|394):
Wenn ich eine Intel-CPU vom Typ G3258 auf einer der Plattformen H81/P81/H87/B85/H91/H97 nutze, kann ich Windows 10 nicht installieren. Wie löse ich das Problem?(7/1/2015)
A:Damit Intels G3258-CPUs Windows 10 unterstützen laden Sie bitte eine der folgenden BIOS-Versionen oder neuere Versionen mit dem Modul Microcode 19 über den Download-Link auf unserer Webseite herunter.
Sollte Ihr Modell in der folgenden Tabelle nicht gelistet sein, schauen Sie bitte in der Beta-Zone Ihres Modells nach und installieren Sie das neueste BIOS von dort.
Modell
P BIOS
H81M-VG4 R2.0
P1.40
H81M-DGS R2.0
P1.60
H81M-HDS R2.0
P1.30
H81M-HDS
P2.10
H81M-DG4
P1.10
H97 Anniversary
P1.50
H97M Anniversary
P2.10
B85 Anniversary
P1.40
B95M-DGS
P1.60
B85M-DGS
P1.50
B85M Pro3
P1.40
H97M Pro4
P2.00
B85M-HDS
P1.70
B85 Pro4
P2.30
B85M
P2.50
H81M-HG4
P1.50
H81M
P1.90
H81M-GL
P2.00
H81M-G
P1.40
H97 Pro4
P1.90
H97M
P2.00
Q (Q&A-117|392):
Wie kann ich die WLAN-Leistung meines M8-Systems verbessern?(6/1/2015)
Schritt 2. Deinstallieren Sie die Treiber für die Intel® Smart Connect Technology von Ihrem System.
Q (Q&A-116|391):
Wenn ich an meinem FM2A88X Extreme6+ zwei Monitore anschließe (DVI und D-Sub) und das System starten möchte, friert der Boot-Prozess von Windows 8.1 ein. Wie löse ich das Problem?(3/1/2015)
Q (Q&A-116|387):
Nach dem Einbau von zwei Grafikkarten vom Typ R9 295x2 in meine X99-Plattform scheitert der Bootvorgang des Systems. Wie löse ich das Problem?(3/1/2015)
A:Bitte beachten Sie die folgenden Schritte um das BIOS zu updaten. Sie finden das BIOS auf der ASRock-Homepage.
Modell
BIOS-Version
X99 Extreme3
P1.80
X99 Extreme4
P1.80
X99 Extreme6
P1.80
X99 Extreme6/ac
P1.60
X99 Extreme11
P1.10
X99 OC Formula
P1.80
X99 Professional
P1.60
X99 WS
P1.70
X99 WS-E
P1.20
X99 WS-E/10G
P1.20
X99M Extreme4
P1.70
X99M Killer
P1.80
X99X Killer
P1.80
Schritt 1. Bitte entfernen Sie alle nicht notwendigen PCI-E-Geräte, darunter auch eine der Grafikkarten vom Typ R9 295x2, so dass nur eine Grafikkarte für die Bildausgabe zuständig ist.
Schritt 2. Starten Sie das System und wechseln Sie ins BIOS.
Schritt 3. Laden Sie dort die Standardeinstellungen des BIOS (Default Settings) und speichern Sie die Änderung.
Schritt 4. Laden Sie erneut das BIOS und nutzen Sie die Option "Instant Flash" um das neueste BIOS zu installieren.
Schritt 5. Bauen Sie nach dem erfolgreichen BIOS-Update die zweite Grafikkarte vom Typ R9 295x2 wieder ein.
Q (Q&A-112|363):
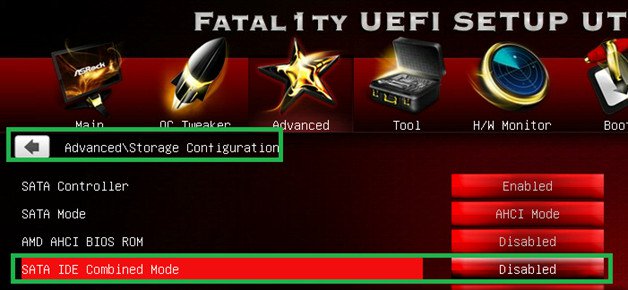
Ich nutze ein M.2-Modul mit SATA3 (6,0 Gbps) mit dem Mainboard Fatal1ty 990FX Killer. Gibt es irgendeinen Tipp um die Performance zu maximieren?(5/1/2014)
A:Bitte deaktivieren Sie die Option [IDE combine mode] im BIOS > Advanced > Storage Configuration und speichern Sie die Änderung.
Alternativ können Sie auf die BIOS-Version P1.10 oder neuer updaten. In diesem Fall wird das System die Änderung automatisch für Sie vornehmen. BIOS-Download
Q (Q&A-111|361):
Wie aktiviere ich das Feature 'Dual Graphics' bei einer AMD-Plattform?(3/1/2014)
A:Schritt 1:
Bitte stellen Sie sicher, dass sie die neueste BIOS-Version installiert haben und im UEFI bei der Einstellung "Dual Graphics" die Standardoption [Auto] eingestellt haben.
Download-Link für das BIOS: https://www.asrock.com/support/download.asp
Schritt 2:
Installieren Sie eine Grafikkarte vom Typ AMD Radeon im PCIe-Slot.
Schritt 3:
Verbinden Sie das Monitorkabel mit dem onboard verfügbaren VGA-Ausgang. Bitte beachten Sie, dass der aktuelle Grafiktreiber und das VBIOS die Grafikausgabe mit aktivierter "Dual Graphics"-Funktion nur über den Onboard-Anschluss zulässt.
In Bezug auf kommende Updates überprüfen Sie bitte unsere Webseite auf neue Informationen.
Schritt 4:
Booten Sie ins Betriebssystem.
Deinstallieren Sie den AMD-Treiber, sollte dieser installiert sein.
Schritt 5:
Installieren Sie den Treiber für die Onboard-Grafikkarte und die diskrete Grafikkarte von der Support-CD.
Schritt 6:
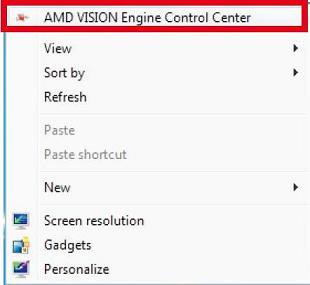
Starten Sie den Computer neu. Führen Sie einen Rechtsklick auf dem Desktop aus und klicken Sie auf den Eintrag "AMD VISION Engine Control Center" um das Konfigurationstool zu starten.
Schritt 7:
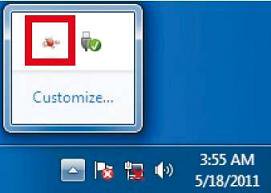
Sie können auch in der Taskbar auf den Eintrag "AMD VISION Engine Control Center" klicken um das Konfigurationstool zu starten.
Schritt 8:
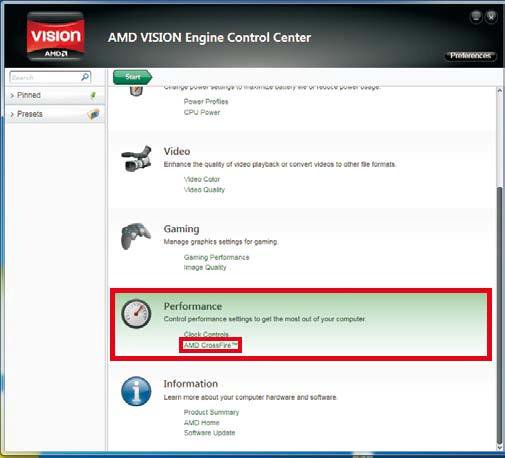
Im AMD VISION Engine Control Center wählen Sie bitte den Punkt "Performance" und klicken dort auf "AMD CrossFire™".
Schritt 9:
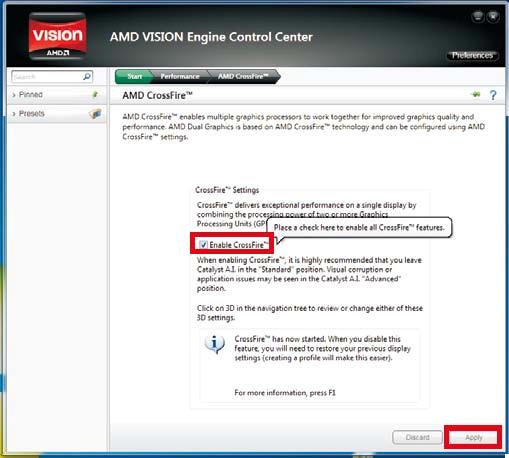
Klicken Sie auf "Enable CrossFire™" und anschließend auf "Apply" um die Einstellungen zu speichern.
Schritt 10:
Starten Sie das System neu. Nun sollten Sie die 'Dual Graphics'-Funktion nutzen können.
Q (Q&A-105|348):
Ich kann das BIOS nicht via Internet Flash updaten? Wie gehe ich vor?(7/1/2013)
A:Befolgen Sie die folgenden Schritte:
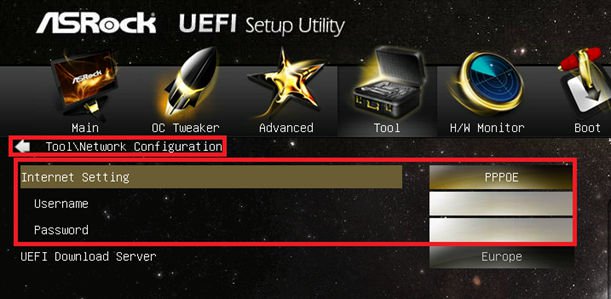
1. Laden Sie die Standardeinstellungen im BIOS (Load Default Settings) und stellen Sie sicher, dass das System mit dem Internet verbunden ist.
2. Wenn Sie PPPoE verwenden, steuern Sie bitte den Menüpunkt "Network Configuration item" an.
Wählen Sie dort bei dem Punkt "Internet Setting" die Einstellung "PPPoE" und geben Sie die Zugangsdaten an (Benutzer und Passwort).
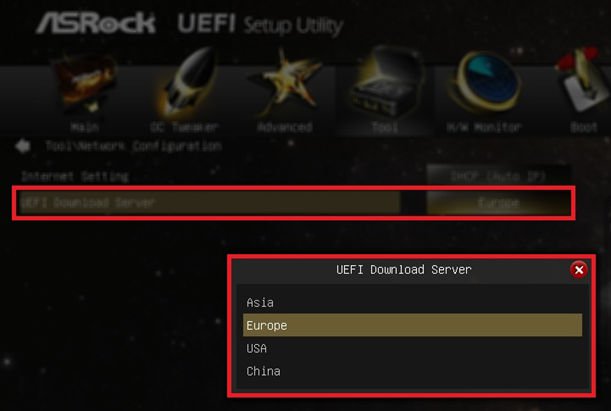
3. Sie können einen UEFI-Download-Sever aus der Nähe auswählen.
4. Wenn das Problem weiter besteht, laden Sie bitte zunächst das neueste BIOS von der ASRock-Homepage herunter und installieren Sie dieses. Bei den darauf folgenden Updates werden Sie Internet Flash nutzen können.
Download-Link: https://www.asrock.com/support/download.de.asp
Q (Q&A-104|345):
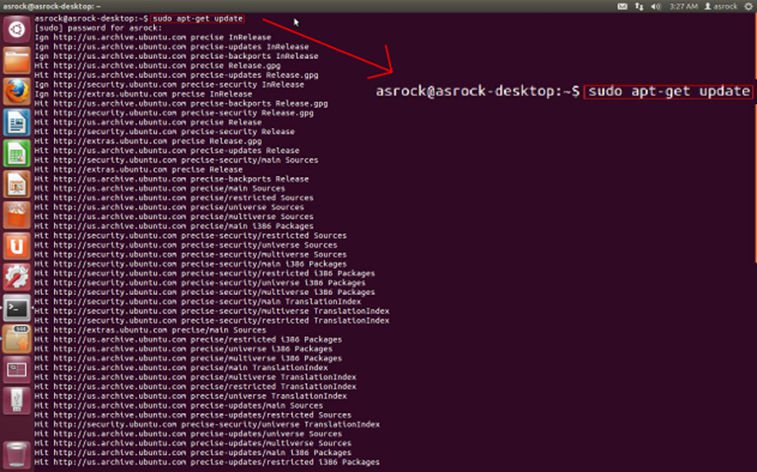
Wie kann ich die 'Wake On LAN'-Funktion auf einem PC der 'Vision 3D'-Serie mit Ubuntu nutzen? (Kernel 3.2.0-23)(4/1/2013)
A:Bitte befolgen Sie die folgenden Punkte, um die WOL-Funktion zu nutzen:
1. Aktivieren Sie bitte die Option "Onboard LAN power on" im BIOS unter 'Advanced' \ ACPI Configuration'.
2. Verbinden Sie das LAN-Kabel.
3. Suchen Sie das Terminal im Dash-Board auf und öffnen Sie dieses.
4. Installieren Sie bitte das 'ethtool' um WOL zu ermöglichen. Dies können Sie mit folgender Befehlskette machen. (Siehe auch folgende Bilder)
#sudo apt-get update
#sudo apt-get install ethtool
#sudo ethtool –s eth0 wol g
#sudo reboot
5. Das System ist jetzt dafür konfiguriert, um von anderen Computern im LAN geweckt werden zu können.
Q (Q&A-96|317):
Mein System erkennt die Grafikkarte nicht und in Dr. Debug erhalte ich die Meldung d6.(6/1/2012)
A:Der Fehler wird durch falsche Informationen in einigen vBIOS-Versionen (Video BIOS) ausgelöst. Kontaktieren Sie bitte den Hersteller Ihrer Grafikkarte und installieren Sie das aktuellste Mainboard-BIOS von unserer Homepage: https://www.asrock.com/support/download.asp
Wenn Sie weitere Fragen haben, wenden Sie sich bitte an den technischen Support : ASRock TSD.
Q (Q&A-92|306):
Unterstützt mein ASRock Intel Mainboard der Serie 6 die neue Ivy-Bridge-CPU von Intel?(2/1/2012)
A:Damit die neuen Intel Next Generation 22nm CPUs benutzt werden können, ist eventuell ein BIOS Update, sowie neue Treiber und ein AXTU Update notwendig. Bitte folgen Sie den Anweisungen um das passende BIOS, die richtigen Treiber und Utilities zu installieren.
Schritt 1: Überprüfen der BIOS Version des Mainboards.
Bitte prüfen Sie die unten stehende Tabelle auf die notwendige BIOS Version.
Haben Sie bereits ein BIOS mit der gleichen oder einer höheren Versionsnummer auf dem Mainboard, so ist kein Update des BIOS erforderlich und Sie können direkt mit Schritt 2 fortfahren.
Model
BIOS Version
H61M-VS R2.0
P2.10
H61M-HGS
P1.50
H61M-HVS
P1.90
H61M-HVGS
P1.70
H61M/U3S3
P1.70
H61M-ITX
P1.60
H61iCafe
P1.70
H61DE/S3
P1.70
H61DE/SI
P1.70
H61M-PS
P1.40
H61M
P1.70
H61DEL
P1.70
H61M-GE
P1.70
P65iCafe
P1.40
H61M-VS
P2.10
H61M-S
P1.50
H61M-GS
P1.50
Model
BIOS Version
Fatal1ty Z68 Professional Gen3
P2.10
Z68 Extreme3 Gen3
P2.10
Z68 Extreme4 Gen3
P2.10
Z68 Extreme7 Gen3
P2.10
Z68 Pro3
P2.10
Z68 Pro3 Gen3
P2.10
Z68 Pro3-M
P2.10
Z68M/USB3
P2.10
Z68M-ITX/HT
P2.20
Z68 Extreme4
P2.20
Model
BIOS Version
Fatal1ty P67 Performance
P2.10
Fatal1ty P67 Professional
P3.10
P67 Extreme4
P3.10
P67 Extreme4 Gen3
P2.10
P67 Extreme6
P2.10
P67 Pro
P2.10
P67 Pro3
P3.10
P67 Pro3 SE
P2.10
Model
BIOS Version
H67DE3
P2.10
H67M
P2.10
H67M-GE
P2.10
H67M-GE/HT
P2.10
H67M-ITX
P2.10
H67M-ITX/HT
P2.10
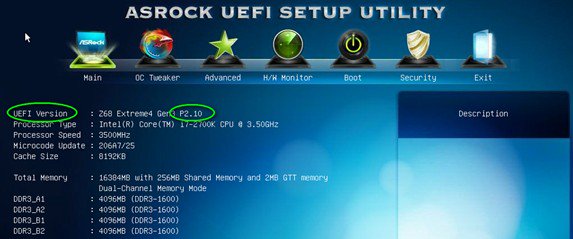
Es gibt zwei Möglichkeiten, die auf dem Mainboard vorhandene BIOS Version zu überprüfen:
1) Booten Sie das System und drücken Sie [F2] oder [Delete] wenn das ASRock Boot Logo angezeigt wird. Sie können die Versionsnummer des BIOS/UEFI wie im Screenshot unten angezeigt ablesen.
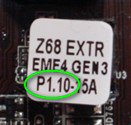
2) Auf dem BIOS-ROM-Chip des Mainboards befindet sich ein Sticker. Dieser sagt Ihnen mit welcher BIOS Version ihr Mainboard ausgeliefert wurde.
Schritt 2: BIOS aktualisieren
A) Wenn Sie eine Sandy-Bridge-CPU besitzen oder sich eine solche ausleihen können, können Sie das BIOS-Update einfach selbst durchführen.
Bitte laden Sie dazu das aktuelle BIOS über den Link in der obigen Tabelle herunter und aktualisieren Sie es.
Für weitere Informationen klicken Sie auf das "How to Update" Icon in der passenden Spalte auf der Download-Seite.
B) Wenn Sie keine Sandy-Bridge-CPU besitzen und auch keine leihen können, setzen Sie sich bitte mit Ihrem Händler in Verbindung, so dass er das BIOS-Update für Sie vornimmt.
Dies ist die zweitschnellste Option wie Sie ihr Mainboard kompatibel zu neuen Ivy-Bridge-CPU machen.
Sollte das nicht möglich sein, dann setzen Sie sich bitte für weitere Hilfe mit dem Technischen Support von ASRock in Verbindung.
* Anmerkung: Wenn Sie einen USB-Stick benutzen, um das BIOS-Update durchzuführen, drücken Sie nachdem das BIOS auf den BIOS-Chip geschrieben wurde eine Taste um das System neu zu starten. Entfernen Sie den USB-Stick zu diesem Zeitpunkt nicht! Die Intel ME Firmware Update Prozedur wird falls notwendig automatisch fortfahren.
**Anmerkung: Bitte benutzen sie nur original BIOS-Files von der ASRock Webseite.
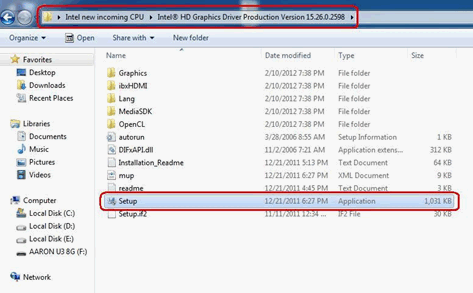
Schritt 3: Die passenden Intel HD Grafiktreiber von der ASRock Webseite aktualisieren
* Wie Sie den Intel HD Grafiktreiber aktualisieren:
1. Bitte entpacken (Unzip) Sie die Datei und öffnen dann den Ordner um dann „Setup" auszuführen.
2. Folgen Sie den Anweisungen der Installationssoftware um den Treiber zu installieren.
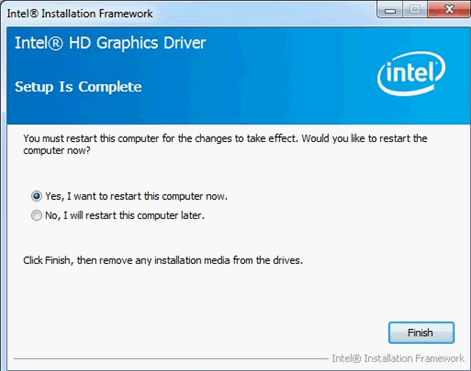
3. Nachdem die Installation abgeschlossen ist, sollten Sie folgende Nachricht sehen.
Schritt 4: Installieren der korrekten Version der Intel Management Engine Software von der ASRock Website:
* Wie Sie die Intel Management Engine aktualisieren:
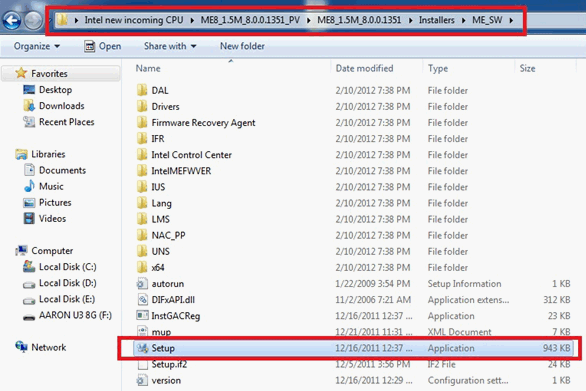
1. Bitte entpacken (Unzip) Sie die Datei und öffnen den Ordner um dann „Setup" auszuführen.
Pfad: Gehen Sie in den Intel ME8 Ordner -> ME8_1.5M_8.0.0.1351 -> Installers -> ME_SW-> Wählen Sie "Setup".
2. Folgen Sie den Anweisungen der Installationssoftware um den Treiber zu installieren.
3. Nachdem die Installation abgeschlossen ist, sollten Sie folgende Nachricht sehen. Klicken Sie danach auf „Finish".
Schritt 5: Installieren des Intel Smart Connect Treibers für Microsoft Windows7/7 64 Bit.
Schritt 6: Aktualisieren des ASRock AXTU Utility.
Bitte aktualisieren Sie AXTU auf die neuste Version von der ASRock Website.
Schritt 7: Ersetzen Sie die CPU durch die neue Intel Ivy Bridge CPU.
Q (Q&A-89|298):
Maus und Keyboard arbeiten ungewöhnlich im BIOS, wie kann ich dieses Problem beheben?(11/1/2011)
A:Bitte aktualisieren Sie das BIOS auf die neuste Version, oder nutzen alternativ das neuste BETA BIOS aus unserer Beta Zone zum Testen.
Link zum BIOS-Download: https://www.asrock.com/support/download.de.asp
Q (Q&A-88|291):
Wenn ich eine ATI HD6670, HD 6570 oder HD 6450 auf einem Mainboard der A75/A55-Serie einbaue, erhalte ich kein Bild von der VGA-Karte. Was kann ich dagegen machen?(9/1/2011)
Oder gehen Sie in das BIOS in den Menüpunkt 'North Bridge Configuration' und deaktivieren Sie dort den Punkt [Dual Graphics] indem sie diesen auf [Disabled] setzen.
Q (Q&A-85|285):
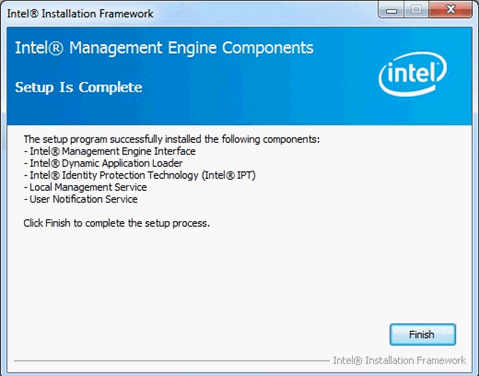
I have installed all the drivers from support CD, but I could not enable the Intel Smart Response Technology on my Z68 motherboard. What should I do?(5/1/2011)
A:First, please download and update BOTH of your BIOS and Intel Rapid Storage Driver.
After doing so, please follow the steps below to setup Intel Smart Response:
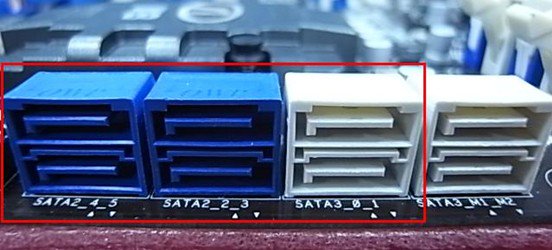
Step 1. Before booting up the system, please make sure to connect your HDD to supported SATA ports.
For Z68 Extreme4, please connect to the ports as shown below.
These ports are from Intel PCH chipset, which support Intel Smart Response Technology.
Please note that, for Z68 Pro3 or Z68 Pro3-M, all the SATA ports are supported.
※ Note:
We recommend users to connect your HDD to SATA3 ports if your HDD is SATA3 spec.
Please DO NOT connect SSD to the system at the moment.
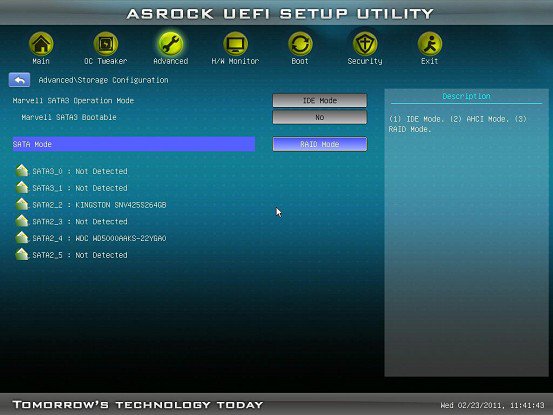
Step 2. Please press F2 or DEL to enter BIOS > Advanced > Storage Configuration.
Step 3. Please set SATA mode to [RAID Mode] as shown below
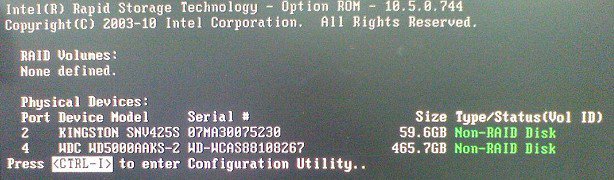
Step 4. In RAID ROM screen, HDD status should be "Non-RAID Disk"
Step 5. Please install OS in SATA HDD, after installation, please shut down your system and connect SSD to SATA ports listed above.
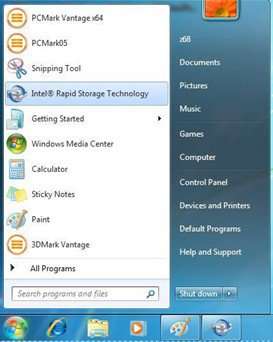
Step 7. After installation is completed, reboot the system and open Intel Rapid Storage Technology.
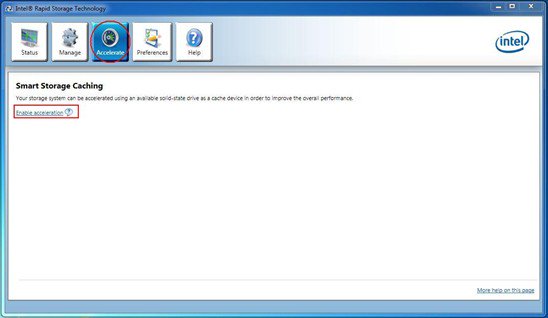
Step 8. Choose "Accelerate", and click "Enable acceleration"
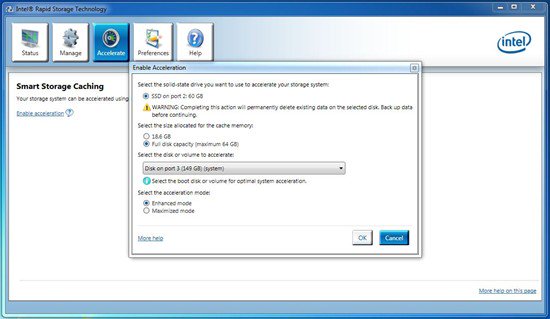
Step 9. You could change the default settings as you want it, then click "OK"
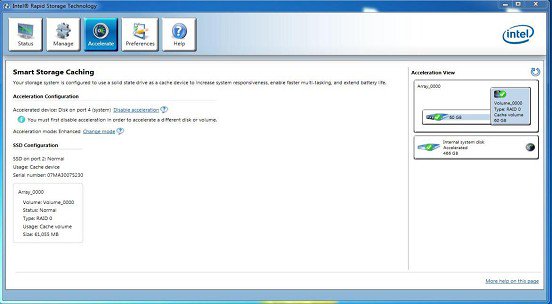
Step 10. You could see the Smart Storage Caching is enabled as shown below:
Q (Q&A-84|283):
I am an owner of AD425PV3/AD525PV3. I could not get any display after booting up my system; I could see CPU fan and power fan are spinning but no display, what should I do?(4/1/2011)
Q (Q&A-77|261):
After installing windows7 on ALiveNF7G-GLan or N68PV-GS I installed all the windows7 driver from the website, why I still get an exclamation mark on "co-processor" in device manager?(11/21/2009)
Q (Q&A-76|258):
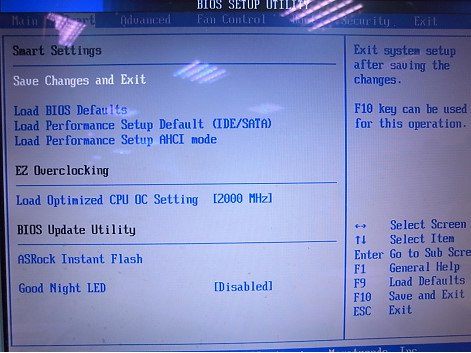
Is there any possibility to disable the LED of ION 330 ?(10/22/2009)
A:Yes. Please update your BIOS to P1.60 first. After doing so, you may find the "Good Night LED" option in BIOS -> Smart, please refer to the following picture.
If you set "Good Night LED" to [Enabled], the system would turn LED off.
Q (Q&A-64|227):
How do I get my onboard LAN to work properly?(4/28/2008)
A:Here are some suggestions:
1.Make sure the "Onboard LAN" option was enabled in BIOS.
2.Make sure the LAN driver was installed properly. Please check it in "Device Manager".
3.Update the BIOS of your motherboard to the latest one.
4.Try the newer LAN driver from ASRock or chipset vendor's website.
ASRock: https://www.asrock.com/support/Download.asp
Realtek: http://www.realtek.com.tw/default.aspx
NVIDIA: http://www.nvidia.com/Download/index.aspx?lang=en-us
VIA
5.Change another LAN cable. (For Gigabit LAN, please make sure your LAN cable could fully work with Gigabit LAN.)
6.Reinstall the operating system.
Q (Q&A-61|221):
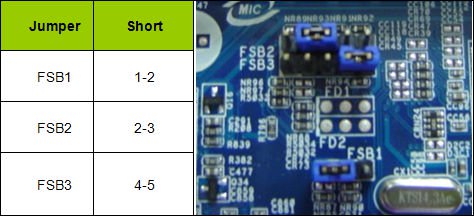
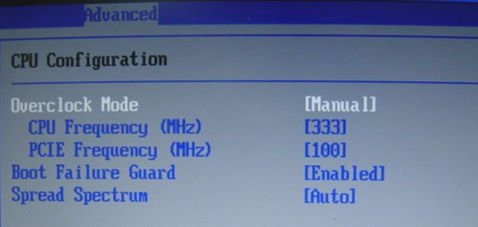
My motherboard is 4Core1600Twins-P35/4Core1600P35-WiFi(+). I want to overclock my FSB 800 CPU. Are there any tips to increase the overclocking capability of my system?(1/14/2008)
A:First of all, please update the BIOS to P1.10 or later.
(Download: https://www.asrock.com/support/download.asp?Model=P35 )
Secondly, please adjust the FSB jumper setting on the motherboard according to the following instructions (this will set the DRAM: FSB (frequency) to 1:1)
After doing the above steps, you may set the "Overclock Mode" to [Manual] in the BIOS>Advanced> CPU Configuration and then adjust the "CPU Frequency" to overclock your system.
Q (Q&A-61|218):
When I install AMD® Phenom CPU on ALiveNF6G-VSTA, I found Windows® Vista™ shows yellow " ! " mark on PCI Express standard Root Port in Device Manager. What do I solve it?(1/14/2008)
A:Please kindly update BIOS P2.20 or later for ALiveNF6G-VSTA to solve the problem.
BIOS Download: https://www.asrock.com/mb/download.asp?Model=ALiveNF6G-VSTA#bios
Q (Q&A-49|13):
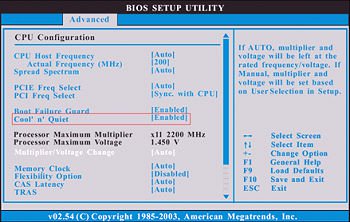
I am using the AMD® AM2 rev.G CPU. But the system always stops at POST after I turn on the system. I can't go into the operating system. What should I do?(12/19/2006)
A:For supporting AMD® AM2 rev.G CPU, please follow the steps to update the BIOS of your motherboard to the latest one.
1.Please press the "F2" key continuously right after turn on the system until it goes into the BIOS setup.
2.Please disable the "Cool'n'Quiet" function in BIOS setup.
3.Press "F10" key to save configuration changes and exit setup.
4.You can start to update the BIOS now.
How to update BIOS?
https://www.asrock.com/support/DOS.html
BIOS download page.
https://www.asrock.com/support/download.asp?c=All
Q (Q&A-46|182):
I'm using the Core 2 Duo E6XXX CPU and DDRII 533/667 RAM on 775Dual-VSTA motherboard. But the system is very unstable. Sometimes it gets blue screen or fail when installing the Windows® XP or some applications. How do I fix this problem?(9/19/2006)
A:Please refer to following steps to fix this problem.
Please set the "DRAM Frequency" as "[333MHz (DDRII 667)]" in BIOS setup if you use DDRII 667 RAM. (BIOS/ Advanced/ Chipset Configuration/ DRAM Frequency)
Please enable the "Flexibility Option" in BIOS setup if you use DDRII 533 RAM. (BIOS/ Advanced/ Chipset Configuration/ Flexibility Option)
If the problem still remains, please update the BIOS to P1.80 or later version.
https://www.asrock.com/mb/download.asp?Model=775Dual-VSTA#bios
Q (Q&A-44|176):
I use 775VM800/P4VM800/K7S41GX/K7S41 motherboards. Do these models support 1440x900 resolution?(7/21/2006)
A:If your board is 775VM800, please update BIOS to P1.50 or later version.
https://www.asrock.com/mb/download.asp?Model=775VM800
If your board is P4VM800, please update BIOS to P1.60 or later version.
https://www.asrock.com/mb/download.asp?Model=P4VM800
If your board is K7S41GX, Please update BIOS to P2.50 or later and VGA driver to 3.73 or later version.
https://www.asrock.com/mb/download.asp?Model=K7S41GX&s=462
If your board is K7S41, Please update BIOS to P2.30 or later and VGA driver to 3.73 or later version.
https://www.asrock.com/mb/download.asp?Model=K7S41&s=462
VGA Driver for K7S41 / K7S41GX: http://www.sis.com/download/agreement.php?id=155931
Q (Q&A-43|174):
If I use Conroe 1066-CPU on 775Dual-VSTA. What kind of memory should I use?(5/24/2006)
A:If the BIOS version is P1.00, we recommend to use DDR400 and DDRII667 memory module; however, BIOS version is P1.10 and later can support DDR400, DDRII533 and DDRII667, so if you will use DDRII533 modules on your system, we suggest you update bios to P1.10 or later version.
https://www.asrock.com/mb/download.asp?Model=775Dual-VSTA#bios
Q (Q&A-31|138):
My Windows® 98SE / ME system is built by K8 Combo-Z / 939A8X-M / K8Upgrade-1689 / K8A8X-M. I found the latest released BIOS which was added a new option-SATA Operation Mode. Can I use the BIOS for my system?(5/15/2005)
A:Before flashing to the latest BIOS, please update your LAN driver to the latest one (3.10a or newer version). Please refer to our download site to find the latest LAN driver.
https://www.asrock.com/support/download.asp
Q (Q&A-27|125):
I want to install Linux Red Hat 9.0 with HT CPU on my P4i65GV. After installation completed and entered into OS, there are two kinds of OS for choosing: 2.4.20-8smp, and 2.4.20-8. When entering into OS 2.4.20-8smp and selecting shut down, it will not shut down properly. How should I solve the problem?(1/18/2005)
A:All ASRock motherboards support ACPI. Since Red Hat 9.0 is APM mode O/S, please refer to https://www.asrock.com/support/Download/P4i65GV.asp to download special BIOS which supports APM. After special BIOS updated, please type the command "Linux apm=power_off" at the beginning of Linux Red Hat 9.0 installation.
Q (Q&A-27|122):
My hard drives are Maxtor Diamond MAX 10 and MaxLine III SATA 250 GB and 300 GB with 16 MB cache buffer. My hard drives can not be detected correctly during the POST, what can I do?(1/18/2005)
A:Please update to the newest BIOS of motherboard. If you still encounter problem, please contact Maxtor and update to the newest firmware of hard drives.
Q (Q&A-23|111):
I use 3.2G/3.4GHz CPU on P4i65GV / P4i48 / 775i65GV. But CPU speed shows 2.8G? How do I fix it?(9/14/2004)
A:Because you use the new CPU and it is necessary to update the microcode for CPU support. Please update to the latest BIOS.
https://www.asrock.com/mb/download.asp?Model=P4i65GV#bios
https://www.asrock.com/mb/download.asp?Model=P4i48#bios
https://www.asrock.com/mb/download.asp?Model=775i65GV#bios
Q (Q&A-22|109):
My motherboard is K7S8X. I can't format my Samsung hard drive and install OS. What should I do?(8/16/2004)
A:Please try to update latest BIOS for K7S8X first and then go to BIOS SETUP -> Advanced -> Chipset Configuration -> IDE Driving. Please try to adjust the option.
Q (Q&A-21|104):
My motherboard is K7S8X. When I connect my HDD on primary IDE with jumper setting at master and AOpen DVD\CD-RW combo drive on primary IDE with jumper setting at slave, it takes more than 1 minute to login Windows XP. How can I solve this problem?(7/12/2004)
A:To solve this issue, please connect the HDD on primary IDE with jumper setting at master and AOpen DVD\CD-RW combo drive on secondary IDE with jumper setting at master. Or you can update the motherboard's BIOS to version 2.40 or later to solve this https://www.asrock.com/mb/download.asp?Model=K7S8X#bios
Q (Q&A-15|79):
My motherboard is K7S8XE+. There are error messages appeared when I am making the SATA driver diskette. What should I do?(1/14/2004)
A:If you have trouble to make this floppy disk, you can follow the instructions below to solve the problem.
1, Please update BIOS to P1.50 or higher version. You can find the latest BIOS version on our website: https://www.asrock.com/mb/download.asp?Model=K7S8XE%2b&s=462
2, Please connect a hard disk drive to your system when making this floppy disk.
3, Please do not use Mitsumi 48A0W CD drive or Mitsumi 5600W CD drive on your system when making this floppy disk. However, you can use them on your system after you finish making this floppy disk.
Q (Q&A-13|68):
My motherboard is SiS chipset based K7S8XE, why my USB 2.0 hard disk box can not be recognized under Windows XP?(11/14/2003)
A:We have experienced that some USB 2.0 boxes may not conscientiously follow the USB 2.0 specification to design, so it cannot operate properly with USB 2.0 specification. Please update the newest BIOS, and then disable the USB 2.0 controller in the BIOS SETUP. At this moment, the USB 2.0 box may have chance to operate with USB 1.1 specification.
A:Please unplug the ATX power and remove the battery, use a metal material like paper clip to short the CLRCMOS1 soldering points or CLRCMOS2 jumpers for 3 seconds. After that, install the battery and plug the ATX power back to the motherboard.
Note: Please do not clear the CMOS right after you update the BIOS.
Q (Q&A-8|38):
How do I get the correct CPU speed after updating the BIOS?(6/13/2003)
A:After updating the BIOS, the default of BIOS will be loaded with stable setting and the system runs with slower speed to secure the first boot runs successfully. In order to make your system running with the optimum setting, please remember to load turbo/default setting after you update the BIOS.
Q (Q&A-5|20):
After I updated BIOS, ASRock LOGO disappeared when booting up. Why?(3/3/2003)
A:Please don't worried! ASRock has removed LOGO in the new BIOS for all ASRock model. It is normal that ASRock LOGO disappeared after flashing BIOS.
 Menü
Menü


![Select Clear Secure Boot Keys, then choose [Yes].](/support/faq/190-2.jpg)

![After clearing the keys, select Install Default Secure Boot Keys, then choose [Yes].](/support/faq/190-4.jpg)