Utilizziamo i cookie per offrirti un'esperienza più personalizzata e fluida. Visitando questo sito web, acconsenti all’utilizzo dei cookie da parte nostra. Se preferisci non accettare i cookie o hai bisogno di maggiori informazioni, consulta la nostra Informativa sulla privacy.
Cookie necessari Questi cookie sono essenziali per il corretto funzionamento del sito web e non possono essere disattivati.
Cookie analitici Questi cookie ci aiutano a capire come i visitatori utilizzano il nostro sito web.
Cookie di marketing Questi cookie vengono utilizzati per tracciare i visitatori e mostrare annunci pubblicitari pertinenti.
Cookie dei social media Questi cookie ti consentono di condividere pagine e contenuti sui social media.
Se siete pienamente consapevoli della categoria della vostra domanda, si può scegliere una delle categorie qui sotto per le domande più frequenti. Catalogo:
Risultati:
Q (537):
How do I configure Realtek 5.1ch audio output on N100M under Windows 10?(10/29/2024)
A:Please follow the steps below.
1. Go to BIOS\Chipset Configuration and set Intel SST to "Enabled”.
2. Boot into Windows. Download and install Realtek high definition audio driver version:6.0.9503.1_RTK_SST and follow the instructions, restarting the system after the installation.
Realtek high definition audio driver ver:6.0.9503.1_RTK_SST:
Q (488):
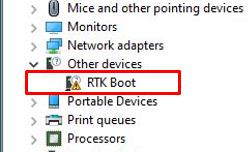
Ho una scheda madre TRX40. Alla voce Gestione dispositivi, c'è un dispositivo RTK Boot che mostra un punto esclamativo e non c'è uscita audio dalla porta audio. Cosa posso fare per risolverlo? (4/1/2020)
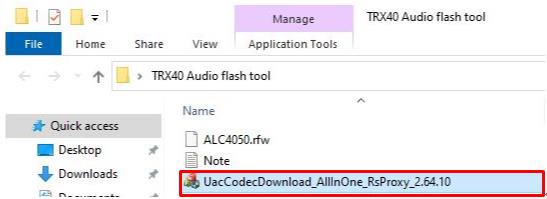
A:Se viene visualizzato un dispositivo RTK sotto Gestione dispositivi e la porta audio non può essere utilizzata, seguire i passaggi seguenti per rimuovere il dispositivo RTK e consentire all'audio di funzionare correttamente.
Passaggio 3. Cliccare con il pulsante destro del mouse sull'icona Start nel desktop e selezionare Gestione dispositivi per vedere se è visualizzato il RTK Boot nel sistema.
Passaggio 5. Fare doppio clic sull'icona UacCodecDownload_AllInOne_RsProxy_2.64.10
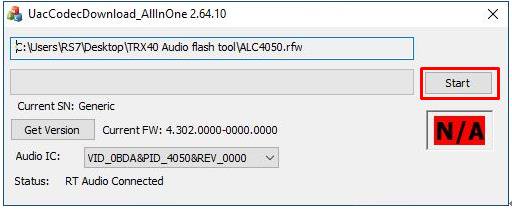
Passaggio 6. Premere il pulsante Start per avviare il flashing del firmware audio.
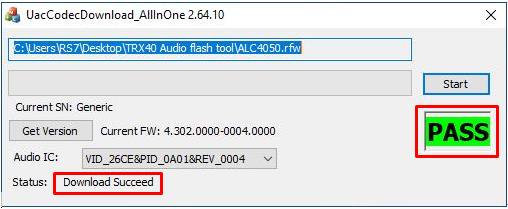
Passaggio 7. Una volta completato il processo di flash, lo strumento mostrerà Pass, il che significa che il firmware audio è stato aggiornato correttamente e non dovrebbe essere visualizzato il dispositivo RTK Boot alla voce Gestione dispositivi.
Q (487):
Quando registro tramite il microfono in Windows 10 1909, si verificano sibili nelle registrazioni.(1/1/2020)
A:Se si sente un sibilo dalle registrazioni, scegliere uno dei metodi seguenti per evitare il sibilo.
Metodo 1:
Passaggio 1.
Scaricare il driver audio ad alta definizione Realtek dal sito web di ASRock.
*Assicurarsi che il cavo LAN sia collegato durante l'installazione del driver audio Realtek.
Passaggio 2:
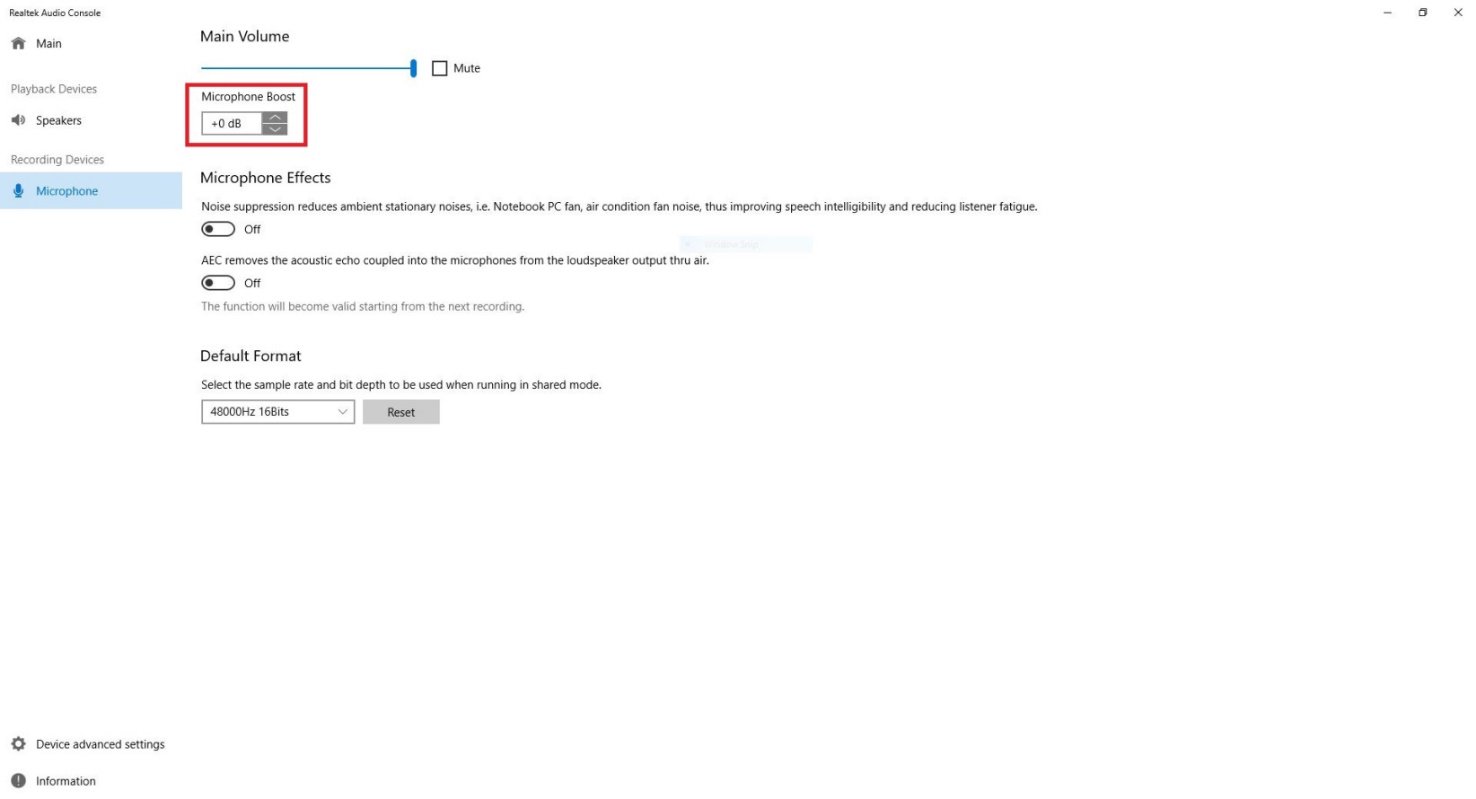
Aprire la "console audio Realtek”.
Passaggio 3.
Attivare l'opzione "La soppressione del rumore riduce i rumori stazionari ambientali” nell'APP della console audio Realtek.
Passaggio 4.
Una volta abilitata l'impostazione di cui sopra, la qualità della registrazione migliorerà.
Metodo 2:
Passaggio 1.
Fare riferimento al passaggio 1 e al passaggio 2 del metodo 1 per aprire la "console audio Realtek”.
Passaggio 2.
Regolare Incremento microfono su + 0db.
Passaggio 3.
Una volta che il valore di boost è stato regolato su + 0db, la qualità della registrazione migliorerà.
Q (469):
Come installare l'app Realtek Audio Console in Windows 10 RS4 o versione successiva?(10/1/2018)
A:In generale, il sistema scaricherà automaticamente l'app in background dopo aver installato il driver Realtek Audio.
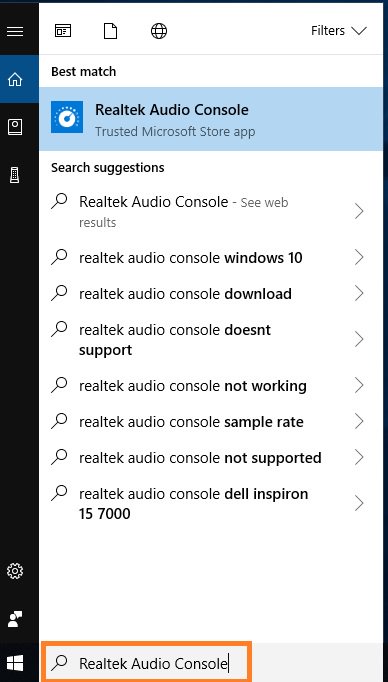
Digita "Realtek Audio Console” nella barra di ricerca di Win10 per accedere all'app.
* Collega il cavo LAN quando installi il driver Realtek Audio.
Se l'app non viene visualizzata sul tuo sistema, segui i passaggi seguenti per installarlo manualmente.
1. Vai a Gestione dispositivi per controllare se il driver audio Realtek sia stato installato.
* Il driver Realtek Audio può essere installato/scaricato dal CD di supporto e dal sito Web ufficiale ASRock: www.ASRock.com.
2. Fai riferimento al seguente link per accedere a "Realtek Audio Control” sul Microsoft Store e clicca su "Scarica” per avviare il download. https://www.microsoft.com/store/productId/9P2B8MCSVPLN
3. Dopo l'installazione, clicca su Avvia per avviare l'app.
Q (468):
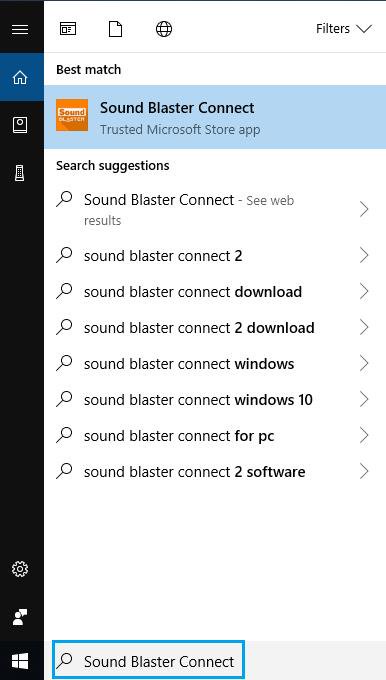
Come si installa l'applicazione Sound Blaster Connect in Windows 10 RS4 o versione successiva?(10/1/2018)
A:In generale, il sistema scaricherà automaticamente l'app in background dopo aver installato il driver Realtek Audio. Digita "Sound Blaster Connect" nella barra di ricerca di Win10 per accedere all'app.
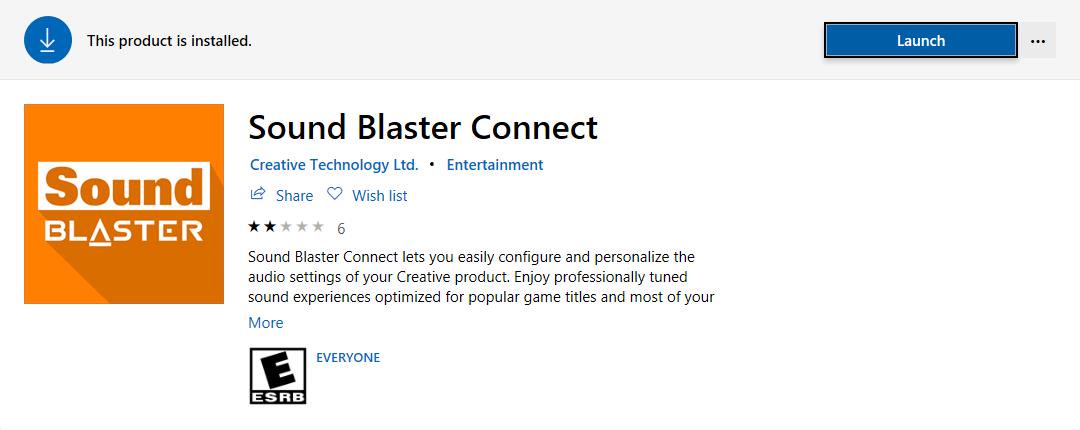
Se l'app non viene visualizzata sul tuo sistema, segui i passaggi seguenti per installarla manualmente.
1. Assicurati che la tua scheda madre supporti Creative Sound e con il driver Realtek Audio installato.
* Visita la pagina delle specifiche della scheda madre su www.ASRock.com per i dettagli.
* Il driver Realtek Audio può essere installato/scaricato dal CD di supporto e dal sito Web ufficiale di ASRock.
2. Accedi a "Sound Blaster Connect” su Microsoft Store e clicca su "Scarica” per avviare il download. https://www.microsoft.com/en-sg/store/p/sound-blaster-connect/9n66rljrt8z2
3. Dopo l'installazione, cliccare su Avvia per avviare l'app.
Fare riferimento alla seguente tabella che supporta Creative SoundBlaster Cinema5.
Q (438):
Perché la piattaforma della serie Beebox mostra "!" nel gestore delle periferiche dispositivi quando si installa il driver Realtek Wireless LAN sotto Windows 10 RS1?(4/1/2017)
A:Se si utilizza Windows 10 RS1 e si installa il driver Realtek, potrebbe essere visualizzato "!" nel gestore delle periferiche.
Fare riferimento al link sottostante per scaricare il driver Realtek Wireless Lan ver: 2023.48.0801.2016 per Windows 10 RS1 o rimuovere il driver Realtek LAN per utilizzare direttamente il driver LAN inbox.
Link: https://www.asrock.com/nettop/overview.asp?Model=Beebox%20Series&cat=Download&os=Win1064
Q (406):
Il mio Beebox che utilizza una scheda Realtek LAN wireless non riesce a connettersi al router con banda a 2,4 GHz.(12/1/2015)
Q (354):
Il mio lettore di schede SD sulla Wi-SD box non è in grado di rilevare le schede SD. Come faccio a far funzionare correttamente il lettore di schede SD?(9/1/2013)
Q (272):
Quando la serie ION 330 viene riavviata dallo stato di sospensione o ibernazione, la periferica audio non funziona più. Come posso risolvere questo problema?(12/30/2010)
Q (259):
Does my motherboard support Windows® 7?(11/21/2009)
A:Please refer our website for windows7 support list.
Website link: https://www.asrock.com/news/events/2009win7/index.asp
If your models are not listed on Windows® 7 support list, please kindly try inbox driver first.
Or go to chipset vender website to download the chipset driver.
Intel® website: http://downloadcenter.intel.com/Default.aspx
AMD® website: http://support.amd.com/us/gpudownload/Pages/index.aspx
NVIDIA® website: http://www.nvidia.com/Download/index.aspx?lang=en-us
Realtek website: http://www.realtek.com.tw/downloads/
VIA® website: http://www.via.com.tw/en/support/drivers.jsp
If you got any further issues, please contact ASRock TSD : Asrock_TSD@asrock.com.tw
Q (247):
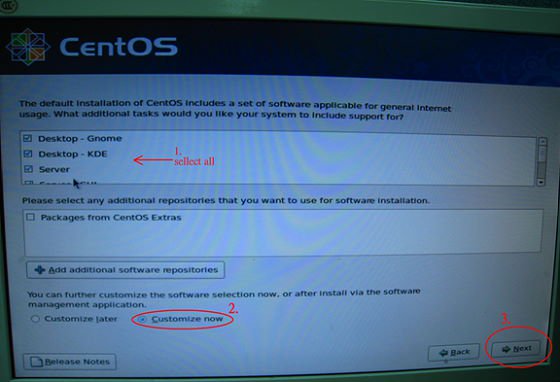
I want to install Linux CentOS 5.2 on X58 SuperComputer. After start the installation of CentOS 5.2, the system stays on checking hardware device. I cannot continue the Linux installation, what can I do?(3/28/2009)
A:Please follow below steps to install your Linux CentOS 5.2 installation.
1.Disable the Onboard LAN 1 and Onboard LAN 2 in BIOS setting.
2.Enter Boot menu and starting the Linux CentOS 5.2 installation.
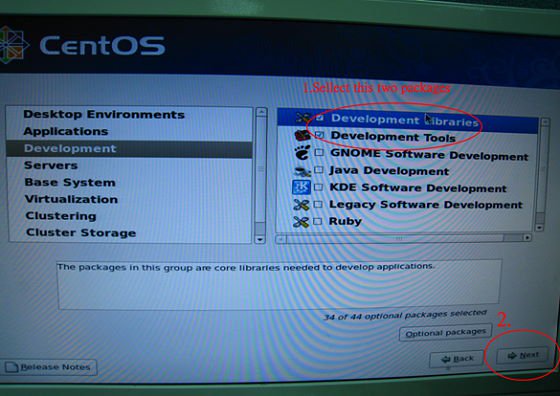
3.Please install the system packages like below picture.
4.After install CentOS 5.2 completely , download your LAN driver by following link.
Link:http://www.realtek.com/downloads/downloadsView.aspx?Langid=1&PNid=13&PFid=5&Level=5&Conn=4&DownTypeID=3&GetDown=false#2
5.Please remove the in-box driver and remove the r8169 LAN driver by following command.
# cp -p r8168-8.011.00.tar.bz2 ~
# cd ~
# tar vjxf r8168-8.011.00.tar.bz2
# cd /lib/modules/`uname -r`/kernel/drivers/net/
# rm -f r8169.ko
# cd ~
# cd r8168-8.011.00
# make clean
# make modules
# make install
# depmod –a
# reboot
6.After upgrade your LAN driver complete, please reboot your system and enable the Onboard LAN 1 and Onboard LAN 2 in BIOS setting.
Q (241):
I have a motherboard with Realtek HD Audio Codec. When I use Windows® XP SP3 or upgrade to Windows® XP SP3, the onboard audio doesn't work. What could I try?(11/27/2008)
A:Please try the Realtek latest audio driver.
The driver is available from this link: http://www.realtek.com.tw/downloads/downloadsView.aspx?Langid=1&PNid=14&PFid=24&Level=4&Conn=3&DownTypeID=3&GetDown=false
Q (235):
My P45 motherboard has two onboard LANs. How do I set the Teaming function and combine both onboard LANs to be a team with more bandwidth in my system?(9/5/2008)
A:Before setting Teaming function, please make sure if your Switch (or Router) could support Teaming (IEEE 802.3ad Link Aggregation) function. (For example: D-Link DGS-3100…)
Then, please refer to following steps to set "Teaming function"...
1. Install RtkTeaming driver ver.1.0.0.51 from Motherboard Support CD
(/Driver/Teaming/ RtkTeaming 1.0.0.51…)
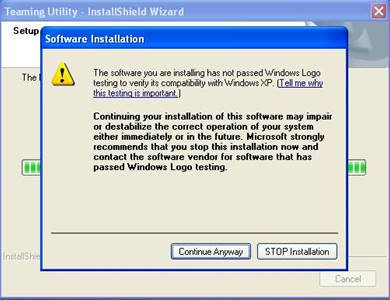
(*When installing teaming driver, system will show below warming message. Please choose "Continue Anyway" and keep installing driver.)
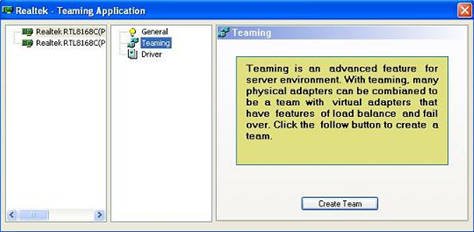
2. After installing driver, please open "Teaming Utility" in Programs. (Start > Programs > Realtek > Teaming Utility >…)
3. Click "Teaming" item and then press "Create Team" button.
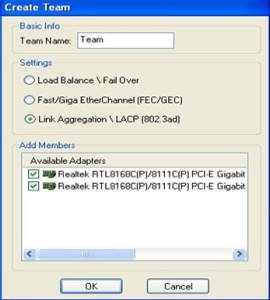
4. Key in Team Name and choose "Link Aggregation \ LACP (802.3ad)" for Settings.
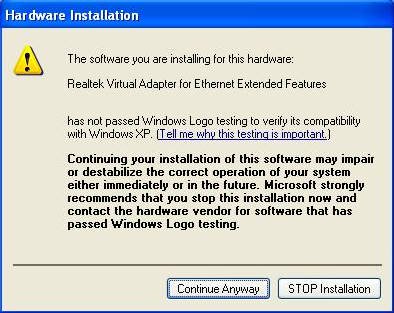
5. Select two available onboard LAN cards and then press "OK" button (After pressing "OK" button, system will show below warming message. Please choose "Continue Anyway".)
6.After doing above settings, system will auto create a new Local Area Connection
7.Reboot system
Then, you will find the "Speed" column of new Local Area Connection will show 2.0Gbps.
Q (230):
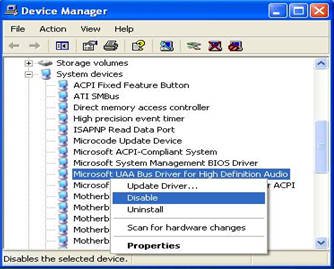
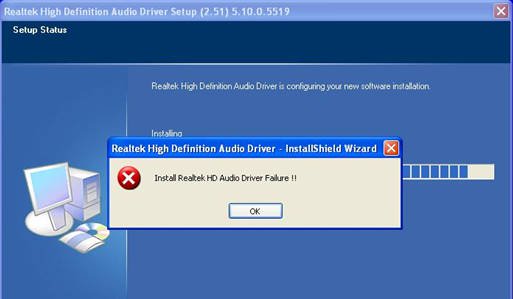
When I install Realtek HD Audio driver, I found the system shows below error message. What can I do? (6/26/2008)
A:Please refer to below steps to reinstall Realtek HD Audio driver:
1.Enter into "Add or Remove Programs" and remove "Realtek High Definition Audio Driver"
2.Disable all "Microsoft® UAA Bus Driver for High Definition Audio" in Device Manager first
3.Then uninstall all "Microsoft® UAA Bus Driver for High Definition Audio" from the system.
4.Reboot system
5.Reinstall "Realtek HD Audio driver" from Motherboard Support CD.
If you still meet this problem, please reinstall fresh Windows® system.
Q (227):
How do I get my onboard LAN to work properly?(4/28/2008)
A:Here are some suggestions:
1.Make sure the "Onboard LAN" option was enabled in BIOS.
2.Make sure the LAN driver was installed properly. Please check it in "Device Manager".
3.Update the BIOS of your motherboard to the latest one.
4.Try the newer LAN driver from ASRock or chipset vendor's website.
ASRock: https://www.asrock.com/support/Download.asp
Realtek: http://www.realtek.com.tw/default.aspx
NVIDIA: http://www.nvidia.com/Download/index.aspx?lang=en-us
VIA
5.Change another LAN cable. (For Gigabit LAN, please make sure your LAN cable could fully work with Gigabit LAN.)
6.Reinstall the operating system.
Q (226):
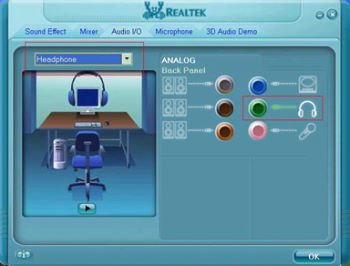
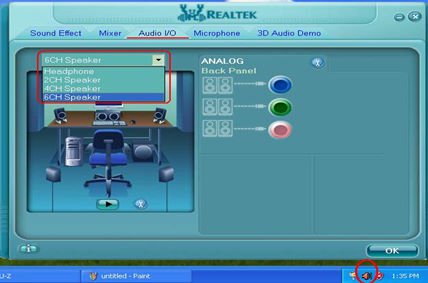
My motherboard with Realtek ALC662 audio codec supports 5.1 channel HD Audio. But it has 3 audio connectors (Light blue, Lime and Pink) on the rear audio panel. How do I connect my 5.1 channel speakers to the rear audio panel?(3/24/2008)
A:Please refer to following steps to connect your 5.1 channel speakers:
1. Connect the "Rear Speaker" to Line In (Light blue) port
2. Connect the "Front Speaker" to Line Out (Lime) port
3. Connect the "Central / Subwoofer" to Microphone (Pink) port
4. Adjust the "Audio I/O" setting to "6CH Speaker" in REALTEK Audio Management. Please refer to the following picture:
Q (207):
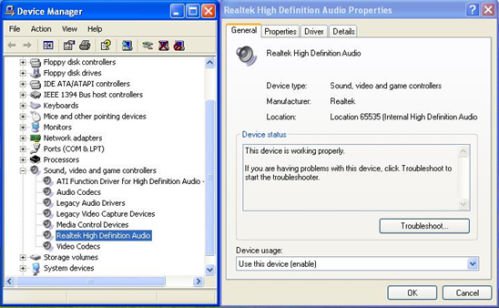
After installing ATI HDMI audio driver for my ATI HD 2xxx series PCIE card, I found the onboard sound will not work. How do I fix the problem?(9/10/2007)
A:Please kindly refer to below steps to check your system setting.
1.Please double check the onboard sound is working properly in Device Manager.
(If not, please reinstall Realtek HD Audio driver from Support CD.)
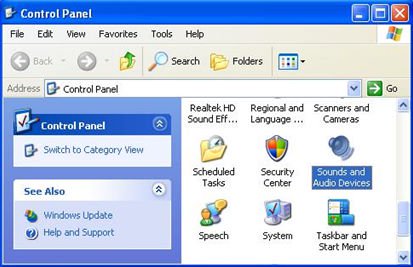
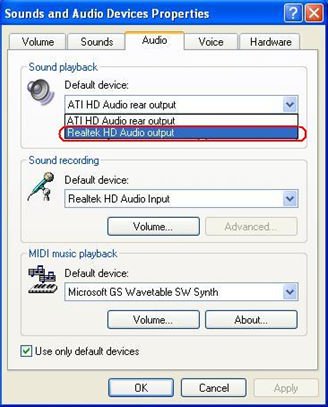
2.Enter the Sound setting in the Control Panel.
3.If the Default device of the Sound playback is "ATI HD Audio rear output", please change it to "Realtek HD Audio output".
4.Press "OK" to save setting.
Q (200):
I have a motherboard with Realtek HD audio codec. After resume Windows® Vista™ from sleep or from hibernation, the high definition audio device may no longer work. How do I solve this?(4/25/2007)
A:This is caused by Microsoft. It can be solved by installing the Microsoft® Hot fix. Please refer to the Microsoft® Knowledge Base: http://support.microsoft.com/kb/929685/en-us
Q (198):
I have a motherboard with Realtek HD audio codec. After installing the Microsoft® Security Update 925902 and 928843, my system shows the following error message. How do I fix this? (4/20/2007)
A:This is caused by Microsoft. It can be solved by installing the Microsoft® Hot fix. Please refer to the Microsoft® Knowledge Base: http://support.microsoft.com/kb/935448/
Q (196):
My onboard audio is Realtek HD audio. In the Windows® Vista™, I can't use Sound Recorder to record the audio. What should I do?(3/19/2007)
A:Please refer to below steps to set the audio device.
1.Install Realtek HD Audio driver from motherboard Support CD. Or download the Realtek HD audio driver from ASRock website.
https://www.asrock.com/support/Download.asp
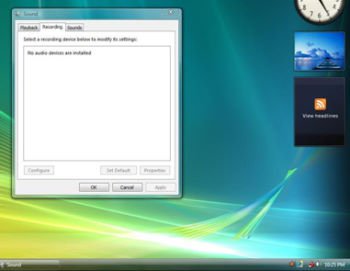
2.Plug in your recording devices (Microphone or other devices) to the Line-in port (or Microphone port), and then the recording device will show up "Line In" (or "Microphone") icon. Please kindly refer to below image. (Control Panel > Sound > Recording)
*Before plug in the recording devices:
*After plug in the recording devices:
3.Reopen the Sound Recorder to record the audio.
Q (193):
I plugged a headphone in my ASRock motherboard with Realtek HD Audio, and set the "Audio I/O" from "2CH" to "Headphone" in Realtek Audio Manager (picture1).
But the Realtek Audio Manager always recognized my headphone as 2CH speaker after I restarted the operating system (picture2).
What should I do?(1/16/2007)
A:Please refer to the following steps to set up the Realtek Audio Manager correctly.
1.Please remove all audio I/O (Headphones, Speakers, Microphone...) from the motherboard.
2.Please go to Realtek Audio Manager and set the "Audio I/O" you want.
3.Click ok.
4.Please plug your audio I/O back.
5.Restart your system.
Q (183):
My system is based on 775Dual-VSTA / ALiveSATA2-GLAN / AM2V890-VSTA with Windows® XP / Windows® 2000 operating system. After updating to the latest BIOS, I found two issues.
1.I can't find the "HD Audio Driver and Application" link in the menu of support CD.
2.There is a yellow exclamation mark in Device Manager.
What could I do?(9/19/2006)
A:1.If your CD is IVD12/ IVD12b (775Dual-VSTA), AV890-10 (ALiveSATA2-GLAN) or AV31/ AV31b (AM2V890-VSTA), you will get the issue.
Please execute the "Setup.exe" file from following directory of support CD.
775Dual-VISTA-> IVD12
CD\Drivers\Audio\REALTEK\MCE_XP_2K (R1.36)\
775Dual-VISTA->IVD12b
CD\Drivers\Audio/ REALTEK\MCE_XP_2K (R1.41)\
ALiveSATA2-GLAN -> AV890-10
CD\Drivers\Audio\REALTEK\MCE_XP_2K (R1.39)\
AM2V890-VSTA -> AV31/ AV31b
CD\Drivers\Audio\REALTEK\MCE_XP_2K (R1.39)\
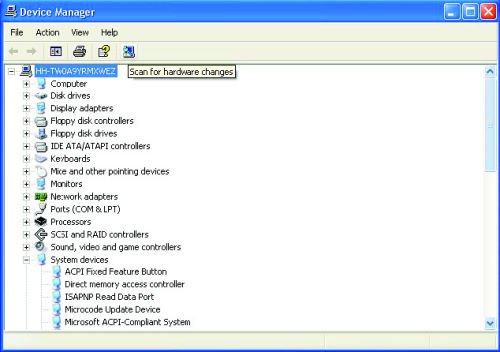
2:The yellow exclamation mark in Device Manager is unnecessary. It will not affect the system at all. Please follow below steps to remove it.
Right-click "My Computer" on your desktop, and click "Properties".
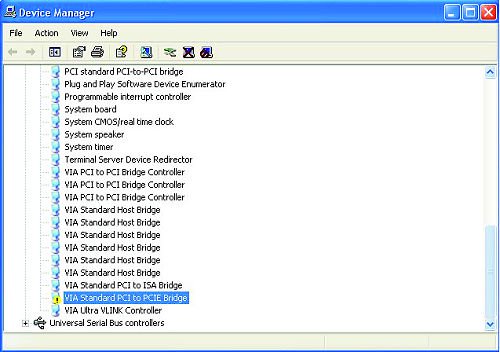
Select "Hardware", and click "Device Manager".
In "Device Manager", double-click the option "System Devices". You will find "VIA® Standard PCI to PCIE Bridge" item with a yellow exclamation mark.
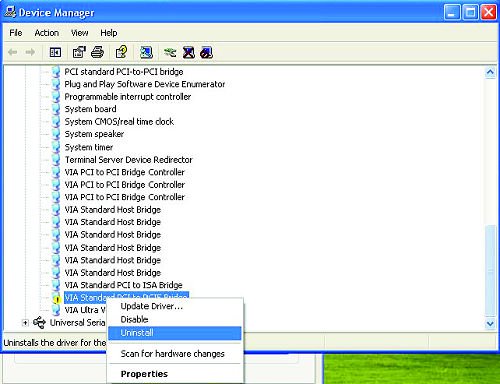
Right-click "VIA® Standard PCI to PCIE Bridge", and select "Uninstall". Confirm your choice by clicking "OK".
After a few seconds, click "Scan for hardware changes" icon on the top.
Q (164):
If I use AC'97 front audio panel with, how do I connect to the High Definition Audio header on the motherboard and get front audio work?(2/17/2006)
A:If you use AC'97 audio panel, please install it to the front panel audio header as below:
A. Connect Mic_IN (MIC) to MIC2_L.
B. Connect Audio_R (RIN) to OUT2_R and Audio_L (LIN) to OUT2_L.
C. Connect Ground (GND) to Ground (GND).
D. MIC_RET and OUT_RET are for HD audio panel only. You don't need to connect them for AC'97 audio panel.
E. Enter BIOS Setup Utility. Enter Advanced Settings, and then select Chipset Configuration. Set the Front Panel Control option from [Auto] to [Enabled]. For Windows® XP
F. Enter Windows® system. Click the icon on the lower right hand taskbar to enter Realtek HD Audio Manager. Click "Audio I/O", select "Connector Settings", choose "Disable front panel jack detection", and save the change by clicking "OK". For Windows® Vista™
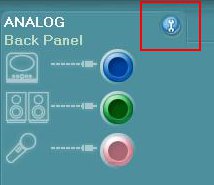
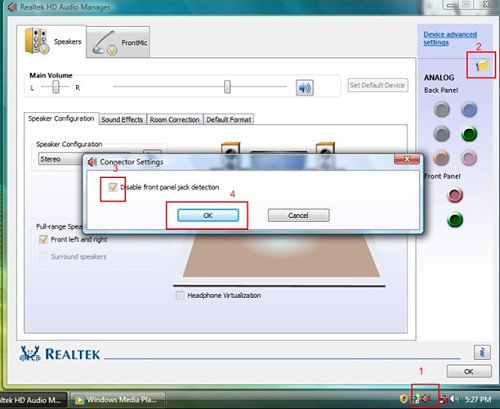
F. Enter Windows® system, 1: Double click the icon on the lower right hand taskbar to enter Realtek HD Audio Manager. 2: Click the "Folder" icon at the top-right corner. 3. Check "Disable front panel jack detection". 4. Click "OK".
(Please refer to the following picture)
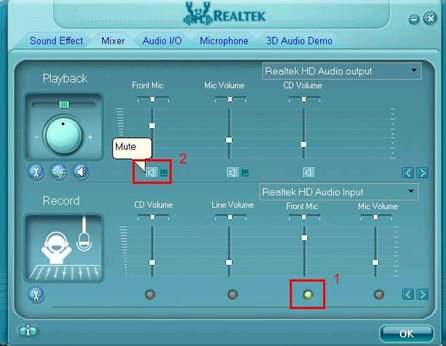
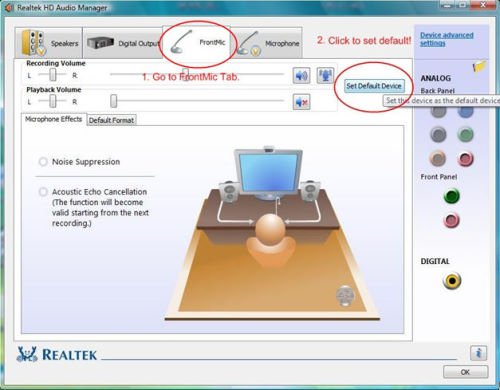
G. To activate the front mic: For Windows® XP:
Please select the Front Mic as default record device in No. 1.
If you want to hear your voice through Front Mic, please deselect "Mute" in No. 2 For Windows® Vista™:
1.Go to the "FrontMic" Tab in the Realtek Control panel.
Click "Set Default Device" to make the Front Mic as the default record device.
Q (121):
I used Prescott CPU and P4i45GV/P4i65GV. I wanted to use NT4.0, but the installation can not be completed. What should I do?(12/15/2004)
A:For Prescott CPU, some OSes (ex.NT4.0) can not be installed. In order to boot legacy OSes that cannot support CPUs with extended CPUID functions, please flash to the latest BIOS to enable "Max CPUID Value Limit" (Advanced => CPU Configuration)
We don't provide drivers for NT4.0. If you need drivers for NT 4.0, please refer to following websites to get them.
VGA driver for P4I45GV/P4I65GV: http://downloadcenter.intel.com/
 Menu
Menu
 (6/26/2008)
 (4/20/2007)