Usamos cookies para oferecer uma experiência mais personalizada e suave. Ao visitar este site, você concorda com o nosso uso de cookies. Se preferir não aceitar cookies ou exigir mais informações, visite nossa Política de Privacidade.
Cookies necessários Estes cookies são essenciais para o correto funcionamento do site e não podem ser desativados.
Cookies analíticos Estes cookies ajudam-nos a entender como os visitantes usam o nosso site.
Cookies de marketing Estes cookies são utilizados para rastrear visitantes e exibir anúncios relevantes.
Cookies de redes sociais Estes cookies permitem partilhar páginas e conteúdos nas redes sociais.
Caso você saiba a categoria da sua dúvida, você pode escolher uma das categorias abaixo para perguntas frequentes. Catalogo:
Resultados:
Q (551):
Microsoft will update the Secure Boot certificates. What do I need to do?(3/16/2026)
A:You only need to follow one of the update methods below and wait for the new Windows Boot Manager to take effect:
Method 1: Update through Windows Update
If Windows Update is turned on and Secure Boot is enabled (see "How to enable Secure Boot”), supported Windows devices will automatically download and install the new Secure Boot certificates and the new Boot Manager.
Since 2024, Microsoft has been rolling out the new Secure Boot database update in phases. All devices with Secure Boot enabled will receive the update automatically before the certificate expires in June 2026.
With default settings, users usually do not need to do anything manually. Just keep Windows Update enabled and wait for the update to install automatically.
Method 2: Manually update the UEFI / BIOS
Note:After updating the BIOS, the system may ask for your BitLocker recovery key to unlock Windows.
You may also choose to turn off Device Encryption and Standard BitLocker Encryption before updating the BIOS, then turn them back on afterward to keep your data safe.
If your device cannot get the update through Windows Update, you can download and install the latest UEFI BIOS from the official website to get the updated Secure Boot certificates.
1. Visit the ASRock official website, search for your motherboard model, and download the latest UEFI BIOS from the support page.
2. Clear the Secure Boot keys.
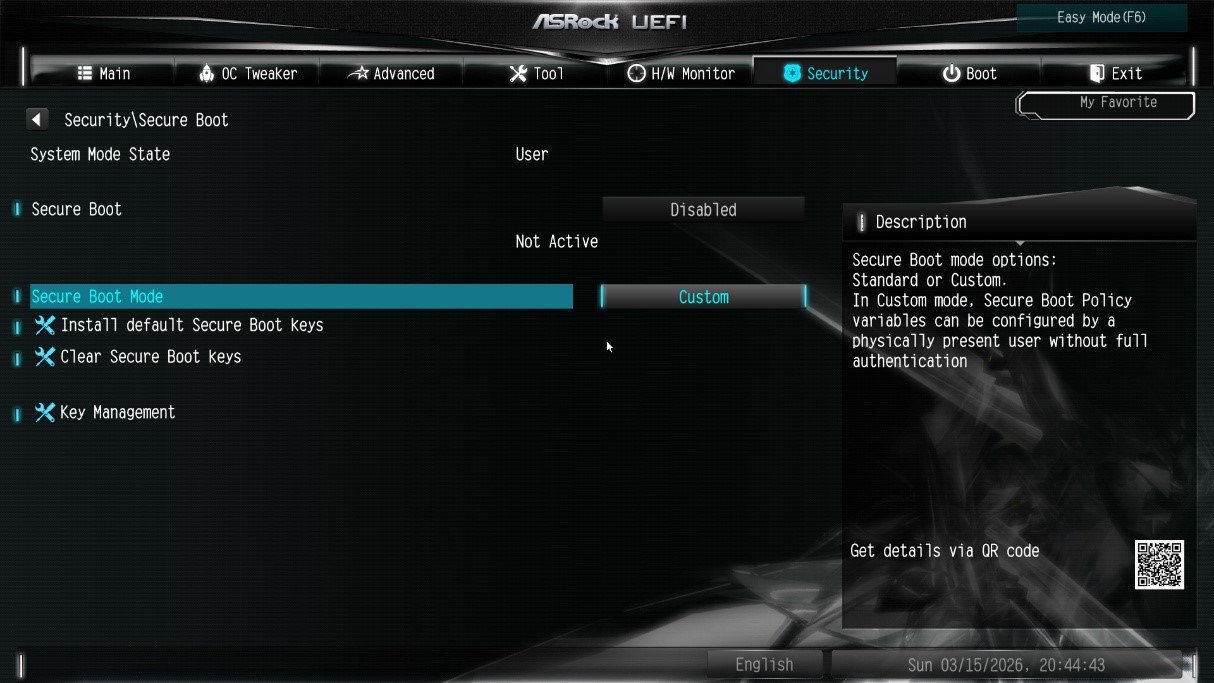
① After updating the BIOS and rebooting, enter BIOS Setup and go to:
Advanced \ Security > Secure Boot
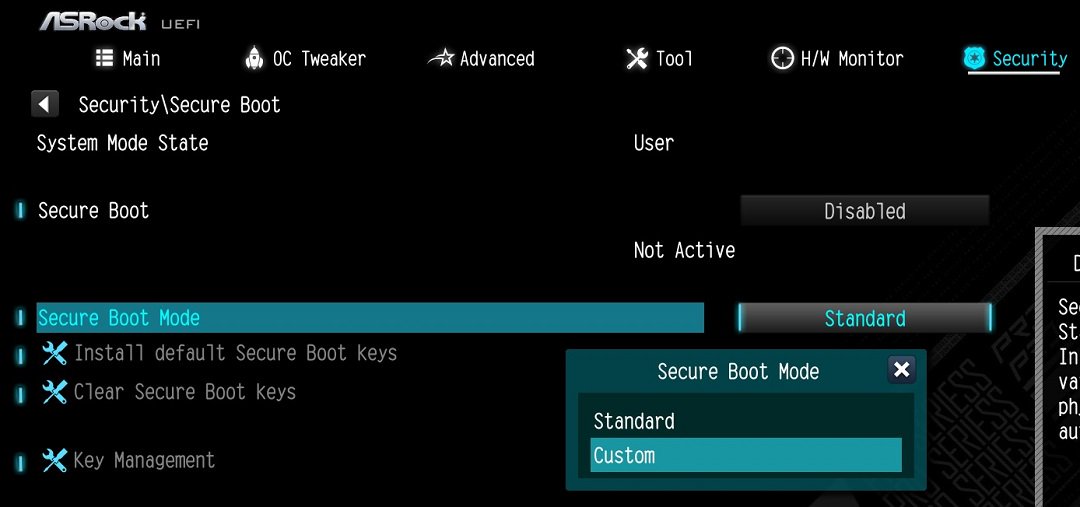
② If Secure Boot Mode is set to Standard, change it to Custom.
③ Select Key Management.
④ Select Clear Secure Boot Keys, then choose [Yes].
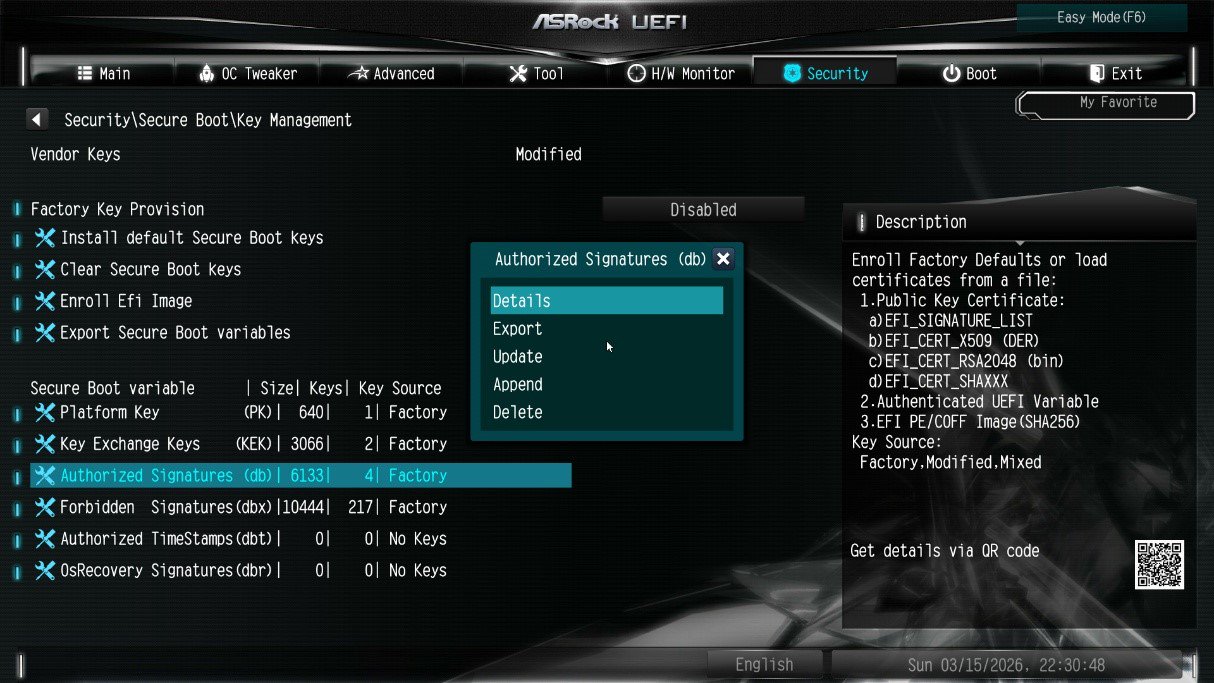
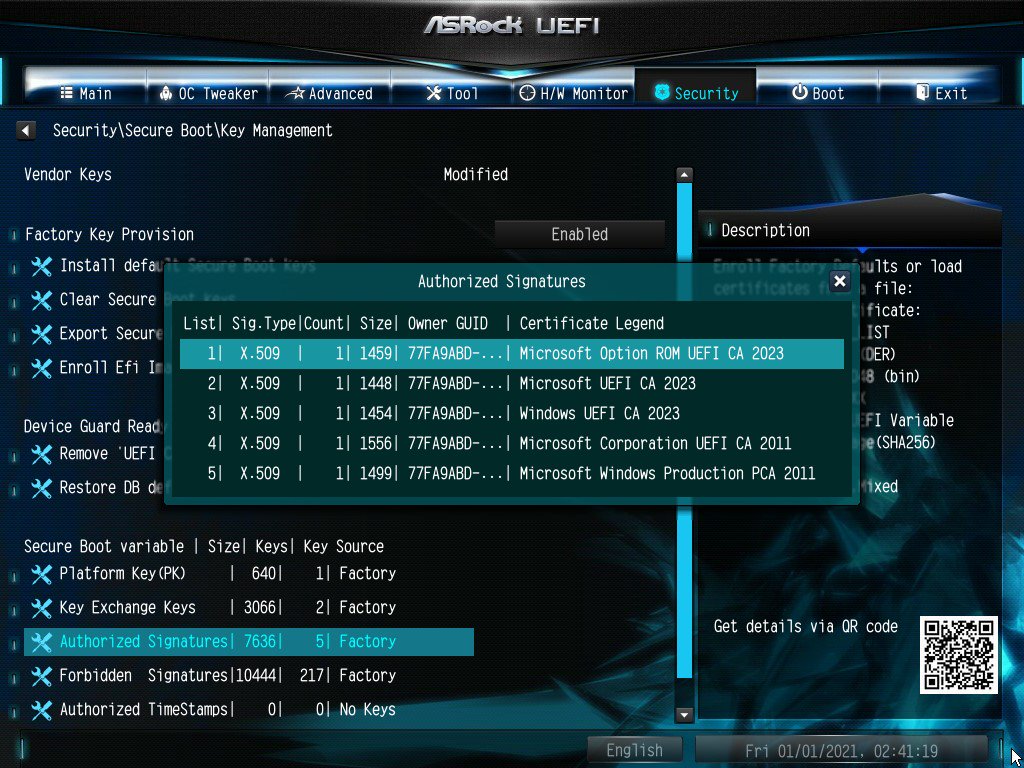
⑤ Confirm that all UEFI Secure Boot keys (PK, KEK, DB, DBX) have been cleared.
3. Install the default Secure Boot keys.
① After clearing the keys, select Install Default Secure Boot Keys, then choose [Yes].
② Confirm that the Size/Number of Keys for PK / KEK / DB / DBX is not 0, and the Key Source shows [Factory]. This means the Secure Boot key update is complete.
4. How to check the Secure Boot key status?
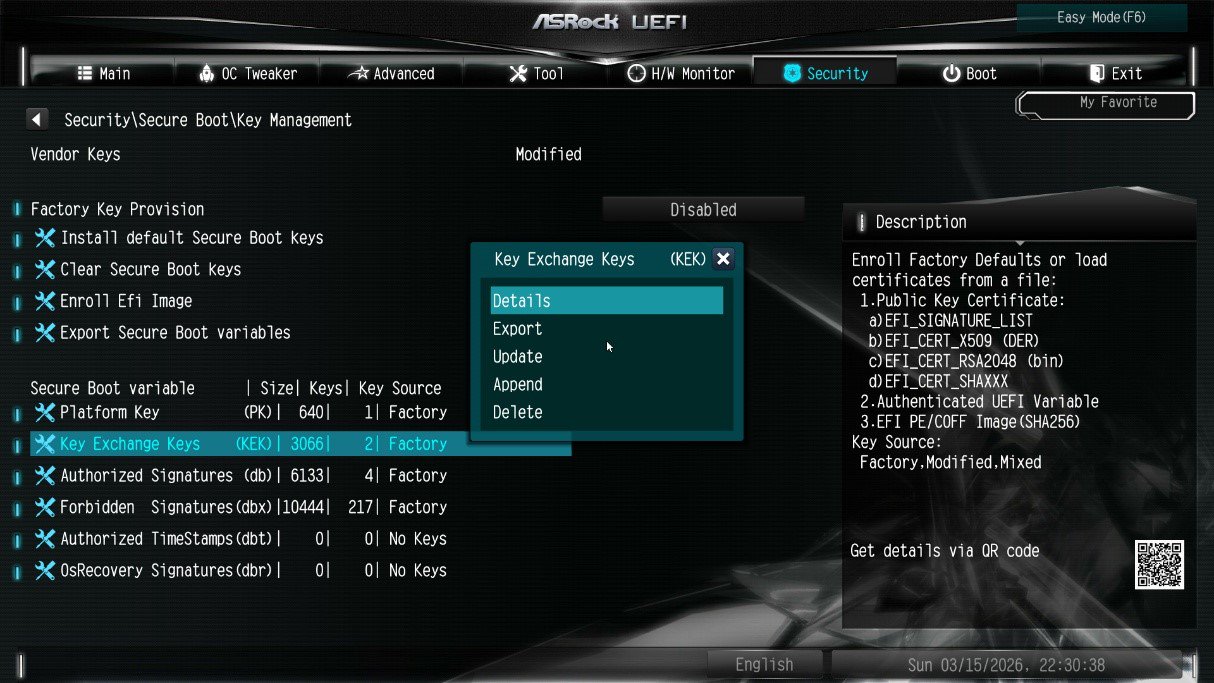
① In BIOS, go to: Security > Secure Boot > Key Management
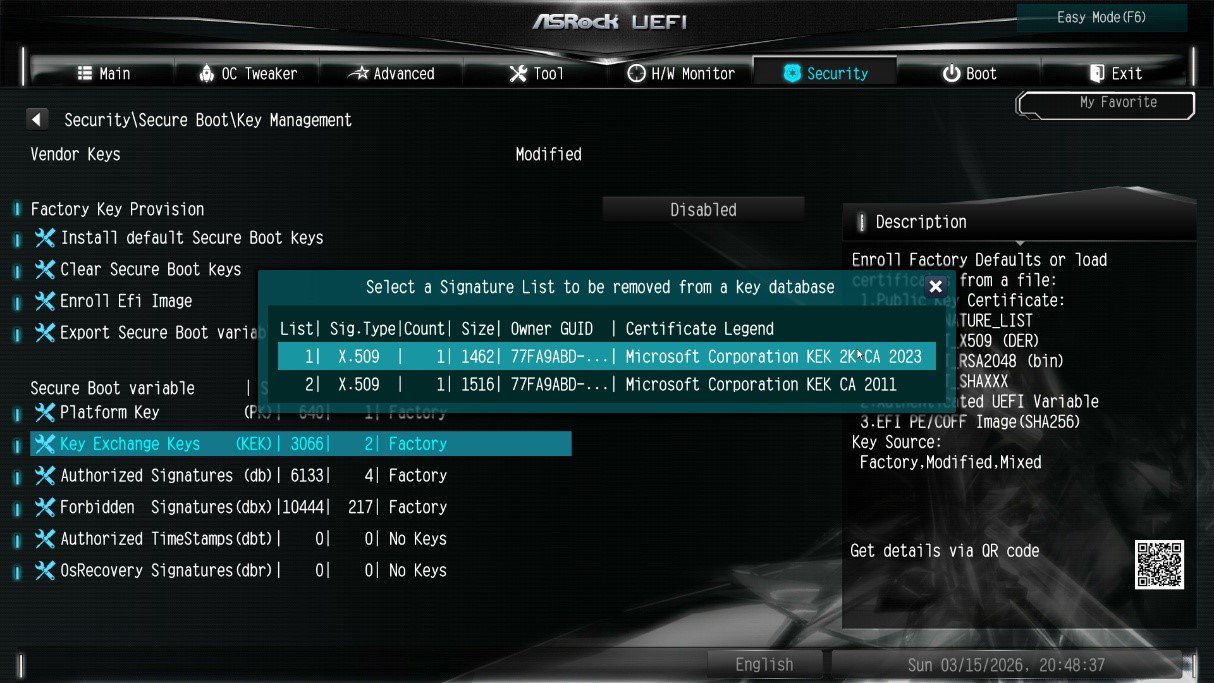
② Select Key Exchange Keys (KEK) choose "Details”:
③ Make sure that KEK Management contains:
- Microsoft Corporation KEK 2K CA 2023
Q (548):
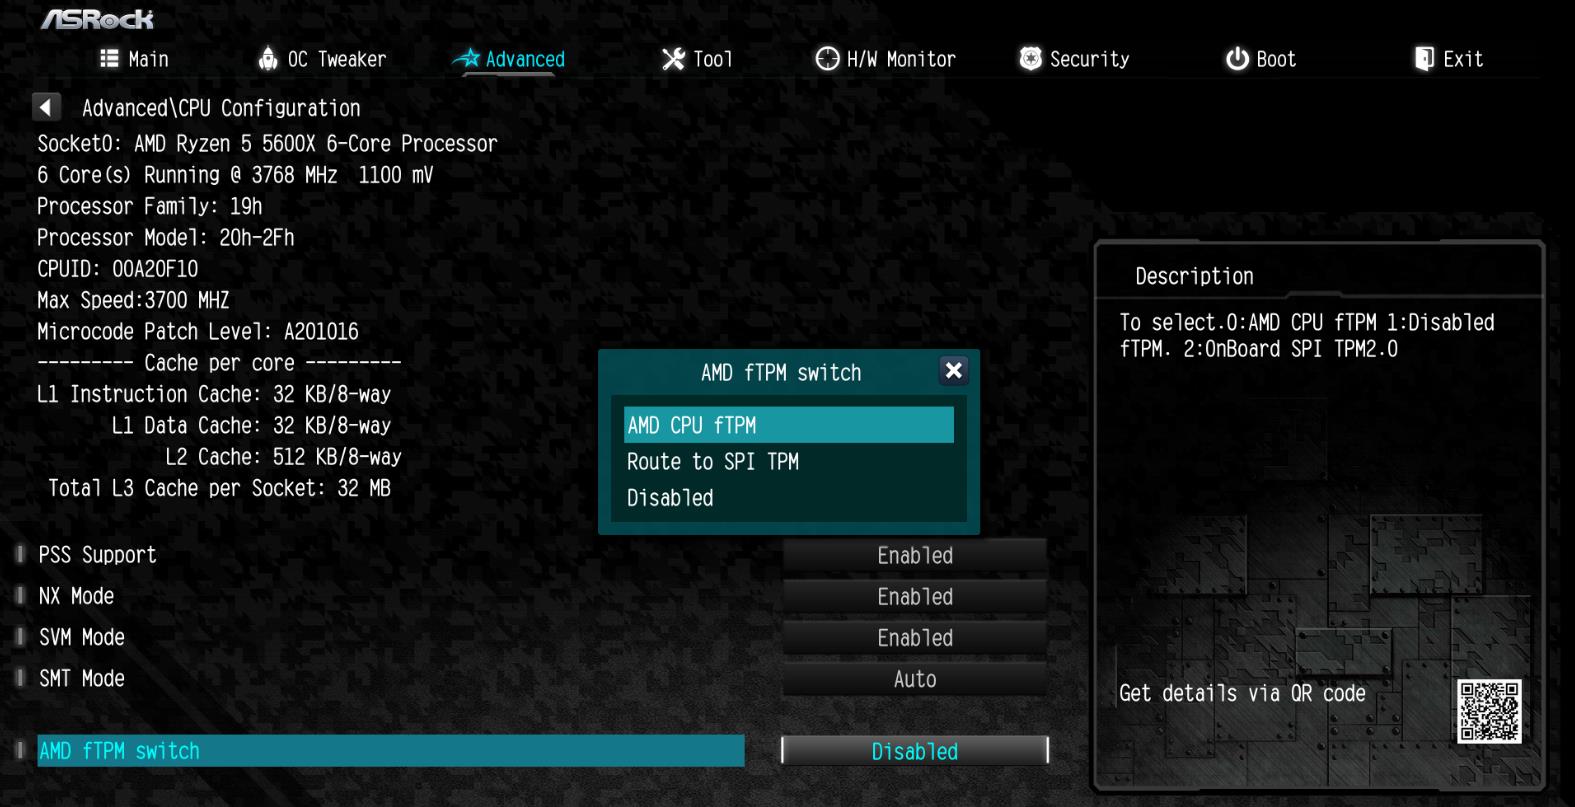
Some new games like Battlefield 6 or Call of Duty: Black Ops 7 require Secure Boot and TPM 2.0 to provide kernel level anti cheat protection. How do I enable these options on ASRock AM4 motherboards?(10/3/2025)
A:On recent platforms such as AMD 800 and AMD 600 series, Secure Boot and TPM 2.0 are enabled by default. With these platforms, there is no need to change BIOS settings.
However, if you are still using an AM4 motherboard, Secure Boot and TPM 2.0 might not be enabled. Also, the TPM firmware might have to be updated.
Before enabling Secure Boot, you must check your disk partition style and BIOS settings to ensure they meet the requirements for Secure Boot.
Secure Boot System Requirements
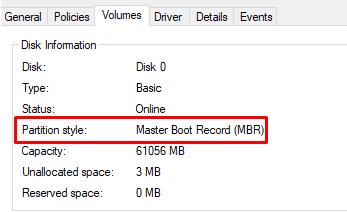
1. Partition Style: GPT (GUID Partition Table). If the disk is MBR (Master Boot Record), please convert it to GPT.
2. BIOS Mode: UEFI only. Legacy or CSM mode doesn't support secure boot.
How to check if the current partition type supports Secure Boot
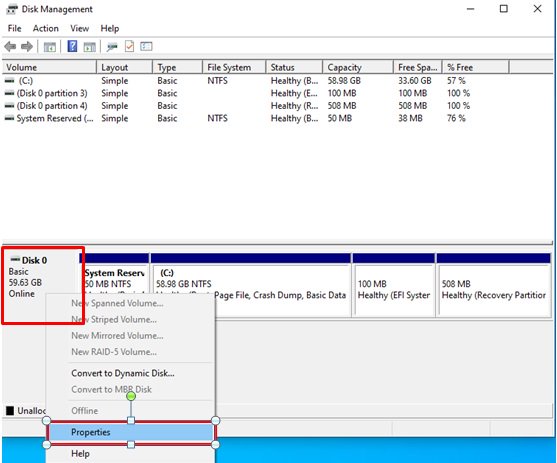
1. Right-click the Windows button on the desktop and select "Disk Management”.
2. Right-click the disk where Windows is installed and select the ""Properties"".
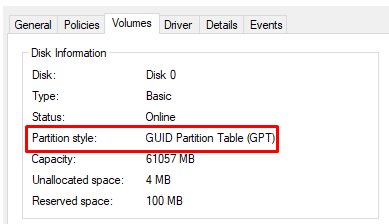
3. Click the "Volumes” tab and check if the partition style is "GPT”.
GPT partition style can support Secure Boot. You can skip below steps 4-7.
4. If the partition style is "MBR”, please make a backup of important data on the system and refer to steps 5-7 to convert the partition style to GPT.
If you have multiple OS installations or if some system partition is on a different drive than where the OS is, the conversion might not have the desired result. Please backup your DATA and reinstall the OS.
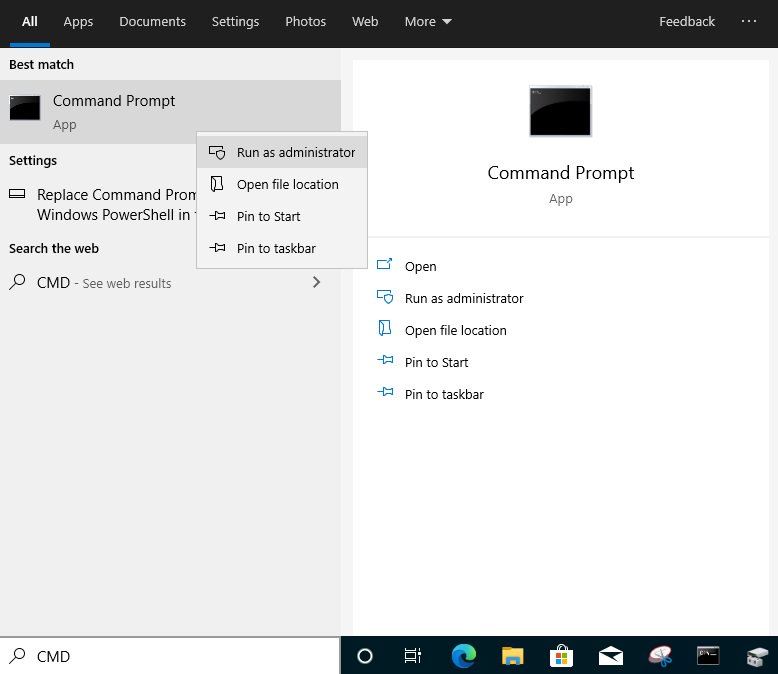
5. Type "CMD" in the Windows search bar, right-click on "Command Prompt” and choose to run as administrator.
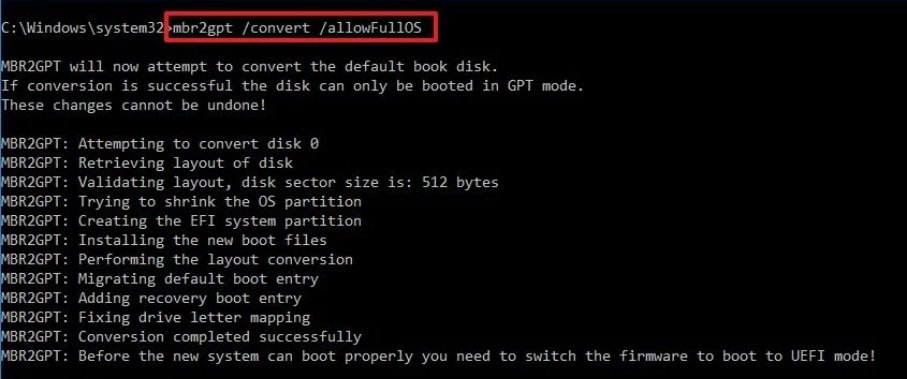
6. Type the command "mbr2gpt /convert /allowFullOS” to convert the partition style and press [Enter].
7. Restart the system, and the BIOS Mode/Partition style will be converted to UEFI/GPT.
Switching to UEFI Mode and Enabling Secure Boot in BIOS
1. Please press the "F2” key during POST to enter BIOS setup.
Go to Boot\CSM (Compatibility Support Module) and set "CSM” to "Disabled”.
Press the "F10” key to save configuration changes.
2. Go to Security\Secure Boot and set "Secure Boot Mode” to "Custom”.
3. Please press "Install default Secure Boot keys” and select "Yes” to install Secure Boot keys. If at this point this option is greyed out, Secure Boot key have been loaded already.
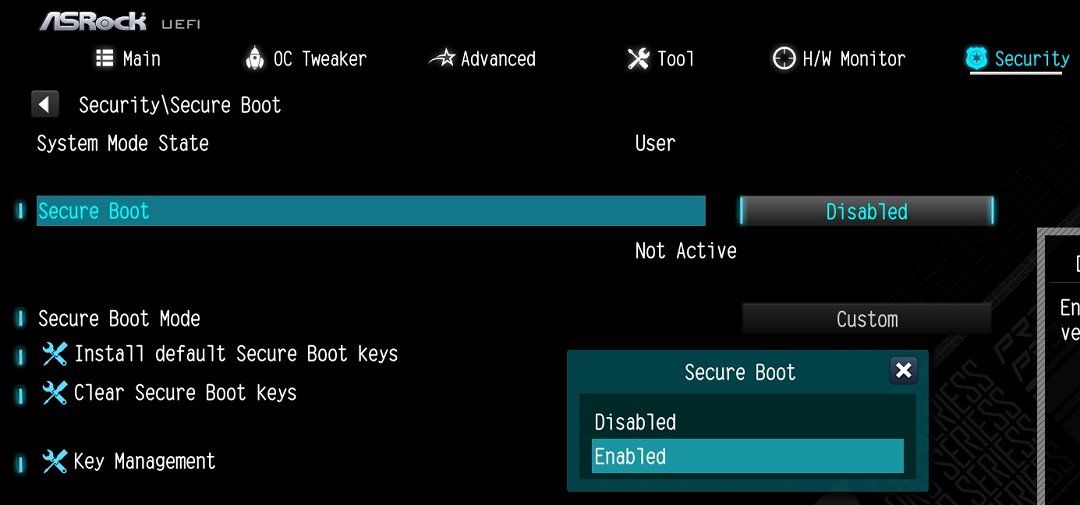
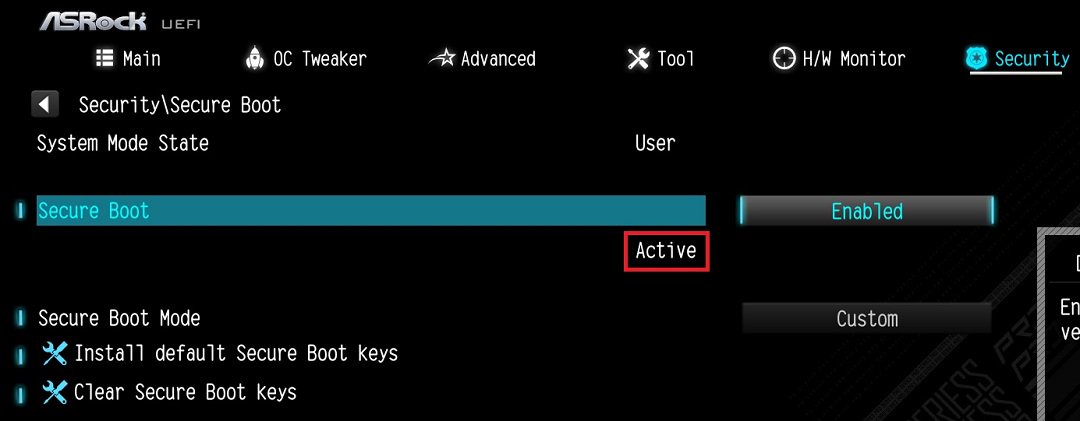
4. Set "Secure Boot” to "Enabled”. Then press the "F10” key to save configuration changes.
5. After the system restarts, go to Security\Secure Boot, and make sure that Secure Boot is showing "Active”.
Update BIOS and AMD fTPM
To ensure compatibility between games and Secure Boot/TPM 2.0, ASRock has released new BIOS versions for AM4 motherboards, to update to AMD fTPM 3.x.2.x version.
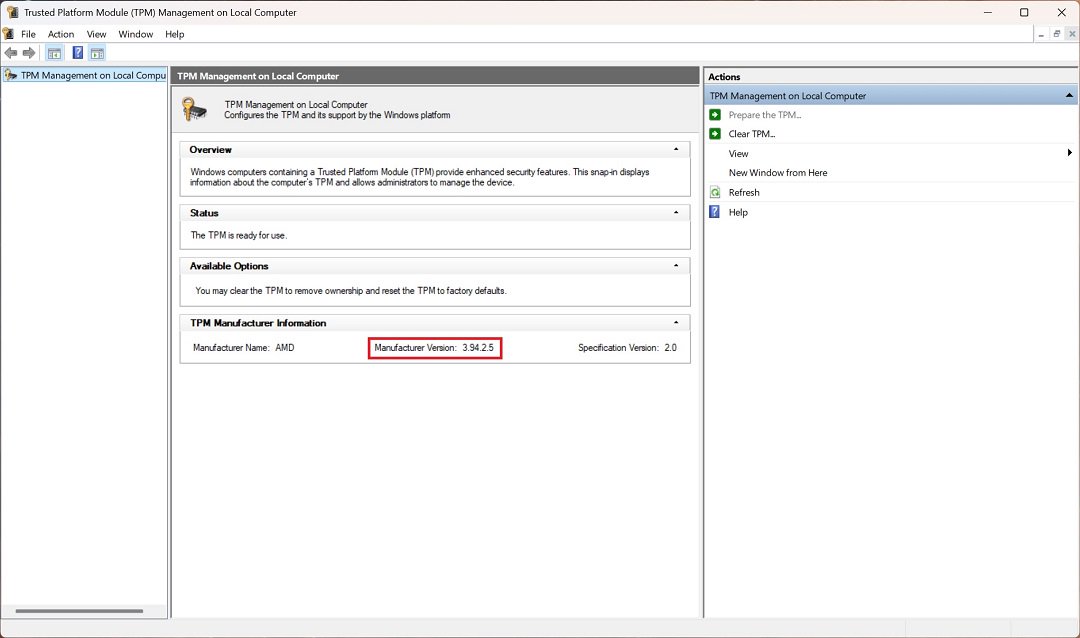
Type "TPM.msc" in the Windows search bar to find the current fTPM version.
If your current fTPM version is 3.x.0.x, we recommend updating to the latest BIOS version to get the fTPM update. This BIOS version should help you to enable anti-cheat on for example Battlefield 6 or Call of Duty:Black Ops 7.
fTPM 3.*.2.* (TPMB) Information
AMD has informed us that only CPUs with below former codename support fTPM 3.*.2.* (TPMB).
If your CPU is not in the supported CPU lineup for TPMB compatibility, based on AMD's official specifications, your CPU does not meet the security requirements necessary for your game.
3. Run "insttool64.exe” as administrator. A command prompt window pop on and close immediately. It is a normal behavior.
4. Run Command prompt as administrator.
5. Enter the folder path to the extracted file and press [enter].
Default path and command:
cd C:\Users\[Username]\Downloads\VBIOS_L06_update\VBIOS update
*Please change the command if you change the download path.
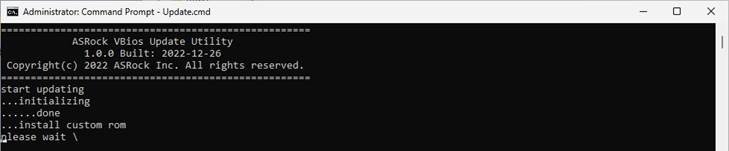
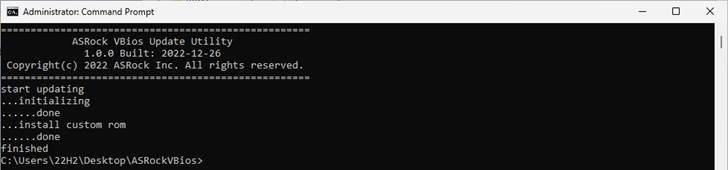
6. Type command "Update.cmd” and press [enter].
Update procedure will start up. This mean the system is flashing the vBIOS. DO NOT turn off the system during the update.
7. Once the flashing has finished, Command Prompt will report it as shown below.
Q (522):
Why can I not find a CSM option under the Boot tab in BIOS?(10/13/2022)
A:When you set Fast Boot to Ultra Fast under the boot tab in BIOS, CSM (Compatibility Support Module) will be disabled and hidden automatically. This is because Ultra Fast Boot is supported only when booting in full UEFI mode, so without enabling CSM.
Q (513):
How do I enable the Optane H10/H20 hybrid function on the Intel Z690/B660/H670 platform?(3/1/2022)
A:If you want to make a fresh Windows installation with Optane H10/H20 hybrid function, please refer to the following steps:
Step 1.
Make sure that H10/H20 Optane memory is installed in an M.2 socket which supports Optane. You can find the info by checking the storage section of the motherboard specifications page on ASRock's website.
Step 2.
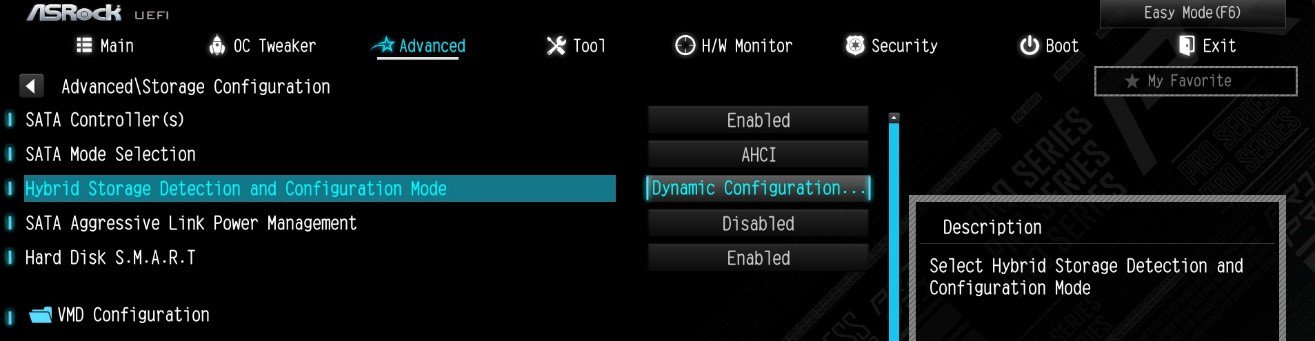
Enable the Hybrid Storage Detection and Configuration Mode in BIOS and press "F10” to save the settings.
Advanced\Storage Configuration\Hybrid Storage Detection and Configuration Mode
Step 3.
Go to Advanced\Storage Configuration\VMD Configuration and set Enable VMD controller to [Enabled].
Then set Enable VMD Global Mapping to [Enabled]. Press F10 to save the changes and exit setup.
Installing Windows® on a VMD platform
After the BIOS setup, please follow the steps below.
Step 1.
Please download the "SATA Floppy Image” driver from ASRock's website (https://www.asrock.com/index.asp). Unzip the file to a USB flash drive or copy the files from ASRock's motherboard support CD.
Step 2.
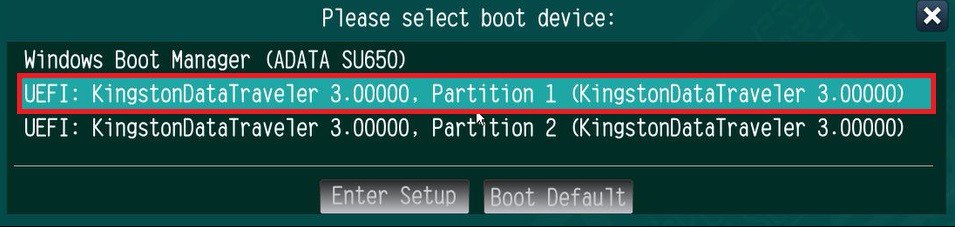
Press at system POST to launch the boot menu and choose the item "UEFI:
installation media>” to install Windows® 10 64-bit / 11 64-bit OS
” to install Windows® 10 64-bit / 11 64-bit OS">
Step 3.
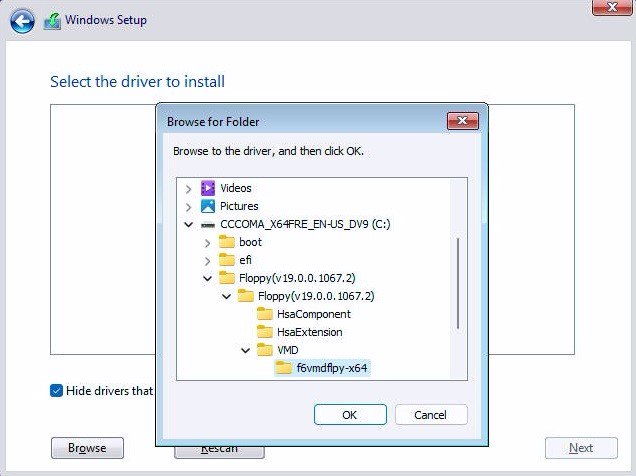
If during the Windows installation process the target drive is not available, please click .
Step 4.
Click and locate the driver on your USB flash drive.
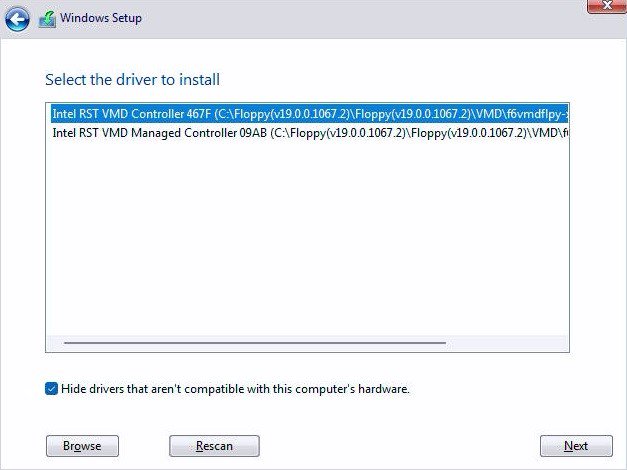
Step 5.
Select "Intel RST VMD Controller” and then click .
.">
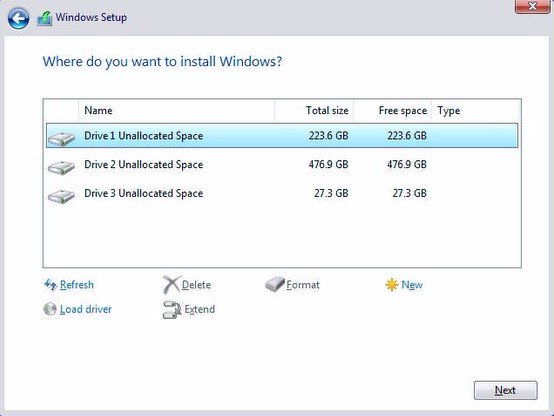
Step 6.
Select unallocated space and then click .
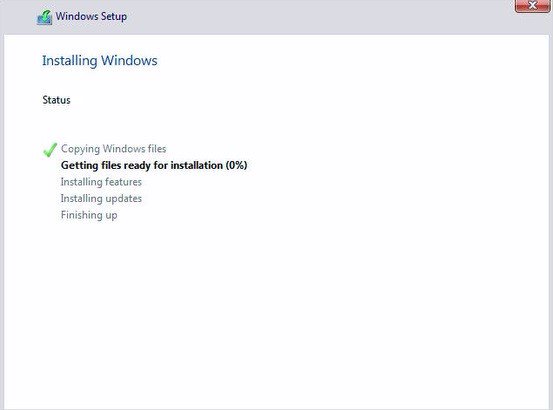
Step 7.
Please follow Windows' installation instructions to finish the process.
Step 8.
After the Windows installation is finished, please install the "Intel Rapid Storage Technology driver and utility” from ASRock's website. https://www.asrock.com/index.asp
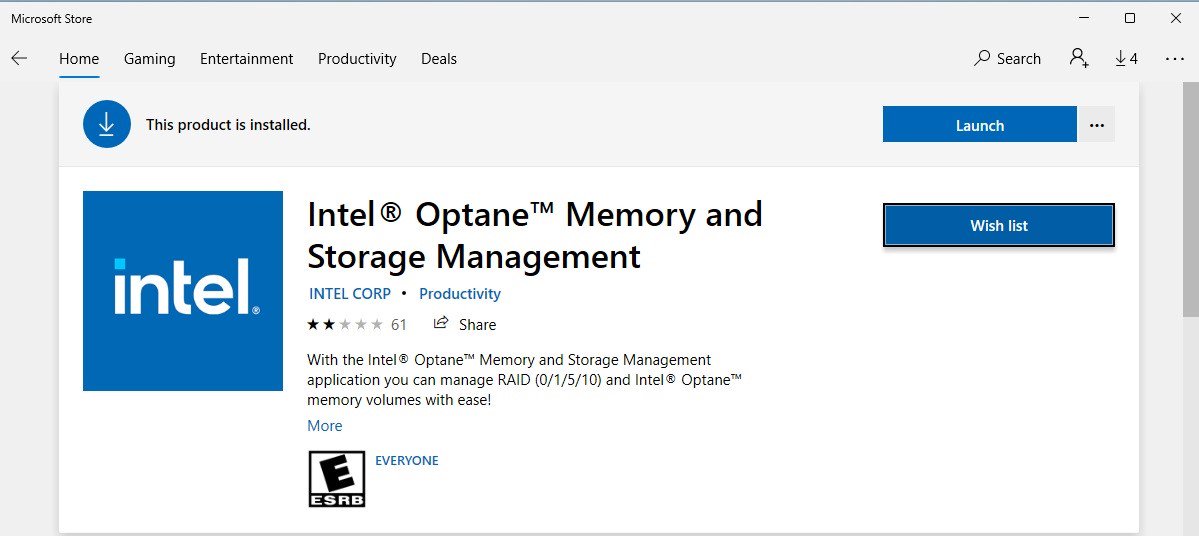
Step 9.
Launch the Intel® Optane™ Memory and Storage Management tool from the Microsoft store.
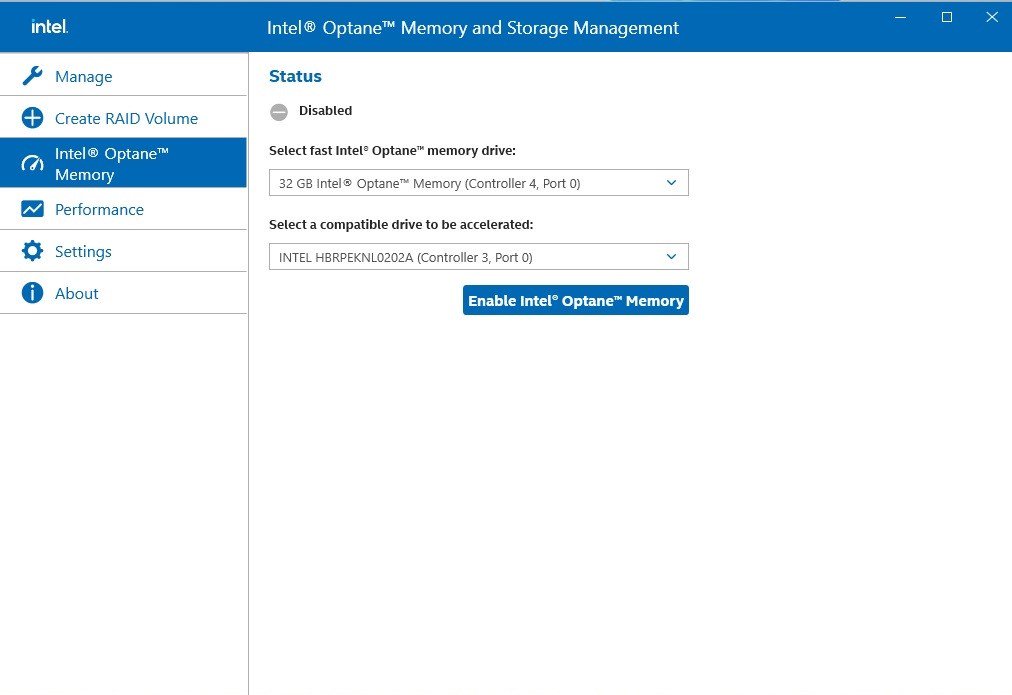
Step 10.
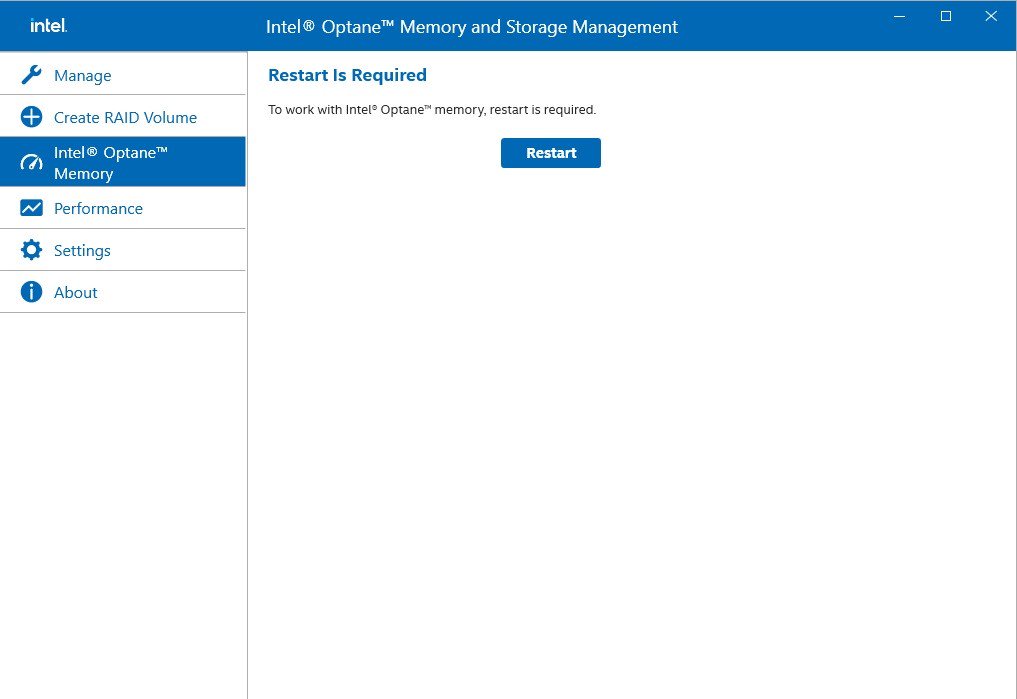
Select the drive which you want to accelerate. Enable Intel® Optane™ Memory. (One restart is required)
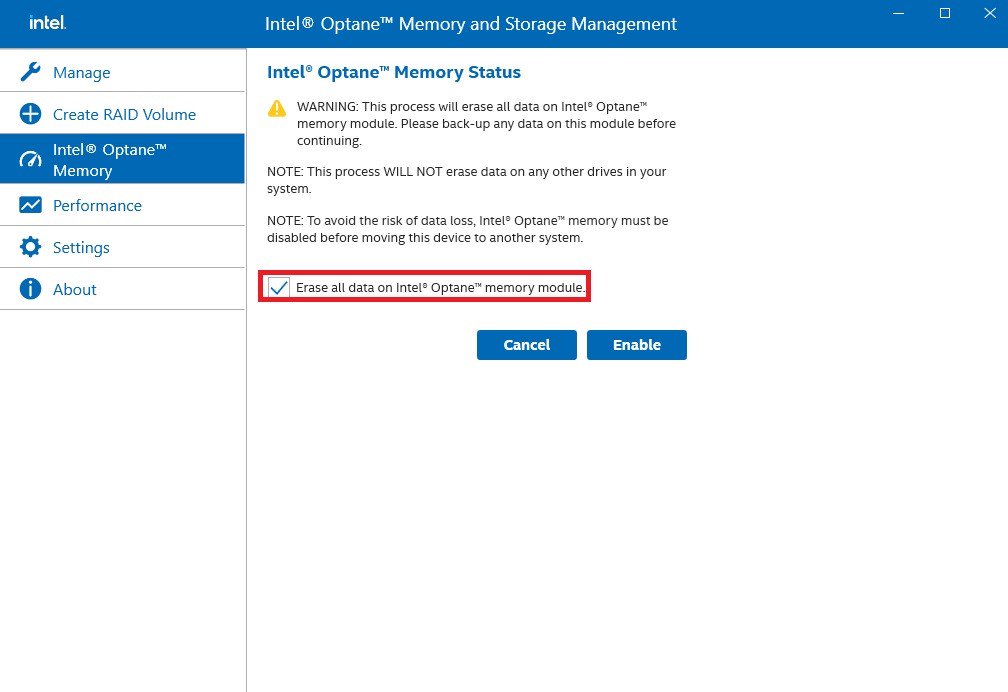
Step 11.
Erase all data on the Intel® Optane™ memory module and click
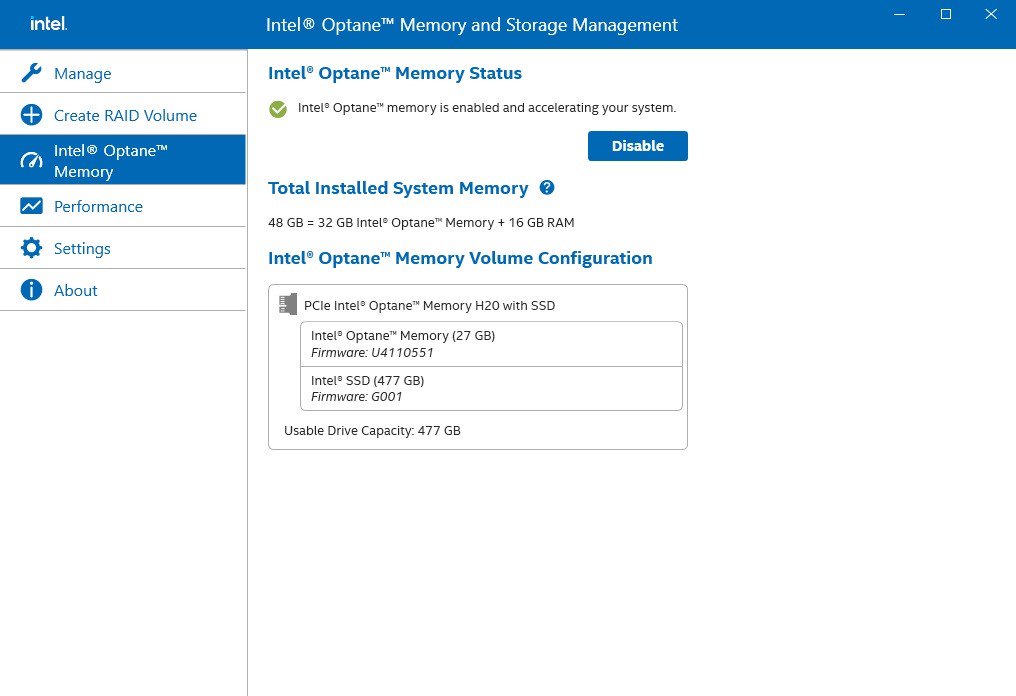
Step 12.
After the system has restarted, the Optane Management tool will show that Optane memory is enabled.
Q (504):
How do I check if the system can support Secure Boot?(10/1/2021)
A:In order to use Secure Boot, the drive with the operating system must use GPT partition style. Please refer to below steps to check the partition style.
Step 1: Right-click the Windows button on the desktop and select "Disk Management”.
Step 2: Right-click the disk where Windows is installed and select the "Properties”.
Step 3: Click the "Volumes” tab and check if the partition style is "GPT”.
Step 4: If the partition style is "MBR”, please make a backup of important data on the system and refer to steps 5 - 7 to convert the partition style to GPT.
Step 5: Type "CMD" in the Windows search bar, right-click on "Command Prompt” and choose to run as administrator.
Step 6: Type the command "mbr2gpt /convert /allowFullOS” to convert the partition style and press [Enter].
Step 7: Restart the system and the BIOS Mode/Partition style will be converted to UEFI/GPT.
Q (500):
TPM2.0 module is required in Windows 11 specification, does it need TPM2.0 hardware module?(7/1/2021)
A:No, please enabled [Intel® Platform Trust Technology (Intel® PTT)] or [AMD CPU fTPM] feature under UEFI BIOS. It supports the TPM2.0 feature without TPM2.0 hardware module.
ASRock Intel Platform
For the new Microsoft® Windows 11 installation, we recommend disabling the CSM setting before using the Intel® PTT.
Supported platform.
Generation
Supported Chipset
Intel 300 series
Z390, Z370, H370, B360, B365, H310, H310C
Intel 400 series
Z490, H470, B460, H410
Intel 500 series
Z590, B560, H510, H570
Intel X299 series
X299
Intel SoC series
Gemi Lake, Gemi Lake Refresh
*Intel® PTT is supported. The actual support may be varied based on official release of Windows 11 by Microsoft®.
BIOS option
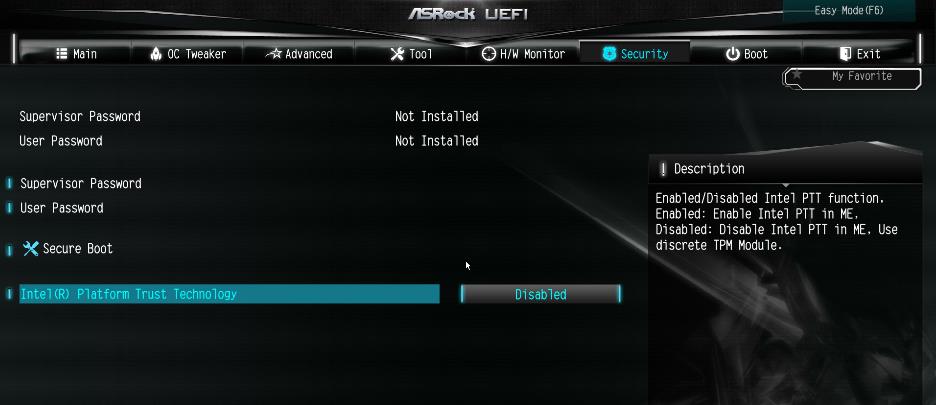
(a) Go to "Security page” to find the "Intel® Platform Trust Technology” option.
(b) Enabled "Intel® Platform Trust Technology” under UEFI BIOS
Q (489):
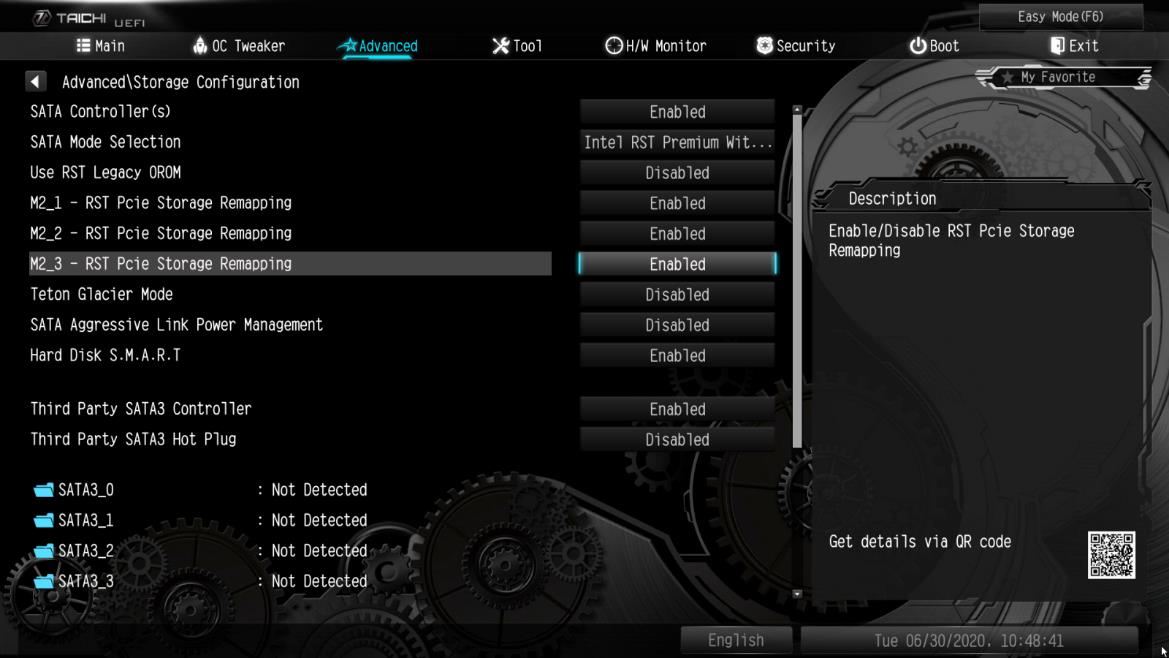
Como eu posso remapear o slot M2_3 e outros slots M.2 para configurar um RAID SSD PCIE?(6/1/2020)
A:Por favor certifique-se de utilizar SSDs PCIE idênticos que sejam do mesmo tipo e capacidade.
Siga os passos abaixo para ajustar a BIOS para configurar o RAID PCIe.
PASSO 1. Entre no Utilitário de Configuração da UEFI pressionando ou durante a tela de post.
PASSO 2. Vá em Advanced -> Storage Configuration e defina SATA Mode Selection para [RAID Mode].
PASSO 3. Vá em Boot -> CSM e defina Launch Storage OpROM policy para [UEFI only].
PASSO 4. Ajuste a opção M.2 - RST PCie Storage Remapping dos slots M.2 que você instalou os SSDs PCIE para [Enabled]. Pressione para salvar as configurações e sair.
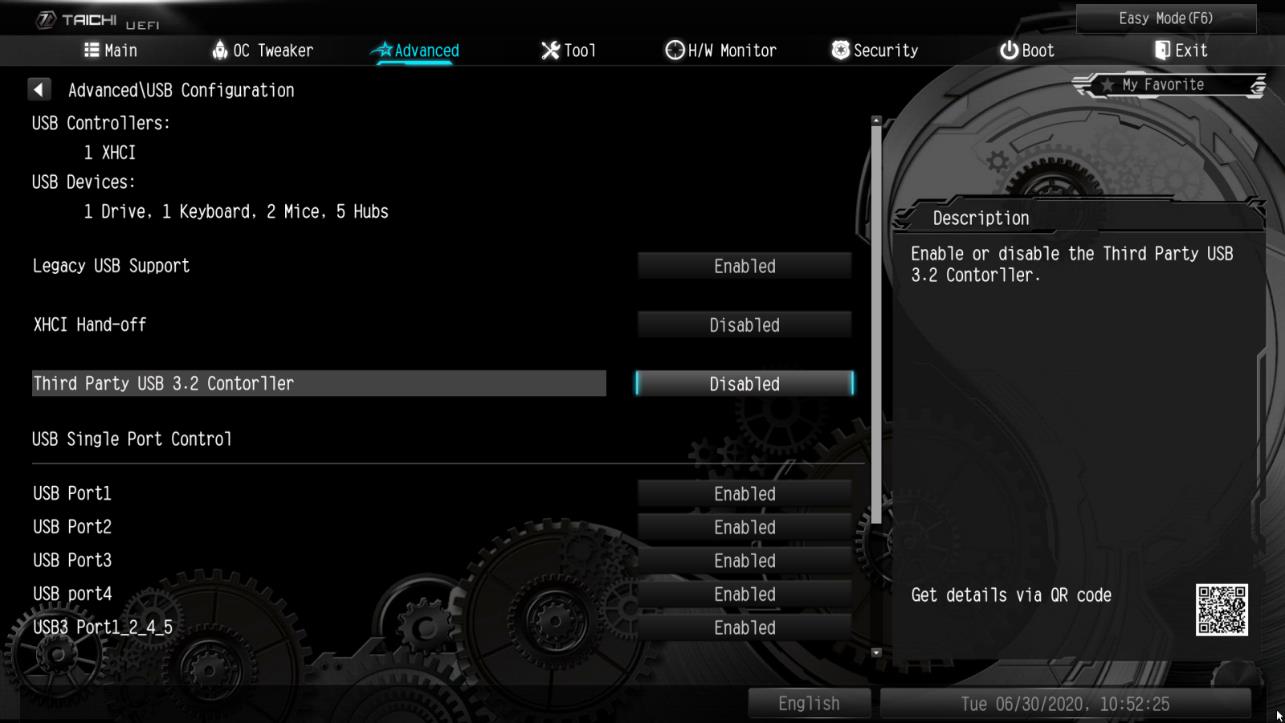
PASSO 5. Vá em Advanced -> USB Configuration e defina Third Party USB 3.2 Controller para [Disabled].
Pressione para salvar as alterações e sair.
Atenção: Depois de desabilitar a opção Third Party USB3.2 Controller, a porta Type-C onboard será desativada.
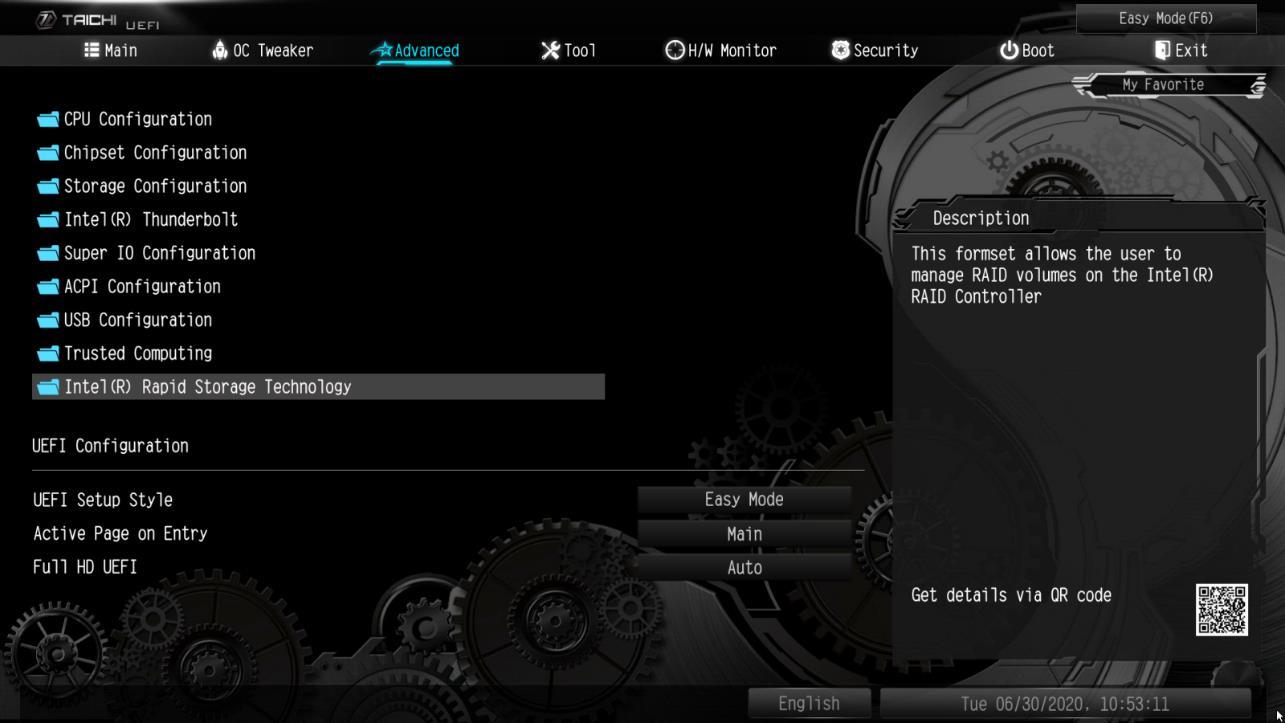
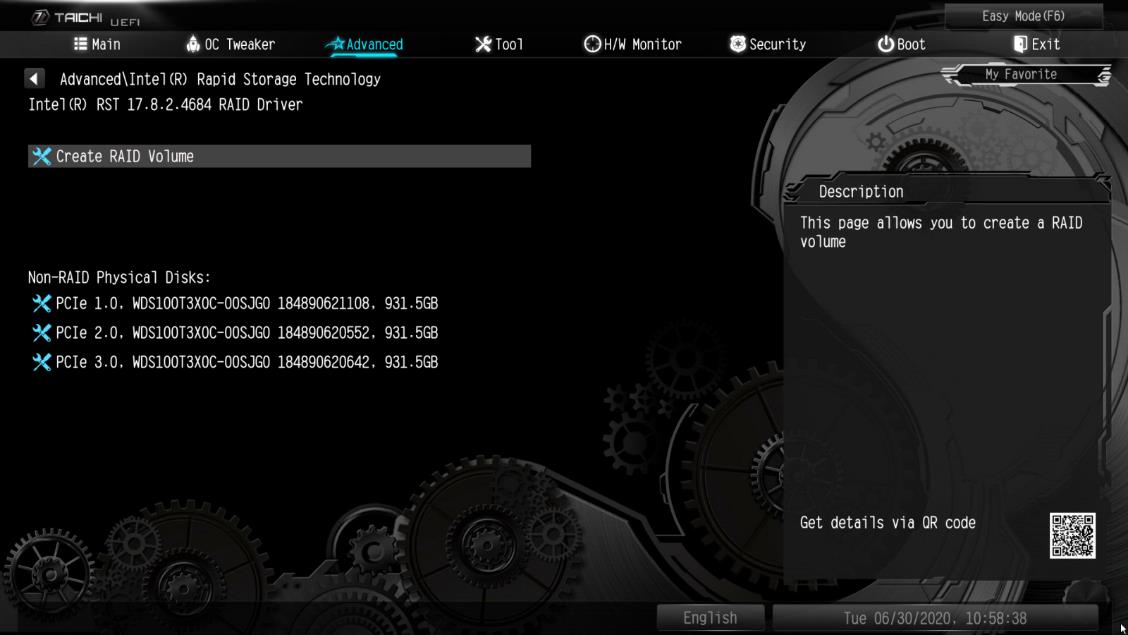
PASSO 6. Entre emm Intel(R) Rapid Storage Technology na página Advanced.
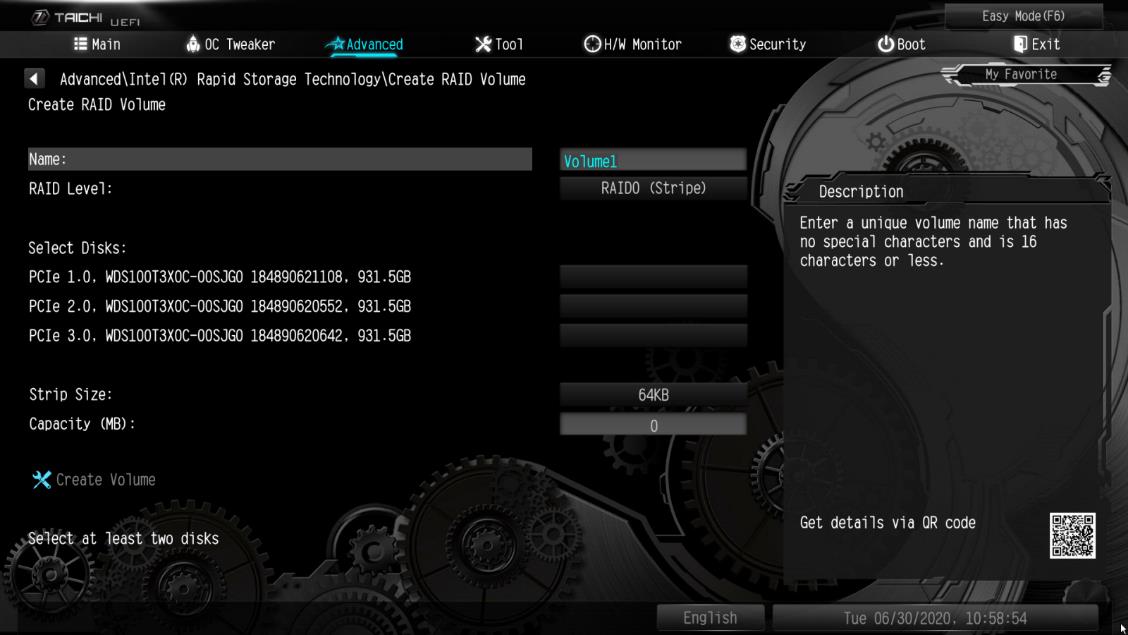
PASSO 7. Selecione a opção Create RAID Volume e pressione .
PASSO 8. Digite um nome de volume e pressione , ou simplesmente pressione para aceitar o nome padrão.
PASSO 9. Selecione o RAID Level deseja e pressione .
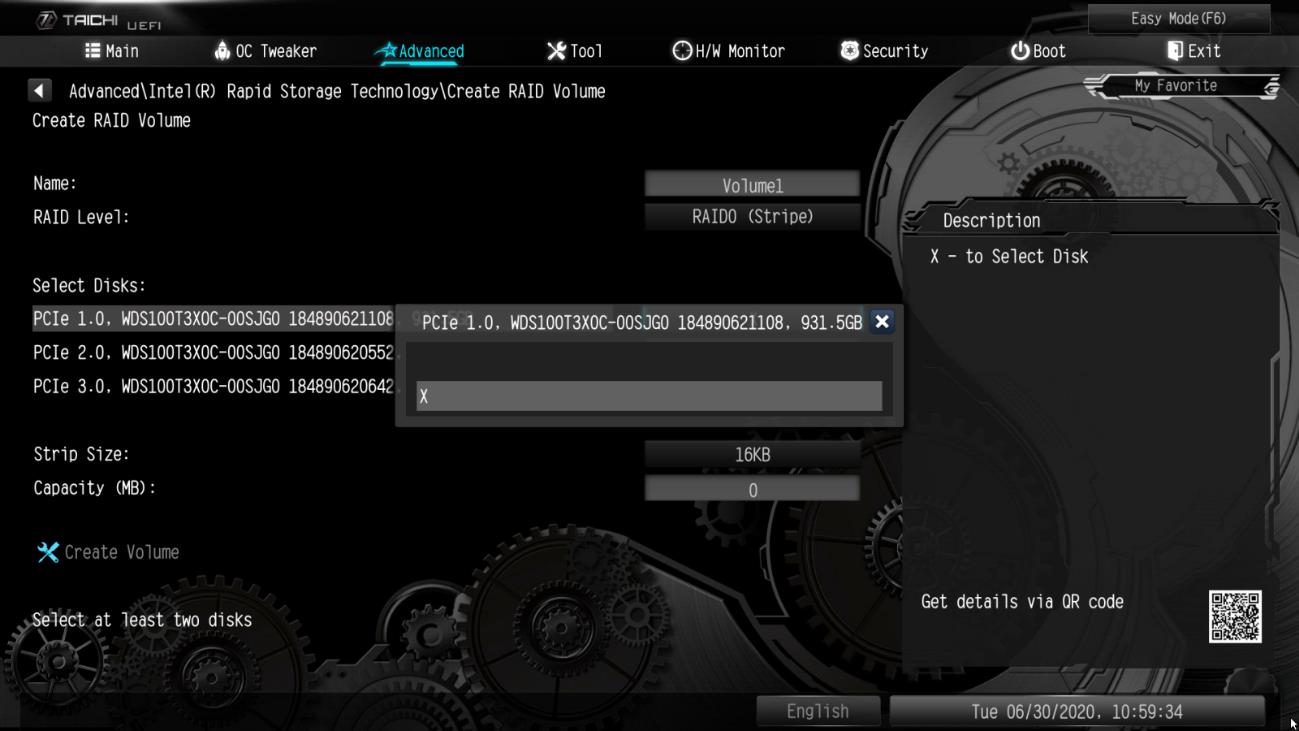
PASSO 10. Selecione os discos alvo em que você deseja criar o RAID e pressione .
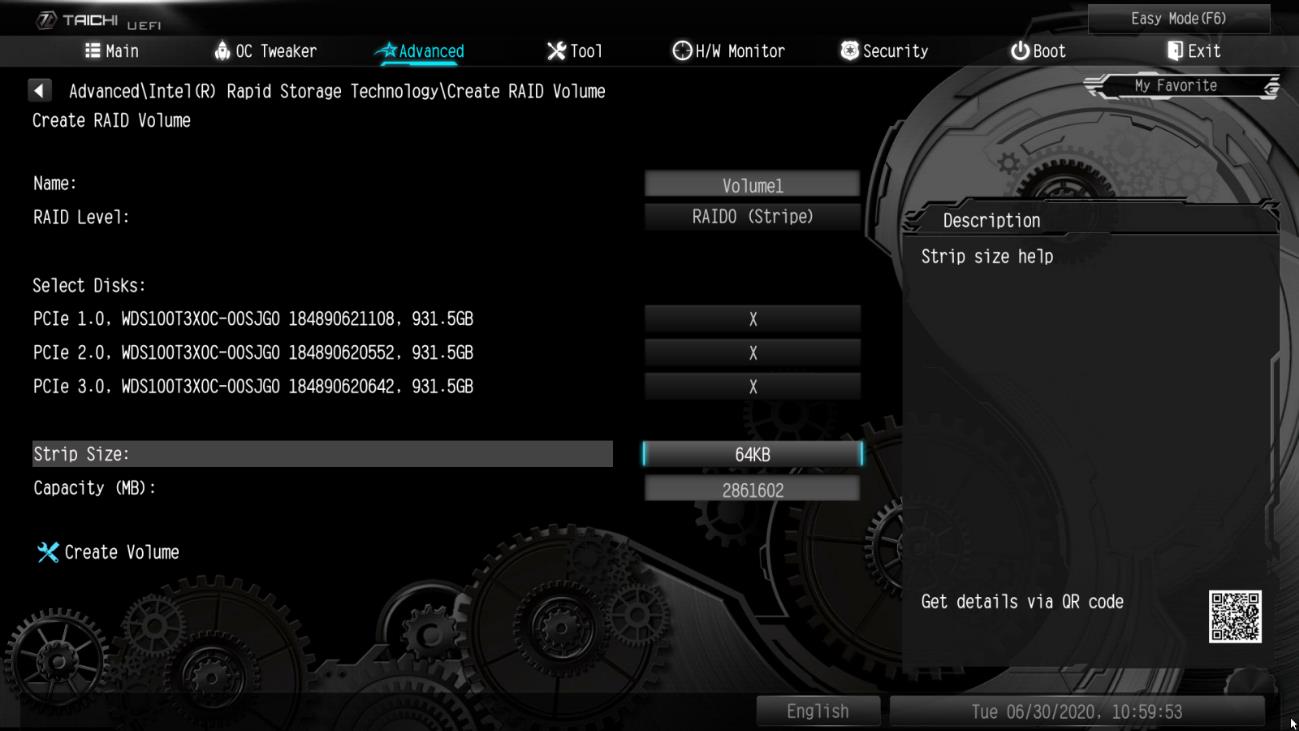
PASSO 11. Selecione o tamanho do stripe para o RAID e pressione .
PASSO 12. Selecione Create Volume e pressione para começar a criar o RAID.
Q (466):
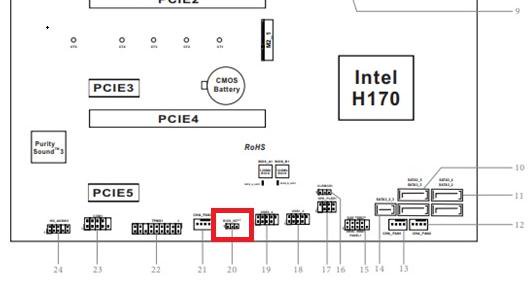
Como as funções BIOS recovery e secure Backup UEFI funcionam nas placas-mãe Intel H170 com dois chips de BIOS?(6/1/2018)
A:Para as placas-mãe Intel H170 com dois chips de BIOS, se a BIOS principal (BIOS_A1) estiver corrompida por favor siga os passos abaixo para recuperar a BIOS.
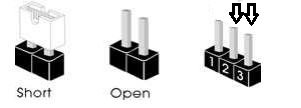
Passo 1. Por favor desconecte o cabo de energia e mova o jumper para os pinos pin2 e pin3 no conector "BIOS_SEL1”.
Para as placas-mãe Intel H170 com dois chips de BIOS, se a BIOS principal (BIOS_A1) estiver corrompida por favor siga os passos abaixo para recuperar a BIOS.
Passo 1. Por favor desconecte o cabo de energia e mova o jumper para os pinos pin2 e pin3 no conector "BIOS_SEL1”.
Passo 4. Após atualizar a BIOS, por favor remova o cabo de energia e mova o jumper para os pinos pin1 e pin2 (conector BIOS_SEL1)
Passo 5. Conete o cabo de energia e o sistema deverá iniciar com a BIOS principal
Q (455):
Como eu reproduzo Dolby ATMOS através de um receiver na Z270 Gaming-ITX/ac?(10/1/2017)
A:Por favor consulte os requerimentos, configurações e procedimentos a seguir.
[Requerimentos]
SO: Windows 10
Receiver / decodificador: Onkyo TX-NR 747 ou outro receiver que suporte HDCP 2.2
Reprodutor: Drive Blu-ray Pioneer Ultra HD
Disco BD: A maioria dos filmes BD 3D / 4K
Software de Reprodução: Power DVD 14 ou mais novo
[Instalação]
1. Quando o sistema iniciar, pressione "F2" para entrar na tela de configuração da UEFI.
Vá para Advanced > CPU Configuration e ative "Software Guard Extensions" na BIOS.
Pressione "F10" para salvar e sair da tela de configuração da BIOS.
Press "F10" to save and exit the BIOS setup screen.
2. Inicialize no S.O. Instale todos os drivers da placa-mãe.
Instale o driver ME ver: 11.6.0.1126 (suporta Blu-ray Ultra HD). Faça o download do driver no endereço a seguir: http://www.asrock.com/MB/Intel/Fatal1ty%20Z270%20Gaming-ITXac/index.asp#osW1064
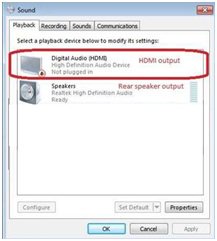
3. Vá para Control Panel > Hardware and sound > Sound e selecione "Receiver output”.
Q (433):
Como eu reproduzo um filme BD 4K através de um drive Pioneer Ultra HD Blu-ray na Z170 Gaming-ITX/ac?(4/1/2017)
A:Requerimentos:
S/O: Windows 10
Receiver / decoder: Onkyo TX-NR 747 ou outro receiver que suporte HDCP 2.2
Software de Reprodução: Power DVD 14 (do Drive Pioneer Ultra HD Blu-ray)
http://www.pioneerelectronics.com/PUSA/Computer/Computer+Drives/BDR-211UBK#overview
Configuração:
M/B: Z170 Gaming-ITX/AC
BIOS: P7.10
CPU: Processador Intel de 7ª geração Intel® Core™ i7/i5 para PC Desktop (Kaby Lake-S)
Configuração:
1. Por favor conecte o cabo HDMI à porta HDMI2 da Z170 Gaming-ITX/ac.
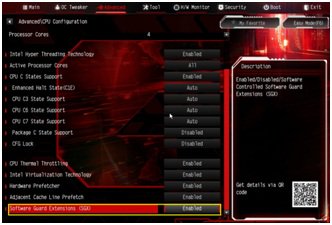
2. Quando o sistema inicia, pressione "F2” para entrar na UEFI.
Vá para Advanced > CPU Configuration e ative a opção "Software Guard Extensions” na BIOS.
Pressione "F10” para salvar e sair da BIOS.
3. Inicie o S/O. Instale todos os drivers para a placa-mãe.
Instale o driver ME (v11.6.0.1126_SW_MSI). Faça o download do driver a partir do seguinte endereço: https://www.asrock.com/MB/Intel/Fatal1ty%20Z270%20Gaming-ITXac/index.asp#osW1064
4. Por favor entre no Painel de Controle > Hardware e Som > Som.
Selecione "Saída HDMI”
5. Ative "UHD color” na TV.
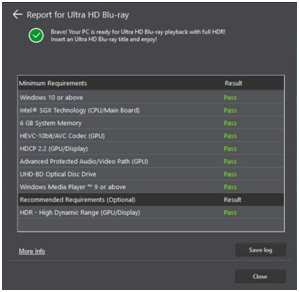
Please run "Ultra Blu-ray advisor” to see if all "Pass”.
Pioneer UHDBD Advisor: http://pioneer.jp/pcperipherals/bdd/eula.php
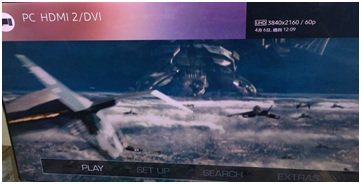
6. Devido ao fato de o HDR não ser suportado pela série de chipsets Intel 100, por favor desative ”UHD color” na TV.
Coloque um filme DB 4K no drive Pioneer Ultra HD Blu-ray.
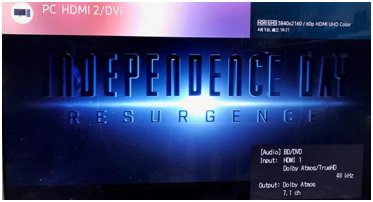
7. Clique " Power DVD”.
8. Então você poderá reproduzir o conteúdo.
Q (432):
Como eu reproduzo um filme DB 4K BD através do drive Pioneer Ultra HD Blu-ray na Z270 Gaming-ITX/ac?(4/1/2017)
A:Requisitos:
S/O: Windows 10
Receiver / decoder: Onkyo TX-NR 747 ou outro receiver que suporte HDCP 2.2
Software de Reprodução: Power DVD 14 (do Drive Pioneer Ultra HD Blu-ray) http://pioneer.jp/pcperipherals/bdd/products/bdr_s11j/spec/
Configuração:
M/B: Z270 Gaming-ITX/ac
BIOS: P1.20
Configuração:
1. Quando o sistema iniciar, pressione "F2” para entrar na tela configuração UEFI.
Vá para Advanced > CPU Configuration e ative "Software Guard Extensions” na BIOS.
Pressione "F10” para salvar e sair da BIOS.
2. Boot into O/S. Install all drivers for the M/B.
Install ME driver (v11.6.0.1126_SW_MSI). Download the driver from the following link: https://www.asrock.com/MB/Intel/Fatal1ty%20Z270%20Gaming-ITXac/index.asp
3. Vá para Painel de Controle > Hardware e Sons > Som e selecione "Saída HDMI”.
4. Ative "UHD color” na TV.
Por favor execute o "Ultra Blu-ray advisor” para verificar se todas as etapas passam.
Pioneer UHDBD Advisor: http://pioneer.jp/pcperipherals/bdd/eula.php
5. Coloque um filme DB 4K no drive Pioneer Ultra HD Blu-ray.
6. Clique em "Power DVD”.
7. Então você poderá reproduzir o conteúdo.
Q (429):
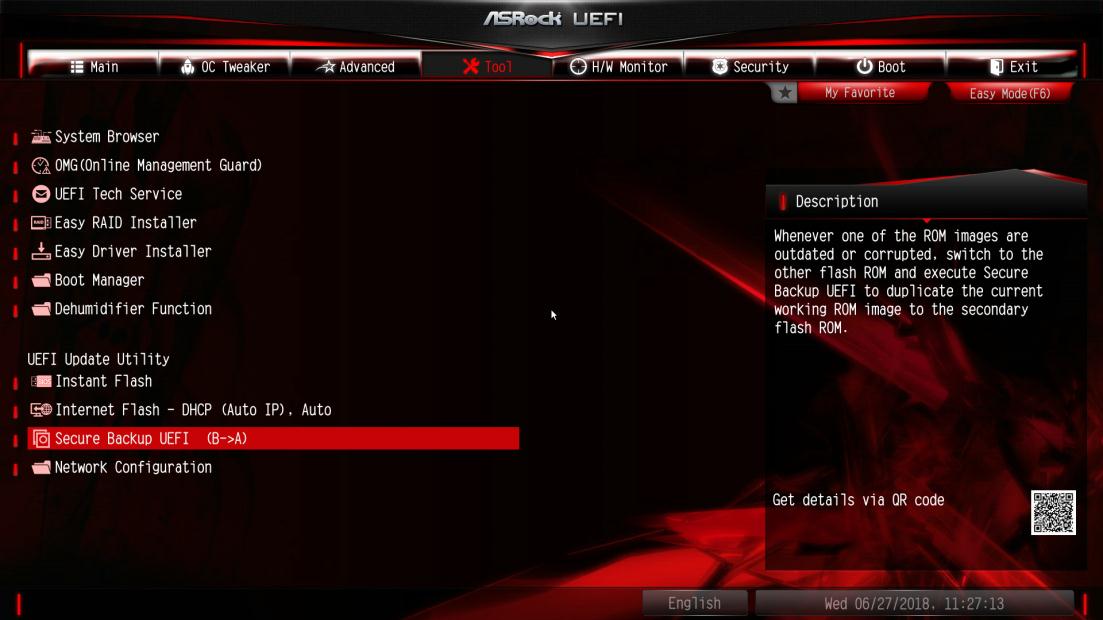
Como as funções de BIOS Recovery e Secure Backup UEFI funcionam com as placas-mãe Intel Z270 com dois chips ROM de BIOS?(2/1/2017)
A:Para as placas-mãe Intel Z270 com dois chips ROM de BIOS, não há necessidade alternar a BIOS quando fizer uma recuperação.
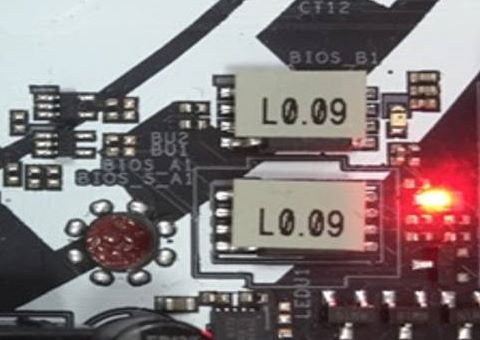
Ao iniciar corretamente, o sistema funciona na BIOS_A1 conforme imagem abaixo.
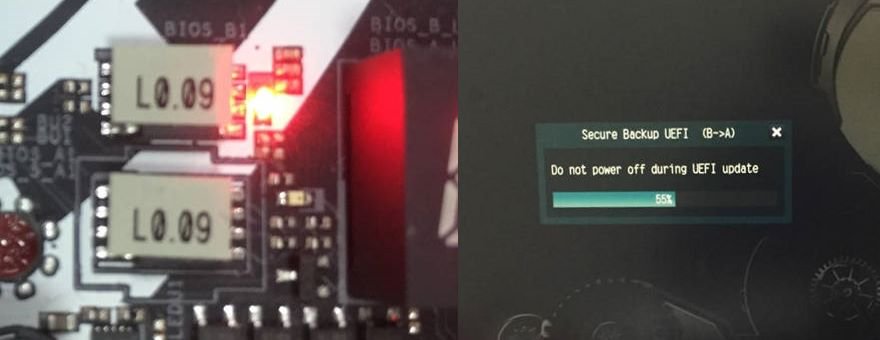
No entanto, se a BIOS_A1 estiver corrompida ou danificada, após diversas tentativas falhas de boot, ela fará automaticamente a recuperação de BIOS a partir da BIOS_B1 de backup e então o sistema ainda irá funcionar na BIOS_A1. E o monitor irá exibir a função Secure Backup UEFI (B-->A) conforme a imagem abaixo.
Após finalizar esta função, o sistema irá reiniciar e funcionar na BIOS ativa BIOS_A1.
Q (382):
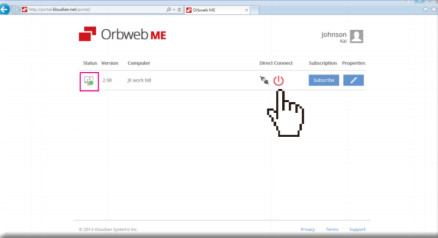
Eu tentei usar o "Wake On Internet Technology" do Orbweb na H87 Killer, mas eu não consegui despertar meu sistema após colocá-lo em modo de descanso remotamente. O que eu devo fazer?(12/1/2014)
2. Por favor remova o antigo driver de rede e então instale o novo.
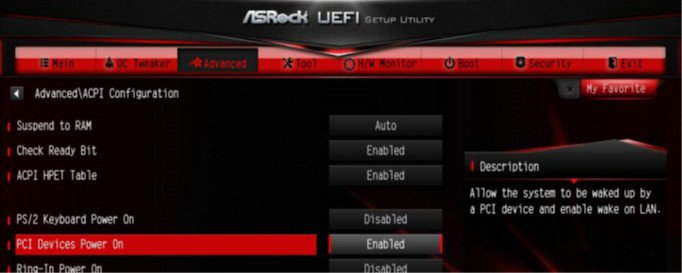
3. Certifique-se que "PCI Devices Power On" está ativado em UEFI SETUP UTILITY > Advanced > ACPI Configuration.
(*A tela da UEFI é apenas para referência. A tela pode ser variar por modelos diferentes.)
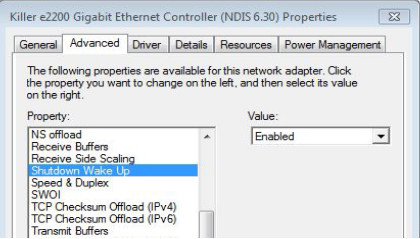
4. Vertifique-se de que "Shutdown Wake Up" e "SWOI" estão ativadas no Gerenciador de Dispositivos > Adaptadores de Rede > Killer e2200 Gigabit Ethernet Controller (NDIS 6.30) Propriedades > Avançado.
5. Utilize o Orbweb para colocar o computador em modo de descanso e acordá-lo remotamente.
Q (361):
Como eu ativo o recurso AMD Dual Graphics emu ma plataforma AMD?(3/1/2014)
A:Passo 1:
Por favor certifique-se de que a sua BIOS está na última versão, e mantenha a configuração padrão da UEFI para a opção "Dual Graphics" como [Auto].
Endereço para download da BIOS: https://www.asrock.com/support/download.asp
Passo 2:
Instale uma placa de vídeo AMD RADEON PCI Express no slot PCIE.
Passo 3:
Conecte o cabo do monitor na porta VGA onboard. Por favor note que o driver VGA / VBIOS atual permite apenas Dual Graphics utilizando a saída de vídeo onboard.
Para atualizações futuras, por favor verifique nosso website para mais informações.
Passo 4:
Inicialize o Sistema.
Então, por favor, remova o driver AMD caso você tenha instalado em seu sistema.
Passo 5:
Instale o driver da VGA onboard a partir do CD de suporte para a VGA onboard e offboard.
Passo 6:
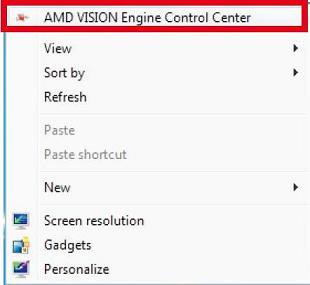
Reinicie seu computador. Clique com o botão direito na área de trabalho. Clique em "AMD VISION Engine Control Center" para entrar no AMD VISION Engine Control Center.
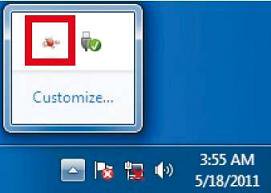
Passo 7:
Você também pode clicar no "AMD VISION Engine Control Center" na sua barra de tarefas para entrar no AMD VISION Engine Control Center.
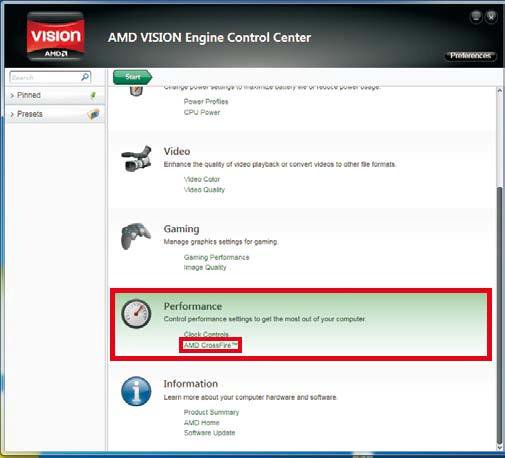
Passo 8:
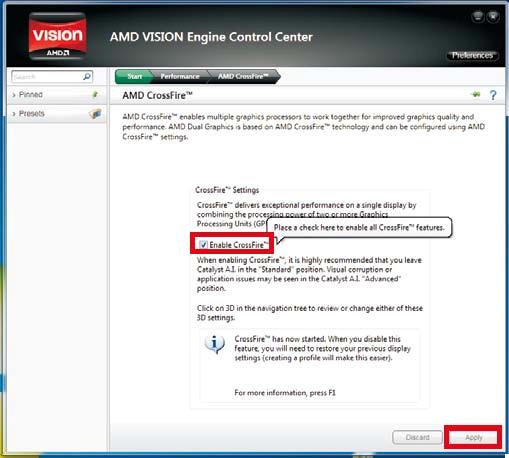
No AMD VISION Engine Control Center, por favor escolha "Performance". Clique em "AMD CrossFire™".
Passo 9:
Clique em "Enable CrossFireTM" e clique "Apply" para salvar suas alterações.
Passo 10:
Reinicie seu sistema. E então você pode desfrutar do Dual Graphics.
Q (348):
I não posso atualizar a BIOS pelo Internet Flash, o que eu devo fazer?(7/1/2013)
A:Você pode seguir os seguintes passos:
1. Por favor carregue as configurações padrão da BIOS e certifique-se de que seu sistema esteja conectado à Internet.
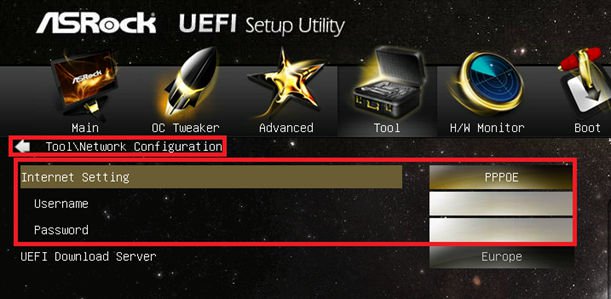
2. Se seu ambiente de Internet for PPPoE, por favor entre no item "Network Configuration".
Selecione "Internet Setting" como "PPPoE" e então digite seu login e senha.
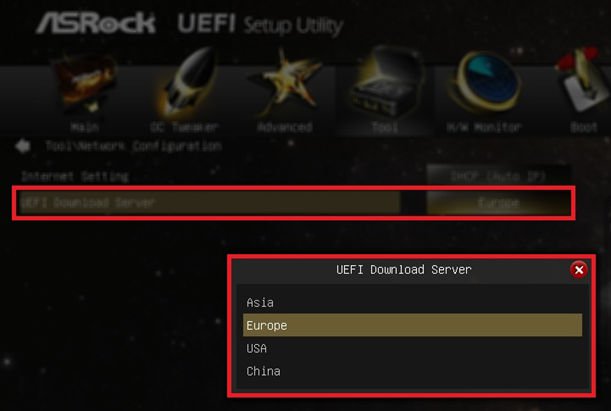
3. Você pode selecionar o Servidor de Download UEFI mais próximo a você.
4. Se o problema persistir, por favor faça o download e atualize para última BIOS através do website da ASRock, e então você poderá atualizar a BIOS pelo Internet Flash da próxima vez.
Link de Download: https://www.asrock.com/support/download.br.asp
Q (329):
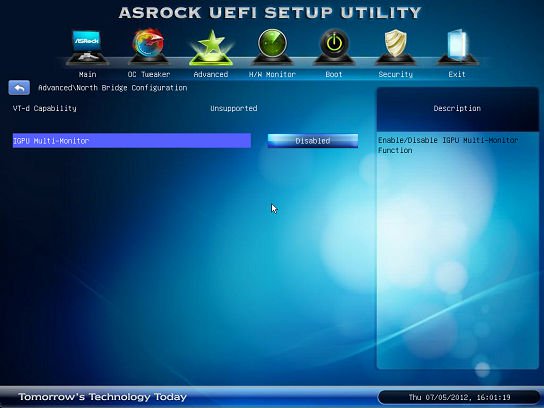
Eu recebo uma mensagem de erro quando estou instalando o driver Intel VGA baixado do website da ASRock. Como eu posso fazer a instalação corretamente na série VisionX?(12/1/2012)
A:Por favor entre na UEFI SETUP UTILITY para ativar a opção "IGPU Multi-monitor" na página "Advanced/North Bridge configuration" (mostrada na imagem) antes de instalar o driver Intel VGA.
Q (316):
Como instalar o SO em volumes RAID com mais de 2.2TB na placa-mãe ASRock 970/990FX?(5/1/2012)
A:Por favor siga o SOP abaixo para instalar o Windows Vista/7 64bit no volume RAID:
Passo 1: Atualize a BIOS para a última versão.
Passo 2: Conecte todos os HDDs e então faça os ajustes a seguir:
Defina o [SATA Mode] como [RAID Mode]
Mude [Onboard RAID 3TB+ Unlocker] para [EFI Compatible ROM]
As opções estão localizadas em BIOS > [Advanced] > [Storage Configuration]
Então pressione F10 para salvar as configurações.
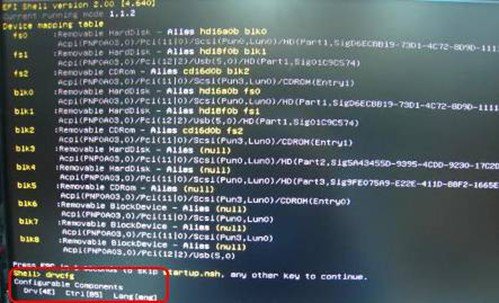
Passo 3: Pressione F11 durante o boot e escolha [Built-in EFI Shell].
Passo 4: Digite "drvcfg" e você verá as informações como mostrado abaixo:
Drv[4E] Ctrl[B5] Lang[eng]
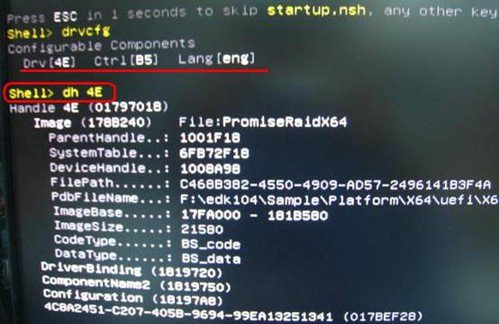
Passo 5: Digite "dh [número do Drv]", por exemplo: digite "dh 4E".
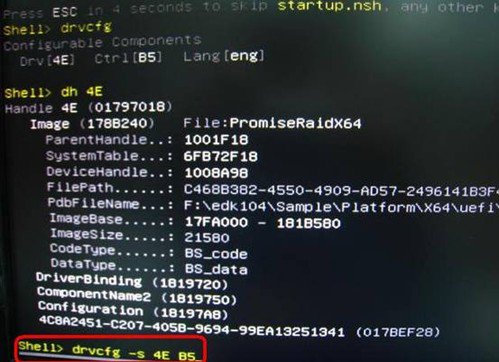
Passo 6: Digite "drvcfg –s [número do Drv] [número de Ctrl]" para entrar no Utilitário Raid.
Por exemplo: Digite "drvcfg –s 4E B5"
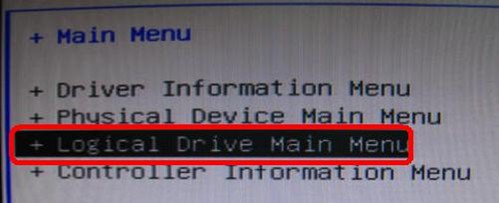
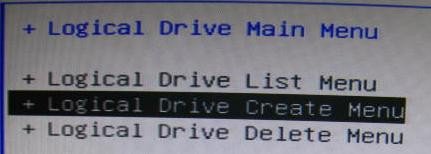
Passo 7: Escolha [Logical Drive Main Menu] para definir o Drive Raid.
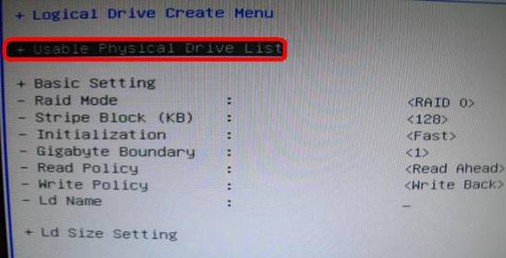
Passo 8: Escolha [Logical Drive Create Menu] para criar o Drive Raid Drive.
Passo 9: Escolha [Usable Physical Drive List] para selecionar o HDD Raid.
Passo 10: Pressione a Barra de Espaço no teclado para marcar a opção.
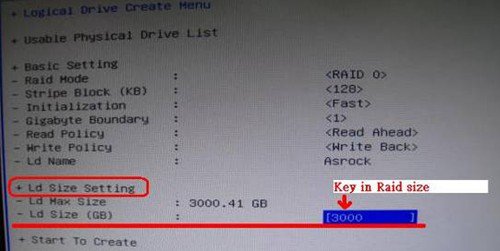
Passo 11: Escolha [Ld Size setting], e digite o tamanho do Raid.
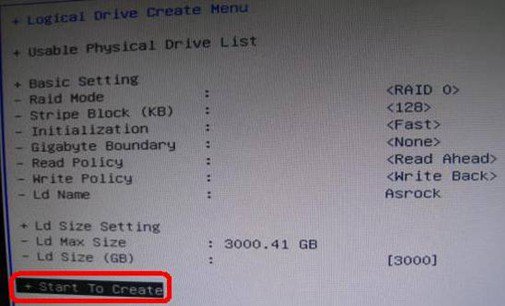
Passo 12: Após definir o tamanho do Raid, por favor escolha [Start to Create]
Passo 13: Pressione "F10" para Sair do Utilitário.
Passo 14: Durante a inicialização, por favor pressione "F11" para entrar no Menu de Boot.
Escolha UEFI: CD/DVD Drive
* Esta opção aparece apenas no Windows7 64bit e Vista 64bit.
Passo 15: Siga o Guia de Instalação do Windows para instalar o sistema.
Por favor carregue o mais novo driver SATA RAID versão 3.3.1540.22, disponível em nosso site, durante a instalação.
Passo 16: Instale os drivers mais novos do site da ASRock.
Q (306):
Minha placa-mãe ASRock Intel série-6 tem suporte a CPU Intel Ivy Bridge?(2/1/2012)
A:Para suportar a CPU Intel da proxima geração de 22nm, é necessário ter a versão de BIOS correspondente, drivers, e AXTU atualizado.
Por favor siga os passos abaixo par atualizar a BIOS, drivers, e utilitários correspondentes.
Passo 1: Verifique a versão da BIOS.
Por favor verifique a tabela abaixo e atualize a BIOS com a versão citada ou superior.
Se você possuir a mesma versão de BIOS ou uma versão superior na sua placa-mãe, não há necessidade de fazer a atualização da BIOS e você poderá pular para o passo 2
Model
BIOS Version
H61M-VS R2.0
P2.10
H61M-HGS
P1.50
H61M-HVS
P1.90
H61M-HVGS
P1.70
H61M/U3S3
P1.70
H61M-ITX
P1.60
H61iCafe
P1.70
H61DE/S3
P1.70
H61DE/SI
P1.70
H61M-PS
P1.40
H61M
P1.70
H61DEL
P1.70
H61M-GE
P1.70
P65iCafe
P1.40
H61M-VS
P2.10
H61M-S
P1.50
H61M-GS
P1.50
Model
BIOS Version
Fatal1ty Z68 Professional Gen3
P2.10
Z68 Extreme3 Gen3
P2.10
Z68 Extreme4 Gen3
P2.10
Z68 Extreme7 Gen3
P2.10
Z68 Pro3
P2.10
Z68 Pro3 Gen3
P2.10
Z68 Pro3-M
P2.10
Z68M/USB3
P2.10
Z68M-ITX/HT
P2.20
Z68 Extreme4
P2.20
Model
BIOS Version
Fatal1ty P67 Performance
P2.10
Fatal1ty P67 Professional
P3.10
P67 Extreme4
P3.10
P67 Extreme4 Gen3
P2.10
P67 Extreme6
P2.10
P67 Pro
P2.10
P67 Pro3
P3.10
P67 Pro3 SE
P2.10
Model
BIOS Version
H67DE3
P2.10
H67M
P2.10
H67M-GE
P2.10
H67M-GE/HT
P2.10
H67M-ITX
P2.10
H67M-ITX/HT
P2.10
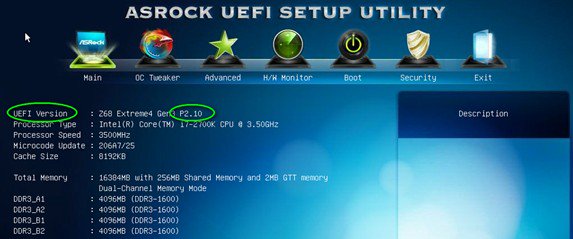
Há duas formas de checar a versão da BIOS.
1 Inicialize seus sistema e pressione [F2] ou [Delete] quando o logo da ASRock aparecer, você poderá encontrar a versão da BIOS ou UEFI na tela principal como mostrado abaixo.
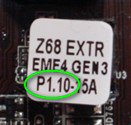
2 Ou encontrar a etiqueta no chip da BIOS como mostrado abaixo, você pode checar qual versão de BIOS foi implementada quando a placa-mãe foi produzida.
Passo 2: Atualizando a BIOS
A), Se você tiver uma CPU Sandy Bridge ou puder emprestar uma de um amigo então você poderá facilmente atualizar a BIOS por sua conta.
Por favor faça o download da BIOS da tabela acima, e atualiza a BIOS.
Para mais instruções por favor clique no ícone "Como atualizar" na coluna correspondente.
B), Se você não tiver uma CPU Sandy Bridge e não puder emprestar uma de outra pessoa, por favor entre em contato com o fornecedor onde você comprou para que ele atualize a BIOS para você.
Esta é a segunda opção mais rápida para fazer com que sua placa suporte a CPU Ivy Bridge.
Caso isso não seja possível, por favor entre em contato com o Suporte Técnico ASRock para obter ajuda adicional.
*Nota: Se você utilizar um disco removível USB para atualizar a BIOS, após a imagem da nova BIOS ser gravada no chip, por favor pressione qualquer tecla para reiniciar o sistema. Neste momento, por favor não remova o disco USB. O procedimento de atualização do firmware Intel ME irá continuar automaticamente caso necessário.
**Nota: Por favor utilize apenas a imagem de BIOS oferecida no site da ASRock.
Passo 3: Atualize o driver Gráfico Intel HD do site da ASRock
*Como atualizar o driver Gráfico Intel HD:
1. Por favor desconpacte e abra a pasta para executar o "setup".
2. Siga o instalador da Intel para instalar o driver gráfico.
3. Após o termino da instalação você verá a seguinte mensagem, por favor reinicie o sistema neste momento.
Passo 4: Instale a versão correta do Intel Management Engine do site da ASRock:
*Como atualizar o Intel Management Engine:
1. Por favor descompacte e abra a pasta para executar o "setup".
Caminho: Entre na pasta Intel ME8 -> ME8_1.5M_8.0.0.1351 -> Installers-> ME_SW-> e escolha "Setup".
2. Siga o instalador da Intel para instalar o driver ME.
3. Após o termino da instalação, você verá a mensagem abaixo. Por favor clique em "Finish".
Passo 5: Instale o driver Intel Smart Connect para Microsoft Windows7/7 64 bit.
Passo 6: Atualize o Utilitário ASRock AXTU.
Please update new AXTU version on ASRock website.
Passo 7: Substitua a CPU para a Intel Ivy Bridge.
Q (289):
I install Microsoft Windows OS in GPT mode and Ubuntu in MBR mode with two different HDD, and I cannot boot into Microsoft Windows OS, how to solve that?(6/1/2011)
A:Please install OS both in GPT or MBR mode.
Both in GPT mode, please refer below steps:
1. Boot into BIOS→[Boot]→[PCI ROM Priority]→choose [EFI Compatible ROM], then press "F10" to save changes and exit.
2. Then press "F11" when booting up and choose "UEFI:[your ODD name]" to install OS.
Both in MBR mode, please refer below step:
Please press "F11" when booting up and choose "AHCI/SATA:[your ODD name]" to install OS.
Q (286):
What's the meaning of AMI UEFI BIOS Beep code?(4/1/2011)
A:Please refer to below form for the beep code and debug code of AMI UEFI BIOS.
Condition
Beeps Code
Debug Code
Normal
No beep
With goodnight LED enabled, debug code will disappear after the beep.
 Cardápio
![Select Clear Secure Boot Keys, then choose [Yes].](/support/faq/190-2.jpg)

![After clearing the keys, select Install Default Secure Boot Keys, then choose [Yes].](/support/faq/190-4.jpg)


![Set Enable VMD Global Mapping to [Enabled]. Press F10 to save the changes and exit setup.](/support/faq/167-4.jpg)
 ” to install Windows® 10 64-bit / 11 64-bit OS">
 .">
.">