Usamos cookies para ofrecerle una experiencia más personalizada y fluida. Al visitar este sitio web, acepta nuestro uso de cookies. Si prefiere no aceptar cookies o necesita más información, visite nuestra Política de privacidad.
Cookies necesarias Estas cookies son esenciales para el correcto funcionamiento del sitio web y no se pueden desactivar.
Cookies analíticas Estas cookies nos ayudan a comprender cómo los visitantes utilizan nuestro sitio web.
Cookies de marketing Estas cookies se utilizan para realizar un seguimiento de los visitantes y mostrar anuncios relevantes.
Cookies de redes sociales Estas cookies te permiten compartir páginas y contenido en redes sociales.
Si está completamente seguro de la categoría de su pregunta, puede elegir más abajo una de las categorías para preguntas más frecuentes. Catálogo de Preguntas más frecuentes:
Resultados:
P (551):
Microsoft will update the Secure Boot certificates. What do I need to do?(3/16/2026)
R:You only need to follow one of the update methods below and wait for the new Windows Boot Manager to take effect:
Method 1: Update through Windows Update
If Windows Update is turned on and Secure Boot is enabled (see "How to enable Secure Boot”), supported Windows devices will automatically download and install the new Secure Boot certificates and the new Boot Manager.
Since 2024, Microsoft has been rolling out the new Secure Boot database update in phases. All devices with Secure Boot enabled will receive the update automatically before the certificate expires in June 2026.
With default settings, users usually do not need to do anything manually. Just keep Windows Update enabled and wait for the update to install automatically.
Method 2: Manually update the UEFI / BIOS
Note:After updating the BIOS, the system may ask for your BitLocker recovery key to unlock Windows.
You may also choose to turn off Device Encryption and Standard BitLocker Encryption before updating the BIOS, then turn them back on afterward to keep your data safe.
If your device cannot get the update through Windows Update, you can download and install the latest UEFI BIOS from the official website to get the updated Secure Boot certificates.
1. Visit the ASRock official website, search for your motherboard model, and download the latest UEFI BIOS from the support page.
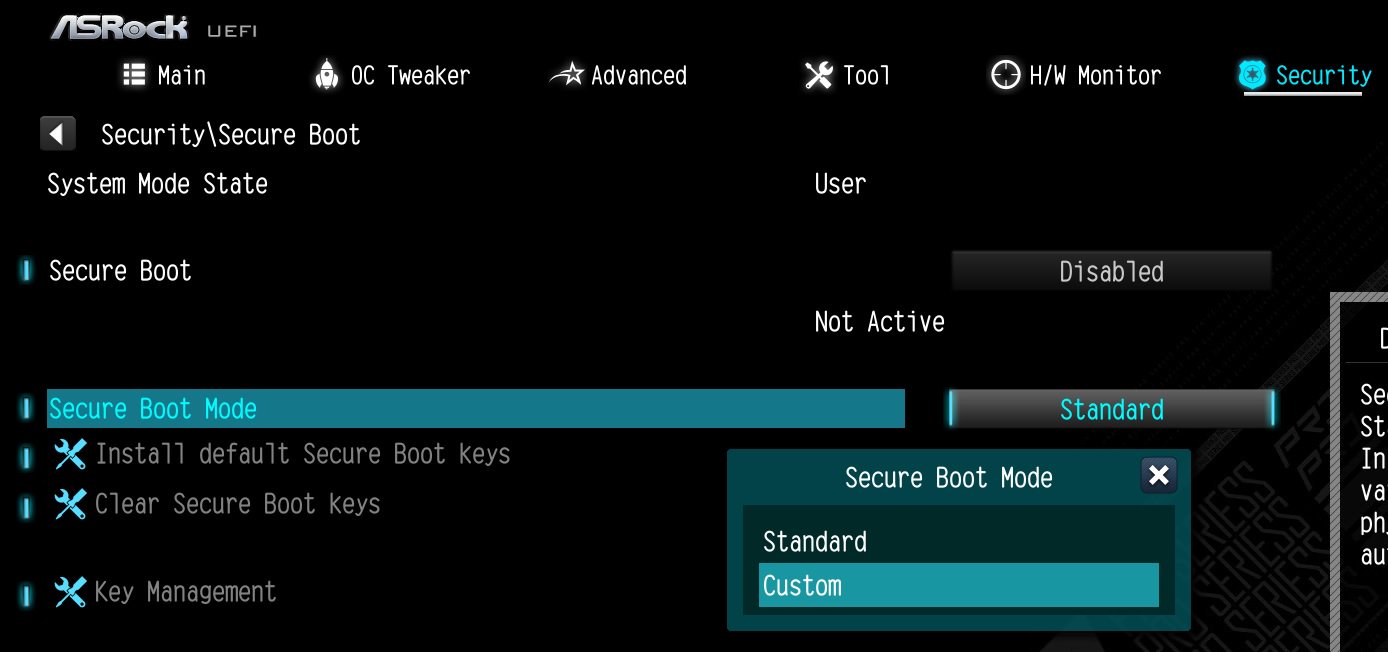
2. Clear the Secure Boot keys.
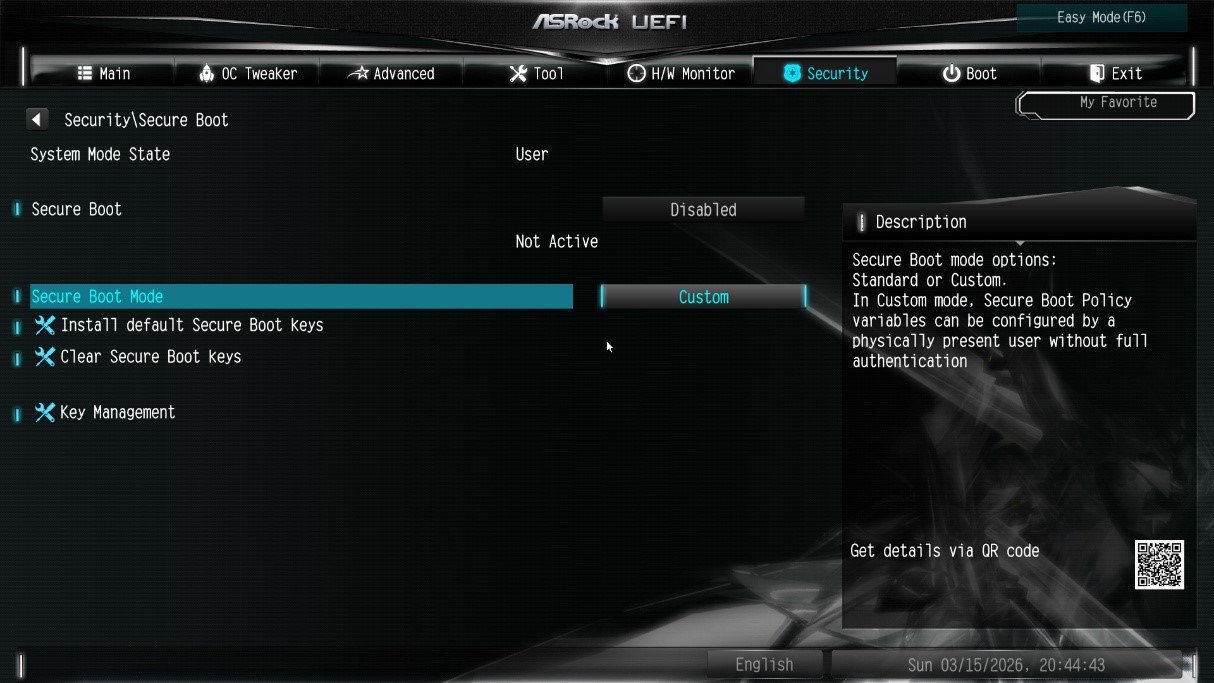
① After updating the BIOS and rebooting, enter BIOS Setup and go to:
Advanced \ Security > Secure Boot
② If Secure Boot Mode is set to Standard, change it to Custom.
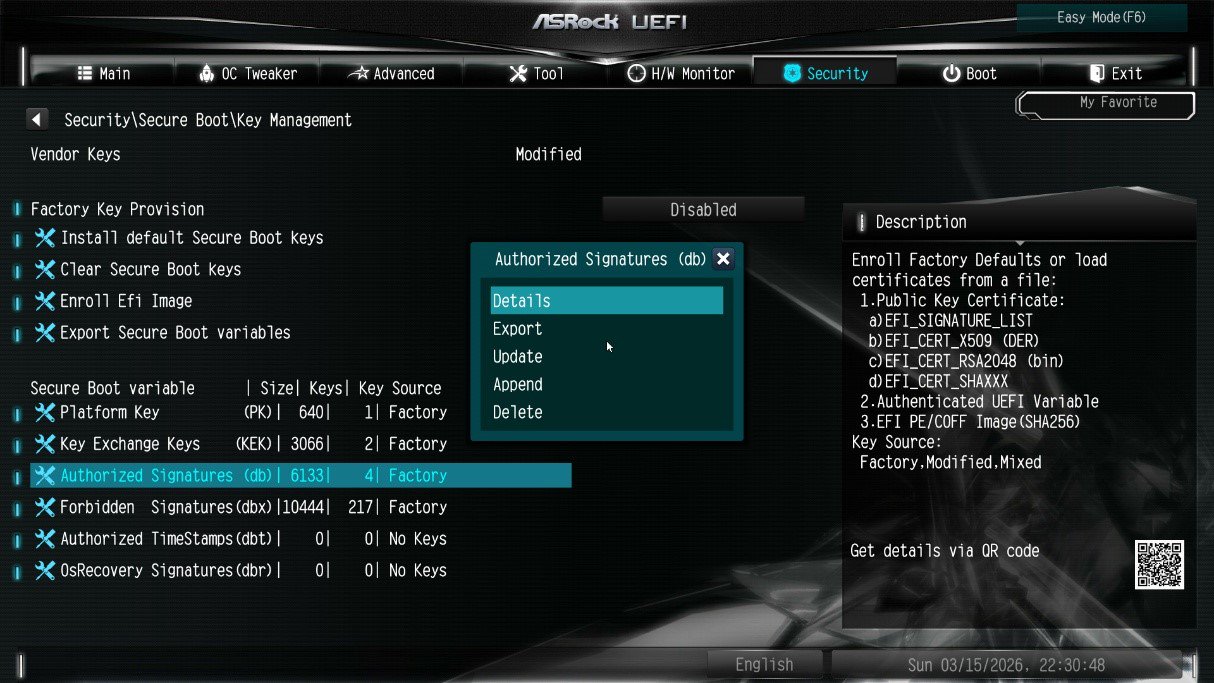
③ Select Key Management.
④ Select Clear Secure Boot Keys, then choose [Yes].
⑤ Confirm that all UEFI Secure Boot keys (PK, KEK, DB, DBX) have been cleared.
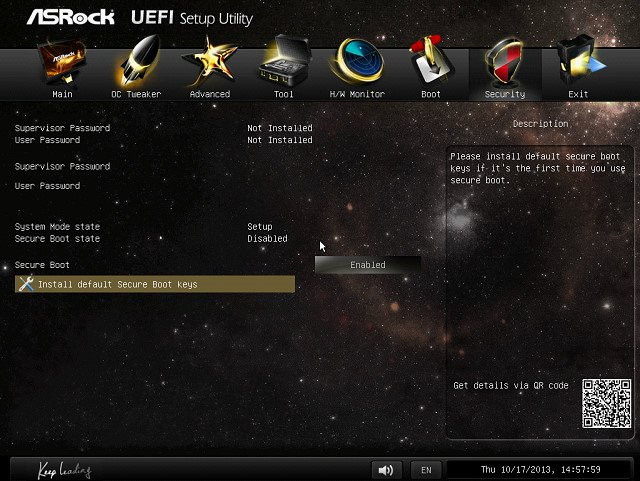
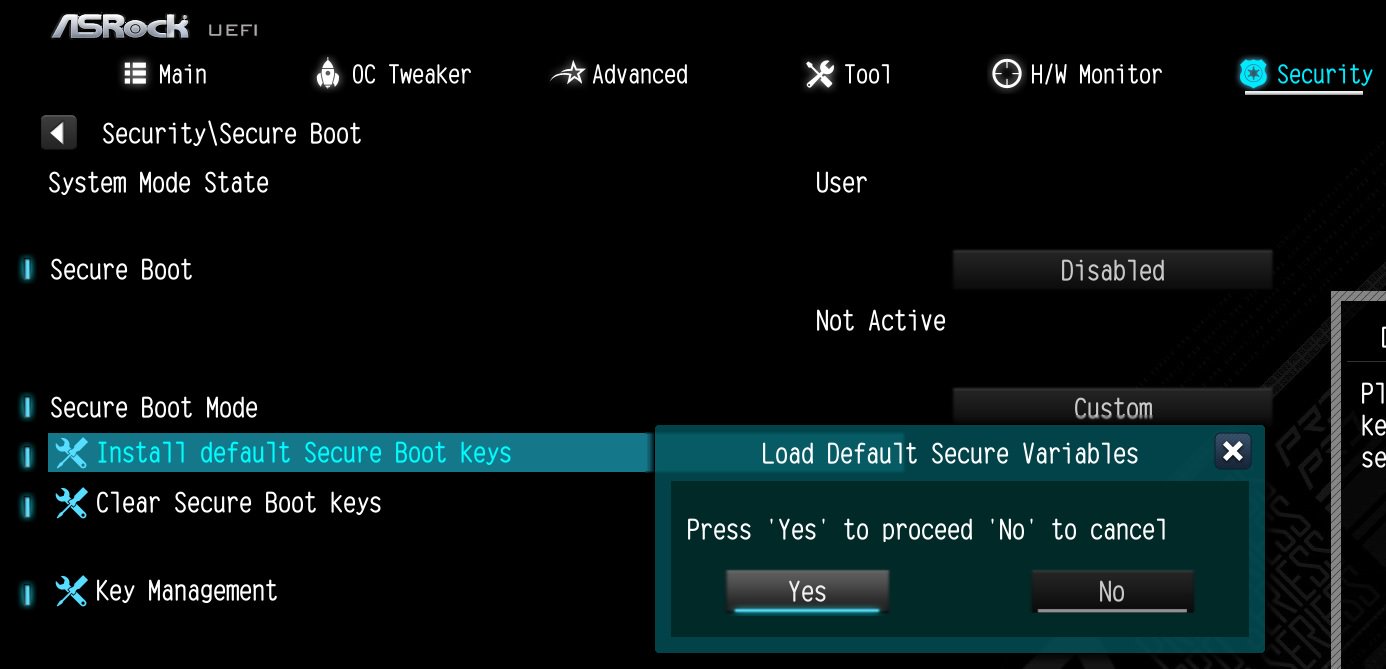
3. Install the default Secure Boot keys.
① After clearing the keys, select Install Default Secure Boot Keys, then choose [Yes].
② Confirm that the Size/Number of Keys for PK / KEK / DB / DBX is not 0, and the Key Source shows [Factory]. This means the Secure Boot key update is complete.
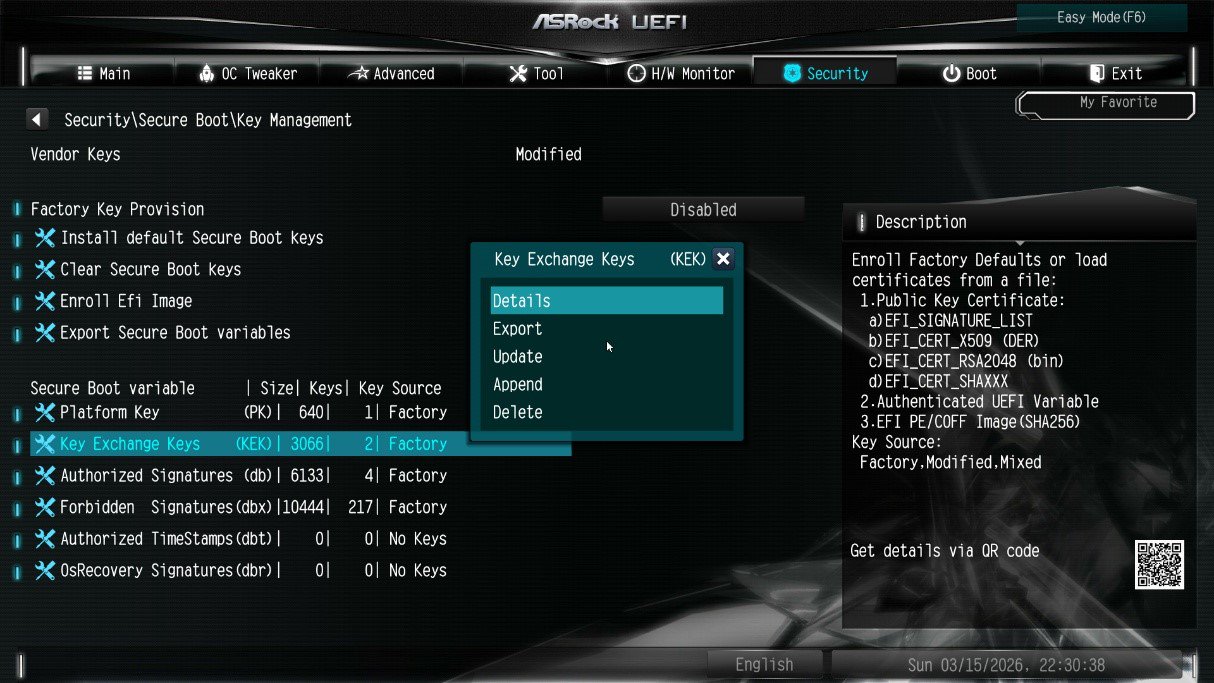
4. How to check the Secure Boot key status?
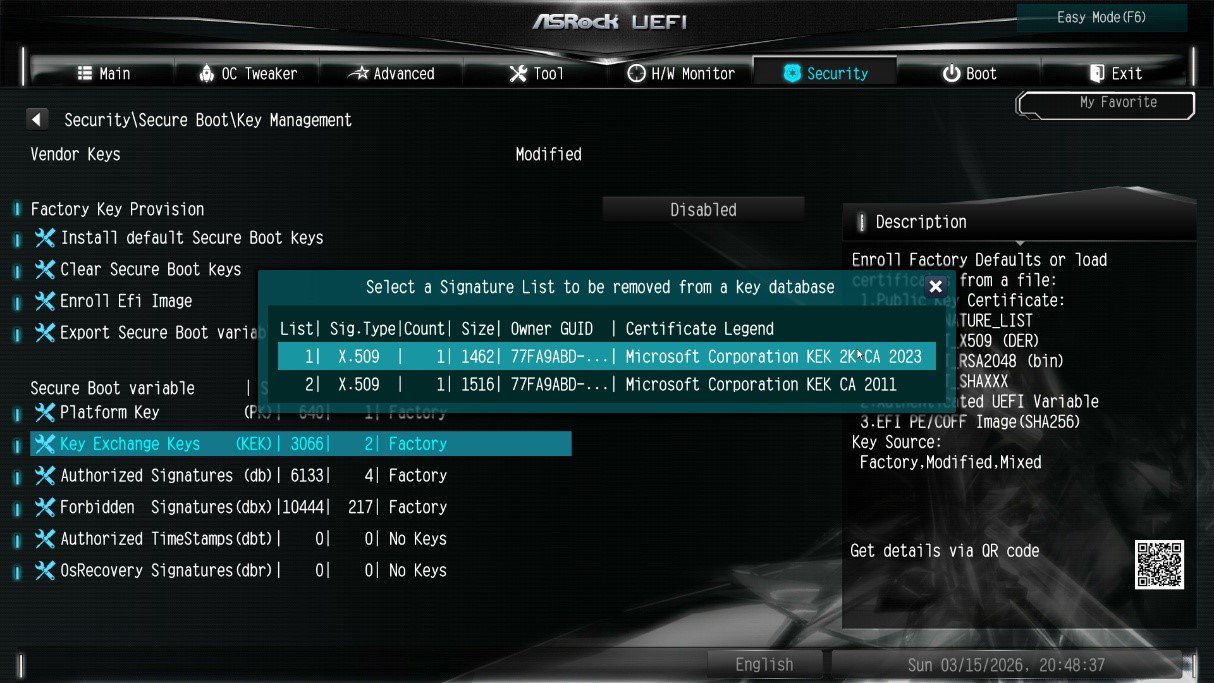
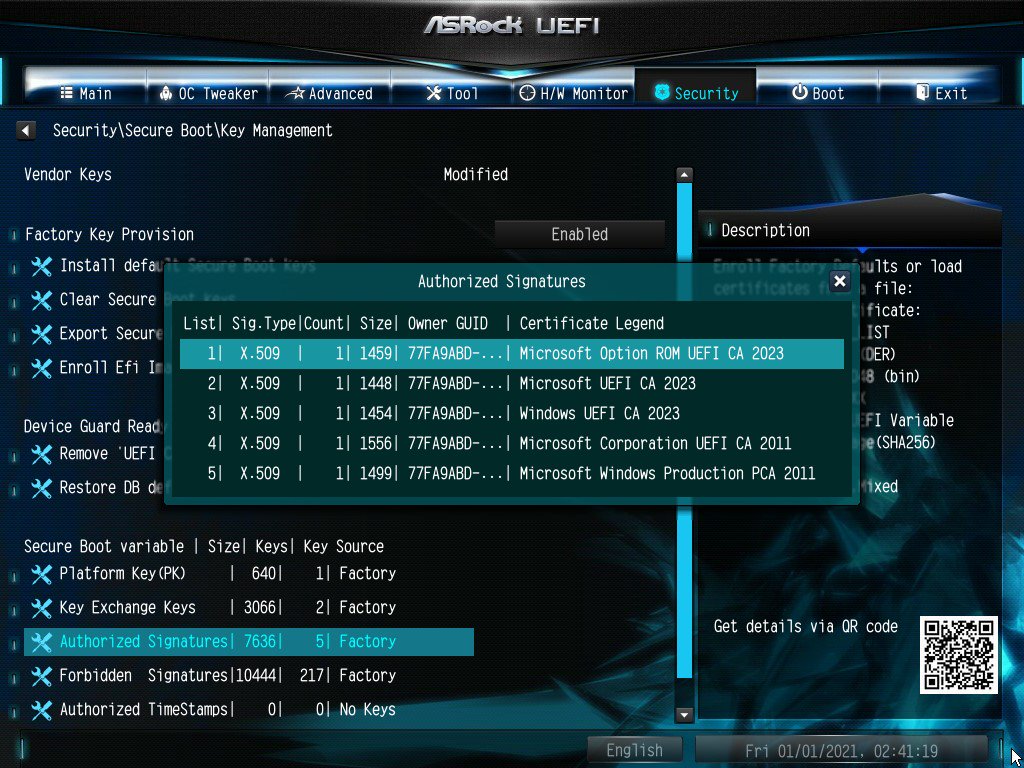
① In BIOS, go to: Security > Secure Boot > Key Management
② Select Key Exchange Keys (KEK) choose "Details”:
③ Make sure that KEK Management contains:
- Microsoft Corporation KEK 2K CA 2023
P (549):
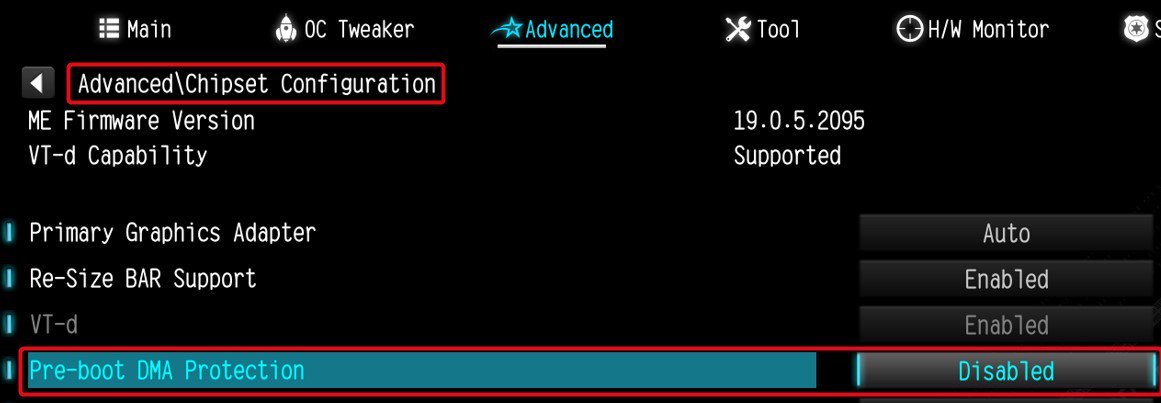
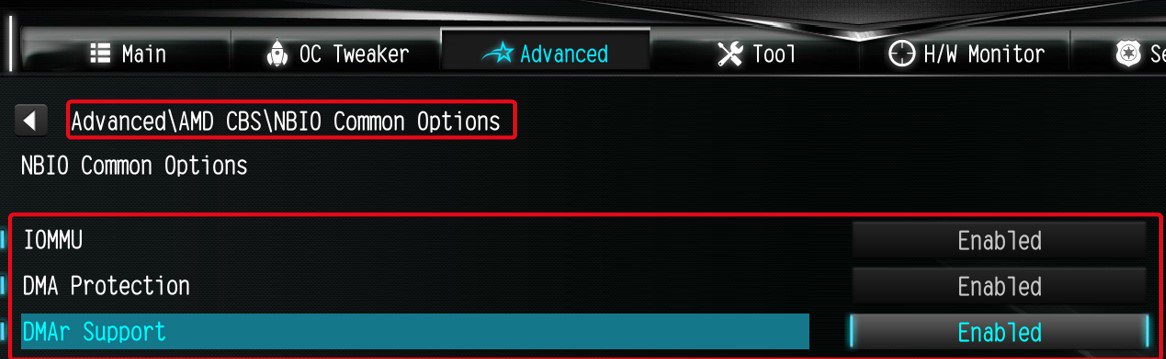
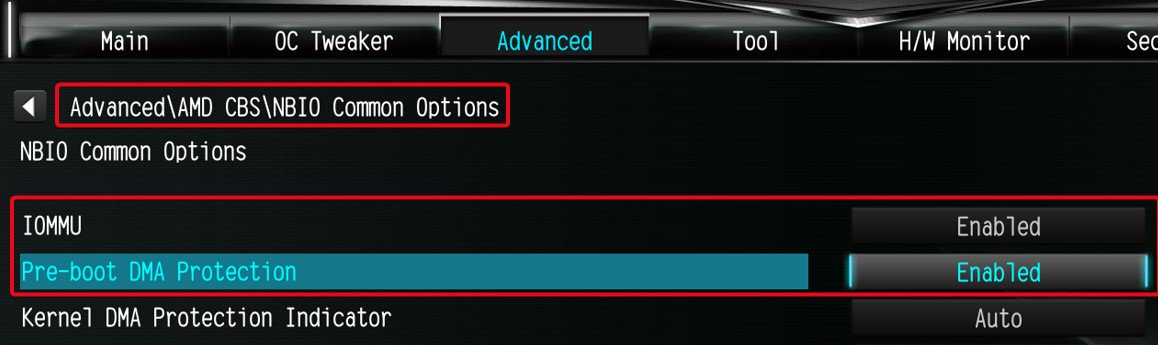
I am looking for Pre-boot DMA Protection option, but I cannot find it in the BIOS interface. Where can I locate this option?(12/16/2025)
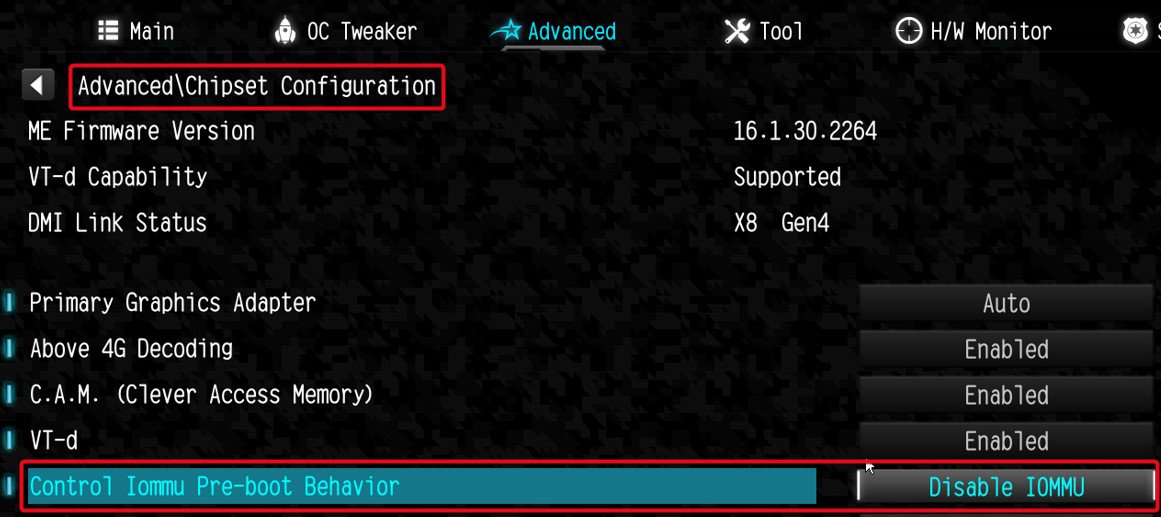
R:The option name varies across different platforms. Please refer to the following screenshots to identify the correct option and its location in the BIOS menu.
Intel platform
● Intel 600, 700 series
● Intel 800 series
Note:
Please first update BIOS to the latest version to obtain this option on Intel 600, 700 and 800 platforms.
AMD Platform
● AM4 series
● AM5 series
Users can enable this option if they encounter game‑related or security‑related problems.
#DMA #Pre-boot #IOMMU #DMA Protection
P (548):
Some new games like Battlefield 6 or Call of Duty: Black Ops 7 require Secure Boot and TPM 2.0 to provide kernel level anti cheat protection. How do I enable these options on ASRock AM4 motherboards?(10/3/2025)
R:On recent platforms such as AMD 800 and AMD 600 series, Secure Boot and TPM 2.0 are enabled by default. With these platforms, there is no need to change BIOS settings.
However, if you are still using an AM4 motherboard, Secure Boot and TPM 2.0 might not be enabled. Also, the TPM firmware might have to be updated.
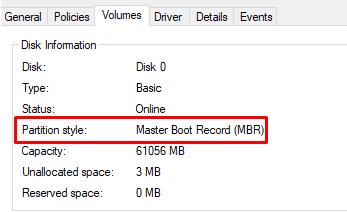
Before enabling Secure Boot, you must check your disk partition style and BIOS settings to ensure they meet the requirements for Secure Boot.
Secure Boot System Requirements
1. Partition Style: GPT (GUID Partition Table). If the disk is MBR (Master Boot Record), please convert it to GPT.
2. BIOS Mode: UEFI only. Legacy or CSM mode doesn't support secure boot.
How to check if the current partition type supports Secure Boot
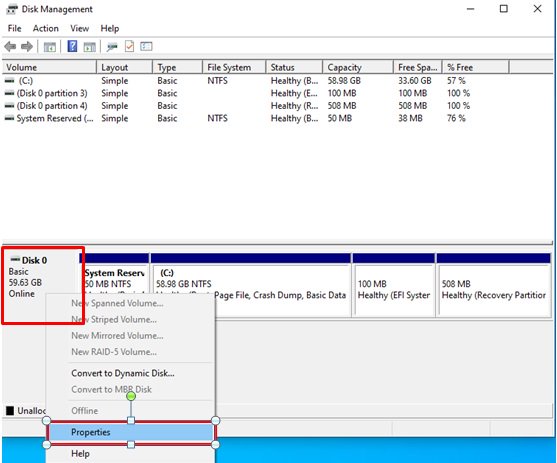
1. Right-click the Windows button on the desktop and select "Disk Management”.
2. Right-click the disk where Windows is installed and select the ""Properties"".
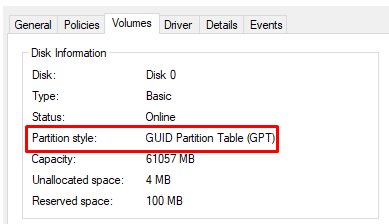
3. Click the "Volumes” tab and check if the partition style is "GPT”.
GPT partition style can support Secure Boot. You can skip below steps 4-7.
4. If the partition style is "MBR”, please make a backup of important data on the system and refer to steps 5-7 to convert the partition style to GPT.
If you have multiple OS installations or if some system partition is on a different drive than where the OS is, the conversion might not have the desired result. Please backup your DATA and reinstall the OS.
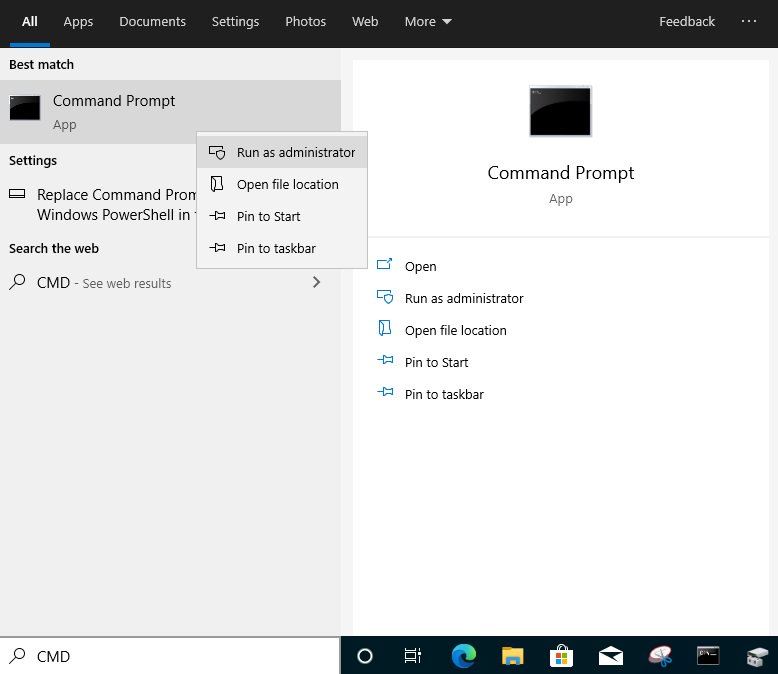
5. Type "CMD" in the Windows search bar, right-click on "Command Prompt” and choose to run as administrator.
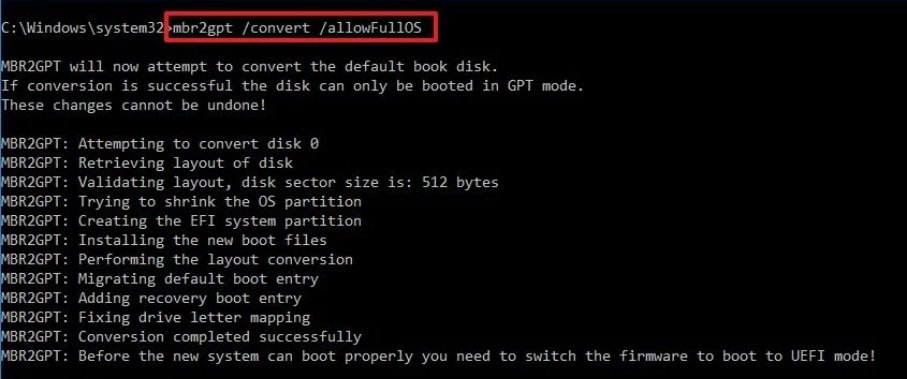
6. Type the command "mbr2gpt /convert /allowFullOS” to convert the partition style and press [Enter].
7. Restart the system, and the BIOS Mode/Partition style will be converted to UEFI/GPT.
Switching to UEFI Mode and Enabling Secure Boot in BIOS
1. Please press the "F2” key during POST to enter BIOS setup.
Go to Boot\CSM (Compatibility Support Module) and set "CSM” to "Disabled”.
Press the "F10” key to save configuration changes.
2. Go to Security\Secure Boot and set "Secure Boot Mode” to "Custom”.
3. Please press "Install default Secure Boot keys” and select "Yes” to install Secure Boot keys. If at this point this option is greyed out, Secure Boot key have been loaded already.
4. Set "Secure Boot” to "Enabled”. Then press the "F10” key to save configuration changes.
5. After the system restarts, go to Security\Secure Boot, and make sure that Secure Boot is showing "Active”.
Update BIOS and AMD fTPM
To ensure compatibility between games and Secure Boot/TPM 2.0, ASRock has released new BIOS versions for AM4 motherboards, to update to AMD fTPM 3.x.2.x version.
Type "TPM.msc" in the Windows search bar to find the current fTPM version.
If your current fTPM version is 3.x.0.x, we recommend updating to the latest BIOS version to get the fTPM update. This BIOS version should help you to enable anti-cheat on for example Battlefield 6 or Call of Duty:Black Ops 7.
fTPM 3.*.2.* (TPMB) Information
AMD has informed us that only CPUs with below former codename support fTPM 3.*.2.* (TPMB).
If your CPU is not in the supported CPU lineup for TPMB compatibility, based on AMD's official specifications, your CPU does not meet the security requirements necessary for your game.
P (544):
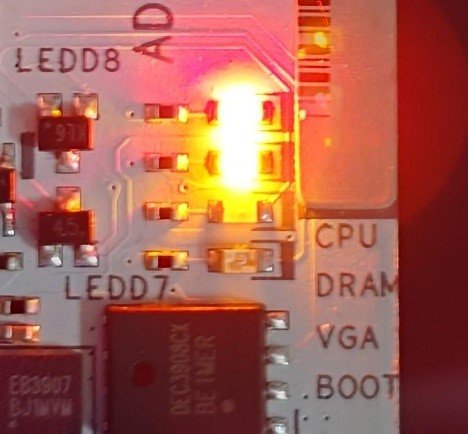
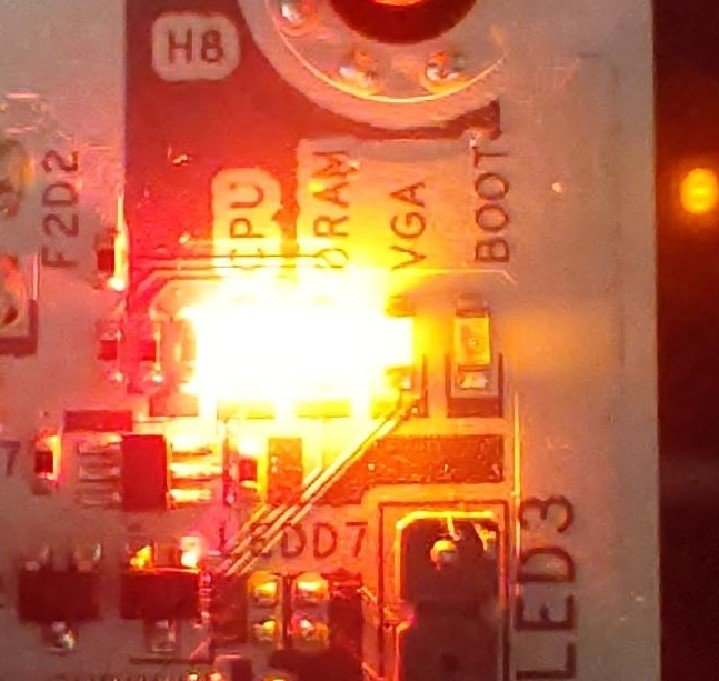
My system has hardware monitoring software installed, such as HWiNFO64. My computer fails to boot after restarting. What should I do?(5/14/2025)
R:On the AMD AM5 platform, restarting the system while hardware monitoring software is running may cause a reboot to fail.
If your system can boot normally but encounters issues during a restart, please close all hardware monitoring software and try restarting the system again.
When the system fails to reboot properly, the motherboard's "Dr. Debug” display and "Post Status Checker (PSC)” may show the following statuses:
X870E Nova WiFi
X870 Pro RS
X870 Steel Legend WiFi
Dr. Debug display "0d”.
The CPU and DRAM LEDs will remain solidly lit.
The CPU LED will remain solidly lit, and the DRAM LED will blink.
P (542):
After installing the system, I noticed that the power supply fan wasn't spinning when I powered it on, but the system booted up normally. Is this normal?(12/19/2024)
R:Yes, this is normal.
The power supply supports the iCOOL Intelligent Fan Control Mode.
When "iCOOL Mode" is enabled, the power supply operates in an energy-saving manner, allowing the fan to remain off during low to moderate loads. The fan will only activate when the power load increases or the temperature rises above a certain threshold.
This feature operates in "Auto" mode by default, but certain models feature or include an iCOOL Intelligent Fan Control Mode switch. You can refer to the specifications of your selected model to determine whether it operates automatically or includes the iCOOL Intelligent Fan Control Mode switch.
#Supply #Power #icool #Fan #ECO
P (538):
After I tried to overclock the memory, my system with Z890 motherboard cannot power on. What should I do?(10/29/2024)
R:Overclocking results may vary between different CPUs and hardware configurations.
If the system fails to power on boot when the power button is pressed (no fans spinning) after loading XMP or overclocking memory, please follow below steps.
1. Switch off power completely. Wait at least 20 seconds. Switch power back on and start the system.
2. If that fails, please clear the CMOS. See the user manual for the clear CMOS procedure for your motherboard.
3. In case that does not help, use flashback to update to the latest BIOS. The BIOS is available via the ASRock website. Please make sure to select the correct model, as some model names are similar.
Visit ASRock's website: https://www.asrock.com/support/index.asp?Model=Z890
P (537):
How do I configure Realtek 5.1ch audio output on N100M under Windows 10?(10/29/2024)
R:Please follow the steps below.
1. Go to BIOS\Chipset Configuration and set Intel SST to "Enabled”.
2. Boot into Windows. Download and install Realtek high definition audio driver version:6.0.9503.1_RTK_SST and follow the instructions, restarting the system after the installation.
Realtek high definition audio driver ver:6.0.9503.1_RTK_SST:
P (534):
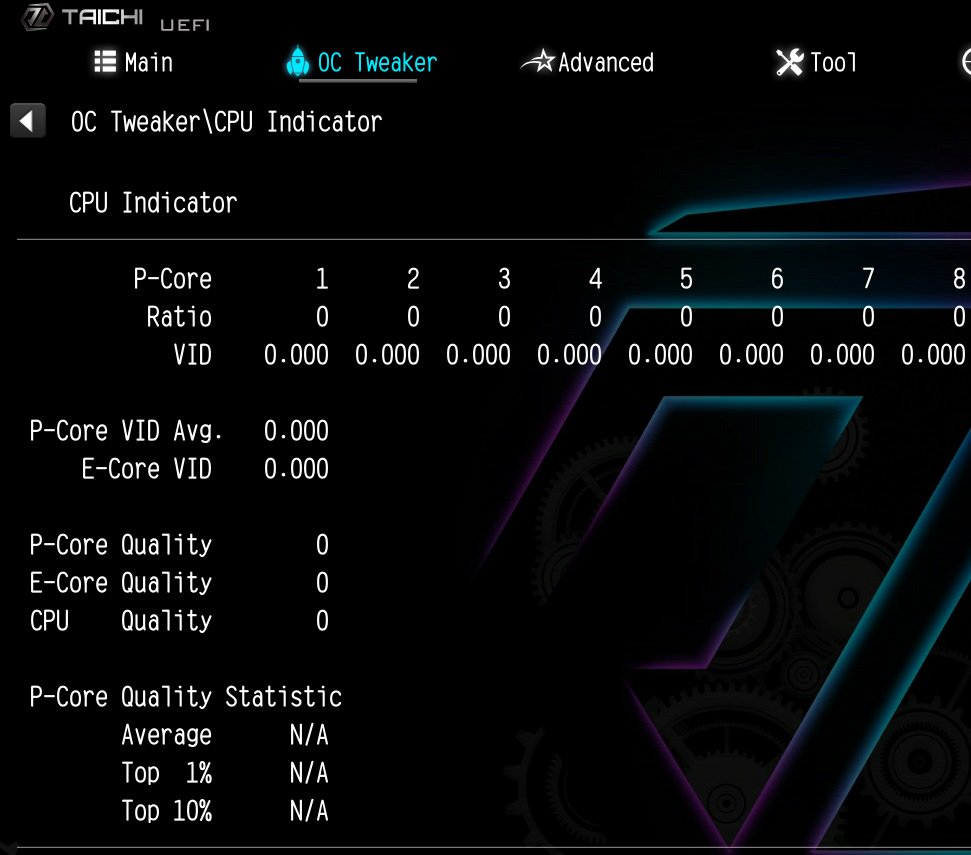
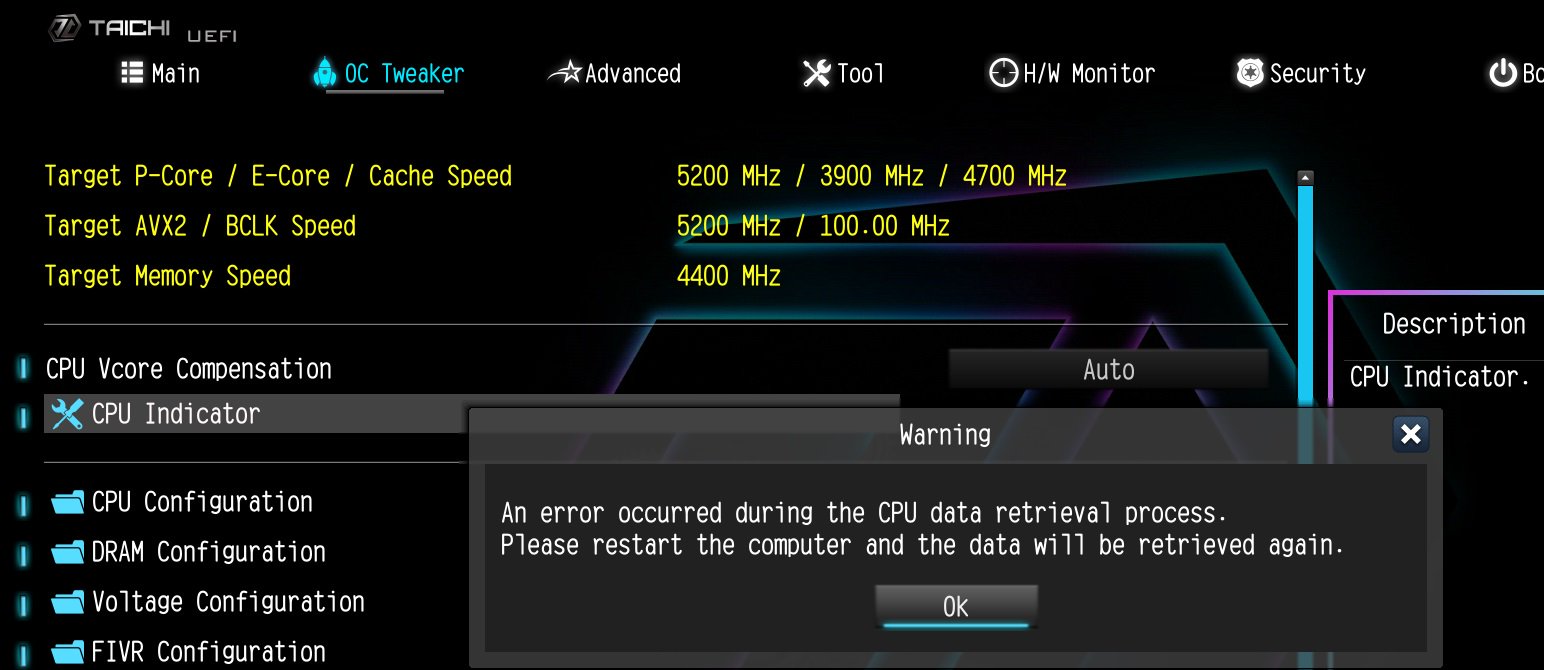
How to fix the information of the 'CPU Indicator' utility displaying "N/A" and "0" on the Intel Z790/Z690 platform?
(11/1/2023)
R:Minimum system requirement: K-Series CPU+ Latest BIOS
If the system encounters an unexpected restart during boot-up, the CPU Indicator utility will display the following warning message when entering the BIOS.
After that, please press "OK” and restart the system and the data will be retrieved again or you can shut down the system and refer to the user manual to clear CMOS and go to the BIOS again to check if the 'CPU Indicator' utility displaying the correct information.
#Intel #Z790 #Z690 #K-series #CPU #Indicator
P (531):
My software requires Secure Boot to be enabled. How can I set it up?(8/16/2023)
R:Please follow the steps below to enable Secure Boot.
Step 1.
Please press the "F2” key during POST to enter BIOS setup.
Go to Boot\CSM (Compatibility Support Module) and set "CSM" to "Disabled".
Press the "F10” key to save configuration changes.
Step 2.
Go to Security\Secure Boot and set "Secure Boot Mode" to "Custom".
Step 3.
Please press "Install default Secure Boot keys" and select "Yes" to install Secure Boot keys.
Step 4.
Set "Secure Boot" to "Enabled". Then press the "F10" key to save configuration changes.
Step 5.
After the system restarts, go to Security\Secure Boot, and make sure that Secure Boot is showing "Active".
*AM5 platform
If a prompt "Discard Changes and Exit" appears after clicking "Install default Secure Boot keys" and selecting "Yes", please select "No" and continue to step 4.
P (530):
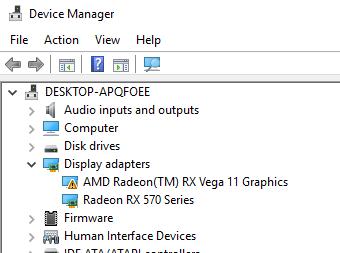
When I installed the APU+AMD GPU on the AMD AM4 platform, the "Record & Stream" icon disappears in AMD Radeon software after disabling the CSM. How can I fix it?(6/30/2023)
R:Please follow the steps below to disable the iGPU.
This problem happens when using an AM4 motherboard and APU (CPU with integrated graphics), if you also have an AMD discrete graphics card and the Compatibility Support Module (CSM) is disabled in BIOS.
1. Go to BIOS\Advanced\AMD CBS\NBIO Common Options\GFX Configuration and set iGPU Configuration to "Disabled”.
2. Press hotkey "F10” to save settings and exit the BIOS setup.
3. Boot into the OS and check if the "Record & Stream" menu appears in the AMD Radeon software.
Procedures
●Intel Graphics Card Driver
Go to Intel's official website to download and install the latest official graphics card driver.
● Update the Graphics Card FW
Step 1. Download and unzip IGFXUpdate(v1.01.1).
Step 2. Run "IGFXUpdate”
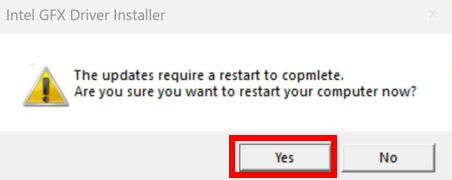
Step 3. Click Yes to restart the system.
Step 4. After the system has restarted, the FW update will begin.
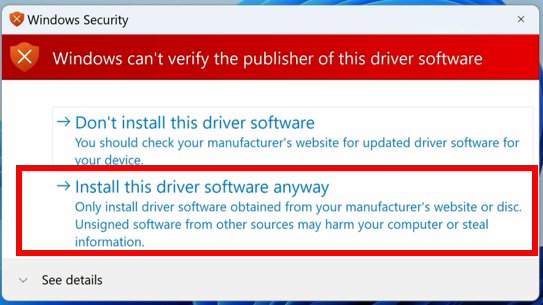
*If this message doesn't show up, please disable the "Secure Boot” in BIOS and try again.
Step 5. During the update, the following security message will pop up.
Step 6. Click on Install this driver software anyway.
Step 7. The update process will proceed. The screen might blink during the update.
Step 8. Please restart your computer when the following prompt is shown.
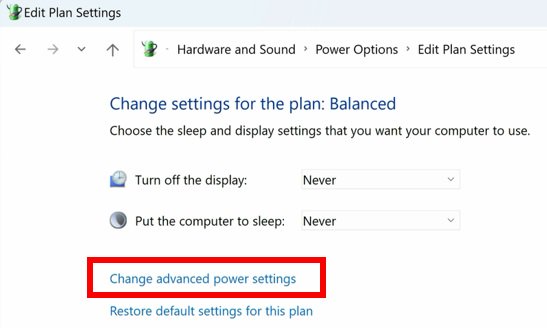
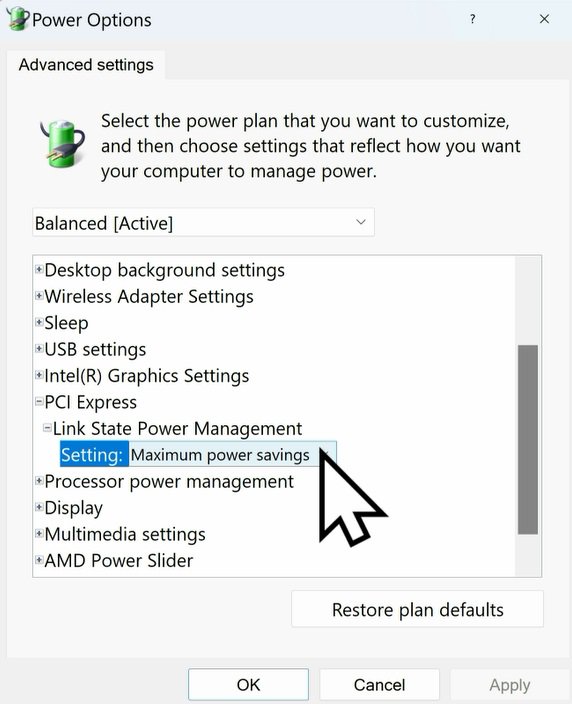
● Set PCIe Power to Maximum Power Savings
Step 1. Go to [Control Panel\Hardware and Sound\Power Options\Edit Plan Settings\Change] and click [Change advanced power settings].
Step 2. Scroll down to PCI Express\Link State Power Management and select Maximum power savings. Make sure to click apply to apply the changes.
● Re-install the Graphics Card Driver and Check the GPU Power
Step 1. Reinstall the latest graphics card driver.
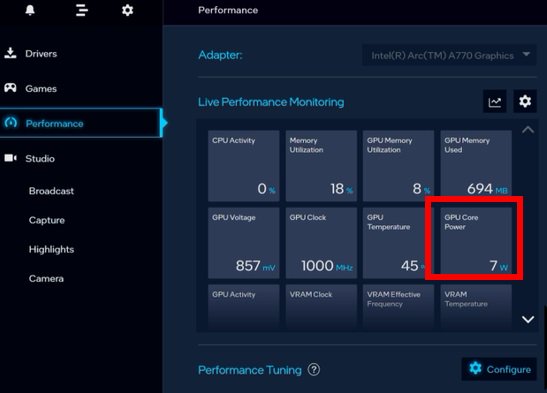
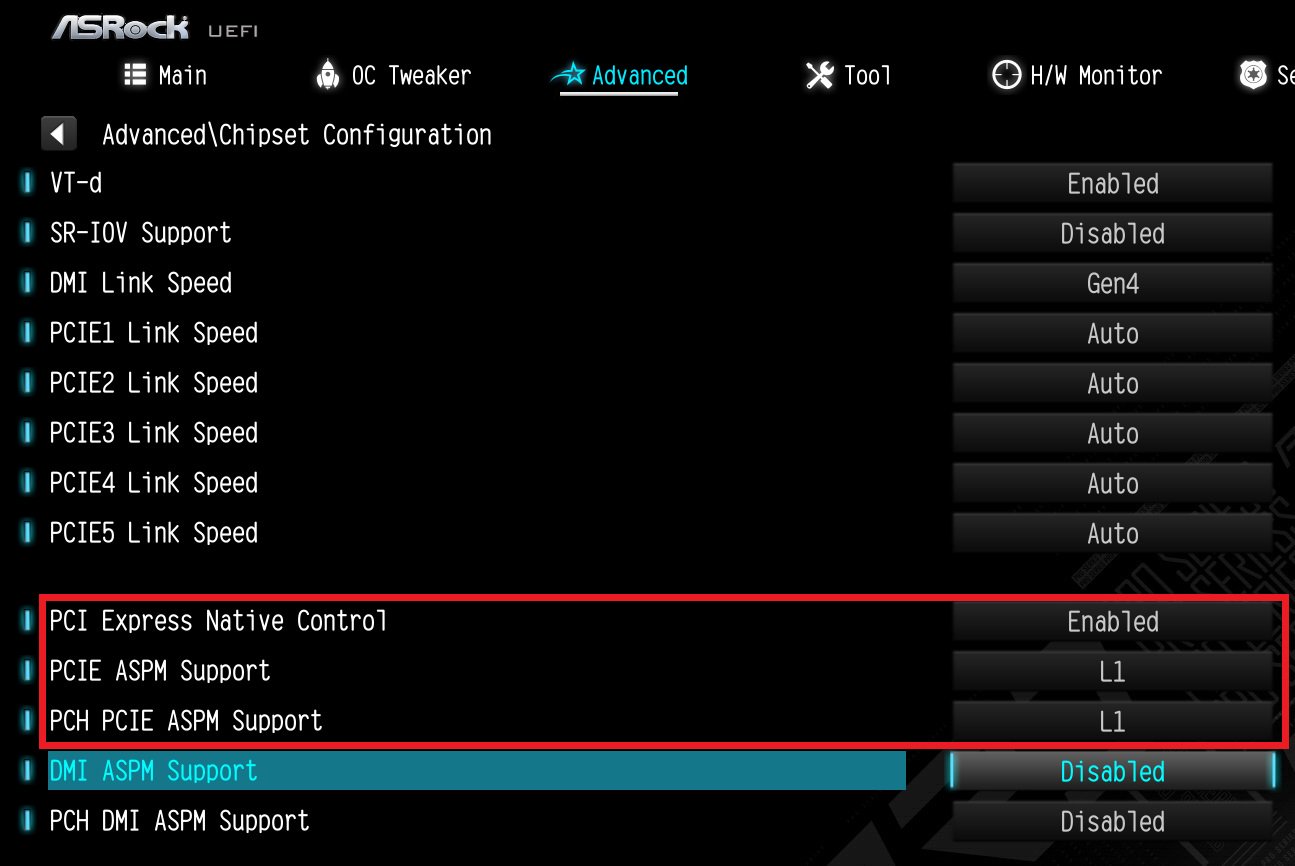
Step 2. To check the power consumption of the Intel ARC graphics card, please open Intel Arc Control and find the GPU Core Power.
BIOS Setting For ARC GPU Power Saving
● ASRock Intel Motherboard:
Required BIOS Version:
700-series motherboard: Please use the latest BIOS
600/500/400-series motherboard: Use the latest BIOS. It that does not work, please contact ASRock Technical Support. https://event.asrock.com/tsd.asp
BIOS Settings for all ASRock Intel models:
In BIOS > Advanced > Chipset Configuration, apply the following settings.
PCI Express Native Control: Enabled
PCIE ASPM Support: L1
PCH PCIE ASPM Support: L1
● ASRock AMD Motherboard:
Required BIOS Version:
Platform
600 series
500 series
400 series
300 series
BIOS version
Any version
Not supported
BIOS Setting for all AMD models:
There is no need to change BIOS settings.
● Other brands motherboard:
Please contact your motherboard vendor for further assistance.
Power Consumption After Updating FW and Changing the BIOS Settings
P (522):
Why can I not find a CSM option under the Boot tab in BIOS?(10/13/2022)
R:When you set Fast Boot to Ultra Fast under the boot tab in BIOS, CSM (Compatibility Support Module) will be disabled and hidden automatically. This is because Ultra Fast Boot is supported only when booting in full UEFI mode, so without enabling CSM.
P (513):
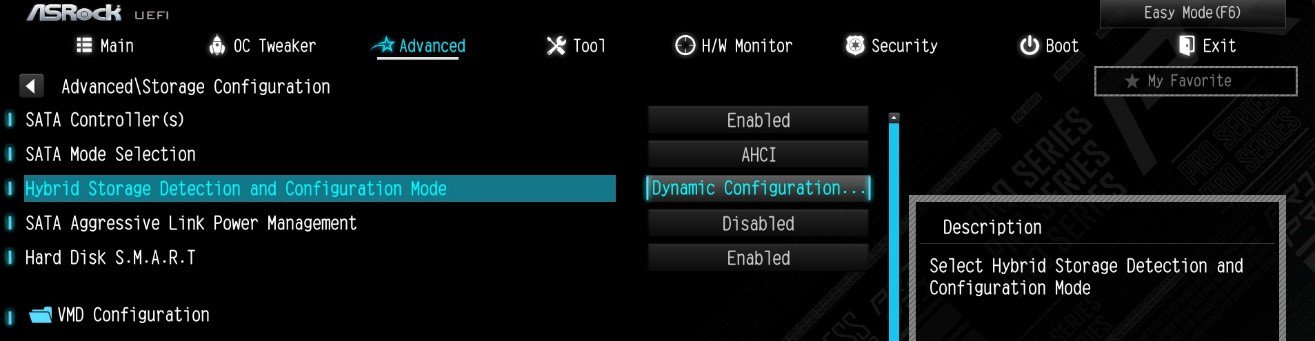
How do I enable the Optane H10/H20 hybrid function on the Intel Z690/B660/H670 platform?(3/1/2022)
R:If you want to make a fresh Windows installation with Optane H10/H20 hybrid function, please refer to the following steps:
Step 1.
Make sure that H10/H20 Optane memory is installed in an M.2 socket which supports Optane. You can find the info by checking the storage section of the motherboard specifications page on ASRock's website.
Step 2.
Enable the Hybrid Storage Detection and Configuration Mode in BIOS and press "F10” to save the settings.
Advanced\Storage Configuration\Hybrid Storage Detection and Configuration Mode
Step 3.
Go to Advanced\Storage Configuration\VMD Configuration and set Enable VMD controller to [Enabled].
Then set Enable VMD Global Mapping to [Enabled]. Press F10 to save the changes and exit setup.
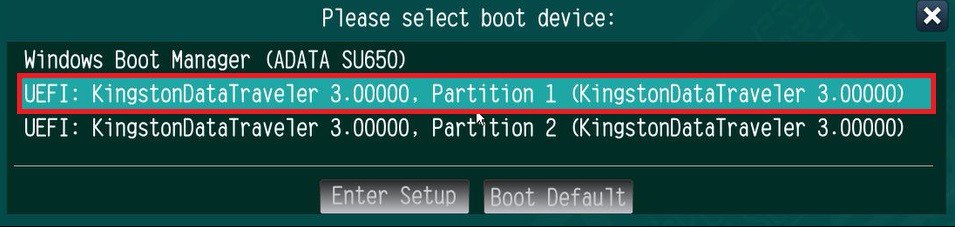
Installing Windows® on a VMD platform
After the BIOS setup, please follow the steps below.
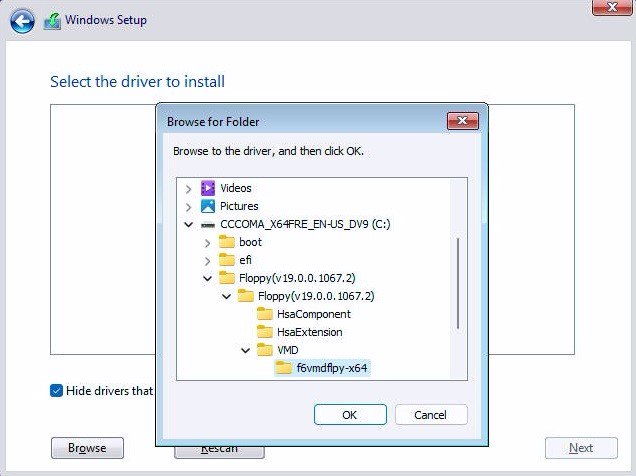
Step 1.
Please download the "SATA Floppy Image” driver from ASRock's website (https://www.asrock.com/index.asp). Unzip the file to a USB flash drive or copy the files from ASRock's motherboard support CD.
Step 2.
Press at system POST to launch the boot menu and choose the item "UEFI:
installation media>” to install Windows® 10 64-bit / 11 64-bit OS
” to install Windows® 10 64-bit / 11 64-bit OS">
Step 3.
If during the Windows installation process the target drive is not available, please click .
Step 4.
Click and locate the driver on your USB flash drive.
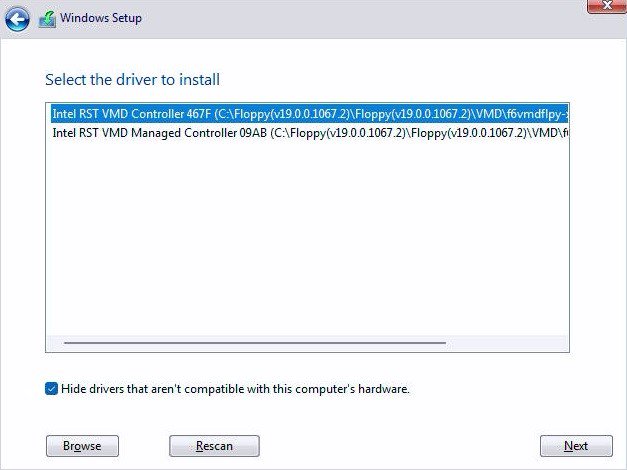
Step 5.
Select "Intel RST VMD Controller” and then click .
.">
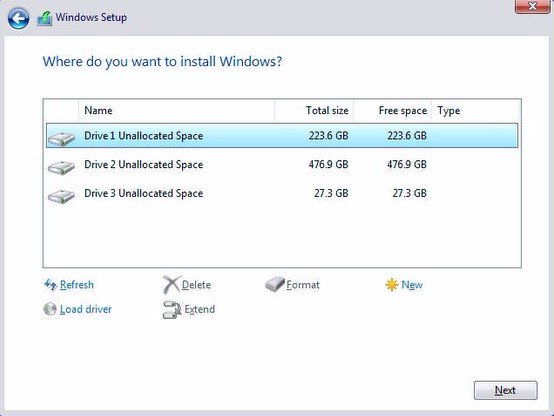
Step 6.
Select unallocated space and then click .
Step 7.
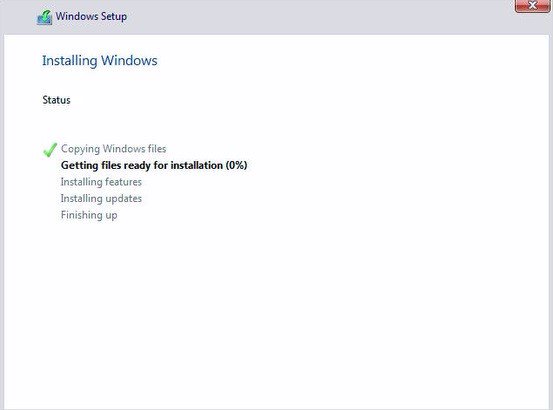
Please follow Windows' installation instructions to finish the process.
Step 8.
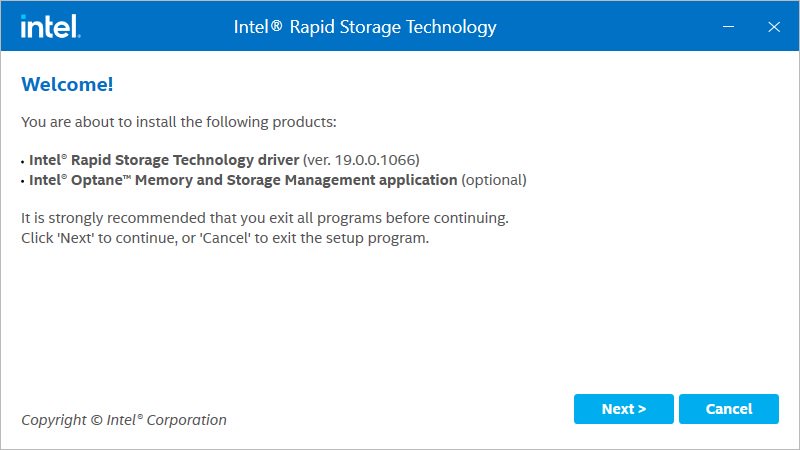
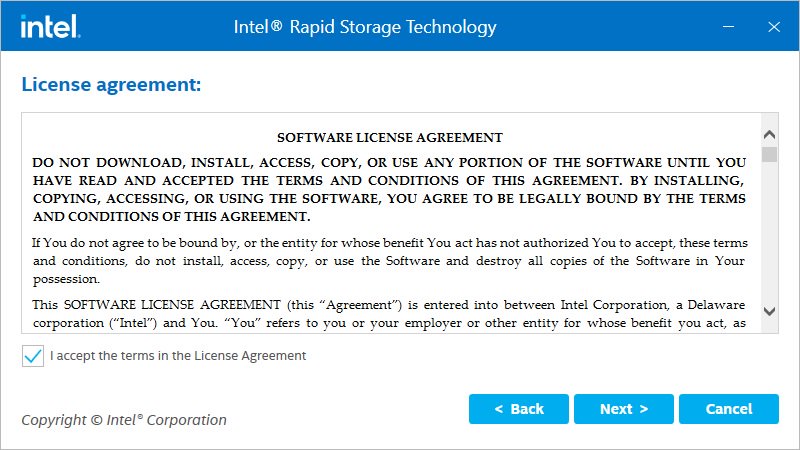
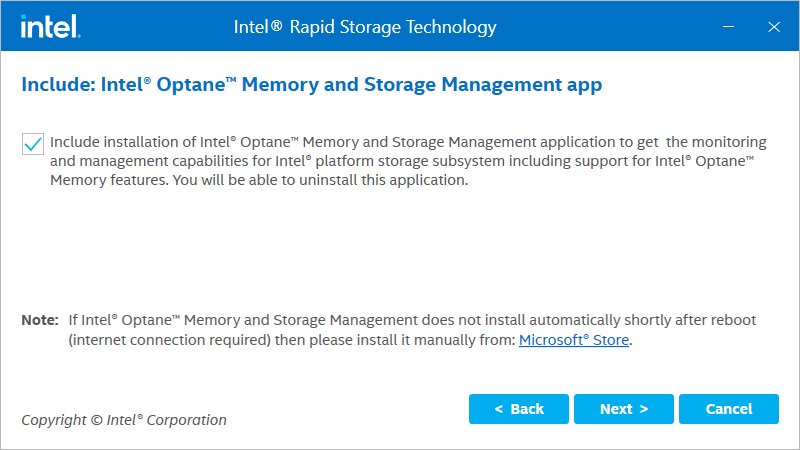
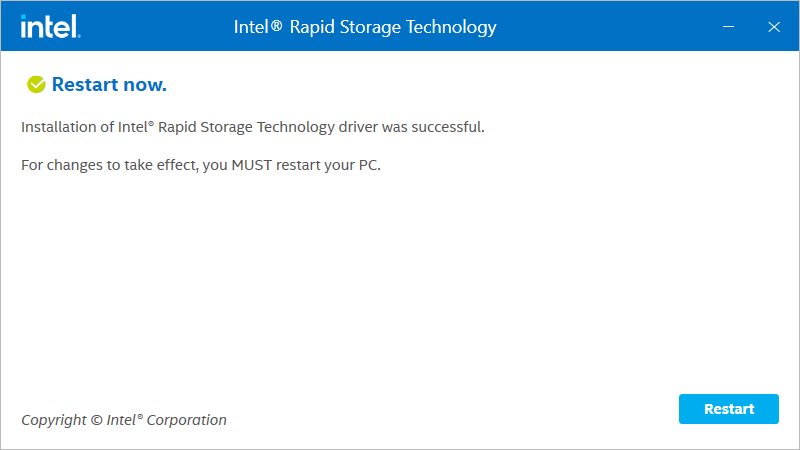
After the Windows installation is finished, please install the "Intel Rapid Storage Technology driver and utility” from ASRock's website. https://www.asrock.com/index.asp
Step 9.
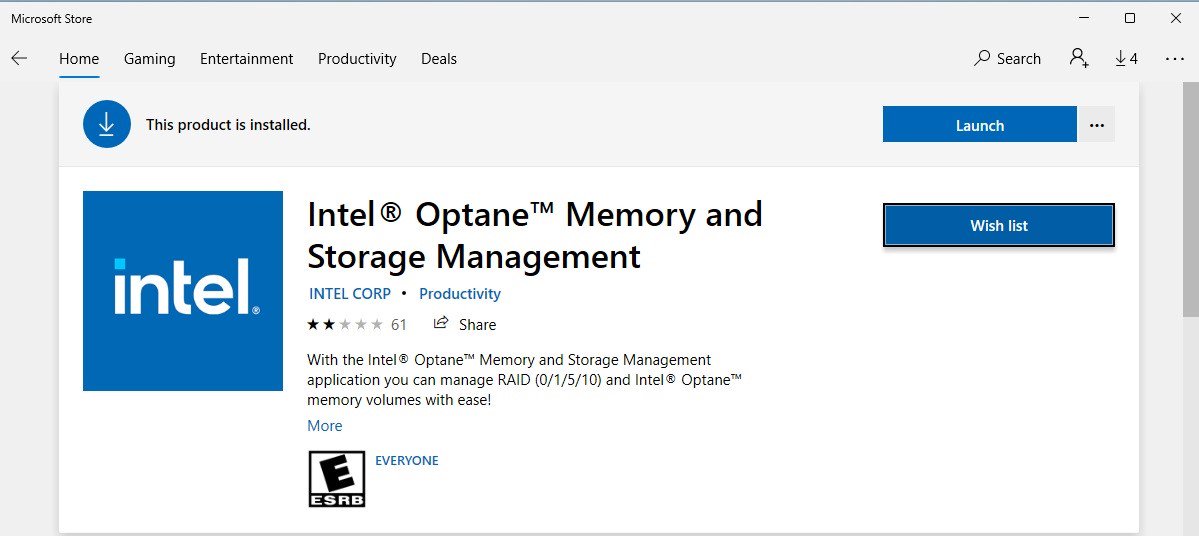
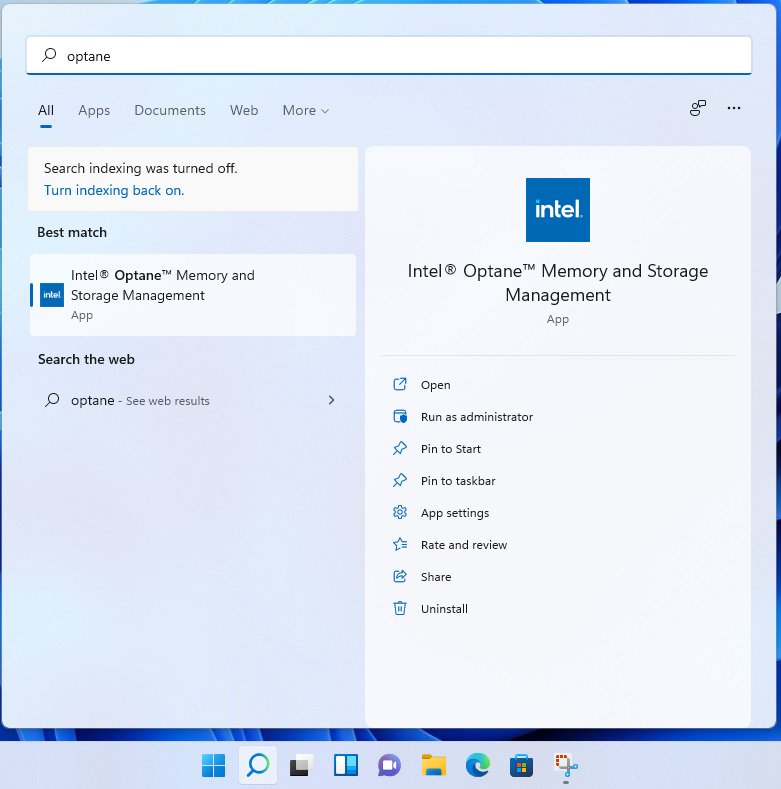
Launch the Intel® Optane™ Memory and Storage Management tool from the Microsoft store.
Step 10.
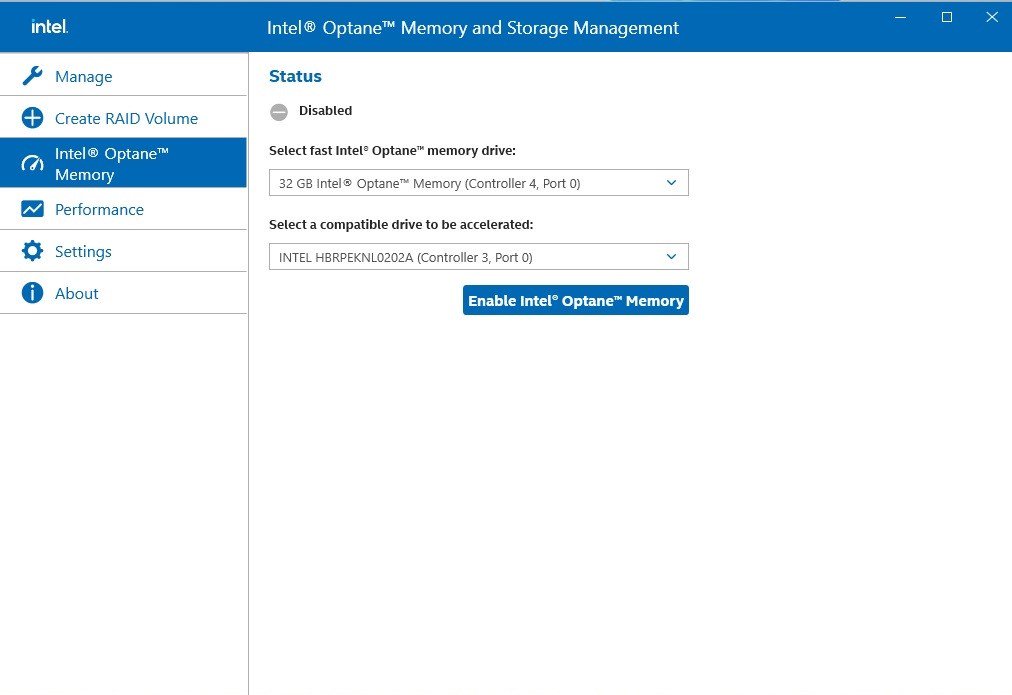
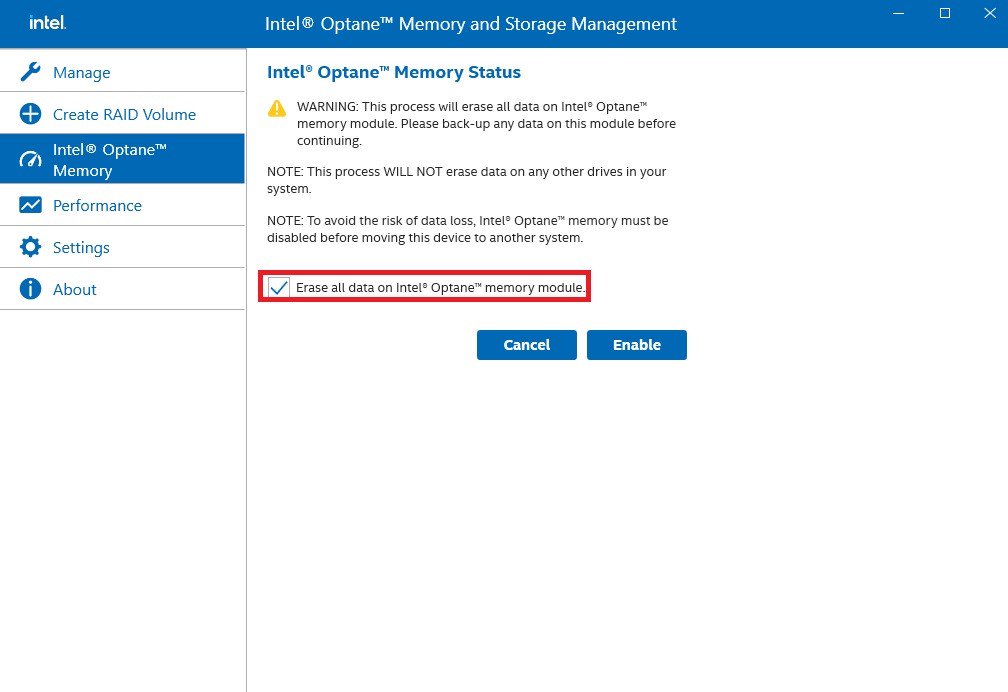
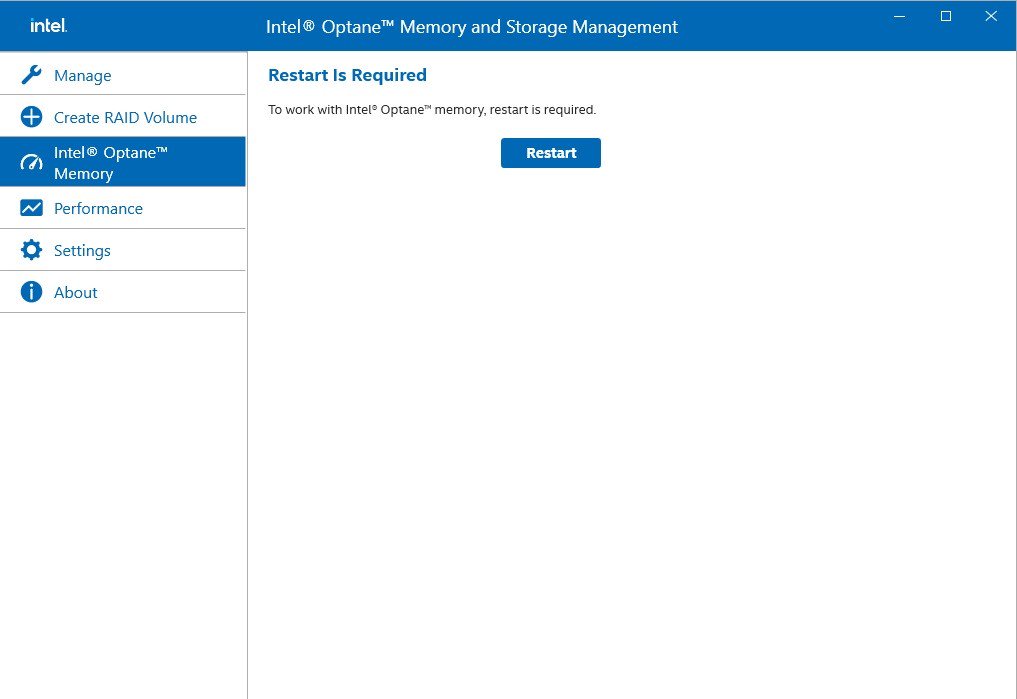
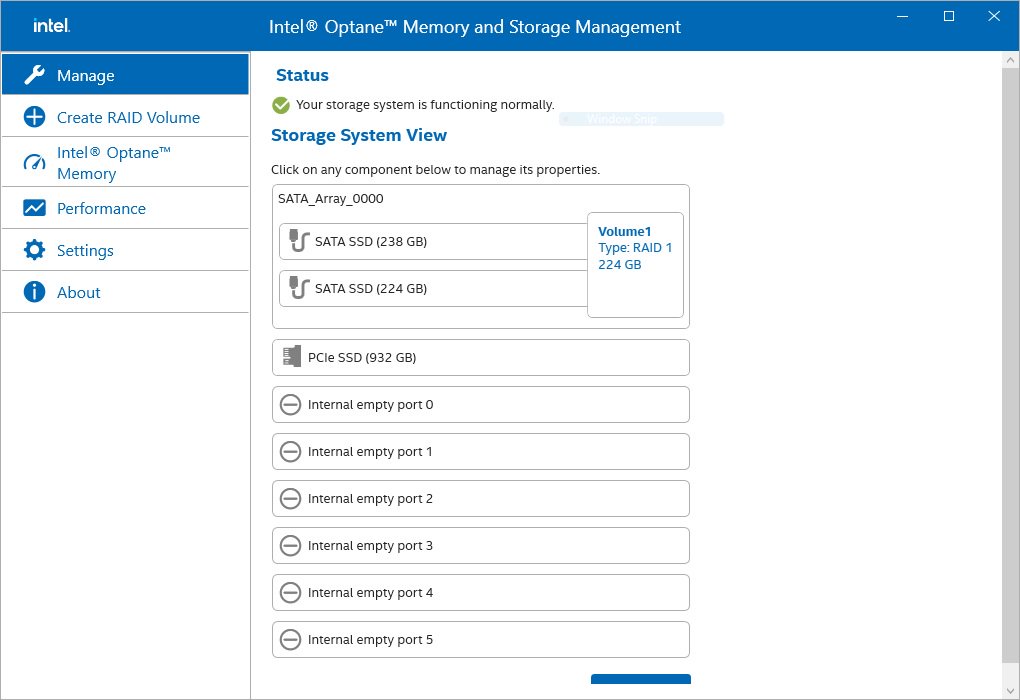
Select the drive which you want to accelerate. Enable Intel® Optane™ Memory. (One restart is required)
Step 11.
Erase all data on the Intel® Optane™ memory module and click
Step 12.
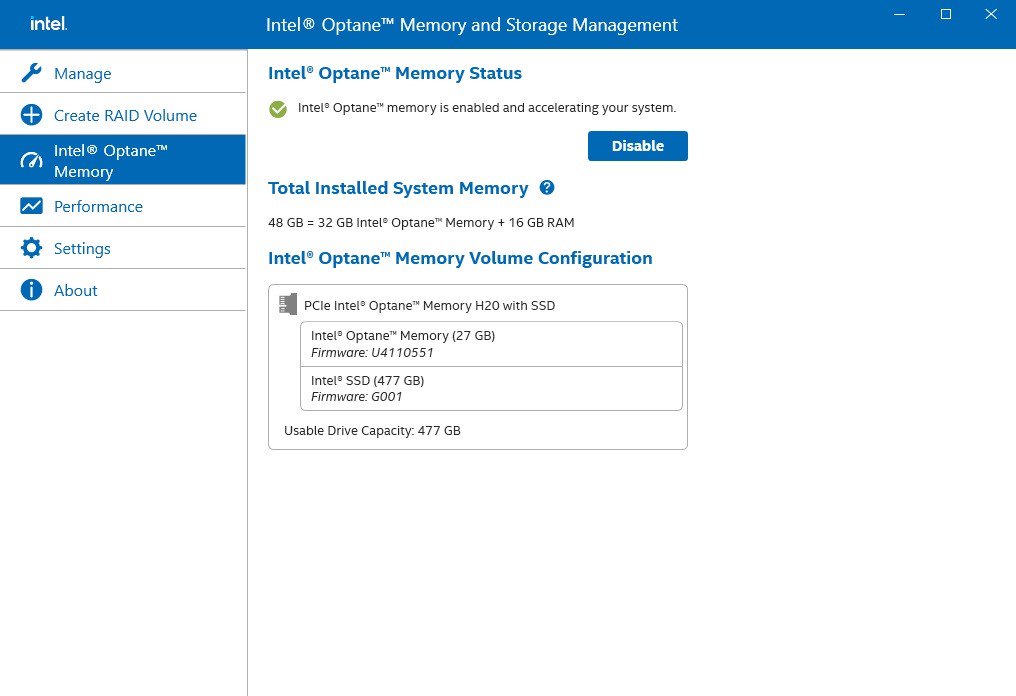
After the system has restarted, the Optane Management tool will show that Optane memory is enabled.
P (510):
How to check the RAID configuration via the Intel RST application under Windows 11?(12/15/2021)
R:Please refer to the following steps to check the RAID configuration.
Step 1: Obtain the Intel(R) RST driver installation package and run the executable (SetupRST.exe).
*RST driver can be obtained via the download section of the product page on the ASRock website.
*Default settings and name of the driver may vary and is subject to change without notice.
Step 2: Install using the default setting and reboot the computer.
Step 3: From Windows desktop, find and launch the Intel® Optane(TM) Memory and Storage Management application.
P (509):
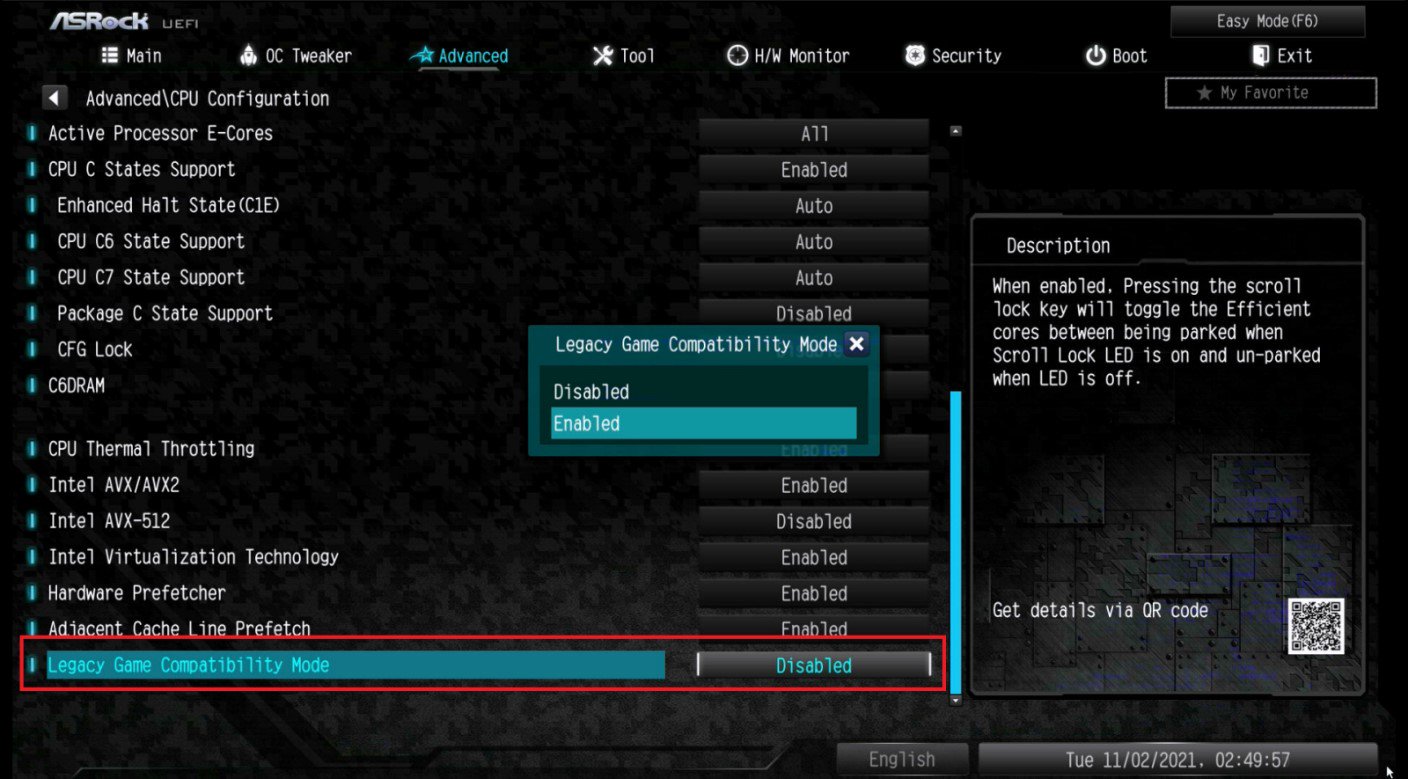
Why can my game not start with my Intel 600 series motherboard?(11/2/2021)
R:Some games use DRM (Digital Rights Management) protection. Please check for available updates for your game, where the DRM solution supports Alder Lake CPUs.
If the game development is discontinued and there is no update available for the DRM, please follow below steps to enable the "Legacy Game Compatibility Mode”.
Step 1.
Press [Del] or [F2] during the POST stage to boot into BIOS.
Step 2.
Press [F6] to enter "Advanced” mode and go to Advanced\CPU Configuration
Step 3.
Enable the "Legacy Game Compatibility Mode” in BIOS.
(The option is at the bottom of the CPU Configuration page)
Step 4.
Press [F10] to save the setting and restart the system.
Step 5.
The [Scroll Lock] key on your keyboard is now a hotkey. It can be used to enable/disable the Intel E-core parking feature. Before starting a game outdated DRM protection, please press [Scroll Lock] within the OS to enable Intel E-core parking.
P (504):
How do I check if the system can support Secure Boot?(10/1/2021)
R:In order to use Secure Boot, the drive with the operating system must use GPT partition style. Please refer to below steps to check the partition style.
Step 1: Right-click the Windows button on the desktop and select "Disk Management”.
Step 2: Right-click the disk where Windows is installed and select the "Properties”.
Step 3: Click the "Volumes” tab and check if the partition style is "GPT”.
Step 4: If the partition style is "MBR”, please make a backup of important data on the system and refer to steps 5 - 7 to convert the partition style to GPT.
Step 5: Type "CMD" in the Windows search bar, right-click on "Command Prompt” and choose to run as administrator.
Step 6: Type the command "mbr2gpt /convert /allowFullOS” to convert the partition style and press [Enter].
Step 7: Restart the system and the BIOS Mode/Partition style will be converted to UEFI/GPT.
P (498):
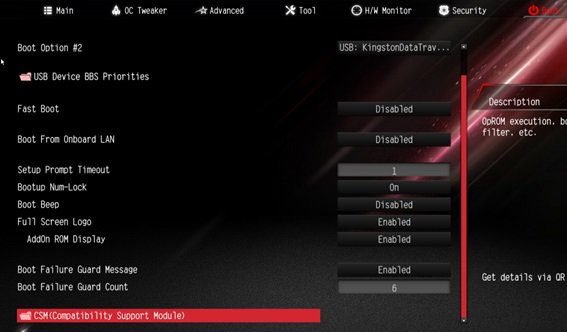
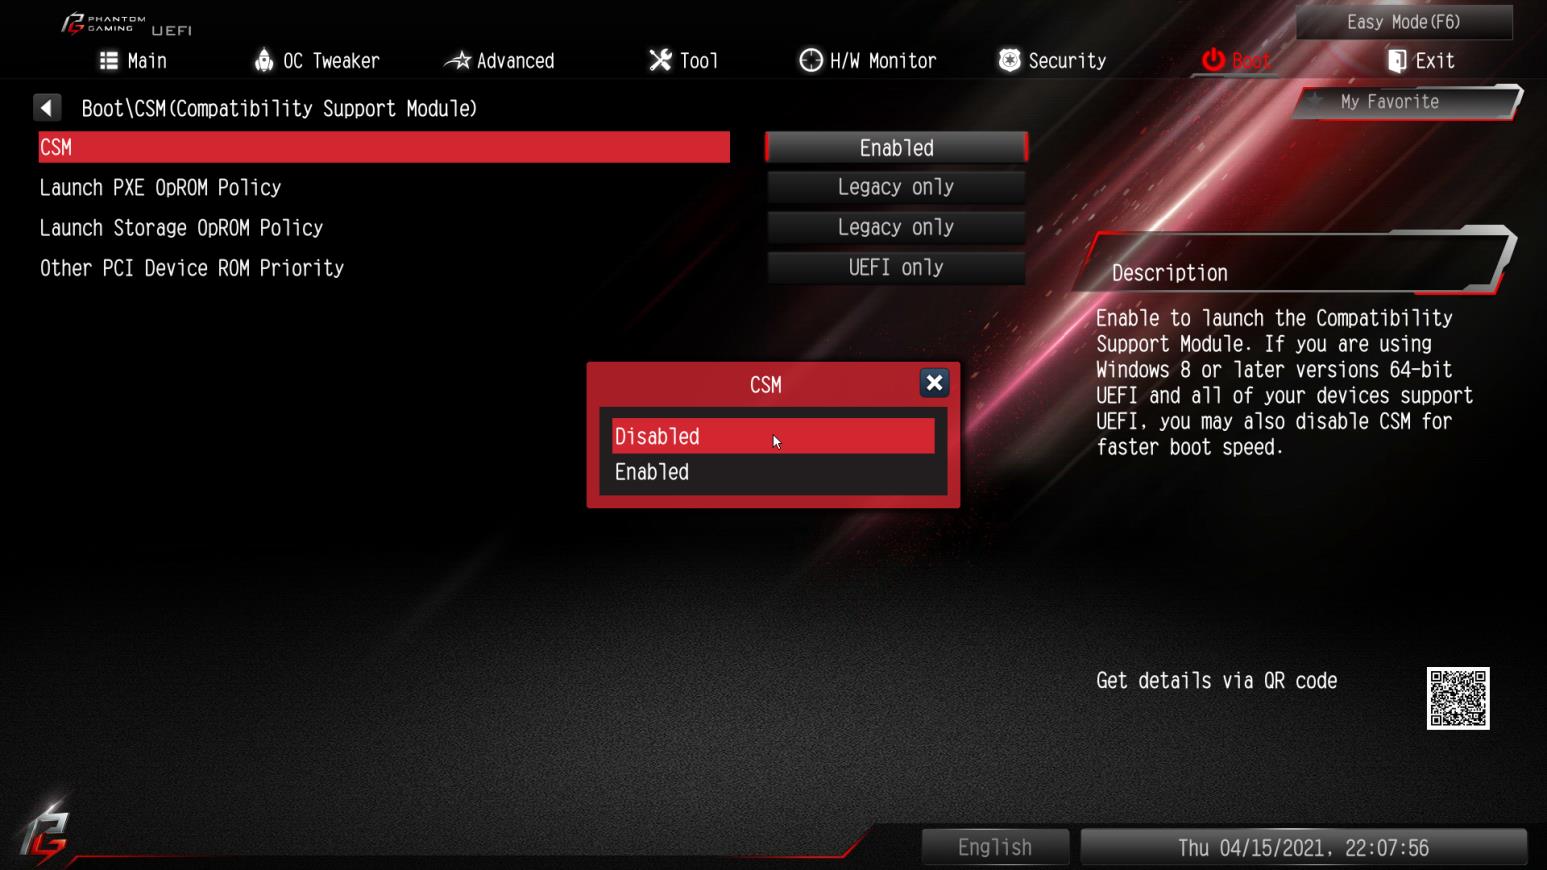
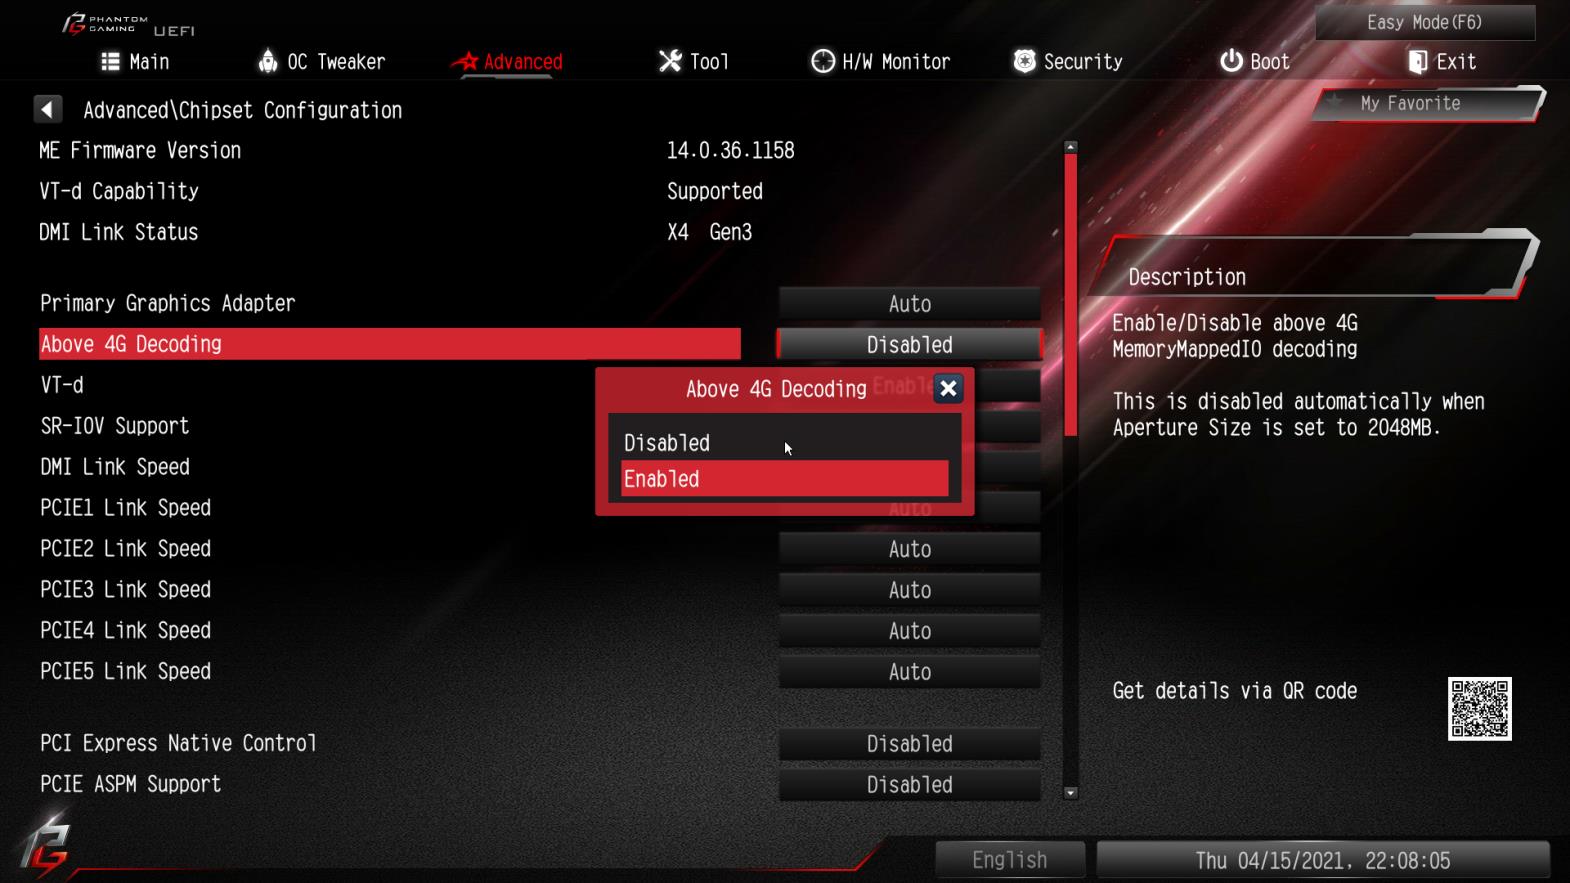
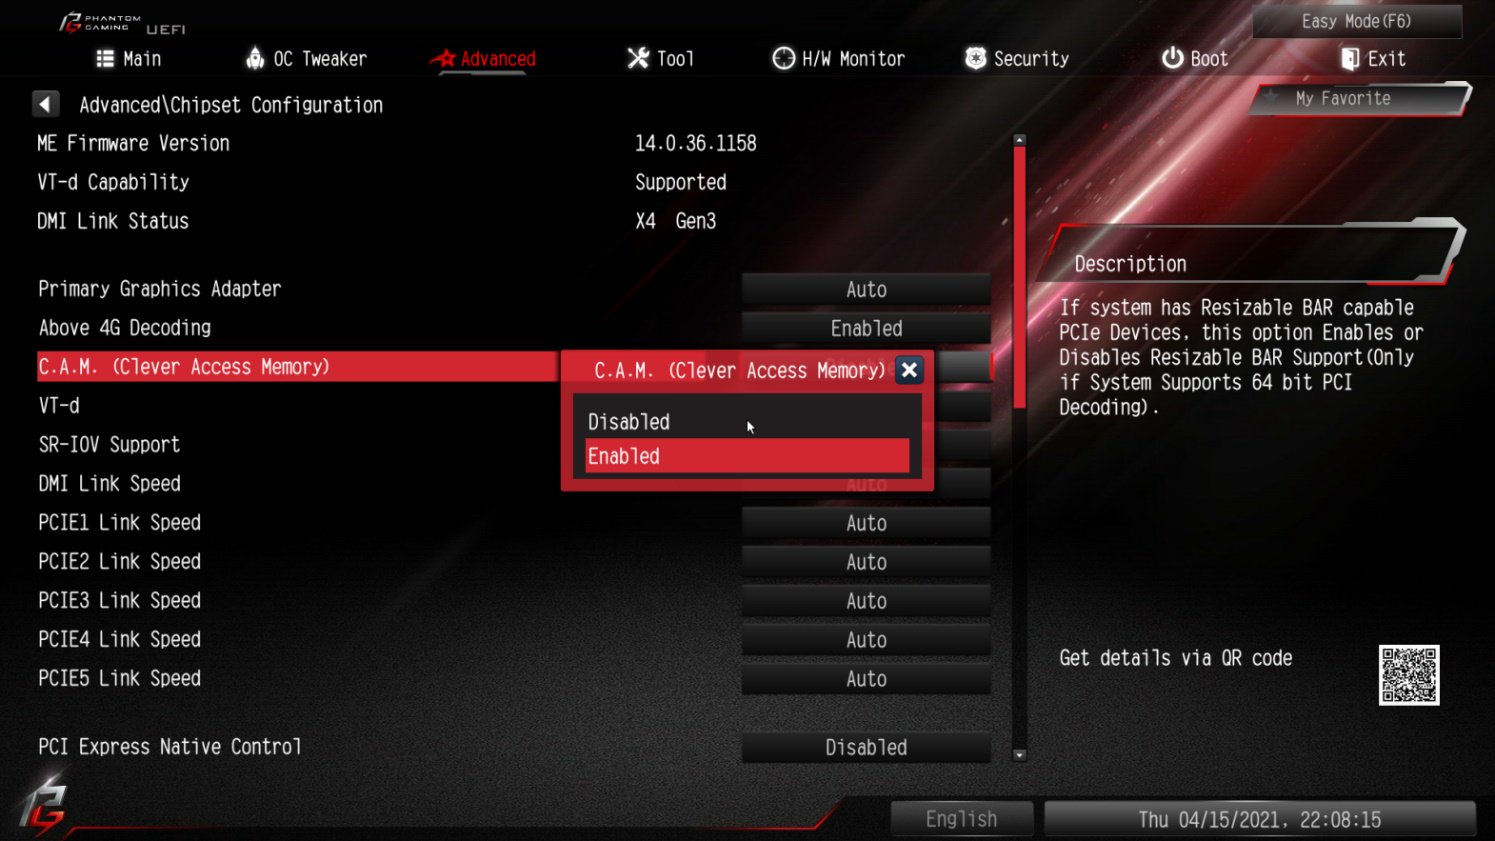
How to enable C.A.M in the BIOS? Also known as Resizable BAR.(4/1/2021)
R:Step 1: On the ASRock website please find the BIOS download page for you motherboard.
Check the descriptions to see if C.A.M. is supported already.
Intel 500-series models support C.A.M. since the first version.
Step 2: While the system is starting press "DEL” to boot into BIOS setup and go to BIOS\Boot\CSM.
If you cannot find the CSM menu then please set "Fast Boot” to "Disabled”.
Step 3: In BIOS\Boot\CSM please set "CSM” to "Disabled”.
Step 4: Go to BIOS\Advanced\Chipset Configuration and set "Above 4G Decoding” to "Enabled”.
Step 5: After step 4, the option "C.A.M” will appear below the option "Above 4G Decoding”.
Please set it to "Enabled”.
Step 6: Press "F10” to save the settings and restart the system.
P (489):
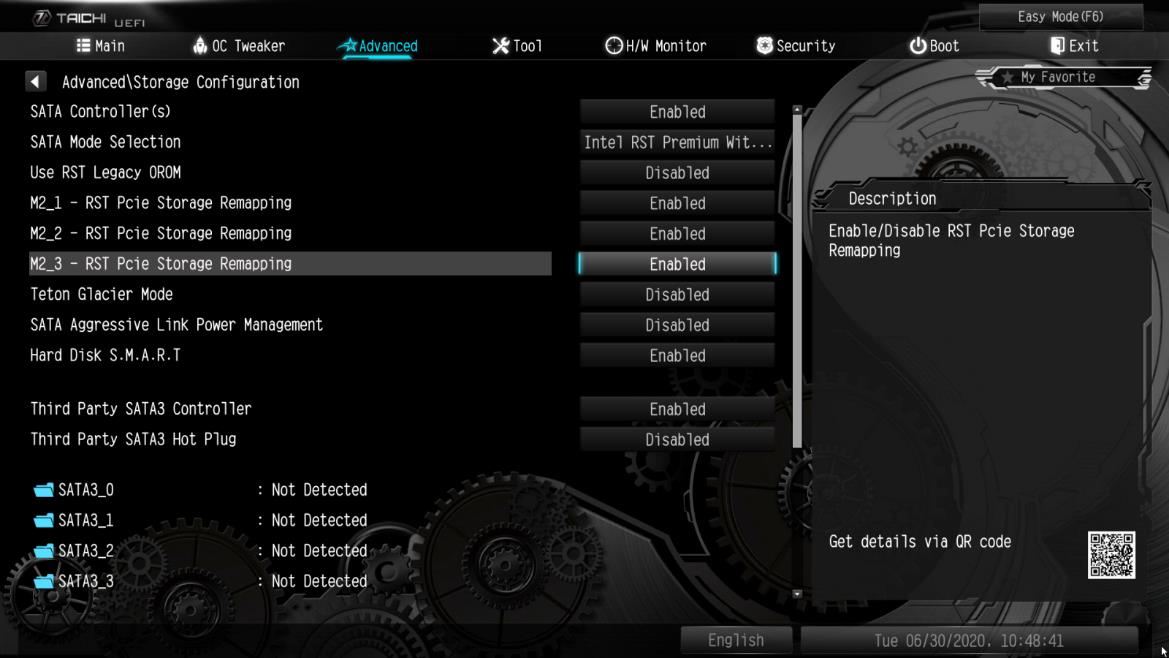
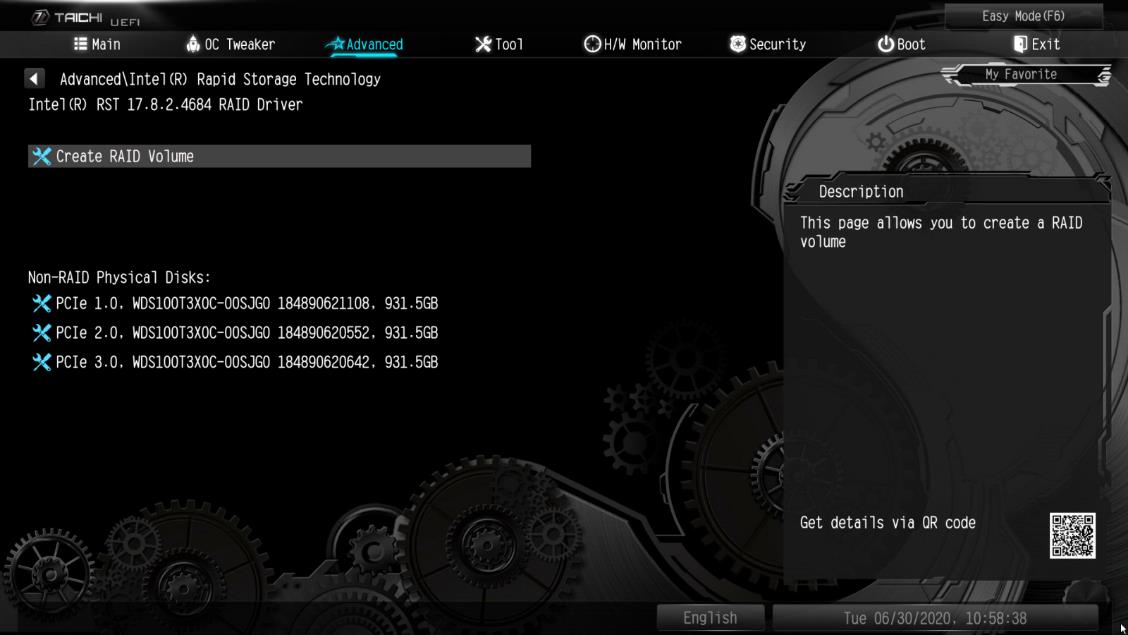
¿Cómo puedo reasignar la ranura M2_3 y otras ranuras M.2 para configurar un PCIE SSD RAID?(6/1/2020)
R:Por favor asegúrese de utilizar SSD PCIE idénticos que sean del mismo tipo y capacidad.
Siga los siguientes pasos para ajustar la configuración de la BIOS para configurar el RAID PCIe.
PASO 1. Entre en la utilidad de configuración UEFI presionando la tecla de acceso rápido o durante la pantalla arranque.
PASO 2. Vaya a Advanced -> Storage Configuration y configure SATA Mode Selection a [RAID Mode].
PASO 3. Vaya a Boot -> CSM y configure Launch Storage OpROM policy a [UEFI only].
PASO 4. Ajuste el slot M.2 - RST PCie Storage Remapping en las que instalo PCIE SSDs a [Enabled]. Presione para guardar la configuración y salir.
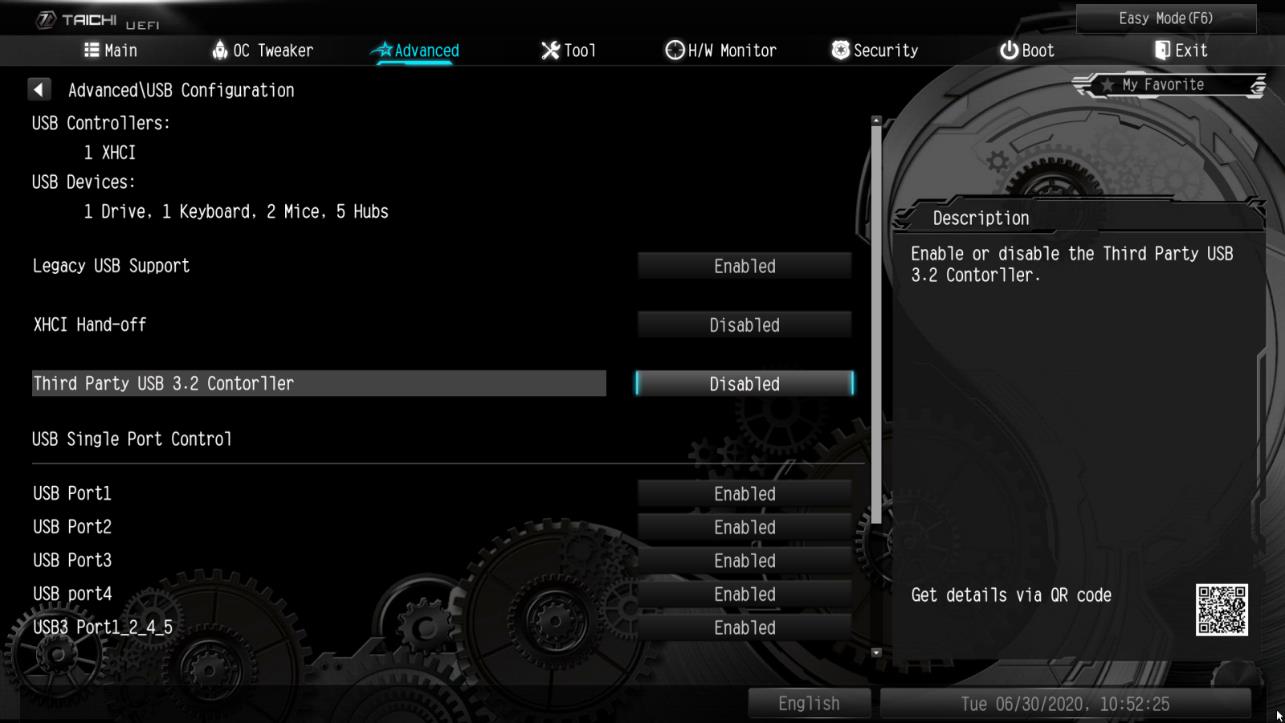
PASO 5. Vaya a Advanced -> USB Configuration y configure Third Party USB 3.2 Controller a [Disabled].
Presione para guardar los cambios y salir de la configuración.
Precaución: Después de deshabilitar el controlador USB3.2 de terceros, se apagará el Puerto Tipo-C.
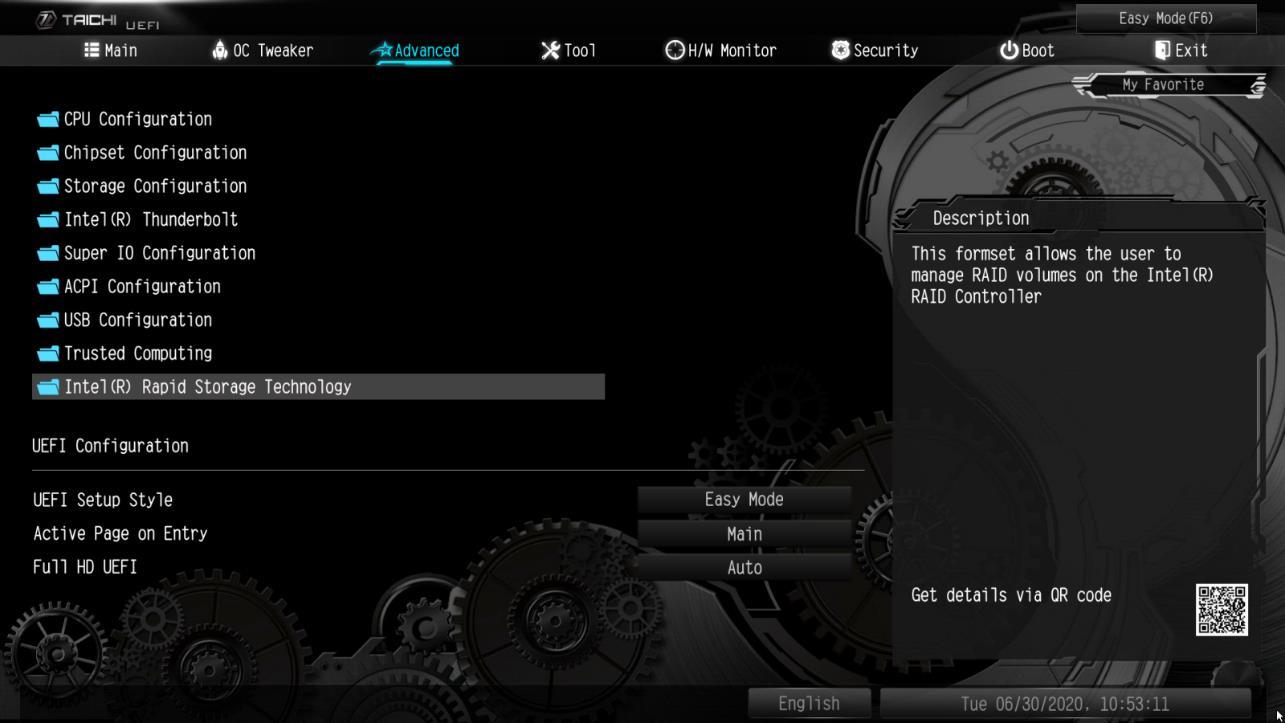
PASO 6. Entre en Intel(R) Rapid Storage Technology en la página Advanced.
PASO 7. Seleccione la opción Create RAID Volume y presione .
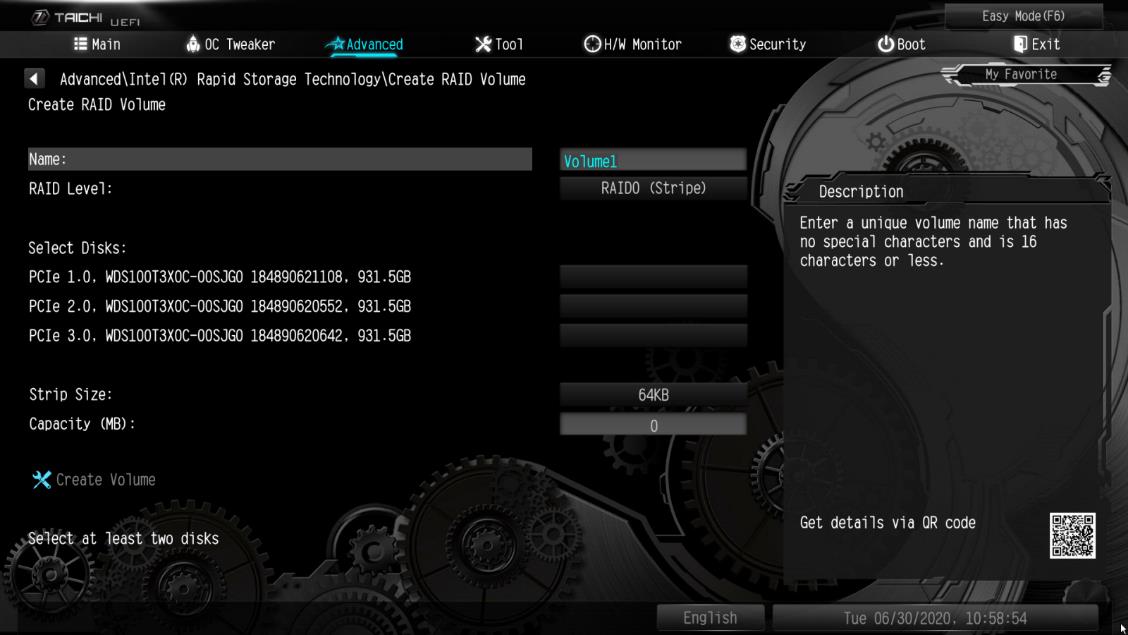
PASO 8. Introduzca el nombre de volume y presione , o simplemente presione para aceptar el nombre por defecto
PASO 9. Seleccione el nivel RAID y presiones .
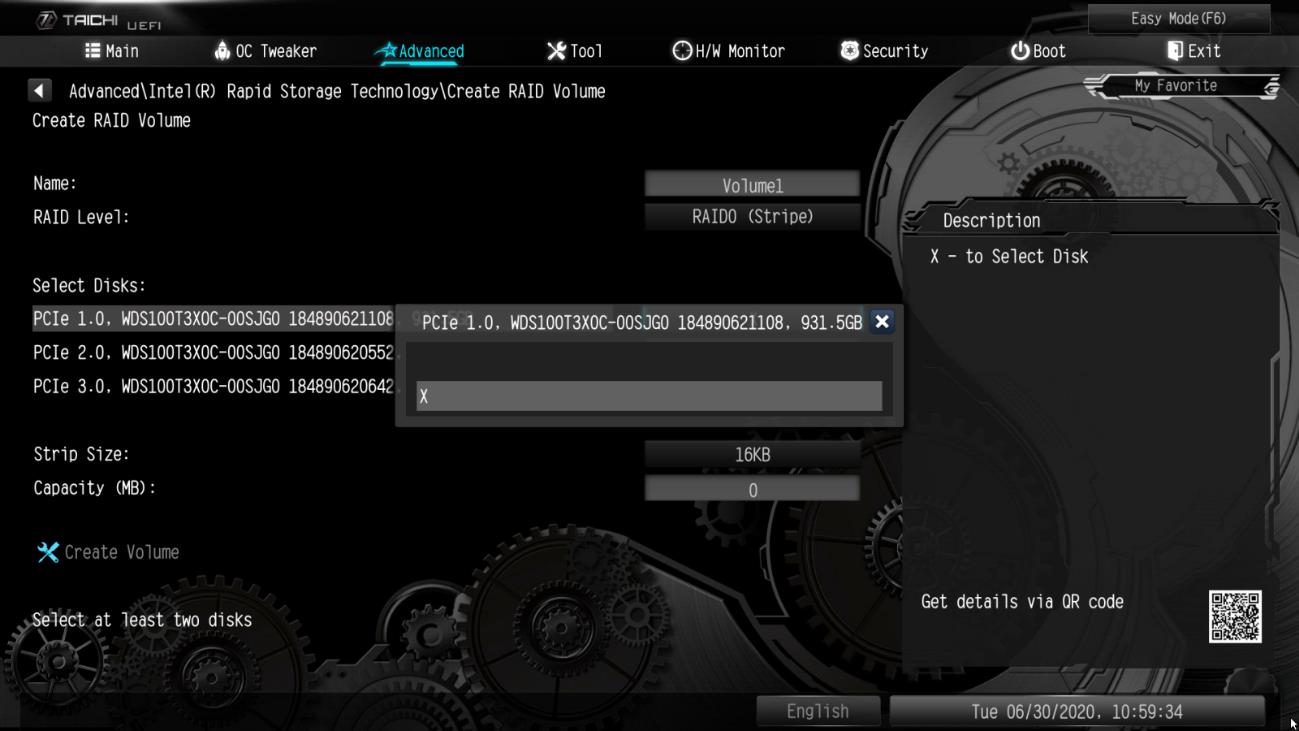
PASO 10. Seleccione los discos duros de destino que desea construir en la matriz RAID y presione .
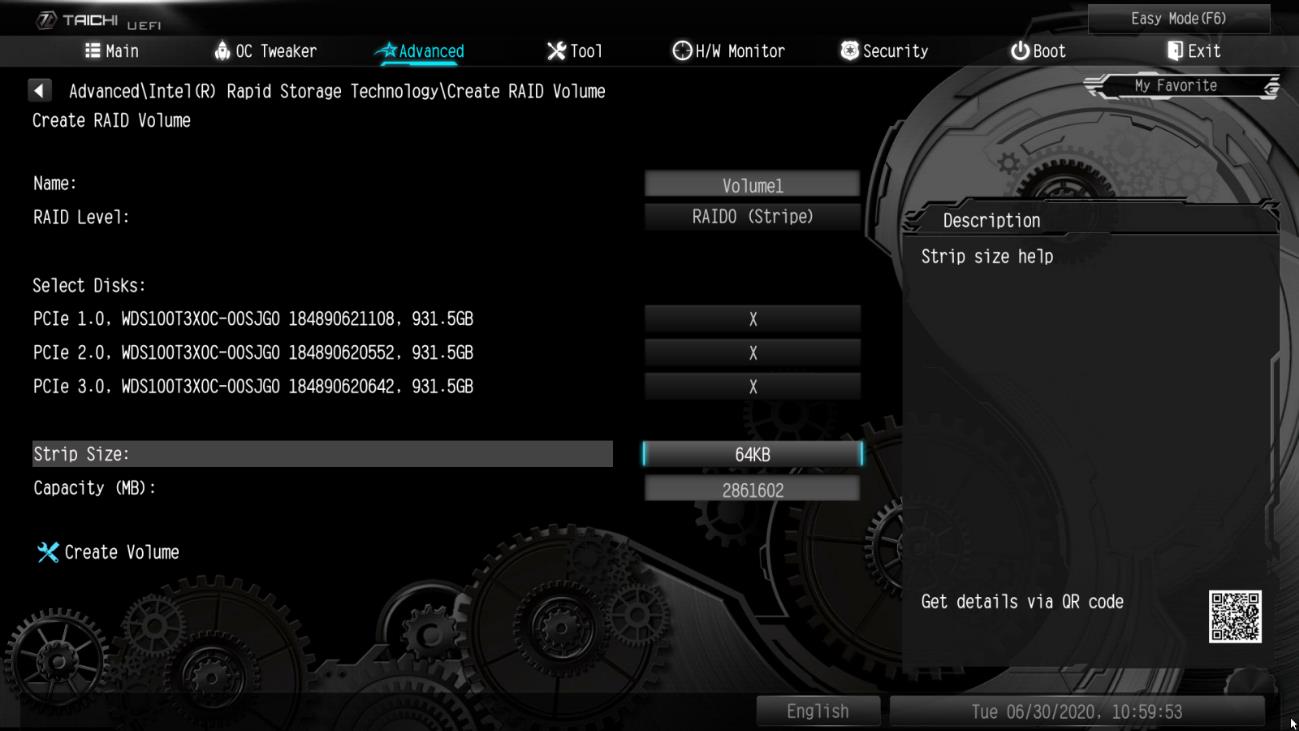
PASO 11. Seleccione un tamaño de banda para la matriz RAID y presione .
PASO 12. Seleccione Create Volume y presione para comenzar a crear la matriz RAID.
P (488):
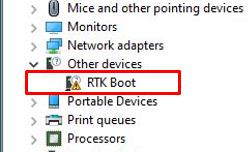
Tengo una placa base TRX40. Bajo el administrador de dispositivos, se muestra un dispositivo de inicio RTK con un signo de exclamación y no hay salida de sonido desde el puerto de audio. ¿Que puedo hacer para arreglarlo?(4/1/2020)
R:Si se muestra un dispositivo RTK bajo el administrador de dispositivos y no se puede usar el puerto de audio, siga los siguientes pasos para quitar el dispositivo RTK y permitir que el audio funcione correctamente.
Paso 3. Haga clic con el botón derecho en el icono de inicio en el escritorio y seleccione el administrador de dispositivos para ver si se muestra RTK Boot en su sistema
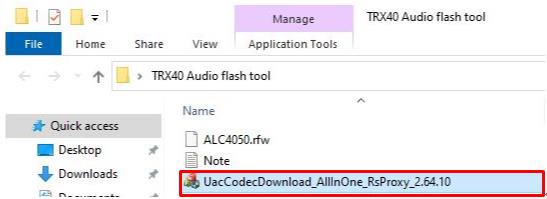
Paso 5. Haga doble clic en UacCodecDownload_AllInOne_RsProxy_2.64.10
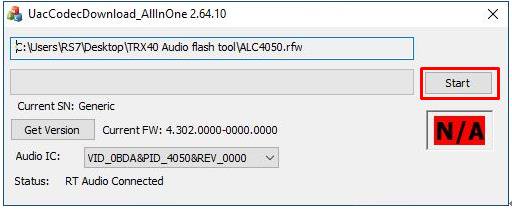
Paso 6. Presione el botón de Inicio para comenzar a flashear el firmware de audio.
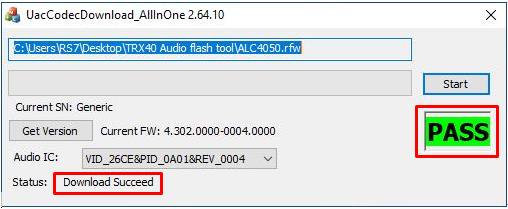
Paso 7. Cuando se completa el proceso de flasheo, la herramienta mostrará Pass, lo que significa que el firmware de audio se ha actualizado y no debería aparecer un dispositivo de arranque RTK bajo del administrador de dispositivos
P (483):
How to set up Teaming with Intel Ethernet Adapter under Windows10 1809 or later version?(10/1/2019)
R:How to set up Teaming with Intel Ethernet Adapter under Windows10 1809 or later version?
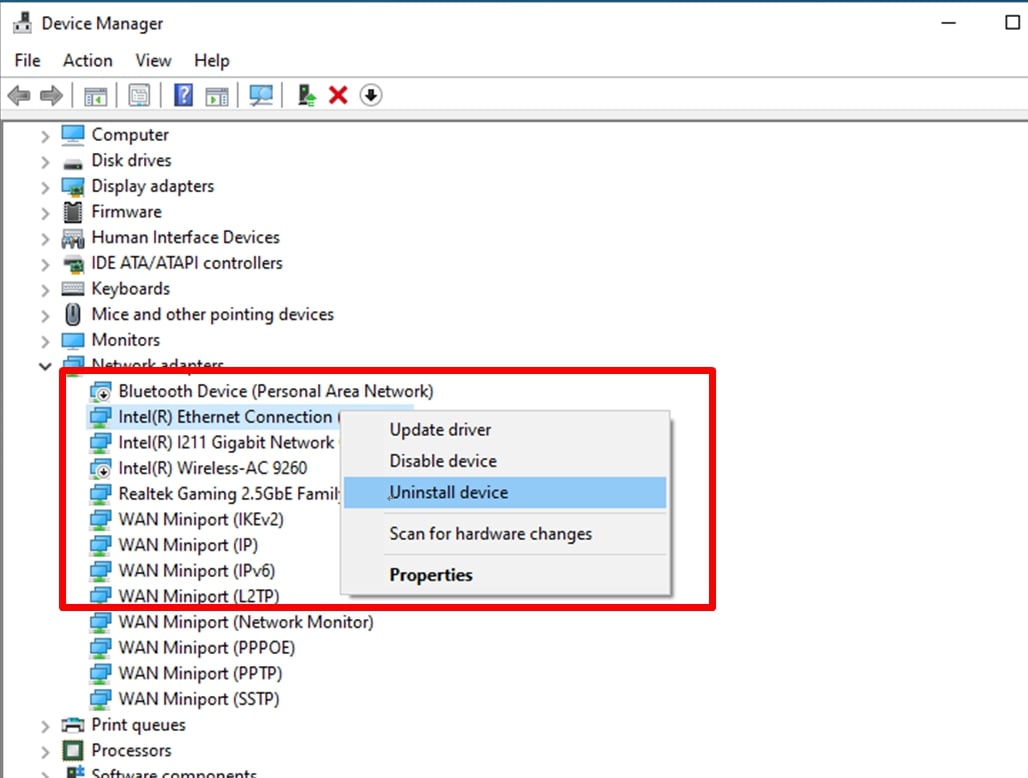
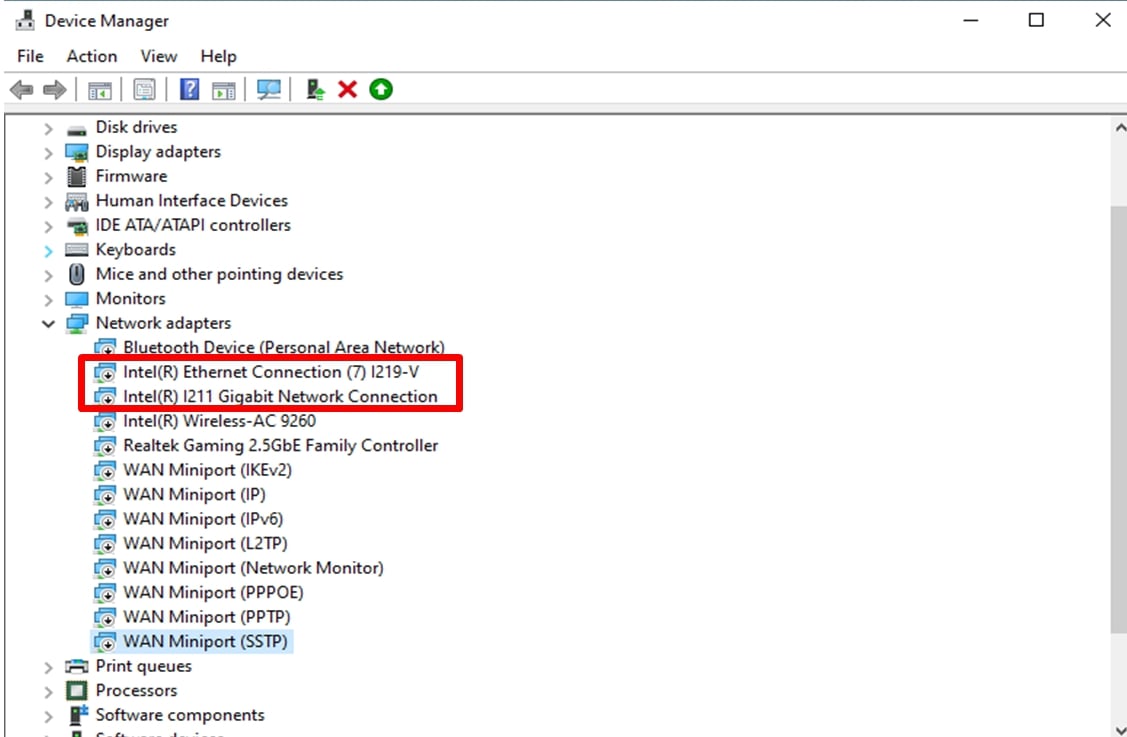
Step1: Access "Device Manager” by searching "Device Manager” at search bar.
Expand "Network Adapters” and right click the Ethernet device to uninstall it.
After uninstalling the Ethernet device, please cold boot the system (power off and then back on completely).
Step2: Download the latest driver (later than v23.5) from Intel or ASRock official website for your Intel® Ethernet Adapter.
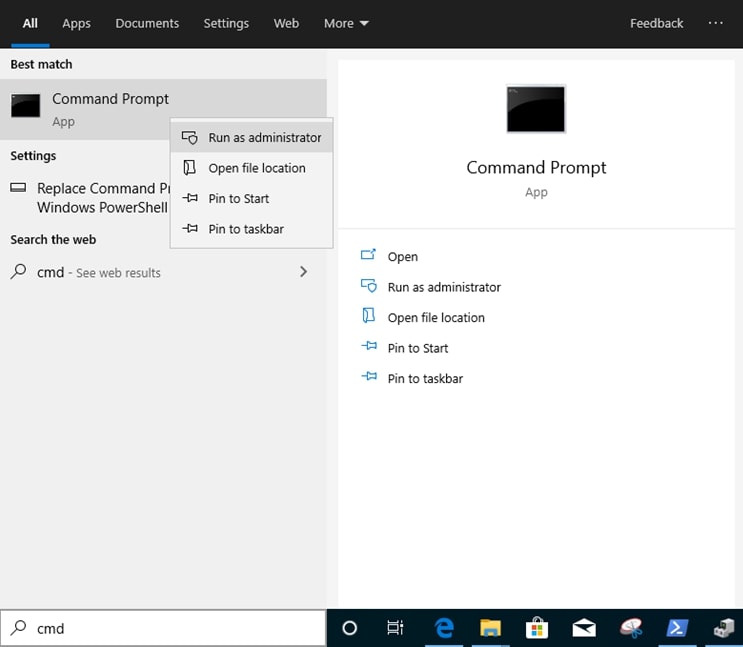
Step3: Search "CMD” at search bar and run Command Prompt as administrator.
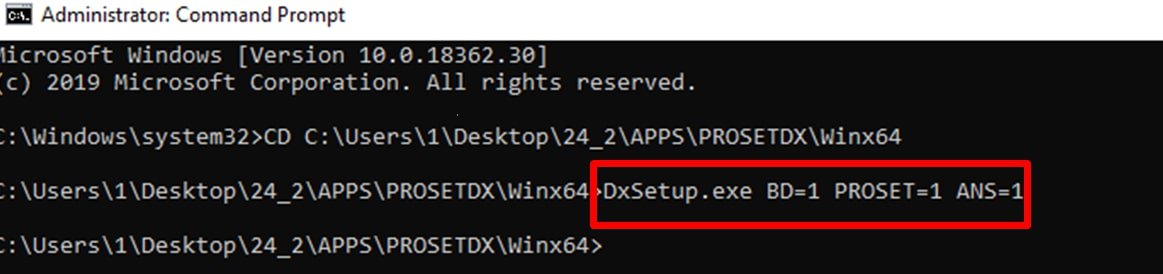
Unzip the driver package and go to APPS > PROSETDX > Winx64. Copy the root.
Within the Command prompt, please change the root to APPS > PROSETDX > Winx64 folder by following command:
CD C:\Users\1\Desktop\24_2\APPS\PROSETDX\Winx64.
Step4: Install the driver by entering command:
DxSetup.exe BD=1 PROSET=1 ANS=1
After the driver installation, please reboot the system.
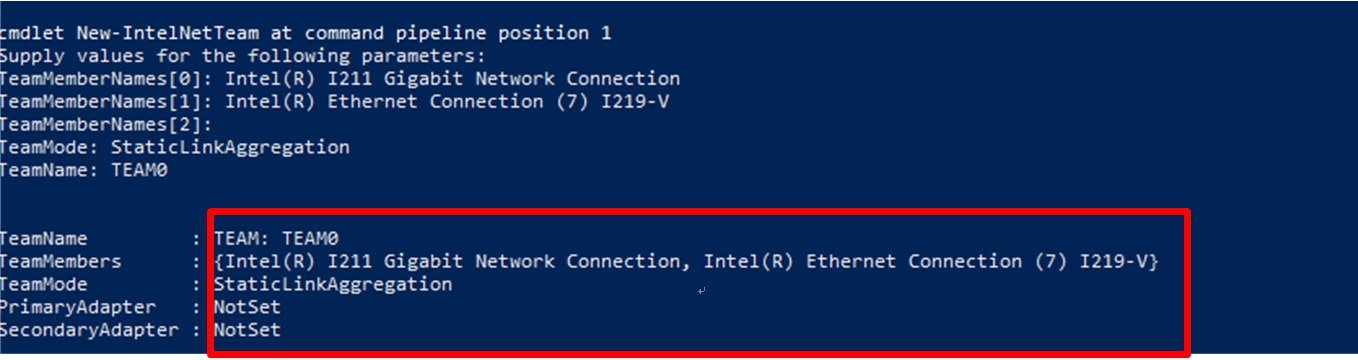
Step5: Search "PowerShell” at search bar and run the Windows PowerShell as administrator
Enter the command:
Import-Module –Name "C:\Program Files\Intel\Wired Networking\IntelNetCmdlets\IntelNetCmdlets.dll"
It would not show any conformation. Please enter another command then:
New-IntelNetTeam
Step6: The system will ask for your Team Member Names. Please go to "Device Manager" > "Network Adapters" to confirm the names of the Ethernet Adapters.
Enter the command:
Inte(R) Ethernet Connection (7) I219-V
Inte(R) I211 Gigabit Network Connection
If you just want to set up a Team by using two Ethernet adapters, please type "Enter” at "TeamMemberName[2]”.
P (465):
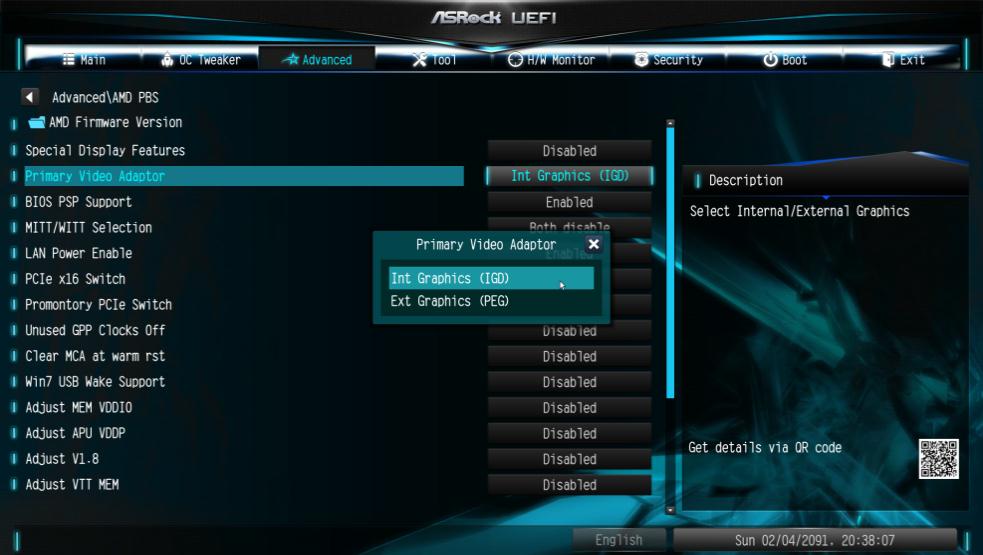
Cuando utilizo la tarjeta VGA con gráficos incorporados de la CPU AM4, el controlador del adaptador de pantalla incorporado muestra un signo de exclamación, ¿que debería hacer?(3/1/2018)
R:Cuando utilizo la tarjeta VGA con gráficos incorporados de la CPU AM4, el controlador del adaptador de pantalla incorporado muestra un signo de exclamación, ¿que debería hacer?
1. Por favor presione "F2” o "Del” durante el ARRANQUE para entrar en la configuración BIOS
2. Elija el adaptador de gráfico interno como tarjeta de video primaria
Ruta: Advanced\AMD PBS\Primary Video Adapter\Int Graphics (IGD)
3. Después de ajustar las opciones anteriores, presione "F10" para guardar la configuración.
También puede probar con el siguiente método.
1. Por favor presione "F2” o "Del” durante el ARRANQUE para entrar en la configuración de la BIOS
2. Deshabilitar CSM
Ruta: Boot/CSM/Deshabilitar
3. Después de ajustar las opciones anteriores, presione "F10" para guardar la configuración.
P (398):
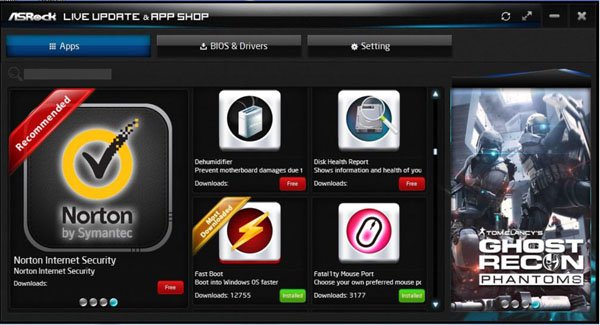
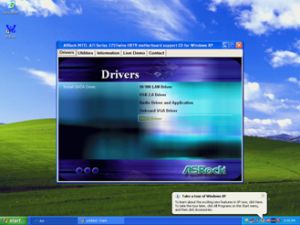
¿Cómo puedo obtener el software ASRock, por ejemplo XFast RAM, Fast Boot, Good Night LED, Deshumidificador, Master Key, USB Key, OC DNA para las placas base Z170 / H170 / serie Gaming B150?(8/1/2015)
R:Para los modelos de la serie gaming de Intel 100, estas características están soportadas en ASRock APP Shop.
Si quiere utilizar estas herramientas, por favor descárguelas de ASRock Live Update APP Shop.
Abajo está la captura de pantalla de la ASRock APP Shop actual.
P (356):
Al instalar Windows 8.1 en modo GPT, hay una carca de agua en la esquina inferior "El arranque Seguro no está configurado correctamente ("Secure boot isn't configured correctly"). ¿Cómo puedo solucionar este problema?(10/1/2013)
R:Por favor entre en la página BIOS\Security para activar [Secure Boot] y elija "Install Default Secure Boot Keys", entonces presione [F10] para guardar la configuración y reiniciar el sistema.
P (345):
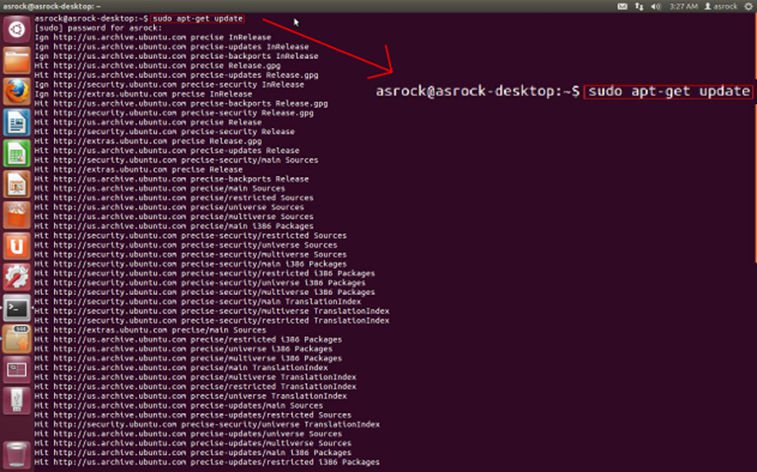
¿Cómo puedo utilizar la función Wake On LAN bajo Ubuntu (version Kernal 3.2.0-23) en la serie Vision 3D?(4/1/2013)
R:Por favor siga los siguientes pasos para utilizar la function WOL.
1. Por favor active "Onboard LAN power on" en la configuración BIOS\Advanced\ACPI.
2. Conecte el cable LAN.
3. Busque terminal en Dash Home y ábralo.
4. Por favor instale para habilitar ethtool WOL siguiendo el comando. (siga la figura)
#sudo apt-get update
#sudo apt-get install ethtool
#sudo ethtool –s eth0 wol g
#sudo reboot
5. Ahora, el sistema está listo para ser despertado a través de LAN por otros equipos.
P (336):
¿Pueden trabajar dos sistemas operativos con Fast Boot?(2/1/2013)
R:Si, pueden trabajar. Pero como el modo de Arranque Rápido (Fast Boot) solo inicializa una unidad de disco/volumen RAID, por favor asegúrese de que los sistemas operativos estén instalados en el mismo disco duro/volumen RAID.
P (289):
Instalo el sistema operativo Microsoft® Windows® en el modo GPT y Ubuntu en el modo MBR con dos discos duros diferentes y no puedo arrancar con el sistema operativo Microsoft® Windows®. ¿Cómo puedo resolver el problema?(6/1/2011)
R:Instale ambos sistemas operativos tanto en modo GPT como en modo MBR.
En el modo GPT, consulte los pasos siguientes:
1. Entre en la BIOS→[Boot] (Arranque)→[PCI ROM Priority] (Prioridad PCI ROM)→ elija [EFI Compatible ROM] (ROM compatible con EFI) y a continuación, presione "F10" para guardar los cambios y salir.
2. A continuación, presione "F11" durante el arranque y elija "UEFI: [el nombre de unidad óptica]" para instalar el sistema operativo.
En el modo MBR, consulte el paso siguiente:
Presione "F11" durante el arranque y elija "AHCI/SATA:[el nombre de unidad óptica]" para instalar el sistema operativo.
P (247):
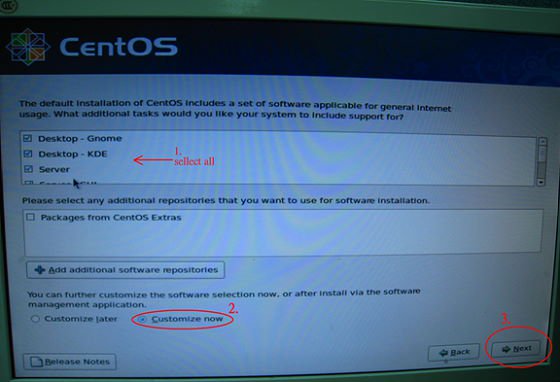
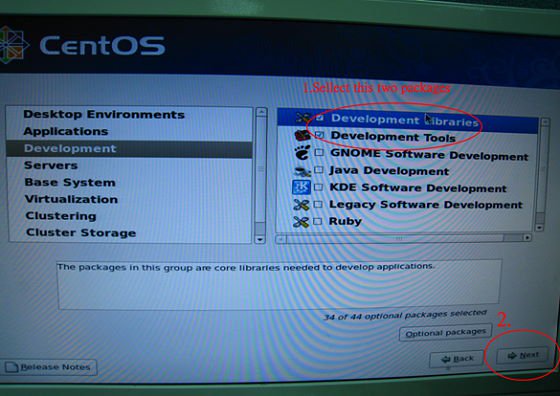
Quiero instalar Linux CentOS 5.2 en X58SuperOrdenador. Después de iniciar la instalación de CentOS 5.2, el sistema se mantiene en comprobar los dispositivos de hardware. No puedo continuar la instalación de Linux, ¿qué puedo hacer?(3/28/2009)
R:Por favor sigue los pasos siguientes para instalar Linux CentOS 5.2.
1.Desactive LAN 1 Onboard y LAN 2 Onboard en la configuración del BIOS.
2.Entre en el menú de arranque e inicie la instalación de Linux CentOS 5.2.
3.Por favor instale los paquetes del sistema según la imagen siguiente.
4.Después de instalar CentOS 5.2 completamente, descargue su driver LAN vía siguiente enlace.
Enlace:http://www.realtek.com/downloads/downloadsView.aspx?Langid=1&PNid=13&PFid=5&Level=5&Conn=4&DownTypeID=3&GetDown=false#2
5.Por favor remueva el driver en caja y el driver LAN r8169 por el comando siguiente.
# cp -p r8168-8.011.00.tar.bz2 ~
# cd ~
# tar vjxf r8168-8.011.00.tar.bz2
# cd /lib/modules/`uname -r`/kernel/drivers/net/
# rm -f r8169.ko
# cd ~
# cd r8168-8.011.00
# make clean
# make modules
# make install
# depmod –a
# reboot
6.Después de actualizar el driver LAN completamente, por favor reinicie el sistema y active LAN 1 Onboard y LAN 2 Onboard en la configuración del BIOS.
P (222):
Estoy utilizando una memoria de sistema 4GB con Windows® Vista™ 64bit y tarjeta de ATi VGA en ALiveXfire-eSATA2, no puedo boot en o instalar Windows® Vista™ 64 bit. Con 3GB o menos memoria de sistema, no tiene ningún problema. ¿Hay una solución para este problema?(2/14/2008)
R:Ésta es un problema conocido de Windows® Vista™ 64 bit. Por favor instale los dos (revisiones)hotfixes siguientes de Microsoft. Solucionará este problema.
http://support.microsoft.com/kb/938194
http://support.microsoft.com/kb/938979
Por favor instale Hotfixes (revisiones) según los pasos siguientes:
1.Boot en Windows® Vista™ 64bit con memoria de sistema menos de 3GB.
(Si usted no puede terminar la instalación de Windows® Vista™ 64bit, por favor instale Windows® Vista™ con memoria de sistema menos de 3GB)
2.Instale el primer hotfix (revisión), reboot, y después instale el segundo.
3.Reboot el sistema y deje el sistema a entrar en Windows® Vista™ 64bit.
4.Apague la computadora. Y entonces instale la Memoria de nuevo.
P (215):
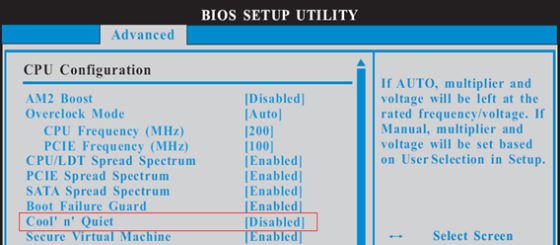
Estoy utilizando AMD® AM2 Athlon 64X2 5000+ Black Edition CPU. La proporción de esta CPU está desbloqueada. Me gustaría que lo overclocking por ajustando la proporción. Pero después de ajustar la proporción de CPU en BIOS y boot en Windows, la porporción de esta CPU no se cambia. ¿Qué debo hacer?(12/19/2007)
R:En realidad, es el comportamiento del conductor de AMD® CPU. Para realizar overclocking por favor inhabilite la función de "Cool 'n' Quiet" de BIOS-> Adelantado-> Configuración de CPU-> Cool 'n' Quiet. Por favor refiérase a la siguiente imagen.
P (203):
Utilizo un USB HDD externo en ALiveNF7G-HD720P/ALiveNF7G-HDready. Me siento que la velocidad del USB es más lenta. ¿Hay algún método para mejorarla?(6/25/2007)
R:Por favor refiere amablemente a los pasos siguientes para el intento.
1.Abra la libreta y mecanografie la entrada del registro siguiente.
2.Conserve el archivo como "USB.reg".
3.Doble haga el clic este archivo para agregar la información al registro.
4.Reboot el sistema.
P (189):
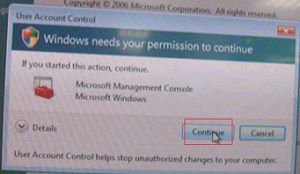
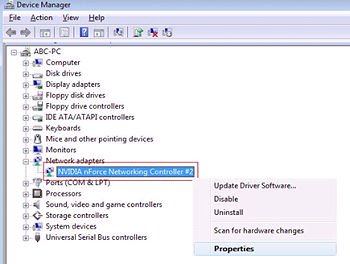
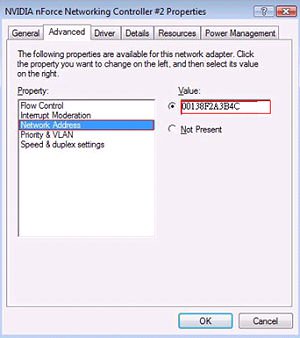
Tengo la placa base de AM2NF6G-VSTA/ALiveNF6G-DVI. El LAN en la placa no se trabaja correctamente bajo Windows® Vista™. ¿Cómo puedo solucionarlo?(12/19/2006)
Solución2.
O por favor refiera a los pasos siguientes para reescribir la dirección de MAC bajo Windows® Vista™.
Paso1: Compruebe la dirección de MAC.
Cuando el sistema se carga, presione la tecla de "F2" para entrar al ajuste del BIOS.
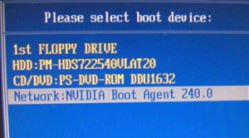
Boot-> "Configuración de los ajustes del Boot" - > fije el "Boot desde el LAN en placa" a "permitible".
Presione "F10". El sistema se recomenzará.
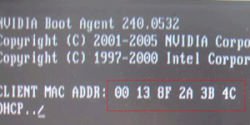
Presione "F11" y seleccione "el Agente del Boot de NVIDIA".
Entonces verás la dirección de MAC , por favor lo registre sin espacio para el uso más último.
Paso2: Sistema del Boot en Window Vista
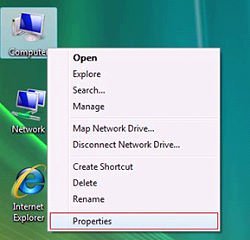
Haga el click derecho "Computadora" y "Características"
Paso3:
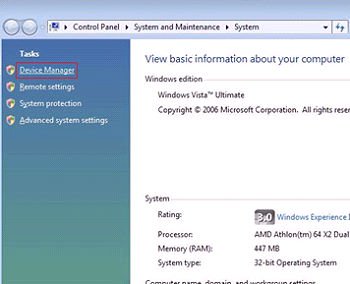
Haga el click "Encargado de Dispositivo"
Paso4:
Haga el click "Continúa"
Paso5.
Haga el click derecho "Regulador del Establecimiento de Red" y "Características".
Paso6:
Sleccione la "Dirección de Red" en la carpeta "Avanzado ".
Escriba la "Dirección de MAC" que lo consiguió desde el paso1 en el artículo del Valor.
Entonces haga el click "ACEPTABLE".
P (181):
¿Cual tecla debo presionar para entrar en la disposición del BIOS? ¿Cual tecla debo presionar para entrar en el menú del boot?(8/18/2006)
R:Para entrar en la disposición del BIOS, por favor presione "F2" repitamente después de encender la computadora hasta que el sistema se entre en la disposición del BIOS. Si desea a entrar en el menú del boot, por favor presione "F11".
P (179):
Mi placa base es AM2XLI-eSATA2. ¿Cómo instalo Windows® XP en SATA HDD en el modo de AHCI?(8/18/2006)
R:Necesita a hacer un diskette del conductor de SATA antes de comenzar la instalación del OS. Por favor refiere a los pasos siguientes:
Incorpore "Modo de la Operación de SATA" en la instalación del BIOS para fijar la opción a [RAID].
Inserte el CD del apoyo de ASRock en su impulsión óptica para boot su sistema
Durante el POSTE al principio del boot-up del sistema, prense la tecla de , y entonces una ventana para la selección de los dispositivos del boot se aparece. Por favor seleccione el CD-ROM como el dispositivo del boot
Cuando ve el mensaje en la pantalla, "¿desea a generar el diskette serial del conductor de ATA [YN]? ", prense
Entonces verá estos mensajes, Por favor inserte un diskette en la impulsión floja.
¡ADVERTENCIA! ¡Formato del diskette flojo se perderá TODOS LOS datos en él!
¿Comience a ajustar a formato y a copiar los archivos [YN]?
Por favor inserte un diskette flojo en la impulsión floja, y presione .
El sistema se comenzará a ajustar a formato el diskette flojo y a copiar los conductores de SATA en el diskette flojo
Recomience e incorpore "Modo de la Operación de SATA" en la disposición del BIOS para fijar la opción a [AHCI].
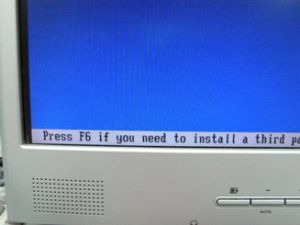
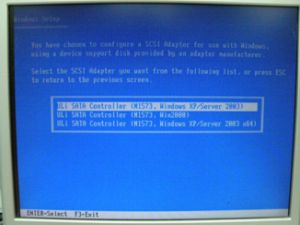
Al principio de la disposición de Windows®, presione F6 para instalar un SCSI de tercera parte o el conductor de RAID. Cuando está incitado, inserte una diskette floja que contiene el conductor de ULi®RAID. Después de leer el diskette flojo, el conductor será presentado. Seleccione el conductor a instalar según el modo que seleciona y el OS de su instalación.
P (178):
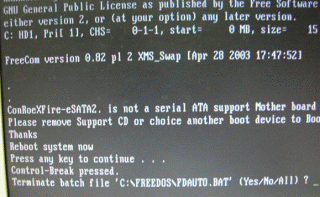
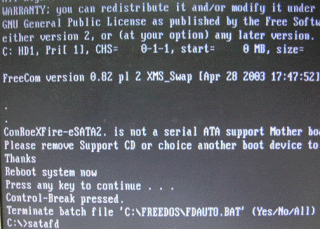
Mi placa base es ConRoeXFire-eSATA2. Cuando booting desde el CD del apoyo para hacer el disco flojo del conductor de la imagen de SATA , él se demuestra el mensaje error como el siguiente. ¿Qué debo hacer?(7/21/2006)
R:1. Cuando ve el mensaje error, por favor mecanografie "Ctrl+C", y presione "y" para terminar el programa.
2. Entonces mecanografie "satafd".
3. Se comenzará a generar el disco de flojo de SATA.
O por favor descargue el conductor desde el Web Site de ASRock y lo copie al diskette flojo.
https://www.asrock.com/mb/download.asp?Model=ConRoeXFire-eSATA2
P (157):
I installed a Windows XP operating system for 775Twins-HDTV in my SATA HDD. I want to duplicate my SATA HDD to another new SATA HDD by using GHOST program. After finished, the new duplicated SATA HDD cannot boot up. What should I do?(11/18/2005)
R:We recommend you to install Windows XP on your original SATA HDD again and install the SATA drivers at the beginning of Windows XP installation. Please refer to the following steps:
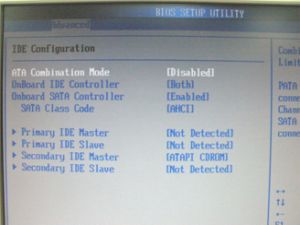
Step 1: Please go to BIOS to disable the "ATA Combination Mode", or you can reserve it as default value. (BIOS/ Advanced/ IDE Configuration/ ATA Combination Mode/ Disabled)
Step 2: Please press "F6" to install SATA drivers at the beginning of the Windows XP installation.
Step 3: Install the SATA drivers. (Please make a SATA Driver Diskette at first. Please refer to the 775Twins-HDTV user manual page 25.)
Step 4: Start to install the operating system.
Step 5: After finished the Windows XP installation, we recommend you to install the SATA driver from support CD.
Step 6: Now, you can start to duplicate the HDD by using GHOST program.
P (152):
How do I use "Boot from Network" function on ASRock motherboard?(10/17/2005)
R:Please press F2 when power on, enter the BIOS setting menu. Select the screen "Boot". Go to the sub screen "Boot settings Configuration". Set the item "Boot From Network" to "Enable". Press F10 to save the setting and reboot.
After restart, press F11 and select Network as the boot device. Or press F2 and enter the sub screen "Boot Device Priority" in BIOS "Boot" screen to change the boot priority of Network.
P (147):
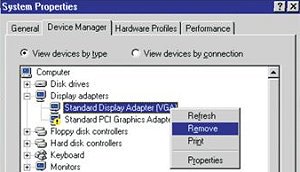
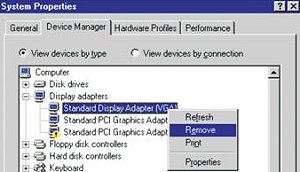
I use PCI Express VGA card on my ASRock motherboard. My operation system is Windows 98SE / ME. In "Device Manager", there are two "Display Adapter Controllers" in "Display Adapters" option. What should I do?(7/15/2005)
R:Please follow the below steps to install PCIE VGA card driver.
a. Please enter "Device Manager" and you will see "Standard Display Adapter (VGA) and "Standard PCI Graphics Adapter (VGA)" in the "Display Adapters" option.
b. Please Choose "Standard Display Adapter (VGA)" and right-click "Remove".
c. After removing the device, please reboot your system. Then, you will only see "Standard Display Adapter (VGA)" in "Display Adapter" option.
d. Please start to install your PCIE VGA card driver.
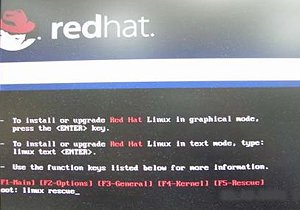
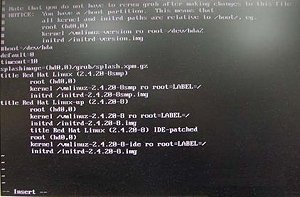
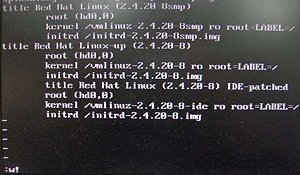
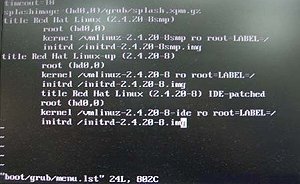
P (146):
I would like to install Red Hat Linux 9.0 on my VIA 8237/8237R based motherboards. But after I finished the installation of Red Hat Linux 9.0, it hung with kernel panic during boot-up. The error message is shown as below:
How do I fix this problem?(7/15/2005)
R:Please add VIA vmlinuz-2.4.20-8-IDE patch to Linux kernel by following steps.
First, copy the patched kernel (vmlinuz-2.4.20-8-ide) into floppy disk. Then, select one of the cases applies to your situation below.
(a)Clean install the Red Hat Linux 9.0.
Before exiting the installation of Red Hat Linux 9.0, press ++ to enter console mode. Then skip the case (b) to proceed.
(b)Use the kernel in existing Red Hat Linux 9.0 system.
Make sure the first boot device is CD_ROM in your system BIOS, then put the installation CD 1 into CD-ROM. When booting the installation CD, type the following command when the "boot:" message appears on the screen.
linux rescue /* press enter */
Then follow the instructions, and select the partition that the existing Red Hat Linux 9.0 is located in the "system to rescue" window. Then it will enter the console mode after a while.
Console mode:
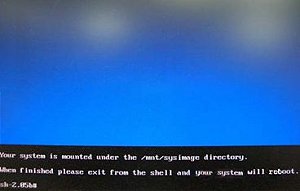
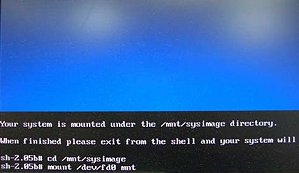
After entering the console mode, run the following commands.
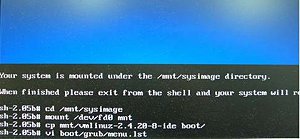
# cd /mnt/sysimage /* press enter */
# mount /dev/fdo mnt /* after type this command, insert the floppy and press "enter" */
# cp mnt/vmlinuz-2.4.20-8-ide boot/ /* reading the floppy for a while */
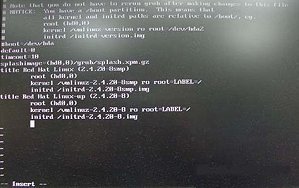
# vi boot/grub/menu.lst /* press enter and it will enter /mnt/sysimage/boot/grub/menu.lst file */
Under /mnt/sysimage/boot/grub/menu.lst file press "A" to enter insert mode.
Add the following lines into /mnt/sysimage/boot/grub/menu.lst file.
title Red Hat Linux (2.4.20-8) IDE-patched /* press enter */
root (hd0,0) /* press enter */
kernel /vmlinuz-2.4.20-8-ide ro root=LABEL=/ /* press enter */
initrd /initrd-2.4.20-8.img /* press Esc to leave insert mode */
Press Esc to leave insert mode and type the command below.
:w! /* press enter to save file */
It will appear the message "boot/grub/menu.lst" 24L, 802C
Then, reboot system and enter the "Red Hat Linux (2.4.20-8) IDE-patched" kernel. The problem would not happen again.
P (134):
My motherboard is Intel 915GL chipset based. After I installed Intel VGA driver 14.10, the screen became black when entering into Windows 2000/XP. What should I do?(4/8/2005)
R:Intel newer VGA driver 14.11 may solve this problem.
When booting up, please press F8 to enter OS with safe mode and uninstall VGA driver 14.10.
Please refer to Intel website to download VGA driver 14.11 and install it.
http://downloadfinder.intel.com/scripts-df/Detail_Desc.asp?agr=N&ProductID=1765&DwnldID=8543
P (123):
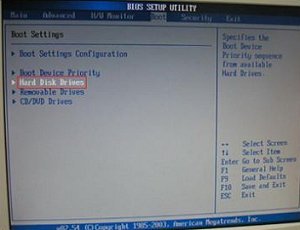
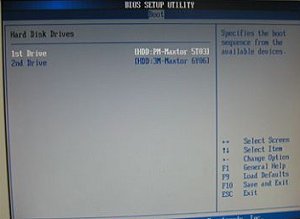
If I use a SATA HDD and an IDE HDD together on P4i65GV, how do I boot from SATA HDD?(1/18/2005)
R:If you connect SATA HDD and IDE HDD together on P4i65GV, you will see an item of the BIOS setting- Hard Disk Drives (please refer to the following pictures).
Please entry the setting, choose your SATA drive as the "1st Drive" and then press "F10" to save the setting and exit.
P (121):
I used Prescott CPU and P4i45GV/P4i65GV. I wanted to use NT4.0, but the installation can not be completed. What should I do?(12/15/2004)
R:For Prescott CPU, some OSes (ex.NT4.0) can not be installed. In order to boot legacy OSes that cannot support CPUs with extended CPUID functions, please flash to the latest BIOS to enable "Max CPUID Value Limit" (Advanced => CPU Configuration)
We don't provide drivers for NT4.0. If you need drivers for NT 4.0, please refer to following websites to get them.
VGA driver for P4I45GV/P4I65GV: http://downloadcenter.intel.com/
P (112):
My ASRock motherboard supports Hybrid Booster. Is Hybrid Booster a utility to install? Where can I get it?(9/14/2004)
R:The Hybrid Booster features supported on each models are a little different.
Please go to https://www.asrock.com/mb/index.asp and find the specification of your motherboard and check the exact features supported.
Actually, Hybrid Booster is a combination of several features which have already been provided with the motherboards.
1. CPU Multiplier: Adjusted by setting onboard FID jumpers.
2. CPU Vcore adjustment: Adjusted by setting BIOS setup option.
3. CPU Frequency Stepless control: Adjusted by setting BIOS setup option.
4. AGP/PCI Frequency control: Adjusted by setting BIOS setup option.
5. ASRock U-COP: Hardware feature, no need to be adjusted.
6. Boot Failure Guard: BIOS feature, no need to be adjusted.
Please refer to https://www.asrock.com/feature/HybridBooster/HybridBooster.html for detailed explanations.
P (103):
Sometimes when my P4i65GV boots up, the CPU fan starts to work then shut down right away. After waiting for 1~2 seconds, it starts to work again. Why?(7/12/2004)
R:Actually, it is caused by Intel 865GV memory sizing code. It will only happen at the 1st or 2nd boot after getting electrical power. So, please don't worry about it, it is normal.
P (99):
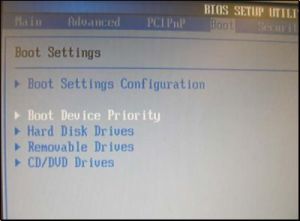
I have installed 1 SATA HDD and 1 IDE HDD (or SCSI card with SCSI HDD) on my P4i48 motherboard, how can I select IDE HDD (or SCSI HDD) in the Boot Device Priority?(6/11/2004)
R:If you would like to select IDE HDD in the Boot Device Priority menu, please set the IDE HDD to the first device of boot sequence in the Hard Disk Drives menu first.
AMI core 8 based BIOS would separate connected bootable devices into 3 groups, Hard Disk, Removable, and CD/DVD drives. Only first boot sequence of device in each group can be selected in the Boot Device Priority menu.
P (89):
My on-board LAN is not working, I found that the MAC address of my on-board LAN is 00-00-00-00-00-00 or FF-FF-FF-FF-FF-FF. What's wrong?(4/15/2004)
R:The MAC address of the on-board LAN is erased. After updating the BIOS or clearing the CMOS, please boot up the system and enter the BIOS setup. After loading the BIOS default, please exit and save changes. Failing to do so may cause the MAC address disappeared. If the MAC address is gone, please contact ASRock technical support engineer for help. ( https://www.asrock.com/general/about.asp?cat=Contact )
P (81):
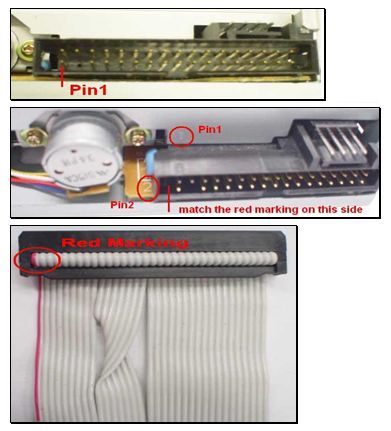
I'd just finished setting up my system. When booting it up, I found that the LED of the floppy drive is always on and I cannot read any floppy disk with the floppy drive. Why?(1/14/2004)
R:Perhaps the floppy ribbon cable is connected to the floppy drive with the wrong orientation. Please reconnect the floppy cable and make sure to match the red marking on the floppy ribbon cable with Pin1 of the floppy drive connector. However, some floppy drives' connectors may not be easily to define Pin1. You can try to check around the connector. Usually, there will be labels for Pin1 or Pin2.
P (78):
In GE Pro-M2 latest BIOS advanced menu, there is one option named "Flexibility". What's the function?(1/14/2004)
R:The default value of this option is "Disabled". It allows better tolerance for memory compatibility when it is set to "Enabled".
ASRock also offers the hot key "Home" to enable Flexibility. Before the system boot up, please keep pressing hot key "Home" first, then push the power button to boot the system up. When the POST screen appears, the function "Flexibility" is enabled.
P (70):
When I try to create my K7S8XE+ SATA driver diskette and boot up with the driver CD, the system locks up. What should I do now?(11/14/2003)
R:Before the SATA driver diskette creating process, please go to BIOS SETUP -> Advanced menu -> Peripheral Configuration -> Onboard SATA and set it to "Disable".
After the driver diskette creating process completed, please set Onboard SATA back to "Enable" in the BIOS.
P (65):
I'm using ALi chipset based motherboard, P4AL-8X and P4AL-800. How can I install Linux correctly on them?(10/15/2003)
R:When installing Linux which the Kernel version is order than 2.4.21 on P4AL-8X or P4AL-800, please follow the bellow procedure.
When installing Linux, at the page choosing the installation between "Graphic mode" or "Text mode", please type "boot: linux pci=conf2" to complete the installation.
After the installation, in the GRUB boot up menu, please press "a" to modify the kernel argument. Please type "ro root=LABEL=/ pci=conf2" in order to boot up correctly.
Download the latest Kernel from http://www.kernel.org/pub/linux/kernel/ , for example, linux-2.4.22.tar.gz from another system.
Copy the latest Kernel into this Linux system.
Compile the latest Kernel.
For further Linux information about ALi chipset, please visit
http://www.ali.com.tw/
P (52):
What is Boot Failure Guard (B.F.G)? How do I enable this function?(8/15/2003)
R:It is an ASRock new technology. While the system could not boot up normally at overclocking setting, the safe boot up mode will be issued from B.F.G and provides a BIOS setting interface for parameter reset/correction.
You don't need to adjust any setting to enable B.F.G. It is a basic function for ASRock motherboard.
P (46):
How could I use Wake on LAN function?(7/9/2003)
R:All of ASRock motherboards support Wake on LAN. Please enable the "PCI Device Power On" in the Power menu of BIOS. After saving the changes and exit the BIOS, please boot into the Windows OS then shut down the system.
Now, the system is ready to be woken up through LAN by other computers.
P (39):
When I use ASRock P4i45G(L) M/B, I see there is 1MB shared memory from the system memory shown in the POST screen during boot process. What is the 1MB shared memory used for? (6/13/2003)
R:The 1MB memory is used for VGA BIOS (before loading OS).
P (38):
How do I get the correct CPU speed after updating the BIOS?(6/13/2003)
R:After updating the BIOS, the default of BIOS will be loaded with stable setting and the system runs with slower speed to secure the first boot runs successfully. In order to make your system running with the optimum setting, please remember to load turbo/default setting after you update the BIOS.
P (27):
Does ASRock motherboard support "Boot from USB device", if my USB device is bootable?(4/15/2003)
R:Yes! All of ASRock motherboards support "Boot from USB device".
When the system boot up, please press "F8" or "F11" to enter "Boot Menu" and select USB device for your fist boot device , then the system will boot from the USB device which you selected. For P4I45D, please plug the bootable USB device to USB port 2,3.
P (25):
Sometimes I cannot boot up from my floppy disk, Why?(4/15/2003)
R:Please try to enable the "Floppy Seek" in the BIOS utility.
P (20):
After I updated BIOS, ASRock LOGO disappeared when booting up. Why?(3/3/2003)
R:Please don't worried! ASRock has removed LOGO in the new BIOS for all ASRock model. It is normal that ASRock LOGO disappeared after flashing BIOS.
P (17):
Should I clear the CMOS after I upgrade the BIOS?(1/30/2003)
R:If your system is running fine, you do not have to clear the CMOS. Also please do not clear the CMOS right after you upgrade the BIOS. After upgrading the BIOS, please reboot your system once then you can clear the CMOS if you need to do it.
P (1):
Why can't I boot up my system with one hard drive on primary IDE and an optical device (CD-ROM, DVD-ROM, CD-RW, etc...) on secondary IDE If connecting the hard drive/optical device as the secondary drive?(10/29/2002)
R:For best compatibility and stability, please make sure your stand alone hard drive on primary IDE has jumper setting to master, and your stand alone optical device on secondary IDE has jumper setting to master, too. Also if you only have one hard drive without any other optical device, please connect the hard drive to primary IDE with its jumper setting to master. Furthermore, for optimizing the transfer rate for the hard drive, we recommend you to connect your hard drive(s) to the primary IDE channel and optical device(s) to the secondary IDE channel.
 Menú
Menú
 (11/1/2023)


![Select Clear Secure Boot Keys, then choose [Yes].](/support/faq/190-2.jpg)

![After clearing the keys, select Install Default Secure Boot Keys, then choose [Yes].](/support/faq/190-4.jpg)


![Set Enable VMD Global Mapping to [Enabled]. Press F10 to save the changes and exit setup.](/support/faq/167-4.jpg)
 ” to install Windows® 10 64-bit / 11 64-bit OS">
 .">
.">