ASRock
 Menu Menu
We use cookies to offer you a more personalized and smoother experience.
By visiting this website, you agree to our use of cookies. If you prefer not to accept cookies or require more information, please visit our Privacy Policy.
Necessary cookies
These cookies are essential for the proper functioning of the website and cannot be turned off.
Analytics cookies
These cookies help us understand how visitors use our website.
Marketing cookies
These cookies are used to track visitors and display relevant advertisements.
Social media cookies
These cookies allow you to share pages and content on social media.

AMD RZ717 (Mediatek) | PCI\VEN_14C3&DEV_0717 |
PCI\VEN_14C3&DEV_0738 | |
PCI\VEN_14C3&DEV_6639 | |
PCI\VEN_14C3&DEV_7925 | |
PCI\VEN_14C3&DEV_7927 | |
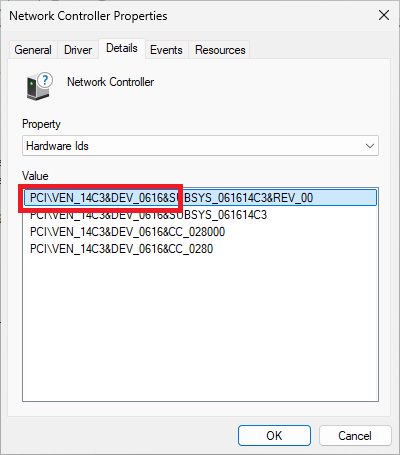
AMD RZ616 (Mediatek) | PCI\VEN_14C3&DEV_0608 |
PCI\VEN_14C3&DEV_0616 | |
PCI\VEN_14C3&DEV_7902 | |
PCI\VEN_14C3&DEV_7920 | |
PCI\VEN_14C3&DEV_7922 | |
PCI\VEN_14C3&DEV_7961 | |
Azurewave AW-CB515 | PCI\VEN_10EC&DEV_B822 |
PCI\VEN_10EC&DEV_C822 | |
PCI\VEN_10EC&DEV_C82F | |
PCI\VEN_10EC&DEV_B821 | |
PCI\VEN_10EC&DEV_C821 | |
PCI\VEN_10EC&DEV_C82B | |
PCI\VEN_10EC&DEV_D723 | |
Azurewave AW-XB611 | PCI\VEN_10EC&DEV_885D |
PCI\VEN_10EC&DEV_A85D | |
PCI\VEN_10EC&DEV_B520 | |
PCI\VEN_10EC&DEV_B851 | |
Azurewave AW-EB601 | PCI\VEN_10EC&DEV_8922 |
PCI\VEN_10EC&DEV_A922 | |
Azurewave AW-XB560 | PCI\VEN_10EC&DEV_C852&SUBSYS_C85210EC |
PCI\VEN_10EC&DEV_C852&SUBSYS_585217AA | |
PCI\VEN_10EC&DEV_C852&SUBSYS_88E5103C | |
PCI\VEN_10EC&DEV_C852&SUBSYS_C88510EC | |
PCI\VEN_10EC&DEV_C852&SUBSYS_C88610EC | |
PCI\VEN_10EC&DEV_C852&SUBSYS_C88710EC | |
PCI\VEN_10EC&DEV_C852&SUBSYS_C81211AD | |
PCI\VEN_10EC&DEV_C852&SUBSYS_56011A3B | |
PCI\VEN_10EC&DEV_C852&SUBSYS_56021A3B | |
PCI\VEN_10EC&DEV_C852&SUBSYS_E110105B | |
PCI\VEN_10EC&DEV_C852&SUBSYS_56031A3B | |
PCI\VEN_10EC&DEV_C852&SUBSYS_C80110EC | |
PCI\VEN_10EC&DEV_C852&SUBSYS_C80210EC | |
PCI\VEN_10EC&DEV_C852&SUBSYS_00B51E26 | |
PCI\VEN_10EC&DEV_C852&SUBSYS_C80310EC | |
PCI\VEN_10EC&DEV_C852&SUBSYS_C3261D31 | |
PCI\VEN_10EC&DEV_C852&SUBSYS_56001A3B | |
PCI\VEN_10EC&DEV_C852&SUBSYS_54001A3B |


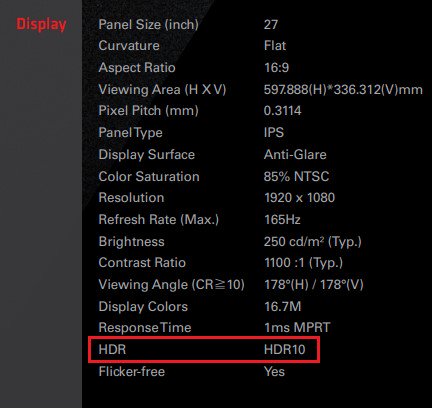
| A770 PGD | A770 CL | A750 CLD | A380 CLI | A770 LE | |
| Intel graphics card driver | Required | Required | Required | Required | Required |
| Update the graphics card FW | Required | No need | Required | No need | No need |
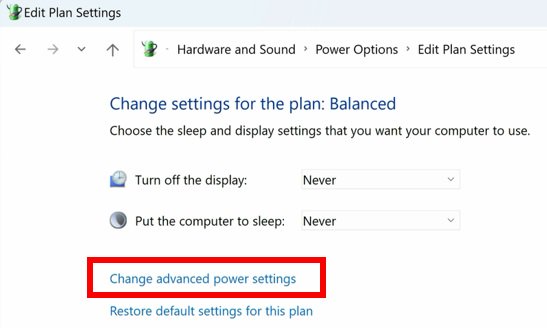
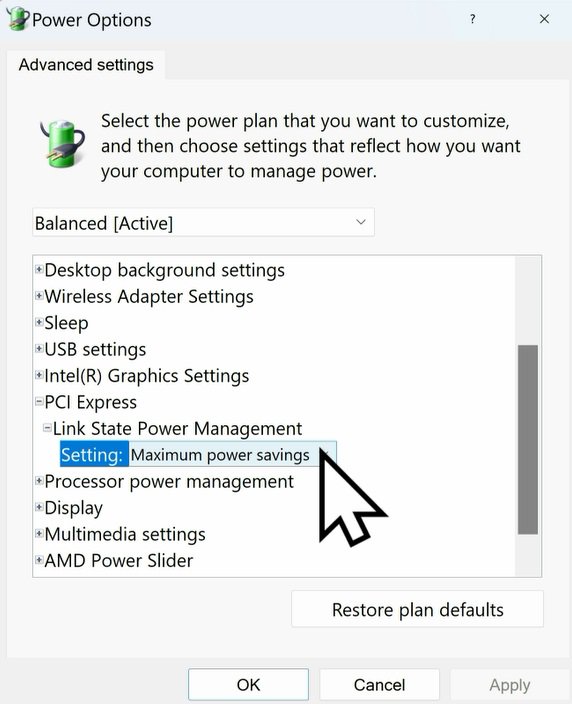
| Set PCIe power to "Maximum power savings" | Required | Required | Required | Required | Required |
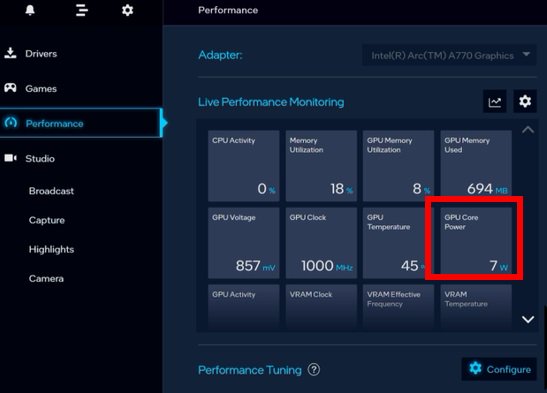
| Reinstall the graphics card driver and check the "GPU Core Power" | Required | No need | Required | No need | No need |


| Platform | 600 series | 500 series | 400 series | 300 series |
| BIOS version | Any version | Not supported | ||
| Unit: watt | Not idle | Idle (power saving) | Monitor off |
| A770 LE | ~35 | ~16 | ~1 |
| A770 PGD | ~29 | ~7 | ~1 |
| A750 CLD | ~42 | ~32 | ~11 |
| A380 CLI | ~17 | ~15 | ~6 |


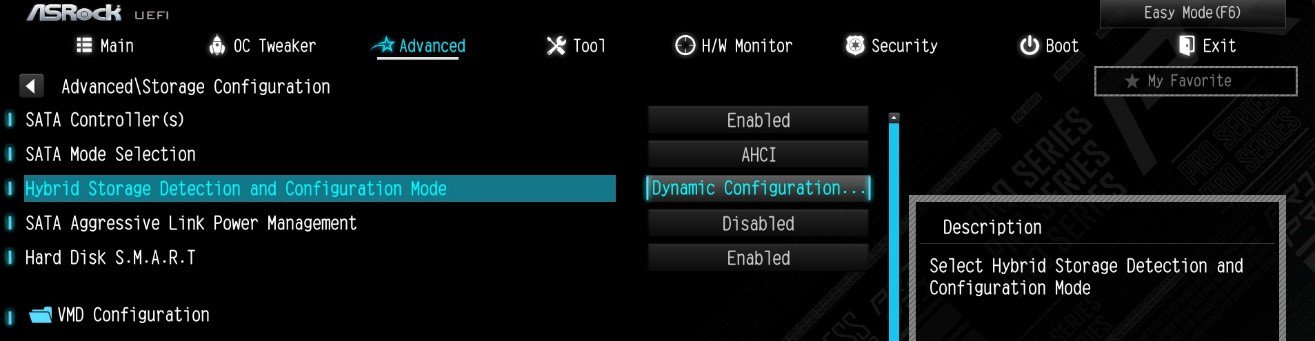
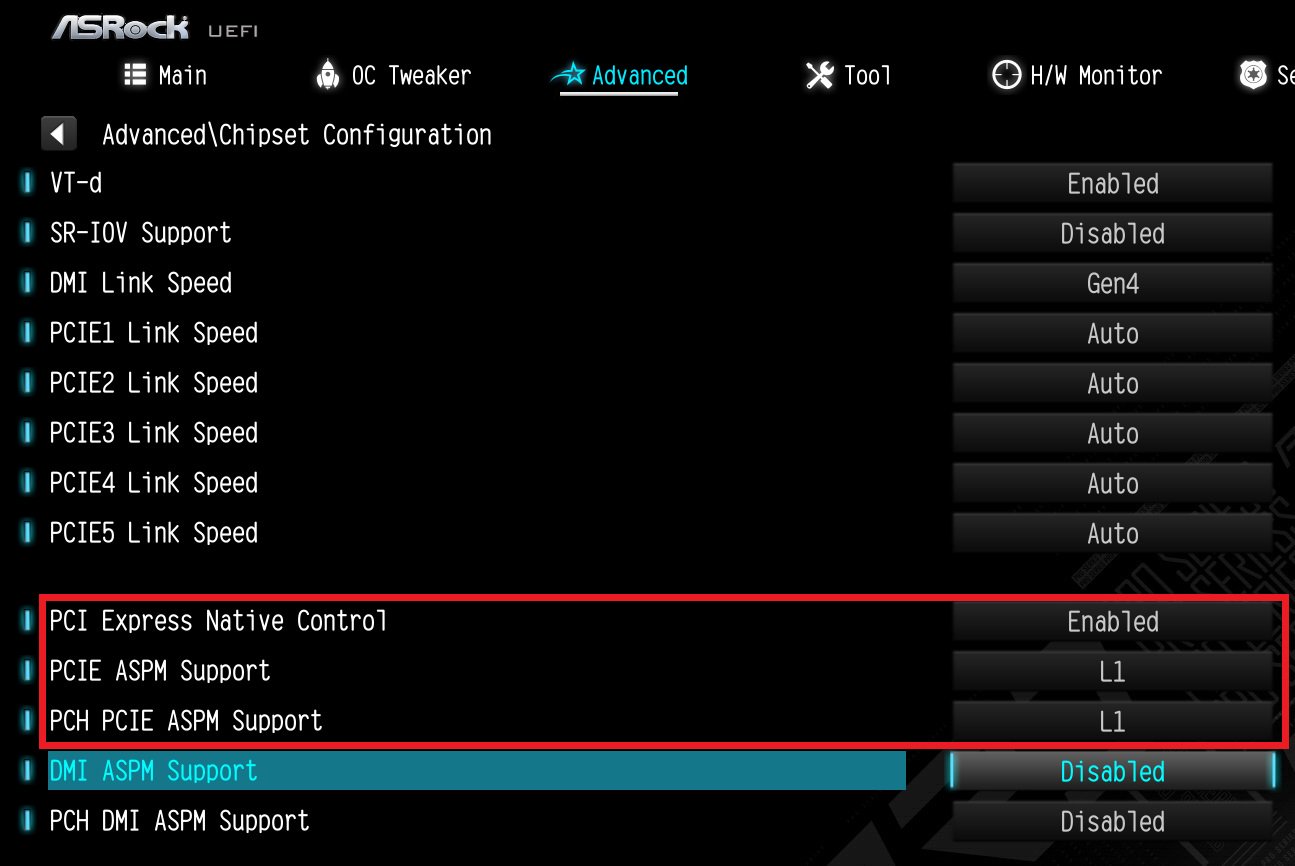
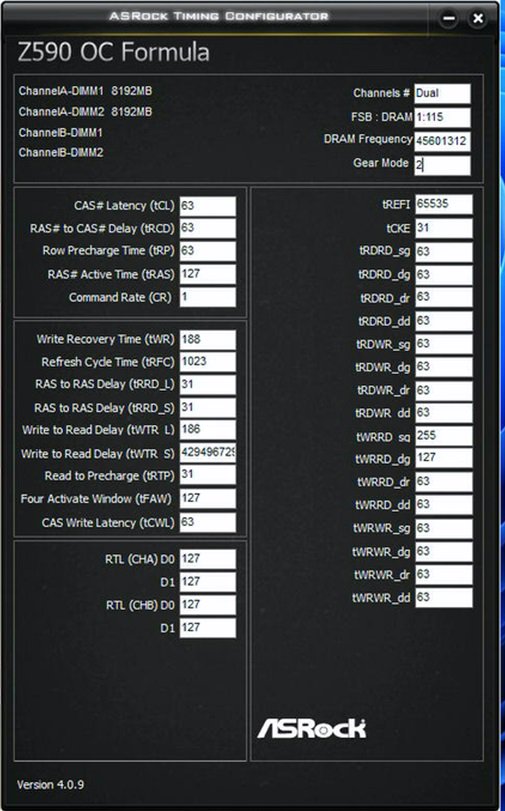
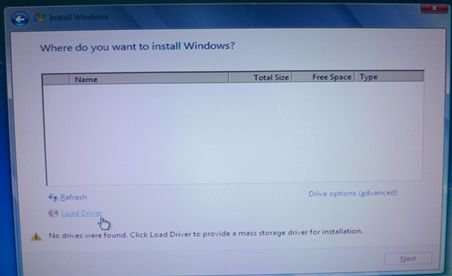
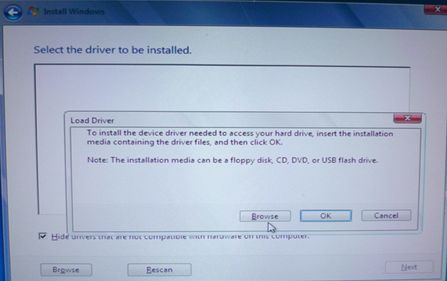
![Set Enable VMD Global Mapping to [Enabled]. Press F10 to save the changes and exit setup.](/support/faq/167-4.jpg)
 ” to install Windows® 10 64-bit / 11 64-bit OS">
 .">
.">
 (10/1/2021)(10/1/2021)


| Platform | Models |
| Intel | Fatal1ty H370 Performance Fatal1ty B360 Gaming K4 Fatal1ty B360M Performance Z390 Phantom Gaming 9 Z390 Phantom Gaming 6 Z390 Phantom Gaming SLI-ITX/ac |
| AMD | Fatal1ty X470 Gaming K4 Fatal1ty X470 Gaming-ITX/ac Fatal1ty B450 Gaming-ITX/ac Fatal1ty B450 Gaming K4 X399 Phantom Gaming 6 |


| Model | BIOS Version |
| Z170 Extreme6+ | P1.80 |
| Z170 Extreme6 | P1.80 |
| Z170 Gaming K6+ | P1.90 |
| Z170 Gaming K6 | P1.90 |


| Model | P BIOS |
| H81M-VG4 R2.0 | P1.40 |
| H81M-DGS R2.0 | P1.60 |
| H81M-HDS R2.0 | P1.30 |
| H81M-HDS | P2.10 |
| H81M-DG4 | P1.10 |
| H97 Anniversary | P1.50 |
| H97M Anniversary | P2.10 |
| B85 Anniversary | P1.40 |
| B95M-DGS | P1.60 |
| B85M-DGS | P1.50 |
| B85M Pro3 | P1.40 |
| H97M Pro4 | P2.00 |
| B85M-HDS | P1.70 |
| B85 Pro4 | P2.30 |
| B85M | P2.50 |
| H81M-HG4 | P1.50 |
| H81M | P1.90 |
| H81M-GL | P2.00 |
| H81M-G | P1.40 |
| H97 Pro4 | P1.90 |
| H97M | P2.00 |


| Model | BIOS Version |
| H61M-VS R2.0 | P2.10 |
| H61M-HGS | P1.50 |
| H61M-HVS | P1.90 |
| H61M-HVGS | P1.70 |
| H61M/U3S3 | P1.70 |
| H61M-ITX | P1.60 |
| H61iCafe | P1.70 |
| H61DE/S3 | P1.70 |
| H61DE/SI | P1.70 |
| H61M-PS | P1.40 |
| H61M | P1.70 |
| H61DEL | P1.70 |
| H61M-GE | P1.70 |
| P65iCafe | P1.40 |
| H61M-VS | P2.10 |
| H61M-S | P1.50 |
| H61M-GS | P1.50 |
| Model | BIOS Version |
| Fatal1ty Z68 Professional Gen3 | P2.10 |
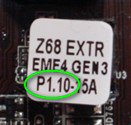
| Z68 Extreme3 Gen3 | P2.10 |
| Z68 Extreme4 Gen3 | P2.10 |
| Z68 Extreme7 Gen3 | P2.10 |
| Z68 Pro3 | P2.10 |
| Z68 Pro3 Gen3 | P2.10 |
| Z68 Pro3-M | P2.10 |
| Z68M/USB3 | P2.10 |
| Z68M-ITX/HT | P2.20 |
| Z68 Extreme4 | P2.20 |
| Model | BIOS Version |
| Fatal1ty P67 Performance | P2.10 |
| Fatal1ty P67 Professional | P3.10 |
| P67 Extreme4 | P3.10 |
| P67 Extreme4 Gen3 | P2.10 |
| P67 Extreme6 | P2.10 |
| P67 Pro | P2.10 |
| P67 Pro3 | P3.10 |
| P67 Pro3 SE | P2.10 |
| Model | BIOS Version |
| H67DE3 | P2.10 |
| H67M | P2.10 |
| H67M-GE | P2.10 |
| H67M-GE/HT | P2.10 |
| H67M-ITX | P2.10 |
| H67M-ITX/HT | P2.10 |
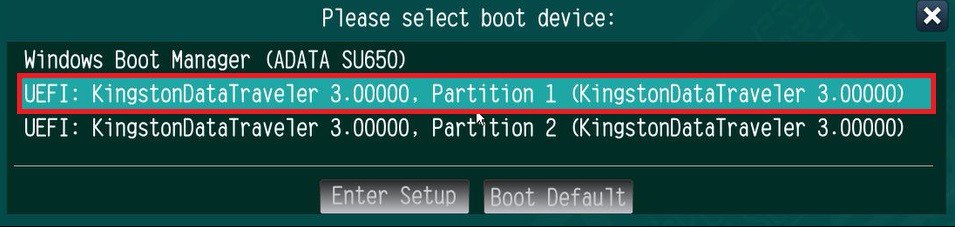
![press [F2] or [Delete] when ASRock boot logo showing up](/support/faq/201202-5.jpg)
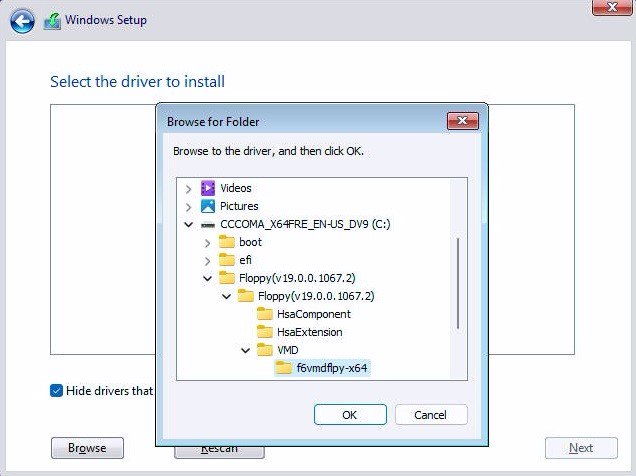
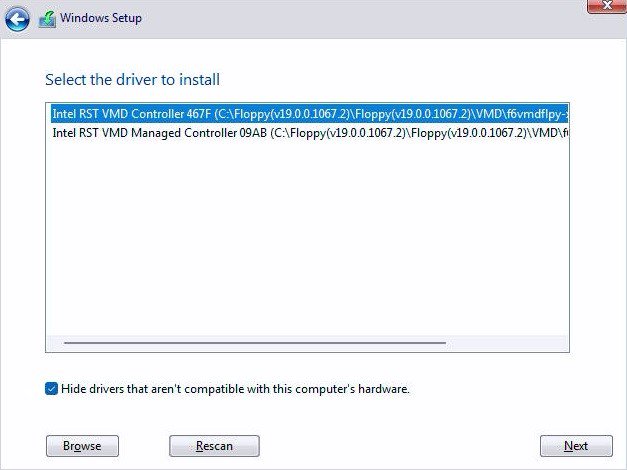
![click on the [How to update] icon in the corresponding row](/support/faq/201202-7.jpg)


 (6/26/2008)(6/26/2008)