We use cookies to offer you a more personalized and smoother experience. By visiting this website, you agree to our use of cookies. If you prefer not to accept cookies or require more information, please visit our Privacy Policy.
Si votre questions porte sur un domaine particulier, vous pouvez choisir directement une catégorie ci-contre pour les réponses aux questions les plus fréquentes:
Résultats:
Question (Q&A-173|523):
Which BIOS settings do I need to adjust when using 13.3” Side Panel?(3/1/2023)
Answer:Before using your side panel, please set "Primary Graphics Adapter” to "Onboard” in the BIOS settings to ensure the display work properly.
Intel 700 series:
To do so, please go to "Advanced”> "Chipset Configuration” and set "Primary Graphics Adapter” to "Onboard”. Then press [F10] to save the settings and restart the system.
AMD AM5:
Please go to "Advanced”> "Onboard Device Configuration” and set "Display Priority” to "Internal Graphics”. Then press [F10] to save the settings and restart the system.
Question (Q&A-171|521):
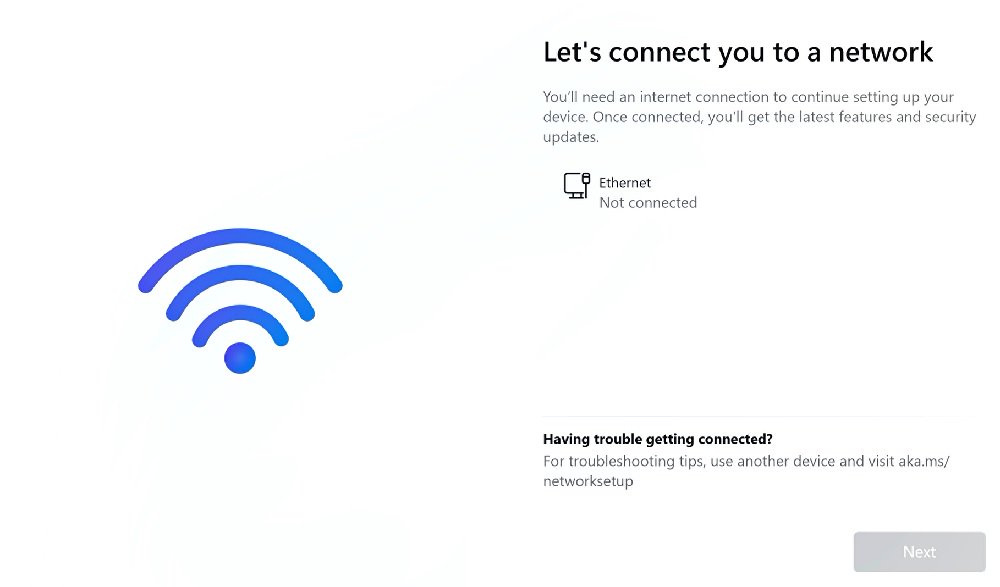
How do I install Windows 11 without the Internet?(9/28/2022)
Answer:If you encounter the following screen while installing Windows 11, please follow the steps below to proceed install Windows 11 without the Internet.
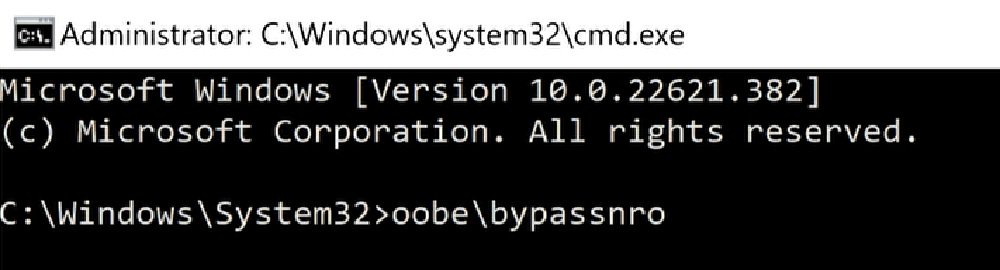
Step 1: Press shift + F10 key to open command prompt → Type oobe\bypassnro → Hit Enter key to set up Windows 11 without an Internet connection.
Step 2: After step 1, the system will restart once.
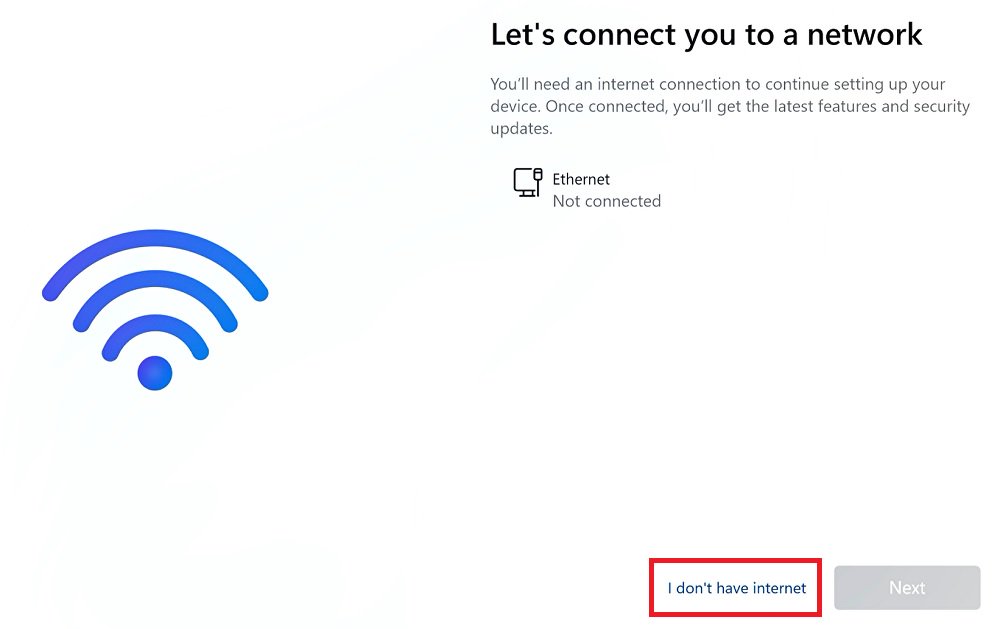
Step 3: After restart, proceed on settings up Windows 11 until you see the following screen. Then click I don't have internet.
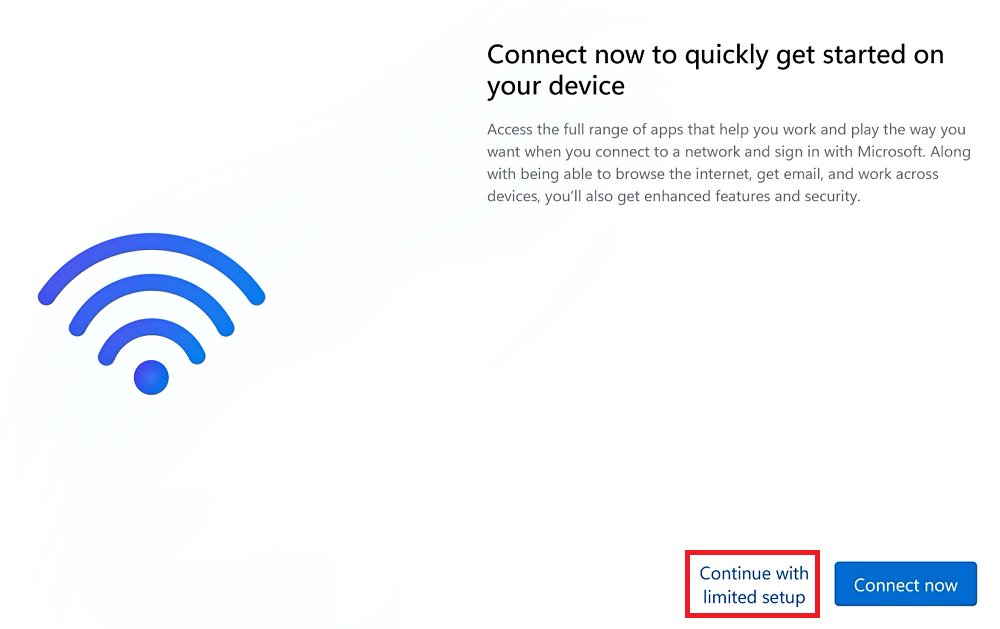
Step 4: Click Continue with limited setup to create an local account.
Question (Q&A-171|520):
There is no sound output from the rear audio port. What can I do to fix it?(9/27/2022)
Question (Q&A-167|512):
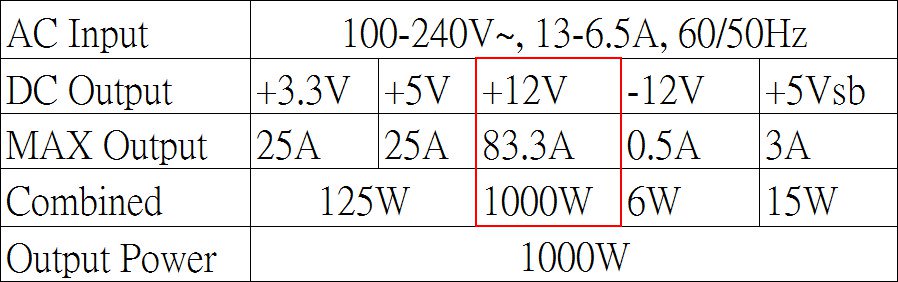
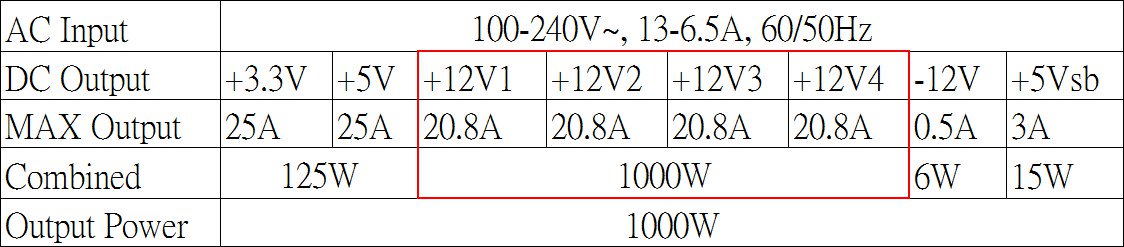
How do I know the power supply is the single rail type or multi rail type?(3/1/2022)
Answer:You can check the label on the power supply, it show the detailed specification of the power supply.
If you only see one "+12V” on your power supply, it means your power supply is "single rail” design.
For example.
If you only see multiple"+12V” on your power supply, it means your power supply is "multi rail” design.
For example.
Question (Q&A-164|504):
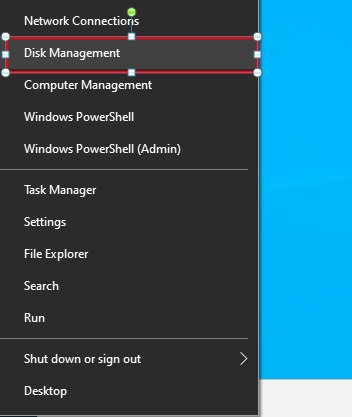
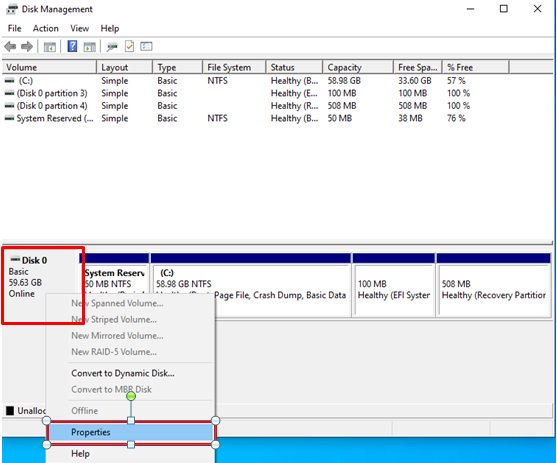
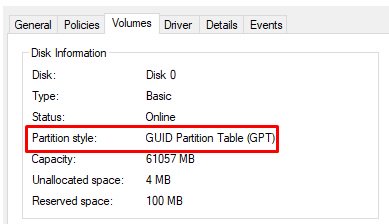
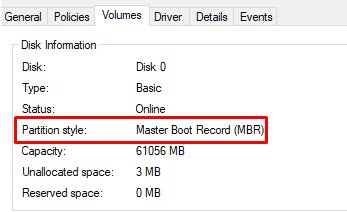
How do I check if the system can support Secure Boot?(10/1/2021)
Answer:In order to use Secure Boot, the drive with the operating system must use GPT partition style. Please refer to below steps to check the partition style.
Step 1: Right-click the Windows button on the desktop and select "Disk Management”.
Step 2: Right-click the disk where Windows is installed and select the "Properties”.
Step 3: Click the "Volumes” tab and check if the partition style is "GPT”.
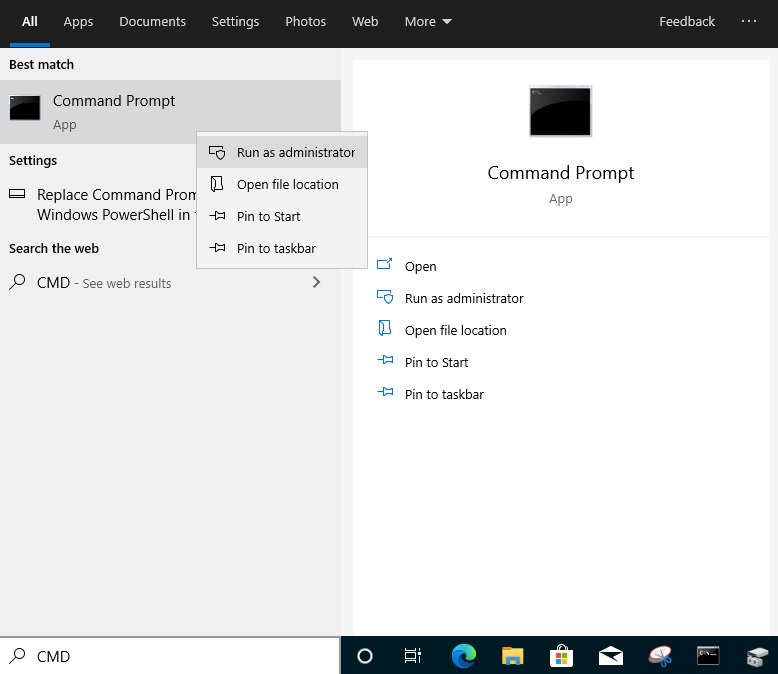
Step 4: If the partition style is "MBR”, please make a backup of important data on the system and refer to steps 5 - 7 to convert the partition style to GPT.
Step 5: Type "CMD" in the Windows search bar, right-click on "Command Prompt” and choose to run as administrator.
Step 6: Type the command "mbr2gpt /convert /allowFullOS” to convert the partition style and press [Enter].
Step 7: Restart the system and the BIOS Mode/Partition style will be converted to UEFI/GPT.
Question (Q&A-163|503):
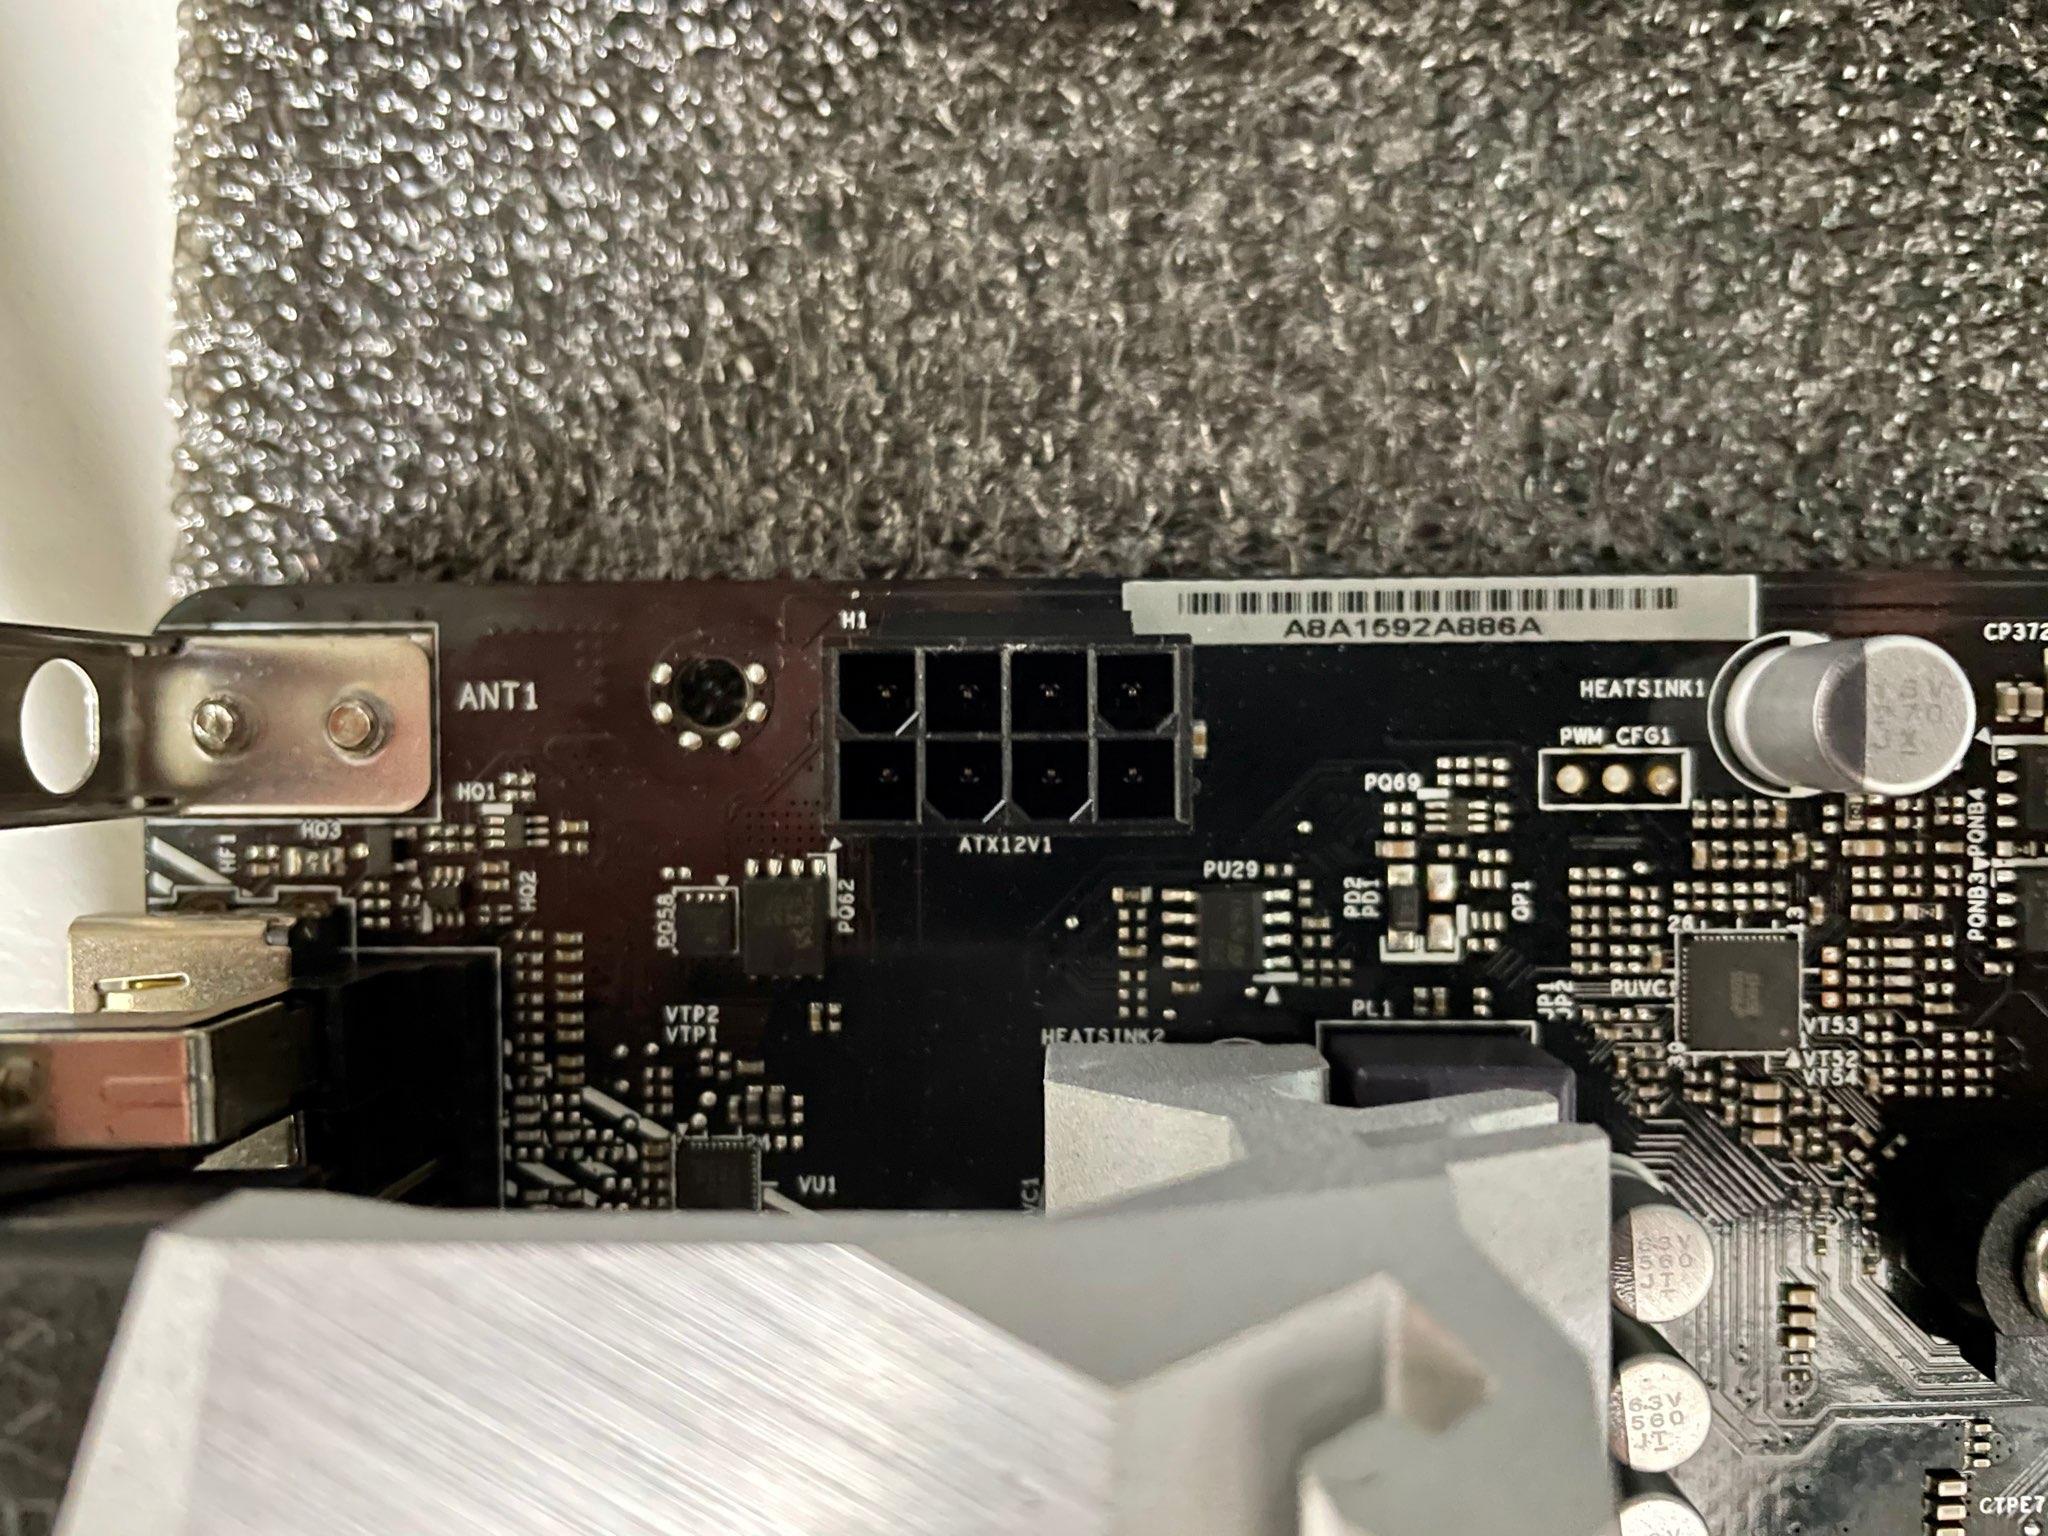
If I have two or three PSUs for my mining system, how do I connect the PSUs to the H510 Pro BTC+ and the graphics cards?(8/1/2021)
Answer:Please refer to the images below.
[Recommended connections when using two power supplies]
[Recommended connections when using three power supplies]
Question (Q&A-160|498):
How to enable C.A.M in the BIOS? Also known as Resizable BAR.(4/1/2021)
Answer:Step 1: On the ASRock website please find the BIOS download page for you motherboard.
Check the descriptions to see if C.A.M. is supported already.
Intel 500-series models support C.A.M. since the first version.
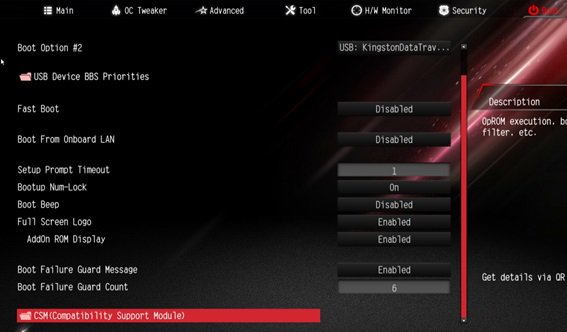
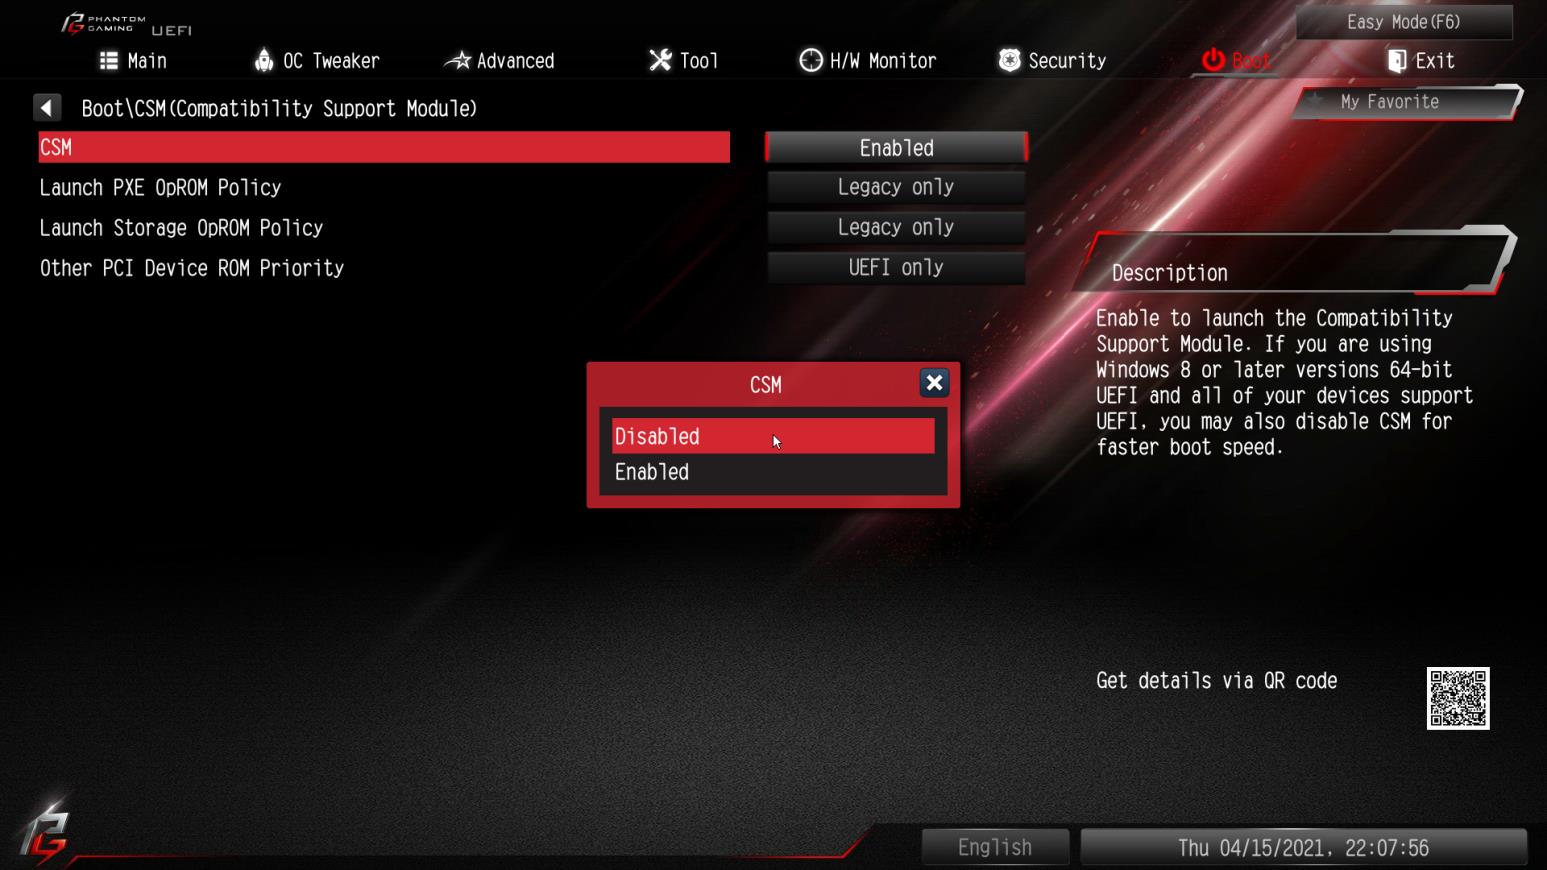
Step 2: While the system is starting press "DEL” to boot into BIOS setup and go to BIOS\Boot\CSM.
If you cannot find the CSM menu then please set "Fast Boot” to "Disabled”.
Step 3: In BIOS\Boot\CSM please set "CSM” to "Disabled”.
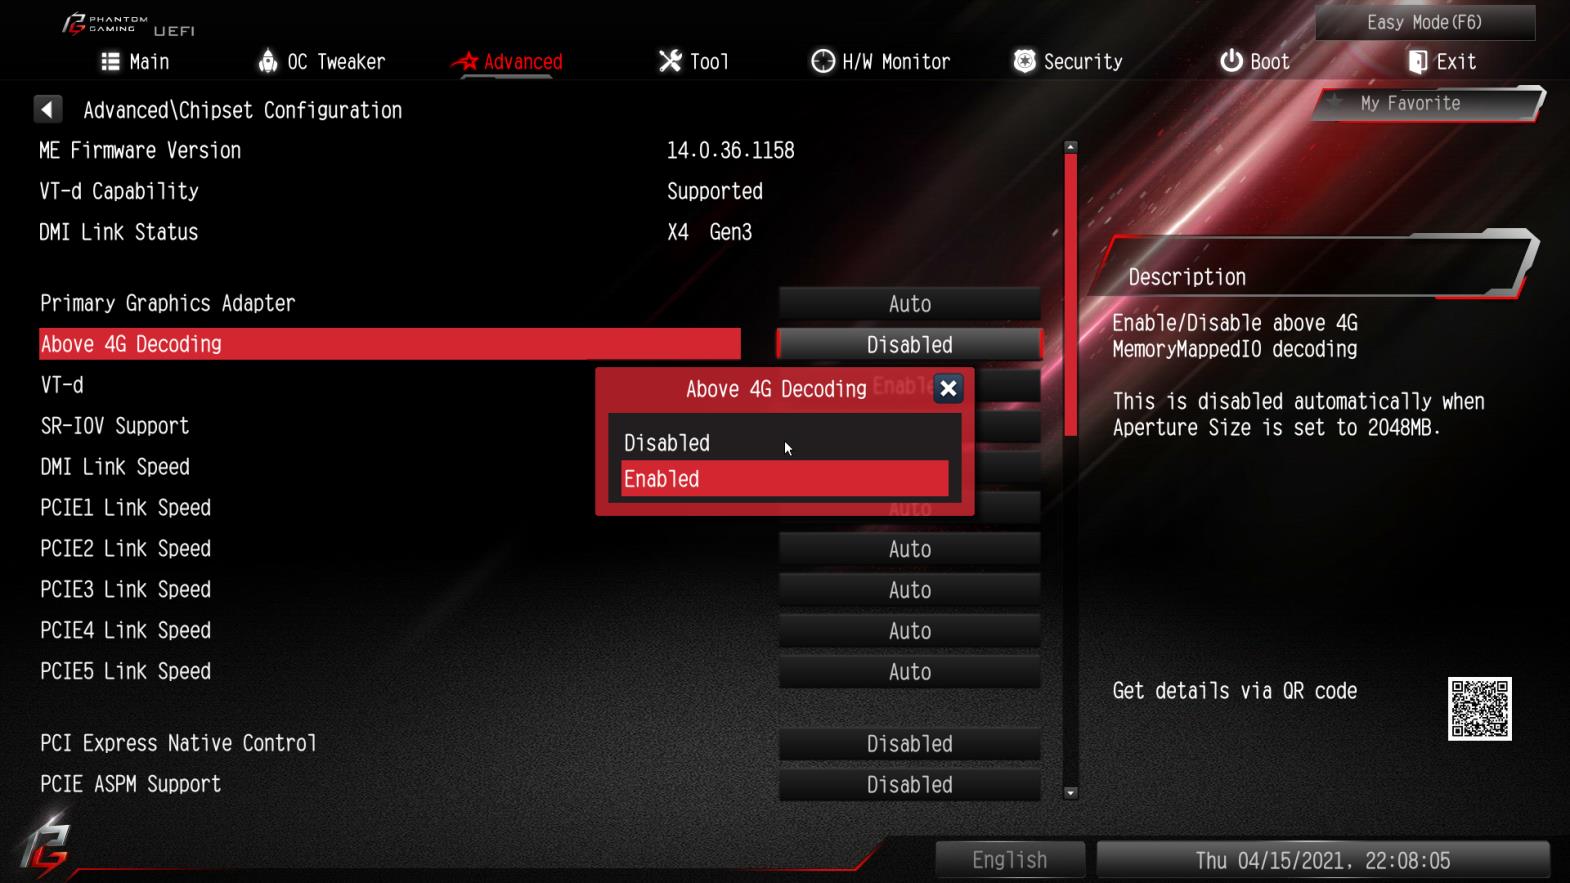
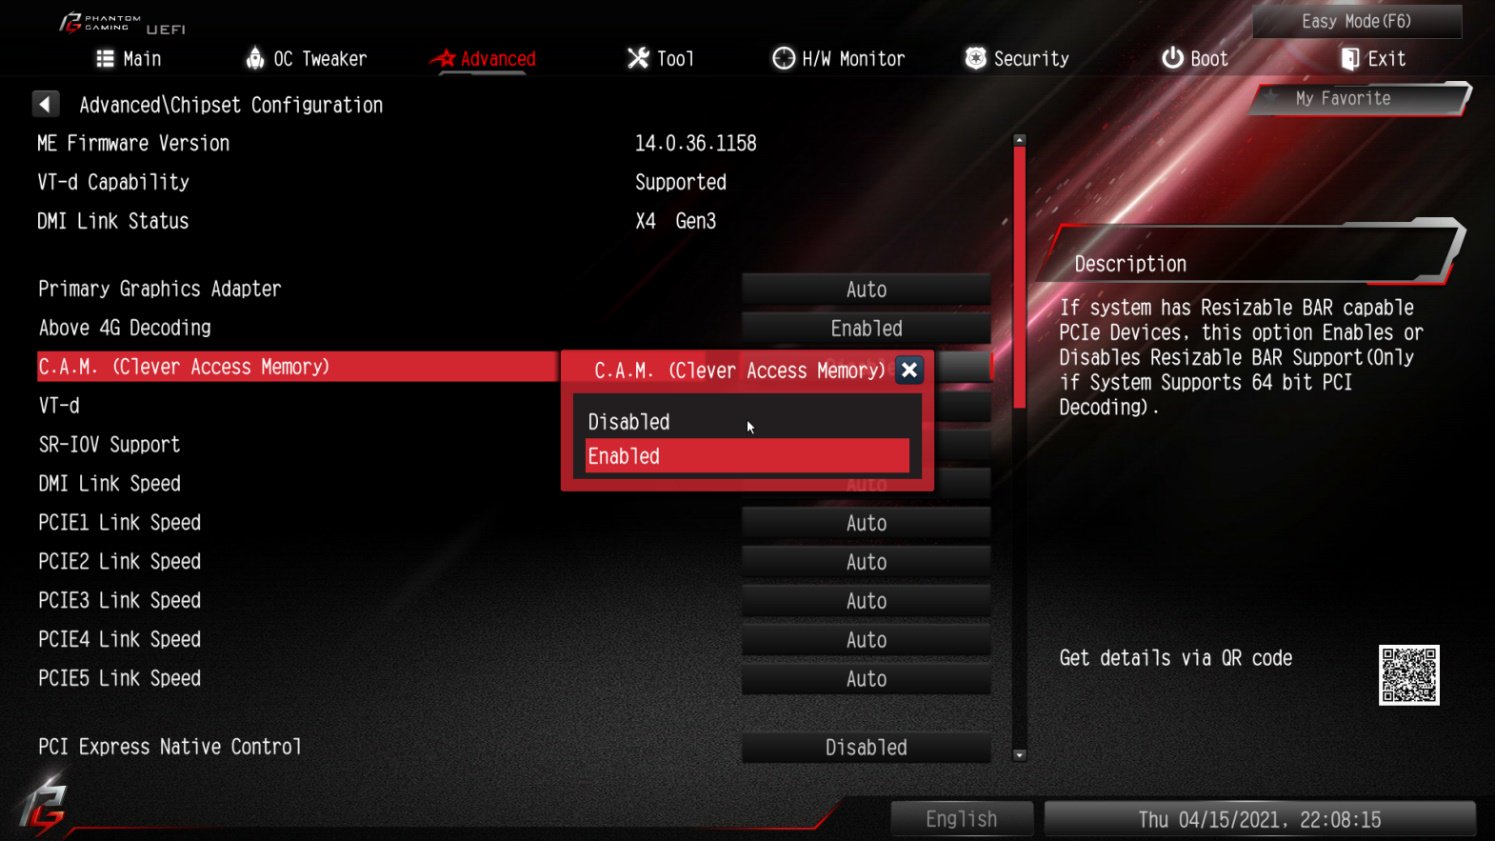
Step 4: Go to BIOS\Advanced\Chipset Configuration and set "Above 4G Decoding” to "Enabled”.
Step 5: After step 4, the option "C.A.M” will appear below the option "Above 4G Decoding”.
Please set it to "Enabled”.
Step 6: Press "F10” to save the settings and restart the system.
Question (Q&A-159|496):
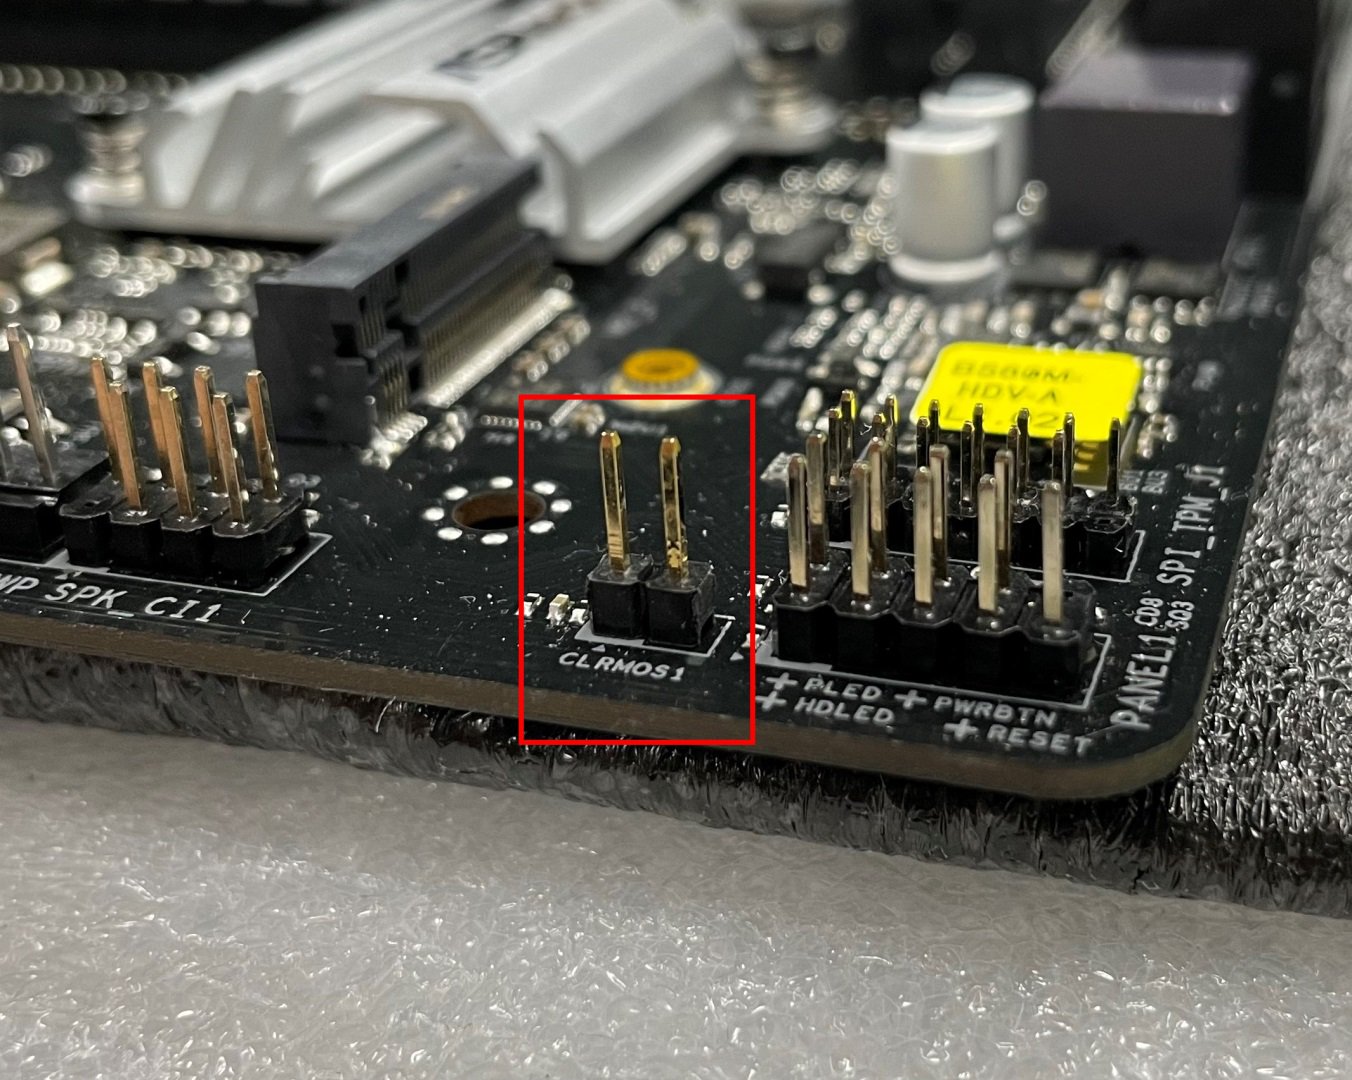
How can I clear the CMOS on my Intel 500 series motherboard?(2/1/2021)
Answer:Please follow the steps below.
Step 1: Disconnect the PSU from the motherboard.
Step 2: Find the CLRMOS header by referring to the motherboard user manual.
Below picture shows what the header should look like.
Step 3: Use a conductive metal object to short the CLRMOS header for at least 30 seconds. You can use for example a paperclip, key, coin or a screwdriver.
Step 4: Remove the metal object from the CLRMOS header and then wait at least 5 more minutes.
Step 5: After 5 minutes please reconnect the PSU and power on the system.
Question (Q&A-156|492):
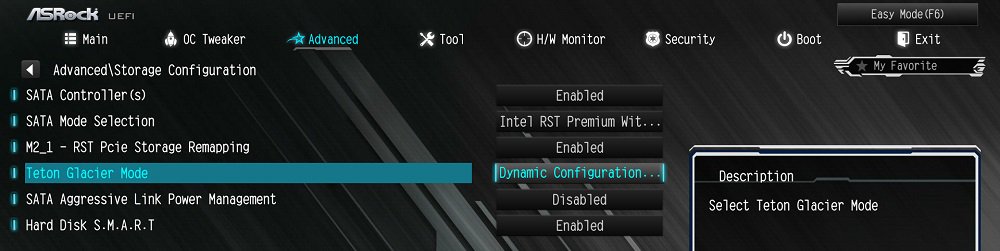
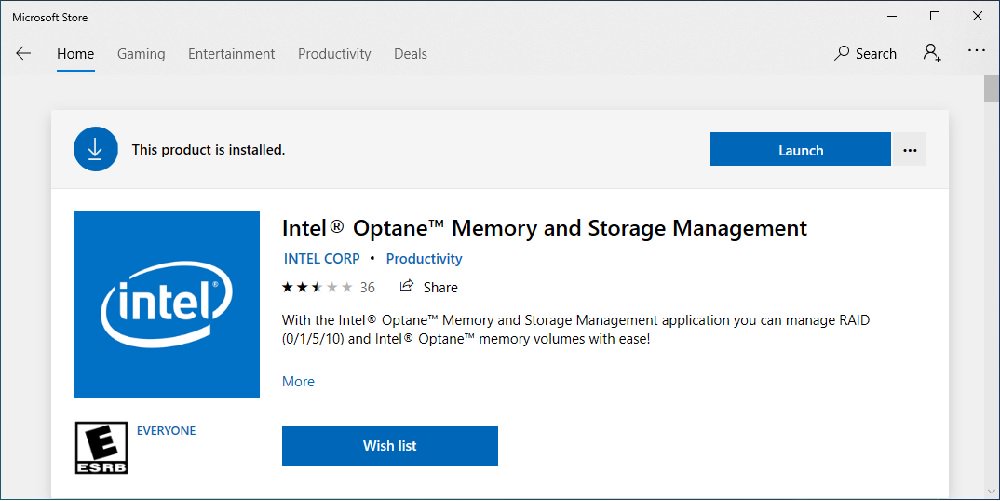
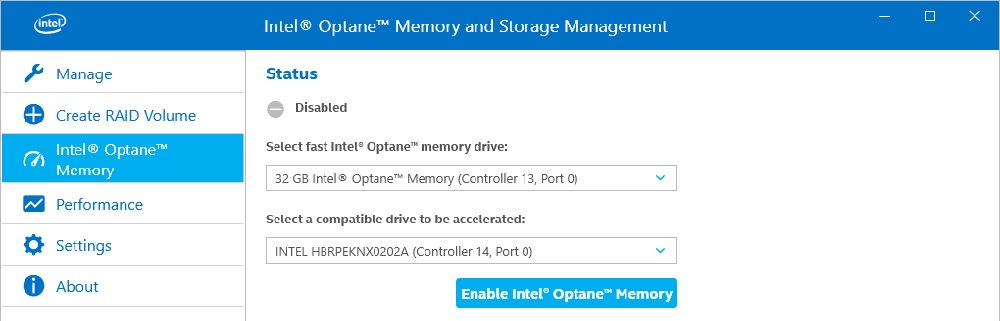
Comment activer le module Optane H10 lorsqu'un autre SSD M.2 Intel est installé sur une plateforme Intel 300/400 Series ?(9/1/2020)
Answer:Pour activer le module Optane H10 lorsqu'un autre SSD M.2 Intel est installé, veuillez suivre les indications ci-dessous :
Étape 1.Veuillez vous assurer que le module Optane H10 est installé dans le socket compatible Optane en vérifiant la rubrique stockage de la rfiche de la fiche de la carte mère.
Étape 4. Activez l'option Teton Glacier Mode dans le BIOS et pressez ensuite la touche F10 pour sauvegarder le réglage.
Rubrique Advanced\Storage Configuration\Teton Glacier Mode\Dynamic Configuration for Hybrid Storage Device activé :
Étape 5. Lancez l'utilitaire de gestion de la mémoire Optane téléchargé depuis le Microsoft Store :
Étape 6. Activez l'option Intel Optane Memory (un redémarrage est requis) :
Étape 7. Après le redémarrage du système, l'outil de gestion du module Optane indique que le module est actif.
Question (Q&A-155|491):
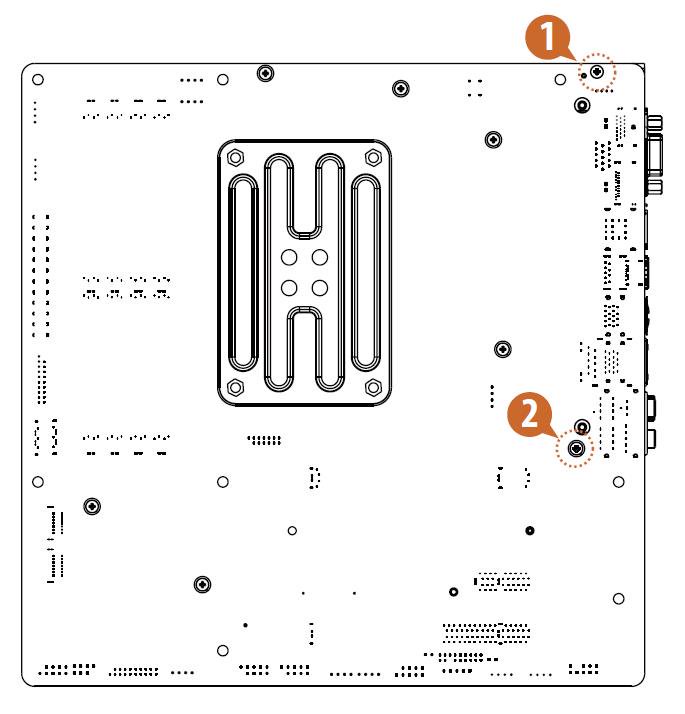
J'ai ajouté un module WiFi à mon système. Comment installer les antennes WiFi sur la carte mère avec le panneau E/S fourni ?(8/1/2020)
Answer:Pour procéder à l'installation des antennes WiFi, veuillez suivre les indications ci-dessous afin de retirer le panneau E/S de la carte mère.
Étape 1.
Veuillez retirer les deux vis de la zone inférieure de la carte mère avant de procéder au retrait du panneau E/S. La position des vis concernées est indiquée sur le visuel ci-dessous.
* Le schéma proposé ici est fourni à titre indicatif. Les vis peuvent être placées à des endroits différents de votre carte mère.
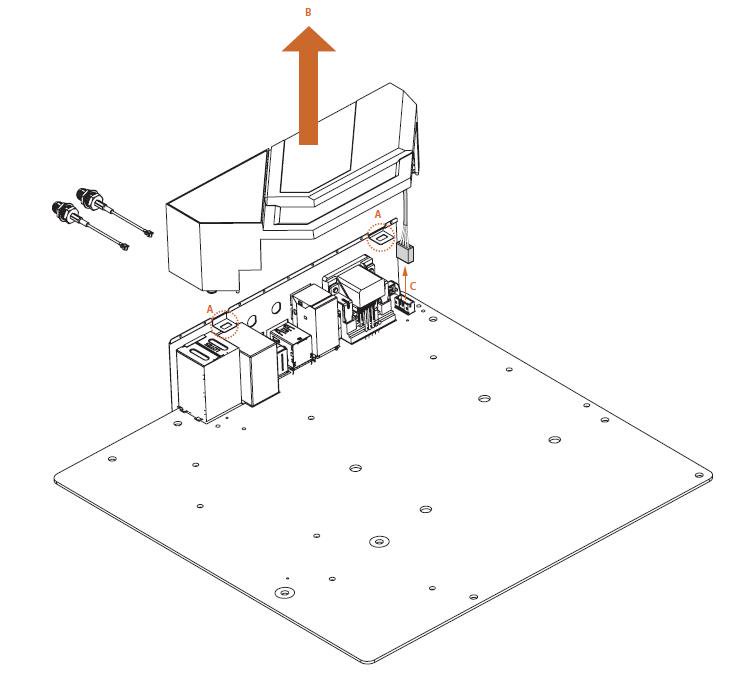
Étape 2.
Pour retirer le panneau E/S, glissez-le vers l'extérieur jusqu'à ce qu'il se dégage des loquets (A) et déplacez le vers le haut (B). Puis débranchez le câble IO_LED_HEADER1 (C).
* Le schéma proposé ici est fourni à titre indicatif. Les différents connecteurs peuvent être placés à des endroits différents de votre carte mère.
Étape 3.
Installez ensuite les antennes WiFi sur le panneau E/S.
Question (Q&A-146|481):
How can I enable wake on LAN function under S5 status in Windows 10 with Intel I211 LAN port?(8/1/2019)
Answer:Step 1: Please visit ASRock website to download the Intel LAN driver. https://www.asrock.com/mb/index.asp
Step 2: Refer to the FAQ from the following link to modify the shutdown behavior under Windows 10. https://www.asrock.com/support/faq.asp?id=408
Step 3: Go to device manager and right click the "Intel® I211/I219 Gigabit Network Connection” LAN device to choose the "Properties”.
Step 4: Intel LAN driver may have two different "Properties”.
(A) The driver supports "Power saver and Wake on LAN” Option.
Please go to Power management to check all of Wake on LAN function.
(B) The driver supports "Enabled PME” Option.
Go to "Advanced” and enable the "Enabled PME” option.
Question (Q&A-145|476):
Comment activer la fonction AMD ReLive ?(3/1/2019)
Answer:Veuillez suivre les instructions ci-dessous pour activer la fonction AMD ReLive.
Étape 1 – Rendez vous sur le site internet d'ASRock et téléchargez le pilote AMD.
Lien de téléchargement : https://www.asrock.com/Graphics-Card/index.asp
Étape 2 – Sélectionnez « Install Radeon ReLive » juste après l'installation du pilote.
Étape 3 – Accédez à la page de la fonction ReLive et activez ReLive en déplaçant le curseur sur ON.
Étape 4 – La fonction ReLive est maintenant activée.
Question (Q&A-145|475):
Je n'arrive pas à installer le pilote de ma carte graphique. Comment résoudre ce problème ?(3/1/2019)
Answer:1. Veuillez télécharger le dernier pilote en date depuis le site officiel.
Lien de téléchargement: https://www.asrock.com/Graphics-Card/index.asp
2. Veuillez vous assurer que la version du pilote de votre carte graphique est bien compatible avec votre système d'exploitation.
3. Effectuez un clic droit sur « Système » puis sélectionnez « Gestion »
4. Cliquez ensuite sur « Gestionnaire de périphériques » et effectuez un double clic sur « Cartes graphiques »
5. Effectuez un clic droit sur la carte graphique et cliquez sur « Mettre à jour le pilote ».
6. Cliquez sur « Parcourir mon ordinateur à la recherche du logiciel de pilote ».
7. Accédez au pilote téléchargé à l'étape 1.
8. Lorsque le pilote a été installé avec succès, le nom du modèle de carte graphique apparait.
Question (Q&A-145|474):
J'ai des écrans noirs de temps en temps. Comment résoudre ce problème ?(3/1/2019)
Question (Q&A-145|478):
Si une nouvelle version du pilote pour cartes graphiques est disponible sur le site internet d'ASRock, dois-je absolument effectuer la mise à jour ?(3/1/2019)
Answer:Un nouveau pilote peut être nécessaire pour les raisons suivantes :
1. Pour prendre en charge de nouveaux produits ou de nouvelles fonctionnalités.
2. Pour optimiser les performances de l'affichage ou du mode Gaming
3. Pour résoudre certains problèmes connus ou améliorer certaines fonctionnalités
Si votre système fonctionne correctement, nous vous recommandons de ne pas effectuer la mise à jour.
Si vous devez effectuer la mise à jour du pilote, il vous faut tout d'abord procéder à la désinstallation du pilote actuel, redémarrer votre système puis installer la nouvelle version du pilote.
Question (Q&A-145|479):
J'ai installé une carte graphique dans mon système, mais l'écran n'affiche rien. Comment résoudre ce problème ?(3/1/2019)
Answer:Veuillez suivre les indications suivantes pour vérifier le bon fonctionnement de votre système.
1. Retirez la carte graphique et vérifiez que le contrôleur graphique embarqué fonctionne. Si ce n'est pas le cas, le problème peut venir d'autres périphériques installés au sein de votre système et la carte graphique n'est pas en cause.
2. Vérifiez les connexions et les câbles entre la carte graphique et l'écran.
3. Assurez vous que le câble d'alimentation PCIe est bien branché sur la carte graphique.
4. Assurez vous que l'écran est bien paramétré pour recevoir le signal d'affichage depuis la bonne source (DVI, HDMI, DP…)
5. Si votre carte mère est équipée de plusieurs slots PCIe, essayez d'installer la carte graphique sur un autre slot PCIe.
Question (Q&A-145|477):
Puis-je utiliser un adaptateur DVI vers D-sub avec un produit de la gamme ASRock RX500 Series ?(3/1/2019)
Answer:La gamme RX500 Series ne prend pas en charge les sorties D-sub, les adaptateurs DVI vers D-sub ne sont donc pas supportés.
Avec un convertisseur HDMI/DP vers D-sub, la présence d'un chipset externe est requise ce qui peut causer des problèmes comme l'absence de signal ou d'affichage, etc…
Nous recommandons aux utilisateurs l'utilisation d'une connexion directe en DP, HDMI ou DVI depuis la carte.
Question (Q&A-125|415):
Comment écrire l'adresse MAC de votre carte mère ?(6/1/2016)
Answer:1. Veuillez ouvrir votre châssis. Vous trouverez un sticker blanc sur le côté de la carte mère avec un identifiant MAC ID à 12 caractères.
3. Décompressez le fichier et déplacez ensuite le dossier « MAC161B » obtenu à la racine d'un support flash USB bootable.
4. Démarrez le système, pressez la touche [F11] pour accéder au menu de démarrage et sélectionnez le support flash USB.
5. Sous DOS, tapez la commande suivante :
Cd MAC161B
MAC CXXXXXXXXXXXX
(XXXXXXXXXXXX étant l'adresse MAC notée à l'étape 1)
6. Le système écrira l'adresse MAC automatiquement.
7. Lorsque le message « Done » s'affiche, l'adresse MAC a été écrite avec succès.
Vous pouvez ensuite relancer le système.
Question (Q&A-122|405):
Lorsque j'essaie d'utiliser un système d'exploitation 64-bit en mode invité sous VMware, le message suivant s'affiche : "This host supports Intel VT-X, but Intel VT-X is disabled".(12/1/2015)
Answer:Veuillez activer "Intel Virtualization Technology" dans le BIOS pour activer VT-x.
(BIOS -> Advanced -> CPU Configuration -> Mettre "Intel Virtualization Technology" sur "Enabled")
Question (Q&A-122|408):
Comment changer le mode de mise en veille de Windows 10 depuis Hibernation (S4) vers Extinction (S5) ?(12/1/2015)
Answer:Veuillez suivre la procédure ci-dessous.
1.Accédez à la rubrique [Système] sous Windows 10.
2.Sélectionnez [Alimentation et mise en veille] and cliquez sur [Paramètres d'alimentation supplémentaires]
3.Cliquez sur [Choisir l'action des boutons d'alimentation].
4.Cliquez sur [Modifier des paramètres actuellement non disponibles].
5.Décochez [Activer le démarrage rapide], et sauvegardez les changements.
6.Réglage effectué.
Question (Q&A-119|399):
Aprés la mise à jour du pilote Killer LAN depuis la version 1.1.52.1451 vers la version 1.1.54.1506 sous Windows 10, le port LAN ne fonctionne plus. Comment résoudre ce problème ?(8/1/2015)
Answer:La mise à jour du pilote Killer LAN depuis la version 1.152.1451 vers les versions les plus récentes de ce pilote peut provoquer des dysfonctionnements du port réseau sous Windows 10 x86/x64. Veuillez suivre la procédure ci-dessous pour résoudre le problème.
Etape 1 : Ouvrez le gestionnaire de périphériques et désinstallez le pilote Killer LAN
Etape 2 : Cochez la case indiquée ci-dessous et cliquez sur [OK].
Etape 3 : Lancez une recherche de modifications sur le matériel.
Etape 4 : Lancez l'installation du nouveau pilote Killer LAN version 1.1.54.1506 ou plus récente et cliquez sur [Remove]. Redémarrez ensuite le système.
Etape 5 : Installez le pilote le plus récent et redémarrez à nouveau le système.
Question (Q&A-115|384):
Durant l'exécution de 3DMark, le système se bloque pendant la phase de test et le message "process exited unexpectedly" s'affiche. Que puis-je faire ?(12/1/2014)
Answer:Veuillez vérifier que l'option "APCI HPET table" du BIOS est activée ou désactiver l'option "Systeminfo Scan" dans 3DMark.
Pour obtenir plus d'informations concernant l'utilisation de 3DMark veuillez vous reporter à la FAQ disponible à l'adresse suivante : http://www.futuremark.com/support/3dmark
Question (Q&A-110|362):
Après l'installation de tous les pilotes depuis le CD de support fourni sur ma carte mère H61 Series, deux périphériques non identifiés apparaissent toujours dans le gestionnaire de périphériques : "IKBMON_01" and "IMSMON_01". Quels pilotes dois-je installer ? (2/1/2014)
Question (Q&A-107|356):
Lors de l'installation de Windows 8.1 en mode GPT, la mention "Secure boot isn't configured correctly" apparait en bas à droite. Comment résoudre ce problème ?(10/1/2013)
Answer:Veuillez accéder à la rubrique Sécurité du BIOS pour activer l'option [Secure Boot] et sélectionner [Install Default Secure Boot Keys]. Sauvegardez la modification avec [F10] et redémarrez le système.
Question (Q&A-107|357):
Lors de l'utilisation de l'application Sunlogin afin de contrôler mon système depuis un périphérique Android, un message d'erreur apparait durant la prise de contrôle. Comment résoudre ce problème ?(10/1/2013)
Answer:Veuillez effectuer la mise à jour du client PC et de l'application Sunlogin depuis le site internet ci-dessous: http://sunlogin.oray.com/en/download/
Question (Q&A-106|354):
Mon lecteur de cartes SD intégré au module Wi-SD Box ne détecte pas les cartes mémoire SD. Comment le faire fonctionner correctement ?(9/1/2013)
Question (Q&A-106|353):
Lorsque je branche un connecteur d'alimentation 4-pin à la Wi-SD Box, mon système est incapable de s'éteindre correctement. Que puis-je faire ?(9/1/2013)
Answer:Le module Wi-SD Box fonctionne parfaitement sans câble d'alimentation 4-pin additionnel. Veuillez vous reporter au guide ci-dessous pour la procédure d'installation du module Wi-SD Box
Question (Q&A-105|346):
Sur un châssis Combo ATX et microATX, quels sont les trous de fixation à utiliser pour installer une carte mère microATX ?(7/1/2013)
Answer:Veuillez vous reporter aux instructions de montage en fonction du facteur de forme de votre produit..
Etape 1 : Veuillez installer les supports en cuivre sur les trous de fixations des emplacements B, C, F, H, J, L et M.
Etape 2 : Pour les emplacements R et S, veuillez vérifier si les trous de fixation correspondants sont présents sur la carte mere.
Veuillez installer les supports en cuivre sur la carte mère.
Question (Q&A-103|340):
Comment installer mon processeur sur les cartes mères au format 115x ?(3/1/2013)
Answer:Il existe deux types différents de protections pour le socket du processeur, veuillez vérifier le type de protection avant de procéder à l'installation du processeur.
Type A : Protection recouvrant le socket CPU. Etape 1. Ouvrez le socket CPU sans retirer la protection: Désengagez le levier en appuyant dessus et en le déplaçant hors de son support. Vous ne devez pas retirer la protection à ce stade de la manipulation.
Etape 2 : Insérez le processeur au format 115x: Asurez vous de bien localiser le Pin1 et les deux encoches d'alignement, puis placez soigneusement le processeur dans le socket.
Etape 3 : Refermez le socket: Pressez sur le levier et placez le délicatement sous le support de maintien. La protection s'enlèvera d'elle-même.
Type B : Protection du socket insérée dans l'emplacement du processeur. Etape 1 : Ouvrez le socket du processeur: Désengagez le levier en appuyant dessus et en le déplaçant hors de son support.
Etape 2 : Retirez la protection du socket: Pressez avec votre index sur le loquet de la protection. Utilisez votre pouce pour retirer la protection PnP Cap (Pick and Place Cap) du socket CPU en la soulevant.
NE JAMAIS retirer le module PnP Cap comme indiqué ci-dessus. Un retrait incorrect de la protection peut endommager les contacts du socket du processeur.
Etape 3 : Insérez le processeur au format 115x: Asurez vous de bien localiser le Pin1 et les deux encoches d'alignement, puis placez soigneusement le processeur dans le socket.
Etape 4 : Refermez le socket : Pressez sur le levier et placez le délicatement sous le support de maintien.
Question (Q&A-103|341):
Je ne peux pas transférer de fichiers via les ports USB 3.0 ASMedia en utilisant XFast sous Windows 8. Comment résoudre ce problème ?(3/1/2013)
Answer:Si vous souhaitez utiliser XFast sur un port USB 3.0 ASMedia, veuillez désinstaller le pilote USB 3.0 ASMedia et utiliser le pilote fourni par Windows 8
Question (Q&A-102|334):
Qu'est ce que Dr .Debug et comment interpreter les codes?(2/1/2013)
Answer:Dr. Debug est utilisé pour obtenir des codes représentant les différentes erreurs que votre système peut rencontrer. Veuillez vous reporter au tableau ci-dessous pour interpreter les différents codes d'erreur.
Code
Description
00
Veuillez vérifier que le processeur est correctement installé et effectuer un Clear CMOS.
0d
Problème lié à la mémoire, la carte graphique ou un autre périphérique. Veuillez effectuer un Clear CMOS, rèinstaller la mémoire ou la carte graphique et retirer les périphériques PCI et USB.
01 - 54 (except 0d), 5A- 60
Problème lié à la mémoire. Veuillez réinstaller le processeur et effectuer un Clear CMOS. Si le problème persiste, veuillez installer un seul module mémoire à la fois ou essayer d'utiliser d'autres modules de mémoire.
55
La mémoire ne peut pas être détectée. Veuillez réinstaller le module mémoire et le processeur. Si le problème persiste, veuillez installer un seul module mémoire à la fois ou essayer d'utiliser d'autres modules de mémoire.
61 - 91
Erreur d'initialisation du chipset. Veuillez effectuer un Reset ou un Clear CMOS.
92 - 99
Problème lié aux périphériques PCIe. Veuillez réinstaller les périphériques PCIe ou essayer de les changer de slot. Si le problème persiste, veuillez retirer tous les périphériques PCIe ou essayer d'utiliser une autre carte graphique.
A0 - A7
Problème lié aux périphériques IDE ou SATA. Veuillez réinstaller vos périphériques IDE ou SATA. Si le problème persiste, veuillez effectuer un Clear CMOS et retirer tous les périphériques SATA.
b0
Problème lié à la mémoire. Veuillez réinstaller le module mémoire et le processeur. Si le problème persiste, veuillez installer un seul module mémoire à la fois ou essayer d'utiliser d'autres modules de mémoire. * Pour les modèles X79, veuillez installer les modules de DDR3 dans les slots A1, B1, C1 e t D1.
b4
Problème lié aux périphériques USB. Veuillez retirer tous les périphériques USB.
b7
Problème lié à la mémoire. Veuillez réinstaller le module mémoire et le processeur et effectuer un Clear CMOS. Si le problème persiste, veuillez installer un seul module mémoire à la fois ou essayer d'utiliser d'autres modules de mémoire.
d6
La carte graphique n'est pas reconnue. Veuillez effectuer un Clear CMOS et réinstaller la carte graphique. Si le problème persiste, essayez d'installer la carte graphique dans un autre slot ou utilisez une autre carte graphique.
d7
Le clavier et la souris ne sont pas reconnus. Veuillez réinstaller votre clavier et votre souris.
d8
Mot de passe invalide.
FF
Veuillez vérifier que le processeur est correctement installé et effectuer un Clear CMOS.
Question (Q&A-102|336):
Fast Boot est-il capable de fonctionner avec deux systèmes d'exploitation ?(2/1/2013)
Answer:Oui. Mais Fast Boost initialise un seul disque dur / volume RAID. Les deux systèmes d'exploitation doivent donc être installés sur le même disque dur / volume RAID.
Question (Q&A-101|330):
Après une msie à jour du Bios, ma carte mère équipée du chipset Intel 6 Series et d'un processeur Intel Ivy Bridge affiche un écran bleu et refuse de lancer Windows 8. Que puis-je faire ?(1/1/2013)
Answer:En raison de la mise à jour d'Intel ME, le comportement de Windows 8 lors du lancement est modifié. Veuillez utiliser le DVD de Windows 8 pour réparer l'installation.
Question (Q&A-100|328):
Est-il utile que je mette à jour le pilote Intel INF avec la version 9.3.0.1025 sous Windows 7 ?(12/1/2012)
Answer:Nous vous recommandons d'installer la version fournie sur le CD de pilotes de votre produit ou sur le site d'ASRock.
Si vous souhaitez procéder à une réinstallation du système, veuillez installer le pilote Intel INF version 9.3.0.1025 avant d'installer les autres pilotes fournis sur le CD.
Question (Q&A-98|323):
Ma carte mère est-elle compatible Windows 8 ?(10/1/2012)
Answer:Veuillez vous reporter à notre site internet pour la liste des modèles compatibles. Lien vers notre site internet
Question (Q&A-98|322):
Comment changer le comportement de Windows 8 pour passer du mode Hibernate (S4) au mode shut down (S5)?(10/1/2012)
Answer:veuillez suivre la procédure ci-dessous sous Windows 8
1. Accédez au panneau de configuration
2. Localisez [Power options] et sélectionnez [Change what the power buttons do].
3. Sélectionnez [Change settings that are currently unavailable].
4. Décochez la case du réglage [Turn on fast startup] et enregistrez les changements.
5. C'est terminé.
Question (Q&A-97|318):
Après la mise à jour du BIOS pour assurer la compatibilité Ivy Bridge, un périphérique inconnu "INT33A0" apparaît dans le gestionnaire de périphériques. Que puis-je faire ?(8/1/2012)
Answer:Il s'agit du périphérique Intel Smart Connect. Vous pouvez désactiver l'option Intel Smart Connect dans le BIOS ou suivre la procédure ci-dessous pour installer le pilote nécessaire.
Etape 1 : Veuillez télécharger le pilote Intel Smart Connect depuis notre site internet : https://www.asrock.com/support/download.fr.asp
Etape 2 : Installez le pilote et redémarrez le système.
Question (Q&A-95|313):
Je n'arrive pas à finaliser l'installation d'AXTU sur un système Windows 7 en langue japonaise, comment régler ce problème ?(5/1/2012)
Question (Q&A-90|302):
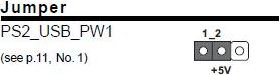
Après l'extinction du système, mon clavier et ma souris restent allumés. Comment les éteindre ?(12/1/2011)
Answer:Si votre carte mère dispose du jumper PS2_USB_PWR1, veuillez le régler sur la position 1_2(++5V) comme indiqué sur le schéma ci-dessous.
Si ce jumper n'est pas présent, veuillez paramétrer [Deep SX] sur [Enable] dans le BIOS ou régler [On/Off Play] sur
[Disabled] dans le BIOS.
Question (Q&A-89|298):
Si mon clavier ou ma souris se comportent de manière anormale dans le BIOS, comment puis-je résoudre ce problème ?(11/1/2011)
Answer:Veuillez mettre à jour le BIOS depuis le lien ci-dessous, ou téléchargez le BIOS Beta depuis la Beta Zone (pour test uniquement). Lien de téléchargement du BIOS: https://www.asrock.com/support/download.fr.asp
Question (Q&A-88|294):
Comment puis-je activer la commande "Data Execution Protection (DEP)" supportée par mon processeur ?(9/1/2011)
Answer:Veuillez accéder au BIOS, et réglez [No execute Memory Protection] sur[Enabled].
Cette option se trouve dans votre BIOS-> Advanced-> CPU Configuration->Réglez [No execute Memory Protection] sur [Enabled.]
Question (Q&A-88|293):
Je voudrais tester la fonctionnalité VT-d. Avez vous un guide de procédure et de fonctionnement ?(9/1/2011)
※ *La configuration requise est indiquée ci-dessous :
i. 2 GB ou plus de mémoire vive (Minimum requis pour VMWare)
ii. Les processeurs K-Series ne sont pas compatibles VT-d
Question (Q&A-87|295):
Mes périphériques USB 3.0 équipés du contrôleur JMicron ne sont pas détectés par les ports USB 3.0 avec contrôleur Etron. Que puis-je faire ?(9/1/2011)
Answer:veuillez suivre la procédure ci-dessous :
1.Veuillez mettre à jour le pilote de votre contrôleur Etron USB 3.0 avec la version v0.104 depuis le lien de téléchargement ci-desssous: https://download.asrock.com/Drivers/others/Etron(0.104.WHQL).zip
2.Veuillez prendre contact avec JMicron et leur demander de vous assister pour la mise à jour du firmware.
Vous pouvez contacter JMicron à l'adresse indiquée ci-dessous :
Email: fae@jmicron.com
Veuillez indiquer à JMicron que vous utilisez la version v0.104 du pilote de périphérique.
Question (Q&A-86|288):
Lors de l'utilisation de Windows MCE, le système sort parfois de veille automatiquement. Comment résoudre ce problème ?(6/1/2011)
Answer:Veuillez vous reporter à la capture d'écran ci-dessous pour désactiver l'option "Télécharger automatiquement les données de Windows Media Center entre les heures suivantes".
(Chemin d'accès : Windows Media Center> Tâches->Paramètres-> Général->Options de téléchargement automatique-> Télécharger automatiquement les données de Windows Media Center entre les heures suivantes)
Question (Q&A-84|286):
What's the meaning of AMI UEFI BIOS Beep code?(4/1/2011)
Answer:Please refer to below form for the beep code and debug code of AMI UEFI BIOS.
Condition
Beeps Code
Debug Code
Normal
No beep
With goodnight LED enabled, debug code will disappear after the beep.
Bad CPU
No beep
No debug code
Bad memory
No beep
45
Without memory
3 long beeps
53
Without CPU
No beep(No Power)
No debug code
Without VGA card
5 long beeps
Beeps at"d6", then show "0d"
Question (Q&A-83|282):
Pourquoi mon iPhone4 n'est-il pas reconnu par le contrôleur Etron USB 3.0 ?(3/14/2011)
Answer:Veuillez télécharger les pilotes en version 0.96 du contrôleur Etron USB 3.0 et mettre à jour votre système.
Le lien de téléchargement du pilote en version 0.96 du contrôleur Etron USB 3.0 est ci-dessous : https://www.asrock.com/support/download.fr.asp
Question (Q&A-83|280):
Après avoir installé Daemon Tool, pourquoi mon système refuse de lire un film sur support Blu-ray sous PowerDVD 10 ?(3/14/2011)
Answer:Veuillez activer l'option "Advanced Emulation" dans la page de préférences de Daemon Tool.
Question (Q&A-83|281):
Si j'utilise Directory Opus, comment améliorer les performance du contrôleur réseau ?(3/14/2011)
Answer:Veuillez effectuer les réglages suivants :
1.Dans l'utilitaire Directory Opus, veuillez augmenter la taille du buffer à 9999
2.Green Ethernet : Désactivé (Disabled)
3.Interrupt Moderation : Désactivé (Disabled)
Question (Q&A-79|264):
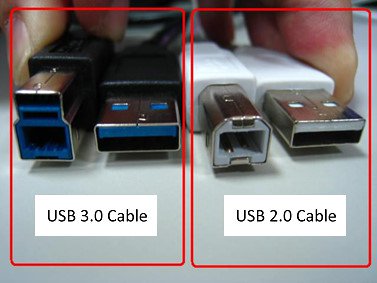
Puis-je utiliser un câble USB 2.0 pour connecteur un disque dur externe USB 3.0 et bénéficier du mode SuperSpeed USB 3.0 ?(5/6/2010)
Answer:Les câbles USB 2.0 et USB 3.0 sont différents. Veuillez vous reporter au visuel ci-dessous pour déterminer si votre câble est au format USB 2.0 ou USB 3.0.
Si vous utilisez un câble USB 2.0 sur un disque dur externe USB 3.0 comme ci-dessous, ce disque ne fonctionnera pas en mode SuperSpeed USB 3.0.
Veuillez connecteur un câble USB 3.0 sur votre disque dur externe pour bénéficier du mode SuperSpeed USB 3.0.
Question (Q&A-77|260):
Puis-je utiliser une solution watercooling pour refroidir mon processeur ?(11/21/2009)
Answer:Nous recommandons d'utiliser les kits de refroidissement AMD® ou Intel® plutôt qu'une solution watercooling. Ils assurent une meilleure circulation de l'air dans le châssis.
Question (Q&A-77|262):
J'ai connecté mon récepteur IR sur le port IR intégré. Comment le faire fonctionner sous Windows® 7 ?(11/21/2009)
Answer:Veuillez effectuer la mise à jour VIA® Windows® Update comme indiqué ci dessous (Fig 1.)
Question (Q&A-77|259):
Ma carte mère est-elle compatible Windows® 7 ?(11/21/2009)
Answer:Veuillez vous reporter à la liste de modèles compatibles Windows® 7 sur notre site internet.
Lien: https://www.asrock.com/news/events/2009win7/index.asp
Si votre modèle n'est pas dans la liste de compatibilité Windows® 7, veuillez essayer les pilotes intégrés.
Ou vous rendre sur le site du fabricant de votre produit pour télécharger le pilote du chipset concerné.
Site internet Intel: http://downloadcenter.intel.com/Default.aspx
Site Internet AMD: http://support.amd.com/us/gpudownload/Pages/index.aspx
Site Internet Nvidia: http://www.nvidia.com/Download/index.aspx?lang=en-us
Site Internet Realtek: http://www.realtek.com.tw/downloads/
Site Internet Via: http://www.via.com.tw/en/support/drivers.jsp
Si vous rencontrez d'autres problèmes, veuillez contacter le support technique ASRock : Asrock_TSD@asrock.com.tw
Question (Q&A-73|250):
Je ne peux pas installer un OS 64-bit virtuel lorsque j'utilise un processeur AMD® avec le logiciel Sun xVM Virtual Box. comment procéder ?(6/25/2009)
Answer:1. Veuillez vérifier que votre système est bien 64-bit, et que votre processeur supporte la fonction AMD-V.
2. Activez l'option [Secure Virtual Machine] dans le BIOS.
3. Veuilez cocher la case de l'option [Enable Nested Paging] dans le logiciel xVM Virtual Box de Sun.
Vous pouvez maintenant installer un OS 64-bit virtuel.
Question (Q&A-71|246):
J'utilise Vista 64-Bit SP1 et l'observateur d'évènements affiche des erreurs de Kernel-Processeur-Alimentation. Malgré cela, mon système fonctionne parfaitement. Comment résoudre cette erreur dans l'observateur d'évènements ?(2/27/2009)
Answer:Veuillez vérifier le réglage suivant dans le BIOS
A)-> Si vous utilisez un processeur Intel, veuillez activer [Enable] l'option [Intel® Speedstep ™ tech] dans le BIOS.
B)-> Si vous utilisez un processeur AMD, veuillez activer [Enable] l'option [Cool'n'Quiet] dans le BIOS.
C)-> Si votre processeur ne supporte pas les fonctions [Intel® Speedstep ™ tech] ou [Cool'n'Quiet], veuillez contacter ASRock VIA® le lien ci-dessous : https://www.asrock.com/support/TSD.asp
Question (Q&A-69|242):
Lorsque je connecte le câble HDMI_SPDIF depuis la carte graphique (GTX260 ou GF9800) sur le connecteur HDMI_SPDIF de la carte mère, aucun son ne sort VIA® le connecteur HDMI. Que dois-je faire ?(11/27/2008)
Answer:L'ordre des pins du connecteur HDMI_SPDIF de la carte mère est différent de celui de certaines cartes graphiques.
Veuillez connecteur le câble HDMI_SPDIF comme ci-dessous :
Question (Q&A-68|238):
Je suis entrain d'utiliser la carte mère Intel® chipset X48/ X38/ P45/ P43/ G43/ P35/ avec modules de mémoire 4GB installé. Mais il va toujours detecter la dimension de mémoire comme 3GB au lieu de 4GB sur l'écran POST. Je doix faire quoi?(10/23/2008)
Answer:Veuillez entrer la configuration BIOS et activer l'option "Memory Remap Feature".
(BIOS/ Advance/ Configuration Chipset / Memory Remap Feature)
Question (Q&A-66|233):
Il s'agit d'une limitation de Windows® XP. Veuillez vous reporter à la base de documentation Microsoft® pour plus de détails : http://support.microsoft.com/kb/284893(7/31/2008)
Answer:Sur les processeurs de type Pentium 4 (et des générations ultérieures), le Vcore n'est plus statique. Veuillez vous reporter au document Intel® ci-dessous. Il montre que le Vcore diminue en fonction de l'augmentation de la charge du processeur. Ceci explique le fait que Vcore peut être inférieur à la valeur affichée dans le BIOS.
(Source: http://download.intel.com/design/processor/datashts/318732.pdf)
Question (Q&A-66|232):
J'ai installé plus de 2 GB de mémoire vive sur mon système. Lorsque j'utilise l'outil d'enregistrement sonore sous Windows® XP, le message d'erreur suivant apparait. Que puis-je faire ? (7/31/2008)
Answer:Il s'agit d'une limitation de Windows® XP. Veuillez vous reporter à la base de documentation Microsoft® pour plus de détails : http://support.microsoft.com/kb/284893
Question (Q&A-64|229):
Lorsque j'utilise Adobe Acrobat Reader 7.08 pour lire un fichier PDF sous Windows® Vista™ SP1, le message d'erreur suivant s'affiche : "Ce logiciel présente un problème de compatibilité....".
Que puis-je faire ?(4/28/2008)
Answer:Veuillez vous rendre sur le site d'Adobe et télécharger la dernière version d'Adobe Acrobat Reader qui corrige ce problème (8.1.2 et ultérieur)
Answer:Voici quelques suggestions :
1.Activez l'option "Onboard LAN" dans le bios de la carte mère (ENABLE)
2.Assurez vous d'avoir installé correctement le pilote du contrôleur LAN. Vérifiez l'état de l'installation du pilote dans le gestionnaire de périphériques
3.Procédez à la mise à jour du BIOS de votre carte mère :
4.Essayez le dernier pilote en date disponible auprès d'ASRock ou du fabricant du contrôleur réseau.
ASRock: https://www.asrock.com/support/Download.fr.asp
Realtek: http://www.realtek.com.tw/default.aspx
nVidia: http://www.nvidia.com/Download/index.aspx?lang=en-us
VIA
5.Changez vôtre ou vos câbles réseau (Dans le cas d'un réseau Gigabit, assurez vous de disposer de câbles compatibles et certifiés)
6.Procédez à la réinstallation de votre système d'exploitation.
Question (Q&A-62|224):
J'utilise la carte ASRock WiFi comme point d'accès sans fil. Cependant il y a d'autres points d'accès sans fil aux alentours. Comment puis-je changer le canal du point d'accès pour éviter les interférences ?(2/14/2008)
Answer:Veuillez suivre les étapes ci-dessous pour changer le canal du point d'accès.
1.Cliquez sur "Setup" pour accéder aux propriétés du réseau sans fil.
2.Désélectionnez "Auto_Channel"
3.Choisissez le canal souhaité. (Nous vous recommandons les canaux 1, 6 ou 11, qui produisent le moins d'interférences)
4.Cliquez sur "Finish" pour terminer le paramétrage.
Question (Q&A-60|215):
J'utilise un processeur AMD® AM2 Athlon 64 X2 5000+ Black Edition. Le multiplicateur de ce processeur est débloqué. Je voudrais l'overclocker en modifiant le multiplicateur. Mais après avoir effectuer la modification dans le BIOS et avoir redémarré sous Windows, le changement du multiplicateur n'a pas été pris en compte. Que dois-je faire ?(12/19/2007)
Answer:Il s'agit du comportement du pilote du processeur. Afin de pouvoir overclocker votre processeur, veuillez désactiver la fonction "Cool'n'Quiet" dans le BIOS -> Advanced->CPU Configuration ->Cool'n'Quiet. Veuillez vous reporter à l'image ci-dessous.
Question (Q&A-59|212):
J'utilise 4 GB de mémoire vive sous Windows® XP Professionnel x64. Pourquoi ne puis-je pas activer l'option d'hibernation dans les options d'alimentation du panneau de configuration ? Il n'y a pas d'onglet relatif à l'hibernation.(11/5/2007)
Answer:Windows® XP Professionnel x64 ne supporte pas l'hibernation sur les systèmes dotés de 4 GB de mémoire vive. Veuillez vous reporter à la base de connaissances Microsoft® pour plus d'informations à ce sujet : http://support.microsoft.com/kb/888575
Question (Q&A-52|197):
Si le port MIDI/GAME est activé (Enabled) dans le BIOS, le gestionnaire de périphériques de Windows® Vista™ affiche un point d'exclamation (!) jaune. Pourquoi ?(3/19/2007)
Answer:Microsoft® n'assure plus le support du port MIDI/GAME sous Windows® Vista™.
Veuillez vous reporter à la Question/Réponse N°4 à cette adresse :
http://forums.microsoft.com/TechNet/ShowPost.aspx?PostID=716672&SiteID=17
Question (Q&A-51|194):
Comment activer la fonctionnalité Windows® Aero sous Windows® Vista™ Premium ?(2/15/2007)
Answer:Vous devez tout d'abord vous assurer que votre système rassemble les conditions requises pour l'activation d'Aero sous Windows® Vista™ Premium. Si ce n'est pas le cas, vous ne pourrez pas activer l'interface Windows® Aero.
Composant
Configuration requise
Processeur
Processeur x86 compatible 32-bit ou Processeur x64 compatible 64-bit
Mémoire
512MB Single Channel (Premium, modèles séparés) 512MB x 2 Dual Channel (Premium, modèles intégrés)
VGA
DirectX9.0 (avec pilote WDDM) avec mémoire vidéo 128-bit (Premium)
Audio
UAA Audio (HD Audio, USB Audio et IEEE1394 Audio) (Premium ou basic selon le niveau de codec)
Veuillez suivre la procédure ci-dessous pour activer la fonction Windows® Aero :
1.Cliquez avec le bouton droit de la souris sur le bureau et cliquez sur "Personnaliser"
2.Sélectionnez la rubrique "Couleur et apparence des fenêtres"
3.Cliquez sur "Ouvrir les propriétés d'apparence classique pour des options de couleurs supplémentaires" comme indiqué sur le visuel ci-dessous.
4.Réglez le Modèle de couleurs sur "Windows® Aero".
Question (Q&A-50|192):
Je voudrais utiliser la fonction CD-in analogique de Windows® Vista™. Mais l'option Analogique de lecture et d'enregistrement ne peut pas être sélectionnée sous Windows® Vista™. Pourquoi est-elle grisée ? (Voici une capture d'écran) (1/16/2007)
Answer:Windows® Vista™ ne supporte pas cette fonction. La sortie audio depuis un CD/DVD-ROM est exclusivement digitale.
Question (Q&A-50|191):
Quand mon système est en veille, il ne peut être réveillé par un périphérique USB. Que puis-je faire ?(1/16/2007)
Answer:Ceci est relatif à Windows® XP. Veuillez vous reporter à la base de connaissances Microsoft® : http://support.microsoft.com/kb/841858
Si vous souhaitez pour bénéficier de la possibilité de réveiller votre système à l'aide de périphériques USB, tels que souris, télécommande, vous devez installer le fichier de registre ci-dessous et redémarrer votre système :
https://www.asrock.com/support/download/ResumeUSB.ZIP.
Question (Q&A-49|13):
I am using the AMD® AM2 rev.G CPU. But the system always stops at POST after I turn on the system. I can't go into the operating system. What should I do?(12/19/2006)
Answer:For supporting AMD® AM2 rev.G CPU, please follow the steps to update the BIOS of your motherboard to the latest one.
1.Please press the "F2" key continuously right after turn on the system until it goes into the BIOS setup.
2.Please disable the "Cool'n'Quiet" function in BIOS setup.
3.Press "F10" key to save configuration changes and exit setup.
4.You can start to update the BIOS now.
How to update BIOS?
https://www.asrock.com/support/DOS.html
BIOS download page.
https://www.asrock.com/support/download.asp?c=All
Question (Q&A-47|186):
My power supply has two 4-pin (2X2) power connectors. Which one should I connect to the motherboard?(10/20/2006)
Answer:Please refer to the following pictures:
1.Please use this connector on the motherboard. (2 black and 2 yellow wires)
2.This is 20+4 pin connector; please only connect the 20-pin connector to the motherboard. Please DO NOT connect this 4-pin connector to the motherboard. (1 black, 1 yellow, 1 red and 1 orange wire)
Question (Q&A-45|181):
What key should I press to enter into BIOS setup? What key should I press to enter into boot menu?(8/18/2006)
Answer:To enter BIOS setup, please press "F2" repeatedly right after you turn on the computer until system goes into BIOS setup.
If you want to enter into boot menu, please press "F11"
Question (Q&A-42|170):
When I use DDR 400 (200 MHz) memory on my board, it shows that the DRAM frequency is running at DDR 333 (166MHz) in BIOS main page. The BIOS option "DRAM Frequency" is set at default setting "Auto". Why?(4/21/2006)
Answer:In order to get the best system compatibility and stability, we make it to run at DDR 333 (166MHz) when DDR 400 (200MHz) memory is installed and BIOS option "DRAM Frequency" is selected to "Auto". If you want to run DDR 400 (200MHz), please kindly adjust the BIOS option "DRAM Frequency" to DDR 400 (200 MHz) manually.
Question (Q&A-40|165):
I have installed total 4GB memory on my motherboard. However, it can only recognize around 3GB or less. How should I do to recognize 4GB totally?(2/17/2006)
Answer:Please refer the description Q4 of Q&A-20.
https://www.asrock.com/support/QA/TSDQA-20.pdf
This limitation applies to most chipsets & Windows® XP 32-bit version operating system.
If you want to get 4GB memory for your system, below two conditions must be required:
1. The memory controller which supports memory hole(memory remap) functionality is used. The latest chipsets like Intel® new chipset, or other chipsets and AMD® K8 CPU architecture can support the memory hole(memory remap) function.
2. Windows® XP Pro X64 Ed. (64-bit) or other OS which can address more than 4GB memory.
http://www.intel.com/support/motherboards/server/sb/cs-016594.htm
Question (Q&A-39|161):
After installing Windows® XP x64 Edition, I see an "Unsupported Standard Game Port" in device manager. And there is no exclamation mark or error message. Why?(1/16/2006)
Answer:Microsoft® does not support game port in Windows® XP x64 Edition. If you want to use a joy pad or joystick in Windows® XP x64 Edition, please use an USB one.
Question (Q&A-36|152):
How do I use "Boot from Network" function on ASRock motherboard?(10/17/2005)
Answer:Please press F2 when power on, enter the BIOS setting menu. Select the screen "Boot". Go to the sub screen "Boot settings Configuration". Set the item "Boot From Network" to "Enable". Press F10 to save the setting and reboot.
After restart, press F11 and select Network as the boot device. Or press F2 and enter the sub screen "Boot Device Priority" in BIOS "Boot" screen to change the boot priority of Network.
Question (Q&A-29|132):
I use a HT CPU and an ASRock motherboard which supports Hyper-Threading. How do I know if my system is working under Hyper-Threading?(3/21/2005)
Answer:Please right click on the Taskbar and choose the Task Manager. In "performance" option, if you see two figures of CPU Usage History, it means that the system is working under Hyper-Threading. (Please refer to the following picture).
Hyper-Threading
If you see only one figure of CPU Usage History, it means that the system is not working under Hyper-Threading. (Please refer to the following picture).
Non Hyper-Threading
Question (Q&A-26|119):
During POST the display shows "Mac address are invalid in both CMOS and DMI. Press F1 to resume". What should I do?(12/15/2004)
Question (Q&A-26|120):
My CPU is Duron FSB 200 MHz CPU. Why my DDR 400 SDRAM can only run at DDR 266 speed on the K7VT6 motherboard?(12/15/2004)
Answer:According to the specification of VIA KT600, only DDR 266 SDRAM is supported if FSB 200 MHz CPU is installed. DDR 400 SDRAM is supported with FSB 266, 333, or 400 MHz CPU. Please refer to the following supporting table.
FSB \ Memory
DDR 266
DDR 333
DDR 400
200 MHz
Yes
No
No
266 MHz
Yes
Yes
Yes
333 MHz
Yes
Yes
Yes
400 MHz
Yes
Yes
Yes
Question (Q&A-24|118):
My OS is Windows XP (or Windows 2000), and I have installed XP Service Pack 1 (Windows 2000 Service Pack 4). But when I use USB 2.0 devices, it will show "High-Speed devices is attached to a non-Hi-Speed port". How can I use USB 2.0 devices?(10/15/2004)
Answer:Please go to "device manager" to check if the driver was installed properly. If not, please do the following steps.
1.Right click the exclamation mark device and choose properties.
2.Click "update driver".
3.Choose "Install the software automatically"
4.Then it will find the device. Please click finish.
Question (Q&A-23|114):
After updating Windows XP to service pack 2, some benchmark or programs may not work properly. What's going on?(9/14/2004)
Answer:Currently, Windows XP service pack 2 is causing some incompatible issue. For incompatible issue of service pack 2, you can refer to following Microsoft's web site:
http://support.microsoft.com/default.aspx?kbid=884130&product=windowsxpsp2
Question (Q&A-23|112):
My ASRock motherboard supports Hybrid Booster. Is Hybrid Booster a utility to install? Where can I get it?(9/14/2004)
Answer:The Hybrid Booster features supported on each models are a little different.
Please go to https://www.asrock.com/mb/index.asp and find the specification of your motherboard and check the exact features supported.
Actually, Hybrid Booster is a combination of several features which have already been provided with the motherboards.
1. CPU Multiplier: Adjusted by setting onboard FID jumpers.
2. CPU Vcore adjustment: Adjusted by setting BIOS setup option.
3. CPU Frequency Stepless control: Adjusted by setting BIOS setup option.
4. AGP/PCI Frequency control: Adjusted by setting BIOS setup option.
5. ASRock U-COP: Hardware feature, no need to be adjusted.
6. Boot Failure Guard: BIOS feature, no need to be adjusted.
Please refer to https://www.asrock.com/feature/HybridBooster/HybridBooster.html for detailed explanations.
Question (Q&A-22|106):
Does my ASRock K7 motherboard, which supports Athlon XP FSB 333 MHz CPU, support AMD® Sempron CPU?(8/16/2004)
Answer:Yes, all ASRock motherboards, which support Athlon XP FSB 333 MHz CPU, would support AMD® Sempron CPU by updating the BIOS. Also ASRock K8S8X motherboard would support AMD® Sempron CPU by updating the BIOS. Please refer to ASRock web site for more information. https://www.asrock.com/support/CPU.asp
Question (Q&A-20|102):
Why is my 4GB of memory reported as about 3.5GB by the system if the chipset of the motherboard support to 4GB Memory size?(6/11/2004)
Answer:Under the current PC memory addressing, there is a memory area just below 4.0 GB which is reserved permanently. The maximum DDR memory support is actually about 3.5GB rather than 4GB. This limitation is caused by the current PC architecture in which the missing 0.5GB of memory addresses are reserved for PCI I/O space, AGP aperture mapping space, and other onboard device I/O space. Thus although the chipset datasheet may claim memory support for up to 4GB, the system actually only offers about 3.5GB with four 1GB DDR DIMMs installed. 32 bit processors only support 4GB of address space.
Question (Q&A-19|97):
I'm using INTEL Prescott CPU on ASRock motherboard. After the system works for a while, I realize that the sound of the CPU fan is getting louder. What's wrong?(5/15/2004)
Answer:Please understand that this is a normal behavior of Intel boxed heat sink. The cooling fan which comes with Prescott CPU (see the following pictures) is an automatically adjustable CPU cooling fan and the speed of the fan will be adjusted according to the environment temperature. While higher temperature is detected by the INTEL boxed heat sink, the fan will speed up. So the sound will get louder.
Question (Q&A-18|93):
My ASRock motherboard can support Prescott CPU. If I want to use Prescott CPU, is there anything I need to notice?(4/15/2004)
Answer:Prescott CPU needs more powerful power supply than Northwood CPU. Please use a 400W(or higher) power supply with Prescott CPU. We also recommend to use following vendors' power supply:Delta、FSP、Seventeam、Macron、Snake、AcBel Or please consult the suggestion of this website.
http://www.tomshardware.com/howto/20021021/powersupplies-15.html
Question (Q&A-18|89):
My on-board LAN is not working, I found that the MAC address of my on-board LAN is 00-00-00-00-00-00 or FF-FF-FF-FF-FF-FF. What's wrong?(4/15/2004)
Answer:The MAC address of the on-board LAN is erased. After updating the BIOS or clearing the CMOS, please boot up the system and enter the BIOS setup. After loading the BIOS default, please exit and save changes. Failing to do so may cause the MAC address disappeared. If the MAC address is gone, please contact ASRock technical support engineer for help. ( https://www.asrock.com/general/about.asp?cat=Contact )
Question (Q&A-17|87):
When connecting the POWER SW, POWER LED, RESET SW and HDD LED cables from my chassis to the PANEL1 connector on the motherboard, I found that the pin holes of the cable does not match with the connector. What should I do?(3/15/2004)
Answer:Please see the following pictures. If your POWER LED cable is designed with 2 cables in pin hole 1 and 3 (see Fig.1), please remove one of the cables and insert to the middle pin hole 2 (see Fig.2). Then, please refer to Fig.3 and Fig.4 for the connection.
Question (Q&A-17|86):
My motherboard is Intel or ALi south bridge based motherboard. When I connect the ATX power connector to the motherboard, the system power on right away. Why?(3/15/2004)
Answer:This issue will happen if CMOS checksum is bad. Please enter the BIOS setup then load BIOS default setting to solve this issue.
Question (Q&A-16|83):
When I play some video or audio media files through my IDE optical devices (CD-ROM and DVD-ROM). I feel that the video/audio playback is not smooth. What should I do?(2/17/2004)
Answer:It might be that the CDROM is transferring in PIO mode instead of DMA mode. It is highly recommended to enable the DMA function of your IDE optical devices (CD-ROM or DVD-ROM) in order to reduce the CPU loading when accessing optical discs. Please follow the bellow procedure to enable DMA mode.
In Windows 2000/XP, assuming that your IDE optical device is connected on secondary IDE channel as master drive,
Right click the "My computer" icon, select "Properties". Then, select "Hardware"----"Device Manager".
In "Device Manager", select "IDE ATA/ATAPI controllers"----double click "Secondary IDE Channel".
In "Secondary IDE Channel Properties", select "Advance Settings" and adjust the "Transfer Mode" of the CDROM (Device 0) from "PIO Only" to "DMA if available".
Click "OK".
In Windows 98SE/ME,
Right click the "My computer" icon, select "Properties". Then, select "Device Manager".
In "Device Manager", double click "CDROM". Then, double click your optical device under "CDROM".
In the new window which displays the optical device properties, select "Settings". Then, check the "DMA" box in "Options".
Click "OK".
Question (Q&A-15|81):
I'd just finished setting up my system. When booting it up, I found that the LED of the floppy drive is always on and I cannot read any floppy disk with the floppy drive. Why?(1/14/2004)
Answer:Perhaps the floppy ribbon cable is connected to the floppy drive with the wrong orientation. Please reconnect the floppy cable and make sure to match the red marking on the floppy ribbon cable with Pin1 of the floppy drive connector. However, some floppy drives' connectors may not be easily to define Pin1. You can try to check around the connector. Usually, there will be labels for Pin1 or Pin2.
Question (Q&A-14|74):
I'm using an add-on LAN card on my ASRock motherboard. The LAN card provides a "Wake On LAN" connector with a cable. Is there a connector on the motherboard so that I can plug this cable?(12/12/2003)
Answer:There's no need to connect this cable to the motherboard and you are still able to use the "Wake On LAN" feature with the add-on LAN card. To use it, please remember to enable the "PCI Device Power On" option in BIOS.
Question (Q&A-14|75):
My parallel port printer can't work normally with my ASRock motherboard. What should I do now?(12/12/2003)
Answer:Please try to go to BIOS SETUP -> Advanced menu -> Peripheral Configuration -> Parallel Port Mode, and set it to "Normal".
Question (Q&A-14|73):
I have an ASRock ATX motherboard. Do I need to screw on the double hole?(12/12/2003)
Answer:ASRock ATX motherboards are ATX specification 1.1 and 2.0 compliant, so the screw hole, which is on the right bottom of board, will be double holes design. According to the ATX specification, it is not necessary to screw this hole, you can please just use a plastic stand to bear this hole. If you still want to screw this hole, please do not over-tighten the screw, doing so may damage the board.
Question (Q&A-13|66):
I'm using Duron 1600MHz Applebred CPU on your K7 series motherboard. How come the CPU is only recognized as a Duron 1200MHz CPU?(11/14/2003)
Answer:The FSB of Duron Applebred CPU (1400MHz to 1800MHz) is 266MHz. It is different from the former Duron CPU (FSB 200MHz). Please remember to adjust the FSB_SEL jumper to FSB 266MHz while using a Duron Applebred CPU.
https://www.asrock.com/support/K7Jumper.pdf
Question (Q&A-13|71):
With 3Com /Intel Gigabit LAN card installed, my system cannot connect to the Internet if PC-cillin 2002 personal firewall is enabled. How do I solve it?(11/14/2003)
Answer:Please update the driver for PC-cillin 2002 personal firewall. The solution is available from Trend Micro Web Site.
English version: http://kb.trendmicro.com/solutions/solutionDetail.asp?solutionID=17007
Chinese version: http://www.trendmicro.com.tw/solutionbank/consumer/Show_SB.asp?L1ClassNo=5&L2ClassNo=28&SBNo=1081
Question (Q&A-12|62):
I'm using an ASRock motherboard which supports Hyper-Threading technology. How come there is no Hyper-Threading technology option in BIOS setup?(10/15/2003)
Answer:The Hyper-Threading technology option in BIOS will appear only when a Hyper-Threading technology CPU is installed.
Question (Q&A-10|56):
After I shut down the system, my USB mouse is still light on. Why?(8/15/2003)
Answer:In order to solve this problem, please adjust the PS2_USB_PWR1 jumper to pin 1-2(+5V).
Question (Q&A-10|54):
My motherboard provides FID jumpers. Why I can't change my CPU multiplier even though I already adjust FID jumpers correctly?(8/15/2003)
Answer:If the multiplier of your CPU is locked by itself, you can't change it even though you set FID jumpers through the motherboard.
Question (Q&A-10|52):
What is Boot Failure Guard (B.F.G)? How do I enable this function?(8/15/2003)
Answer:It is an ASRock new technology. While the system could not boot up normally at overclocking setting, the safe boot up mode will be issued from B.F.G and provides a BIOS setting interface for parameter reset/correction.
You don't need to adjust any setting to enable B.F.G. It is a basic function for ASRock motherboard.
Question (Q&A-9|48):
When I'm going to install USB 2.0 driver for my Windows 2000, it asked me to update Service pack 4. Where can I get Service pack 4 for Windows 2000?(7/9/2003)
Answer:Windows 2000 service pack 4 is now available on Microsoft website.
Please refer to http://www.microsoft.com/windows2000/downloads/servicepacks/sp4/default.mspx
Question (Q&A-9|46):
How could I use Wake on LAN function?(7/9/2003)
Answer:All of ASRock motherboards support Wake on LAN. Please enable the "PCI Device Power On" in the Power menu of BIOS. After saving the changes and exit the BIOS, please boot into the Windows OS then shut down the system.
Now, the system is ready to be woken up through LAN by other computers.
Question (Q&A-9|45):
I'm using ASRock motherboard. In the BIOS, I found that the Vcore is a little bit higher. Is this normal?(7/9/2003)
Answer:The value is still in tolerance of the CPU SPEC. It's more stable to set the Vcore a little higher under CPU SPEC. Please do not worry about it.
Question (Q&A-8|43):
How to clear CMOS? (6/13/2003)
Answer:Please unplug the ATX power and remove the battery, use a metal material like paper clip to short the CLRCMOS1 soldering points or CLRCMOS2 jumpers for 3 seconds. After that, install the battery and plug the ATX power back to the motherboard.
Note: Please do not clear the CMOS right after you update the BIOS.
Question (Q&A-8|42):
May I use the power supply without +12V power (4 pins) connector for ASRock Intel platform Motherboards? (6/13/2003)
Answer:ASRock has its own design to omit the Intel specified 4-pin connector. All needed power for motherboard can be supplied from 20-pin ATX connector. So ASRock P4 platform motherboards is able to support some power supplies without +12V 4-pin connector.
Question (Q&A-8|41):
I found two digits or letters changing at the right bottom corner during POST screen. What is it?(6/13/2003)
Answer:This is the BIOS POST code. It represents each step BIOS does during POST screen.
Question (Q&A-8|38):
How do I get the correct CPU speed after updating the BIOS?(6/13/2003)
Answer:After updating the BIOS, the default of BIOS will be loaded with stable setting and the system runs with slower speed to secure the first boot runs successfully. In order to make your system running with the optimum setting, please remember to load turbo/default setting after you update the BIOS.
Question (Q&A-7|37):
What's the function of JL1 and JR1 jumpers on my ASRock motherboard?(5/9/2003)
Answer:When you connect speakers in back panel and front panel at the same time,
1. If the jumpers JL1 and JR1 are short, both front panel and rear panel audio connectors can work.
2. If both jumper caps on JL1 and JR1 are removed, only front panel audio works.
However, it requires your front panel to support the function.
Question (Q&A-7|36):
If I install Win9x MR driver by pressing the auto setup of the support CD, the MR modem always picks up com 5. How do I solve it?(5/9/2003)
Answer:Please reload the driver by following steps:
1. Please click the properties of MR modem under "device manager".
2. Click the "driver" and click "update driver".
3. Select the driver you want.
4. Load the driver from the path to support CD\drivers\amr\win9x
Question (Q&A-6|27):
Does ASRock motherboard support "Boot from USB device", if my USB device is bootable?(4/15/2003)
Answer:Yes! All of ASRock motherboards support "Boot from USB device".
When the system boot up, please press "F8" or "F11" to enter "Boot Menu" and select USB device for your fist boot device , then the system will boot from the USB device which you selected. For P4I45D, please plug the bootable USB device to USB port 2,3.
Question (Q&A-6|25):
Sometimes I cannot boot up from my floppy disk, Why?(4/15/2003)
Answer:Please try to enable the "Floppy Seek" in the BIOS utility.
Question (Q&A-6|30):
I'm using a AMD Athlon XP 2000+ processor with FSB 266MHz on K7S8X, but the FSB jumper can only set from 100, 133, 166MHz. How do I adjust to FSB 266MHz?(4/15/2003)
Answer:Please understand that AMD Athlon XP 2000+ processor with FSB 266MHz is actually running with 133*2=266MHz. Please adjust the FSB jumper to 100MHz for FSB 200MHz processors, 133MHz for FSB 266MHz processors and 166MHz for 333MHz processors.
Question (Q&A-5|24):
Do I need to install USB2.0 driver if my system runs Win XP SP1?(3/3/2003)
Answer:You don’t need to install USB2.0 if you already upgrade to service pack 1 which
include USB2.0 driver.
Question (Q&A-5|23):
Where can I get the detailed BIOS setting description?(3/3/2003)
Answer:You can find the detailed user manual and BIOS setting description in ASRock support CD.
Question (Q&A-5|21):
Why I only see 1667MHz for my Athlon XP 2000+ CPU?(3/3/2003)
Answer:2000+ is the model number of AMD CPU, it does not represent the CPU frequency.
Please refer to http://www.amd.com for more information.
Question (Q&A-5|20):
After I updated BIOS, ASRock LOGO disappeared when booting up. Why?(3/3/2003)
Answer:Please don't worried! ASRock has removed LOGO in the new BIOS for all ASRock model. It is normal that ASRock LOGO disappeared after flashing BIOS.
Question (Q&A-5|19):
What is ASRock U-COP?(3/3/2003)
Answer:ASRock U-COP = ASRock Universal CPU Overheating Protection is a hardware level mechanism, which provide the auto-power-shut-off function to protect CPU from the damage while the CPU temperature getting high.
All ASRock Intel/AMD CPU series motherboards are equipped with ASRock U-COP.
Question (Q&A-4|17):
Should I clear the CMOS after I upgrade the BIOS?(1/30/2003)
Answer:If your system is running fine, you do not have to clear the CMOS. Also please do not clear the CMOS right after you upgrade the BIOS. After upgrading the BIOS, please reboot your system once then you can clear the CMOS if you need to do it.
Question (Q&A-4|16):
How can I set CPU FSB (Front Side Bus) correctly?(1/30/2003)
Answer:For Intel CPU: You do not need to do any setting. When you install CPU at the first time, all that you need to do is go to BIOS and "Load setup defaults", then the system will auto detect the correct CPU FSB.
For K7VT2 and K7VM2: There is a FSB_SEL jumper on the motherboard .
FSB 100Mhz set 2-3
FSB 133Mhz set 1-2
Question (Q&A-2|7):
My PC runs Windows 98/ME, can I still use USB 2.0 products?(11/26/2002)
Answer:Since Microsoft is only developing drivers for Windows XP and 2000, you will have to use a 3rd party vendor's drivers. Also Power Management for USB 2.0 works fine under Windows XP. It may not work properly under Win98/ME/2000. Please check detailed information from Microsoft Web Site:
Question (Q&A-1|2):
What's the meaning of AMI BIOS Beep Codes?(10/29/2002)
Answer:The following are AMI BIOS Beep Codes that can occur.
Beep Code
Descriptions
1 short
Memory refresh timer error.
2 short
Parity error.
3 short
Main memory read / write test error.
4 short
System timer failure.
5 short
Process error.
6 short
Keyboard controller BAT test error.
7 short
General exception error.
8 short
Display memory error.
9 short
ROM BIOS checksum error.
10 short
CMOS shutdown Read/Write error.
11 short
Cache Memory bad.
Question (Q&A-1|4):
If I use 1 GB or more memory on the M/B, Windows 98/ME O.S. shows "Error Message: Insufficient Memory to Initialize Windows". What's wrong?(10/29/2002)
Answer:It's a limitation of Win9x/ME. Windows NT 4.0 / 2000 / XP has no problem, please check detailed information from Microsoft Web Site.
http://support.microsoft.com/default.aspx?scid=kb;EN-US;Q184447
Question (Q&A-1|3):
Can I install both DDR and SD RAM at the same time?(10/29/2002)
Answer:No! Please do not install DDR and SD RAM simultaneously.
 Menu
Menu
 (2/1/2014)
 (8/1/2012)
 (7/31/2008)
 (1/16/2007)