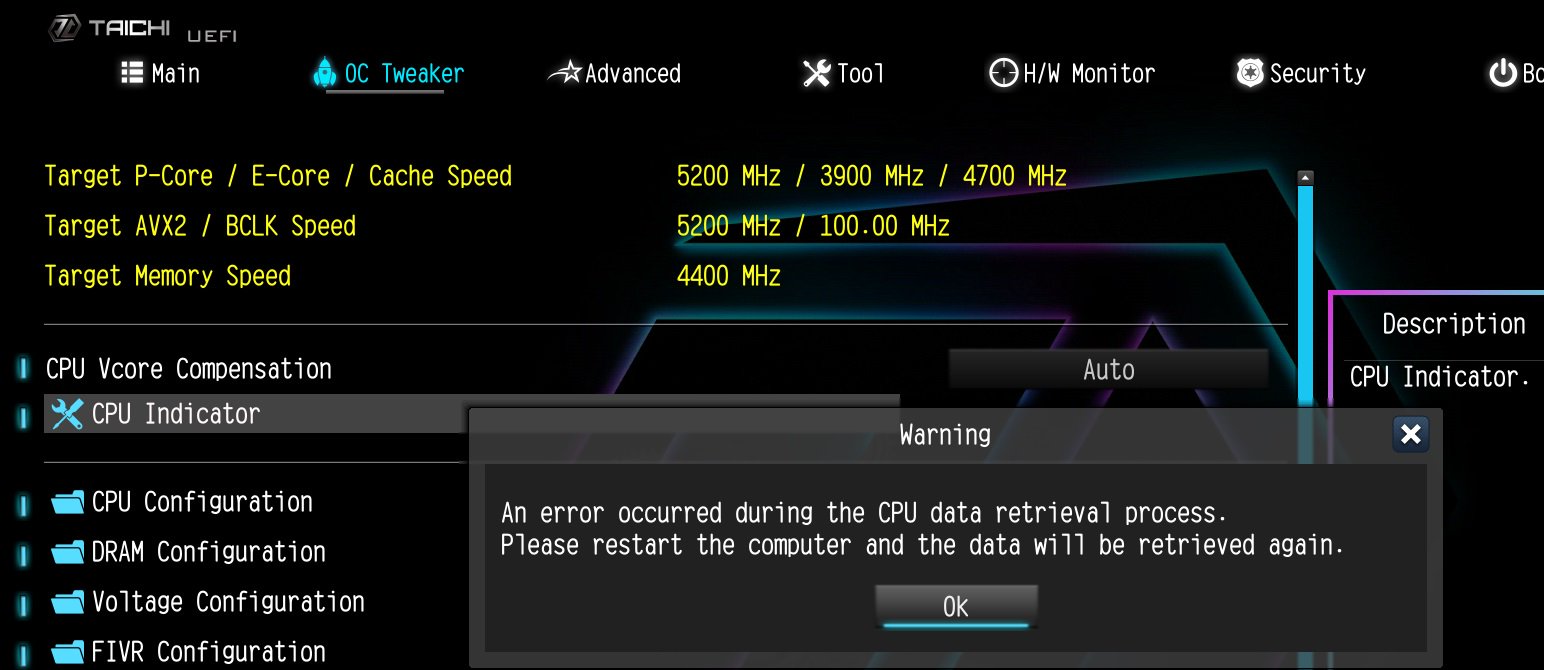
ご質問: How do I enable the Optane H10/H20 hybrid function on the Intel Z690/B660/H670 platform?(3/1/2022) 答え: If you want to make a fresh Windows installation with Optane H10/H20 hybrid function, please refer to the following steps:
Step 1.
Make sure that H10/H20 Optane memory is installed in an M.2 socket which supports Optane. You can find the info by checking the storage section of the motherboard specifications page on ASRock's website.
Step 2.
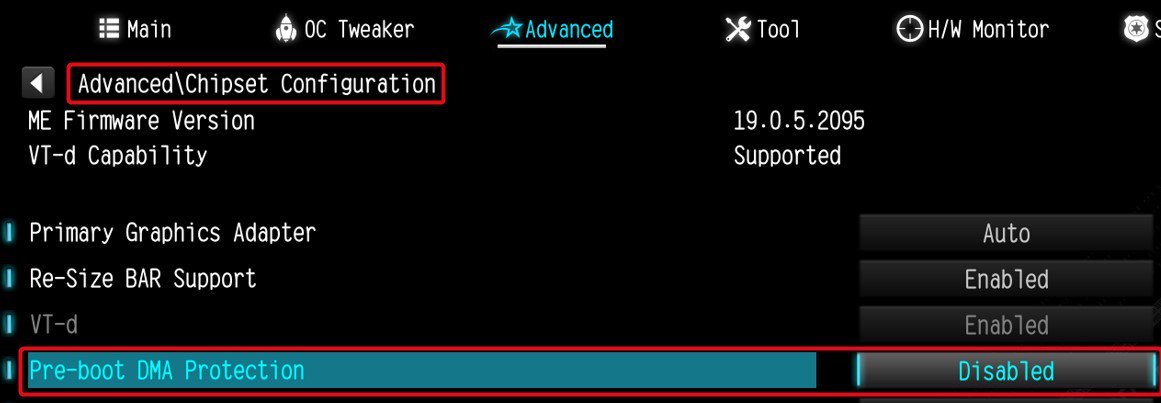
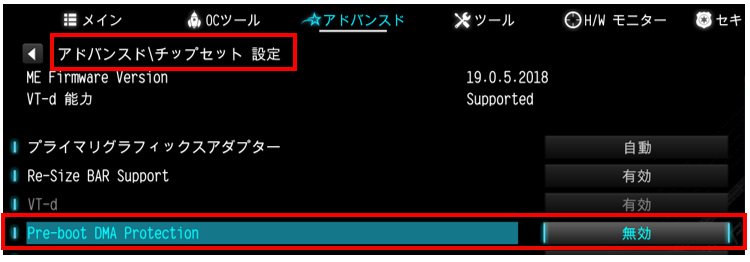
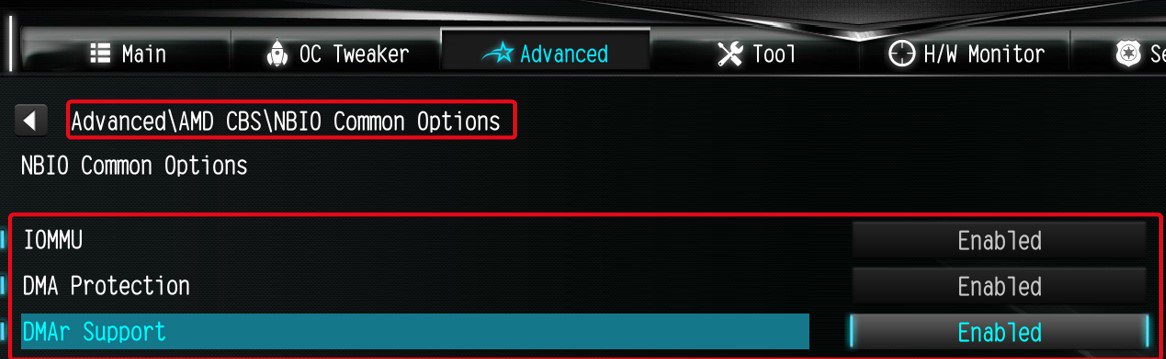
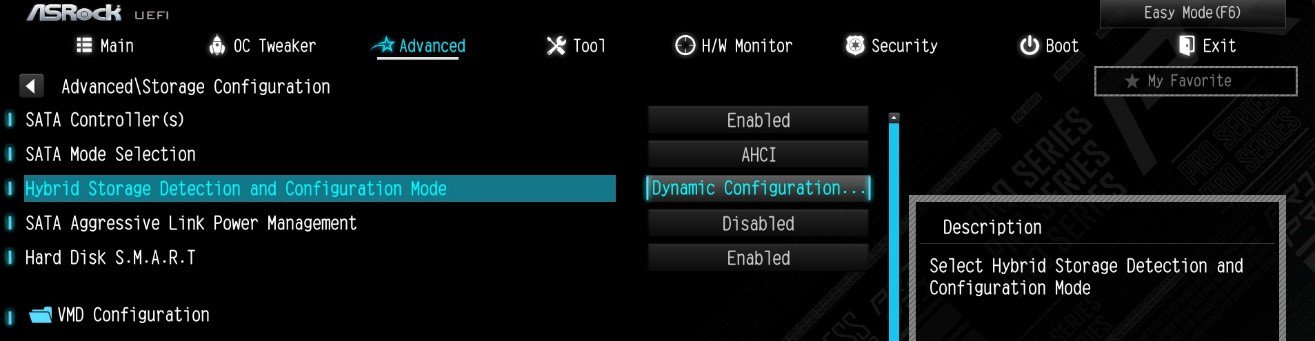
Enable the Hybrid Storage Detection and Configuration Mode in BIOS and press "F10” to save the settings.
Advanced\Storage Configuration\Hybrid Storage Detection and Configuration Mode
Step 3.
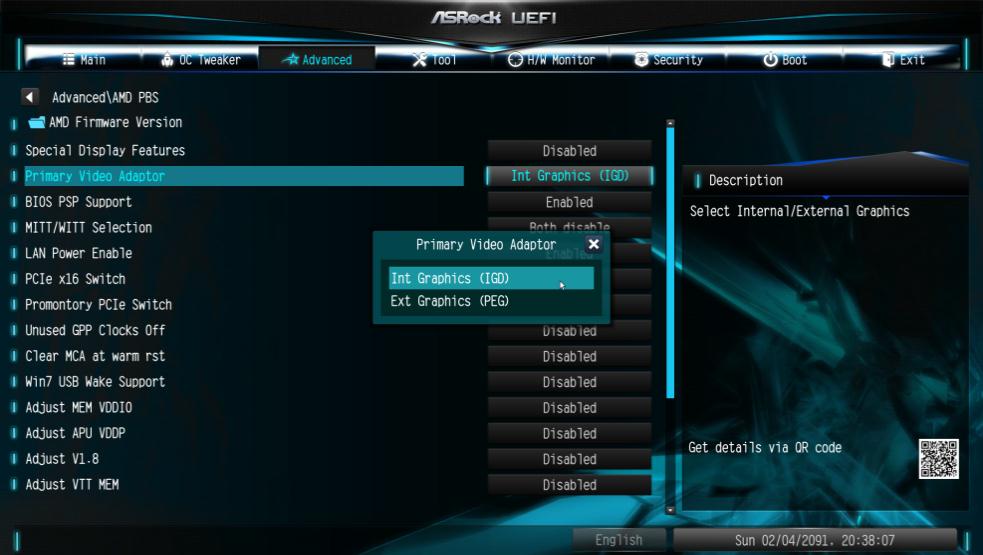
Go to Advanced\Storage Configuration\VMD Configuration and set Enable VMD controller to [Enabled].
Then set Enable VMD Global Mapping to [Enabled]. Press F10 to save the changes and exit setup.
Installing Windows® on a VMD platform
After the BIOS setup, please follow the steps below.
Step 1.
Please download the "SATA Floppy Image” driver from ASRock's website (https://www.asrock.com/index.asp). Unzip the file to a USB flash drive or copy the files from ASRock's motherboard support CD.
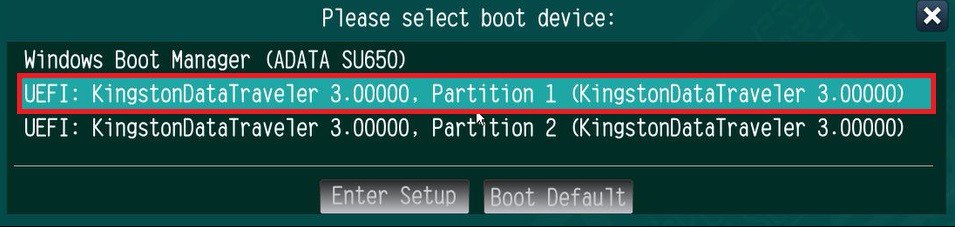
Step 2.
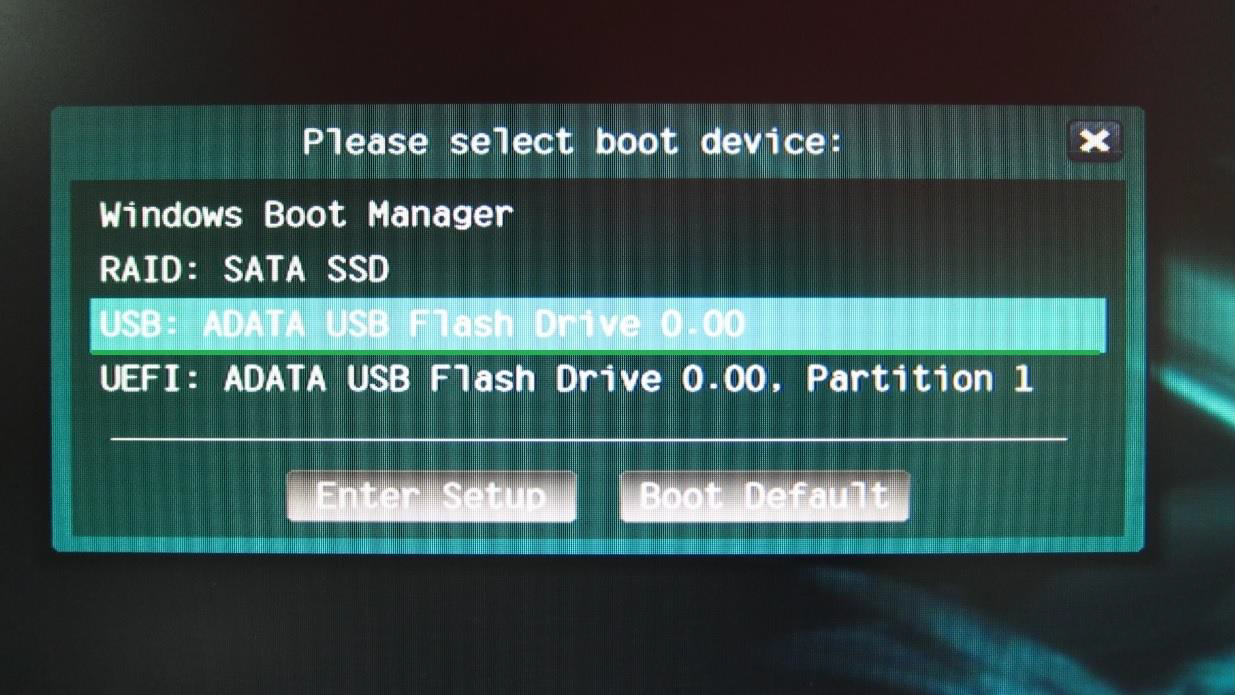
Press at system POST to launch the boot menu and choose the item "UEFI:
installation media>” to install Windows® 10 64-bit / 11 64-bit OS
” to install Windows® 10 64-bit / 11 64-bit OS">
Step 3.
If during the Windows installation process the target drive is not available, please click .
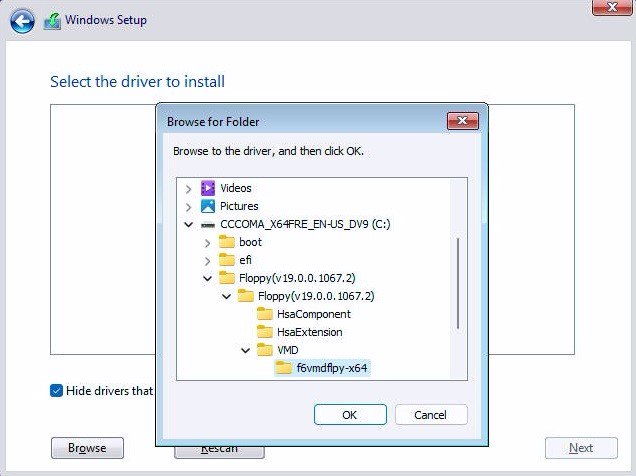
Step 4.
Click and locate the driver on your USB flash drive.
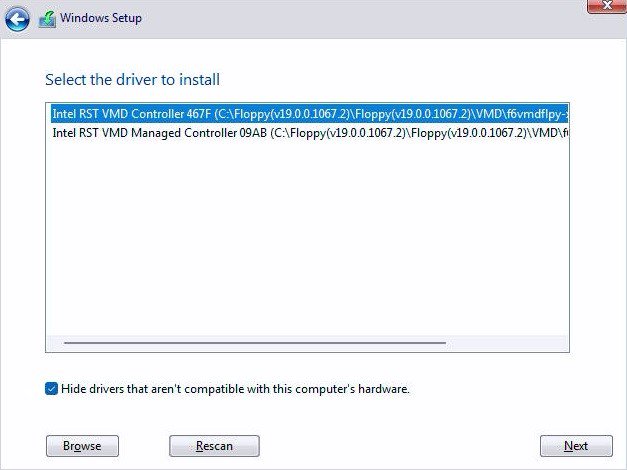
Step 5.
Select "Intel RST VMD Controller” and then click .
.">
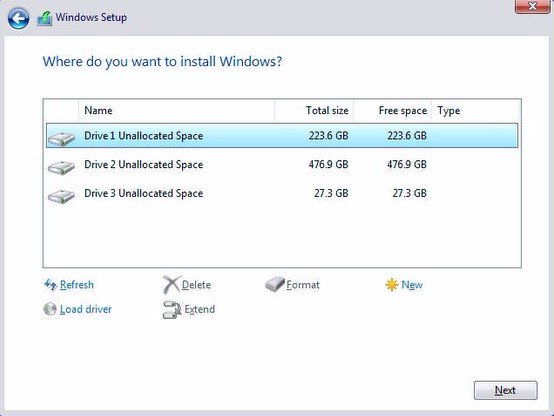
Step 6.
Select unallocated space and then click .
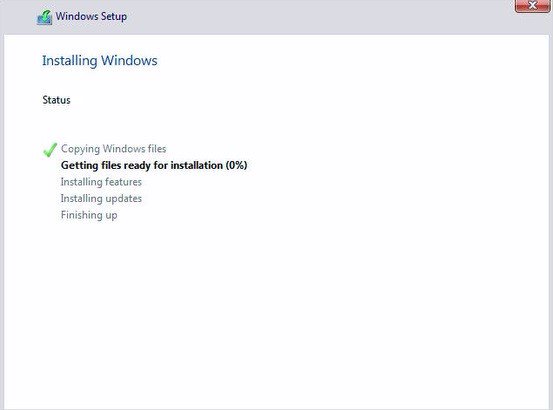
Step 7.
Please follow Windows' installation instructions to finish the process.
Step 8.
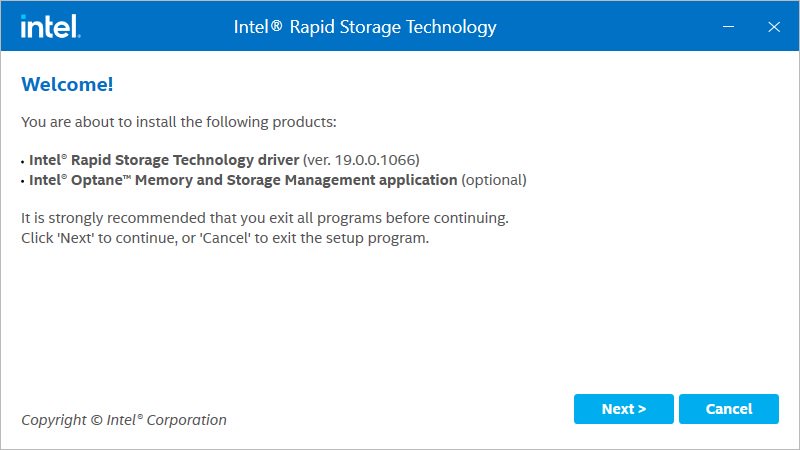
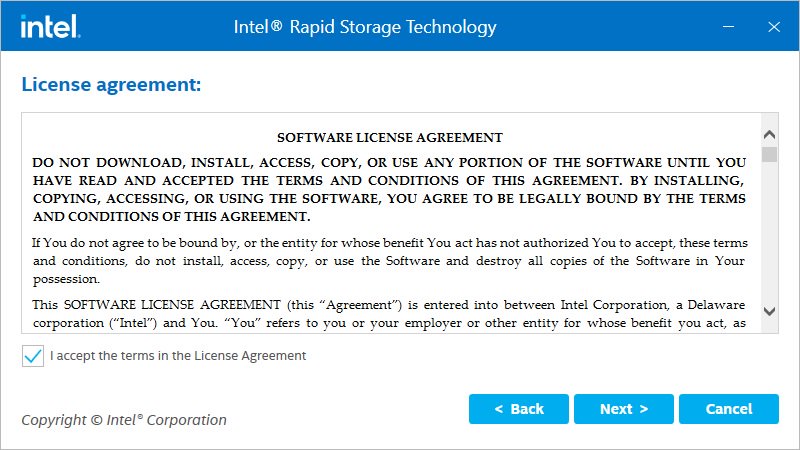
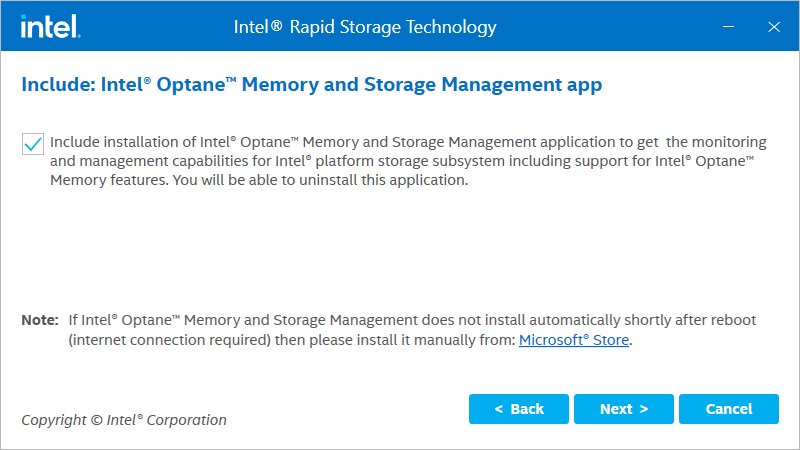
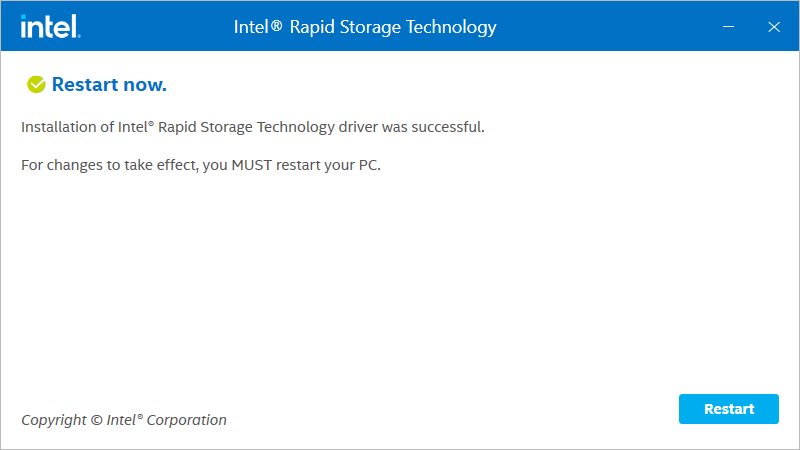
After the Windows installation is finished, please install the "Intel Rapid Storage Technology driver and utility” from ASRock's website. https://www.asrock.com/index.asp
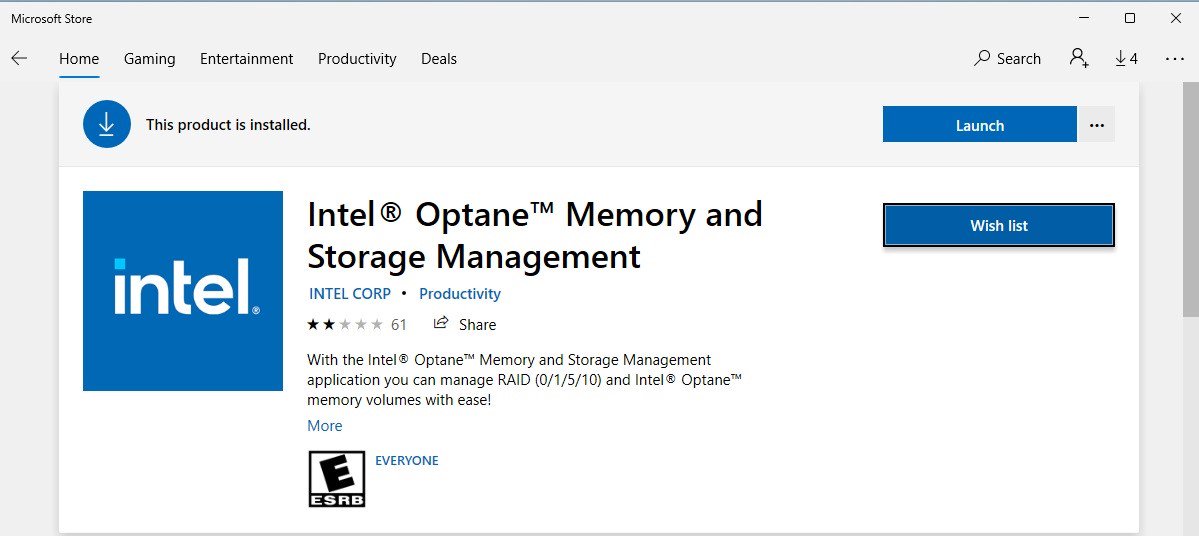
Step 9.
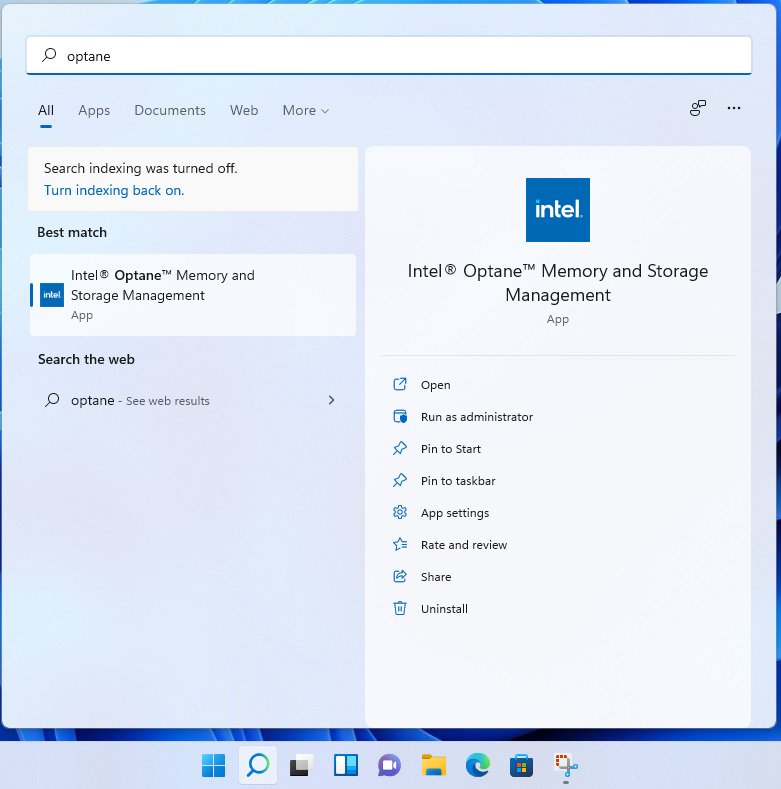
Launch the Intel® Optane™ Memory and Storage Management tool from the Microsoft store.
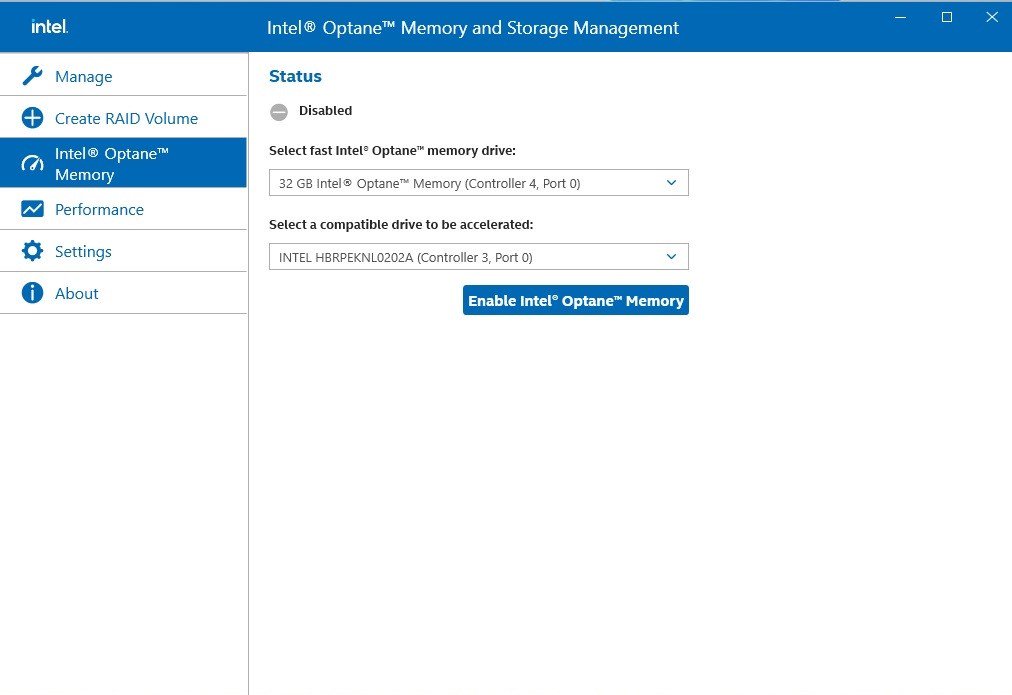
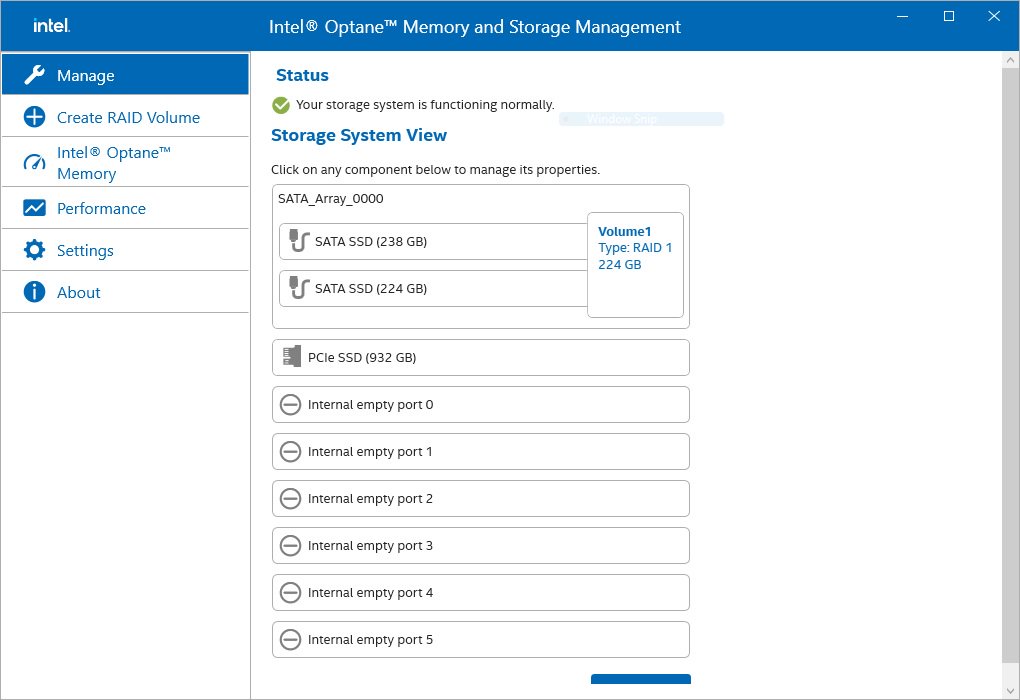
Step 10.
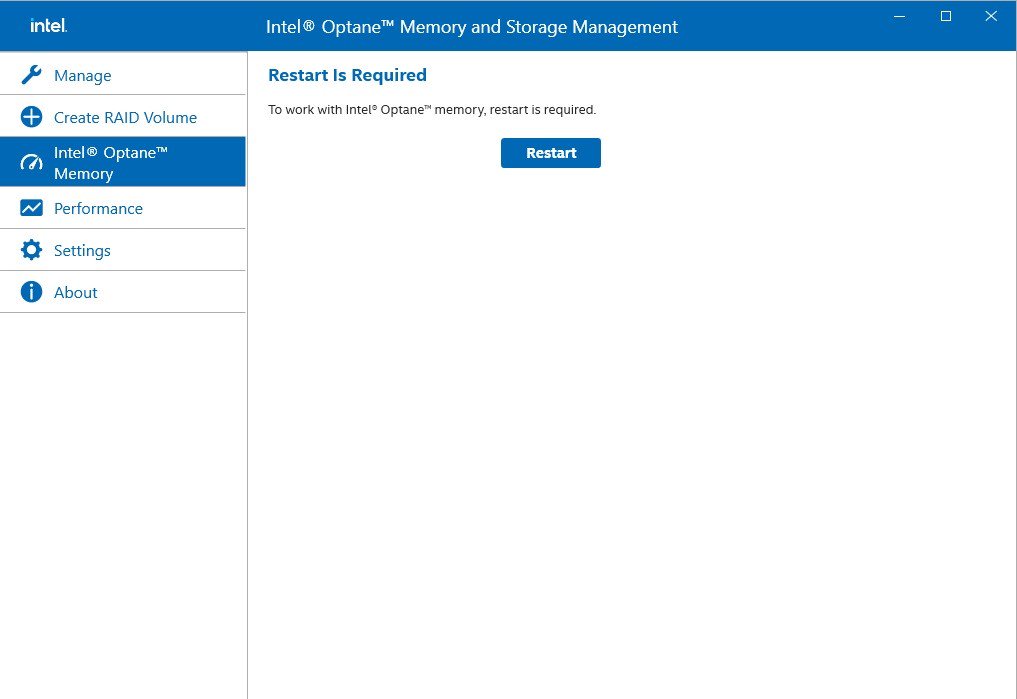
Select the drive which you want to accelerate. Enable Intel® Optane™ Memory. (One restart is required)
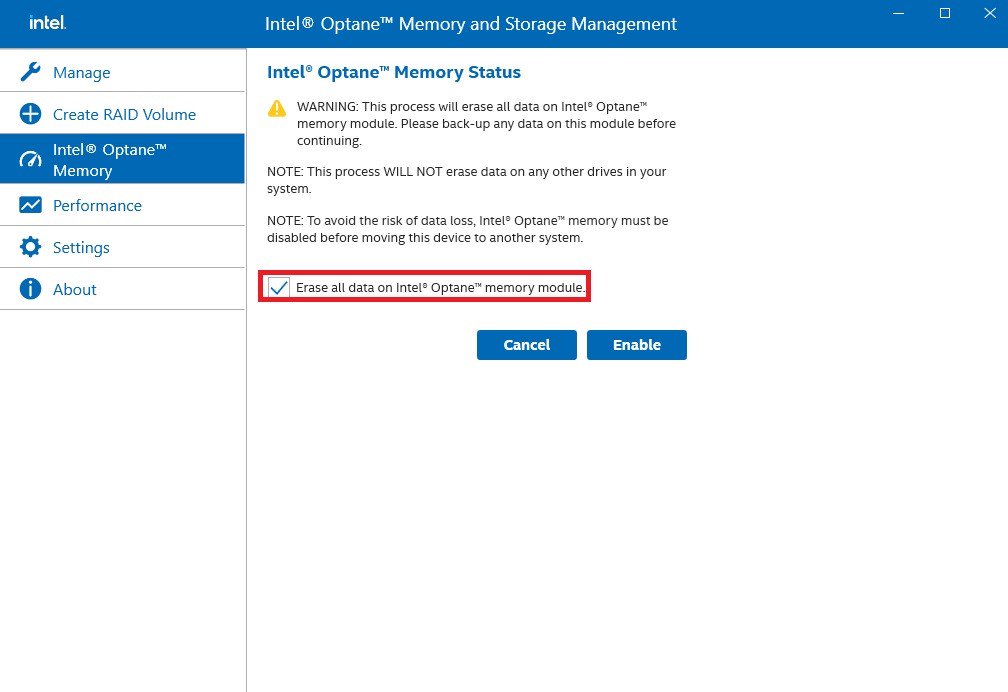
Step 11.
Erase all data on the Intel® Optane™ memory module and click
Step 12.
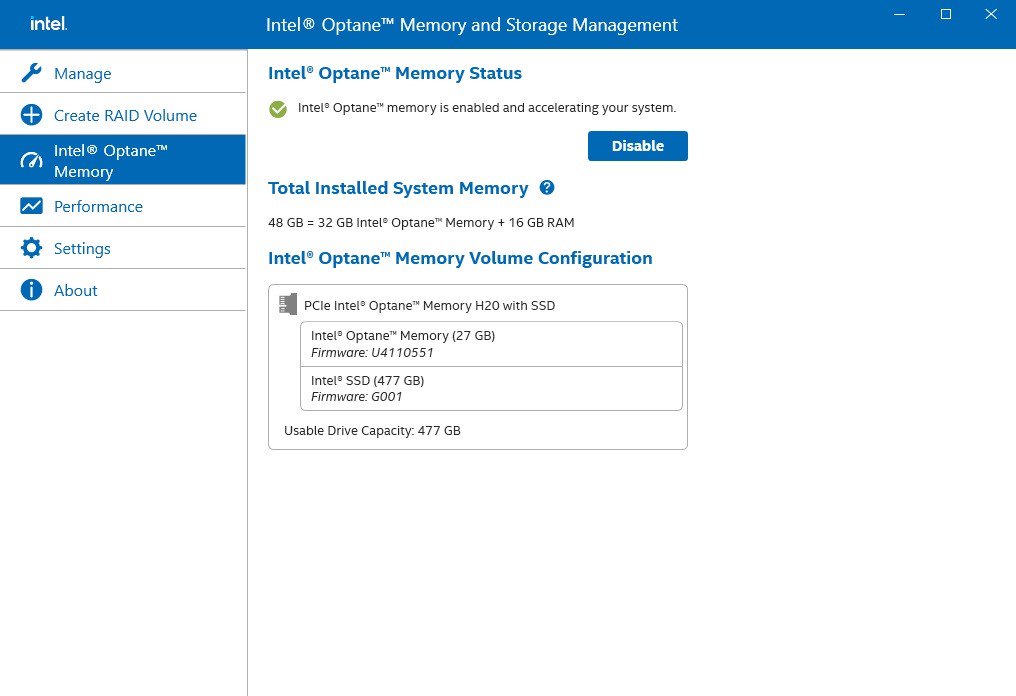
After the system has restarted, the Optane Management tool will show that Optane memory is enabled.
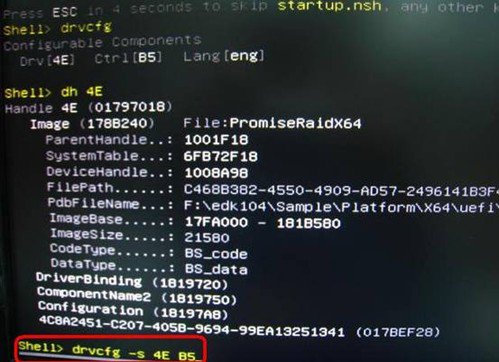
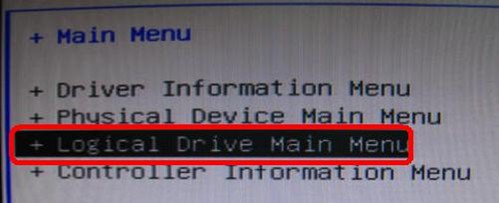
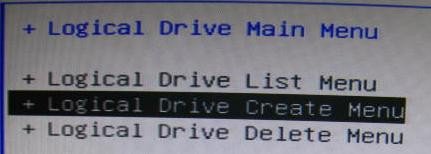
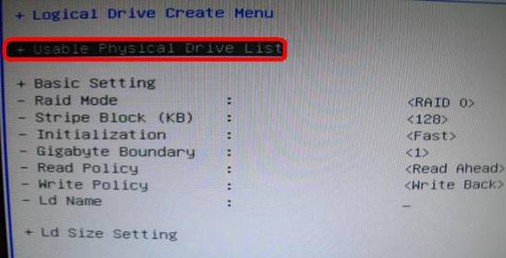
ご質問: How to check the RAID configuration via the Intel RST application under Windows 11?(12/15/2021) 答え: Please refer to the following steps to check the RAID configuration.
Step 1: Obtain the Intel(R) RST driver installation package and run the executable (SetupRST.exe).
*RST driver can be obtained via the download section of the product page on the ASRock website.
*Default settings and name of the driver may vary and is subject to change without notice.
Step 2: Install using the default setting and reboot the computer.
Step 3: From Windows desktop, find and launch the Intel® Optane(TM) Memory and Storage Management application.
ご質問: Why can my game not start with my Intel 600 series motherboard?(11/2/2021) 答え: Some games use DRM (Digital Rights Management) protection. Please check for available updates for your game, where the DRM solution supports Alder Lake CPUs.
If the game development is discontinued and there is no update available for the DRM, please follow below steps to enable the "Legacy Game Compatibility Mode”.
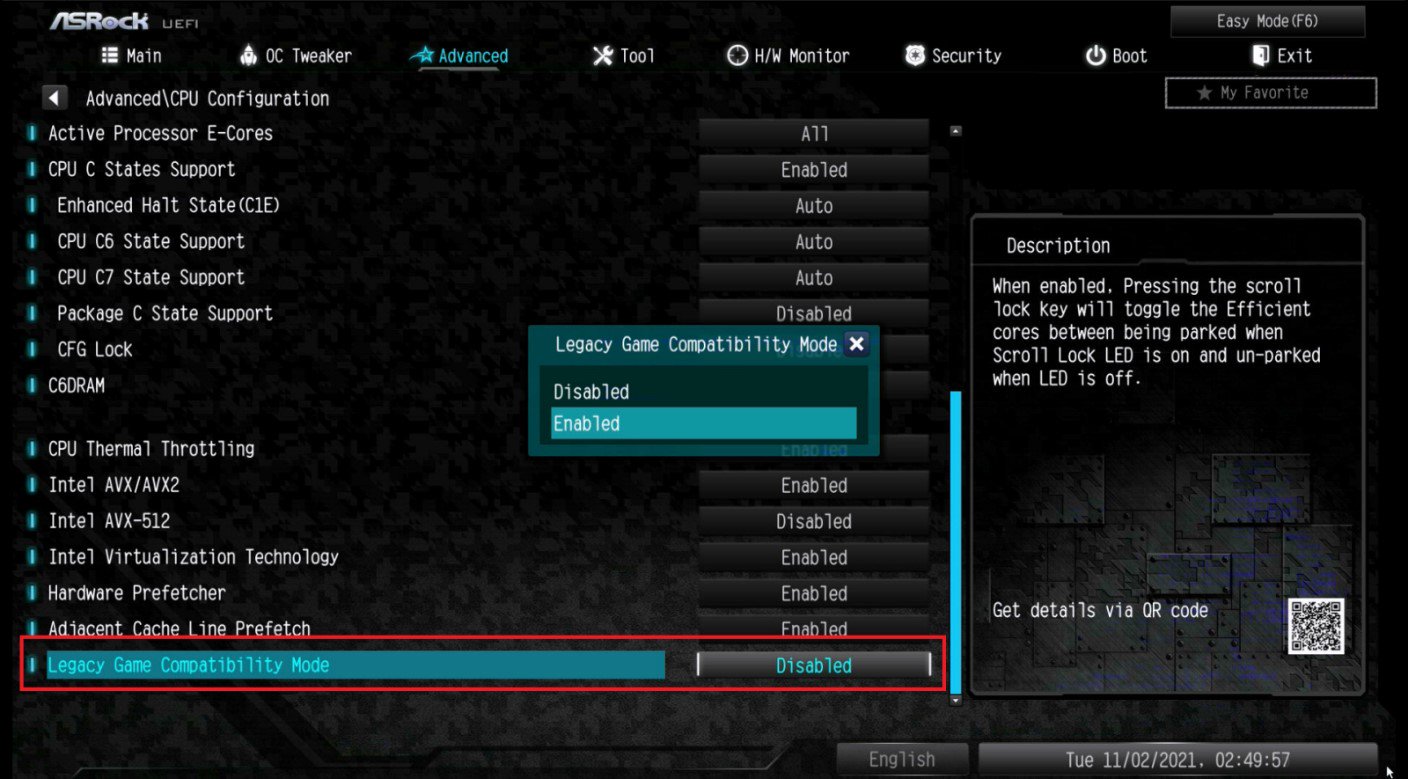
Step 1.
Press [Del] or [F2] during the POST stage to boot into BIOS.
Step 2.
Press [F6] to enter "Advanced” mode and go to Advanced\CPU Configuration
Step 3.
Enable the "Legacy Game Compatibility Mode” in BIOS.
(The option is at the bottom of the CPU Configuration page)
Step 4.
Press [F10] to save the setting and restart the system.
Step 5.
The [Scroll Lock] key on your keyboard is now a hotkey. It can be used to enable/disable the Intel E-core parking feature. Before starting a game outdated DRM protection, please press [Scroll Lock] within the OS to enable Intel E-core parking.
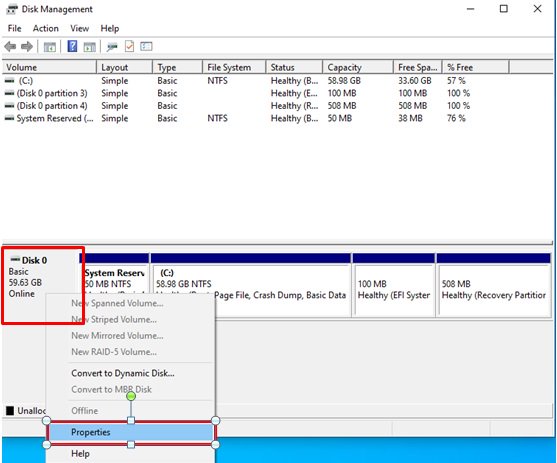
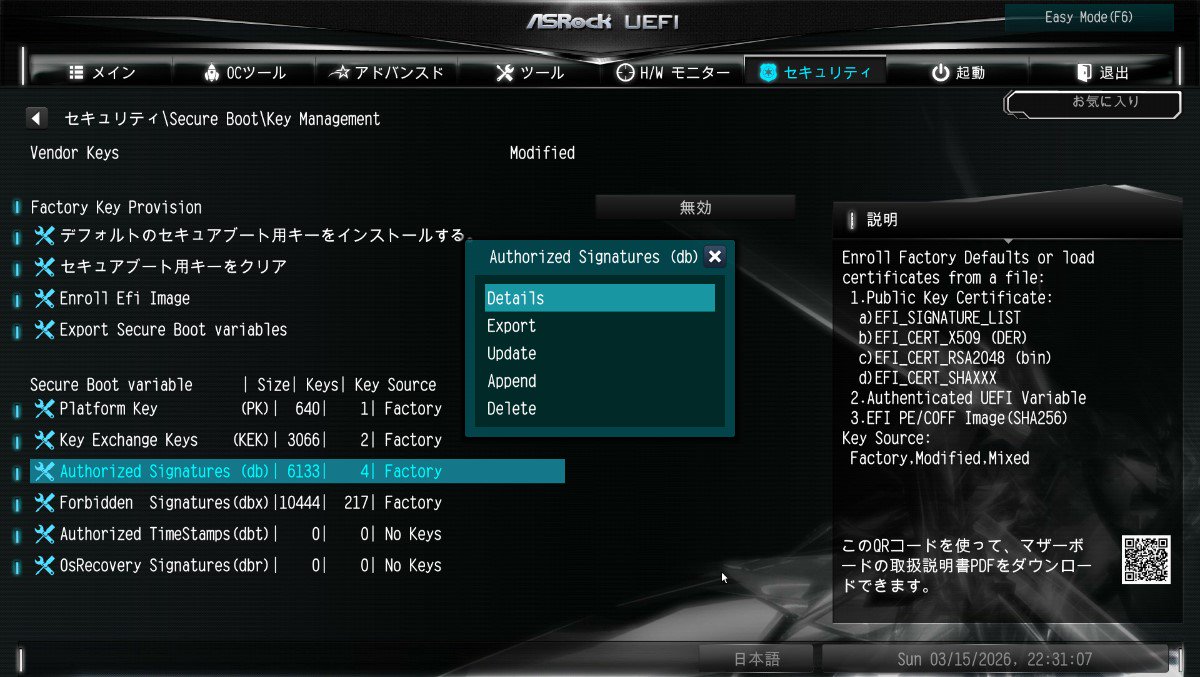
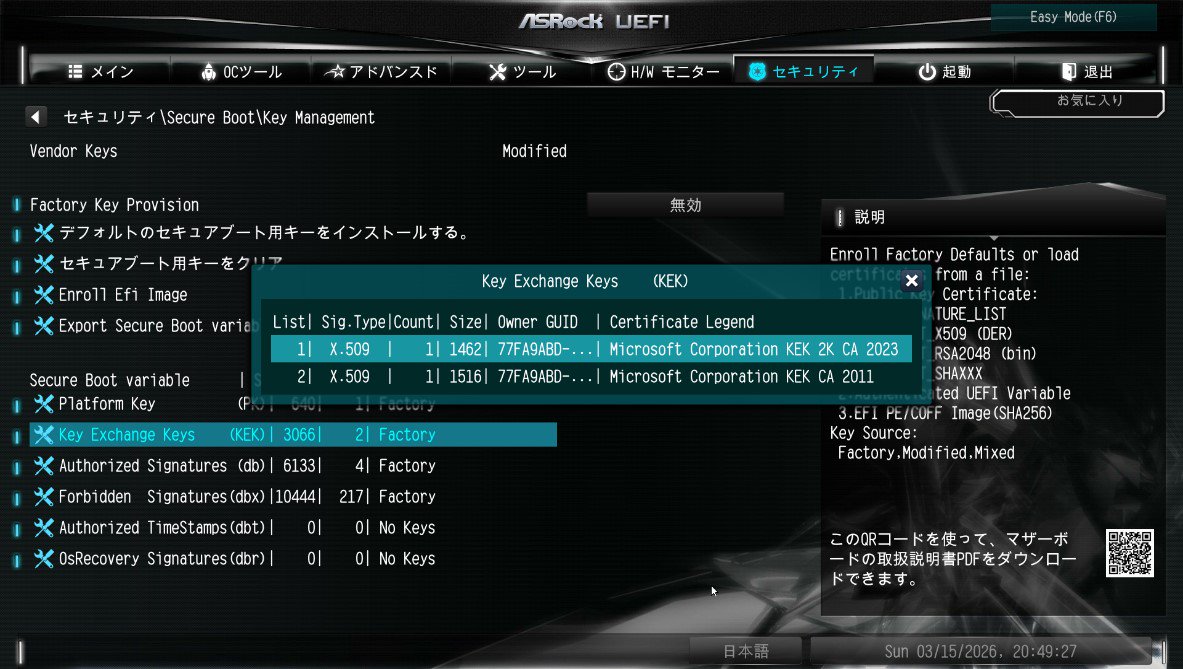
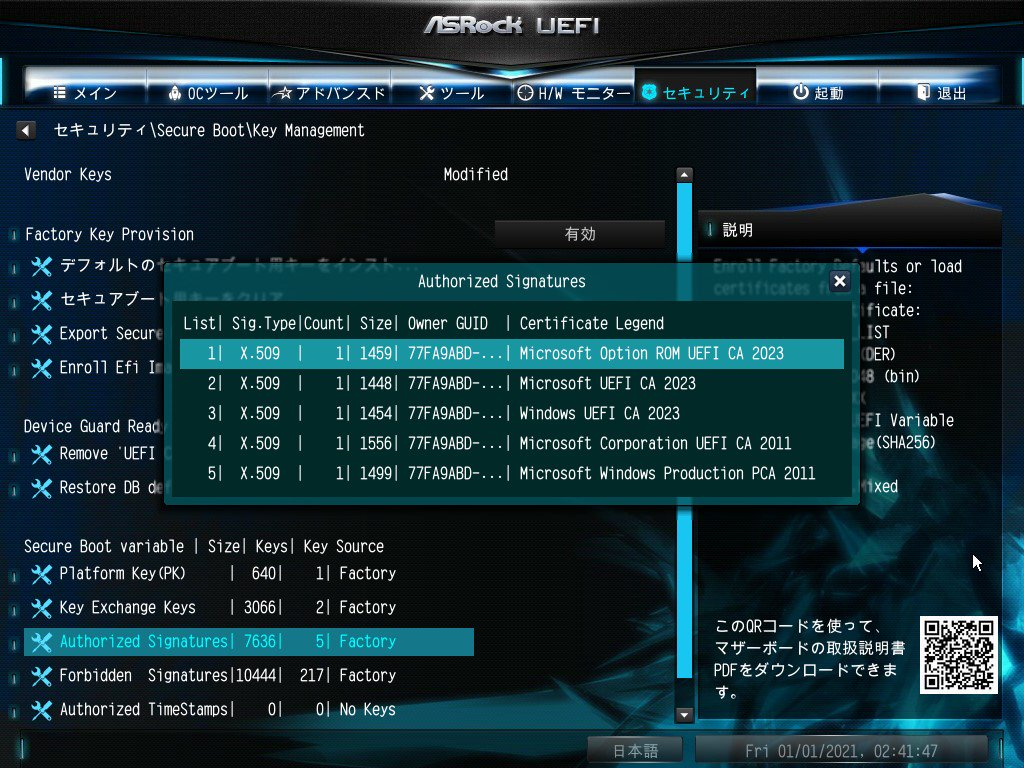
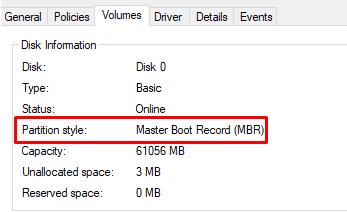
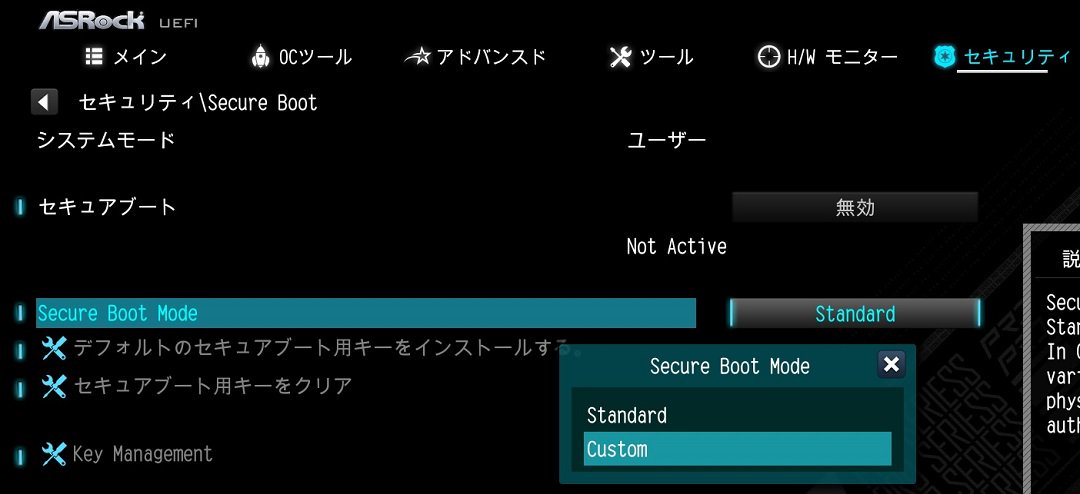
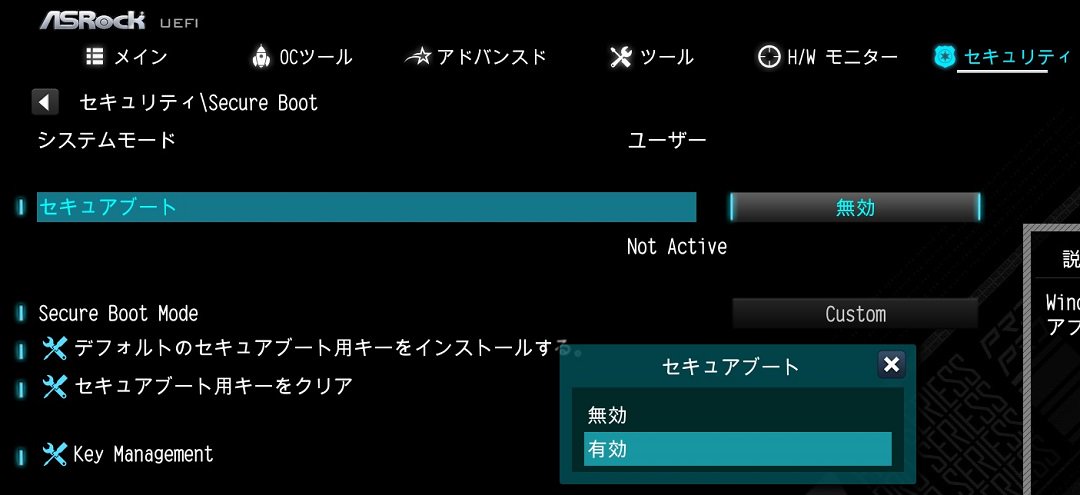
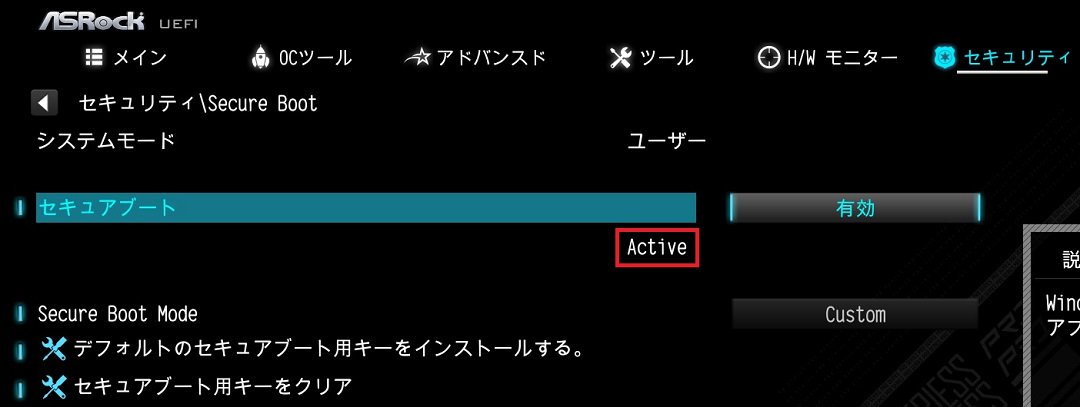
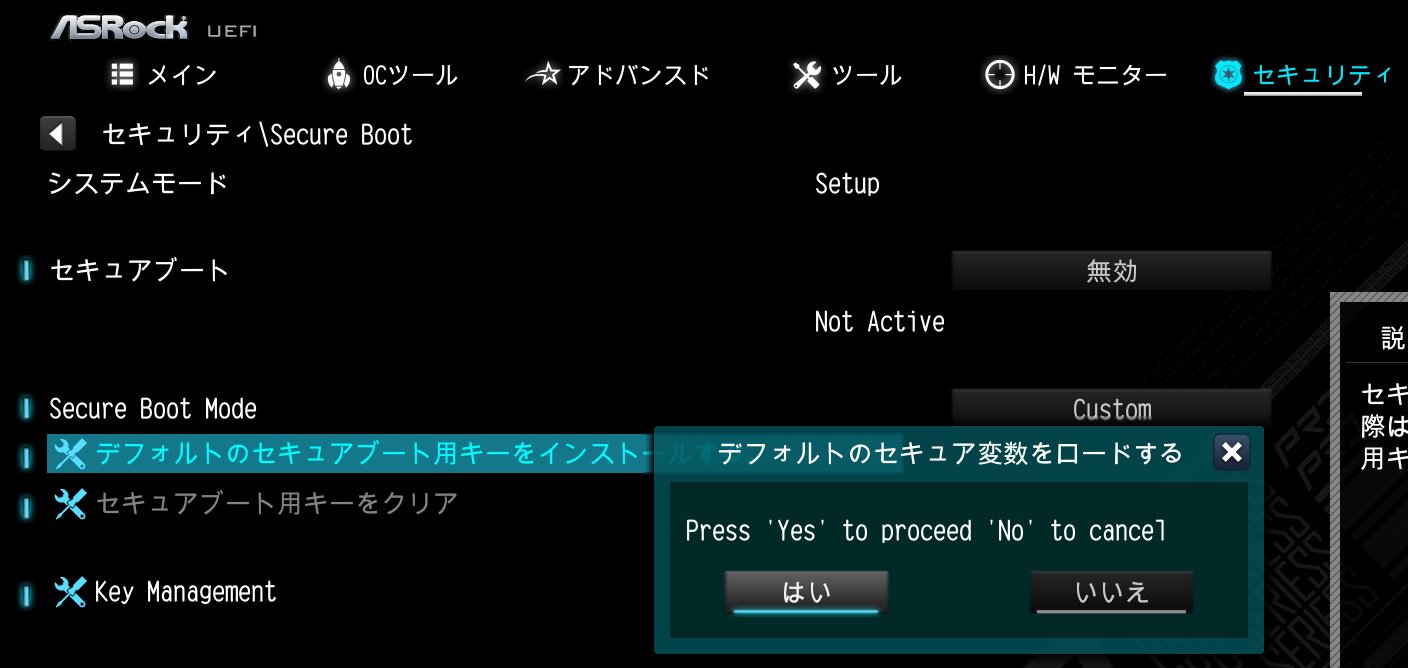
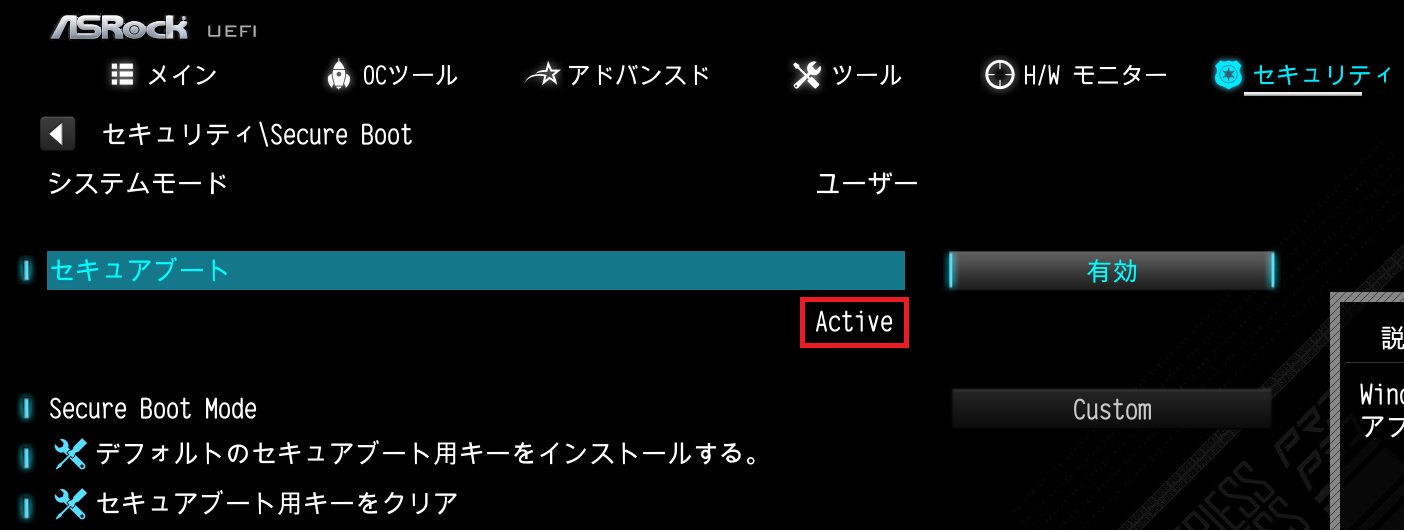
ご質問: How do I check if the system can support Secure Boot?(10/1/2021) 答え: In order to use Secure Boot, the drive with the operating system must use GPT partition style. Please refer to below steps to check the partition style.
Step 1: Right-click the Windows button on the desktop and select "Disk Management”.
Step 2: Right-click the disk where Windows is installed and select the "Properties”.
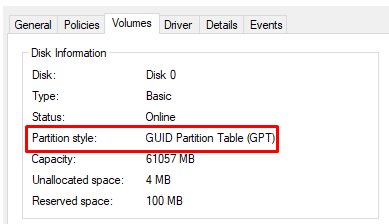
Step 3: Click the "Volumes” tab and check if the partition style is "GPT”.
Step 4: If the partition style is "MBR”, please make a backup of important data on the system and refer to steps 5 - 7 to convert the partition style to GPT.
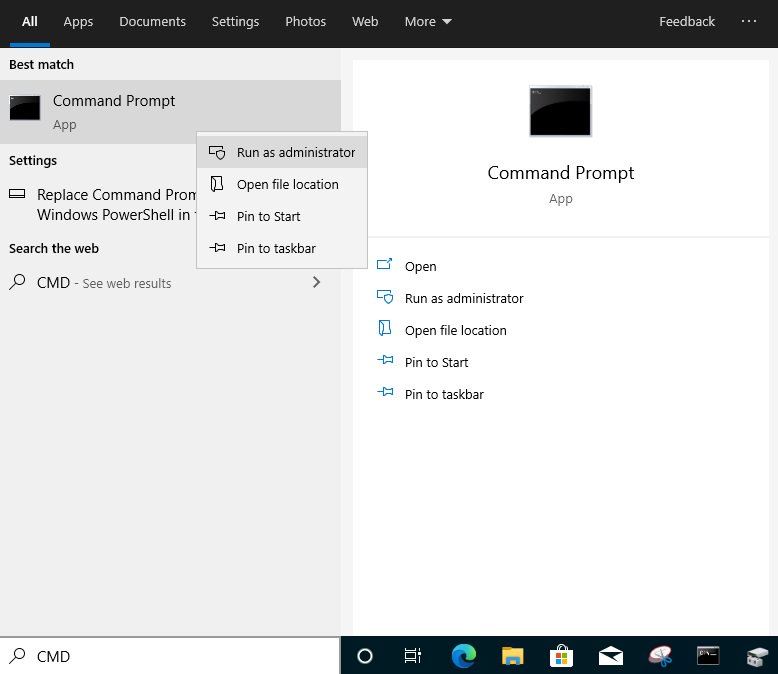
Step 5: Type "CMD" in the Windows search bar, right-click on "Command Prompt” and choose to run as administrator.
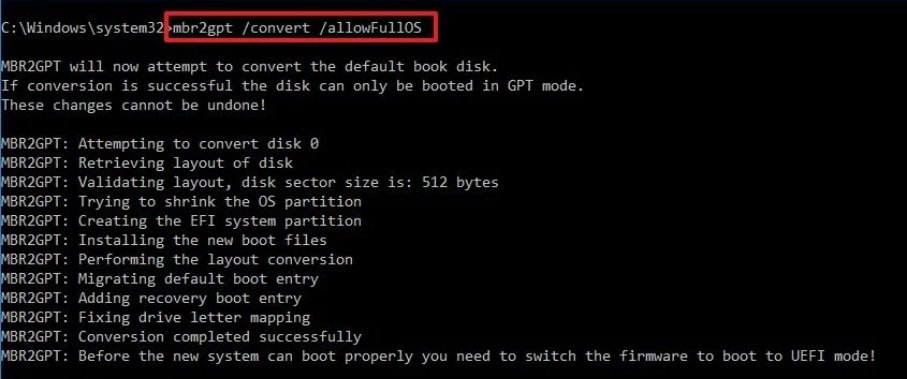
Step 6: Type the command "mbr2gpt /convert /allowFullOS” to convert the partition style and press [Enter].
Step 7: Restart the system and the BIOS Mode/Partition style will be converted to UEFI/GPT.
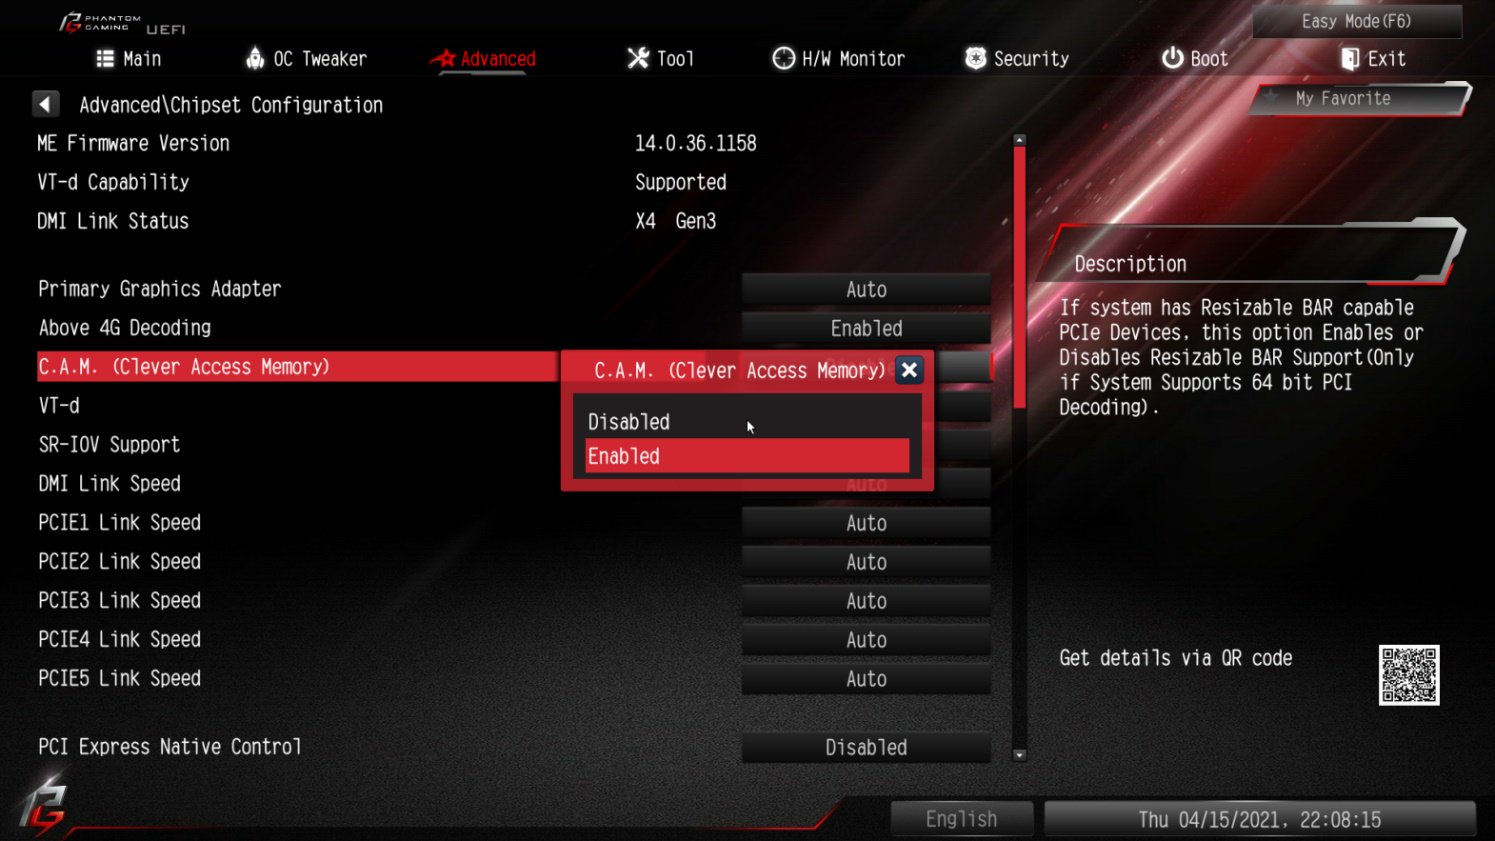
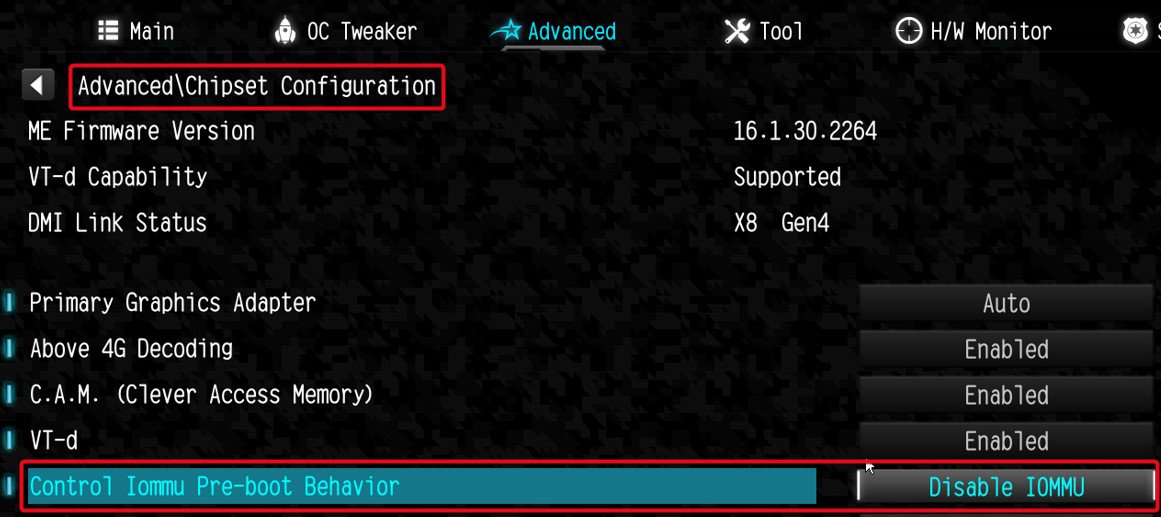
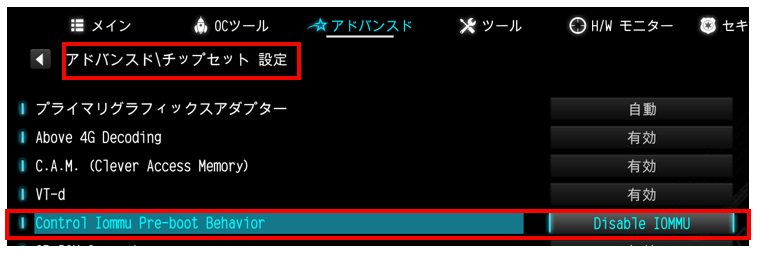
ご質問: How to enable C.A.M in the BIOS? Also known as Resizable BAR.(4/1/2021) 答え:
Step 1: On the ASRock website please find the BIOS download page for you motherboard.
Check the descriptions to see if C.A.M. is supported already.
Intel 500-series models support C.A.M. since the first version.
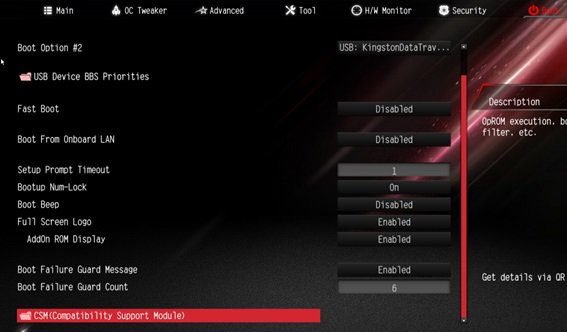
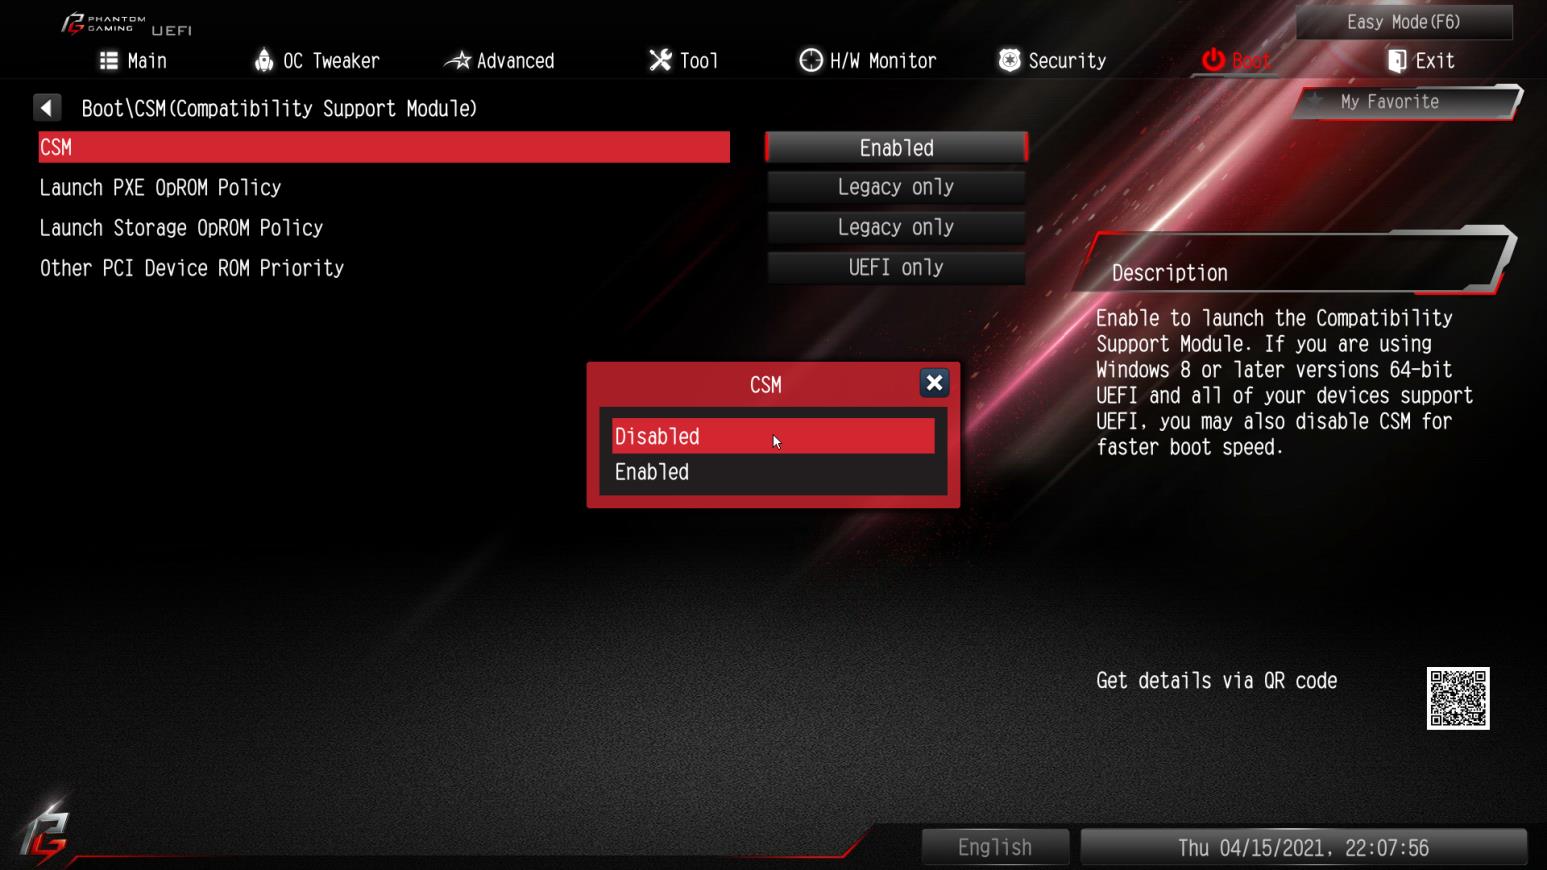
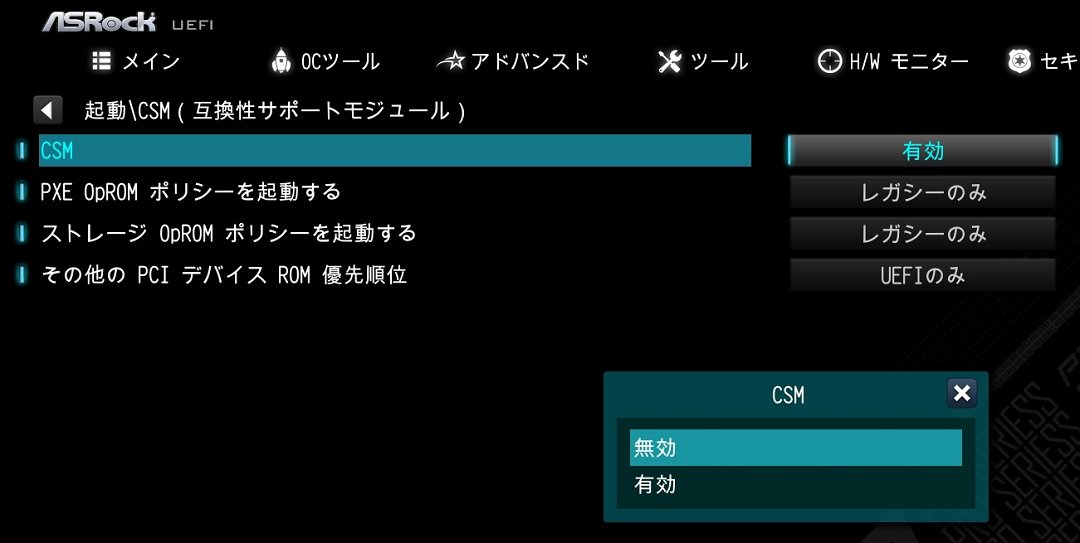
Step 2: While the system is starting press "DEL” to boot into BIOS setup and go to BIOS\Boot\CSM.
If you cannot find the CSM menu then please set "Fast Boot” to "Disabled”.
Step 3: In BIOS\Boot\CSM please set "CSM” to "Disabled”.
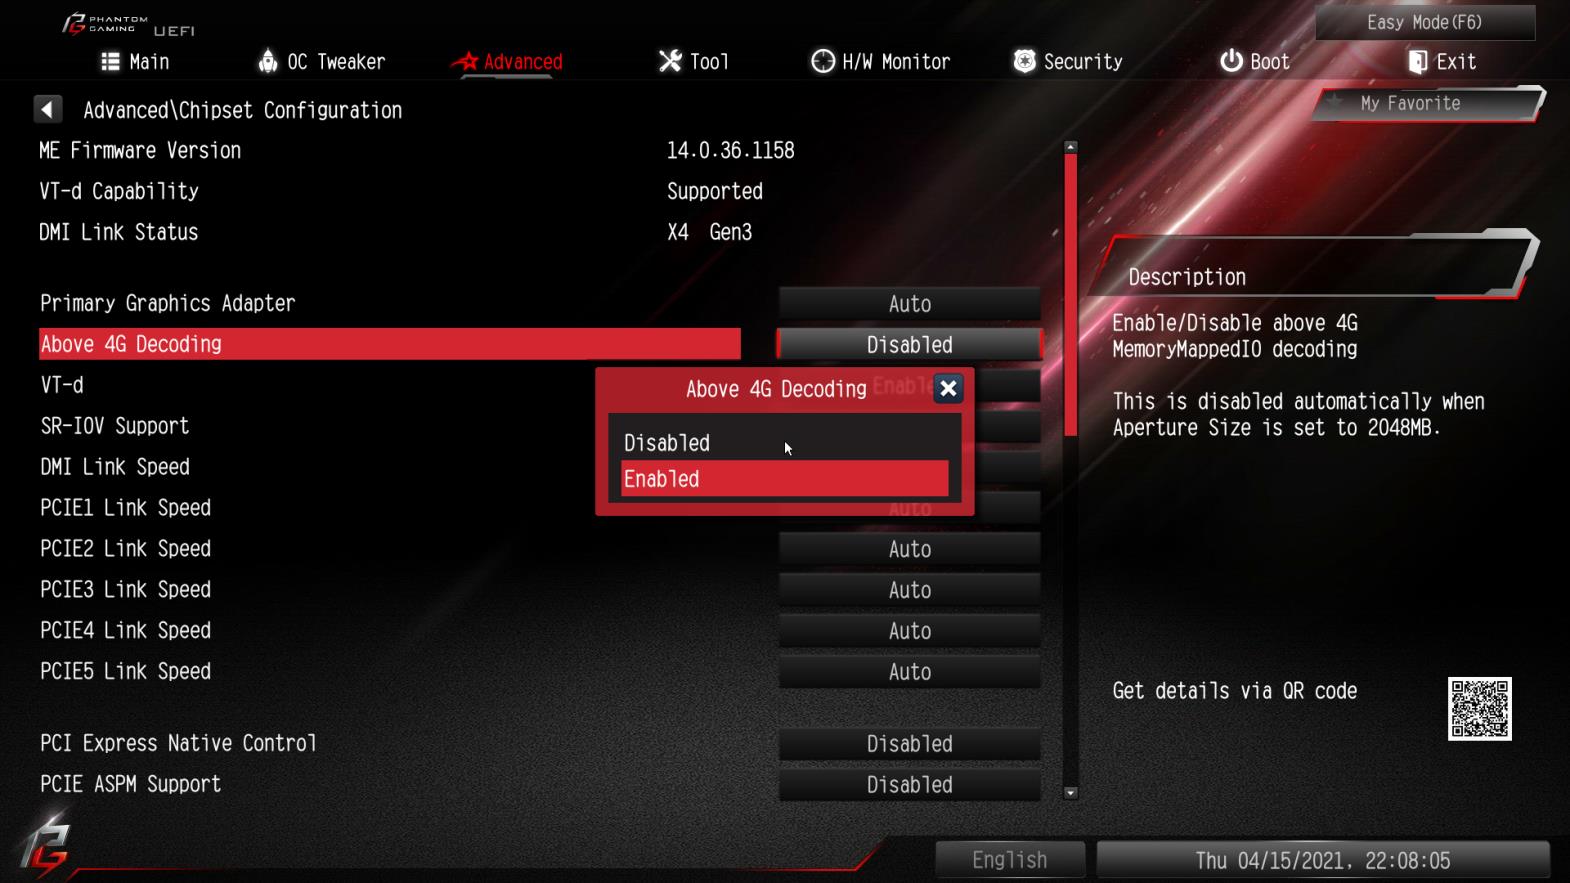
Step 4: Go to BIOS\Advanced\Chipset Configuration and set "Above 4G Decoding” to "Enabled”.
Step 5: After step 4, the option "C.A.M” will appear below the option "Above 4G Decoding”.
Please set it to "Enabled”.
Step 6: Press "F10” to save the settings and restart the system.
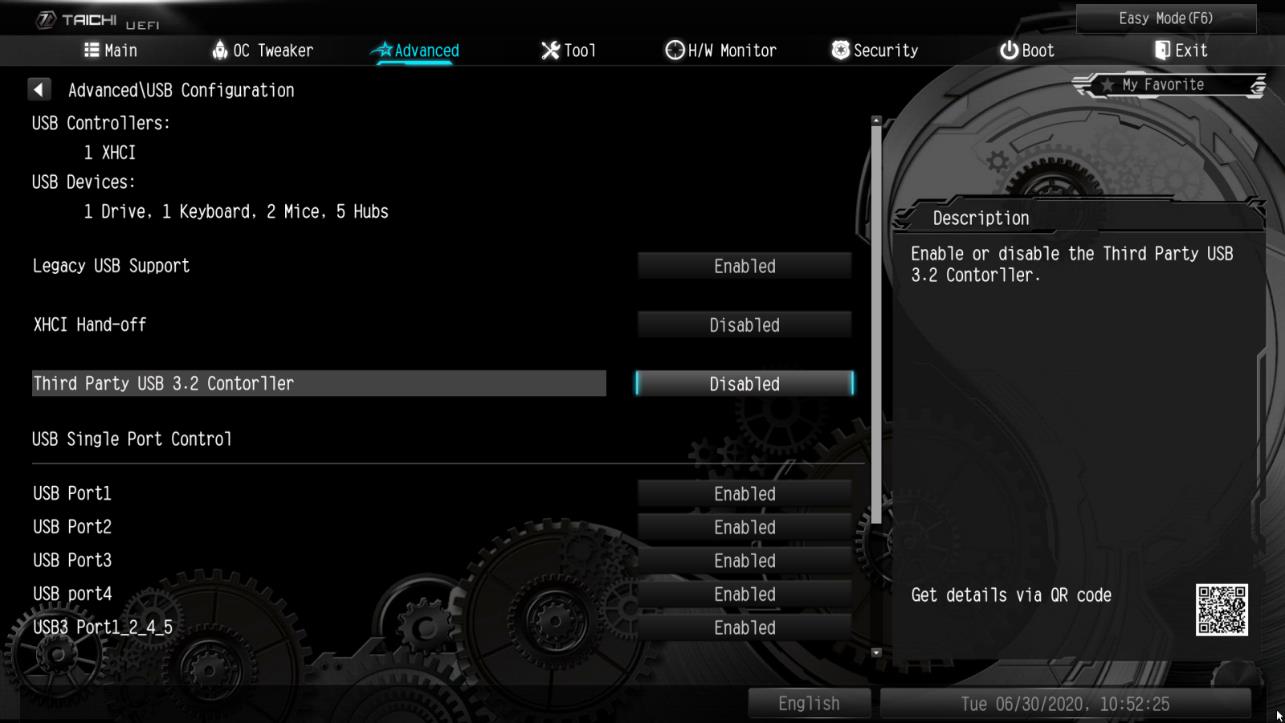
手順 5. Advanced(詳細) -> USB Configuration(USB 設定)の順に進んで、Third Party USB 3.2 Controller(サードパーティー USB 3.2 コントローラー)を [Disabled(無効)] に設定します。 を押して設定変更を保存し、セットアップを終了します。注意: Third Party USB3.2 Controller(サードパーティー USB 3.2 コントローラー)を無効にすると、オンボード Type-C ポートがオフに
なります。
ご質問: If I change the setting in BIOS of AM4 series motherboards, is there any notice before updating BIOS?(3/1/2017) 答え: If you change any setting in BIOS and want to update the BIOS, please enter BIOS setup to load default setting. After reboot, please update the BIOS.
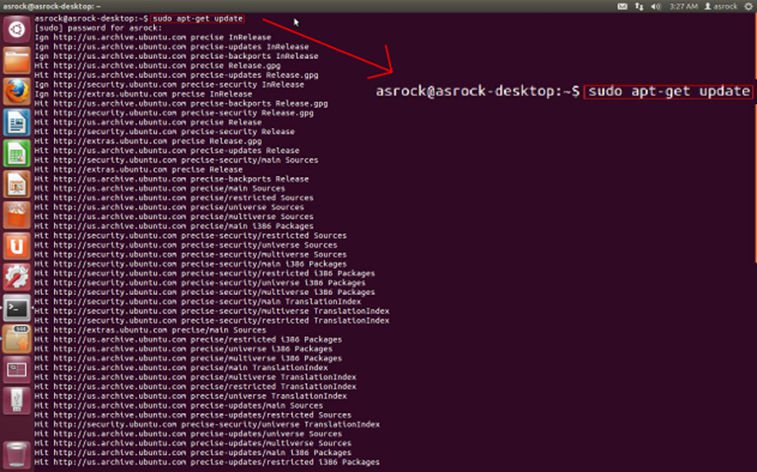
ご質問: Vision 3D シリーズの Ubuntu (Kernal version 3.2.0-23) でWake On LAN 機能を使用するにはどうしたら良いですか。(4/1/2013) 答え: 次の手順に従って WOL 機能を使用してください。
1. BIOS\Advanced\ACPI(BIOS\アドバンスド\ACPI)コンフィギュレーションで「Onboard LAN power on(オンボード LAN 電源オン)」を有効にしてください。
2. LAN ケーブルを接続します。
3. Dash Home(ダッシュホーム)で端子を検索して開きます。
4. ethtool をインストールして、次のコマンドに従って WOL を有効にしてください。(図を参照してください。)
#sudo apt-get update
#sudo apt-get install ethtool
#sudo ethtool –s eth0 wol g
#sudo reboot
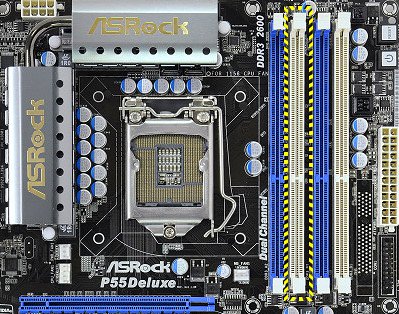
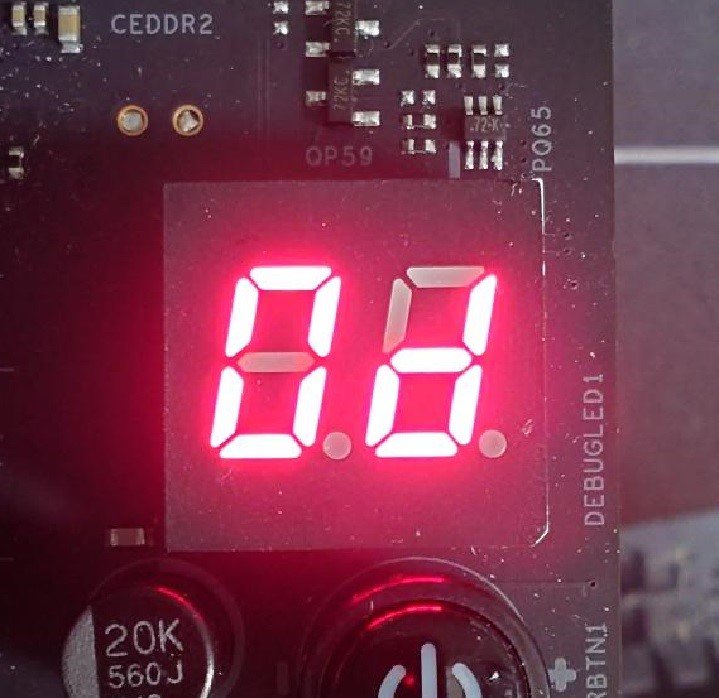
ご質問: Why my P55 chipset motherboard cannot boot up, the Dr. Debug LED display shows error code "E8".(10/22/2009) 答え: Due to the Chipset spec., please insert the memory module into the white slot (DDR3_B1) which is nearly CPU socket for the first priority.
Please insert your DRAM in this slot for the first priority.
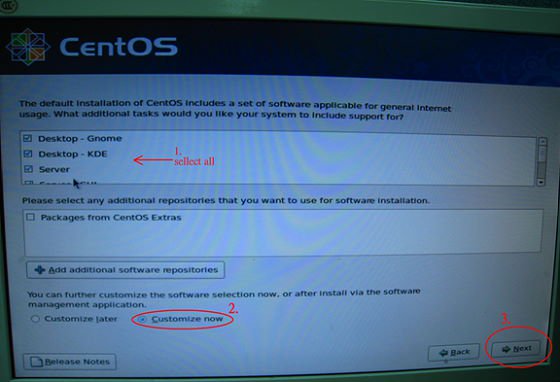
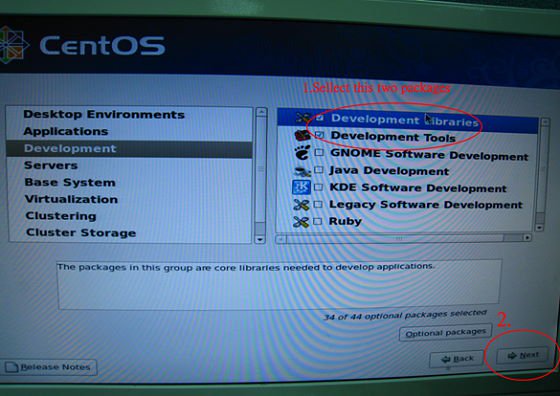
ご質問: I want to install Linux CentOS 5.2 on X58 SuperComputer. After start the installation of CentOS 5.2, the system stays on checking hardware device. I cannot continue the Linux installation, what can I do?(3/28/2009) 答え: Please follow below steps to install your Linux CentOS 5.2 installation.
1.Disable the Onboard LAN 1 and Onboard LAN 2 in BIOS setting.
2.Enter Boot menu and starting the Linux CentOS 5.2 installation.
3.Please install the system packages like below picture.
4.After install CentOS 5.2 completely , download your LAN driver by following link.
Link:http://www.realtek.com/downloads/downloadsView.aspx?Langid=1&PNid=13&PFid=5&Level=5&Conn=4&DownTypeID=3&GetDown=false#2
5.Please remove the in-box driver and remove the r8169 LAN driver by following command.
# cp -p r8168-8.011.00.tar.bz2 ~
# cd ~
# tar vjxf r8168-8.011.00.tar.bz2
# cd /lib/modules/`uname -r`/kernel/drivers/net/
# rm -f r8169.ko
# cd ~
# cd r8168-8.011.00
# make clean
# make modules
# make install
# depmod –a
# reboot
6.After upgrade your LAN driver complete, please reboot your system and enable the Onboard LAN 1 and Onboard LAN 2 in BIOS setting.
ご質問: When I create a RAID volume over 2TB capacity, the RAID volume cannot be recognized after installing the RAID driver during XP installation. Why?(1/12/2009) 答え: Due to the operating system limitation, Windows® XP only supports MBR disk format, the MBR disk format cannot support the hard drive capacity over 2TB.
If you want to use over 2TB RAID volume to be your boot disk, below three conditions must be required:
1.Your operating system must be Windows® Vista™ x64 SP1 or Windows® 7 64bit.
2.EFI BIOS.
3.GPT disk format.
Please refer to following link to get more information.
Link:
http://support.microsoft.com/?scid=kb;en-us;946557&x=9&y=7
http://www.microsoft.com/whdc/device/storage/GPT_FAQ.mspx
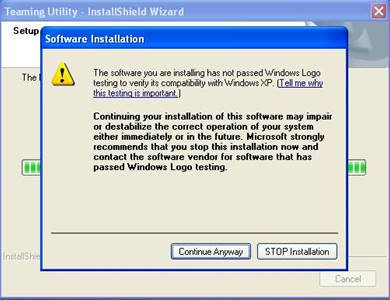
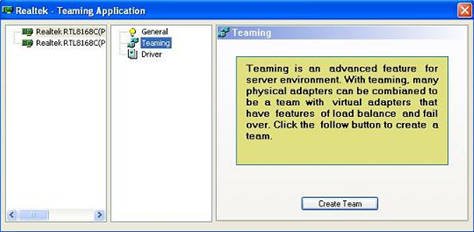
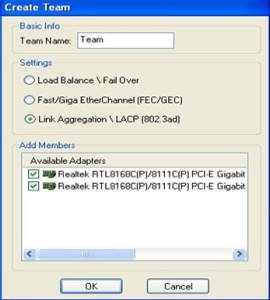
ご質問: My P45 motherboard has two onboard LANs. How do I set the Teaming function and combine both onboard LANs to be a team with more bandwidth in my system?(9/5/2008) 答え: Before setting Teaming function, please make sure if your Switch (or Router) could support Teaming (IEEE 802.3ad Link Aggregation) function. (For example: D-Link DGS-3100…)
Then, please refer to following steps to set "Teaming function"...
1. Install RtkTeaming driver ver.1.0.0.51 from Motherboard Support CD
(/Driver/Teaming/ RtkTeaming 1.0.0.51…)
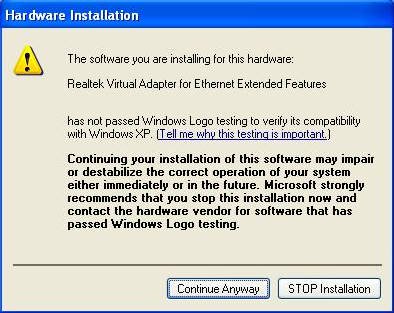
(*When installing teaming driver, system will show below warming message. Please choose "Continue Anyway" and keep installing driver.)
2. After installing driver, please open "Teaming Utility" in Programs. (Start > Programs > Realtek > Teaming Utility >…)
3. Click "Teaming" item and then press "Create Team" button.
4. Key in Team Name and choose "Link Aggregation \ LACP (802.3ad)" for Settings.
5. Select two available onboard LAN cards and then press "OK" button (After pressing "OK" button, system will show below warming message. Please choose "Continue Anyway".)
6.After doing above settings, system will auto create a new Local Area Connection
7.Reboot system
Then, you will find the "Speed" column of new Local Area Connection will show 2.0Gbps.
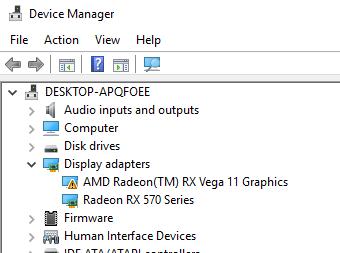
ご質問: When installing NVIDIA GeForce 8400/8500 series PCIE VGA card on K10N78hSLI-WiFi / K10N78hSLI-1394 / K10N78hSLI-GLAN under Windows® XP/ XP 64-bit, I can not get full system memory. Besides, system shows two display adapters in the Device Manager. What can I do? (6/26/2008) 答え: While system boot up, please press "F2" to enter BIOS set up screen. Please go into BIOS setup and set "Hybrid SLI" option to [Disabled] in BIOS>Advanced>Chipset Configuration.
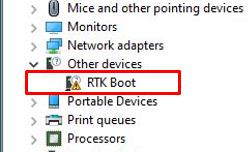
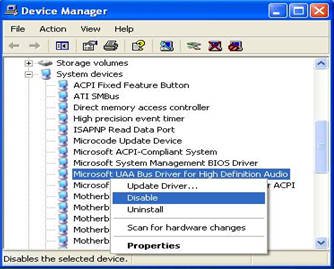
ご質問: When I install Realtek HD Audio driver, I found the system shows below error message. What can I do? (6/26/2008) 答え: Please refer to below steps to reinstall Realtek HD Audio driver:
1.Enter into "Add or Remove Programs" and remove "Realtek High Definition Audio Driver"
2.Disable all "Microsoft® UAA Bus Driver for High Definition Audio" in Device Manager first
3.Then uninstall all "Microsoft® UAA Bus Driver for High Definition Audio" from the system.
4.Reboot system
5.Reinstall "Realtek HD Audio driver" from Motherboard Support CD.
If you still meet this problem, please reinstall fresh Windows® system.
ご質問: I'm using 4GB system memory with Windows® Vista™ 64bit and ATi VGA card on ALiveXfire-eSATA2, I'm not able to boot into or install Windows® Vista™ 64 bit. With 3GB or less system memory, it has no problem. Is there a solution for this problem?(2/14/2008) 答え: This is a known issue of Windows® Vista™ 64 bit. Please install the following two hotfixes from Microsoft. It will solve this problem.
http://support.microsoft.com/kb/938194
http://support.microsoft.com/kb/938979
Please install the Hotfixes according to the following steps:
1.Boot into Windows® Vista™ 64bit with less than3GB system memory.
(If you are not able to finish installing Windows® Vista™ 64bit, please install Windows® Vista™ with less than 3GB system memory)
2.Install the first hotfix, reboot, and then install the second.
3.Reboot the system and let system go into Windows® Vista™ 64bit.
4.Shut down the computer. And then install the Memory back.
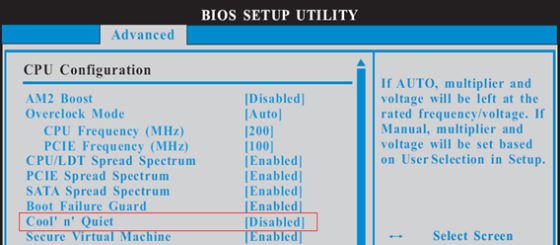
ご質問: I'm using the AMD® AM2 Athlon 64X2 5000+ Black Edition CPU. The ratio of this CPU is unlocked. I would like to overclock it by adjusting the ratio. But after adjust the CPU ratio in BIOS and boot into the Windows, the ratio of this CPU does not change. What should I do?(12/19/2007) 答え: Actually, it is AMD® CPU driver's behavior. To perform overclocking please disable the "Cool 'n' Quiet" function in BIOS-> Advanced-> CPU Configuration-> Cool'n'Quiet. Please refer to the following picture.
ご質問: I use an external USB HDD on ALiveNF7G-HD720P/ALiveNF7G-HDready. I feel that the speed of USB is slower. Is there any method to improve it?(6/25/2007) 答え: Please kindly refer to below steps for try.
1.Open Notepad and type following registry entry.
Solution2.
Or please refer following steps to re-write MAC address under Windows® Vista™.
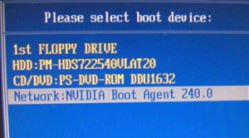
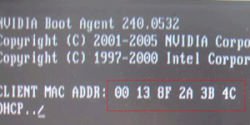
Step1: Check MAC address.
When system boot up, press "F2" to enter BIOS setting.
Boot-> "Boot settings Configuration" -> set "Boot From Onboard LAN" to "enable".
Press "F10". System will restart.
Please "F11" and select "NVIDIA Boot Agent".
Then you will see MAC address, pls. record it with no space for later usage.
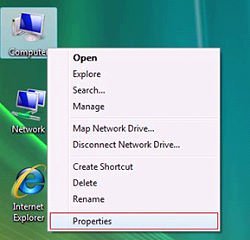
Step2: Boot system into Window Vista
Right click "Computer" and click "Properties"
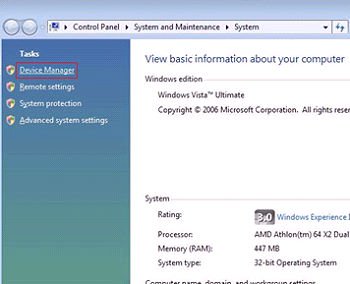
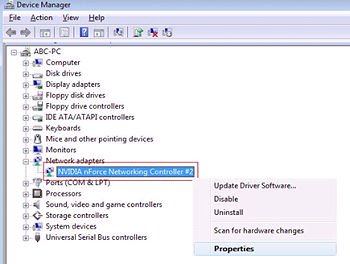
Step3:
Click "Device Manager"
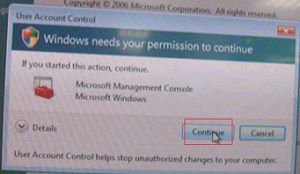
Step4:
Click "Continue"
Step5.
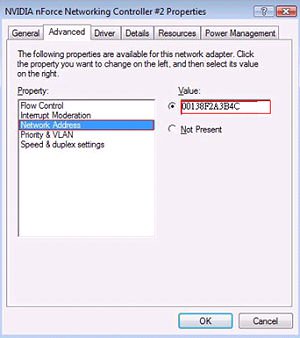
Right click "Networking Controller" and click "Properties".
Step6:
Choose "Network Address" in "Advanced " folder.
Write "MAC Address" which got from step1 into Value item.
Then click "OK".
ご質問: I'm using SATA devices (Hard Drives or Optical Drives) on AM2XLI-eSATA2 (939SLI-eSATA2/939SLI32-eSATA2), but my system takes long time to boot. How do I solve it?(9/19/2006) 答え: Please make sure to connect your SATA Devices on the Master ports (Red or Orange) first and then the Slave ports.
ご質問: What key should I press to enter into BIOS setup? What key should I press to enter into boot menu?(8/18/2006) 答え: To enter BIOS setup, please press "F2" repeatedly right after you turn on the computer until system goes into BIOS setup.
If you want to enter into boot menu, please press "F11"
ご質問: My motherboard is AM2XLI-eSATA2. How do I install Windows® XP on SATA HDD in AHCI mode?(8/18/2006) 答え: You need to make a SATA driver diskette before you start the OS installation. Please refer to the following steps:
Enter "SATA Operation Mode" in BIOS setup to set the option to [RAID].
Insert the ASRock Support CD into your optical drive to boot your system.
During POST at the beginning of system boot-up, press key, and then a window for boot devices selection appears. Please select CDROM as the boot device.
When you see the message on the screen, "Do you want to generate Serial ATA driver diskette [YN]?", press .
Then you will see these messages, Please insert a diskette into the floppy drive.
WARNING! Formatting the floppy diskette will lose ALL data in it!
Start to format and copy files [YN]?
Please insert a floppy diskette into the floppy drive, and press .
The system will start to format the floppy diskette and copy SATA drivers into the floppy diskette.
Restart and enter "SATA Operation Mode" in BIOS setup to set the option to [AHCI].
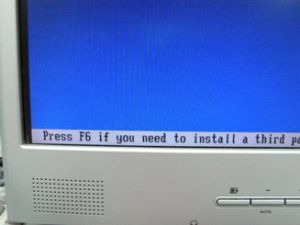
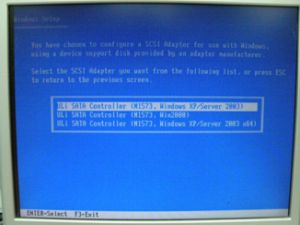
At the beginning of Windows® setup, press F6 to install a third-party SCSI or RAID driver. When prompted, insert a floppy disk containing the ULi® RAID driver. After reading the floppy disk, the driver will be presented. Select the driver to install according to the mode you choose and the OS you install.
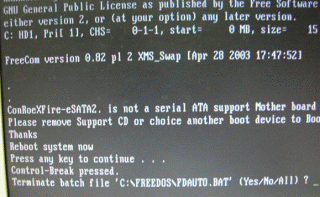
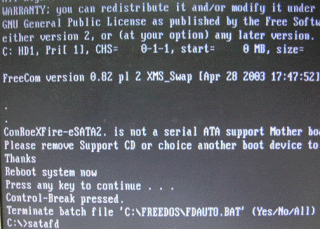
ご質問: My motherboard is ConRoeXFire-eSATA2. When booting from support CD to make SATA floppy image driver disk, it stop with a message. What should I do?(7/21/2006) 答え: 1. When you see the message, please type "Ctrl+C", and press "y" to terminate the program.
2 Then type "satafd". Press "enter".
3.Insert floppy disk. It will start to generate the SATA floppy disk.
Or please download the driver from ASRock Web Site and copy to floppy diskette.
https://www.asrock.com/mb/download.asp?Model=ConRoeXFire-eSATA2
ご質問: How do I use 4 SATA HDDs to build system in RAID0 mode on K8SLI-eSATA2, 939SLI-eSATA2 and 939SLI32-eSATA2?(5/24/2006) 答え: If you want to build a system in RAID 0 mode with 4 SATA HDDs, please follow below steps:
1.Enter the BIOS and set "SATA Operation Mode" to RAID mode.
BIOS -> Advance -> IDE Configuration -> SATA Operation Mode -> RAID
2.Set "eSATAII Support" to Disable.
BIOS -> Advance -> IDE Configuration -> eSATAII Support -> Disable
3.Press "F10" to save and exit.
4.When you boot up system, press "CTRL+ A" to go into ULI RAID Utility screen, and choose "Create RAID 0 Stripe X4 for Performance" option to build a RAID system with 4 SATA HDDs.
You could refer BIOS SETUP UTILITY of user manual to adjust BIOS setting.
K8SLI-eSATA2 user manual page 42.
https://download.asrock.com/Manual/K8SLI-eSATA2.pdf
939SLI-eSATA2 user manual page 43.
https://download.asrock.com/Manual/939SLI-eSATA2.pdf
939SLI32-eSATA2 user manual page 41.
https://download.asrock.com/Manual/939SLI32-eSATA2.pdf
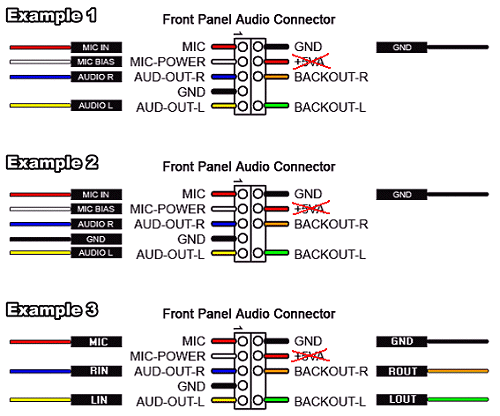
ご質問: My onboard audio is AC'97 audio. The front panel audio connector cables of my case are different from the description of manual. How should I connect them? Please advice.(4/21/2006) 答え: The wording on the front panel connector cables may be different by each chassis manufacturer. Please check the function of each cable. Otherwise it may damage the board if cables are connected to the wrong connectors. We found that if you connect the "GND" (Ground) or "USB VCC" (USB Power) connector pins to the "+5V" pin, it will damage the motherboard after booting up the system. So we recommend you must not install any connector on the +5V pin of the Front Panel Audio header. It will not affect the Audio function if you remove the connector from the +5V pin.
For this reason, we will remove the +5V pin from the Front Panel Audio header of our products in the future.
There are three examples for your reference, please refer to the following pictures.
ご質問: I use a Samsung HD080HJ (P80SD) 80GB SATA II HDD on K8Upgrade-NF3. After installing Nvidia all in one driver from the support CD, it takes a little bit long time to boot into Windows® XP. How could I solve this problem?(1/16/2006) 答え: Please follow below steps to update Nvidia IDE driver:
1. Under Windows® XP, please go to "Control panel" and choose "Add/Remove program" to remove the Nvidia IDE driver.
2. Please download the new Nvidia IDE driver from https://download.asrock.com/Drivers/Special/NVIDIA_4.84IDE.zip
3. After driver download is completed, please install the new IDE driver for your system.
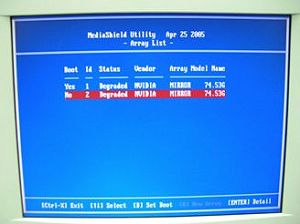
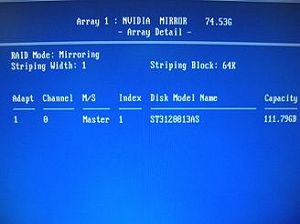
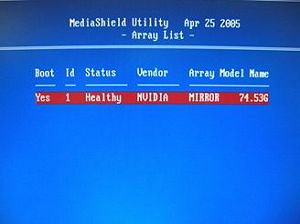
ご質問: I use two SATA HDDs to create RAID 1 (mirroring) array on K8NF4G-SATA2. After I finish setting up the array and OS installation, I remove one of the two SATA HDDs. However, when I put the SATA HDD back, it shows a warning message as below when booting up the system. What should I do? (1/16/2006) 答え: When you remove one of the two SATA HDDs, the system will recognize the left one as an abnormal array. Then, when you put a HDD back, the system will recognize the two HDDs as two abnormal arrays. That is why it shows a warning message to remind you that is not a normal RAID 1 (mirroring) array.
In order to solve it, please press "F10" during POST to get into MediaShield Utility and do the following steps to rebuild the array.
Step 1: Please go to the MediaShield Utility (Press F10) and choose one of the SATA HDD (array) in "Array list".
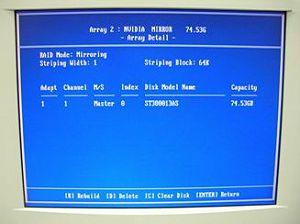
Step 2: Press "Enter" to get into the "Array Detail"
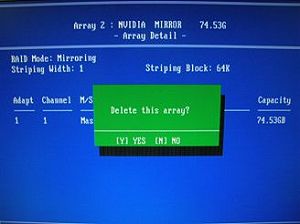
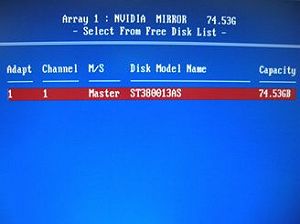
Step 3: Press "D" to delete this array.
Step 4: After you delete it, please go to "Array Detail" of the left Array.
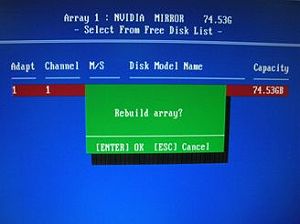
Step 5: Press "R" (Rebuild) to get into "Select From Free Disk List"
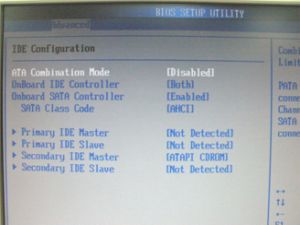
ご質問: I installed a Windows XP operating system for 775Twins-HDTV in my SATA HDD. I want to duplicate my SATA HDD to another new SATA HDD by using GHOST program. After finished, the new duplicated SATA HDD cannot boot up. What should I do?(11/18/2005) 答え: We recommend you to install Windows XP on your original SATA HDD again and install the SATA drivers at the beginning of Windows XP installation. Please refer to the following steps:
Step 1: Please go to BIOS to disable the "ATA Combination Mode", or you can reserve it as default value. (BIOS/ Advanced/ IDE Configuration/ ATA Combination Mode/ Disabled)
Step 2: Please press "F6" to install SATA drivers at the beginning of the Windows XP installation.
Step 3: Install the SATA drivers. (Please make a SATA Driver Diskette at first. Please refer to the 775Twins-HDTV user manual page 25.)
Step 4: Start to install the operating system.
Step 5: After finished the Windows XP installation, we recommend you to install the SATA driver from support CD.
Step 6: Now, you can start to duplicate the HDD by using GHOST program.
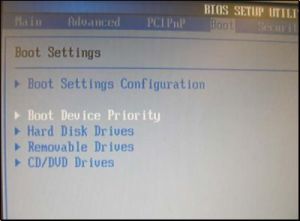
ご質問: How do I use "Boot from Network" function on ASRock motherboard?(10/17/2005) 答え: Please press F2 when power on, enter the BIOS setting menu. Select the screen "Boot". Go to the sub screen "Boot settings Configuration". Set the item "Boot From Network" to "Enable". Press F10 to save the setting and reboot.
After restart, press F11 and select Network as the boot device. Or press F2 and enter the sub screen "Boot Device Priority" in BIOS "Boot" screen to change the boot priority of Network.
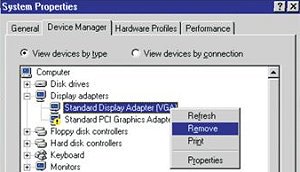
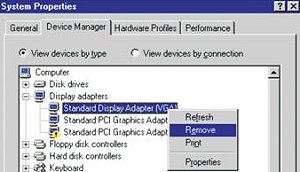
ご質問: I use PCI Express VGA card on my ASRock motherboard. My operation system is Windows 98SE / ME. In "Device Manager", there are two "Display Adapter Controllers" in "Display Adapters" option. What should I do?(7/15/2005) 答え: Please follow the below steps to install PCIE VGA card driver.
a. Please enter "Device Manager" and you will see "Standard Display Adapter (VGA) and "Standard PCI Graphics Adapter (VGA)" in the "Display Adapters" option.
b. Please Choose "Standard Display Adapter (VGA)" and right-click "Remove".
c. After removing the device, please reboot your system. Then, you will only see "Standard Display Adapter (VGA)" in "Display Adapter" option.
d. Please start to install your PCIE VGA card driver.
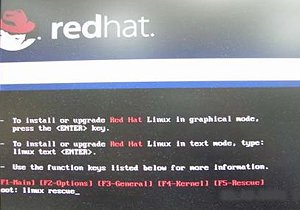
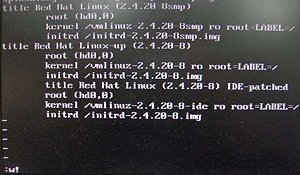
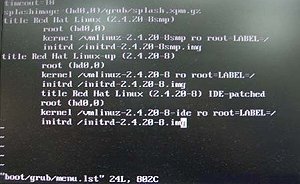
ご質問: I would like to install Red Hat Linux 9.0 on my VIA 8237/8237R based motherboards. But after I finished the installation of Red Hat Linux 9.0, it hung with kernel panic during boot-up. The error message is shown as below:
How do I fix this problem?(7/15/2005) 答え: Please add VIA vmlinuz-2.4.20-8-IDE patch to Linux kernel by following steps.
First, copy the patched kernel (vmlinuz-2.4.20-8-ide) into floppy disk. Then, select one of the cases applies to your situation below.
(a)Clean install the Red Hat Linux 9.0.
Before exiting the installation of Red Hat Linux 9.0, press ++ to enter console mode. Then skip the case (b) to proceed.
(b)Use the kernel in existing Red Hat Linux 9.0 system.
Make sure the first boot device is CD_ROM in your system BIOS, then put the installation CD 1 into CD-ROM. When booting the installation CD, type the following command when the "boot:" message appears on the screen.
linux rescue /* press enter */
Then follow the instructions, and select the partition that the existing Red Hat Linux 9.0 is located in the "system to rescue" window. Then it will enter the console mode after a while.
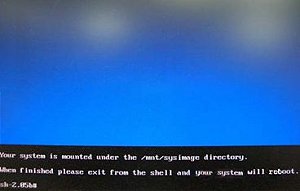
Console mode:
After entering the console mode, run the following commands.
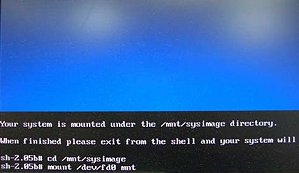
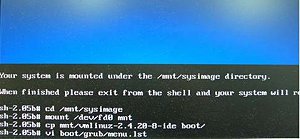
# cd /mnt/sysimage /* press enter */
# mount /dev/fdo mnt /* after type this command, insert the floppy and press "enter" */
# cp mnt/vmlinuz-2.4.20-8-ide boot/ /* reading the floppy for a while */
# vi boot/grub/menu.lst /* press enter and it will enter /mnt/sysimage/boot/grub/menu.lst file */
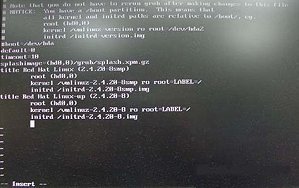
Under /mnt/sysimage/boot/grub/menu.lst file press "A" to enter insert mode.
Add the following lines into /mnt/sysimage/boot/grub/menu.lst file.
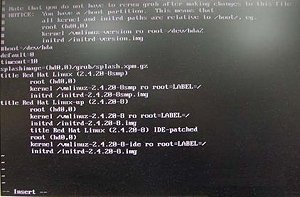
title Red Hat Linux (2.4.20-8) IDE-patched /* press enter */
root (hd0,0) /* press enter */
kernel /vmlinuz-2.4.20-8-ide ro root=LABEL=/ /* press enter */
initrd /initrd-2.4.20-8.img /* press Esc to leave insert mode */
Press Esc to leave insert mode and type the command below.
:w! /* press enter to save file */
It will appear the message "boot/grub/menu.lst" 24L, 802C
Then, reboot system and enter the "Red Hat Linux (2.4.20-8) IDE-patched" kernel. The problem would not happen again.
ご質問: My motherboard is Intel 915GL chipset based. After I installed Intel VGA driver 14.10, the screen became black when entering into Windows 2000/XP. What should I do?(4/8/2005) 答え: Intel newer VGA driver 14.11 may solve this problem.
When booting up, please press F8 to enter OS with safe mode and uninstall VGA driver 14.10.
Please refer to Intel website to download VGA driver 14.11 and install it.
http://downloadfinder.intel.com/scripts-df/Detail_Desc.asp?agr=N&ProductID=1765&DwnldID=8543
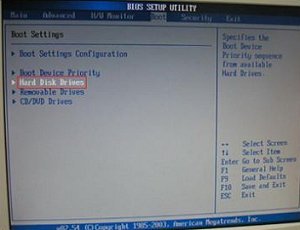
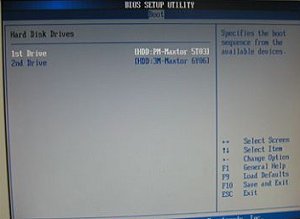
ご質問: If I use a SATA HDD and an IDE HDD together on P4i65GV, how do I boot from SATA HDD?(1/18/2005) 答え: If you connect SATA HDD and IDE HDD together on P4i65GV, you will see an item of the BIOS setting- Hard Disk Drives (please refer to the following pictures).
Please entry the setting, choose your SATA drive as the "1st Drive" and then press "F10" to save the setting and exit.
ご質問: I used Prescott CPU and P4i45GV/P4i65GV. I wanted to use NT4.0, but the installation can not be completed. What should I do?(12/15/2004) 答え: For Prescott CPU, some OSes (ex.NT4.0) can not be installed. In order to boot legacy OSes that cannot support CPUs with extended CPUID functions, please flash to the latest BIOS to enable "Max CPUID Value Limit" (Advanced => CPU Configuration)
We don't provide drivers for NT4.0. If you need drivers for NT 4.0, please refer to following websites to get them.
VGA driver for P4I45GV/P4I65GV: http://downloadcenter.intel.com/
ご質問: My ASRock motherboard supports Hybrid Booster. Is Hybrid Booster a utility to install? Where can I get it?(9/14/2004) 答え: The Hybrid Booster features supported on each models are a little different.
Please go to https://www.asrock.com/mb/index.asp and find the specification of your motherboard and check the exact features supported.
Actually, Hybrid Booster is a combination of several features which have already been provided with the motherboards.
1. CPU Multiplier: Adjusted by setting onboard FID jumpers.
2. CPU Vcore adjustment: Adjusted by setting BIOS setup option.
3. CPU Frequency Stepless control: Adjusted by setting BIOS setup option.
4. AGP/PCI Frequency control: Adjusted by setting BIOS setup option.
5. ASRock U-COP: Hardware feature, no need to be adjusted.
6. Boot Failure Guard: BIOS feature, no need to be adjusted.
Please refer to https://www.asrock.com/feature/HybridBooster/HybridBooster.html for detailed explanations.
ご質問: Sometimes when my P4i65GV boots up, the CPU fan starts to work then shut down right away. After waiting for 1~2 seconds, it starts to work again. Why?(7/12/2004) 答え: Actually, it is caused by Intel 865GV memory sizing code. It will only happen at the 1st or 2nd boot after getting electrical power. So, please don't worry about it, it is normal.
ご質問: I have installed 1 SATA HDD and 1 IDE HDD (or SCSI card with SCSI HDD) on my P4i48 motherboard, how can I select IDE HDD (or SCSI HDD) in the Boot Device Priority?(6/11/2004) 答え: If you would like to select IDE HDD in the Boot Device Priority menu, please set the IDE HDD to the first device of boot sequence in the Hard Disk Drives menu first.
AMI core 8 based BIOS would separate connected bootable devices into 3 groups, Hard Disk, Removable, and CD/DVD drives. Only first boot sequence of device in each group can be selected in the Boot Device Priority menu.
ご質問: My on-board LAN is not working, I found that the MAC address of my on-board LAN is 00-00-00-00-00-00 or FF-FF-FF-FF-FF-FF. What's wrong?(4/15/2004) 答え: The MAC address of the on-board LAN is erased. After updating the BIOS or clearing the CMOS, please boot up the system and enter the BIOS setup. After loading the BIOS default, please exit and save changes. Failing to do so may cause the MAC address disappeared. If the MAC address is gone, please contact ASRock technical support engineer for help. ( https://www.asrock.com/general/about.asp?cat=Contact )
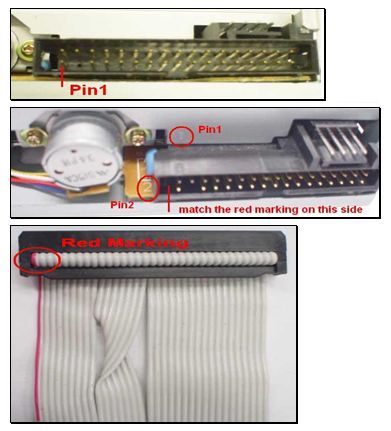
ご質問: I'd just finished setting up my system. When booting it up, I found that the LED of the floppy drive is always on and I cannot read any floppy disk with the floppy drive. Why?(1/14/2004) 答え: Perhaps the floppy ribbon cable is connected to the floppy drive with the wrong orientation. Please reconnect the floppy cable and make sure to match the red marking on the floppy ribbon cable with Pin1 of the floppy drive connector. However, some floppy drives' connectors may not be easily to define Pin1. You can try to check around the connector. Usually, there will be labels for Pin1 or Pin2.
ご質問: In GE Pro-M2 latest BIOS advanced menu, there is one option named "Flexibility". What's the function?(1/14/2004) 答え: The default value of this option is "Disabled". It allows better tolerance for memory compatibility when it is set to "Enabled".
ASRock also offers the hot key "Home" to enable Flexibility. Before the system boot up, please keep pressing hot key "Home" first, then push the power button to boot the system up. When the POST screen appears, the function "Flexibility" is enabled.
ご質問: When I try to create my K7S8XE+ SATA driver diskette and boot up with the driver CD, the system locks up. What should I do now?(11/14/2003) 答え: Before the SATA driver diskette creating process, please go to BIOS SETUP -> Advanced menu -> Peripheral Configuration -> Onboard SATA and set it to "Disable".
After the driver diskette creating process completed, please set Onboard SATA back to "Enable" in the BIOS.
ご質問: I'm using ALi chipset based motherboard, P4AL-8X and P4AL-800. How can I install Linux correctly on them?(10/15/2003) 答え: When installing Linux which the Kernel version is order than 2.4.21 on P4AL-8X or P4AL-800, please follow the bellow procedure.
When installing Linux, at the page choosing the installation between "Graphic mode" or "Text mode", please type "boot: linux pci=conf2" to complete the installation.
After the installation, in the GRUB boot up menu, please press "a" to modify the kernel argument. Please type "ro root=LABEL=/ pci=conf2" in order to boot up correctly.
Download the latest Kernel from http://www.kernel.org/pub/linux/kernel/ , for example, linux-2.4.22.tar.gz from another system.
Copy the latest Kernel into this Linux system.
Compile the latest Kernel.
For further Linux information about ALi chipset, please visit
http://www.ali.com.tw/
ご質問: What is Boot Failure Guard (B.F.G)? How do I enable this function?(8/15/2003) 答え: It is an ASRock new technology. While the system could not boot up normally at overclocking setting, the safe boot up mode will be issued from B.F.G and provides a BIOS setting interface for parameter reset/correction.
You don't need to adjust any setting to enable B.F.G. It is a basic function for ASRock motherboard.
ご質問: How could I use Wake on LAN function?(7/9/2003) 答え: All of ASRock motherboards support Wake on LAN. Please enable the "PCI Device Power On" in the Power menu of BIOS. After saving the changes and exit the BIOS, please boot into the Windows OS then shut down the system.
Now, the system is ready to be woken up through LAN by other computers.
ご質問: How do I get the correct CPU speed after updating the BIOS?(6/13/2003) 答え: After updating the BIOS, the default of BIOS will be loaded with stable setting and the system runs with slower speed to secure the first boot runs successfully. In order to make your system running with the optimum setting, please remember to load turbo/default setting after you update the BIOS.
ご質問: When I use ASRock P4i45G(L) M/B, I see there is 1MB shared memory from the system memory shown in the POST screen during boot process. What is the 1MB shared memory used for? (6/13/2003) 答え: The 1MB memory is used for VGA BIOS (before loading OS).
ご質問: Does ASRock motherboard support "Boot from USB device", if my USB device is bootable?(4/15/2003) 答え: Yes! All of ASRock motherboards support "Boot from USB device".
When the system boot up, please press "F8" or "F11" to enter "Boot Menu" and select USB device for your fist boot device , then the system will boot from the USB device which you selected. For P4I45D, please plug the bootable USB device to USB port 2,3.
ご質問: After I updated BIOS, ASRock LOGO disappeared when booting up. Why?(3/3/2003) 答え: Please don't worried! ASRock has removed LOGO in the new BIOS for all ASRock model. It is normal that ASRock LOGO disappeared after flashing BIOS.
ご質問: Should I clear the CMOS after I upgrade the BIOS?(1/30/2003) 答え: If your system is running fine, you do not have to clear the CMOS. Also please do not clear the CMOS right after you upgrade the BIOS. After upgrading the BIOS, please reboot your system once then you can clear the CMOS if you need to do it.
ご質問: Why can't I boot up my system with one hard drive on primary IDE and an optical device (CD-ROM, DVD-ROM, CD-RW, etc...) on secondary IDE If connecting the hard drive/optical device as the secondary drive?(10/29/2002) 答え: For best compatibility and stability, please make sure your stand alone hard drive on primary IDE has jumper setting to master, and your stand alone optical device on secondary IDE has jumper setting to master, too. Also if you only have one hard drive without any other optical device, please connect the hard drive to primary IDE with its jumper setting to master. Furthermore, for optimizing the transfer rate for the hard drive, we recommend you to connect your hard drive(s) to the primary IDE channel and optical device(s) to the secondary IDE channel.
 メニュー
メニュー
 (11/1/2023)
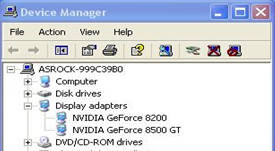 (6/26/2008)
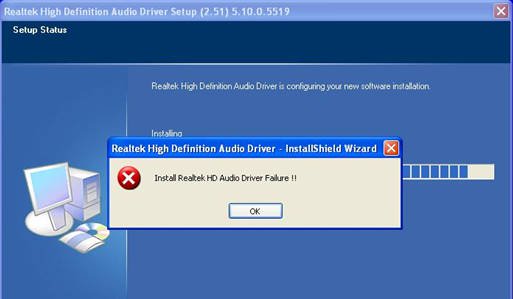 (6/26/2008)
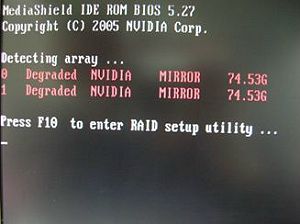 (1/16/2006)


![Select Clear Secure Boot Keys, then choose [Yes].](/support/faq/190-2.jp.jpg)
![After clearing the keys, select Install Default Secure Boot Keys, then choose [Yes].](/support/faq/190-4.jp.jpg)


![Set Enable VMD Global Mapping to [Enabled]. Press F10 to save the changes and exit setup.](/support/faq/167-4.jpg)
 ” to install Windows® 10 64-bit / 11 64-bit OS">
 .">
.">