Utilizziamo i cookie per offrirti un'esperienza più personalizzata e fluida. Visitando questo sito web, acconsenti all’utilizzo dei cookie da parte nostra. Se preferisci non accettare i cookie o hai bisogno di maggiori informazioni, consulta la nostra Informativa sulla privacy.
Se siete pienamente consapevoli della categoria della vostra domanda, si può scegliere una delle categorie qui sotto per le domande più frequenti. Catalogo:
Risultati:
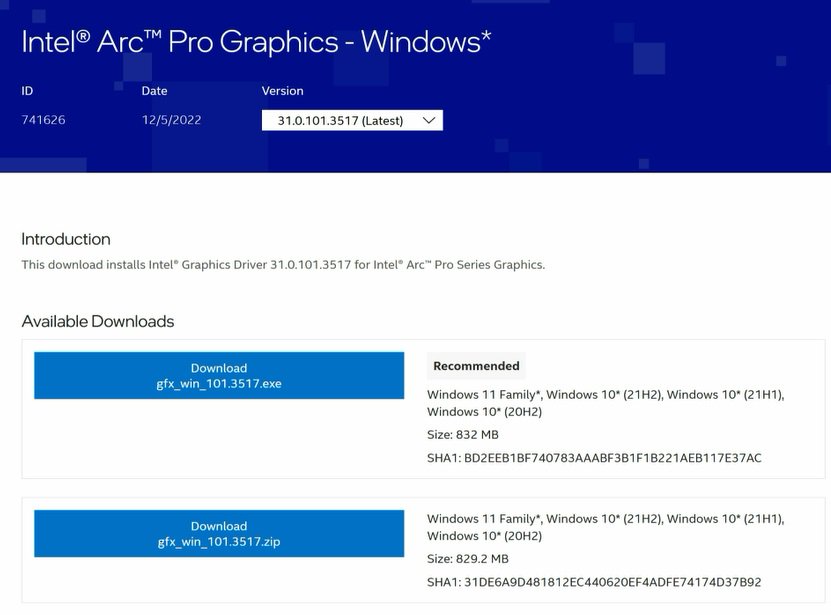
Q (528):
How can I let my ARC graphics card enter power saving mode?(4/11/2023)
A:Please check below table and follow the instructions.
Procedures
●Intel Graphics Card Driver
Go to Intel's official website to download and install the latest official graphics card driver.
● Update the Graphics Card FW
Step 1. Download and unzip IGFXUpdate(v1.01.1).
Step 2. Run "IGFXUpdate”
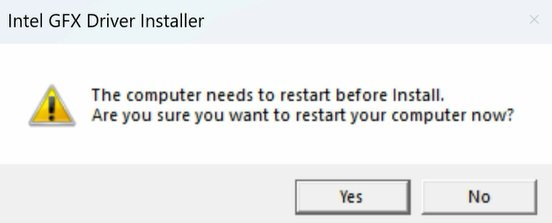
Step 3. Click Yes to restart the system.
Step 4. After the system has restarted, the FW update will begin.
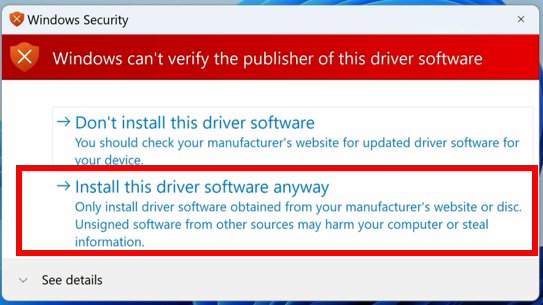
*If this message doesn't show up, please disable the "Secure Boot” in BIOS and try again.
Step 5. During the update, the following security message will pop up.
Step 6. Click on Install this driver software anyway.
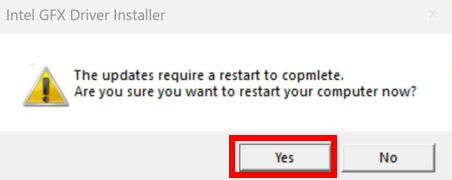
Step 7. The update process will proceed. The screen might blink during the update.
Step 8. Please restart your computer when the following prompt is shown.
● Set PCIe Power to Maximum Power Savings
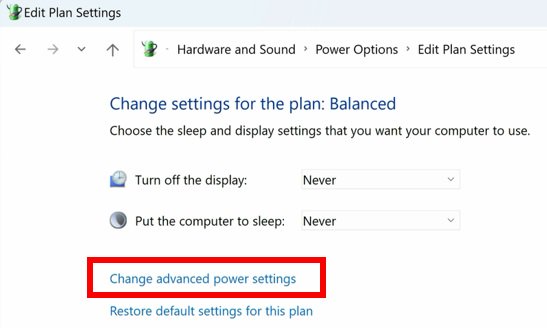
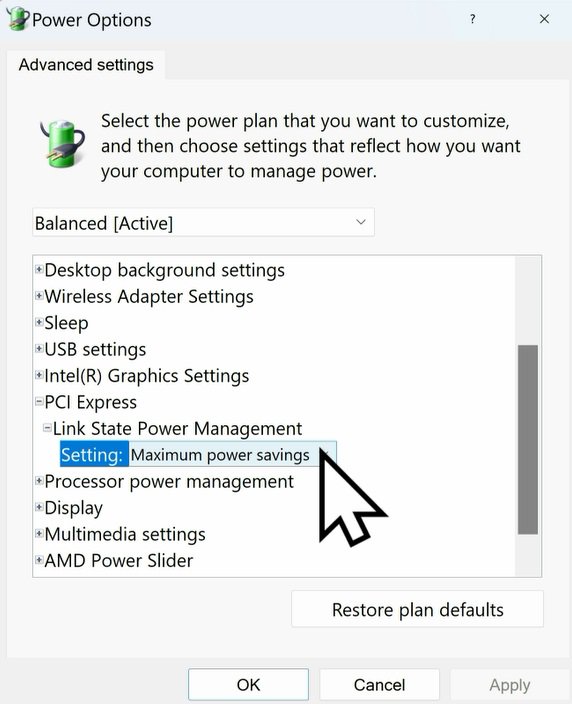
Step 1. Go to [Control Panel\Hardware and Sound\Power Options\Edit Plan Settings\Change] and click [Change advanced power settings].
Step 2. Scroll down to PCI Express\Link State Power Management and select Maximum power savings. Make sure to click apply to apply the changes.
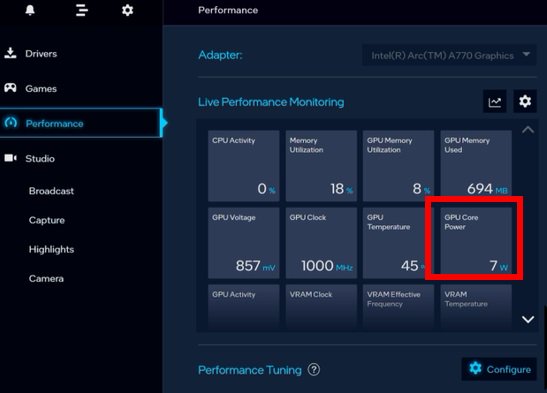
● Re-install the Graphics Card Driver and Check the GPU Power
Step 1. Reinstall the latest graphics card driver.
Step 2. To check the power consumption of the Intel ARC graphics card, please open Intel Arc Control and find the GPU Core Power.
BIOS Setting For ARC GPU Power Saving
● ASRock Intel Motherboard:
Required BIOS Version:
700-series motherboard: Please use the latest BIOS
600/500/400-series motherboard: Use the latest BIOS. It that does not work, please contact ASRock Technical Support. https://event.asrock.com/tsd.asp
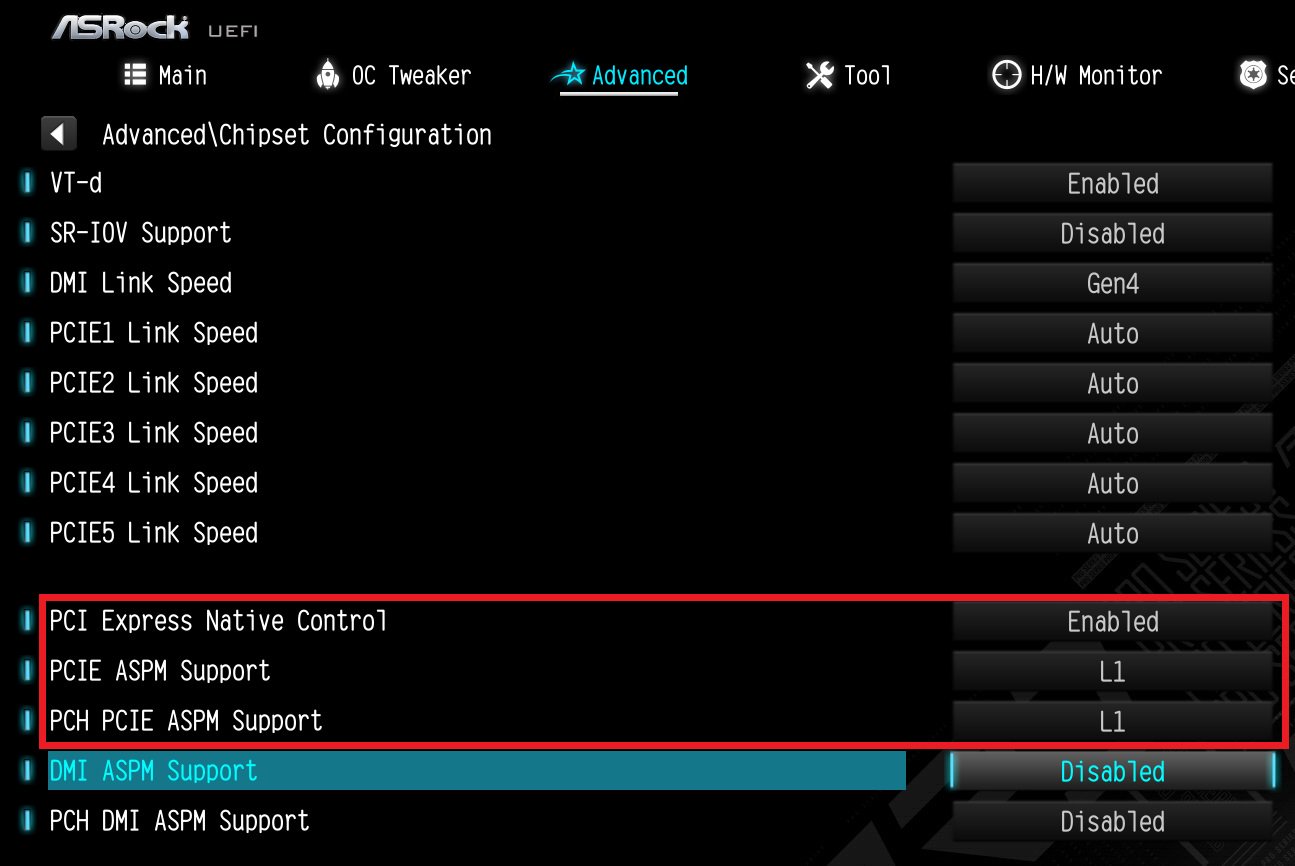
BIOS Settings for all ASRock Intel models:
In BIOS > Advanced > Chipset Configuration, apply the following settings.
PCI Express Native Control: Enabled
PCIE ASPM Support: L1
PCH PCIE ASPM Support: L1
● ASRock AMD Motherboard:
Required BIOS Version:
Platform
600 series
500 series
400 series
300 series
BIOS version
Any version
Not supported
BIOS Setting for all AMD models:
There is no need to change BIOS settings.
● Other brands motherboard:
Please contact your motherboard vendor for further assistance.
Power Consumption After Updating FW and Changing the BIOS Settings
Q (523):
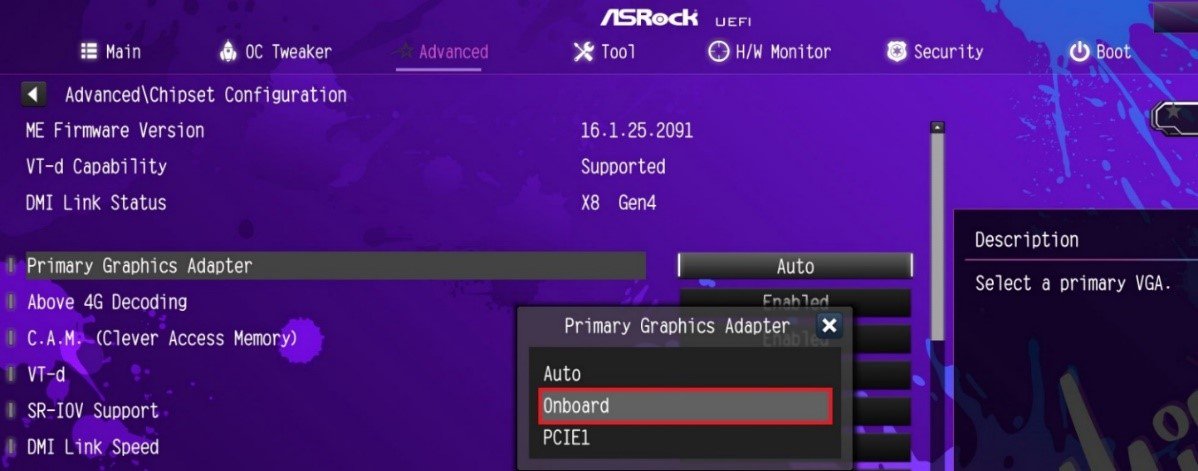
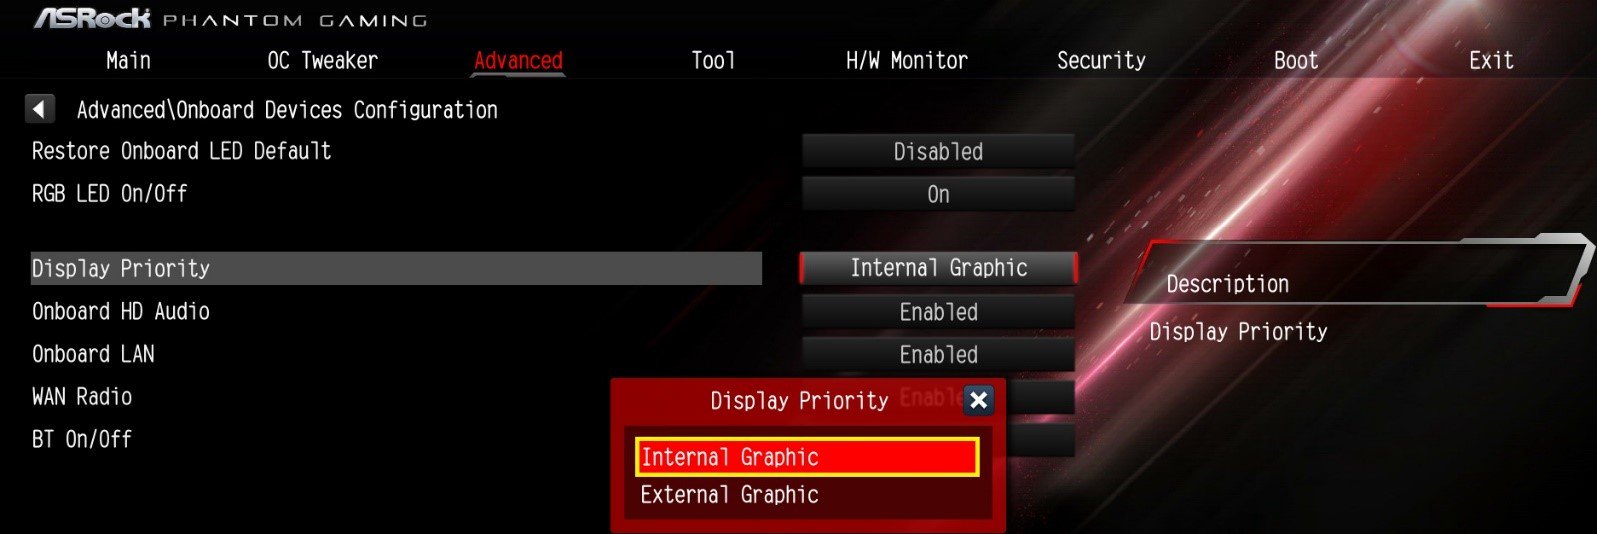
Which BIOS settings do I need to adjust when using 13.3” Side Panel?(3/1/2023)
A:Before using your side panel, please set "Primary Graphics Adapter” to "Onboard” in the BIOS settings to ensure the display work properly.
Intel 700 series:
To do so, please go to "Advanced”> "Chipset Configuration” and set "Primary Graphics Adapter” to "Onboard”. Then press [F10] to save the settings and restart the system.
AMD AM5:
Please go to "Advanced”> "Onboard Device Configuration” and set "Display Priority” to "Internal Graphics”. Then press [F10] to save the settings and restart the system.
3. Run "insttool64.exe” as administrator. A command prompt window pop on and close immediately. It is a normal behavior.
4. Run Command prompt as administrator.
5. Enter the folder path to the extracted file and press [enter].
Default path and command:
cd C:\Users\[Username]\Downloads\VBIOS_L06_update\VBIOS update
*Please change the command if you change the download path.
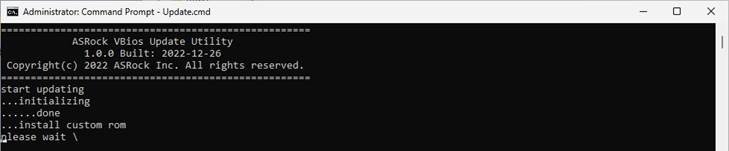
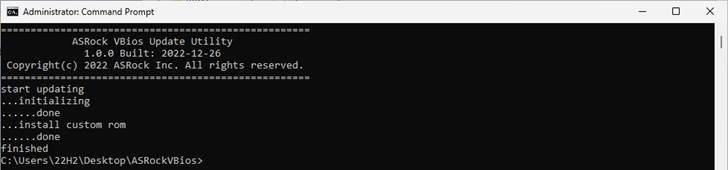
6. Type command "Update.cmd” and press [enter].
Update procedure will start up. This mean the system is flashing the vBIOS. DO NOT turn off the system during the update.
7. Once the flashing has finished, Command Prompt will report it as shown below.
Q (524):
I cannot control the RGB lighting of the graphics card. What can I do to fix it?(3/1/2023)
A:Please flash the RGB controller firmware of the graphics card via the following procedure.
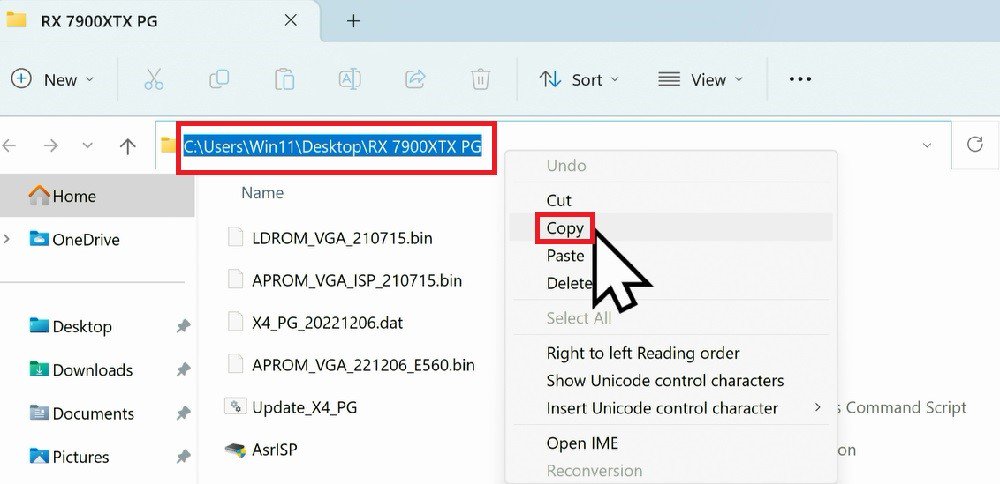
Step 1. Find and download the correct firmware for your graphics card.
Below steps use the RX 7900 XTX Phantom Gaming 24GB OC (RX7900XTX PG 24GO) as example. File and folder names can be different when using another card.
*Please make sure that the graphics card driver is installed before flashing the RGB firmware. *Exit the RGB software before flashing the RGB firmware (and make sure it is not running in the background).
Step 2. Please extract the RGB firmware tool and copy the path of the folder that contains the RGB firmware.
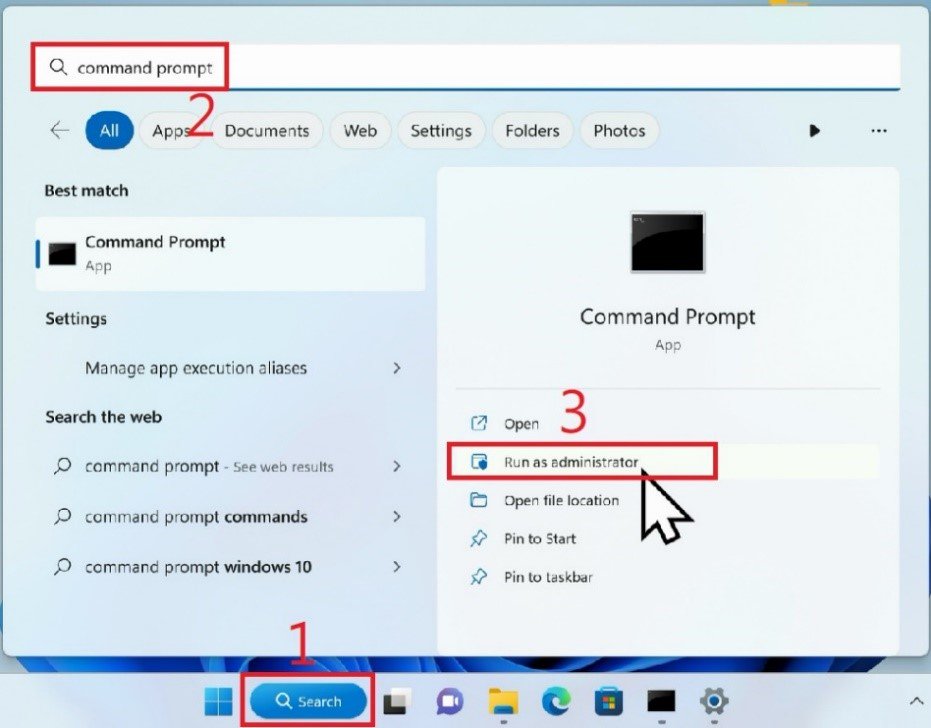
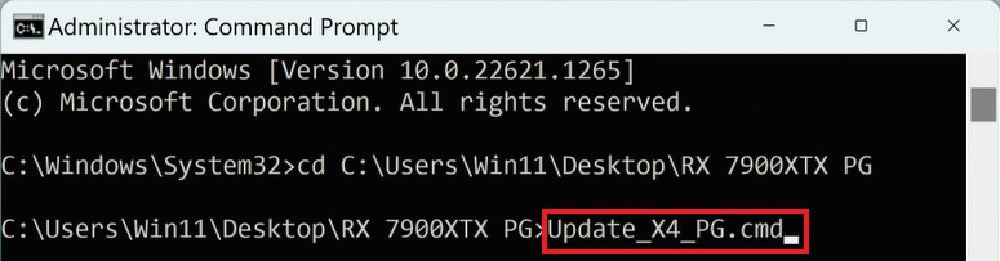
Step 3. Open Command Prompt as administrator.
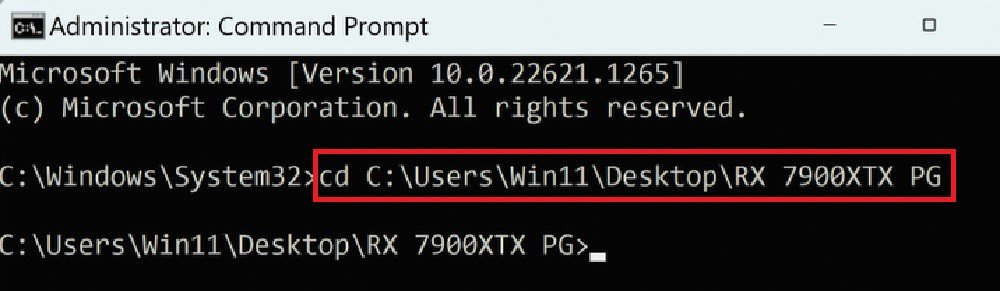
Step 4. Type cd and paste the path that you have just copied.
Step 5. Hit the Enter key.
Step 6. Type the word "Update” and press the Tab key on the keyboard. A full command file name will show up.
*The command will be vary based on the graphics card used.
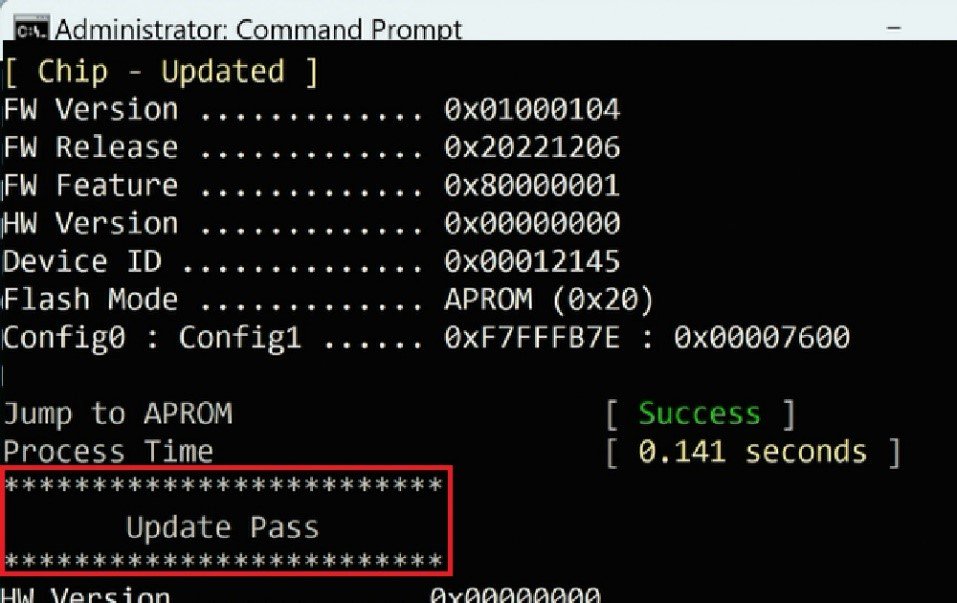
Step 7. Use the Enter key to start flashing the RGB firmware. Give it some time.
Step 8. Once the RGB firmware is updated, the command prompt will show "Update Pass.”
Step 9. Start the ASRock RGB software and check if the graphics card's RGB lighting can be controlled.
Q (515):
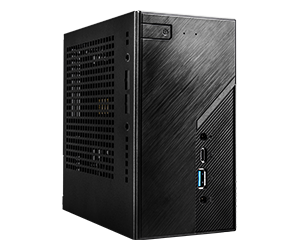
Which graphics cards are supported on my Deskmeet?(7/18/2022)
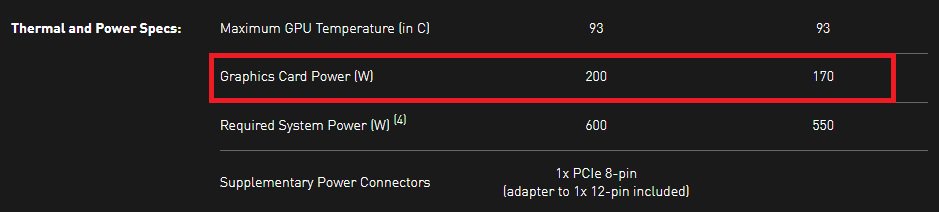
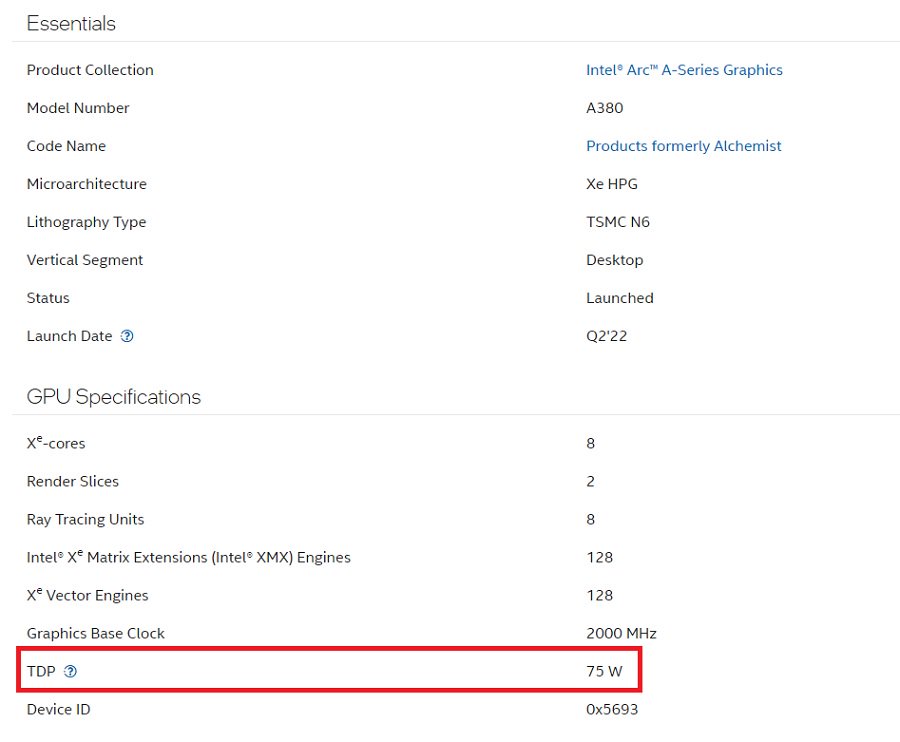
A:We recommend using a graphic card that consumes up to 200 watt, and supports a discrete Dual slot Graphics card up to 20CM.
The Deskmeet supports CPUs that are up to 65W ("Default TDP” or "Processor Base Power”). The peak power draw of a 65W CPU is about 200W.
The Deskmeet comes with a 500W PSU. So it is able to handle a graphic card with a power draw up to 200W.
For the graphics card's power consumption, please check the specifications provided by the graphic card's vendor.
When checking the power consumption of the graphics card, please refer to the examples below. The power consumption is marked red here:
AMD
NVidia
Intel
Q (493):
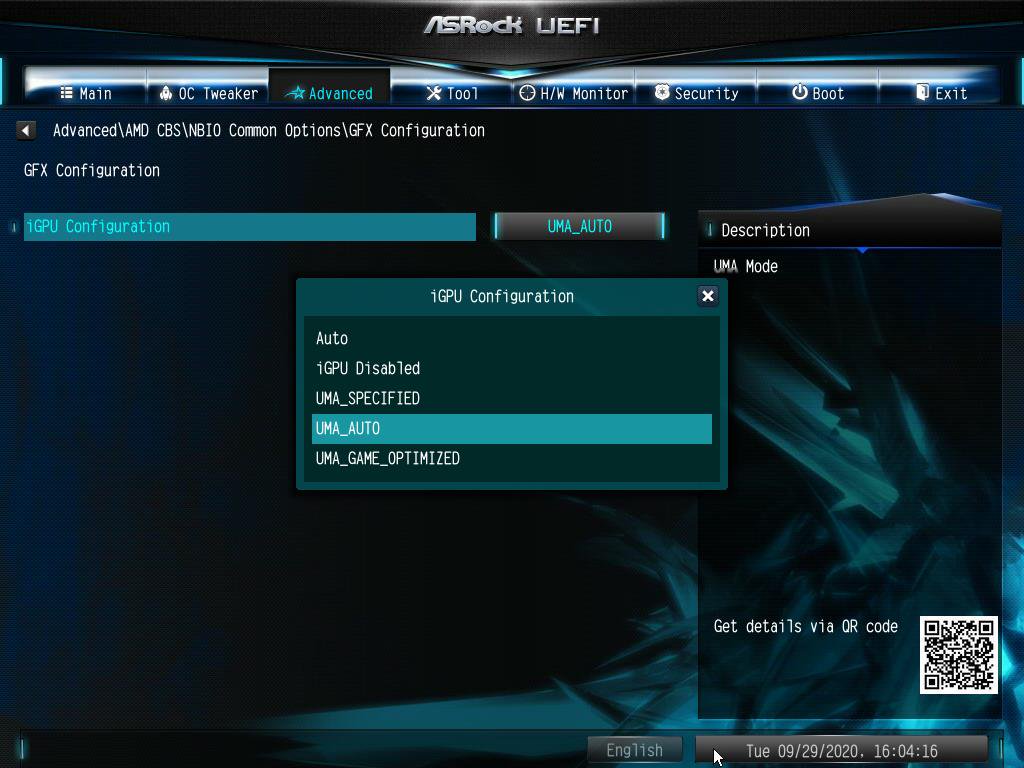
How do I enable IGPU Multi-Monitor on B550/A520 series motherboard?(10/1/2020)
A:To enable IGPU Multi Monitor, please refer to the following path and set the [iGPU Configuration] to [UMA_AUTO].
Advanced\AMD CBS\NBIO Common Options\GFX Configuration
Q (482):
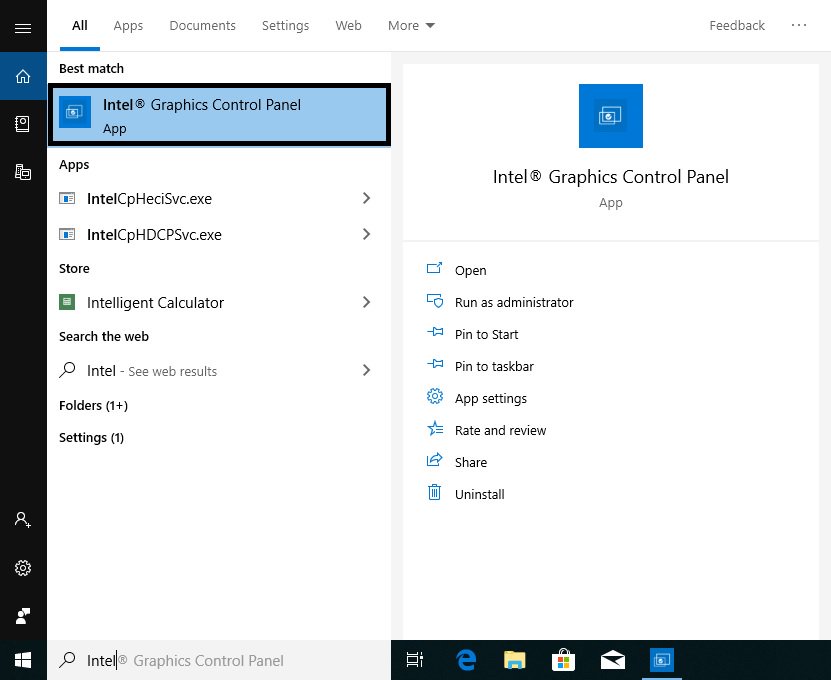
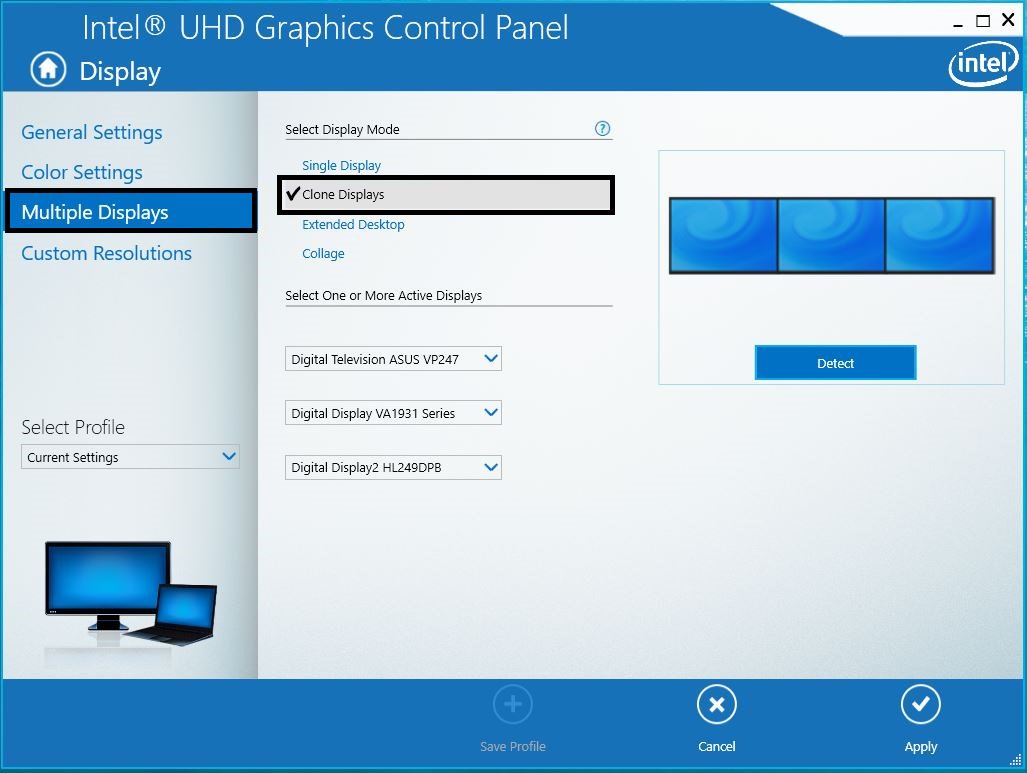
How do I configure clone mode in triple displays under Intel platform?(9/1/2019)
A:Please refer to the following procedures to adjust display settings under Intel® Graphics Control Panel:
Step 1. Please search "Intel® Graphics Control Panel” in Windows search bar and open it.
*System will auto-download the Intel® Graphics Control Panel from internet after installing the onboard VGA driver.
If the App doesn't exist in your system, please visit Intel or ASRock website to install the latest Graphics driver for your system.
Step 2. Select "Clone Displays” under "Multiple Display” and then click "Apply” to apply the change.
Q (473):
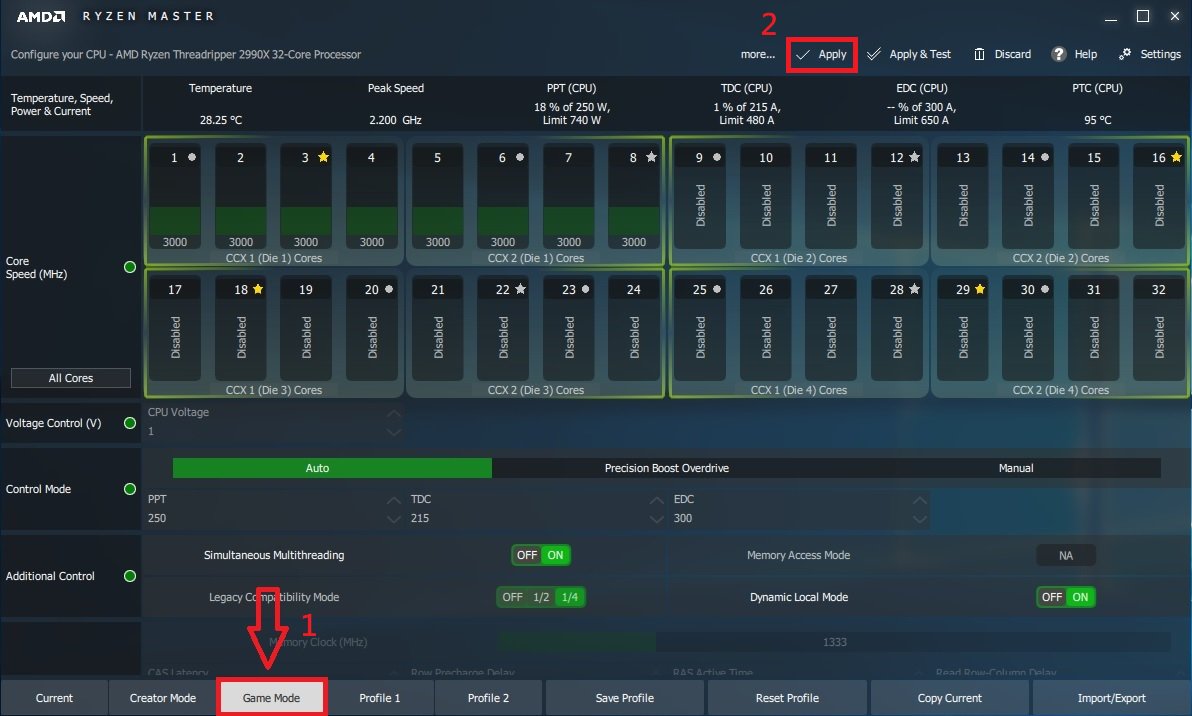
Mi piacerebbe ottimizzare le mie prestazioni grafiche durante la riproduzione di giochi su piattaforma X399, cosa devo fare per configurare il sistema? (2/1/2019)
A:Poiché alcuni giochi non supportano più di 16 core, AMD Ryzen Master Utility fornisce la modalità di gioco per ottimizzare le prestazioni grafiche.
Fare riferimento al seguente link per scaricare e installare l'utility AMD Ryzen Master.
Link per scaricare Ryzen Master: https://www.amd.com/en/technologies/ryzen-master
Seguire i passaggi per selezionare la modalità di gioco e applicare.
Dopo di ciò, le prestazioni grafiche saranno ottimizzate.
Q (472):
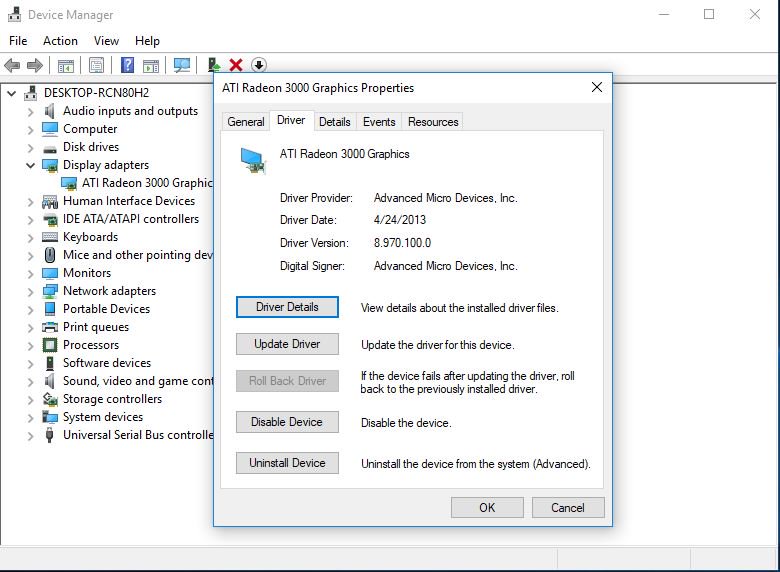
Come installo manualmente il driver VGA con Win10 64bit sulla 760GM-HDV?(1/1/2019)
A:Fare riferimento ai seguenti passaggi per installare manualmente il driver VGA.
Step 1. Andare su Gestione dispositivi
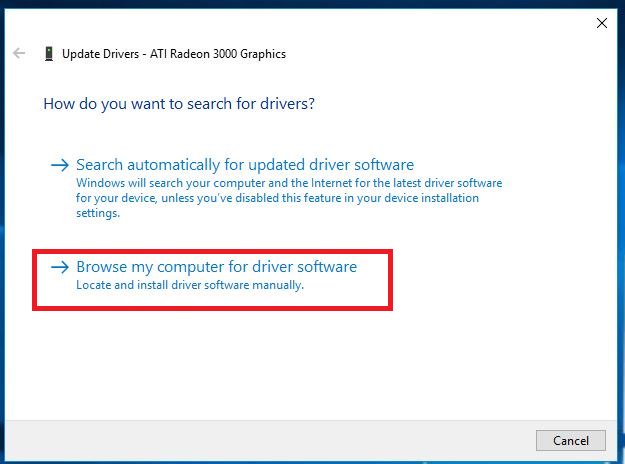
Step 2. Fare clic con il pulsante destro del mouse sugli adattatori del display per inserire le "proprietà” e selezionare "Aggiorna driver”.
Step 3. Scegliere "Cerca il software del driver nel mio computer”.
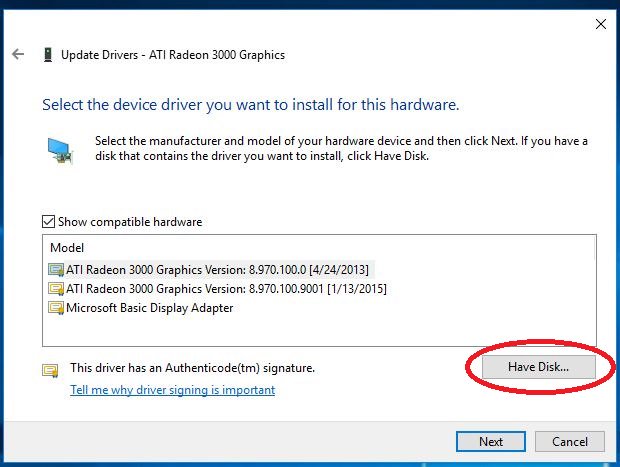
Step 4. Scegliere "Fammi scegliere da un elenco di driver disponibili sul mio computer”.
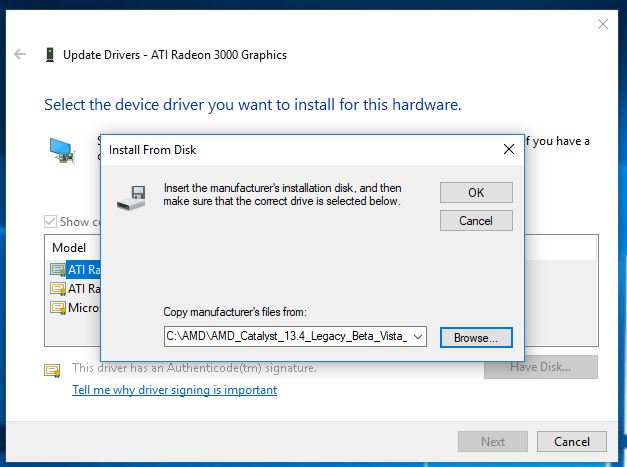
Step 5. Fare clic su "Disco driver” e sfogliare per cercare il driver dal disco.
Step 6. Fare clic su "OK” e scegliere "Avanti” per installare il driver.
*Se il sistema utilizza la porta HDMI integrata per visualizzare il monitor e il monitor visualizza la risoluzione errata, attenersi alla procedura seguente per regolare la risoluzione del monitor.
Step 1. Installare il driver AMD all in 1 come indicato di seguito:
Link: https://download.asrock.com/Drivers/AMD/AllIn1/Allin1(v15.7.1).zip
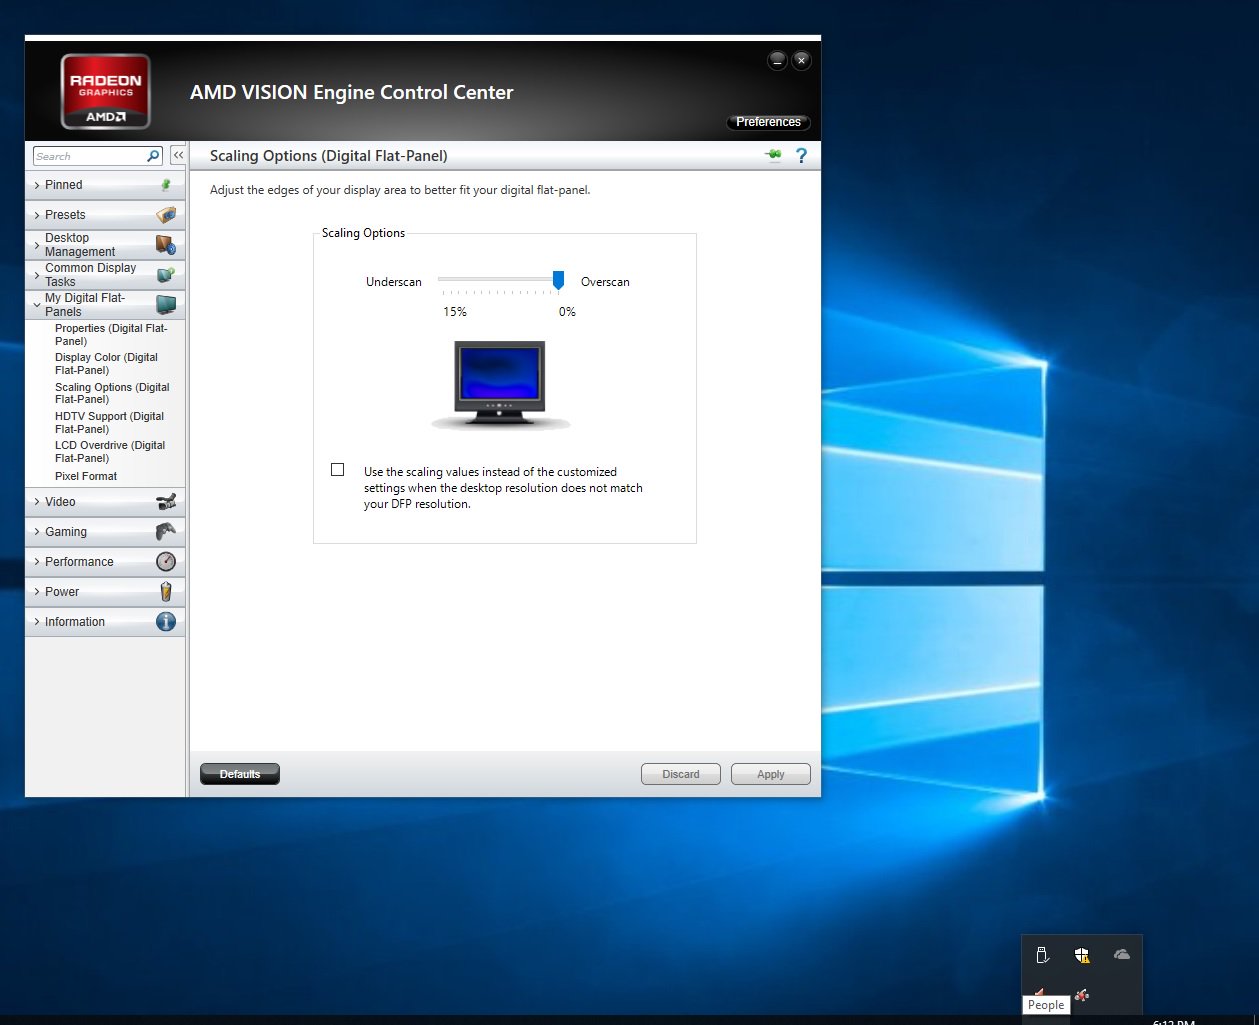
Step 2. Aprire il "Centro di controllo del motore AMD VISION”.
Step 3. Scegliere "Opzioni di ridimensionamento (schermo piatto digitale)” e regolare le Opzioni di ridimensionamento su Overscan
Q (464):
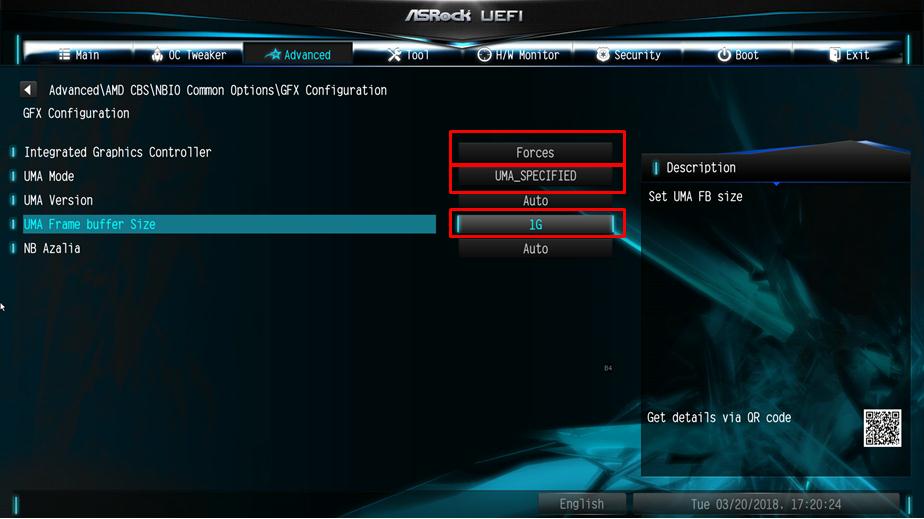
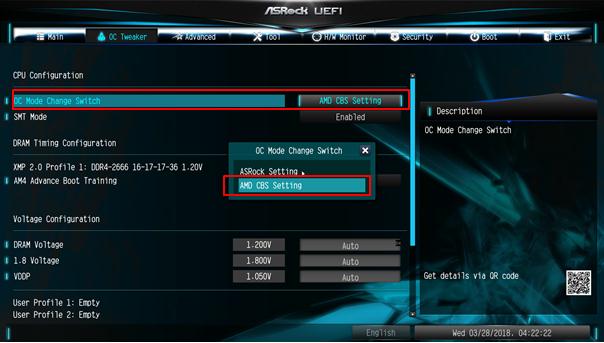
Come regolo la memoria condivisa mentre utilizzo la CPU Raven Ridge sulla piattaforma AM4?(3/1/2018)
A:Se desideri regolare la memoria condivisa, procedi nel seguente modo per trovare e regolare le impostazioni di OC.
1. Premi "F2" o "Canc" durante il POST per accedere alla configurazione del BIOS
2. Fare riferimento al seguente percorso per regolare le impostazioni di OC.
a. Advanced\AMD CBS\NBIO Common Options\GFX Config IGC :Forces
b. Advanced\AMD CBS\NBIO Common Options\UMA Mode : UMA_Spec
c. Advanced\AMD CBS\NBIO Common Options\UMA Frame Buffer Size: Scegli una dimensione preferita
d. OC Tweaker\OC Mode Change Switch\AMD CBS Setting
3. Dopo aver regolato le opzioni qui sopra, premi "F10" per salvare la configurazione
Q (465):
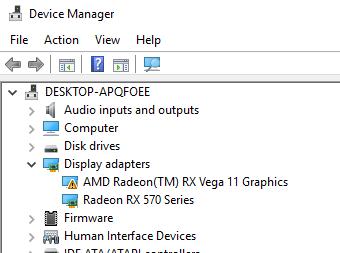
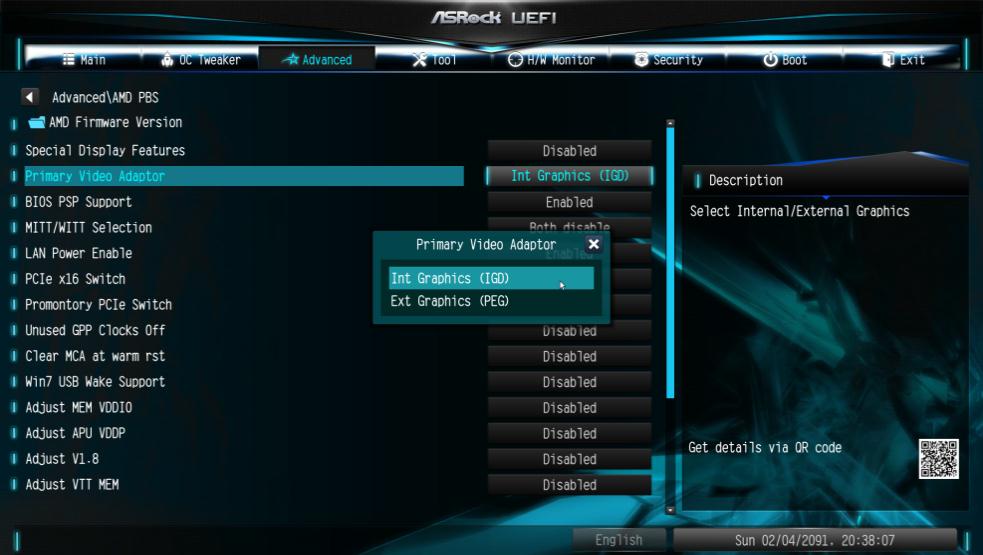
Quando utilizzo la scheda VGA con CPU AM4 grafica integrata, il driver dell'adattatore dello schermo integrato mostra un punto esclamativo, cosa devo fare?(3/1/2018)
A:Se utilizzi la scheda VGA e l'adattatore integrato mostra un punto esclamativo come nell'immagine in basso, attieniti alla procedura per rimuovere il punto esclamativo.
1. Premi "F2" o "Canc" durante il POST per accedere alla configurazione del BIOS
2. Scegli l'adattatore video principale come scheda grafica
Percorso: Advanced\AMD PBS\Primary Video Adapter\Int Graphics (IGD)
3. Dopo aver regolato le opzioni sopra, premi "F10" per salvare la configurazione.
Puoi provare anche il metodo di seguito.
1. Premi "F2" o "Canc" durante il POST per accedere alla configurazione del BIOS
2. Disattiva CSM
Percorso: Boot/CSM/Disable
3. Dopo aver regolato le opzioni sopra, premi "F10" per salvare la configurazione.
Q (448):
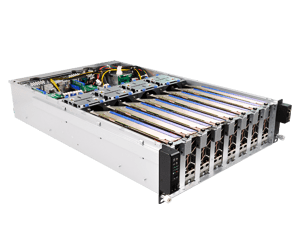
Il sistema non riconosce una delle mie schede grafiche. Cosa devo fare?(9/1/2017)
A:Se alcune schede grafiche non vengono riconosciute dal sistema, questo problema non è necessariamente correlato solo alla scheda madre ma anche ad altri componenti. Le schede riser, l'alimentatore, le schede grafiche e persino il sistema operativo sono tutti punti chiave del sistema. Fare riferimento alle seguenti tre parti per controllare il sistema.
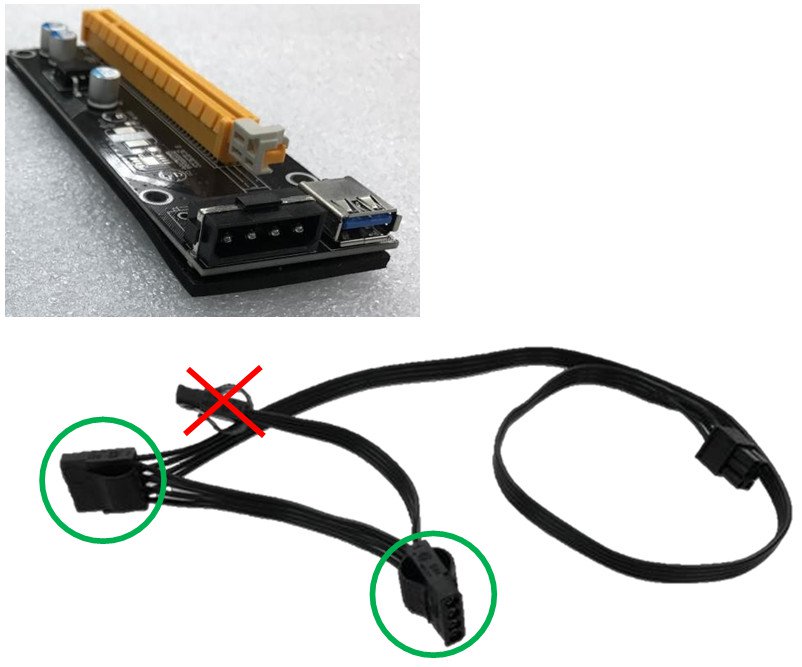
(A) La scheda riser PCIe
1. Verificare che le schede grafiche siano installate correttamente sulle schede riser. Oppure rimuovere le schede grafiche dalle schede riser ed installarle nuovamente sulle schede riser.
2. Raccomandiamo di scegliere schede di riser PCIe con connessione a 6 pin per il sistema di 'mining'.
3. Se si utilizzano schede riser PCIe con un connettore Molex, utilizzare massimo due connettori Molex su ciascun cavo di alimentazione, non di più.
(B) Alimentazione
Quando si utilizzano (quasi) 13 schede grafiche, probabilmente dovrai utilizzare 2 alimentatori. Normalmente l'alimentatore fornirà alimentazione da 12V, 5V e 3,3V alla scheda madre.
Ma in un sistema di 'mining' con più alimentatori la situazione è diversa. Il primo alimentatore deve essere collegato alla scheda madre (12V, 5V e 3,3V) e ad alcune delle schede grafiche (12V). Il secondo alimentatore deve essere collegato solo ad alcune schede grafiche (12V). Dato che il secondo alimentatore fornirà solo tensione 12V alle schede grafiche, questo potrebbe causare squilibrio nell'alimentazione.
I fornitori di alimentatori suggeriscono agli utenti di utilizzare solo un alimentatore per sistema.
(C) Schede grafiche
1. I sistemi a singola GPU in genere assorbono 200W, il sistema avrà bisogno di una adeguata alimentazione per tutto il sistema. Verifica che l'alimentazione del sistema sia adeguata per tutto il sistema.
2. Installa una scheda grafica e assicurati che possa essere riconosciuta nella gestione dei dispositivi.
In caso contrario, arresta il sistema e premi il pulsante di alimentazione per riavviare il sistema.
3. Se non viene rilevata, pulire la connessione dorata della scheda grafica con una gomma (anche la gomma della matita) e reinstalla scheda.
 Menu
Menu