Utilizziamo i cookie per offrirti un'esperienza più personalizzata e fluida. Visitando questo sito web, acconsenti all’utilizzo dei cookie da parte nostra. Se preferisci non accettare i cookie o hai bisogno di maggiori informazioni, consulta la nostra Informativa sulla privacy.
Se siete pienamente consapevoli della categoria della vostra domanda, si può scegliere una delle categorie qui sotto per le domande più frequenti. Catalogo:
Risultati:
Q (531):
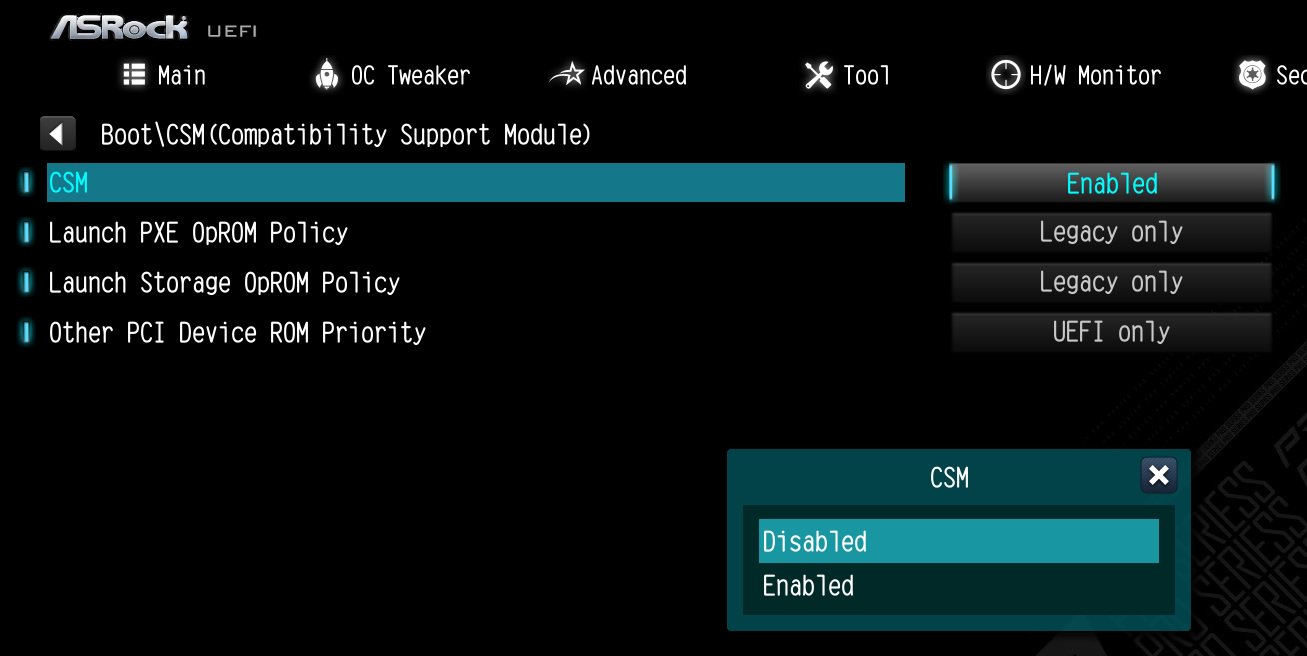
My software requires Secure Boot to be enabled. How can I set it up?(8/16/2023)
A:Please follow the steps below to enable Secure Boot.
Step 1.
Please press the "F2” key during POST to enter BIOS setup.
Go to Boot\CSM (Compatibility Support Module) and set "CSM" to "Disabled".
Press the "F10” key to save configuration changes.
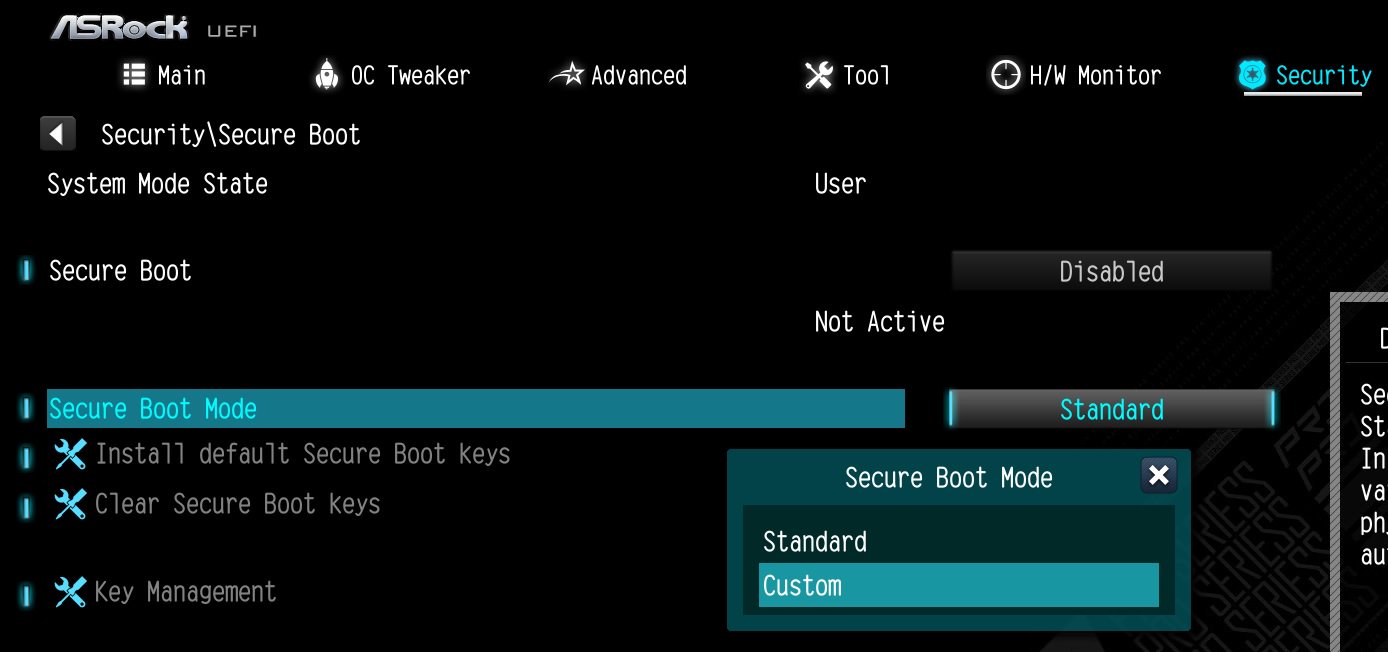
Step 2.
Go to Security\Secure Boot and set "Secure Boot Mode" to "Custom".
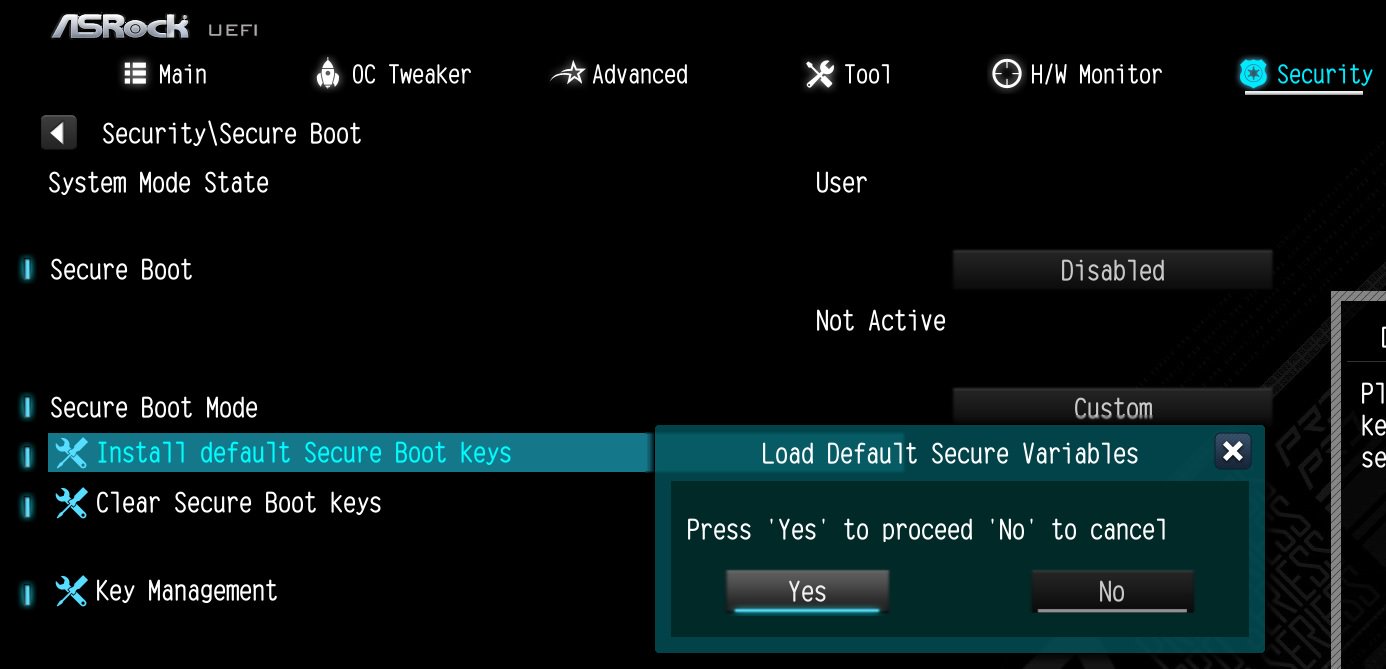
Step 3.
Please press "Install default Secure Boot keys" and select "Yes" to install Secure Boot keys.
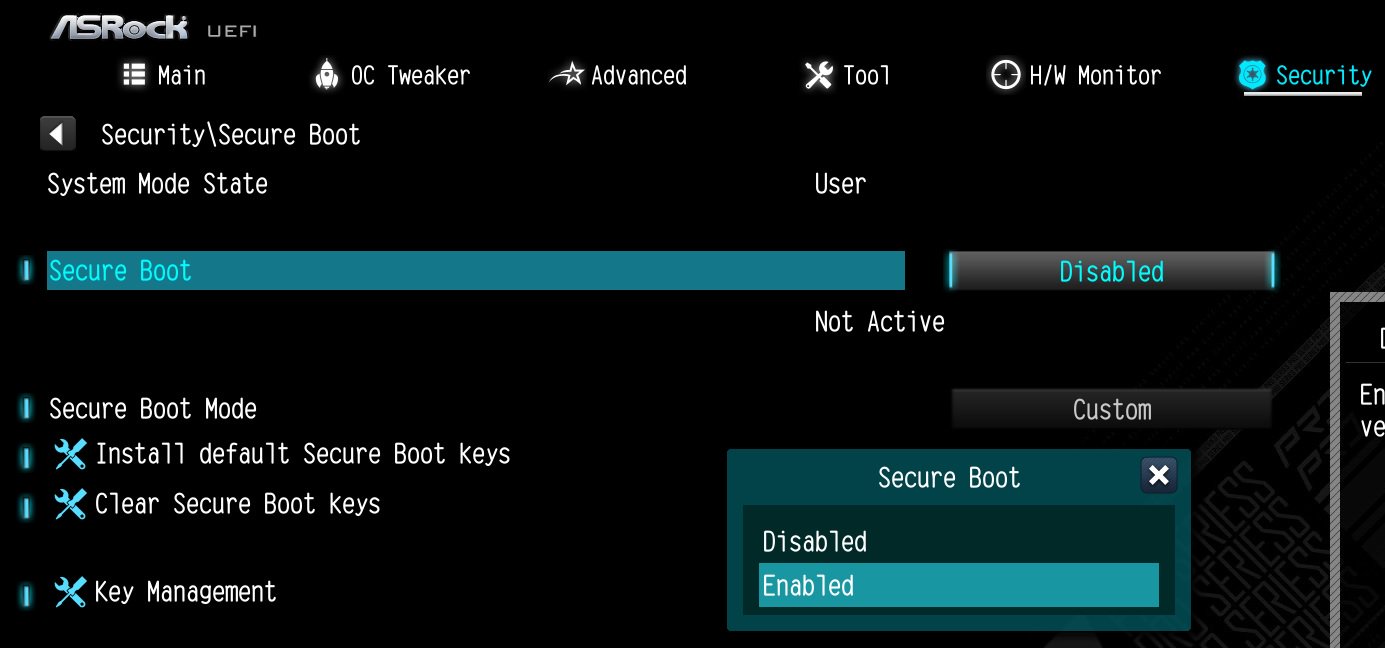
Step 4.
Set "Secure Boot" to "Enabled". Then press the "F10" key to save configuration changes.
Step 5.
After the system restarts, go to Security\Secure Boot, and make sure that Secure Boot is showing "Active".
*AM5 platform
If a prompt "Discard Changes and Exit" appears after clicking "Install default Secure Boot keys" and selecting "Yes", please select "No" and continue to step 4.
Q (530):
When I installed the APU+AMD GPU on the AMD AM4 platform, the "Record & Stream" icon disappears in AMD Radeon software after disabling the CSM. How can I fix it?(6/30/2023)
A:Please follow the steps below to disable the iGPU.
This problem happens when using an AM4 motherboard and APU (CPU with integrated graphics), if you also have an AMD discrete graphics card and the Compatibility Support Module (CSM) is disabled in BIOS.
1. Go to BIOS\Advanced\AMD CBS\NBIO Common Options\GFX Configuration and set iGPU Configuration to "Disabled”.
2. Press hotkey "F10” to save settings and exit the BIOS setup.
3. Boot into the OS and check if the "Record & Stream" menu appears in the AMD Radeon software.
Q (522):
Why can I not find a CSM option under the Boot tab in BIOS?(10/13/2022)
A:When you set Fast Boot to Ultra Fast under the boot tab in BIOS, CSM (Compatibility Support Module) will be disabled and hidden automatically. This is because Ultra Fast Boot is supported only when booting in full UEFI mode, so without enabling CSM.
Q (520):
There is no sound output from the rear audio port. What can I do to fix it?(9/27/2022)
Q (509):
Why can my game not start with my Intel 600 series motherboard?(11/2/2021)
A:Some games use DRM (Digital Rights Management) protection. Please check for available updates for your game, where the DRM solution supports Alder Lake CPUs.
If the game development is discontinued and there is no update available for the DRM, please follow below steps to enable the "Legacy Game Compatibility Mode”.
Step 1.
Press [Del] or [F2] during the POST stage to boot into BIOS.
Step 2.
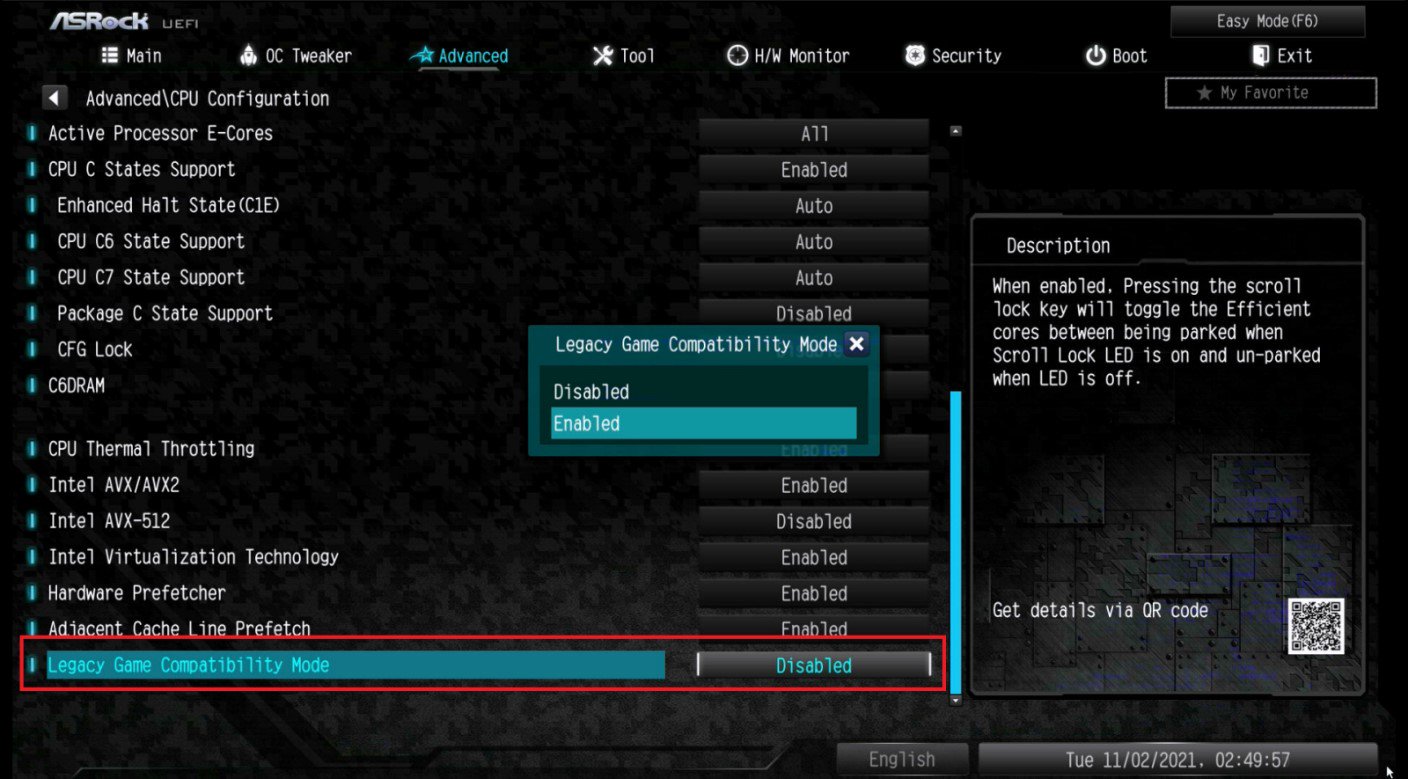
Press [F6] to enter "Advanced” mode and go to Advanced\CPU Configuration
Step 3.
Enable the "Legacy Game Compatibility Mode” in BIOS.
(The option is at the bottom of the CPU Configuration page)
Step 4.
Press [F10] to save the setting and restart the system.
Step 5.
The [Scroll Lock] key on your keyboard is now a hotkey. It can be used to enable/disable the Intel E-core parking feature. Before starting a game outdated DRM protection, please press [Scroll Lock] within the OS to enable Intel E-core parking.
Step 2.
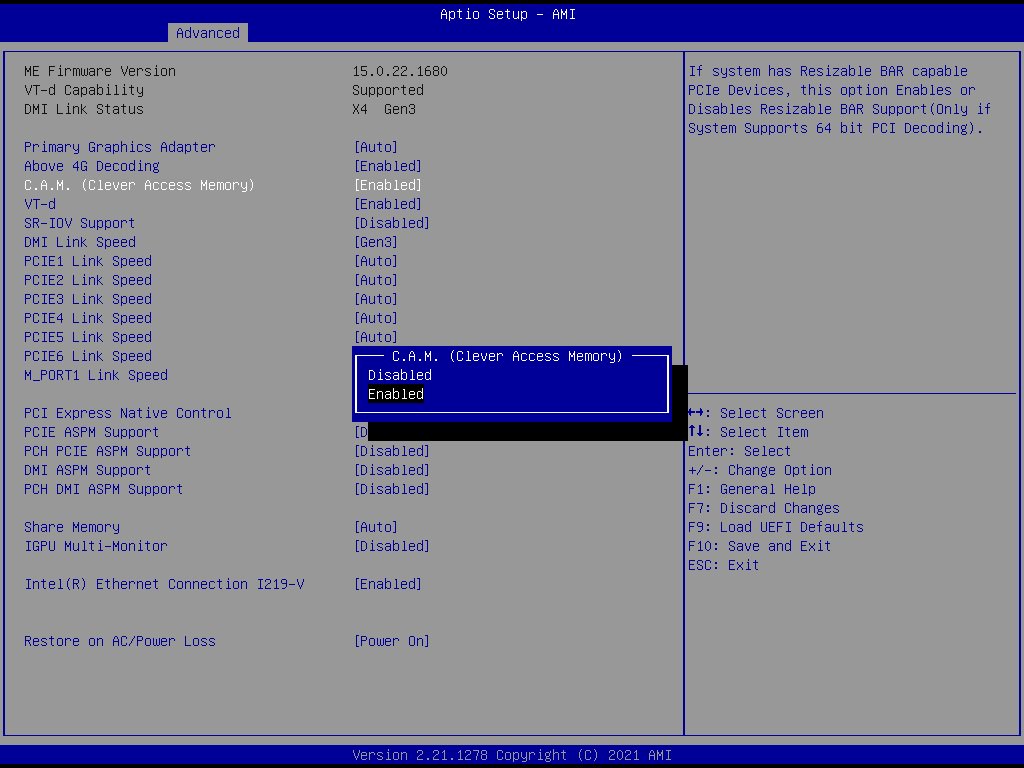
The C.A.M. (Clever Access Memory) option is supported when integrated graphics are disabled.
By default integrated graphics will be disabled when a PCIe graphics card is detected.
Please make sure the monitor is connected to the graphic card.
Step 3.
Please go to BIOS\Advanced\Chipset Configuration and enable "C.A.M. (Clever Access Memory)”.
Step 4.
Press F10 to save the setting and restart.
Q (501):
I want to turn off the LED while the system is off. Where can I find the setting?(7/1/2021)
A:Please follow the steps below and set the "Turn on Onboard LED in S5” setting to disabled under the BIOS.
Step 1.
While the system is starting, press hotkey "F2” or "Del” repeatedly to enter BIOS setup.
Step 2.
Disable the "Turn On Onboard LED in S5” under the BIOS.
AMD platform: Advanced\Onboard Devices Configuration\Turn On Onboard LED in S5\Disabled
Intel platform: Advanced\Chipset Configuraiton\Turn on Onboard LED in S5\Disabled
Step 3.
Press hotkey "F10” to save the changes.
Q (466):
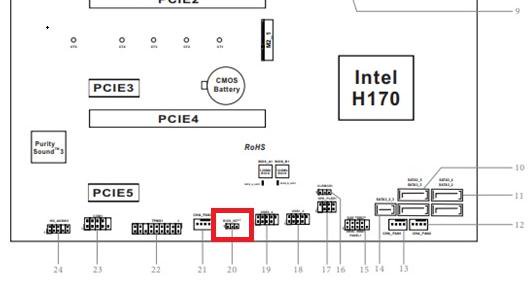
In che modo le funzioni di ripristino del BIOS e di backup UEFI sicuro funzionano sulle schede madri Intel H170 con due chip BIOS ROM?(6/1/2018)
A:Per le schede madri Intel H170 con due chip BIOS ROM, se il BIOS principale (BIOS_A1) è corrotto, seguire i passaggi seguenti per ripristinare il BIOS principale.
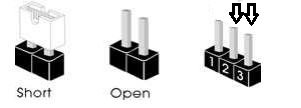
Fase 1. Scollegare il cavo di alimentazione e spostare il jumper sul pin2 corto e il pin3 sull'header "BIOS_SEL1".
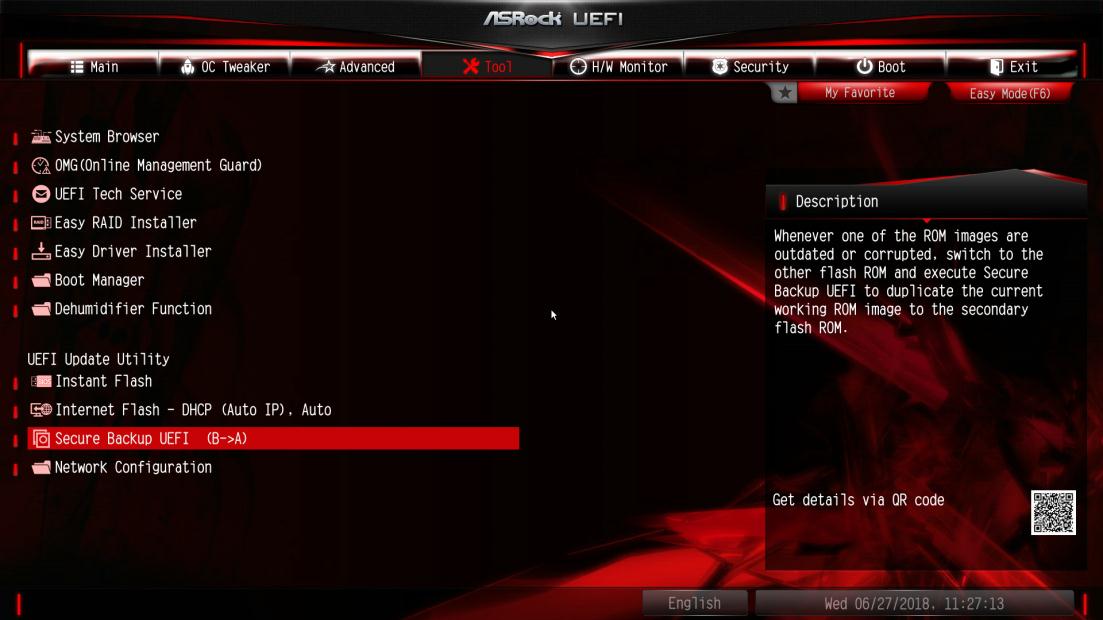
Fase 2. Collegare il cavo di alimentazione e avviare il BIOS (BIOS_B1).
Fase 3. Cliccare clic su Secure Backup UEFI (B-> A). Questo copierà il file BIOS di backup nel file BIOS principale.
Fase 4. Dopo aver aggiornato il BIOS, rimuovere gentilmente il cavo di alimentazione e spostare il jumper sul pin1 corto e sul pin2 (header BIOS_SEL1)
Fase 5. Collegare il cavo di alimentazione e il sistema dovrebbe essere avviato con il file BIOS principale
Q (444):
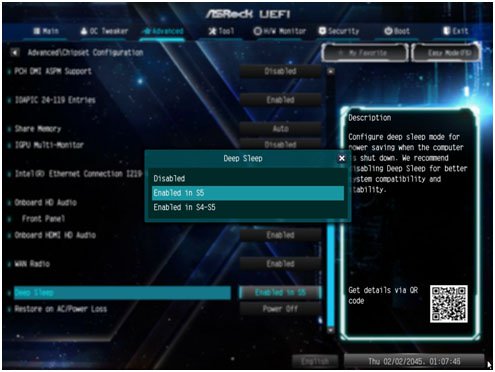
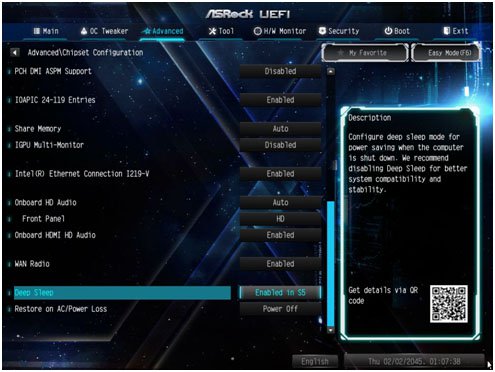
Come posso disattivare l'alimentazione della porta USB in modalità S5?(7/1/2017)
A:L'alimentazione della porta USB può essere disattivata attivando l'opzione "Deep Sleep".
Premi "F2” o "Canc” durante il POST per accedere alla configurazione del BIOS, seleziona il menu "Avanzate”, accedi alla pagina "Configurazione chipset” e regola l'opzione "Deep Sleep” su "Attivato in S5”.
Dopo aver regolato l'impostazione, premi "F10” per salvare la configurazione. L'alimentazione della porta USB verrà quindi disattivata in modalità S5.
Q (445):
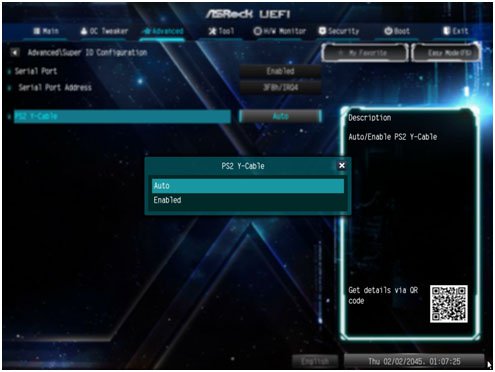
Vorrei utilizzare il mouse PS2 sulla porta PS2. Cosa devo fare?(7/1/2017)
A:Se la tua scheda madre ha due porte PS2, basta collegare il mouse PS2 alla porta PS2 verde ed utilizzare il mouse PS2.
Se la tua scheda madre ha solo una porta PS2, imposta "Cavo PS2 a Y" su "Attivo". Premi "F2" o "Canc" durante il POST per accedere al BIOS, seleziona il menu "Avanzate", "Configurazione Super IO" e imposta "Cavo PS2 a Y" su "Attivo". Premi "F10" per salvare la configurazione. Il mouse PS2 potrà quindi essere utilizzato.
Q (440):
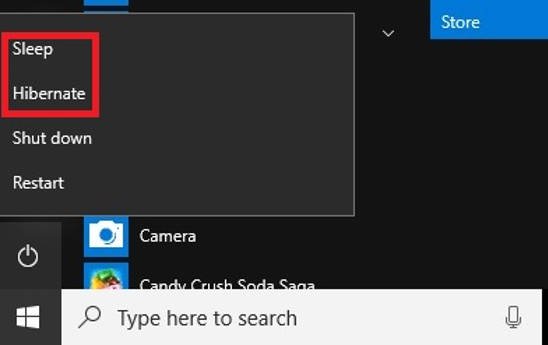
Voglio utilizzare la funzionalità USB Power On sulle schede della serie AM4, come posso impostarla? (6/1/2017)
A:La funzione USB Power on supporta le modalità Sospendi (S3) e Ibernazione (S4) in Windows OS.
Clicca sul pulsante Start e quindi scegli Sospendi (modalità S3) e Ibernazione (modalità S4) in Windows.
Q (423):
Come posso aggiornare il BIOS tramite ASRock Instant Flash sulla piattaforma AM4?(3/1/2017)
A:Dato che la AMD AM4 è una nuova struttura, abbiamo appena scoperto che il BIOS non può essere completamente aggiornato tramite il nostro Instant Flash. Quindi, per la vecchia versione del BIOS rilasciata prima del 07/03/2017, non esiste alcuna opzione "Instant Flash" in BIOS. Per assicurarsi che l'aggiornamento del BIOS possa essere eseguito completamente, utilizza i metodi di aggiornamento del BIOS in DOS o Windows per fare temporaneamente l'aggiornamento.Dopo l'aggiornamento alla versione seguente, la funzione Instant Flash e le opzioni sono supportate in BIOS e possono essere utilizzate per aggiornare il file BIOS più recente per il futuro.
Modello
Versione del BIOS
Fatal1ty X370 Professional Gaming
P1.50
X370 Taichi
P1.50
X370 Killer SLI/ac
P1.60
X370 Killer SLI
P1.60
Fatal1ty X370 Gaming K4
P1.60
Fatal1ty AB350 Gaming K4
P1.40
AB350 Pro4
P1.40
AB350M
P1.20
Q (429):
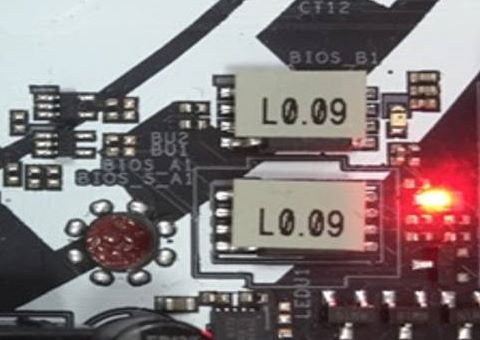
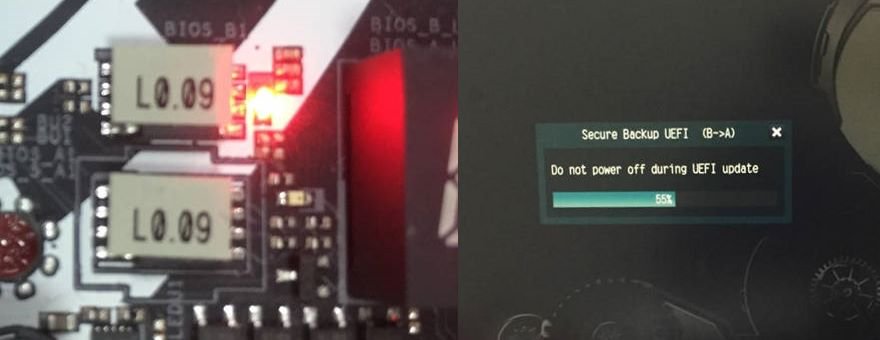
Come funzionano le funzioni di ripristino del BIOS e Secure Backup UEFI con le schede madri Intel Z270 con due chip ROM del BIOS?(2/1/2017)
A:Per le schede madri Intel Z270 con due chip ROM del BIOS, non c'è bisogno di passare da una ROM del BIOS all'altra quando si fa il recupero.
Quando si avvia correttamente, il sistema funziona sul BIOS_A1 attivo, riportato nell'immagine qui sotto.
Tuttavia, se BIOS_A1 attiva è danneggiato o corrotto, dopo diversi tentativi falliti di avvio, farà automaticamente il ripristino del BIOS dal BIOS_B1 di backup e quindi il sistema continuerà a funzionare sul BIOS_A1 attivo. E il monitor mostrerà la funzione Secure Backup UEFI (B -> A) come nell'immagine qui sotto.
Dopo aver terminato questa funzione, il sistema si riavvierà e funzionerà sul BIOS_A1 attivo.
 Menu
Menu