We use cookies to offer you a more personalized and smoother experience. By visiting this website, you agree to our use of cookies. If you prefer not to accept cookies or require more information, please visit our Privacy Policy.
Nếu bạn tự phân loại được câu hỏi của mình, bạn có thể chọn một trong các mục dưới đây để xem những câu hỏi thường được đặt ra nhất. Các mục gồm có:
Các kết quả:
Q (488):
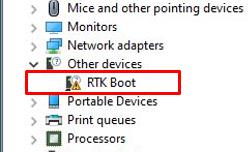
I have a TRX40 motherboard. Under the device manager, there is a RTK Boot device showing with an exclamation mark and there is no sound output from the audio port. What can I do to fix it?(4/1/2020)
A:If there is a RTK device showing under the device manager and audio port cannot be used, please follow the steps below to remove the RTK device and allow the audio to work properly.
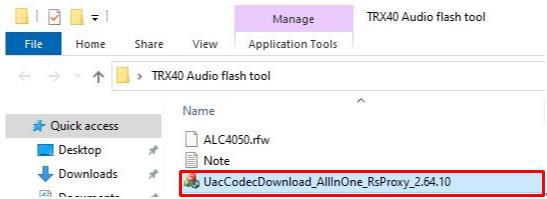
Step 5. Double click the UacCodecDownload_AllInOne_RsProxy_2.64.10
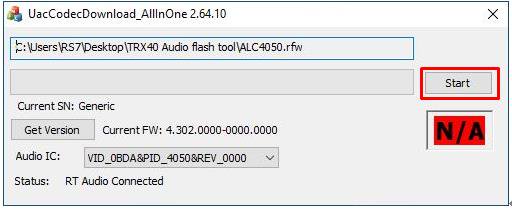
Step 6. Press the Start button to start flashing the audio firmware.
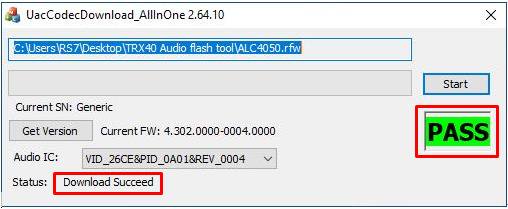
Step 7. Once the flashing process is completed, the tool will show Pass which means audio firmware has successfully flashed and there should not be RTK boot device showing under the device manager.
Q (487):
When I record via the Microphone in Windows 10 1909, there are hissing noises from the recordings.(1/1/2020)
A:If hissing noise is heard from recordings, please choose one of the methods below to avoid hissing noise.
Method 1:
Step 1.
Download the Realtek high definition audio driver from the ASRock website.
*Please make sure your LAN cable is connected when installing the Realtek audio driver.
Step2:
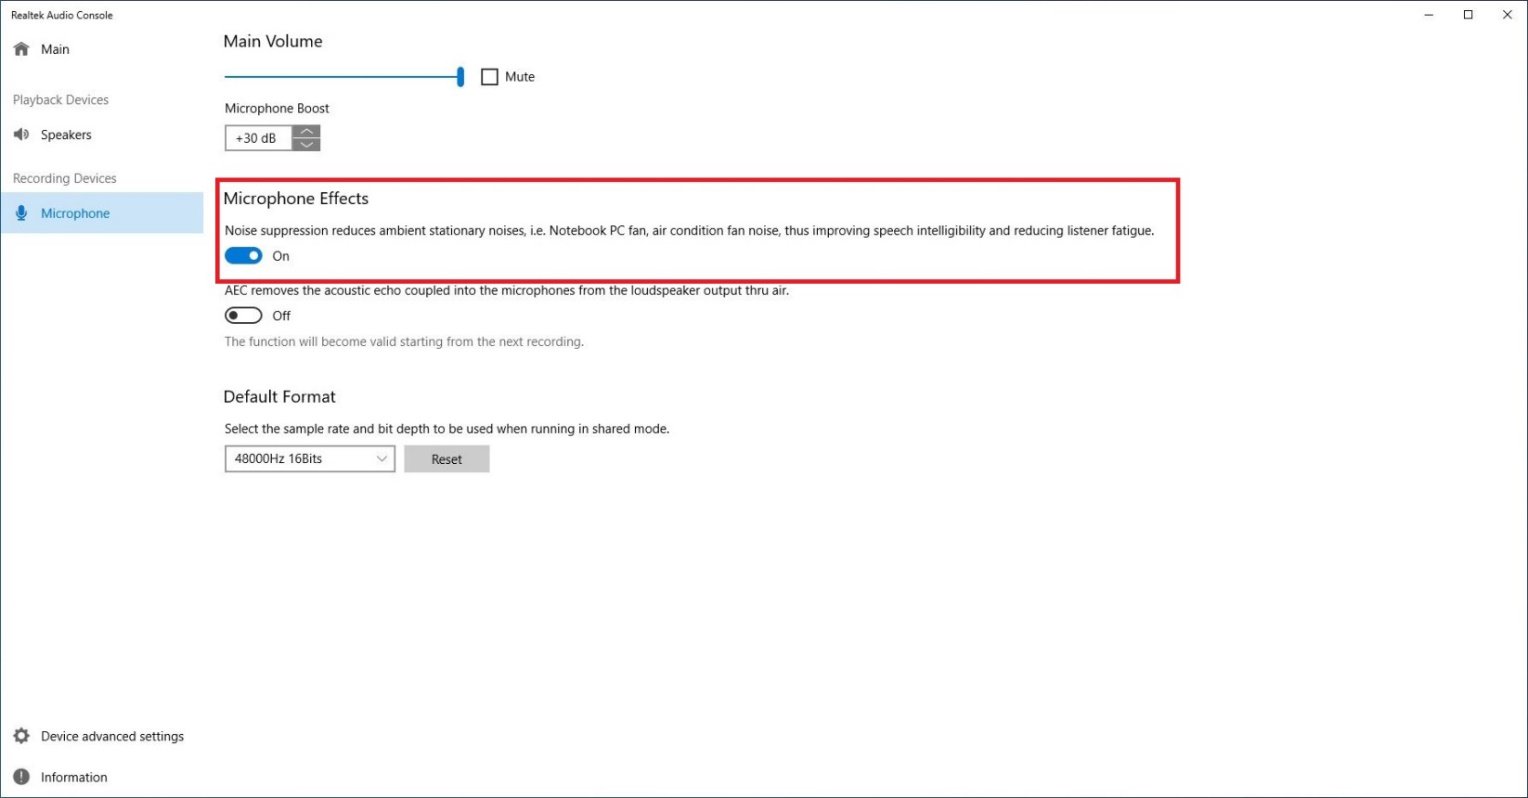
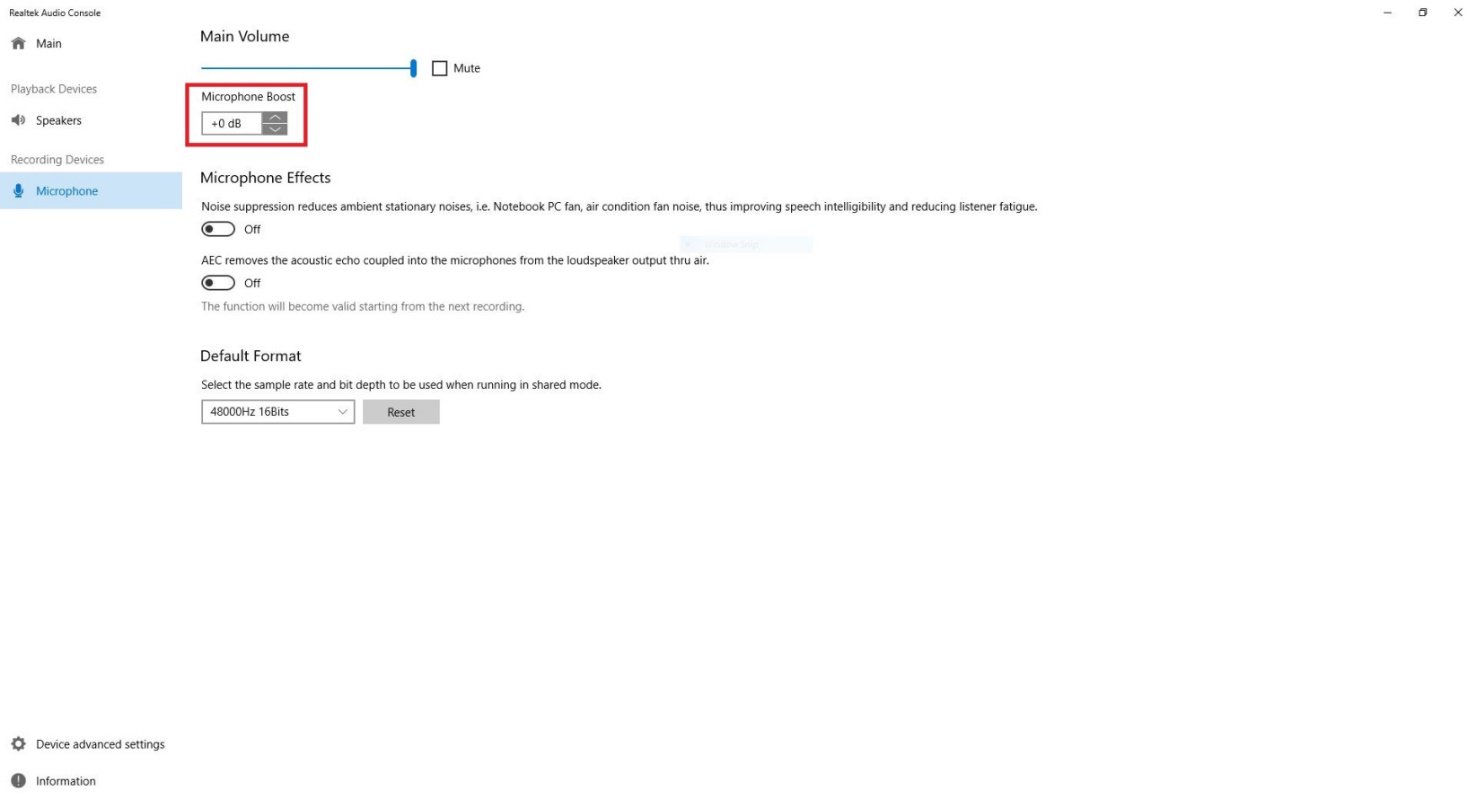
Open the "Realtek audio console”.
Step 3.
Turn on the "Noise suppression reduces ambient stationary noises” option in the Realtek audio console APP.
Step 4.
Once the setting above is enabled, recording quality will be improved.
Method 2:
Step 1.
Refer to step 1 and step 2 of method 1 to open the "Realtek audio console”.
Step 2.
Adjust Microphone Boost to +0db.
Step 3.
Once the boost value is adjusted to +0db, recording quality will be improved.
Q (468):
How do I install Sound Blaster Connect APP under Windows 10 RS4 or later version?(10/1/2018)
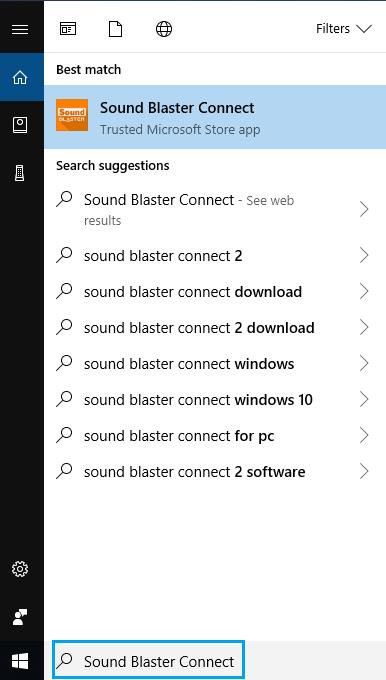
A:In general, the system will auto-download the APP in background after installing Realtek Audio driver. Please type "Sound Blaster Connect” in Win10 search bar to access APP.
If the APP doesn't show up on your system, please follow the steps below to install it manually.
1.Make sure your motherboard supports Creative Sound and with Realtek Audio driver installed.
* Please visit motherboard specification page on www.ASRock.com for details.
* Realtek Audio driver could be installed/downloaded from support CD and ASRock official website.
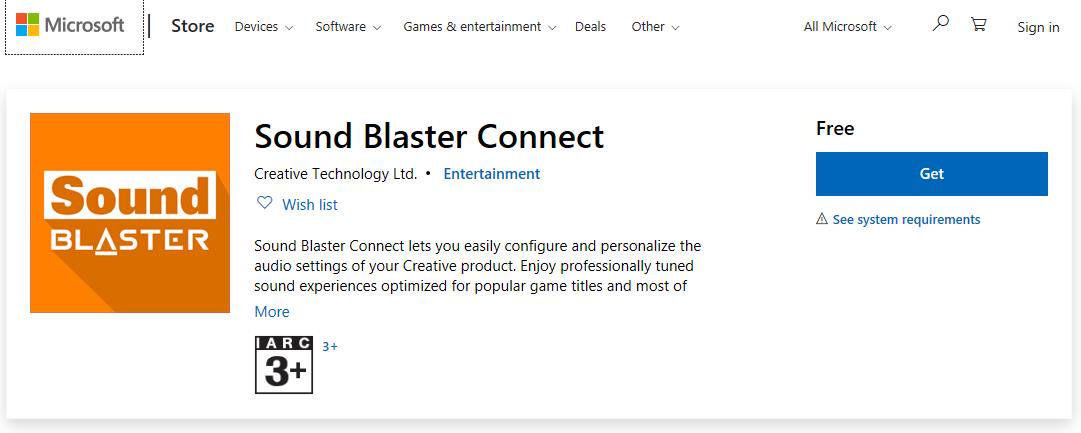
2.Access "Sound Blaster Connect” on Microsoft Store and click "Get” to start downloading. https://www.microsoft.com/en-sg/store/p/sound-blaster-connect/9n66rljrt8z2
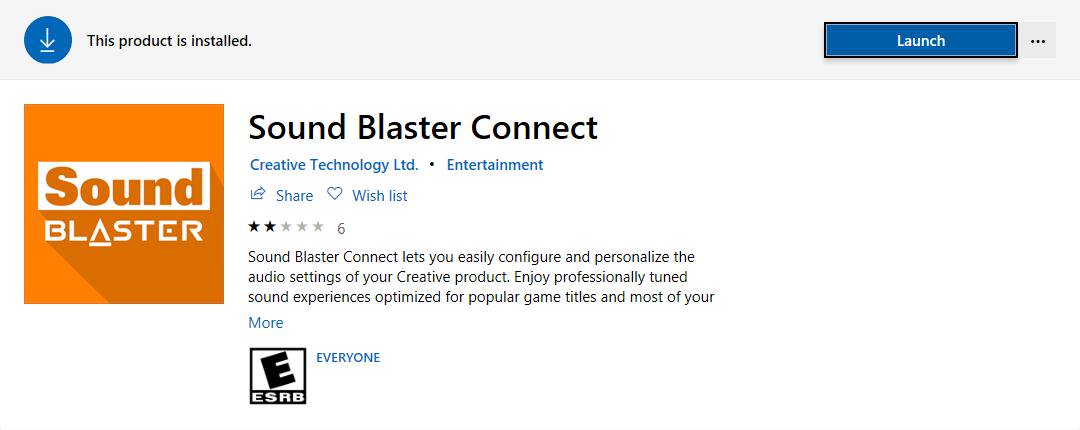
3.After installation, click Launch to launch the APP.
Please refer to the following table which supports the Creative SoundBlaster Cinema5.
Q (469):
How to install Realtek Audio Console APP under Windows 10 RS4 or later version?(10/1/2018)
A:In general, the system will auto-download the APP in background after installing Realtek Audio driver.
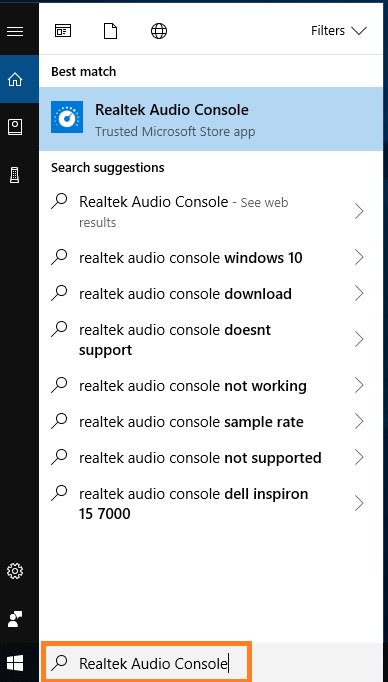
Please type "Realtek Audio Console” in Win10 search bar to access APP.
*Please connect the LAN cable when installing the Realtek Audio driver.
If the APP doesn't show up on your system, please follow the steps below to install it manually.
1.Go to the device manager to check if the Reaktek Audio driver is installed.
* Realtek Audio driver could be installed / downloaded from support CD and ASRock official website: www.ASRock.com.
2. Please make sure that Windows updates are at latest.
Settings > Update & Security > Windows Update and select Check for updates
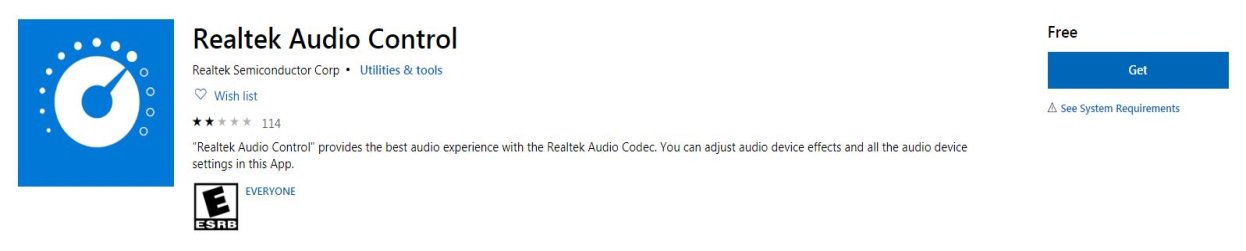
3.Please refer to the following link to access "Realtek Audio Control” on Microsoft Store and click "Get” to start downloading. https://www.microsoft.com/store/productId/9P2B8MCSVPLN
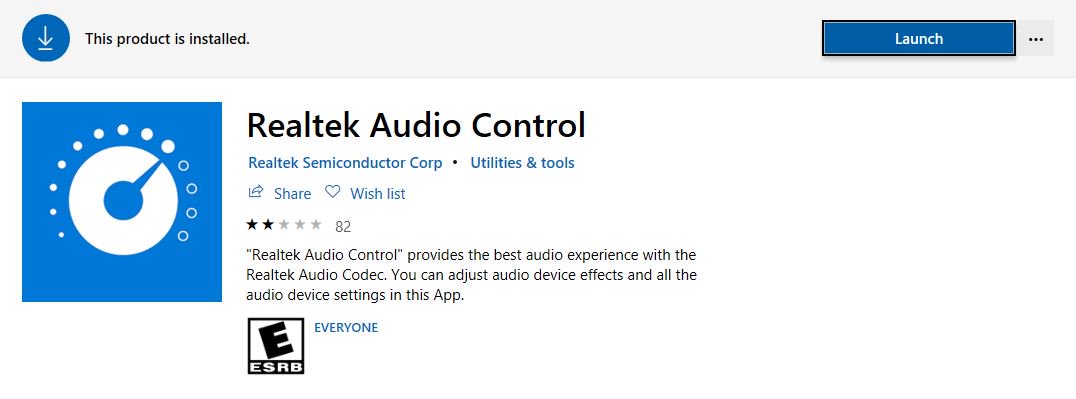
4.After installation, click Launch to launch the APP.
Q (457):
I'd like to use the Windows Mixed Reality Headset on on-board HDMI, what should I do?(12/1/2017)
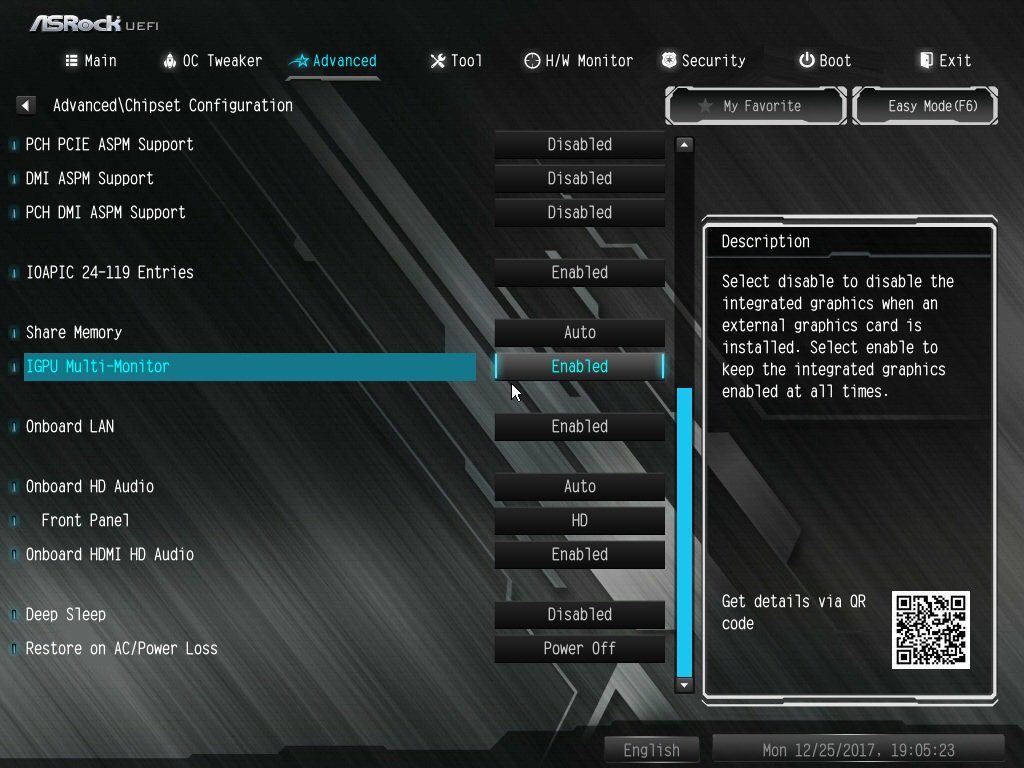
2. If an external graphics card is installed, please enable "IGPU Multi-Monitor” under BIOS.
BIOS Path: Advanced > Chipset Configuration > IGPU Multi-Monitor
3. Download the VGA driver version 15.60.01.4877 from the Intel download center and Install it on your system.
Download Link: https://downloadcenter.intel.com/product/128199/Graphics-for-8th-Generation-Intel-Processors
4. Install the "Windows Mixed Reality Headset” USB 3.0 connector to the on-board USB3.0 port.
5. Install the "Windows Mixed Reality Headset” HDMI connector to the on-board HDMI port
The Windows Mixed Reality Headset should work now.
Q (455):
How do I play Dolby ATMOS through a receiver on Z270 Gaming-ITX/ac?(10/1/2017)
A:Please refer to the following requirements, configurations and setup procedures.
[Requirements]
OS: Windows 10
Receiver / decoder: Onkyo TX-NR 747 or other receiver supporting HDCP 2.2
Player: Pioneer Ultra HD Blu-ray drive
BD Disk: Most 3D / 4K BD disk movie
Playback Software: Power DVD 14 or later version
[Setup]
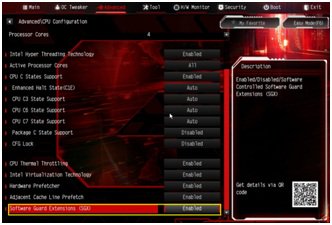
1. When the system boots up, press "F2" to enter UEFI setup screen.
Go to Advanced > CPU Configuration and enable "Software Guard Extensions" in BIOS setting.
Press "F10" to save and exit the BIOS setup screen.
2. Boot into O.S. Install all drivers for the M/B.
Install ME driver ver: 11.6.0.1126 (supports Ultra HD Blu-ray). Download the driver from the following link: http://www.asrock.com/MB/Intel/Fatal1ty%20Z270%20Gaming-ITXac/index.asp#osW1064
3. Go to Control Panel > Hardware and sound > Sound and select "Receiver output”.
Q (396):
Does DTS Connect 5.1 Surround work under Windows 10?(8/1/2015)
A:Because of Microsoft Windows 10 OS limitations, DTS Connect 5.1 Surround doesn't work under Windows 10.
If you'd like to use DTS connect 5.1 Surround, please choose earlier versions i.e. Windows 8.1/ Windows 8/ Windows 7.
Q (350):
When I play music or movies with Media Player under Win8 32/64bit, Media Player stops and shows an error message whenever I plug a headphone into the front audio panel. How do I fix this?(9/1/2013)
A:Please re-open Media Player and play the file again to have sound come out from the front headphone.
Q (297):
How do I setup digital sound (DTS5.1, Dolby5.1, DTS HD Master and Dolby True HD) output via HDMI or SPDIF?(11/1/2011)
A:Requirements:
OS: Windows7, Vista SP2 or later.
Receiver / decoder: Onkyo TX-SR608 amplifier for example:
Playback software: for example Power DVD10 v10.0.2025.52 or other playback software.
Setup:
1. Please install all drivers from support CD, after that please check device manager, there should be no any "!" or "?" on list.
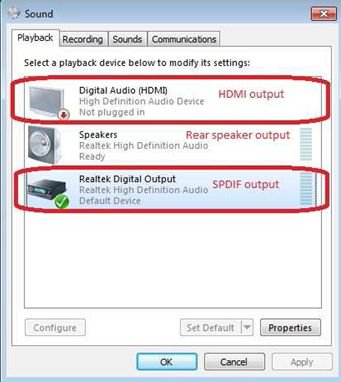
2. Please enter Control Panel > Hardware and Sound > Sound,
If you would like to output via HDMI, please select [HDMI output]
If you would like to output via SPDI, please select [Digital output]
*Different motherboard/chipset may show different information, above picture is for references only.
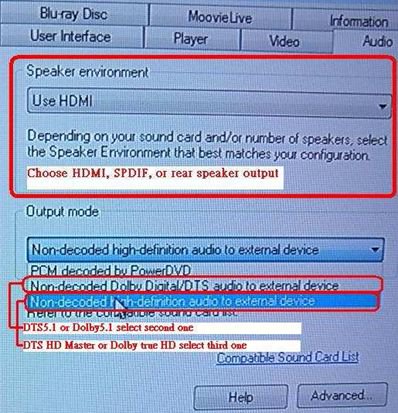
3. Enter the Audio settings in your application.
We take Power DVD 10 here for example: Choose the Speaker environment and Output modes as you want.
4. Set your decoder/amplifier to the digital sound output, which you want.
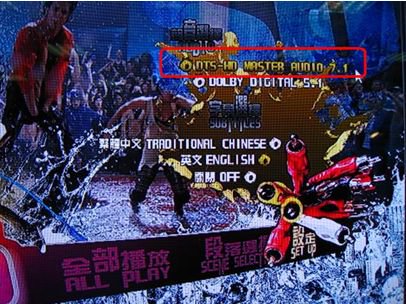
5. Set the correct output format on your content /source manual.
6. Then you can play the content/source.
Q (263):
If I use AC'97 front audio panel with VIA® audio codec motherboard, how do I connect AC'97 front panel to HD Audio header on the motherboard?(2/10/2010)
A:If you use AC'97 front audio panel, please install it to the HD audio header as below:
A. Connect Mic_IN (MIC) to MIC2_L.
B. Connect Audio_R (RIN) to OUT2_R and Audio_L (LIN) to OUT2_L.
C. Connect Ground (GND) to Ground (GND).
D. MIC_RET and OUT_RET are for HD audio panel only. You don't need to connect them for AC'97 audio panel.
E. Enter BIOS Setup Utility. Enter Advanced Settings, and then select
Chipset Configuration. Set the Front Panel Control option from [Auto] to [Enabled]. For Windows® XP
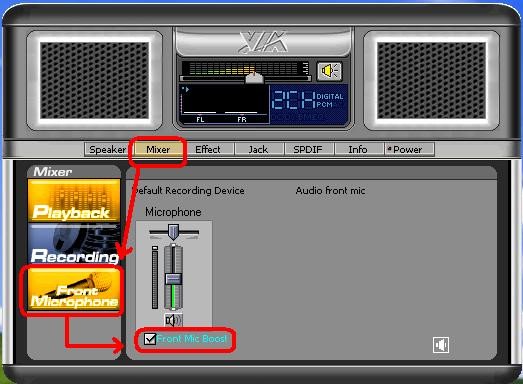
F. Enter Windows® system. Click the icon on the lower right hand taskbar to enter VIA® ADeck. Click "Mixer", select "Front Microphones", choose "Front Mic Boost", and leave.
Like below picture:
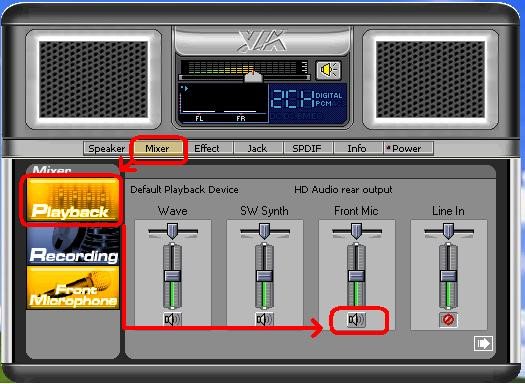
H. If you want to hear your voice through Front Mic, Please click "Mixer", select "Play Back", choose "Front Mic", and leave.
Like below picture: For Windows® Vista™ / Windows® 7
F. Enter BIOS "Chipset Settings" page, manual [Front Panel] to [Enable].
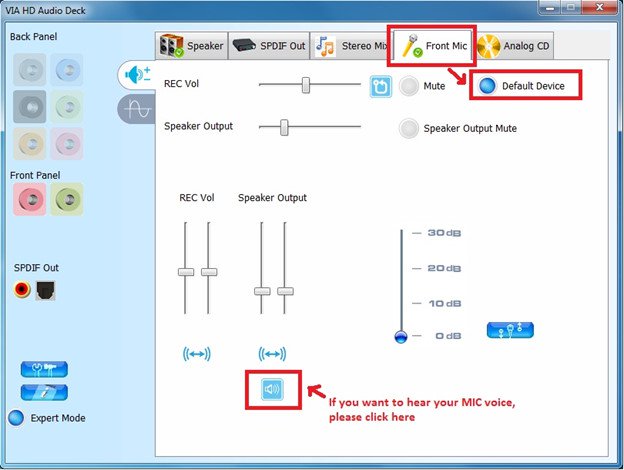
G. Enter Windows® system. Click the icon on the lower right hand taskbar to enter VIA® VDeck. Click "Front Mic", select "Default Device"
H. If you want to hear your voice through Front Mic, Please click "Speaker Output" icon.
Like below picture:
Q (245):
I install ATI 2xxx, 3xxx, 4xxx series PCIE VGA card on the motherboard. After installing all Windows® XP drivers from the motherboard, it still shows an unknown "audio device on the high definition audio bus." message under device manager. What could I try?(1/12/2009)
A:There is an integrated audio chip in the ATI 2xxx, 3xxx, 4xxxx series graphics cards.
Please install ATI HDMI audio driver.
http://ati.amd.com/support/drivers/xp/hdmiaudio-xp.html
Q (241):
I have a motherboard with Realtek HD Audio Codec. When I use Windows® XP SP3 or upgrade to Windows® XP SP3, the onboard audio doesn't work. What could I try?(11/27/2008)
A:Please try the Realtek latest audio driver.
The driver is available from this link: http://www.realtek.com.tw/downloads/downloadsView.aspx?Langid=1&PNid=14&PFid=24&Level=4&Conn=3&DownTypeID=3&GetDown=false
Q (232):
I install more than 2GB system memory on my system. When I run the "Sound Recorder" under Windows® XP, it always shows the following error message. What's wrong? (7/31/2008)
A:This is the limitation of Windows® XP. Please refer to the Microsoft® Knowledge Base for details: http://support.microsoft.com/kb/284893
Q (230):
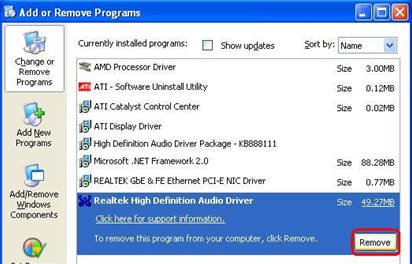
When I install Realtek HD Audio driver, I found the system shows below error message. What can I do? (6/26/2008)
A:Please refer to below steps to reinstall Realtek HD Audio driver:
1.Enter into "Add or Remove Programs" and remove "Realtek High Definition Audio Driver"
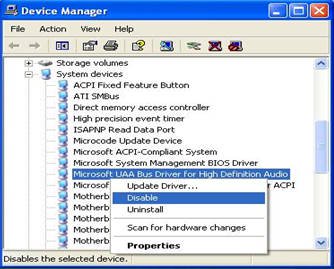
2.Disable all "Microsoft® UAA Bus Driver for High Definition Audio" in Device Manager first
3.Then uninstall all "Microsoft® UAA Bus Driver for High Definition Audio" from the system.
4.Reboot system
5.Reinstall "Realtek HD Audio driver" from Motherboard Support CD.
If you still meet this problem, please reinstall fresh Windows® system.
Q (226):
My motherboard with Realtek ALC662 audio codec supports 5.1 channel HD Audio. But it has 3 audio connectors (Light blue, Lime and Pink) on the rear audio panel. How do I connect my 5.1 channel speakers to the rear audio panel?(3/24/2008)
A:Please refer to following steps to connect your 5.1 channel speakers:
1. Connect the "Rear Speaker" to Line In (Light blue) port
2. Connect the "Front Speaker" to Line Out (Lime) port
3. Connect the "Central / Subwoofer" to Microphone (Pink) port
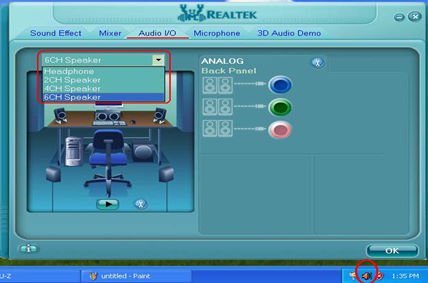
4. Adjust the "Audio I/O" setting to "6CH Speaker" in REALTEK Audio Management. Please refer to the following picture:
Q (207):
After installing ATI HDMI audio driver for my ATI HD 2xxx series PCIE card, I found the onboard sound will not work. How do I fix the problem?(9/10/2007)
A:Please kindly refer to below steps to check your system setting.
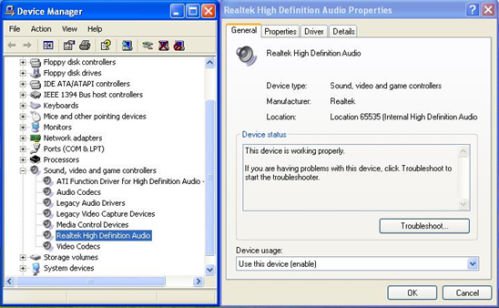
1.Please double check the onboard sound is working properly in Device Manager.
(If not, please reinstall Realtek HD Audio driver from Support CD.)
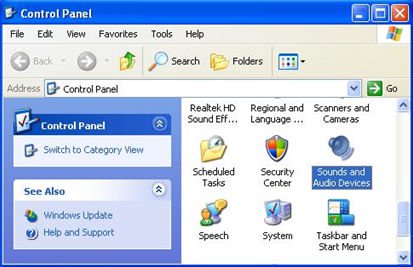
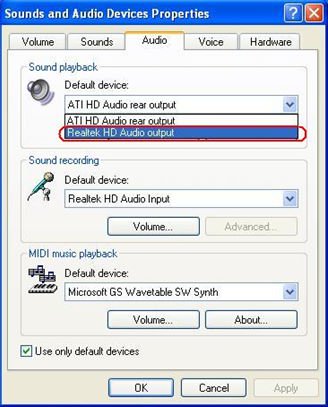
2.Enter the Sound setting in the Control Panel.
3.If the Default device of the Sound playback is "ATI HD Audio rear output", please change it to "Realtek HD Audio output".
4.Press "OK" to save setting.
Q (200):
I have a motherboard with Realtek HD audio codec. After resume Windows® Vista™ from sleep or from hibernation, the high definition audio device may no longer work. How do I solve this?(4/25/2007)
A:This is caused by Microsoft. It can be solved by installing the Microsoft® Hot fix. Please refer to the Microsoft® Knowledge Base: http://support.microsoft.com/kb/929685/en-us
Q (198):
I have a motherboard with Realtek HD audio codec. After installing the Microsoft® Security Update 925902 and 928843, my system shows the following error message. How do I fix this? (4/20/2007)
A:This is caused by Microsoft. It can be solved by installing the Microsoft® Hot fix. Please refer to the Microsoft® Knowledge Base: http://support.microsoft.com/kb/935448/
Q (196):
My onboard audio is Realtek HD audio. In the Windows® Vista™, I can't use Sound Recorder to record the audio. What should I do?(3/19/2007)
A:Please refer to below steps to set the audio device.
1.Install Realtek HD Audio driver from motherboard Support CD. Or download the Realtek HD audio driver from ASRock website.
https://www.asrock.com/support/Download.asp
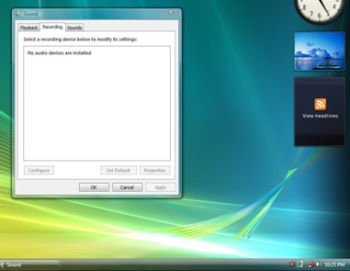
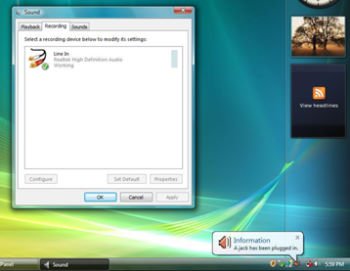
2.Plug in your recording devices (Microphone or other devices) to the Line-in port (or Microphone port), and then the recording device will show up "Line In" (or "Microphone") icon. Please kindly refer to below image. (Control Panel > Sound > Recording)
*Before plug in the recording devices:
*After plug in the recording devices:
3.Reopen the Sound Recorder to record the audio.
Q (193):
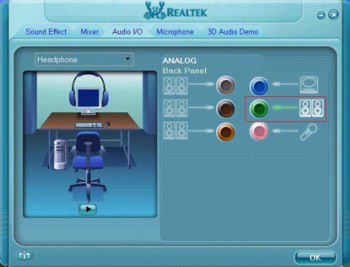
I plugged a headphone in my ASRock motherboard with Realtek HD Audio, and set the "Audio I/O" from "2CH" to "Headphone" in Realtek Audio Manager (picture1).
But the Realtek Audio Manager always recognized my headphone as 2CH speaker after I restarted the operating system (picture2).
What should I do?(1/16/2007)
A:Please refer to the following steps to set up the Realtek Audio Manager correctly.
1.Please remove all audio I/O (Headphones, Speakers, Microphone...) from the motherboard.
2.Please go to Realtek Audio Manager and set the "Audio I/O" you want.
3.Click ok.
4.Please plug your audio I/O back.
5.Restart your system.
Q (192):
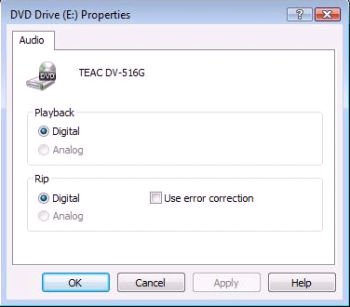
I would like to use the analog CD-in function in Windows® Vista™. But the "Analog" item of Playback and Rip can not be selected in Windows® Vista™. It was gray. Why? (Here is the screenshot.) (1/16/2007)
A:Windows® Vista™ operating system does not support the analog CD-in. The output of CD/DVD-ROM playback will be digital only.
Q (172):
My onboard audio is AC'97 audio. The front panel audio connector cables of my case are different from the description of manual. How should I connect them? Please advice.(4/21/2006)
A:The wording on the front panel connector cables may be different by each chassis manufacturer. Please check the function of each cable. Otherwise it may damage the board if cables are connected to the wrong connectors. We found that if you connect the "GND" (Ground) or "USB VCC" (USB Power) connector pins to the "+5V" pin, it will damage the motherboard after booting up the system. So we recommend you must not install any connector on the +5V pin of the Front Panel Audio header. It will not affect the Audio function if you remove the connector from the +5V pin.
For this reason, we will remove the +5V pin from the Front Panel Audio header of our products in the future.
There are three examples for your reference, please refer to the following pictures.
Q (164):
If I use AC'97 front audio panel with, how do I connect to the High Definition Audio header on the motherboard and get front audio work?(2/17/2006)
A:If you use AC'97 audio panel, please install it to the front panel audio header as below:
A. Connect Mic_IN (MIC) to MIC2_L.
B. Connect Audio_R (RIN) to OUT2_R and Audio_L (LIN) to OUT2_L.
C. Connect Ground (GND) to Ground (GND).
D. MIC_RET and OUT_RET are for HD audio panel only. You don't need to connect them for AC'97 audio panel.
E. Enter BIOS Setup Utility. Enter Advanced Settings, and then select Chipset Configuration. Set the Front Panel Control option from [Auto] to [Enabled]. For Windows® XP
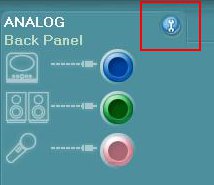
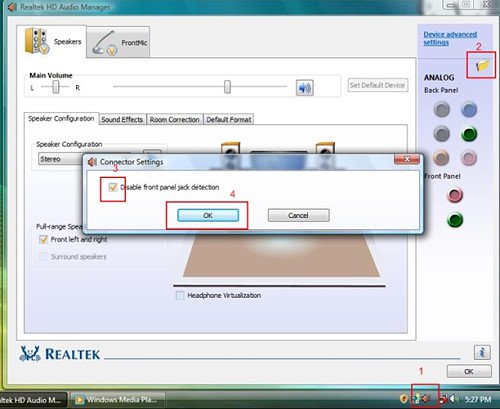
F. Enter Windows® system. Click the icon on the lower right hand taskbar to enter Realtek HD Audio Manager. Click "Audio I/O", select "Connector Settings", choose "Disable front panel jack detection", and save the change by clicking "OK". For Windows® Vista™
F. Enter Windows® system, 1: Double click the icon on the lower right hand taskbar to enter Realtek HD Audio Manager. 2: Click the "Folder" icon at the top-right corner. 3. Check "Disable front panel jack detection". 4. Click "OK".
(Please refer to the following picture)
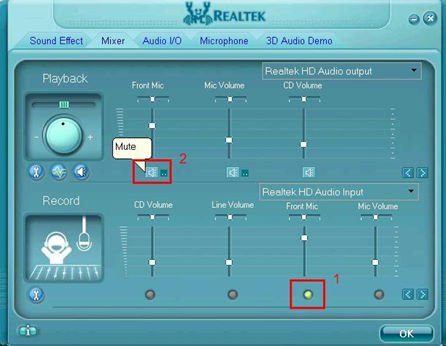
G. To activate the front mic: For Windows® XP:
Please select the Front Mic as default record device in No. 1.
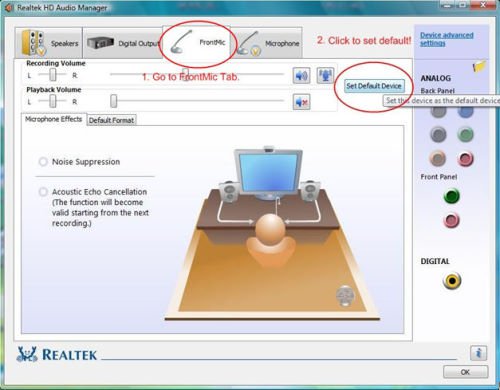
If you want to hear your voice through Front Mic, please deselect "Mute" in No. 2 For Windows® Vista™:
1.Go to the "FrontMic" Tab in the Realtek Control panel.
Click "Set Default Device" to make the Front Mic as the default record device.
Q (166):
What's the requirement for High Definition Audio to work under Windows® XP 64bit?(2/17/2006)
A:For normal working of High Definition Audio under Windows® XP 64bit, there is a hotfix file provided by Microsoft. Please install the hotfix before installing the audio driver. Otherwise, the audio driver may not be installed successfully.
Please click the link to download the hotfix file:
http://support.microsoft.com/?kbid=901105
Q (34):
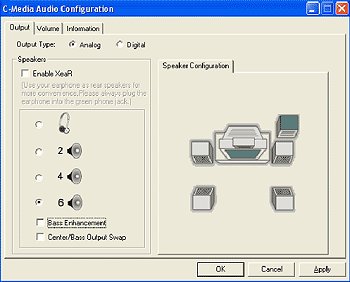
Can I use the microphone if I select 6 speakers in C-Media Audio Configuration?(5/9/2003)
A:If you select 6 speakers in C-Media Audio Configuration for 5.1 CH output, all three audio connectors (Line in, Line out and MIC) are defined as output connectors.
Microphone is an input device. So you are not able to use the microphone at this moment.
Q (33):
How do I select "Output Type" in C-Media 3D Audio Configuration?(5/9/2003)
A:Please select "Analog" for "Output Device" in C-Media 3D Audio Configuration.
Q (10):
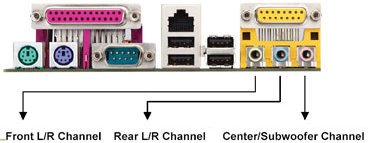
If I want to use 4/6 speakers, how do I setup 4/6-Channel audio ?(11/26/2002)
A:STEP 1: 4 CH: Connect the front L/R channel to "Line Out", the rear L/R channel to "Line In".
6 CH: Connect the front L/R channel to "Line Out", the rear L/R channel to "Line In", and the Center/Subwoofer channel to "Mic In".
STEP 2:
After installation of C-Media Audio driver, you will find an icon "C-Media Audio configuration" on the taskbar.
STEP 3:
Click the icon, and the screen will show the current audio configuration.
Select "Output" to change your audio configuration. Select "Analog" for Output Type and choose "4 channels" / "6 channels" for your speaker configuration.
 Thực đơn
 (7/31/2008)
 (6/26/2008)
 (4/20/2007)
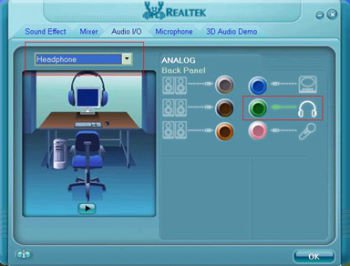
 (1/16/2007)