Sütiket használunk, hogy még személyre szólóbb élményt nyújthassunk. A weboldal meglátogatásával elfogadja a sütik használatát. Ha nem szeretné elfogadni a sütiket, vagy további tájékoztatásra van szüksége, olvassa el Adatvédelmi irányelveinket.
Procedures
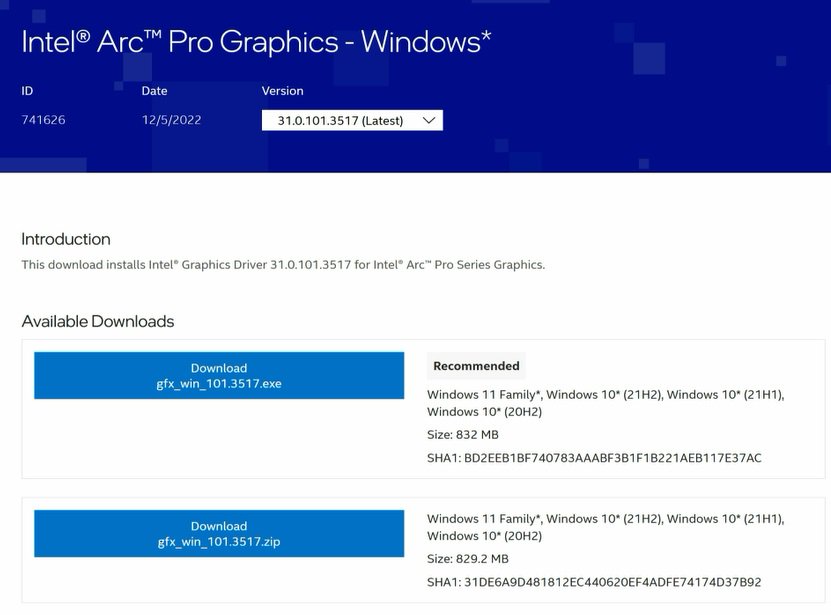
●Intel Graphics Card Driver
Go to Intel's official website to download and install the latest official graphics card driver.
● Update the Graphics Card FW
Step 1. Download and unzip IGFXUpdate(v1.01.1).
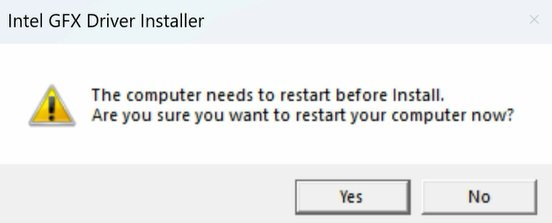
Step 2. Run "IGFXUpdate”
Step 3. Click Yes to restart the system.
Step 4. After the system has restarted, the FW update will begin.
*If this message doesn't show up, please disable the "Secure Boot” in BIOS and try again.
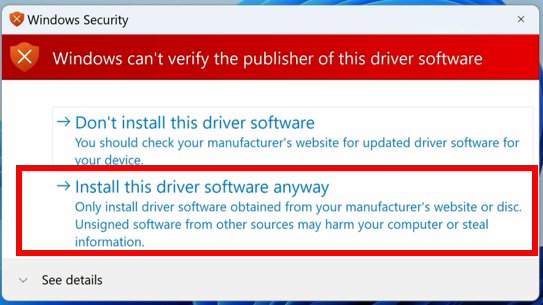
Step 5. During the update, the following security message will pop up.
Step 6. Click on Install this driver software anyway.
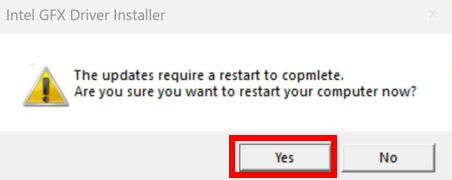
Step 7. The update process will proceed. The screen might blink during the update.
Step 8. Please restart your computer when the following prompt is shown.
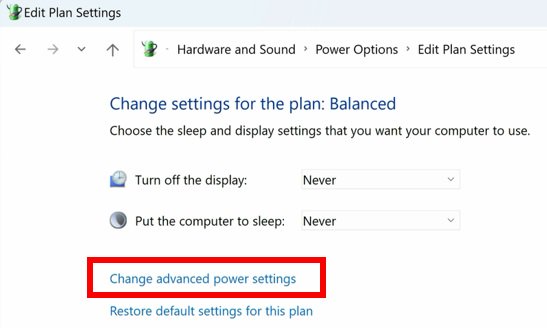
● Set PCIe Power to Maximum Power Savings
Step 1. Go to [Control Panel\Hardware and Sound\Power Options\Edit Plan Settings\Change] and click [Change advanced power settings].
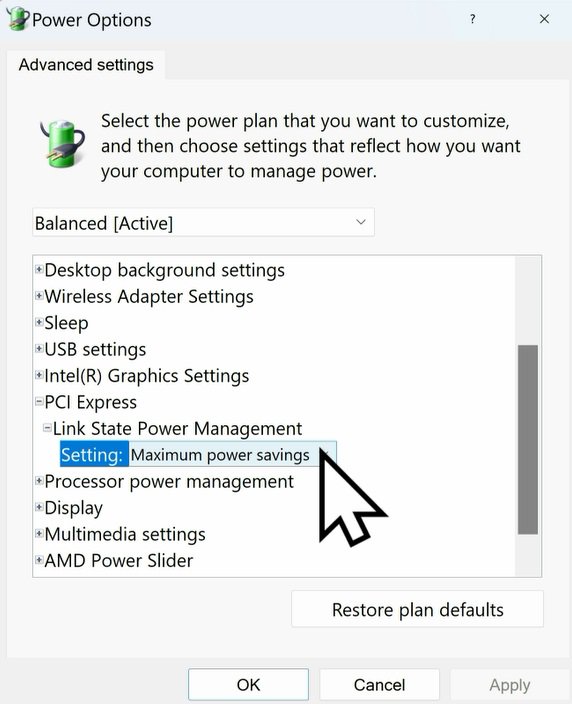
Step 2. Scroll down to PCI Express\Link State Power Management and select Maximum power savings. Make sure to click apply to apply the changes.
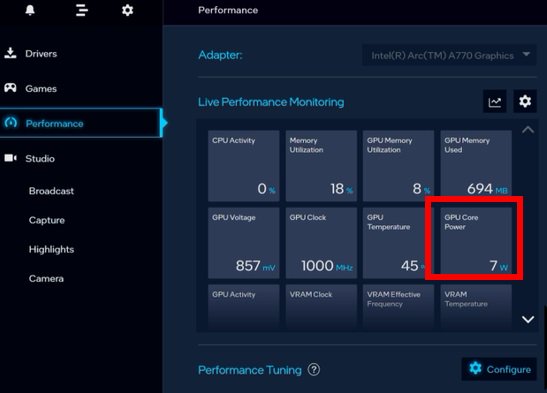
● Re-install the Graphics Card Driver and Check the GPU Power
Step 1. Reinstall the latest graphics card driver.
Step 2. To check the power consumption of the Intel ARC graphics card, please open Intel Arc Control and find the GPU Core Power.
BIOS Setting For ARC GPU Power Saving
● ASRock Intel Motherboard:
Required BIOS Version:
700-series motherboard: Please use the latest BIOS
600/500/400-series motherboard: Use the latest BIOS. It that does not work, please contact ASRock Technical Support. https://event.asrock.com/tsd.asp
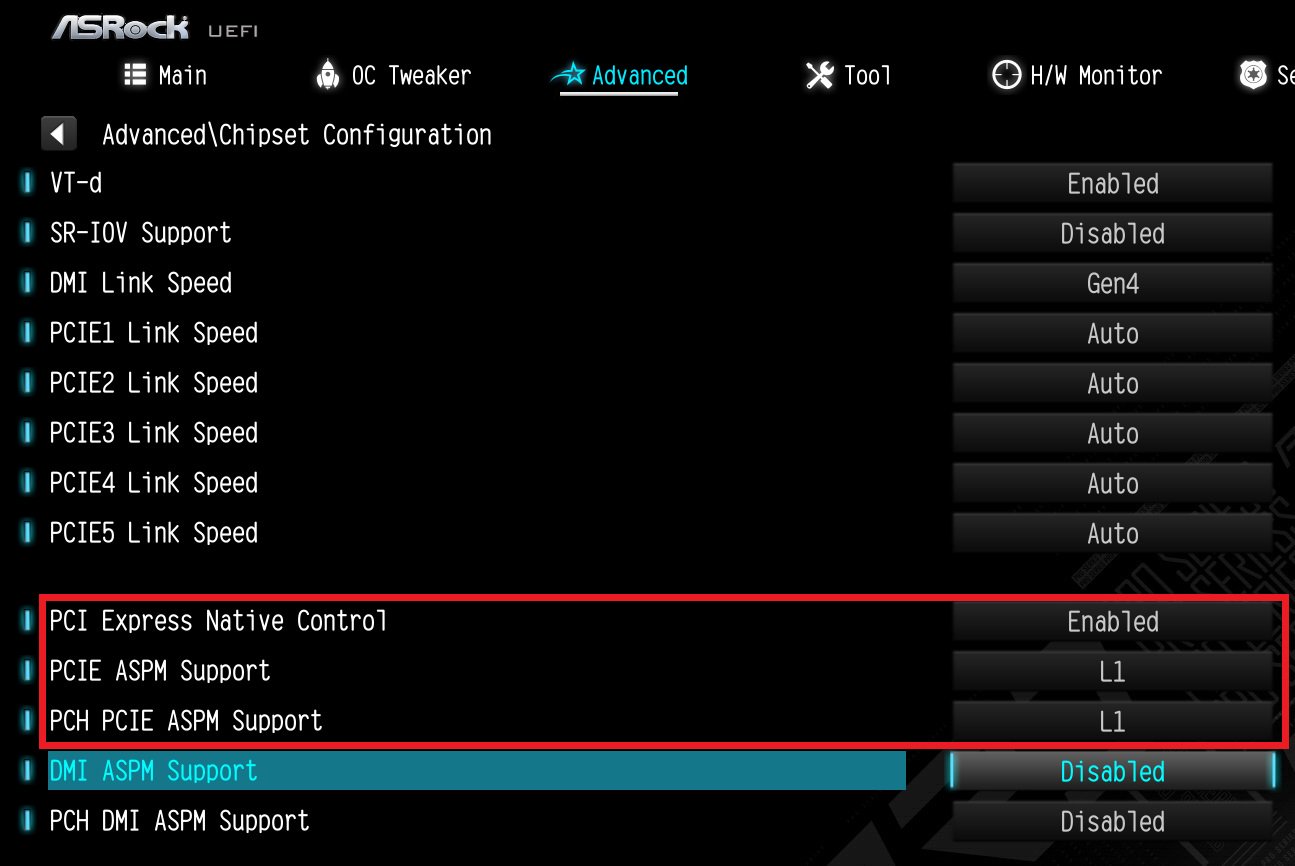
BIOS Settings for all ASRock Intel models:
In BIOS > Advanced > Chipset Configuration, apply the following settings.
PCI Express Native Control: Enabled
PCIE ASPM Support: L1
PCH PCIE ASPM Support: L1
● ASRock AMD Motherboard:
Required BIOS Version:
Platform
600 series
500 series
400 series
300 series
BIOS version
Any version
Not supported
BIOS Setting for all AMD models:
There is no need to change BIOS settings.
● Other brands motherboard:
Please contact your motherboard vendor for further assistance.
Power Consumption After Updating FW and Changing the BIOS Settings
Q (523):
Which BIOS settings do I need to adjust when using 13.3” Side Panel?(3/1/2023)
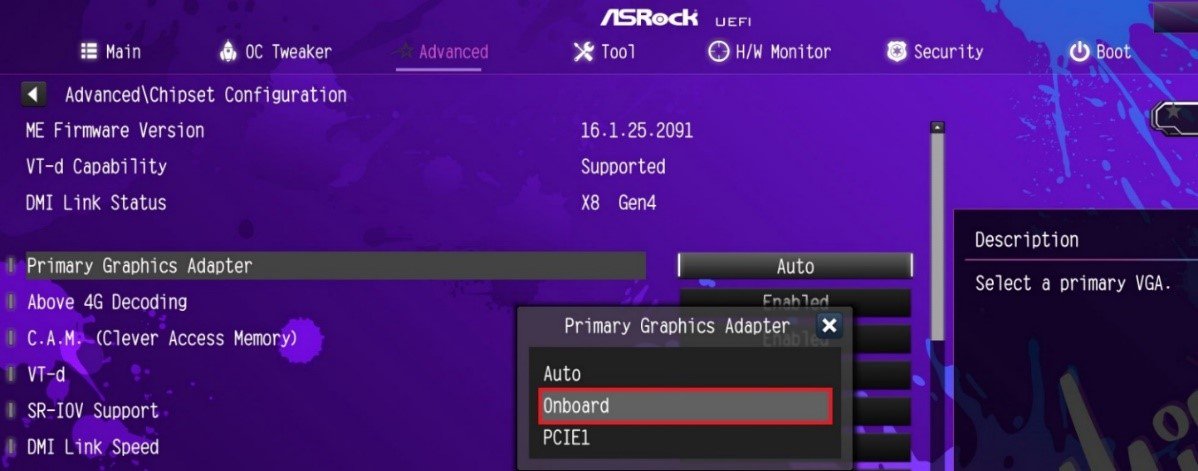
A:Before using your side panel, please set "Primary Graphics Adapter” to "Onboard” in the BIOS settings to ensure the display work properly.
Intel 700 series:
To do so, please go to "Advanced”> "Chipset Configuration” and set "Primary Graphics Adapter” to "Onboard”. Then press [F10] to save the settings and restart the system.
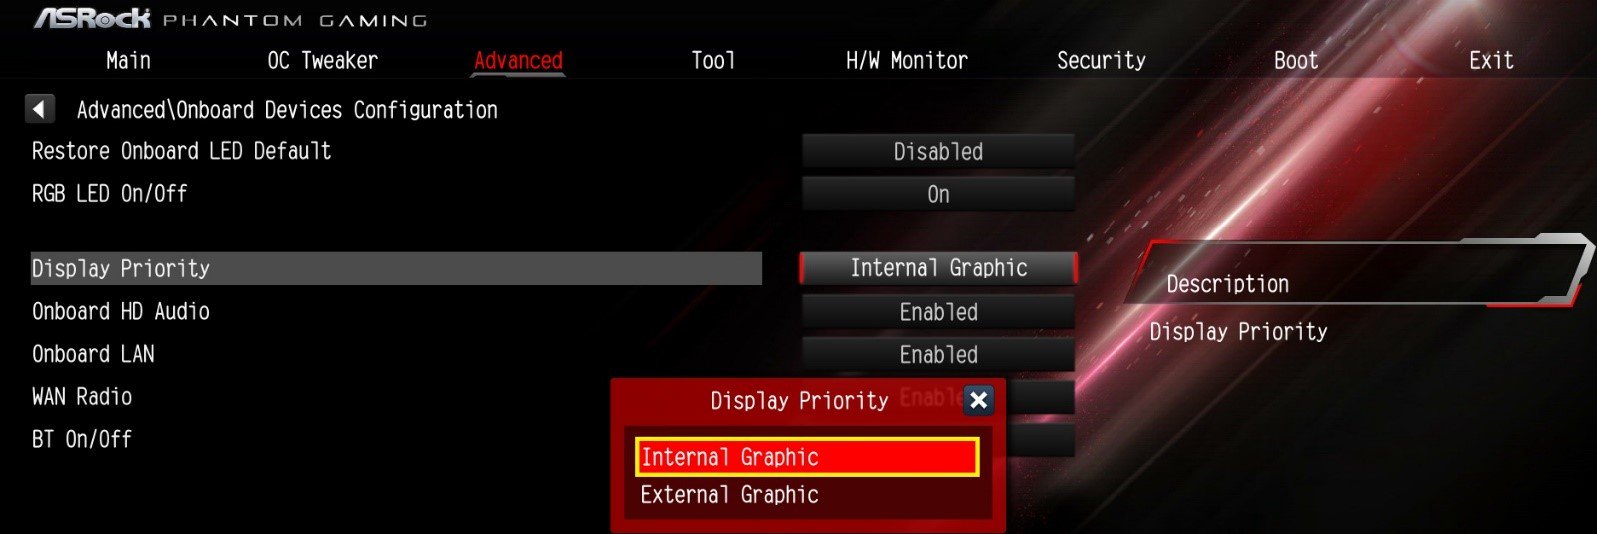
AMD AM5:
Please go to "Advanced”> "Onboard Device Configuration” and set "Display Priority” to "Internal Graphics”. Then press [F10] to save the settings and restart the system.
3. Run "insttool64.exe” as administrator. A command prompt window pop on and close immediately. It is a normal behavior.
4. Run Command prompt as administrator.
5. Enter the folder path to the extracted file and press [enter].
Default path and command:
cd C:\Users\[Username]\Downloads\VBIOS_L06_update\VBIOS update
*Please change the command if you change the download path.
6. Type command "Update.cmd” and press [enter].
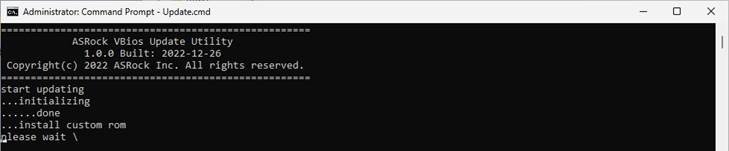
Update procedure will start up. This mean the system is flashing the vBIOS. DO NOT turn off the system during the update.
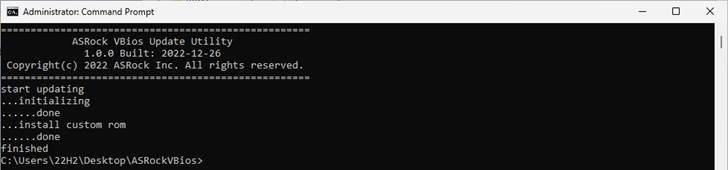
7. Once the flashing has finished, Command Prompt will report it as shown below.
Q (524):
I cannot control the RGB lighting of the graphics card. What can I do to fix it?(3/1/2023)
A:Please flash the RGB controller firmware of the graphics card via the following procedure.
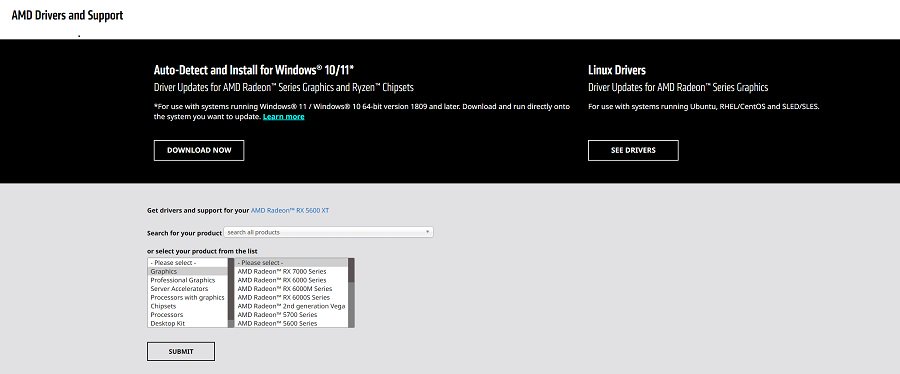
Step 1. Find and download the correct firmware for your graphics card.
Below steps use the RX 7900 XTX Phantom Gaming 24GB OC (RX7900XTX PG 24GO) as example. File and folder names can be different when using another card.
*Please make sure that the graphics card driver is installed before flashing the RGB firmware. *Exit the RGB software before flashing the RGB firmware (and make sure it is not running in the background).
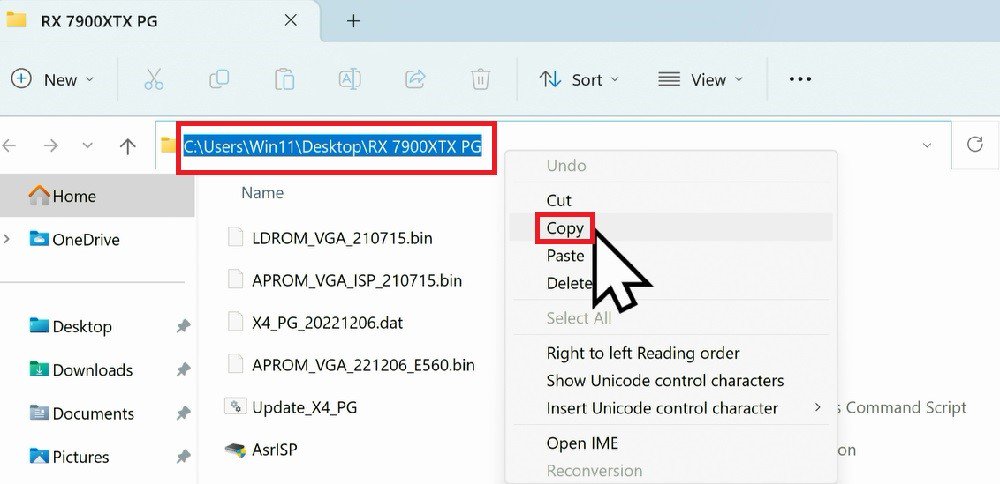
Step 2. Please extract the RGB firmware tool and copy the path of the folder that contains the RGB firmware.
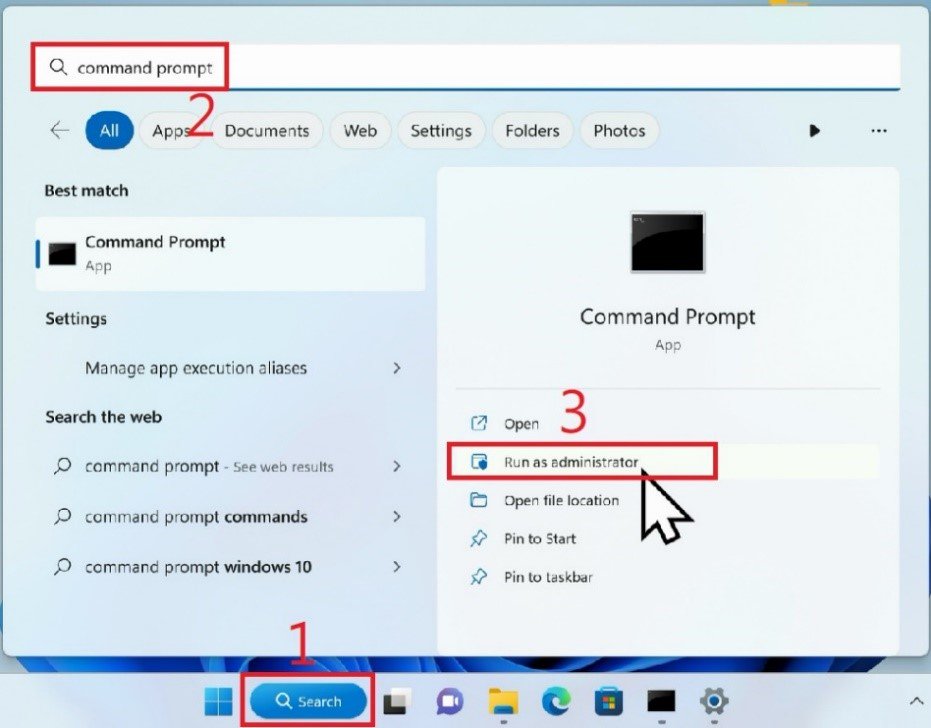
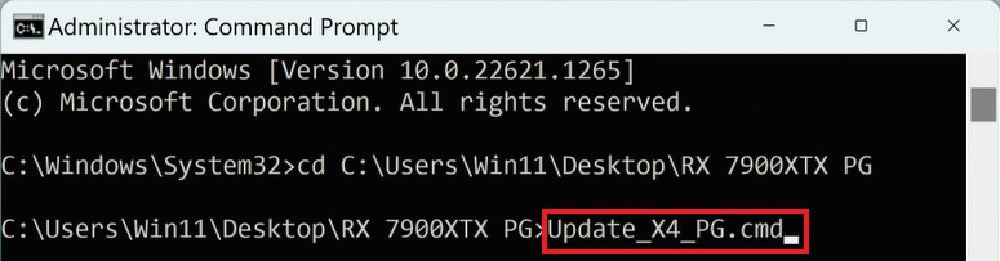
Step 3. Open Command Prompt as administrator.
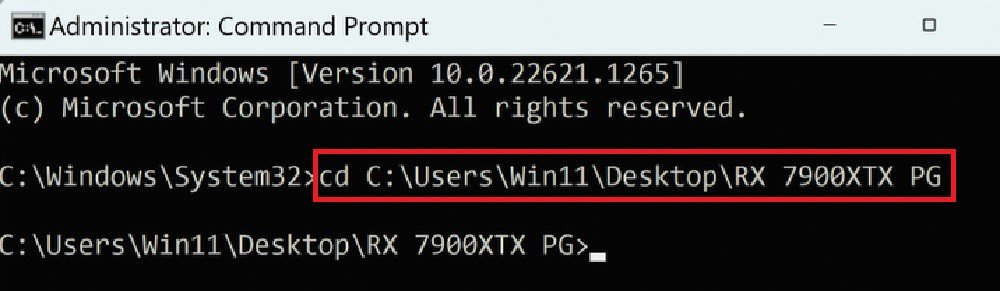
Step 4. Type cd and paste the path that you have just copied.
Step 5. Hit the Enter key.
Step 6. Type the word "Update” and press the Tab key on the keyboard. A full command file name will show up.
*The command will be vary based on the graphics card used.
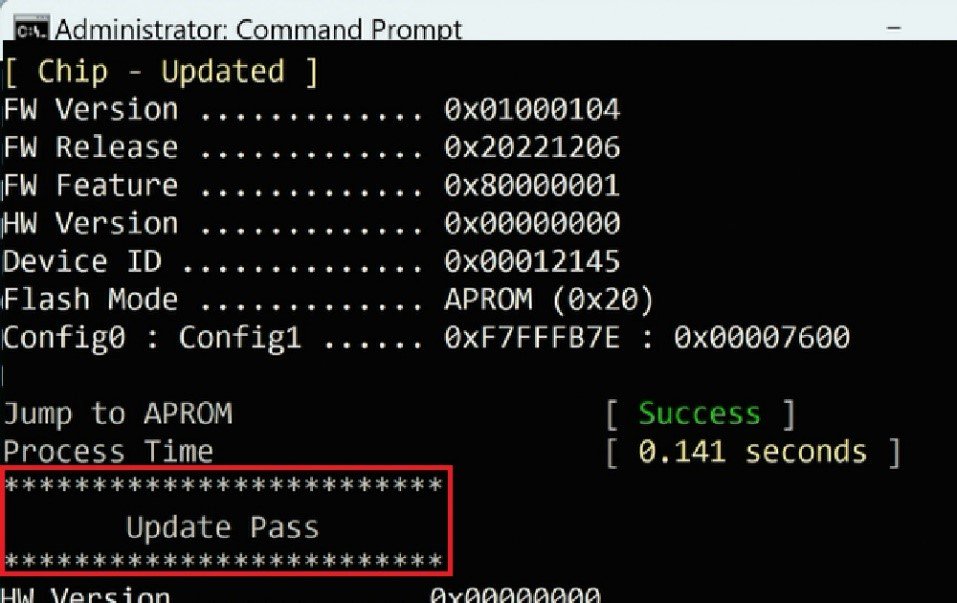
Step 7. Use the Enter key to start flashing the RGB firmware. Give it some time.
Step 8. Once the RGB firmware is updated, the command prompt will show "Update Pass.”
Step 9. Start the ASRock RGB software and check if the graphics card's RGB lighting can be controlled.
Q (515):
Which graphics cards are supported on my Deskmeet?(7/18/2022)
A:We recommend using a graphic card that consumes up to 200 watt, and supports a discrete Dual slot Graphics card up to 20CM.
The Deskmeet supports CPUs that are up to 65W ("Default TDP” or "Processor Base Power”). The peak power draw of a 65W CPU is about 200W.
The Deskmeet comes with a 500W PSU. So it is able to handle a graphic card with a power draw up to 200W.
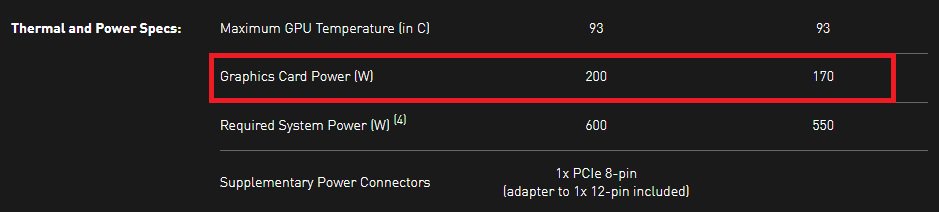
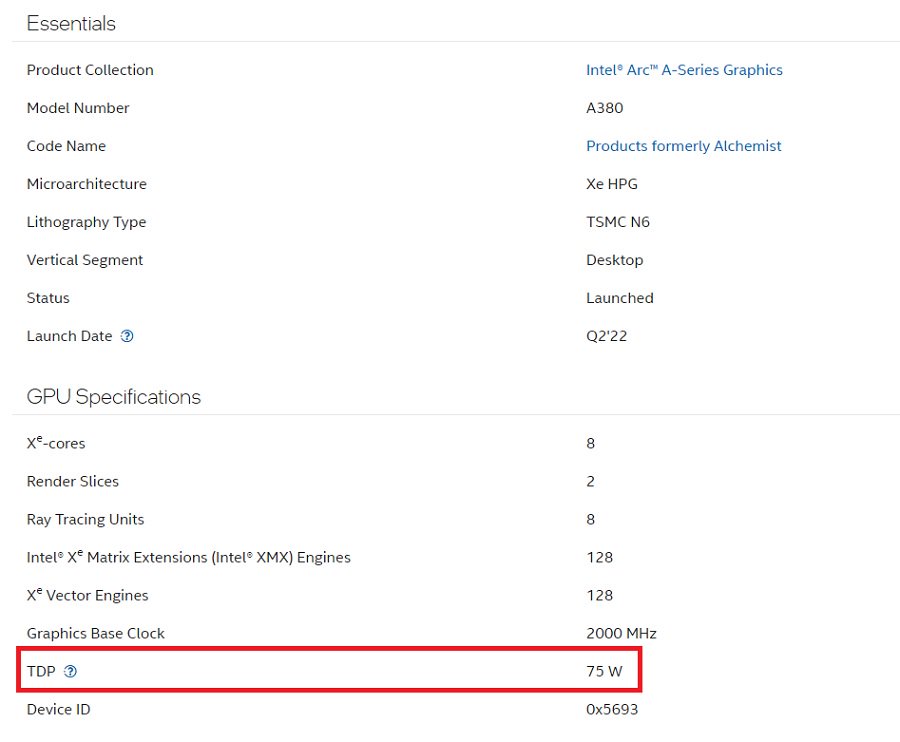
For the graphics card's power consumption, please check the specifications provided by the graphic card's vendor.
When checking the power consumption of the graphics card, please refer to the examples below. The power consumption is marked red here:
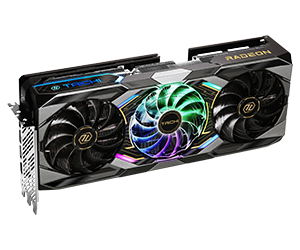
AMD
NVidia
Intel
Q (493):
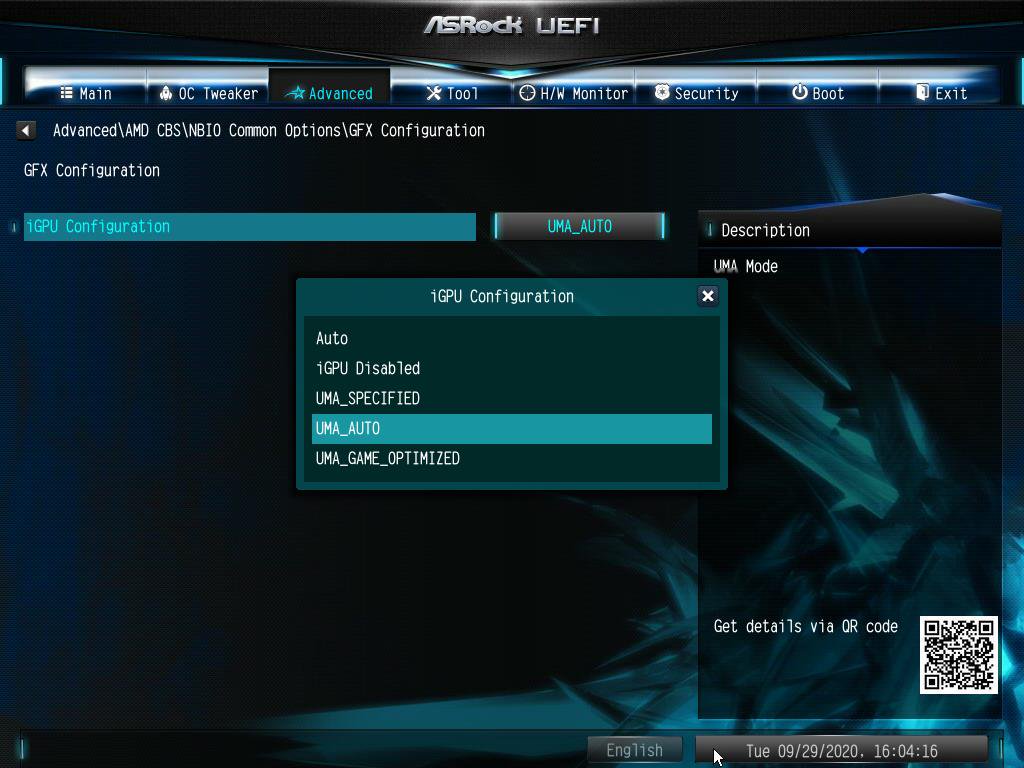
How do I enable IGPU Multi-Monitor on B550/A520 series motherboard?(10/1/2020)
A:To enable IGPU Multi Monitor, please refer to the following path and set the [iGPU Configuration] to [UMA_AUTO].
Advanced\AMD CBS\NBIO Common Options\GFX Configuration
Q (482):
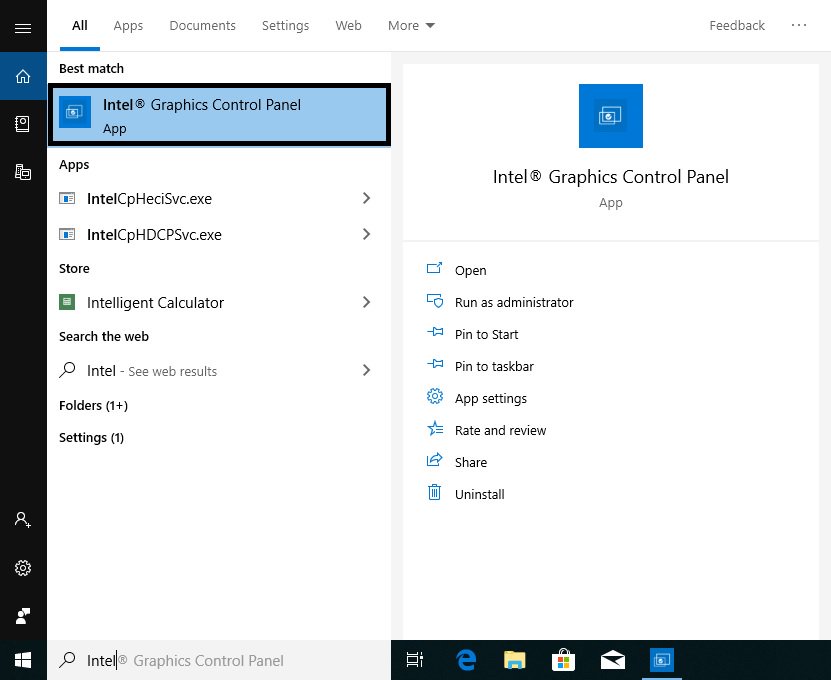
How do I configure clone mode in triple displays under Intel platform?(9/1/2019)
A:Please refer to the following procedures to adjust display settings under Intel® Graphics Control Panel:
Step 1. Please search "Intel® Graphics Control Panel” in Windows search bar and open it.
*System will auto-download the Intel® Graphics Control Panel from internet after installing the onboard VGA driver.
If the App doesn't exist in your system, please visit Intel or ASRock website to install the latest Graphics driver for your system.
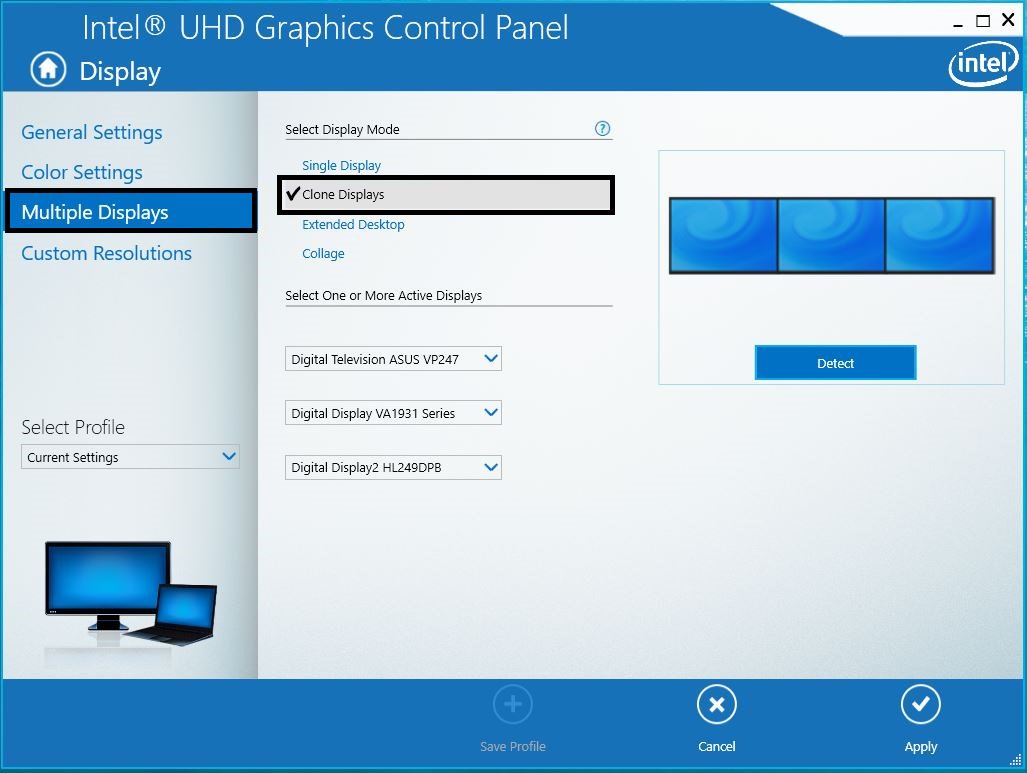
Step 2. Select "Clone Displays” under "Multiple Display” and then click "Apply” to apply the change.
Q (473):
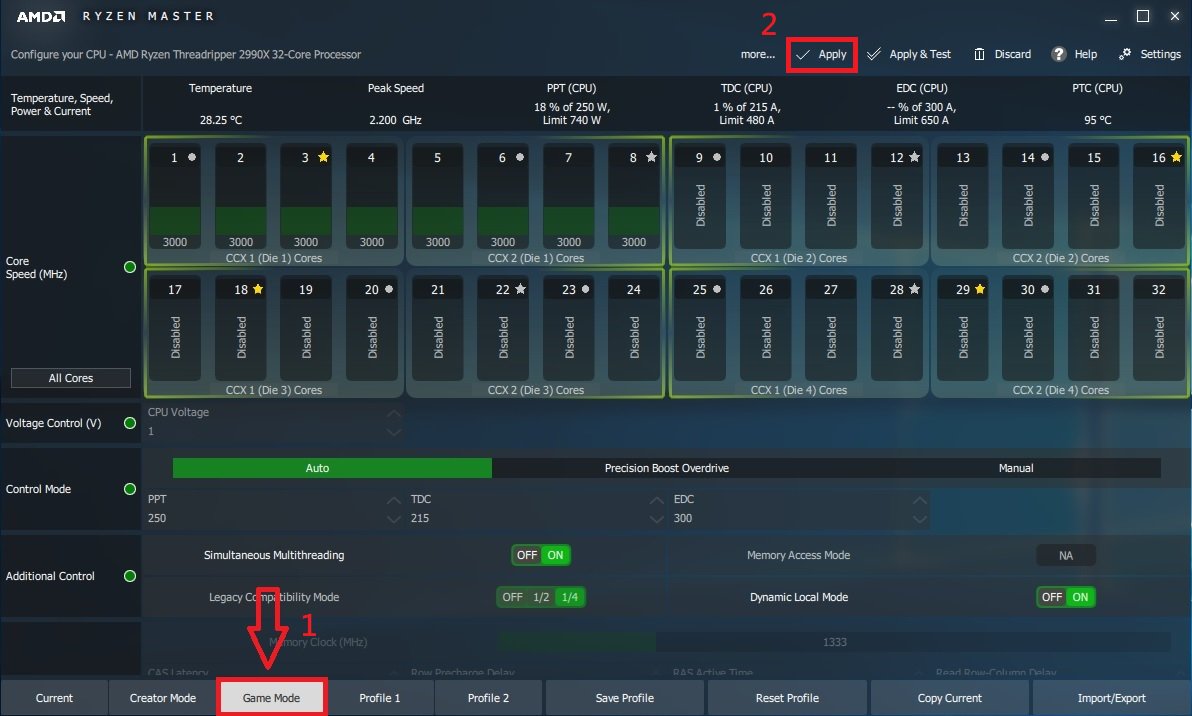
Szeretném optimalizálni a grafikai teljesítményt az X399 platformon játszott játékokhoz. Hogyan állítsam be a rendszert? (2/1/2019)
A:Mivel egyes játékok nem támogatnak 16 magnál többet, az AMD Ryzen Master Utility tartalmaz Játékmódot, hogy optimalizálja a grafikai teljesítményt.
A lenti hivatkozásról töltse le és telepítse az AMD Ryzen Master Utility segédprogramot.
Ryzen Master letöltése:https://www.amd.com/en/technologies/ryzen-master
Kövesse a Játékmód kiválasztásának és alkalmazásának lépéseit.
Ezt követően optimalizálva lesz a grafikus teljesítmény.
Q (472):
Hogyan tudom kézileg telepíteni a VGA-illesztőprogramot Win10 64bit alatt 760GM-HDV esetén?(1/1/2019)
A:Az alábbi lépések segítségével telepítse kézileg a VGA-illesztőprogramot.
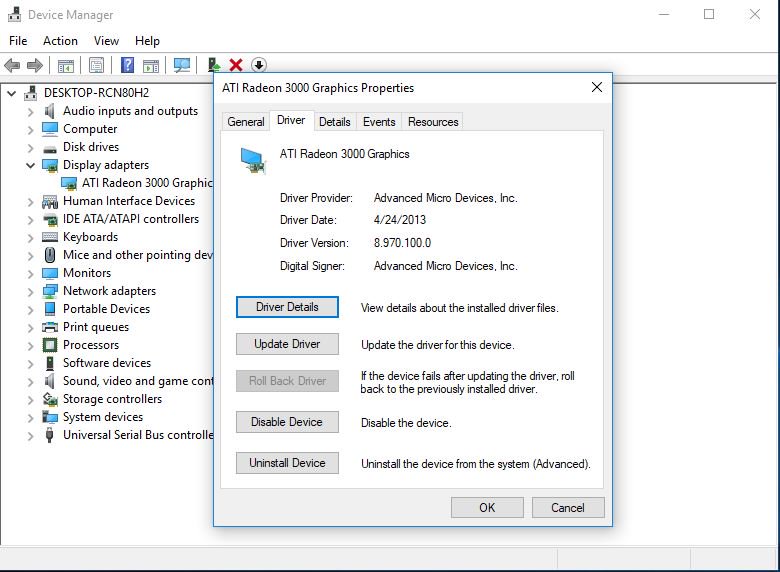
Step 1. Nyissa meg az Eszközkezelőt.
Step 2. Kattintson jobb gombbal videokártyára, hogy belépjen a „Tulajdonságokba”, majd válassz az „Illesztőprogram frissítése” lehetőséget.
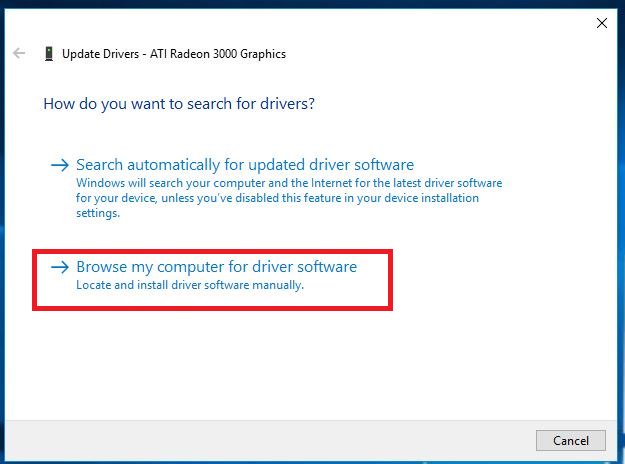
Step 3. Válassza az „Illesztőprogramok megkeresése a számítógépen” lehetőséget.
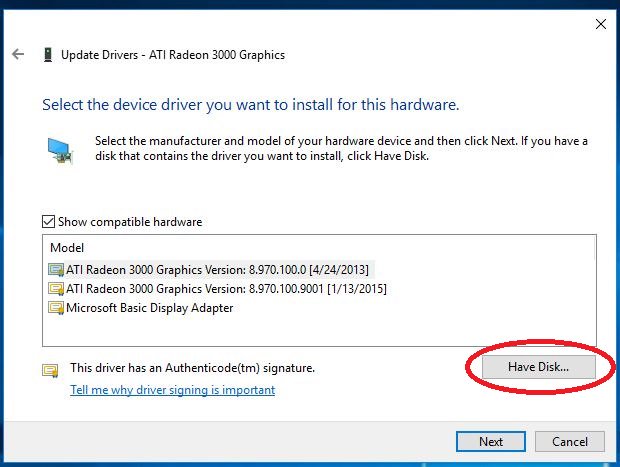
Step 4. Válassza a „Választás a számítógépen található illesztőprogram-listából” lehetőséget.
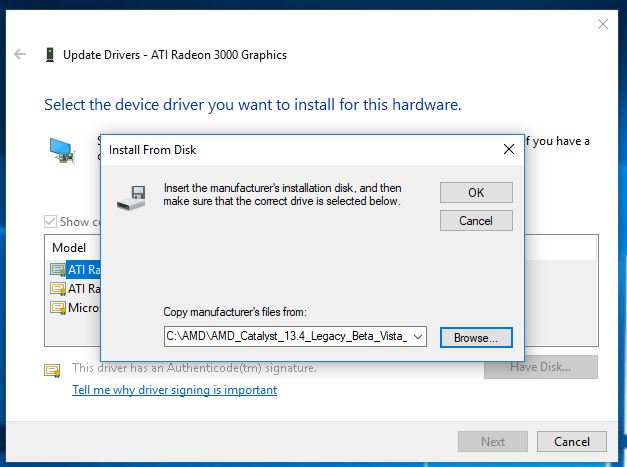
Step 5. Kattintson a „Saját lemez” gombra, és keresse meg az illesztőprogramot a lemezen.
Az útvonal: C:\AMD\AMD_Catalyst_13.4_Legacy_Beta_Vista_Win7_Win8\Packages\Drivers\Dispaly\W86A_INF
Step 6. Kattintson az „OK” gombra, majd a „Következő” gombbal telepítse az illesztőprogramot.
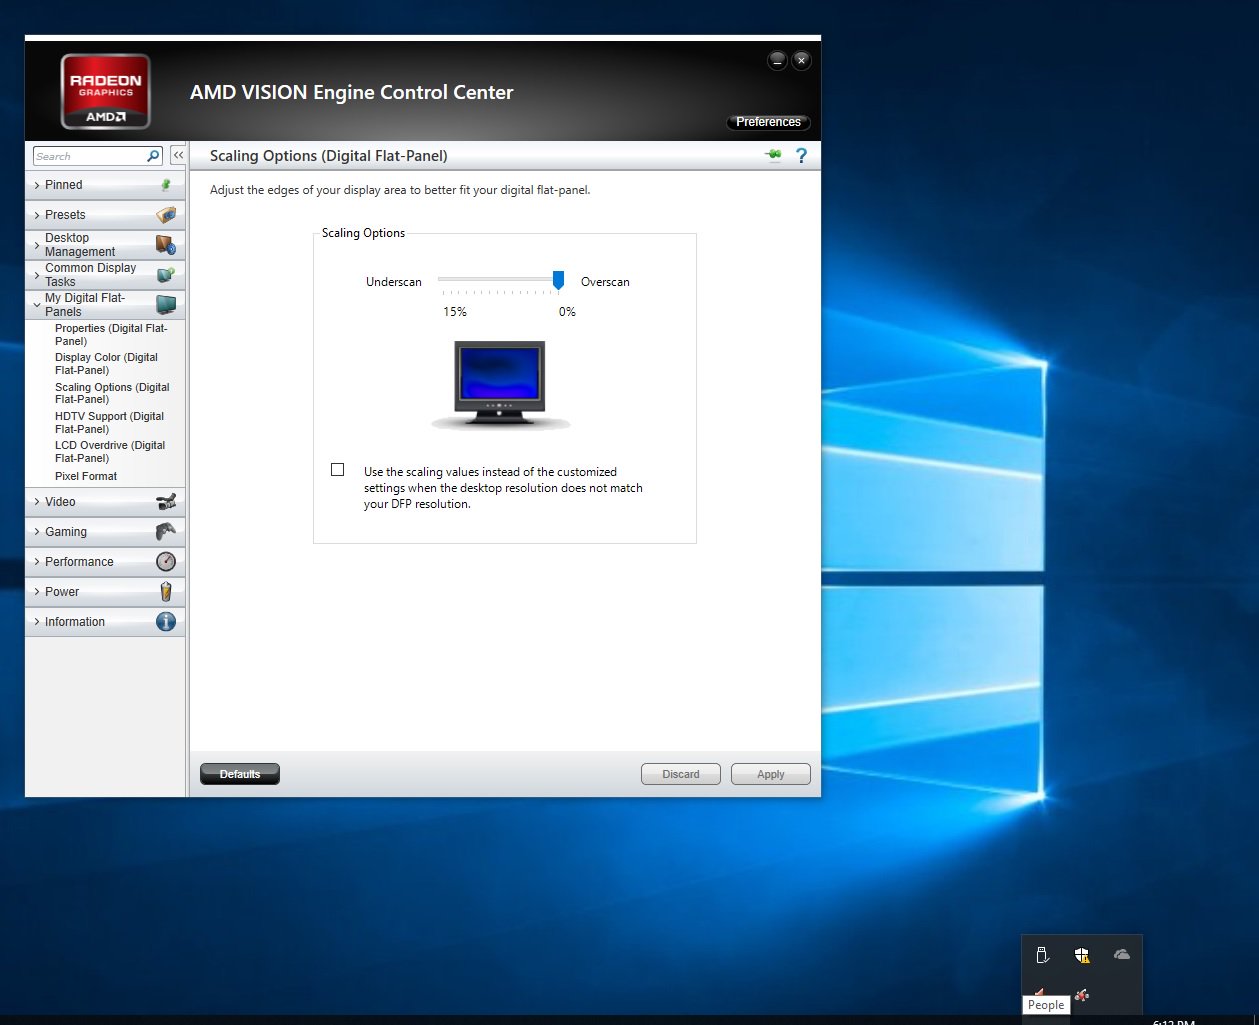
*Ha a rendszer az integrált HDMI-csatlakozón keresztül csatlakozik a megjelenítőhöz, és azon nem megfelelő felbontás látható, kövesse a lenti lépéseket a monitorfelbontás beállításához.
1. lépés Az alábbi hivatkozásról telepítse az AMD all-in-1 illesztőprogramot:
Hivatkozás: https://download.asrock.com/Drivers/AMD/AllIn1/Allin1(v15.7.1).zip
2. lépés Nyissa meg az „AMD VISION Engine vezérlőpultot”.
3. lépés Válassza a „Méretezési lehetőségek (digitális síkképernyő)” lehetőséget, és állítsa a méretezést „Túlpásztázásra”.
Q (464):
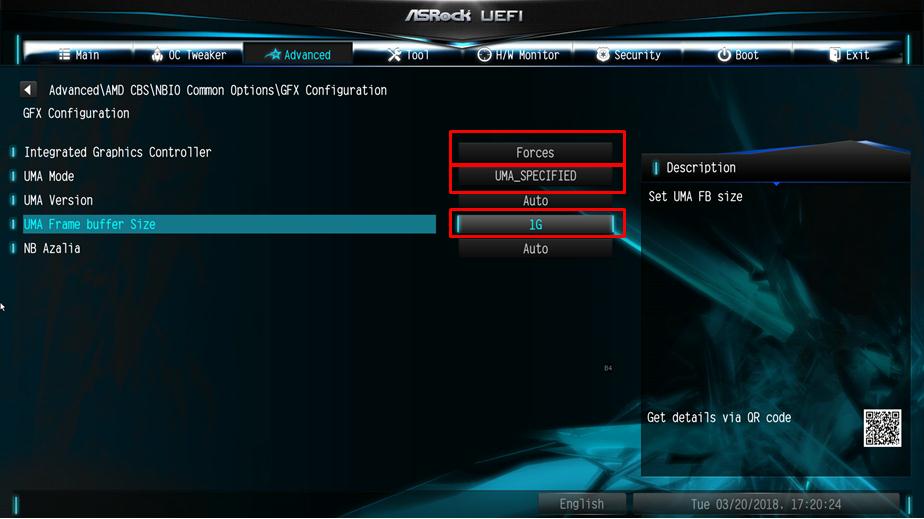
Hogyan állíthatom be a megosztott memóriát Raven Ridge CPU esetén AM4 platformon?(3/1/2018)
A:Ha szeretné módosítani a megosztott memóriát, kövesse az alábbi lépéseket az OC-beállítások megkereséséhez és módosításához.
1. A POST képernyőn nyomja meg az „F2” vagy „Del” gombot, hogy megnyissa a BIOS-beállításokat.
2. Kövesse az alábbi útvonalat az OC-beállítások módosításához.
a. Advanced\AMD CBS\NBIO Common Options\GFX Config IGC :Forces
b. Advanced\AMD CBS\NBIO Common Options\UMA Mode : UMA_Spec
c. Advanced\AMD CBS\NBIO Common Options\UMA Frame Buffer Size: válasszon egy kívánt méretet
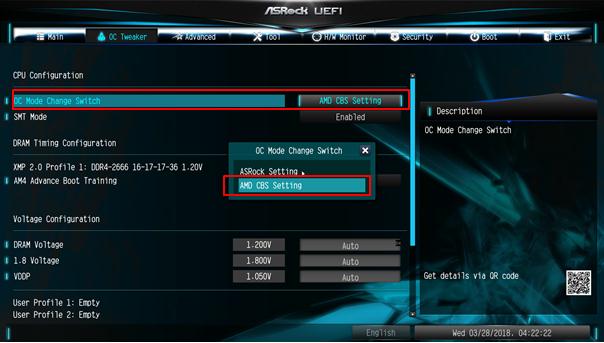
d. OC Tweaker\OC Mode Change Switch\AMD CBS Setting
3. A fenti beállítások módosítását követően az „F10” billentyűvel mentse a beállításokat.
Q (465):
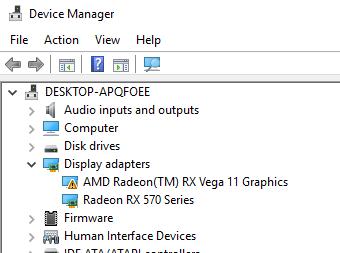
Ha VGA kártyát használok integrált grafikus vezérlőjű AM4 CPU-val, az integrált grafikus vezérlő mellett felkiáltójel látható.
Mit tegyek?(3/1/2018)
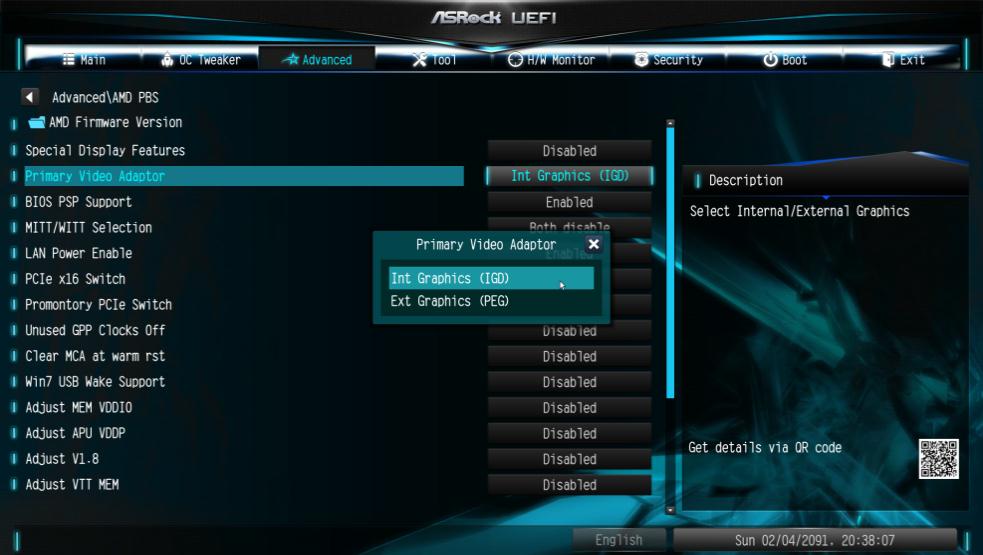
A:Ha a VGA kártyát használja, és az integrált grafikus vezérlő mellett az alábbi képen látható felkiáltójelet látja,
kövesse az alábbi lépéseket a felkiáltójel eltávolításához.
1. A POST képernyőn nyomja meg az „F2” vagy „Del” gombot, hogy megnyissa a BIOS-beállításokat
2. Állítsa be az elsődleges videoadapternek a belső grafikus vezérlőt
Útvonal: Advanced\AMD PBS\Primary Video Adapter\Int Graphics (IGD)
3. A fenti beállítások módosítását követően az „F10” billentyűvel mentse a beállításokat.
Az alábbi megoldást is kipróbálhatja.
1. A POST képernyőn nyomja meg az „F2” vagy „Del” gombot, hogy megnyissa a BIOS-beállításokat
2. Kapcsolja ki a CSM-et
Útvonal: Boot/CSM/Disable
3. A fenti beállítás módosítását követően az „F10” billentyűvel mentse a beállításokat.
Q (448):
A rendszer nem ismeri fel az egyik grafikus kártyámat. Mit tegyek?(9/1/2017)
A:Ha a rendszer nem ismer fel egyes grafikus kártyákat, az nem mindig az alaplap miatt van, más alkatrészek is lehetnek ennek okozói. A kiemelő kártyák, a tápellátás, a grafikus kártyák, de még az operációs rendszerek is a rendszer fontos elemei. Az alábbi három szakasz lépéseit végigjárva ellenőrizze rendszerét.
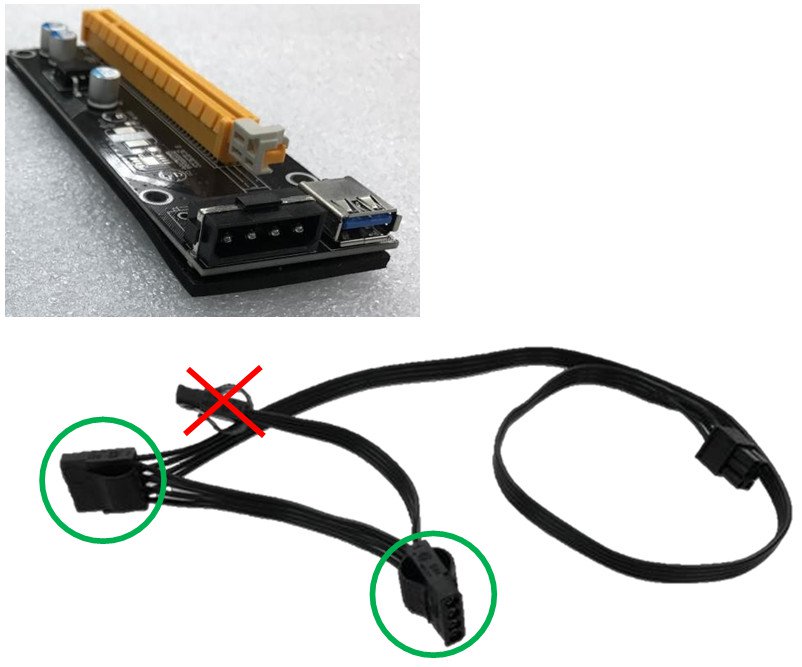
(A) A PCIe kiemelő kártya
1. Ellenőrizze, hogy a grafikus kártyák megfelelően vannak-e telepítve a kiemelő kártyákra. Vagy vegye ki a grafikus kártyákat a kiemelő kártyákról, és helyezze be újra a kiemelő kártyákat.
2. Javasoljuk, hogy bányász rendszeréhez olyan PCIe kiemelő kártyát válasszon, ami 6 tűs tápellátással rendelkezik.
3. Ha Molex csatlakozós PCIe kiemelő kártyákat használ, maximum két Molex csatlakozót használjon az egyes tápkábeleken. Többet ne.
(B) Tápellátás
Ha (közel) 13 grafikus kártyát használ, valószínűleg 2 tápegységre lesz szüksége. A tápegységek általában 12, 5 és 3,3 V feszültséget biztosítanak az alaplap számára.
De egy bányász rendszer esetén más a helyzet a több tápegységgel. Az első tápegységet az alaplaphoz (12, 5 és 3,3 V) és néhány grafikus kártyához (12 V) kell csatlakoztatni. A második tápegységet csak néhány grafikus kártyához (12 V) kell csatlakoztatni. Mivel a második tápegység csak 12 V feszültséget biztosít a grafikus kártyák felé, egyenetlen lehet a teljesítményeloszlása.
A tápegységek gyártói azt javasolják, hogy egy rendszerhez csak egy tápegységet használjon.
(C) Grafikus kártyák
1. Az egy GPU-s rendszerek jellemzően 200 W teljesítményt vesznek fel, és a rendszernek elegendő tápellátásra van mindehhez szüksége. Ellenőrizze, hogy a rendszer tápellátása elegendő-e a teljes rendszer számára.
2. Szereljen be egy grafikus kártyát, és ellenőrizze, hogy az eszközkezelő megtalálja-e.
Ha nem, állítsa le a rendszert, és a főkapcsolóval indítsa újra a rendszert. Majd várjon, hogy a rendszer felismeri-e az eszközt.
3. Ha nem észleli, tisztítsa meg a grafikus kártya arany érintkezőit egy radírral (ceruzaradír), és helyezze vissza a kártyát.
 Menü
Menü