Sütiket használunk, hogy még személyre szólóbb élményt nyújthassunk. A weboldal meglátogatásával elfogadja a sütik használatát. Ha nem szeretné elfogadni a sütiket, vagy további tájékoztatásra van szüksége, olvassa el Adatvédelmi irányelveinket.
Ha pontosan tudja, hogy kérdése milyen témát érint, válaszon az alábbi kategóriák közül.
Eredmények:
Q (488):
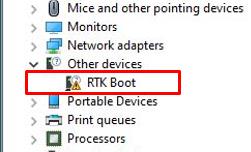
TRX40 alaplapom van. Az eszközkezelőben látható egy RTK Rendszerindító eszköz felkiáltójellel, és nem jön hang a hangkimenetből. Hogyan javíthatom ezt? (4/1/2020)
A:Ha látható RTK eszköz az eszközkezelőben, és nem használható a hangkimenet, kövesse a lenti lépéseket az RTK eszköz eltávolításához, hogy a hangkimenet megfelelően működjön.
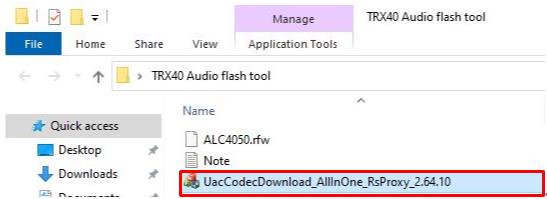
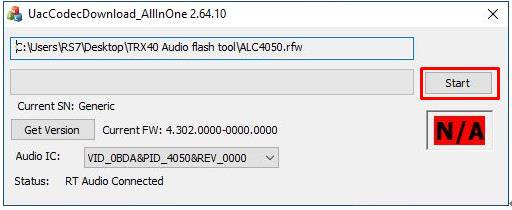
5. lépés Kattintson duplán az UacCodecDownload_AllInOne_RsProxy_2.64.10 fájlra
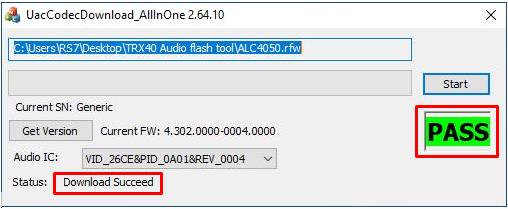
6. lépés Nyomja meg a Start gombot az audio firmware frissítésének indításához.
7. lépés Ha a flashelés kész, az eszköz a Pass üzenetet jeleníti meg, ami azt jelenti, hogy a firmware sikeresen flashelve lett, és nem szabad látszódnia az RTK indítóeszköznek az eszközkezelőben.
Q (487):
Ha a mikrofonon keresztül rögzítek hangot a Windows 10 1909-es verziójában, sistergő hangok szólnak a felvételben. (1/1/2020)
A:Ha sistergő hangokat hall a felvételben, az alábbi módszerek egyikével elkerülhetők a sistergő hangok.
1. módszer:
1. lépés
Töltse le a Realtek high definition hangillesztőprogramot az ASRock weboldaláról.
*Ellenőrizze, hogy csatlakoztatva van-e a LAN-kábel, amikor a Realtek Audio illesztőprogramot telepíti.
2. lépés:
Nyissa meg a „Realtek audio console” alkalmazást.
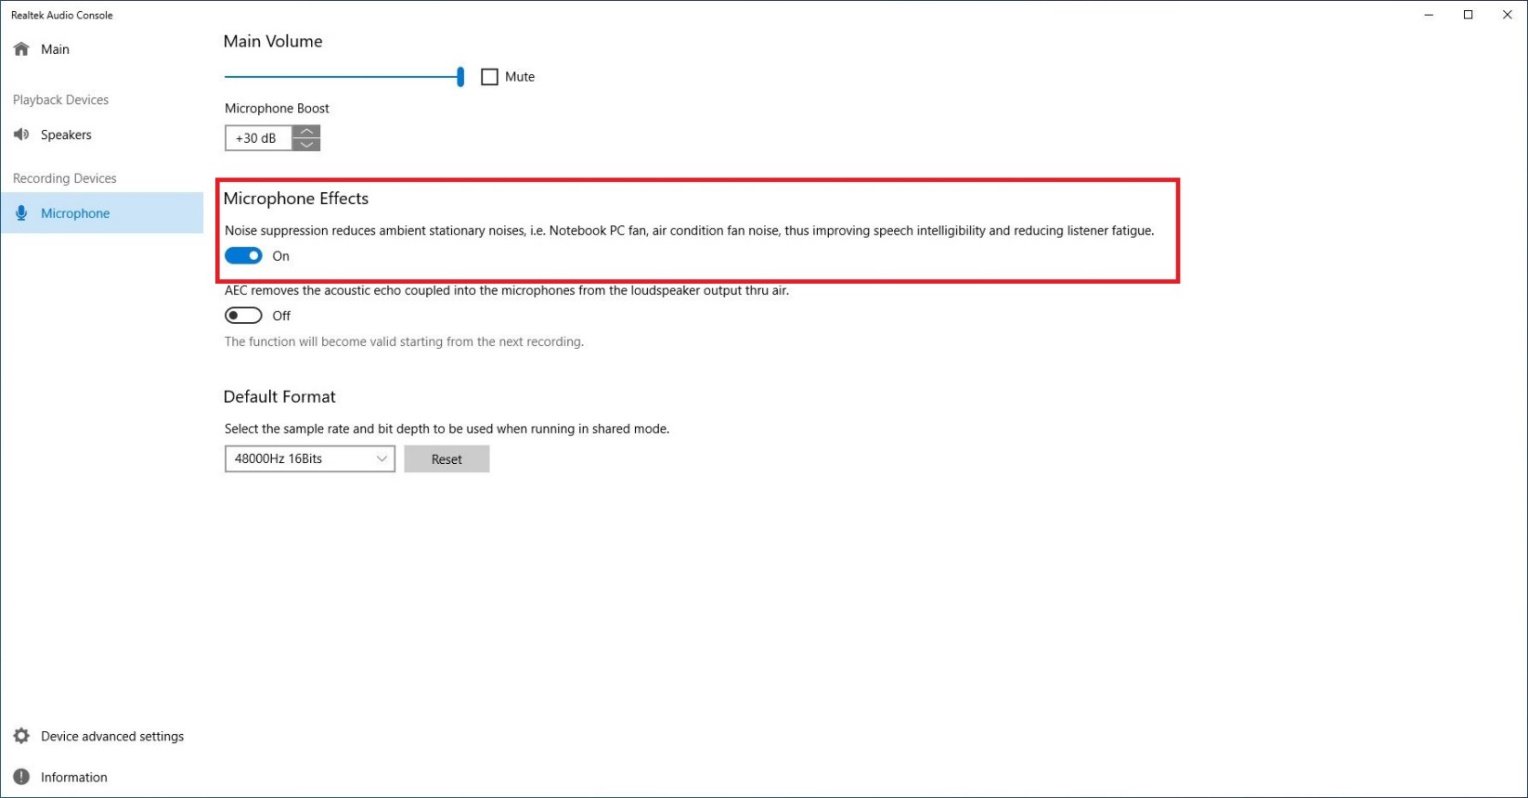
3. lépés
Kapcsolja be a „Noise suppression reduces ambient stationary noises” lehetőséget a Realtek audio console alkalmazásban.
4. lépés
Miután elvégezte a fenti beállítást, jobb lesz a felvétel minősége.
2. módszer:
1. lépés
A „Realtek audio console” megnyitásához lásd 1. lépés, és az 1. módszer 2. lépése.
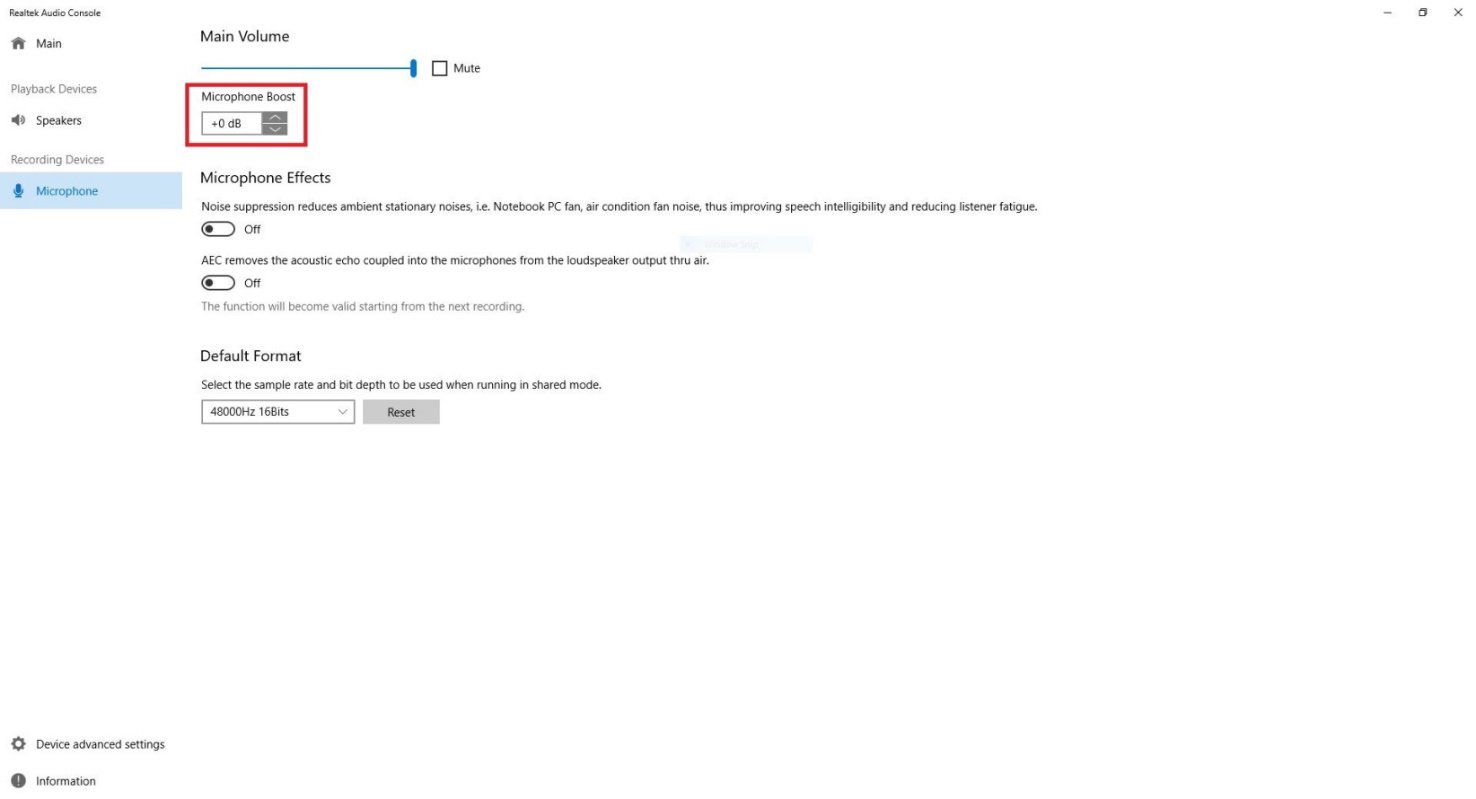
2. lépés
Állítsa a Microphone Boost beállítást +0db értékre
3. lépés
Miután az erősítést +0 db-re állította, jobb lesz a felvétel minősége.
Q (468):
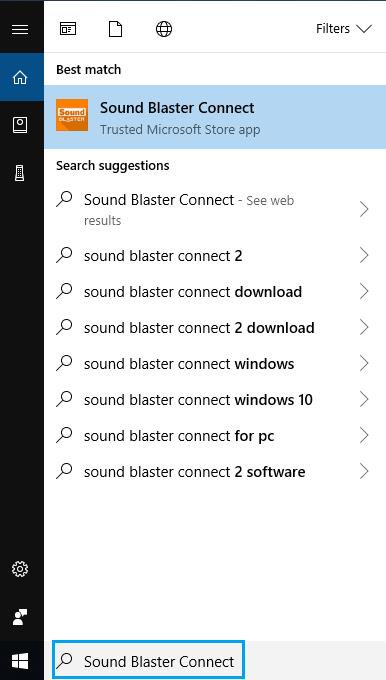
Hogyan tudom telepíteni a Sound Blaster Connect alkalmazást Windows 10 RS4 vagy újabb verzió esetén?(10/1/2018)
A:A rendszer a Realtek Audio illesztőprogram telepítését követően általában a háttérben automatikusan letölti az alkalmazást. Az alkalmazás eléréséhez írja be a Win10 keresősávjába, hogy „Sound Blaster Connect”.
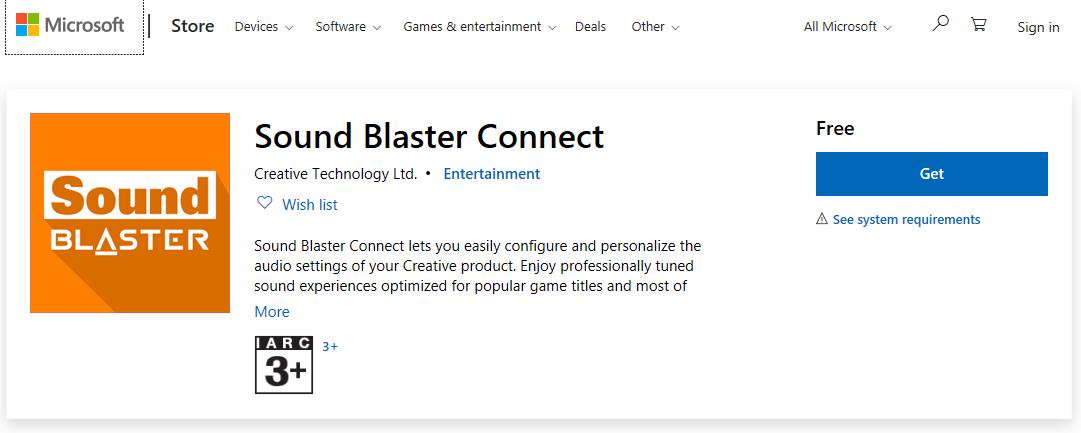
Ha az alkalmazás nem jelenik meg a listában, kövesse az alábbi lépéseket a kézi telepítéshez.
1. Ellenőrizze, hogy alaplapja támogatja-e a Creative Sound szolgáltatást és a Realtek Audio telepítve van-e.
* Az alaplap műszaki adataival kapcsolatos részletekért látogasson el az www.ASRock.com oldalra.
* A Realtek Audio illesztőprogramja telepíthető/letölthető a kiegészítő CD-ről és az ASRock hivatalos weboldaláról.
2. Keresse meg a „Sound Blaster Connect” alkalmazást a Microsoft Store áruházban és a „Letötlés” gombbal kezdje meg a letöltést. https://www.microsoft.com/en-sg/store/p/sound-blaster-connect/9n66rljrt8z2
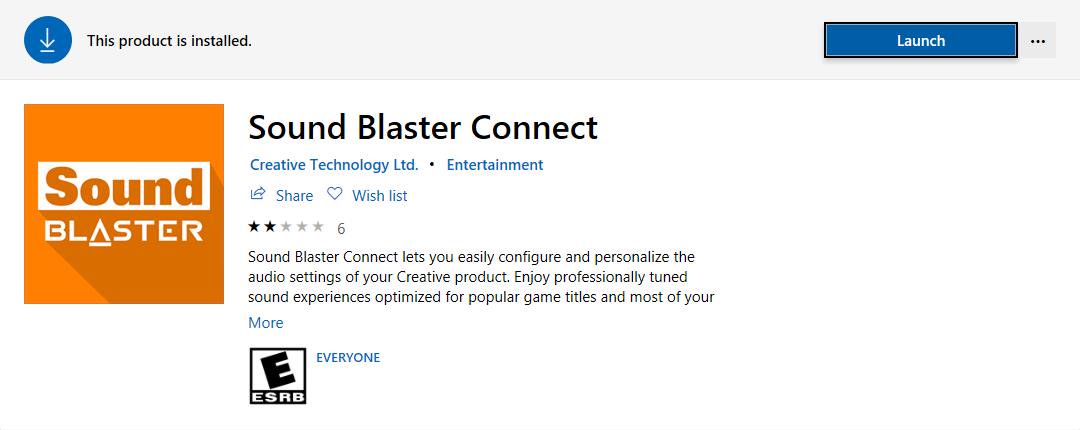
3. Telepítés után kattintson a „Launch” gombra az alkalmazás indításához.
A Creative SoundBlaster Cinema5 támogatásával kapcsolatban lásd az alábbi táblázatot.
Q (469):
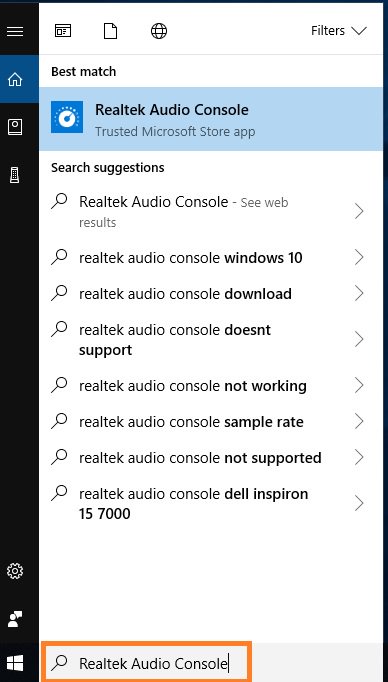
Hogyan tudom telepíteni a Realtek Audio Console alkalmazást Windows 10 RS4 vagy újabb verzió esetén?(10/1/2018)
A:A rendszer a Realtek Audio illesztőprogram telepítését követően általában a háttérben automatikusan letölti az alkalmazást.
Az alkalmazás eléréséhez írja be a Win10 keresősávjába, hogy „Realtek Audio Console”.
*Csatlakoztassa a LAN-kábelt, amikor a Realtek Audio illesztőprogramot telepíti.
Ha az alkalmazás nem jelenik meg a listában, kövesse az alábbi lépéseket a kézi telepítéshez.
1. Nyissa meg az Eszközkezelőt, és ellenőrizze, hogy a Realtek Audio illesztőprogram telepítve van-e.
* A Realtek Audio illesztőprogramja telepíthető/letölthető a kiegészítő CD-ről és az ASRock hivatalos weboldaláról: www.ASRock.com.
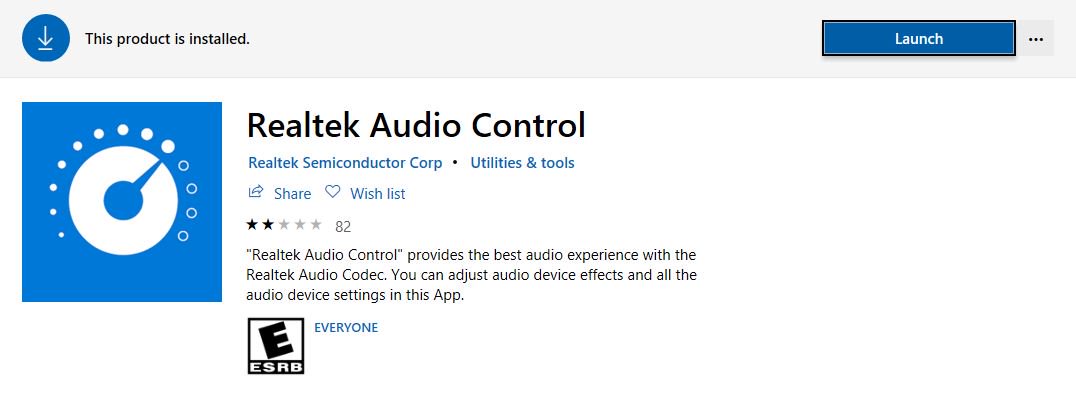
2. Kattintson az alábbi hivatkozásra a „Realtek Audio Control” letöltéséhez a Microsoft Store áruházból, és kattintson a „Letöltés” gombra a letöltés megkezdéséhez. https://www.microsoft.com/store/productId/9P2B8MCSVPLN
3. Telepítés után kattintson a „Launch” gombra az alkalmazás indításához.
Q (457):
Szeretném a Windows Mixed Reality Headsetet használni a beépített HDMI csatlakozóval. Mit tegyek?(12/1/2017)
A:Kérjük, kövesse az alábbi lépéseket
1. Olvassa el a „Microsoft Windows Mixed Reality PC hardware guidelines” dokumentumot a rendszer hardverkövetelményeinek ellenőrzéséhez. https://support.microsoft.com/en-us/help/4039260/windows-10-mixed-reality-pc-hardware-guidelines
* A Windows Mixed Reality használatához beépített Intel HD Graphics 620 vagy újabb DX12 kompatibilis integrált grafikus vezérlő szükséges.
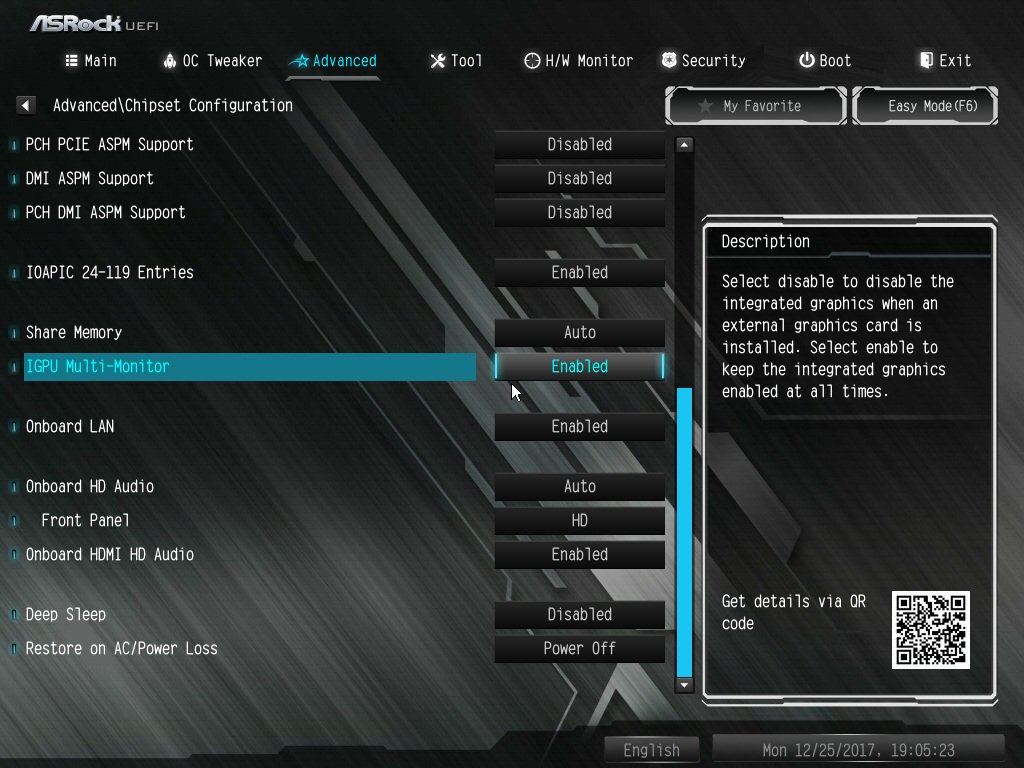
2. Ha van külső grafikus kártya beépítve, engedélyezze az „IGPU Multi-Monitor” opciót a BIOS-ban.
BIOS útvonal: Advanced > Chipset Configuration > IGPU Multi-Monitor
3. Töltse le a 15.60.01.4877 verziójú VGA-illesztőprogramot az Intel letöltőközpontból, és telepítse a rendszerére.
Letöltés: https://downloadcenter.intel.com/product/128199/Graphics-for-8th-Generation-Intel-Processors
4. Csatlakoztassa a „Windows Mixed Reality Headset” USB 3.0 csatlakozóját a beépített USB 3.0 porthoz.
5. Csatlakoztassa a „Windows Mixed Reality Headset” HDMI csatlakozóját a beépített HDMI porthoz.
Ezt követően a Windows Mixed Reality Headsetnek működnie kell.
Q (455):
Hogyan játszhatok le Dolby ATMOS rendszerű hangot a Z270 Gaming-ITX/ac alaplappal egy vevőkészüléken keresztül?(10/1/2017)
A:Olvassa végig az alábbi rendszerkövetelményeket, konfigurációkat és beállítási folyamatokat.
[Követelmények]
Operációs rendszer: Windows 10
Vevő/dekóder: Onkyo TX-NR 747 vagy más vevő, ami támogatja a HDCP 2.2 szabványt.
Lejátszó: Pioneer Ultra HD Blu-ray-lejátszó
BD-lemez: a legtöbb 3D / 4K BD-lemezen lévő film
Lejátszó szoftver: Power DVD 14 vagy újabb verzió
[Beállítás]
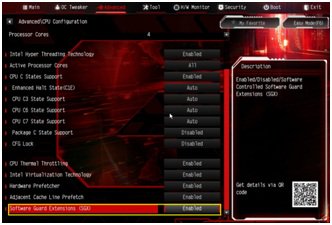
1. A rendszer indításakor nyomja meg az „F2” billentyűt, hogy belépjen az UEFI beállításaiba.
Lépjen az Advanced > CPU Configuration menübe, és engedélyezze a „Software Guard Extensions” opciót a BIOS beállításaiban.
Az „F10” billentyű megnyomásával mentse a módosításokat, és lépjen ki a BIOS beállításaiból
2. Indítsa el az operációs rendszert. Telepítse az alaplap összes illesztőprogramját.
Telepítse az ME-illesztőprogram 11.6.0.1126-os verzióját (támogatja az Ultra HD Blu-ray tartalmakat). Töltse le az illesztőprogramot az alábbi hivatkozásról: http://www.asrock.com/MB/Intel/Fatal1ty%20Z270%20Gaming-ITXac/index.asp#osW1064
3. Nyissa meg a Vezérlőpult > Hardver és hang > Hang ablakot, és válassza ki a „Vevő kimenetet”.
Q (396):
A DTS Connect 5.1 Surround működik Windows 10 alatt?(8/1/2015)
A:A Microsoft Windows 10 operációs rendszer korlátai miatt a DTS Connect 5.1 Surround nem működik Windows 10 alatt.
Ha szeretné használni a DTS Connect 5.1 Surround hangzást, válasszon korábbi verziót (pl. Windows 8.1/ Windows 8/ Windows 7).
Q (350):
Amikor zenét vagy filmeket játszom le a Media Playerben Win8 32/64 bites rendszeren, a Media Player váratlanul leáll, és hibaüzenet jelenít meg, amikor fejhallgatót csatlakoztatok az előlapi audiopanelhez. Mit tehetek ilyenkor?(9/1/2013)
A:Kérjük, nyissa meg újra a Media Playert, és játssza le újra a fájlt, hogy a hangot az előlapi panelről hallja.
Q (297):
Hogyan tudom beállítani a digitális (DTS5.1, Dolby5.1, DTS HD Master és Dolby True HD) kimenetet HDMI vagy SPDIF csatlakozón keresztül?(11/1/2011)
A:Követelmények:
Op.rendszer: Windows7, Vista SP2 vagy újabb.
Vevő / dekóder: Onkyo TX-SR608 erősítő, például:
Lejátszó szoftver: például Power DVD10 v10.0.2025.52 vagy más szoftver.
Beállítás:
1. Telepítsen minden illesztőprogramot a mellékelt CD-ről, majd ezt követően ellenőrizze az eszközkezelőt (ne legyen „!" vagy „?" a listán).
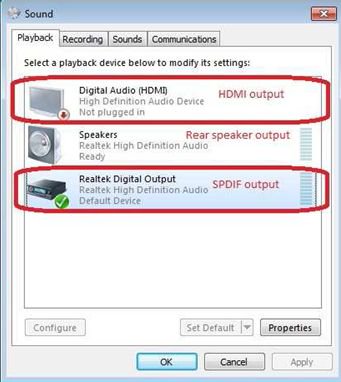
2. Nyissa meg a Vezérlőpult > Hardver és hang > Hang ablakot.
Ha a hangot a HDMI kimeneten keresztül szeretné hallani, válassza a [HDMI kimenet] lehetőséget
Ha a hangot a SPDI kimeneten keresztül szeretné hallani, válassza a [Digitális kimenet] lehetőséget
*Eltérő alaplap/chipkészlet esetén más információk jelenhetnek meg, a fenti kép csak példa.
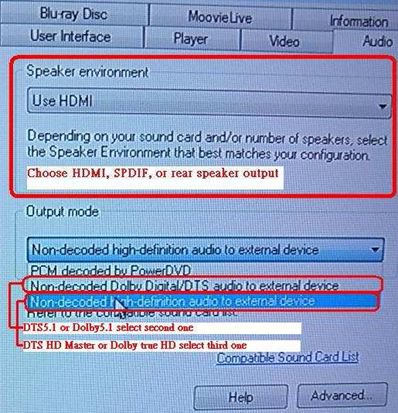
3. Lépjen be alkalmazása hangbeállításaiba.
Mi példaként a Power DVD 10-et használtuk: Igény szerint válassza ki a Speaker environment (Hangszóró elrendezés) és Output (Kimenet) üzemmódokat.
4. Állítsa dekóderét/erősítőjét a kívánt digitális hangkimenetre.
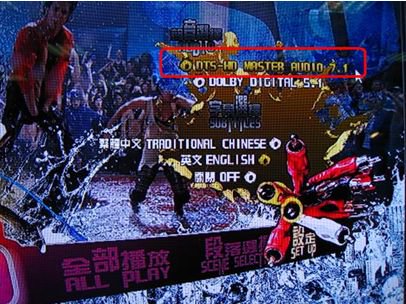
5. Állítsa be a tartalomhoz/forráshoz a helyes kimeneti formátumot.
6. Most lejátszhatja a tartalmat/forrást.
Q (263):
If I use AC'97 front audio panel with VIA® audio codec motherboard, how do I connect AC'97 front panel to HD Audio header on the motherboard?(2/10/2010)
A:If you use AC'97 front audio panel, please install it to the HD audio header as below:
A. Connect Mic_IN (MIC) to MIC2_L.
B. Connect Audio_R (RIN) to OUT2_R and Audio_L (LIN) to OUT2_L.
C. Connect Ground (GND) to Ground (GND).
D. MIC_RET and OUT_RET are for HD audio panel only. You don't need to connect them for AC'97 audio panel.
E. Enter BIOS Setup Utility. Enter Advanced Settings, and then select
Chipset Configuration. Set the Front Panel Control option from [Auto] to [Enabled]. For Windows® XP
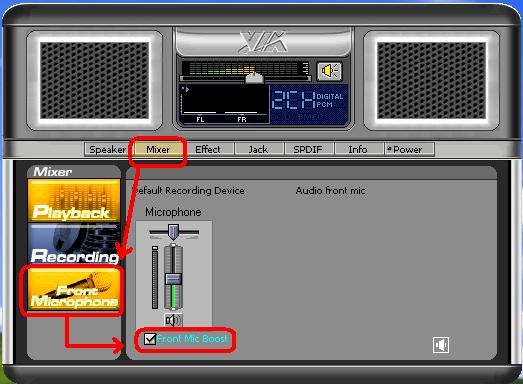
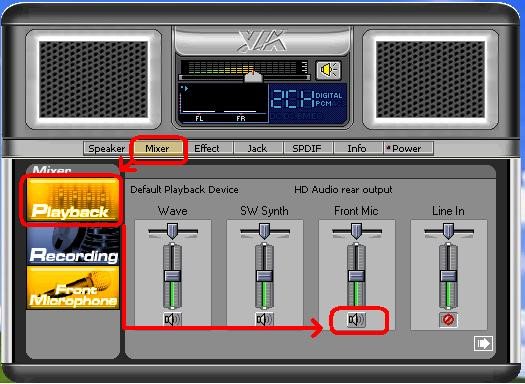
F. Enter Windows® system. Click the icon on the lower right hand taskbar to enter VIA® ADeck. Click "Mixer", select "Front Microphones", choose "Front Mic Boost", and leave.
Like below picture:
H. If you want to hear your voice through Front Mic, Please click "Mixer", select "Play Back", choose "Front Mic", and leave.
Like below picture: For Windows® Vista™ / Windows® 7
F. Enter BIOS "Chipset Settings" page, manual [Front Panel] to [Enable].
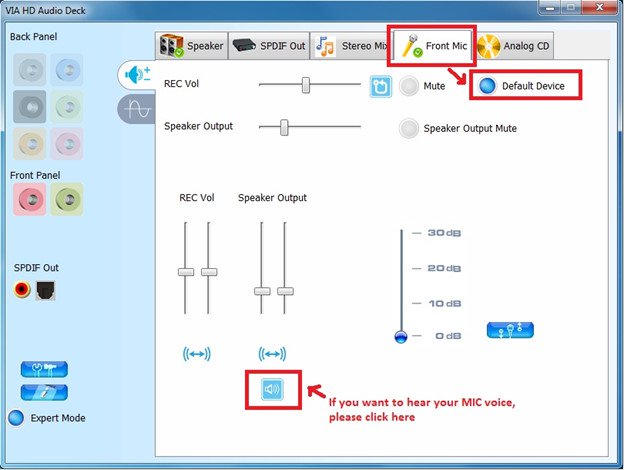
G. Enter Windows® system. Click the icon on the lower right hand taskbar to enter VIA® VDeck. Click "Front Mic", select "Default Device"
H. If you want to hear your voice through Front Mic, Please click "Speaker Output" icon.
Like below picture:
Q (245):
I install ATI 2xxx, 3xxx, 4xxx series PCIE VGA card on the motherboard. After installing all Windows® XP drivers from the motherboard, it still shows an unknown "audio device on the high definition audio bus." message under device manager. What could I try?(1/12/2009)
A:There is an integrated audio chip in the ATI 2xxx, 3xxx, 4xxxx series graphics cards.
Please install ATI HDMI audio driver.
http://ati.amd.com/support/drivers/xp/hdmiaudio-xp.html
Q (241):
I have a motherboard with Realtek HD Audio Codec. When I use Windows® XP SP3 or upgrade to Windows® XP SP3, the onboard audio doesn't work. What could I try?(11/27/2008)
A:Please try the Realtek latest audio driver.
The driver is available from this link: http://www.realtek.com.tw/downloads/downloadsView.aspx?Langid=1&PNid=14&PFid=24&Level=4&Conn=3&DownTypeID=3&GetDown=false
Q (232):
I install more than 2GB system memory on my system. When I run the "Sound Recorder" under Windows® XP, it always shows the following error message. What's wrong? (7/31/2008)
A:This is the limitation of Windows® XP. Please refer to the Microsoft® Knowledge Base for details: http://support.microsoft.com/kb/284893
Q (230):
When I install Realtek HD Audio driver, I found the system shows below error message. What can I do? (6/26/2008)
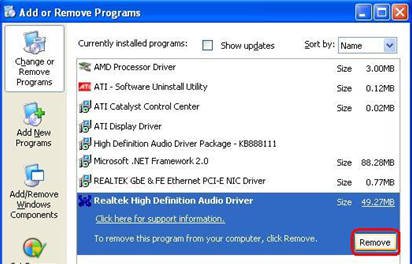
A:Please refer to below steps to reinstall Realtek HD Audio driver:
1.Enter into "Add or Remove Programs" and remove "Realtek High Definition Audio Driver"
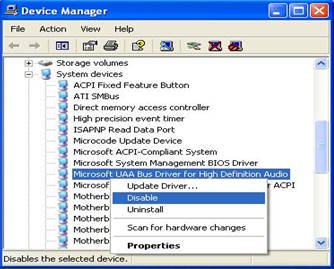
2.Disable all "Microsoft® UAA Bus Driver for High Definition Audio" in Device Manager first
3.Then uninstall all "Microsoft® UAA Bus Driver for High Definition Audio" from the system.
4.Reboot system
5.Reinstall "Realtek HD Audio driver" from Motherboard Support CD.
If you still meet this problem, please reinstall fresh Windows® system.
Q (226):
My motherboard with Realtek ALC662 audio codec supports 5.1 channel HD Audio. But it has 3 audio connectors (Light blue, Lime and Pink) on the rear audio panel. How do I connect my 5.1 channel speakers to the rear audio panel?(3/24/2008)
A:Please refer to following steps to connect your 5.1 channel speakers:
1. Connect the "Rear Speaker" to Line In (Light blue) port
2. Connect the "Front Speaker" to Line Out (Lime) port
3. Connect the "Central / Subwoofer" to Microphone (Pink) port
4. Adjust the "Audio I/O" setting to "6CH Speaker" in REALTEK Audio Management. Please refer to the following picture:
Q (207):
After installing ATI HDMI audio driver for my ATI HD 2xxx series PCIE card, I found the onboard sound will not work. How do I fix the problem?(9/10/2007)
A:Please kindly refer to below steps to check your system setting.
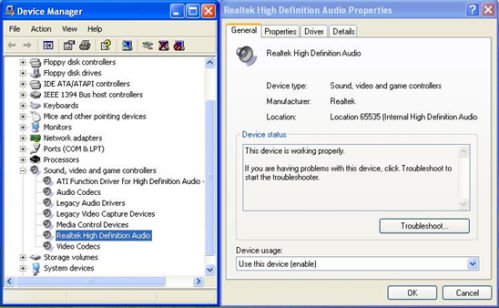
1.Please double check the onboard sound is working properly in Device Manager.
(If not, please reinstall Realtek HD Audio driver from Support CD.)
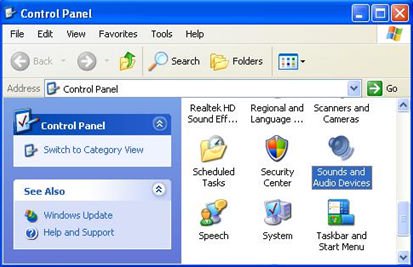
2.Enter the Sound setting in the Control Panel.
3.If the Default device of the Sound playback is "ATI HD Audio rear output", please change it to "Realtek HD Audio output".
4.Press "OK" to save setting.
Q (200):
I have a motherboard with Realtek HD audio codec. After resume Windows® Vista™ from sleep or from hibernation, the high definition audio device may no longer work. How do I solve this?(4/25/2007)
A:This is caused by Microsoft. It can be solved by installing the Microsoft® Hot fix. Please refer to the Microsoft® Knowledge Base: http://support.microsoft.com/kb/929685/en-us
Q (198):
I have a motherboard with Realtek HD audio codec. After installing the Microsoft® Security Update 925902 and 928843, my system shows the following error message. How do I fix this? (4/20/2007)
A:This is caused by Microsoft. It can be solved by installing the Microsoft® Hot fix. Please refer to the Microsoft® Knowledge Base: http://support.microsoft.com/kb/935448/
Q (196):
My onboard audio is Realtek HD audio. In the Windows® Vista™, I can't use Sound Recorder to record the audio. What should I do?(3/19/2007)
A:Please refer to below steps to set the audio device.
1.Install Realtek HD Audio driver from motherboard Support CD. Or download the Realtek HD audio driver from ASRock website.
https://www.asrock.com/support/Download.asp
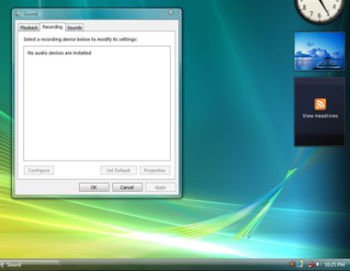
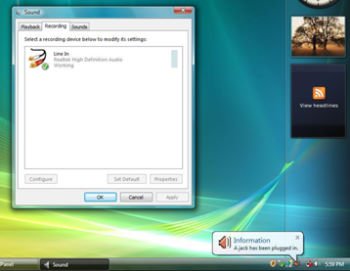
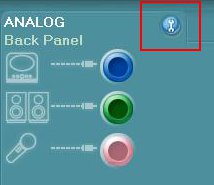
2.Plug in your recording devices (Microphone or other devices) to the Line-in port (or Microphone port), and then the recording device will show up "Line In" (or "Microphone") icon. Please kindly refer to below image. (Control Panel > Sound > Recording)
*Before plug in the recording devices:
*After plug in the recording devices:
3.Reopen the Sound Recorder to record the audio.
Q (193):
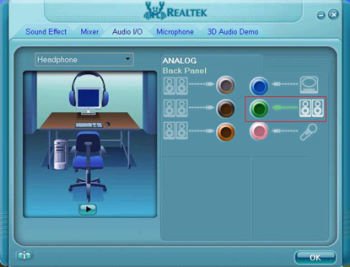
I plugged a headphone in my ASRock motherboard with Realtek HD Audio, and set the "Audio I/O" from "2CH" to "Headphone" in Realtek Audio Manager (picture1).
But the Realtek Audio Manager always recognized my headphone as 2CH speaker after I restarted the operating system (picture2).
What should I do?(1/16/2007)
A:Please refer to the following steps to set up the Realtek Audio Manager correctly.
1.Please remove all audio I/O (Headphones, Speakers, Microphone...) from the motherboard.
2.Please go to Realtek Audio Manager and set the "Audio I/O" you want.
3.Click ok.
4.Please plug your audio I/O back.
5.Restart your system.
Q (192):
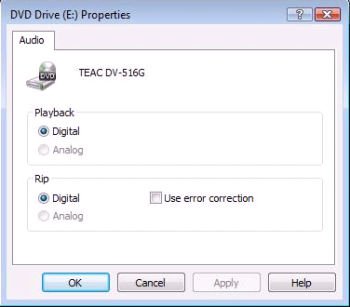
I would like to use the analog CD-in function in Windows® Vista™. But the "Analog" item of Playback and Rip can not be selected in Windows® Vista™. It was gray. Why? (Here is the screenshot.) (1/16/2007)
A:Windows® Vista™ operating system does not support the analog CD-in. The output of CD/DVD-ROM playback will be digital only.
Q (172):
My onboard audio is AC'97 audio. The front panel audio connector cables of my case are different from the description of manual. How should I connect them? Please advice.(4/21/2006)
A:The wording on the front panel connector cables may be different by each chassis manufacturer. Please check the function of each cable. Otherwise it may damage the board if cables are connected to the wrong connectors. We found that if you connect the "GND" (Ground) or "USB VCC" (USB Power) connector pins to the "+5V" pin, it will damage the motherboard after booting up the system. So we recommend you must not install any connector on the +5V pin of the Front Panel Audio header. It will not affect the Audio function if you remove the connector from the +5V pin.
For this reason, we will remove the +5V pin from the Front Panel Audio header of our products in the future.
There are three examples for your reference, please refer to the following pictures.
Q (164):
If I use AC'97 front audio panel with, how do I connect to the High Definition Audio header on the motherboard and get front audio work?(2/17/2006)
A:If you use AC'97 audio panel, please install it to the front panel audio header as below:
A. Connect Mic_IN (MIC) to MIC2_L.
B. Connect Audio_R (RIN) to OUT2_R and Audio_L (LIN) to OUT2_L.
C. Connect Ground (GND) to Ground (GND).
D. MIC_RET and OUT_RET are for HD audio panel only. You don't need to connect them for AC'97 audio panel.
E. Enter BIOS Setup Utility. Enter Advanced Settings, and then select Chipset Configuration. Set the Front Panel Control option from [Auto] to [Enabled]. For Windows® XP
F. Enter Windows® system. Click the icon on the lower right hand taskbar to enter Realtek HD Audio Manager. Click "Audio I/O", select "Connector Settings", choose "Disable front panel jack detection", and save the change by clicking "OK". For Windows® Vista™
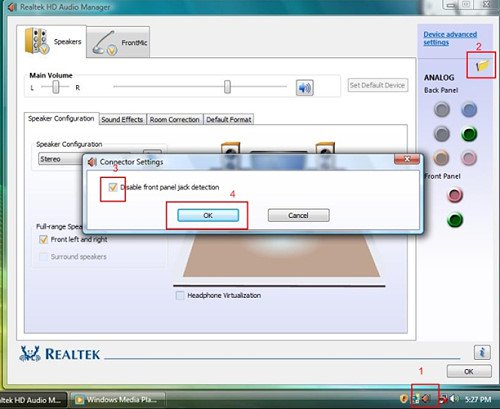
F. Enter Windows® system, 1: Double click the icon on the lower right hand taskbar to enter Realtek HD Audio Manager. 2: Click the "Folder" icon at the top-right corner. 3. Check "Disable front panel jack detection". 4. Click "OK".
(Please refer to the following picture)
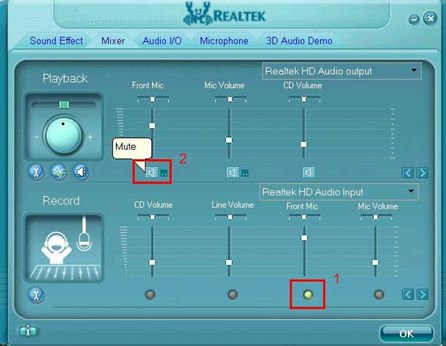
G. To activate the front mic: For Windows® XP:
Please select the Front Mic as default record device in No. 1.
If you want to hear your voice through Front Mic, please deselect "Mute" in No. 2 For Windows® Vista™:
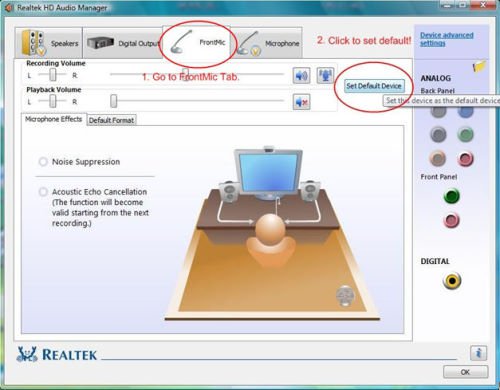
1.Go to the "FrontMic" Tab in the Realtek Control panel.
Click "Set Default Device" to make the Front Mic as the default record device.
Q (166):
What's the requirement for High Definition Audio to work under Windows® XP 64bit?(2/17/2006)
A:For normal working of High Definition Audio under Windows® XP 64bit, there is a hotfix file provided by Microsoft. Please install the hotfix before installing the audio driver. Otherwise, the audio driver may not be installed successfully.
Please click the link to download the hotfix file:
http://support.microsoft.com/?kbid=901105
Q (34):
Can I use the microphone if I select 6 speakers in C-Media Audio Configuration?(5/9/2003)
A:If you select 6 speakers in C-Media Audio Configuration for 5.1 CH output, all three audio connectors (Line in, Line out and MIC) are defined as output connectors.
Microphone is an input device. So you are not able to use the microphone at this moment.
Q (33):
How do I select "Output Type" in C-Media 3D Audio Configuration?(5/9/2003)
A:Please select "Analog" for "Output Device" in C-Media 3D Audio Configuration.
Q (10):
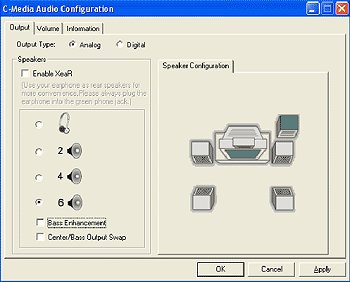
If I want to use 4/6 speakers, how do I setup 4/6-Channel audio ?(11/26/2002)
A:STEP 1: 4 CH: Connect the front L/R channel to "Line Out", the rear L/R channel to "Line In".
6 CH: Connect the front L/R channel to "Line Out", the rear L/R channel to "Line In", and the Center/Subwoofer channel to "Mic In".
STEP 2:
After installation of C-Media Audio driver, you will find an icon "C-Media Audio configuration" on the taskbar.
STEP 3:
Click the icon, and the screen will show the current audio configuration.
Select "Output" to change your audio configuration. Select "Analog" for Output Type and choose "4 channels" / "6 channels" for your speaker configuration.
 Menü
Menü
 (7/31/2008)
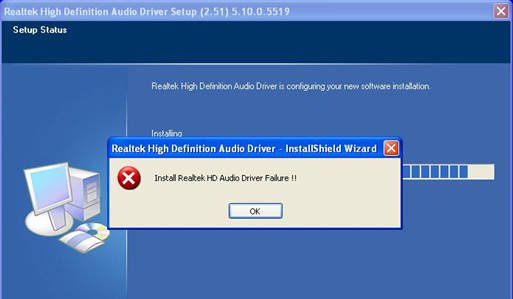 (6/26/2008)
 (4/20/2007)
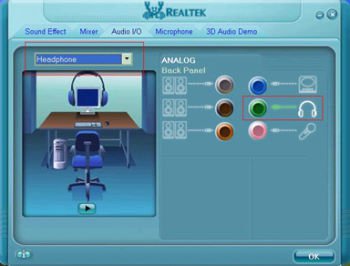
 (1/16/2007)